1
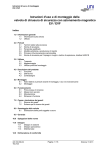
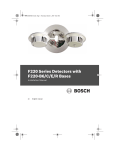
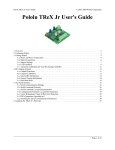
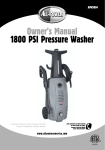
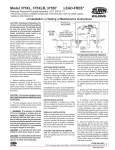
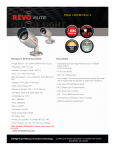
OPERATION AND SERVICE MANUAL FLAME PACK Series 400 Southern Cross 3175 Corners N. Court Peachtree Corners, Georgia 30071 www.southerncrossinc.com 770-441-0403 OPERATION AND SERVICE MANUAL FLAME PACK SERIES 400 SERIAL #_______________ OWNER________________ DATE__________________ SEARCH_______________ CENTER_______________ MANUAL P/N 211.410K Revised May 27th, 2015 2 TABLE OF CONTENTS SECTION PAGE 1. SOUTHERN CROSS SERVICE POLICY .................................................................. 5 2. GENERAL DESCRIPTION .......................................................................................... 6 3. SPECIFICATIONS ....................................................................................................... 7 4. PRINCIPLES OF OPERATION .................................................................................. 8 5. FLAME PACK SAFETY GUIDELINES .................................................................... 9 6. PART IDENTIFICATION ......................................................................................... 10 7. CHANGING BATTERIES......................................................................................... 12 8. FILLING THE FUEL CYLINDER ............................................................................ 13 9. CHANGING FILTERS .............................................................................................. 14 10. PRE-START CHECK................................................................................................. 15 11. CALIBRATION TEST ............................................................................................... 16 12. SURVEY PROCEDURE ............................................................................................ 17 13. SHUT DOWN PROCEDURE .................................................................................... 17 14. OPERATING HINTS AND CAUTIONS .................................................................. 18 15. CLEANING THE FLAME PACK AND CASE ........................................................ 19 16. CLEANING THE FILTERS AND INTAKE SYSTEM ............................................ 20 17. TROUBLESHOOTING GUIDE ................................................................................ 21 18. RETURNING EQUIPMENT FOR REPAIR ............................................................. 22 19. QUICK REFERENCE PARTS LIST ......................................................................... 24 20. FLAME PACK FUEL ................................................................................................ 26 21. FLAME PACK OPERATION VIDEO ...................................................................... 30 3 PICTURES/DIAGRAMS FIGURE PAGE FIGURE 1: FLAME PACK 400 CASE ............................................................................. 6 FIGURE 2: FLAME PACK 400 ......................................................................................... 7 FIGURE 3: PART IDENTIFICATION ............................................................................ 10 FIGURE 4: PROBE ASSEMBLY .................................................................................... 11 FIGURE 5: CHANGING BATTERIES ........................................................................... 12 FIGURE 6: FILLING THE FUEL CYLINDER .............................................................. 13 FIGURE 7: PRIMARY FILTER ...................................................................................... 14 FIGURE 8: SECONDARY FILTER ................................................................................ 14 FIGURE 9: CALIBRATION TEST ................................................................................ 16 FIGURE 10: PARTS LIST ............................................................................................... 24 FIGURE 11: PRINTED CIRCUIT BOARD SCHEMATIC ............................................ 26 FIGURE 12: CHASSIS SCHEMATIC ............................................................................ 27 FIGURE 13: ELECTRICAL/ELECTRONIC DIAGRAM ...............................................28 FIGURE 14: EXTENDED FUEL SYSTEM .................................................................... 29 FIGURE 15: ALL TERRAIN VEHICLE (ATV) LEAK SURVEY KIT……………….31 FIGURE 16: FLAME PACK TEST KIT.…………………………….…………………32 4 SECTION 1 SOUTHERN CROSS SERVICE POLICY Southern Cross will repair a FLAME PACK 400, which under normal use and service develops any problem that is the fault of the Manufacturer, with no charge to the customer for parts and labor. This service policy is limited to repairing a FLAME PACK 400, which proves to be defective, with returned transportation prepaid, within ONE YEAR from date of purchase. This does not include consumable items such as: batteries, filters and intake cone components. This service policy does not apply if the FLAME PACK has been repaired, resold, or altered by unauthorized persons or which has been subject to misuse, negligence, or which has had serial numbers defaced or removed. The Manufacturer reserves the right to make changes in the design of the FLAME PACK and to make additions or improvements without incurring any obligation to modify any units previously sold. Repair after the one-year period will be performed on customer's FLAME PACK at current prices for material and labor. Southern Cross recommends annual calibration of each unit to ensure accuracy and reliability. Flame Packs serviced on an annual basis will last longer and prevent costly repairs. 5 SECTION 2 GENERAL DESCRIPTION The Model 400 Flame Pack is a hydrocarbon gas detector, which employs hydrogen flame ionization as the detection method. The Model 400 is designed to be hand carried as a single unit. It eliminates shoulder straps, harnesses, interconnecting tubes, cords and the like. It is lightweight and small in size. Its moving parts and controls are kept to a minimum, which reduces downtime for repair. It can be taken anywhere a person can walk, crawl, or climb. In the search range, (50 ppm @ full scale), it is capable of detecting as low as one part per million (ppm) of hydrocarbons in air. A centering range, (5000 ppm @ full scale), is provided to assist in centering leaks. The meter indicates the presence of hydrocarbons. An alarm sounds at a preset point on the search range. The Model 400 Flame Pack utilizes disposable 9-volt alkaline batteries, available almost anywhere, and a 40% Hydrogen/60%Nitrogen fuel mixture. The Model 400 Flame Pack is adaptable for mobile applications utilizing auxiliary sampling systems. FIGURE 1: FLAME PACK 400 CASE 6 SECTION 3 SPECIFICATIONS Weight (total carried) Shipping Weight Reaction Time Operating Noise Fuel Capacity Battery Life Hydrocarbon Readout Hydrocarbon Alarm Flame Out Indication Sample Flow Rate Warm-up Time Ignition Batteries Fuel Fuel Consumption Rate 5 pounds 18 pounds 2-3 seconds None 300cc @ 1800psi 3-4 days (Alkaline) Meter (0-100 micro amp) Preset 40 - 50% full scale Light emitting diode (LED) and audible Alarm 220-240cc/min 5 to 15 minutes Piezoelectric spark Two - 9V alkaline batteries 40% hydrogen - 60% nitrogen gas Total hydrocarbon less than 0.5ppm as methane 225 psi/hr. +/- 20% NOTE: At 225psi/hr., it will take approximately 8 hours to use 1,800 psi of fuel. Standard Calibration Search Center 50 ppm methane in air 5000 ppm methane in air FIGURE 2: FLAME PACK 400 7 SECTION 4 PRINCIPLES OF OPERATION Detection When a hydrocarbon is burned, ionization occurs. Ions are electrically charged particles which then appear in the flame. In the Model 400 Flame Pack, all hydrocarbons in the sample are burned in a hydrogen flame across which an electrical potential has been placed. The presence of ions in the flame changes not only the conductance of the flame, but also the current flow through the flame. This change of conductance and current is processed by the detection circuitry of the Flame Pack. Because of this electrical change, the flame ionization method of hydrocarbon detection has been called "hydrocarbon counting." Hydrogen/Nitrogen Fuel Due to a lack of carbon atoms, the hydrogen and nitrogen in the fuel does not set off the alarm. Flame Out Indicators (LED & alarm) A thermocouple is positioned in the flame, which produces a voltage dependent upon temperature. This voltage is amplified and switched via an integrated circuit IC. When the temperature reaches a predetermined value, no current can flow through the IC. The light emitting diode (LED) is extinguished and the alarm will turn off. Should the flame temperature drop due to a flame out condition, the LED and alarm will be switched on. Ignition Ignition is accomplished via a piezoelectric igniter. When the igniter is pushed, a metallic rod strikes the piezoelectric material in the assembly. The pressure from the impact causes an electrical charge to occur. This charge is transmitted into the cell via the igniter lead, which acts as a spark plug, causing ignition. Indication of gas In the search range: In the centering range: Alarm sounds, and the meter moves up scale. The meter goes up scale, but the alarm does not sound. 8 SECTION 5 FLAME PACK SAFETY GUIDELINES WARNING!! 1- No smoking or open flames when filling with fuel. 2- Keep large cylinder securely mounted with valve protector in place when not in use. 3- Never tighten or loosen fittings under pressure. 4- Flame Pack must not be lit when fueling. 5- Never fill with Flame Pack fuel valve open. 6- Do NOT carry lit Flame Pack into an explosive atmosphere. 7- When the Flame Pack is not lit, its exhaust is a combustible mixture of hydrogen and air. Take the proper precautions WARNING!! Flame arresters are provided to minimize the possibility of ignition in a combustible atmosphere. Do NOT use a flame ionization device in an explosive atmosphere. IN NO CASE SHOULD THE FLAME PACK BE USED WITH THE EXHAUST FLAME ARRESTOR REMOVED, OR DAMAGED, OR WITHOUT THE QUICK CONNECT (QC) BODY WITH FLAME ARRESTOR INSTALLED. 9 SECTION 6 PART IDENTIFICATION 1 2 3 4 15 14 11 12 13 5 6 7 8 9 10 16 FIGURE 3: PART IDENTIFICATION 1- SCC 276.400K Detect Probe Supplies voltage to the cell and detects current flow due to ionization. 2- SCC 272.497 Cell and Mount Assembly Fuel and air mixture burns inside the cell. Ionization occurs within the flame. 3- SCC 265.404 Igniter Lead (replacement kit) The igniter lead carries electrical energy from the igniter into the cell where it acts as a spark plug, igniting the fuel air mixture. 4- SCC 282.440K Pump to Cell tube This is a formed tube that carries the fuel and air from the pump to the cell. 5- SCC 281.435 Pump Assembly (restricted sale) The fuel moving through the pump mixes with the sample from the probe. 6- SCC 822.420K Regulator Reduces fuel pressure from the cylinder to an operational level. 7- SCC 823.400K Fuel Valve Turns the fuel supply to the unit on and off. 8- SCC 846.300K Fuel Cylinder A stainless steel cylinder that holds 300 cc of fuel at 1,800 psi. 9- SCC 824.211K Check Valve Provides means of refilling fuel cylinder. 10- SCC 862.065K End Cap Prevents contamination of the check valve. Protects the check valve threads. 11- SCC 265.151K Thermocouple (TCPL) Produces an electrical signal dependent upon the temperature in the cell. 12- SCC 281.413K Exhaust Flame Arrester Installed into the cell assembly, it provides SOME protection should the Flame Pack be used in an explosive atmosphere. 10 WARNING!! NEVER USE FLAME PACK WITH EXHAUST FLAME ARRESTOR REMOVED OR DAMAGED. 13- SCC 281.414K Quick Connect (QC) Body with Flame Arrester This is a fitting with an internal check valve (popit) and 1/4" male pipe threads and a flame arrestor. The Probe Assembly QC Stem plugs into the QC Body. 14- SCC 276.410K Elbow It is a 45° fitting that screw onto the pump nipple. 15- SCC 273.355 Elbow Lock & O-RING SCC 891.009K WARNING!! NEVER USE FLAME PACK WITH QC BODY AND FLAME ARRESTOR REMOVED OR DAMAGED. 17 18 19 22 23 20 16 21 FIGURE 4: PROBE ASSEMBLY 16- SCC 281.443K Probe Assembly Carries the sample to the Flame Pack. The lower probe is flexible to prevent hanging up on obstacles. 17- SCC 861.202K QC Stem Inserts into QC body 18- SCC 821.400K Filter Housing Contains the Primary Filter. Removes dust and dirt from sample. 19- SCC 862.008K Male Connector Connects the lower probe to the filter housing. 20- SCC 282.405K Probe Stiffener A probe stiffener is used to make the lower probe rigid. 21- SCC 281.442K Lower Probe 22- SCC 282.411K Intake Cone Can be used to hold a second filter, spring and gasket. 23- SCC 282.412K Plug and Screen 11 SECTION 7 CHANGING BATTERIES 1- MAKE SURE RANGE SWITCH IS OFF!! 2- Loosen 1/4 turn screw, pull black handle to remove. 3- Remove spacer. Remove old batteries from battery bracket/ handle assembly by pulling each one straight away from contacts. 4- Install fresh batteries. 5- Reinstall spacer. 6- Slide spacer down in between batteries so that the "ears" are resting on the batteries. When replacing the black handle, make sure the spacer attachment string is inside. NOTE: Although the batteries cannot be installed backwards, a momentary contact in this position with the power on, can damage the circuit board. 7- We recommend using 9 volt alkaline batteries. We recommend these because they will give longer service. CAUTION! NEVER STORE FLAME PACK WITH BATTERIES INSTALLED. NOTE: REMOVE BATTERIES WHEN SHIPPING THE FLAME PACK. FIGURE 5: CHANGING BATTERIES 12 SECTION 8 FILLING THE FUEL CYLINDER WARNING!! The hydrogen/nitrogen fuel mix is a high pressure combustible gas. This fuel must be handled with the proper care. Remember, NO SMOKING or OPEN FLAMES when fueling Flame Pack. 1- Connect the refill assembly to a bottle of 40% hydrogen - 60% nitrogen fuel; (see: Flame Pack Fuel, Section 18 Page 25). Verify contents by checking the specification tag. 2- Crack cylinder valve momentarily to blow dirt and/or water out of the refill assembly. 3- Remove end cap from the Flame Pack's check valve. 4- Make sure the check valve connection is clean. 5- Make sure the Flame Pack is not lit and the fuel valve is closed. Connect check valve to refill assembly. Gently snug fitting. Do not over tighten 6- Ensure purge valve is closed. 7- Stand to the side of the gauge. Open the cylinder valve slowly until the pressure gauge reading stops increasing. Observe and note the reading on the pressure gauge. 8- CAUTION! Never tighten or loosen fittings under pressure. 9- Close the cylinder valve. 10- Open the purge valve to relieve pressure in the fill assembly, and then close it. 11- Disconnect the Flame Pack from the fill assembly. 12- RE-INSTALL END CAP FINGER TIGHT. SLIGHT force using the open end wrench provided will keep the End Cap from coming off while surveying with the Flame Pack. Replace the End Cap if lost. NOTE: To fully utilize fuel, when filling the Flame Pack's cylinder, a cascade fueling system can be used on multiple tanks. FIGURE 6: FILLING THE FUEL CYLINDER 13 SECTION 9 CHANGING FILTERS 1- PRIMARY FILTER Change the primary filter in the filter housing a minimum of once EVERY DAY. A. Place spring into filter housing, large end down. B. Place the smaller (closed) end of the filter element into SMALL end of the spring. C. Fit the gasket into the upper portion of the filter housing. This will then fit on the top of the OPEN end of the filter element when the top is screwed into place. D. FIGURE 7: PRIMARY FILTER 2- INSTALLING THE SECONDARY FILTER-OPTIONAL In very dusty conditions it is advisable to use an additional filter element in the intake cone. Incorrect installation can cause operational malfunctions. FIGURE 8: SECONDARY FILTER A. Remove Plug & Screen from the intake cone with the hex key. B. Install gasket first, (make sure it lies flat), then the filter and spring as shown. C. Remember, the OPEN END OF THE ELEMENT GOES INTO THE CONE FIRST to fit against the gasket. Install the spring, the SMALL end fitting over the filter. Replace plug & screen and tighten until its top is flush with the intake cone's surface. 14 SECTION 10 PRE-START CHECK A calibration test should always be performed in clean air. The test should be preceded by a visual inspection to insure all components are intact, and an operational test to insure all functions are operational. The following steps should be performed at each start-up, periodically during survey, after any repair or any time it is suspected that the instrument's calibration has changed. 1- Look for any physical damage, or missing parts, such as the end cap, flame arrestor or carrying strap. Also, ensure the Flame Pack has a clean, dry, and properly installed filter. WARNING!! NEVER USE THE FLAME PACK WITH EXHAUST FLAME ARRESTOR REMOVED OR DAMAGED. 2- Fill the fuel cylinder until the fuel gauge stops increasing. 3- With probe plugged in, open the fuel valve and listen for a hissing sound to indicate fuel flow. When using the same Flame Pack, if the sound is different than on previous days, it may be an indication the fuel system is in need of cleaning or that there is something wrong with the fuel system. IF NO GAS FLOWS, STOP! The Flame Pack is in need of repair. 4- With the zero adjust fully counterclockwise, turn on the power. The LED should come on and the alarm should sound. Press the igniter; the alarm and LED should go off within 3 seconds. If the LED and alarm remain on, wait 5 seconds and press the igniter again. If the LED and alarm still stay on, The Flame Pack needs to be repaired. If the LED and alarm go off, proceed. Slowly rotate the zero adjust knob clockwise to 100 and then counterclockwise to 0. This is to check the zero adjust and note the alarm point, which should be between 40% and 50% of the scale. 5- Note the alarm point with "new" batteries. Anytime the operator notices that the alarm point has dropped, (4-8%), the batteries need to be replaced. 6- Extinguish the flame by placing your thumb over the intake cone. The LED should come on and the alarm should sound within 3 seconds. Reignite the Flame Pack. Remove the probe from the QC body. The LED and the alarm should come on within 3 seconds. Reinstall probe. This procedure tests for leaks in the sample system. 7- Turn zero adjust knob fully counterclockwise. After waiting 5 seconds, reignite. The alarm and LED should turn off. 8- If any of these tests fail, go to the trouble shooting guide, Section 15, Page 20. 9- Perform the calibration test (Page 15) using SCC calibration test gas for the Flame Pack 400, (P/N 100.163) or equivalent (50ppm Methane in air). 15 SECTION 11 CALIBRATION TEST INSTRUCTIONS If the Flame Pack passes inspection, proceed with this calibration test. 1- Ensure fuel cylinder has at least of 200 psi of fuel. This is a minimum to operate the instrument. 2- Light Flame Pack and allow to warm-up until the meter is stable and is not drifting. Warm up normally takes 5 minutes but may take as long as 15 minutes depending on ambient temperature and moisture. Adjust the meter to zero in clean air. 3- Place the intake cone over nozzle of 50 ppm test can. Release a 1 or 2 second burst of gas. The meter reading should respond to a minimum of 90% of the meter scale. 4- Allow meter to return to zero and repeat step 3. If you get the same reading, the Flame Pack is calibrated properly. NOTE: Readings may vary due to background hydrocarbon level. Readings may also vary due to the amount of 50 ppm gas in the can. A new can has a high velocity, approximately 750ccm. A can that is almost empty has a velocity about 100ccm. A new can may need only a 1 or 2 second burst of gas; while a near empty can may need a 3 second burst. 5- If the meter fails to go to a minimum of 90%, the Flame Pack is in need of repair and calibration. 6- If the Flame Pack passes all pre-start and calibration tests, it is ready to go to work. FIGURE 9: CALIBRATION TEST 16 SECTION 12 SURVEY PROCEDURE 1- Perform calibration tests as laid out in Section 10, Page 14 & 15. 2- Using the “Zero Adjust” set the meter slightly below the alarm point. This setting must be monitored due to changes in background hydrocarbon levels. 3- The most effective method of survey is to walk slowly and drag the intake cone on the ground. When doing this, the probe stiffener should be fully retracted. Operators should test all likely leak and venting locations as well as any visual leak indications. 4- In some conditions, such as slight amounts of decaying vegetation, enough hydrocarbons are present to key the alarm. By lifting the intake cone up 1 or 2 inches, this can be significantly reduced. Also, the intake cone should not be dragged through wet grass. The sensitivity to small leak indications will be reduced in either case. With practice, an operator can readily distinguish between dead vegetation and a leaking pipe. 5- Meter sets and above ground piping can be checked by sampling the mechanical connections. The probe stiffener allows the operator to extend the reach of the Flame Pack. 6- Pushing the switch to the centering position desensitizes the Flame Pack and allows its user to center the greatest concentration of gas. The detect alarm is inactive while operating in this range. 7- Should it be desirable to leave the Flame Pack lit while it is inactive (for example, in order to eliminate warm up delays), the power switch may be turned off to prevent the alarm from activating. The flame will remain lit unless the fuel is turned off or the probe is disconnected. Place Flame Pack in a safe place with the flame arrester pointing downward. This allows condensation to drip out of the cell. 8- Leaking gas follows the path of least resistance. Use caution when conducting your survey. Gas does not always vent close to the leak source. Surface and underground conditions may cause gas to vent at a considerable distance from the actual hole in the pipe. Some of these conditions are; paving, ice, snow, water, crusted soil, and subsurface paths such as sewer lines and telephone conduits. 9- Reference AGA GPTC Guide for Gas Transmission and Distribution Systems 199598 Gas Leakage Control Guidelines Appendix G-192-11. SECTION 13 SHUT DOWN PROCEDURE 1- Place thumb over intake cone. This will put out the flame by stopping the air flow. Both audible and visual alarms should come on within 3 seconds. 2- Turn switch to the off position. Allow the fuel to flow for 15 to 20 minutes with exhaust flame arrestor pointed down. Doing this will dry the cell. Close the fuel valve. It will take a short time for the fuel to completely stop flowing. 3- Clean Flame Pack before storage. SEE "CLEANING THE FLAME PACK 400" SECTION 13, Page 18. 17 SECTION 14 OPERATING HINTS AND CAUTIONS 1- NOTE: ALWAYS TURN THE POWER SWITCH ON BEFORE IGNITING THE FLAME PACK DAMAGE MAY OCCUR TO THE CIRCUIT BOARD IF THE IGNITER BUTTON IS PUSHED WITH THE POWER SWITCH OFF. 2- Flame Packs that are run less than 20 minutes, then turned off, may be difficult to light next time or may react strangely for a short time. 3- If the flame is put out due to a large leak, move away from the gas. Keep the fuel valve open, allowing the fuel to flow. When the gas has had time to clear out of the Flame Pack, relight. Do not attempt to relight the Flame Pack in an explosive environment. 4- Dragging the intake cone in wet grass may allow water to collect in the lower filter, putting out the flame. 5- Dragging the intake cone in dusty areas or in newly cut or fertilized grass may cause false indications. Put a SMALL amount of poly-fill in the intake cone as a pre filter. It may also extend the life of the primary filter element Poly-fill (polyester fiber pillow fill) can be purchased at cloth stores and department type stores. 6- Use care when installing batteries (power switch MUST be off). Do not damage terminals. Double check battery connections. REPLACE THE BATTERY SPACER!! 7- The exhaust flame arrestor will normally drip water or expel water vapor. In some conditions, this may condense in the flame arrestor and put out the flame. If this happens, shake out the moisture from the Flame Arrestor. Allow fuel to flow to help dry out the cell before trying to relight. WARNING!! NEVER USE THE FLAME PACK WITH THE EXHAUST FLAME ARRESTOR REMOVED OR DAMAGED. 8- The F.P. 400 will operate about 8 hours when filled to 1800 psi. 9- If a problem develops with the Flame Pack, take the following steps; A. Fill fuel cylinder B. Change batteries C. Change filters D. Empty intake cone E. See trouble-shooting section of manual, Section 15, page 20. F. Call Southern Cross Corp. Customer Service Dept. at: 770-441-0403 or 1-800-241-5057. 10- To decrease the risk of corrosion from perspiration on and in the handle/battery bracket assembly, wear a terry wrist band (sweat band) on the hand holding the Flame Pack. 11- The Flame Pack 400 is manufactured with precision parts. Unnecessary shaking, or shock to the instrument should be avoided. 12- Keep liquid from entering the Flame Pack, either up the probe, or through other openings. 18 13- If the Flame Pack gets wet, for any reason (dropped in water, or rained on etc.) REMOVE BATTERIES, dry instrument and install new batteries. 14- DO NOT PUT WET FLAME PACK INTO CASE. DO NOT PUT WET OR DRY FLAME PACK INTO A WET CASE. SECTION 15 CLEANING THE FLAME PACK 400 AND CASE Cleaning the Flame Pack is essential for proper operation. Perform Steps 1 through 5 every day Flame Pack is used!! 1- Remove the top of the filter housing and plug & screen. Remove filter, spring and gasket. Keep dirty filters separate, they can be cleaned and reused. (Section 14 Page 19) 2- BLOW dirt out of probe if working in very dusty area. Use oil free compressed air, P/N 450.050. 3- Properly install a clean filter with the cleaned gasket and spring. Replace top of housing until the O-ring is engaged and the probe does not leak (do not smash the O-ring). Section 9 Page 13 4- Replace plug & screen after checking screen, clean if needed. 5- Wipe down probe and Flame Pack with a SLIGHTLY DAMP cloth using a common cleaning solution. Wipe all exposed surfaces. Slide stiffener up then down to clean entire probe and stiffener. INCLUDE 6 through 9 ONCE A WEEK (and as needed). 6- Check switch. SWITCH MUST BE OFF!! Remove black handle and spacer. Remove batteries by pulling each straight out of their terminals (contacts). This is so the terminals will not be damaged. Wipe down both handles, inside and out. Check battery terminals for damage or corrosion. ALLOW TO DRY! 7- Check switch again. SWITCH MUST BE OFF!! Reinstall batteries; make sure they fit terminals snugly. REPLACE BATTERY SPACER and black handle. Put dry Flame Pack into its dry case. 8- TO CLEAN PROBE A. Remove filter housing top and remove filter, spring and gasket. Remove plug & screen and anything in intake cone. B. Blow out probe with compressed air P/N 450.050. Then flush with a soap and water solution. Flush out with clean water. C. Blow out with the air again and allow to dry. D. Install clean filter and cleaned gasket and spring before using. E. Re-install plug & screen after cleaning 9- TO CLEAN CASE A. Remove all accessories and all removable foam. B. Turn case over and clean out all dust and dirt. C. Wipe out case with a DAMP cloth. D. Knock dirt and dust out of foam, and then wipe it down. E. Allow case and foam to dry while cleaning Flame Pack and accessories. 19 PERFORM THE CLEANING STEPS AS NEEDED DURING THE SURVEY. NOTE: NEVER PUT A WET FLAME PACK INTO ITS CASE!!!! NEVER PUT A FLAME PACK INTO A WET CASE!!!! SECTION 16 CLEANING THE FILTERS AND INTAKE SYSTEM 1- CLEANING THE SINTERED BRONZE FILTERS A. Fill sink or CLEAN non-glass container, with very warm water and soap solution B. Wash filters by vigorously shaking them. C. Rinse twice, vigorously shaking them in clean water. D. Allow to dry overnight. 2- CLEANING THE INTAKE SYSTEM The intake system of the Flame Pack 400 will occasionally require cleaning. A good schedule is about every 2 months; depending on the amount of dirt the Flame Pack is exposed to, how often filters are changed and other environmental factors. ADDITIONAL cleaning is needed when there is an increase in difficulty in lighting, a decreased sound of fuel flow, or an increase in response time. A. BE SURE POWER SWITCH IS OFF!! B. Remove QC body from elbow. Plug the QC stem into the QC body. If necessary unscrew the top of the filter housing and use that QC stem from the probe. Blow clean compressed air through QC Body and out of the QC Stem to remove as much dust and dirt as possible. Then flush QC body with cleaner, SCC P/N 452.010K, for approximately 10 to 15 seconds. Shake out and blow clean compressed air through to remove as much cleaner as possible. Leave QC stem in place 10 minutes. C. Open valve to allow fuel to flow. Blow out system with oil free compressed air (low pressure). You can use SCC P/N 450.050. D. Place wand of cleaner, SCC P/N 452.010K, through elbow, into the hole in the pump intake, up against the pump screen. Flush Flame Pack until cleaner drips from exhaust flame arrester, approximately 15 seconds. The cleaner will work its way through the system with the fuel. Then, blow out the system with the compressed air again to help remove the cleaner. E. Allow fuel to flow for 1 hour. This is to remove the cleaner from the fuel system. F. Hook up the probe, light Flame Pack, and burn for 1 hour. If the meter pegs at full scale, all of the cleaner may not be out of the system. G. Go through pre-start check and calibration test before using the Flame Pack for surveying. See Section 10, page 14. 20 SECTION 17 TROUBLESHOOTING GUIDE 1- If Flame Pack Fails to Light (LED and alarm stays on.) A. B. C. D. E. F. G. H. I. Is fuel pressure a minimum of 200 psi? Are batteries good? Is valve completely open? Can you hear fuel flowing? Put Flame Pack up to your ear. If no sound is heard, repeat step A. Is the O-ring in the check valve blown out? Is the probe assembly obstructed? Put an aspirator bulb over the Q.C. stem (use the aspirator bulb off of a CGI). Plug intake cone with your thumb and squeeze the bulb. Release the bulb. It should not inflate. Now remove your thumb. Did the bulb fully inflate within 1.5 seconds? Check filters for proper installation (see Section 8, page 12). Check tube inside the intake cone, it must be completely open. Is the probe assembly plugged in correctly? Remove and reinstall. Did it "click" into place? Is the switch in the search range (center position)? Depress and release the igniter. Did the Flame Pack light (LED and alarm off? If not, wait 5 seconds and repeat step H. If the unit did not light, it is in need of repair. 2- LED and alarm are off, but meter does not respond to test gas. A. B. C. D. Have new batteries been installed? Are batteries properly installed? (See Section 9 page 13) Are the wires or battery terminals shorted out or broken? Are batteries HOT OR BULGING? WARNING!! Hot or bulging batteries may explode or be hot enough to burn a person's skin. CAUTION! Momentary contact of batteries to battery terminals with the switch on can cause damage to the circuit board. E. If new batteries get HOT, there is an internal short and the Flame Pack needs to be returned to Southern Cross for repair. If assistance is needed, call Southern Cross Customer Service Department at: 770-441-0403 or 1-800-241-5057 21 SECTION 18 RETURNING EQUIPMENT FOR REPAIR Southern Cross manufactures and repairs Flame Packs at our corporate headquarters in Peachtree Corners, Georgia. We can perform your recommended annual calibration as well as any necessary repairs over the life of your Flame Pack. I’m ready to submit my repair to Southern Cross! What do I need to do? 1. Print and complete our Customer Repairs form and include it in the box with your item. You can find this form on our website under www.southerncrossinc.com “Instrument Repairs.” 2. Remove batteries and empty any fuel from cylinder before shipping. Empty fuel cylinder should be included in the box. The probe should also be included, as applicable. 3. Equipment should be shipped in its original shipping/storage case and securely taped (not locked) for protection. We highly encourage you to ship your Flame Pack in its original foam- otherwise when we ship it back to you, we will have to charge you for new foam. 4. Ship the equipment to us: Southern Cross: Repair Department 3175 Corners North Court, Peachtree Corners, GA 30071 5. We will call you once we have completed an assessment on your item and can give you an estimate on the cost of the repair. You will not be charged until you accept the estimate. Frequently Asked Questions: How long will it take to get my equipment returned? Our turn time is between four to six weeks. We highly recommend sending repairs in the off season for quicker return. Do you offer a warranty on your repair services? We certify all repairs and calibrations to the manufacturers’ specifications and we provide a limited warranty for 90 days. Our quality control department thoroughly tests all repaired equipment prior to return. How often is my equipment supposed to be serviced? Southern Cross recommends that you have your Flame Pack 400s and ‘46 Hawks serviced annually to prevent large repairs in the long term. We suggest you check your user manual for manufacturer recommendations for your other field equipment. I see a ’minimum charge’ on the form I’m sending with my repair. What is the minimum charge? Once we receive your item for repair, we will assess it thoroughly for repairs needed. Whether or not you decide to go forward with the repairs, we will charge you for 1.5 hours of labor. There is also a freight/handling charge on every item. 22 CUSTOMER REPAIR FORM Please complete this form and follow instructions below for your equipment repair. This will expedite your repair and ensure immediate communication. Southern Cross does not use RMA numbers. Company name Primary Contact name Company address, city, state, zip Primary Contact phone number (office, cell, etc.) Company phone Primary Contact email address(es) Company fax Secondary Contact name Billing preference: (Do not provide Card number) Purchase Order # or credit card (Visa, MC, Amex) Secondary Contact phone number (office, cell) Would you like an estimate before repairs are done? Secondary Contact email address(es) Quantity Equipment being sent for repair Serial Number Describe problem, malfunction or irregularities. Use this area for any notes to Technician. INSTRUCTIONS: Please complete this form and include it with equipment being returned. Equipment should be shipped in its original shipping/storage case and securely taped (but not locked) for protection. Include the fill assembly and probe. Remove batteries and empty fuel from fuel cylinder (but include the empty fuel cylinder) before shipping. Shipping, handling and packaging costs will be added in addition to a minimum labor charge. Ship to the following address: SOUTHERN CROSS– REPAIR DEPARTMENT 3175 Corners North Court Peachtree Corners, GA 30071 800‐241‐5057 23 SECTION 19 QUICK REFERENCE PARTS LIST CHASSIS ASSEMBLY 1- SCC 262.403 SCC 273.355 SCC 274.700K SCC 276.410K SCC 281.413K SCC 281.414K 2- SCC 265.640 3- 3-SCC 651.401K SCC 793.040 SCC 793.140 SCC 793.144 SCC 793.148 SCC 793.640 SCC 793.643 SCC 794.424 SCC 862.061 SCC 891.009K Igniter Replacement Kit Elbow Lock Teflon Washers. Under Knob Elbow, 45 Elbow, 45 Exhaust Flame Arrester QC Body w/Flame Arrester LED Meter 100 uA Nut, Hex, 4-40, SS.Cinch Connector FHMS, 4-40xl/4", SS.Cover Plate, Rear & Front FHMS, 4-40xl", SS..Cinch Connector FHMS,4-40x2",SS..Cell RHMS,4-40x5/8",SS..Meter RHMS,4-40x3/4",black oxide..Meter Bezel Washer,Int.Star,#4..Cinch Connector Protective Cap, Package of 10 O-Ring (for 281.414K & between elbow & chassis) SCC 272.497 CELL & MOUNT ASSEMBLY SCC 265.404 SCC 265.151K SCC 276.400K SCC 282.440K SCC 266.200K SCC 265.110K Cable) SCC 637.102K SCC 642.333K SCC 642.410K SCC 642.510K SCC 643.005K SCC 646.002 SCC 265.161K 4567- Igniter Lead Replacement Kit (Use w/262.403 only) Thermocouple Assy Detect Probe Pump-Cell Tube FIGURE 10: PARTS LIST CIRCUIT BOARD (403+) Cell Output Cable (Coax I.C. 741 Capacitor 3.3μf Capacitor 10μf Capacitor100μf Capacitor 5pf Op Amp 111 (Amp. BB) WIRING HARNESS SCC 265.160K Wiring Sub-Assembly (harness minus pot & alarm) SCC 611.401K Power/Range Switch SCC 639.402 Potentiometer 10K SCC 681.403 Alarm & Mount SCC 681.402 Vibrating Alarm 24 SCC 281.443K SCC 281.410K SCC 281.442K SCC 282.405K SCC 282.411K SCC 282.412K SCC 821.400K SCC 862.941K PROBE ASSEMBLY Intake Cone w/plug & screen Probe, Lower Section w/Aluminum Ferrule Probe Stiffener Intake Cone Plug & Screen Filter Housing Ferrule Set, Nylon FUEL ASSEMBLY SCC 822.420K SCC 822.429K SCC 821.415K SCC 823.400K SCC 824.211K SCC 862.065K SCC 271.402K SCC 271.401K SCC 276.405K SCC 276.440 SCC 276.441 SCC 614.100K SCC 614.101K SCC 711.100K SCC 793.020 SCC 793.622 SCC 794.100 SCC 794.402 SCC 277.402 SCC 221.100K SCC 221.102K SCC 281.401K SCC281.403K SCC 281.402K SCC 281.403K SCC 281.404K SCC 283.403K SCC 823.410K Regulator, 400 FP Fuel Regulator Wrench Regulator Sleeve Valve, Fuel Supply Check Valve, stainless steel (SS), Fill End Cap, SS (for Check Valve) HANDLE ASSEMBLY Black Handle, Box Battery Bracket Battery Holder/Clip (2 required) Spacer Negative Battery Terminal Positive Battery Terminal Wrist Strap Hex Nut Screw,2-56x5/16" Nylon Washer (must have) Internal Star Lock Washer CASE WITH FOAM Wrench 9/16"x5/8" Hex Key, 5/16", Intake Cone's Plug Spare Filter Kit (18 filters, 1 spring, 1 gasket) FILL ASSEMBLY Gauge, w/Cover,4000psi Fill Assembly Fill Stem Assembly Refill Adapter Valve, Purge, Steel OPERATING SUPPLIES SCC 100.163 SCC 211.410K SCC 450.050 SCC 452.010K 25 Test Gas, 50ppm Manual, 400 FP Aero-Duster Cleaner, Cleaning Intake System SECTION 20 FLAME PACK FUEL The Flame pack uses a mixture of hydrogen and nitrogen as its "fuel". Obtaining the correct mixture is important as the instrument will not read correctly or may fail to function altogether with an incorrect mixture. When fuel is purchased it should be specified as follows: FLAME IONIZATION FUEL GAS; 40% HYDROGEN/ 60% NITROGEN TOTAL HYDROCARBONS AS CH4 LESS THAN 0.6 PPM Due to the specialized nature of the equipment required to produce this gas, it is not available from Southern Cross Corp. It should be purchased directly from a specialty gas supplier such as nexAir, Matheson, Scientific Gas Products, or Linde. Our experience has shown that mixtures purchased from discount suppliers or welding shops are not always reliable and may cause the instrument to malfunction. Some suppliers will furnish cylinders on a rental demurrage plan. Matheson Tri-Gas 800-416-2505 www.mathesontrigas.com nexAir 888-639-2474 www.nexair.com Airgas 866-924-7427 www.airgas.com Praxair 800-772-9247 www.praxair.com 26 FIGURE 11 26 Error! FIGURE 12 27 FIGURE 13 29 FIGURE 14 30 3175 Corners North Court Peachtree Corners, Georgia 30071 www.southerncrossinc.com 770-441-0403 FLAME PACK MODEL 400 OPERATION AND MAINTENANCE VIDEO This fifteen minute instructional video on the care of and operation of the Flame Pack is a must for your training library. Topics covered in the video include: THEORY OF OPERATION FUEL STORAGE SAFETY REFUELING BATTERY REPLACEMENT FILTER REPLACEMENT START UP PROCEDURE RESPONSE TEST SURVEY TECHNIQUE SHUTDOWN AND STORAGE The video (Part No. SCC 211.004) is available from Southern Cross. To order: Call our Norcross office at 800-241-5057, order by fax at (770) 662-5228 or email request to: [email protected]. 31 All Terrain Vehicle (ATV) Leak Survey Kit www.southerncrossinc.com (800) 241-5057 Leaking gas lines mean lost revenues – Southern Cross is your partner in gas leakage control. Contact Southern Cross today to discuss a cost effective plan for your company! Survey in rugged or hard to access areas Method of detection is the Southern Cross Flame Pack 400 (not included) Blower draws sample into six drag tubes Alarm amplifier mounted inside the case produces a loud sound and activates a bright red signal as the Flame Pack alarms. Easy installation on most ATVs. An integral tool in your D.O.T. compliance program, pipeline integrity and safety program. Convenient calibration testing in the field with 50 PPM test gas. Two 9-Volt alkaline batteries provide a week or more of survey. Flame Pack is easily removed for portable survey and CGI/pinpointing use. 31 TRUCK MOUNTED KITS ALSO! We have endeavored to make your selection of mobile survey equipment as easy as possible, selecting only the options you actually need and employing plug and play technology. With either the Fixed or Portable Unit, using a 2” trailer receiver you have the flexibility of removing much of the equipment and using the truck elsewhere. If you choose the portable unit and decide at a later date you need to add the Sampling Arm, it plugs into the manifold and connectors already in place. Same for the Fixed system. Quickly removable also, it allows you to add additional options, such as Fuel Tank Cradle and Sampling Arm. Our technicians can provide 32 full installations! For use with the Flame Pack Model 400 or the ’46 Hawk. CALIBRATION TEST KIT FOR MODEL 400 FLAME PACK Now an entire calibration testing kit in an aerosol can for a quick and convenient method of checking the calibration of the Model 400 Flame Pack. CONVENIENT-Nothing to Assemble COMPACT-Small Size Makes It Easy To Carry or Store LIGHTWEIGHT-Less Than 5 Oz. SAFE-50 PPM; Noncombustible HIGH QUALITY-Certified To Be Within 5% Of Stated Contents ECONOMICAL-100 or More Tests Each To use, first adjust the meter to zero in clean air. Then insert can nozzle into intake cone and release a short burst of gas. Meter reading at or near full scale indicates a properly functioning Flame Pack. Readings may vary due to background hydrocarbon level. FIGURE 16: FLAME PACK TEST GAS Single Cans 32 Part # SCC 100.163 3175 Corners North Court Peachtree Corners, Georgia 30071 www.southerncrossinc.com 770-441-0403