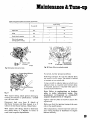
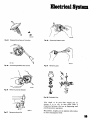
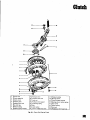
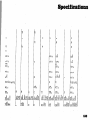
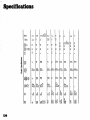
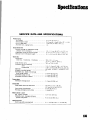
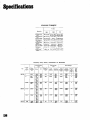
1
0
f
1
j
1R1
1M
o
o
@
7
o
I
r
t
Jot
I
0
4
V
J
7
F
2
V
4
y
oomm llI IP
J
c
ffi
DRAKE PUBLlSHERS INC
r
O
DATSU
RANGE 1969 1973
MAINTENANCE
REPAIR
BY DRAKE AUTOMOTIVE EDITORS
Quick Reference Indel
MAINTENANCE
TUNE UP
STEERING
5
91
ENGINE
21
REAR DRIVE
ELECTRICAL SYSTEM
39
CLUTCH
FUEL SYSTEM
67
TRANSMISSION
107
COOLING SYSTEM
77
BODY WORK
115
BRAKES
81
SPECIFICATIONS
119
FRONT SUSPENSION
89
Tho purpose
eference
We
of this manual
source
ndeavor
specifications
to
at
the Publisher
rors or
Upon
make
provide the
he
utomobila
perform
normal
owner
ervice
not be held
Ipon
ible for
nd
mechanic with
operations
date
manufacturing changes typographical
omissions
elying
on
this manual
formation contained herein
the combination of
photograph
we
have tried
illustration
elul tool
DRAKE
PUBLlSHERS ING
381
PARK
NEW
AVENUE
YORK
NY
SOUTH
1CXJ16
95
99
rporato the late t manufacturing design changes nd upto
made to attain
the time of publication While
ryeffort
ompiting the
impls
to
with which
SUSPENSION
to be
nd
brief and
l 1 to
te
cy
ISBN 87749 302 2
Published in 1973
by
Dlake Publishers Inc
381 Palk Avenue South
NewYolk N Y 10016
@Dlake Publishels Inc 1973
Printed in the United States of America
able of Contents
MAINTENANCE
TUNE UP
CHARGING CIRCUIT DESCRIPTION
ALTERNATOR
40
41
VALVE CLEARANCE
6
Description
41
FAN BELT
6
Removal
41
ENGINE OIL
6
Installation
44
OIL FILTER
6
COOLANT
7
Descri ption
44
7
Measure ofVoltage
45
7
Adjustment
Charging Relay
47
Nissan
Long Life Coolant
COMPRESSION
Test Result
8
BATTERY
8
IGNITION TIMING
POINTS
CONDENSER
VOLTAGE REGULATOR
44
48
49
9
ALTERNATOR
FUSES
FUSIBLE LINKS
9
EMISSION CONTROL DIAGRAMS
50
9
DISTRIBUTOR
52
52
49
SPARK PLUGS
10
Construction
CARBURETOR
10
Disassembly
52
11
Assembly
53
Idle Limiter
CHECKING
Cap
ADJUSTING DASH
IGNITION COIL
POT Automatic Transmission Only 11
Installed on
Engine
DUAL POINT DISTRIBUTOR
Cap and Rotor
Head
11
12
56
Construction
56
Descri ption
57
SPARK PLUGS
5
12
Descri ption
Point
12
Inspection
58
Phase Difference
12
58
TUNE UP GUIDE
Cleaning and Regap
14
TROUBLE SHOOTING IGNITION
58
TROUBLE SHOOTING
15
HEATER UNIT REMOVAL
59
TROUBLESHOOTING HEADLIGHT
62
TROUBLESHOOTINQ
63
22
REMOVAL
23
24
24
Pistons and
Connecting Rods
2
Cylinder
27
ASSEMBLY
63
Removal
DESCRIPTION
Head
HORN
RADIO
ENGINE
INSTALLATION
DISASSEMBLY
5
63
TROUBLESHOOTING
SPEEDOMETER
65
TROUBLESHOOTING RADIO
65
NOISE PREVENTION CHART
66
FUEL SYSTEM
27
Cylinder Head
28
AIR CLEANER ELEMENT
Piston and Connecting Rods
29
AUTOMATIC TEMPERATURE
Engine
30
OIL PUMP
36
Removal
36
Installation
3
CONTROL AIR CLEANER
AIR CONTROL VALVE
Idle
Compensator
TEMPERATURE SENSOR
Removal
ELECTRiCAL SYSTEM
Removal
68
68
68
69
69
69
Installation
69
FUEL PUMP
69
Removal and Disassembly
STARTER
64
TROUBLESHOOTING HEATER
40
Inspection
40
Assembly
69
O
70
1
Table of Gontents
CARBURETOR
Removal
3
FRONT SUSPENSION
3
Disassembly
3
Float Chamber
ANTI DIESELING SOLENOID
RECOMMENDATIONS
74
Removal
4
Installation
90
74
STEERING
74
BOOST CONTROLLED
DECELERATION DEVICE
Assembly and Installation
Cleaning and Inspection
JETS
STEERING GEAR COMPONENTS
92
74
RECOMMENDATIONS
92
74
ASSEMBLY
93
74
STEERING LINKAGE
93
5
REAR DRIVE
SUSPENSION
COOLING SYSTEM
SHOCK ABSORBERS
DRAINING
FLUSHING
WATER PUMP
78
78
Removal
78
Disassemb y
79
Inspection
79
Installation
79
THERMOSTAT
Removal and Installation
RADIATOR
96
Inspection
96
Installation
96
DRIVE SHAFf
97
RECOMMENDATIONS
97
79
79
CLUTCH
79
Removal and Installation
Inspection
9
80
REMOVAL
102
RELEASE BEARING
102
REPAIR
103
Refacing Pressure Plate
BRAKES
MASTER CYLINDER
82
Installation
82
FRONT DISC BRAKE
82
Description
82
Removal
82
Disassembly
ADJUSTMENT
INSTALLATION
MASTER CYLINDER
Removal
103
104
104
105
105
Disassembly
Inspection
105
Assembly
106
Installation
106
BLEEDING CLUTCH SYSTEM
106
106
84
and Repair
Piston Seal
Replacement
Assembly and Installation
Pad Replacement
84
85
TRANSMISSION
85
86
REMOV AL
109
REAR BRAKE
86
INSTALLATION
III
Removal and
86
4SPEED TRANSMISSION
113
87
Removal and Installation
113
Inspection
Assembly
2
82
Removal
Inspection
96
Removal
Disassembly
88
RECOMMENDATIONS
113
Table of Gontents
BODY WORK
FRONT FENDER
Removal and Installation
SPARK PLUGS
122
VALVES
122
116
OIL PUMP
122
116
GENERAL
123
123
116
ELECTRICAL
Removal and Installation
116
MANUAL TRANSMISSION
12
Adjustment
11
CARBURETOR
131
TRUNK LID
11
CLUTCH
134
11
ENGINE
HOOD
Removal and Installation
Torsion Bar Removal
and
Adjustment
TORQUE
117
SPECIFICA liONS
LUBRICANTS SAE
DISTRIBUTOR
121
138
PRESSURES
139
AUTOMATIC TRANSMISSION
140
PROPELLER SHAFT
144
BRAKE CHASSIS
120
136
138
TUNE UP
CAPACITIES
Sf ARTER
INFORMATION
ALIGNMENT
NOTES
WHEEL
146
14
a
llaiDteDlDce
Tune up
VALVE CLEARANCE
6
FAN BELT
6
ENGINE OIL
6
OIL FILTER
6
COOLANT
Nissan
7
Long
Life Coolant
7
COMPRESSION
7
Test Result
8
BATTERY
8
IGNITION TIMING
9
POINTS
9
CONDENSER
9
SPARK PLUGS
10
CARBURETOR
10
Idle Limiter
CHECKING
Cap
POT Automatic Transmission
Installed on
Engine
DUAL POINT DISTRIBUTOR
Cap and
11
ADJUSTING DASH
Rotor Head
Point
Only
11
11
12
12
12
Phase Difference
12
TUNE UP GUIDE
14
TROUBLE SHOOTING
15
I
IlaiDteDlDce
TUDe up
VALVE CLEARANCE
Valve clearance
adjustment
is
FAN BELT
performed with
adjust
the engine not running The initial
ment is made while the engine is cold
camshaft
cover
remove
Each valve must be ad
justed with the valve completely closed that
the rocker arm should be at the base
is
Ilowest
of the
point
cam
nut and turn the
locking
specified
the
adjusting
clearance is obtained
screw
as
procedure on each valve
engine over bv hand to position
necessary
Temporarily replace
cover
engi
with two
or
Remove
ne
checked
turning the
each valve
as
the camshaft
three bolts and warm up the
cover and recheck the
the
according to the warranty cer
Readjust as necessary Replace the
cover using a new gasket if the old
valve clearance
tilicates
camshaft
gasket
engine
appears
tlattened
or
broken
Run
and check for leaks from the gasket
Valve clearance
Unit
mOl
or
damage
lbl is
nator
472
0
applied
pulleys
when thumb pressure 122 0
midway between fan and alter
in
ENGINE OIL
Check if oil is diluted with water
Drain and refill
0 20
0 008
Exhaust
0 25
0 010
Intake
0 25
0 010
30
0
0 012
Cold
a A milky oil
cooling water
corrective
indicates the presence of
cause and take
measure
b An oil with
extremely low viscosity
gasoline
Ag
8
1
Check oil
level If below the
specitied
raise it up to the H level
Engine
oil capacity
including
oillilterl
Maximum
H leveli
S qts
Minimum IL leveli
The oillilter is of a
Adjusting valve clearance
in
dicates dilution with
OIL FILTER
Exhaust
gasoline
Isolate the
31 U S qts
Warm
or
if necessary
oil
Notes
41 U
Intake
if
It is correct if detlection is
belt tension
0 315 to
in
I
Replace
until
a
this
cracks
Loosen the
lobe
fuel gauge between the rocker arm and
camshaft Straighten the locking nut Repeat
with
for
necessary
Adjust
Unbolt and
Remove the air cleaner
the
Check
cartridge type
Fig 2 Drive belt tension
level
TUDe up
llaiDteDlDce
b
Percent C0ncentralion
Sea
BoiHng point
0
level
2
I090C
HeUUre
Inlle
228OF
Water
6
0
1
5
6
With heater
leakage
replace
I Y
leaks past gasketed
is found retighten just
stop leakage If retightening is
tive
X
I
Check for oil
anv
1
tilter
as an
no
lSOC SoF
3SoC
61UF
3IOP
lcity
cap
620
610
Without heater
protection
FreeL
I
coning
1240C 2SSor
2210F
50
kem
i
system
I060C
3m
Q
U S gal
Imper gal
S
s gal
U
Imper gal
60
flange
enough
longer
I
I
t
1
5to
U S
gal
1 Imper gal
U S
6 4t
U S
O
6 81
gal
Imper gal
gal
Imper gal
I
1 U U S gal
I i Imper gal
COMPRESSION
If
to
effec
When it becomes necessary to check
it
compression
assembly
is
essential
to
cylinder
remove
an
spark plugs
purpose of this test is to
determine whether there is excessive leakage
The
When
Note
installing
Do
leakage
not
should
oiltilter
tighten by hand
occur
past the piston rings head gasket etc To test
the engine should be heated to the operating
temperature and throttle and choke valves
COOLANT
opened
overtighten
oil
filter
lest
Long Life Coolant
L L C is an ethylene glycol base product con
taining chemical inhibitors to protect the
cooling system from rusting and corrosion
The L LC does not contain any glycerine
ethyl or alcohol It will not evaporate or boil
away and can be used with either high or low
temperature thermostats It flows freely tran
sfers heat eniciently and will not clog the
The L L C
passages in the cooling system
must not be mixed with other product This
coolant can be used throughout the seasons of
Nissan
the year
Whenever any coolant is changed the cooling
system must be tlushed and relilled with a
new
coolant Check the level
Cylinder compression
in
be less than 80cf of the
c
OF
0
32
10
14
20
4
cylinders should
highest reading
not
Dif
I
I
I
2
30
I
l
I
40
40
so
58
t
t
to
20
30
40
so
EG001
Fig 3 Protection concentration
7
llaiDteDaDce
Tune up
fClcnt comprc sion in two
llalh
ll
indiL
an
nte
cylinder
more
Low
piqoll ring
he
i1
ol1lpanit
u mption
nn
Thi
1
R
If
l
into
c
Frigid
r
climates
usuallv
Tropical
fuel
excessive
Other
c ll1pre
low
i
bv
result from
may
climates
climates
20ne 6SoF
I 28
Over I
23
1
Over I 10
126
ult
lindf 1
ell
rl
can
trouhle
charge
value
value
at
ion in cYlinders
ornpn
oln
Full
Permissible
hrokpll piston ring
or
n
or
improperlv seated valve
sion in
one or
more
cvlin
Illall quantity of engine oil
through the spark plug holes
a
pOll
ylinder
nd retest compression
II
oil
adding
Illl challn
the compression
Iwlp
an
II pn s ure tn
alve is sticking
II
l
low
01
is
low
the likelihood is that
seating improperly
and if
the compres ion
past the
pressure
arc defective
linder compression in
dinder
help
hat rings
t
any
adding
two
adjacent
oil
does not
this could be
leakage
Fig
surface
gasketed
4
Testing compression
pressure
Oil and water in comhustion in any two ad
ent cylinder
is low and if adding oil does
ja
help the compression this
akage past the gasketed surface
not
I
Oil
and
1
11 from this trouhle
nmpre
water in
ion prC
could
comhustion chambers
be
can
Sl1re
p i at rpm
Standard 1
c
1350
Minimum 128 350
ET002
Fig 5 Checking specific gravity of battery electrolyte
BATTERY
Check electrolyte level in each batterv cell
Unscrew
each
liller
cap
and
inspect
lluid
level If the lluid is low add distilled water to
bring the level up approximately 0 394 to
be clean to prevent current leakage bet
terminals and from positive terminal to
hold down clamp
must
ween
0 787 in above the plates Do not overlill
In addition to current
Measure the
cumulation of acid and dirt
specitic gravity
of
battery
elec
may
trolyte
cause
connector
8
Clean top of battery and terminals with a
solution of baking soda and water Rinse 011
tightening
petroleum
and
corrosion
dry
wi h compressed air
Top
of
battery
leakage prolonged ac
on top of battery
blistering of the material covering
straps and corrosion of straps After
terminals
vaseline
to
coat
them
with
protect them from
TUDe up
l1aiDteDIDce
Clean and
correct
points
and distributor breaker
spark plugs
Check
for condition
the earn and wick
Note
Do not apply grease excessively
Thoroughly wipe oIl dirt and dust from timing
mark on crank pulley and timing indicator on
Point gap
and front
0 0177 to 0 0217 in
cover
Dwell angle
Warm up engine sufticiently
Install
plug
Set
a
timing light
wire and install
idling speed
to
on
a
point dwell and gap are
apply distributor grease to
full contact and that
IGNITION TIMING
cylinder spark
No 1
49 to 55 degrees
tachometer
approximately
CONDENSER
800 rpm
Clean outlet of condenser lead wire and check
Check
if it
ignition timing
iBefore Top of Dead
is
Center
50
B T D l
by the
use
timing light
If necessary adjust it as follows
Loosen
set
screw
to
such
Lock distributor set
to 5
screw
et screw
Retighten
if necessary
capacity
witb
Check
condenser
meter
Condenser insulation
be also checked using
an
extent
that
distributor can be moved bv hand
Adjust ignition timing
for loose
of
BT D C
and
make
sure
thaI timing is correct
a
t
1Z
large resistance value
normal
the tester pointer
When condenscr is
range
to
measure
swings largely and rapidly and moves
gradually back to the intinite side When thc
pointer does not stay still or it points zero in
resistance replacement is necessary
Retard side
Advance side
POINTS
Check the distributor breaker
normal
Make
points
for ab
pitting and wear Replace if necessary
they are in correct alignment for
sure
Fig
Fig
6 Adjusting
ignition timing
capacit V
resistance may
testcr by adjusting its
Ignition timing
5
a
7 Checking
ignition timing
Fig 8 Checking distributor point gap
llainteDance
Tune up
Condeneer capacity
Check ignition
if neceesary adjust it to
800 rpm retard sidel
timing
the specillcations 15
Hctard side 0 05 I F
idle
Adjust
Micro Farad
adjusting
that
screw so
CO
per
centage is 1 5 0 5
Advance oide 0 22 I F
Repeat the procedures
Micro Farad
and
1
Condenser insulation resistance
5MlltMega
ohms
above
5
5 0 5
On
a
cleaner
spect
clean
plugs in a sand blast
Inspect each spark plug Make sure
that thev
of the
heat range In
insulator lor cracks and chips Check
are
both center and
specitied
ground electrodes
replace with
excessively
plugs File center
worn
0 028 to 0 031 in
Tighten plugs
If they
are
spark
new
electrode l1at Set the gap to
using proper adjusting tooL
to 110 to 15 0 ft lb
meter
mixture
it
thoroughly
essential
to
have
of
a
idle
the meter
warmed and calibrated
Warm up engine
Be
lock
engine operation
idling speed
Adjust throttle adjusting
speed is 800 rpm 1 in N
tor
sure
to
both
screw so
minute at
that
D
apply parking
front
and
rear
brake and to
wheels witb
b Hold brake
on
pedal while stepping down
pedal Otherwise car will
dangerously
accelerator
rush out
And
sure
that the
equipped model
adjustment has been made
then check the
lever in
engine
range tor automatic
D
cent and idle
CO
one
equipped
wheel chocks
Idling
sulliciently
Continue
transmission
check should be done in the
with the selector lever in
adjustment requires the use
When preparing to adjust
is
is
On automatic transmission
torque
CARBURETOR
CO
percentage
range
make
Idle mixture
CO
at 800 rpm
automatic
model
and
described in items 3
Caution
SPARK PLUGS
Remove
as
that
so
position
speed
N
position
specitications
Insure that
are as
with the
CO
per
tollows
rpm 650
percentage
1
50 5
Readjust by turning in or out throttle ad
justing screw or idle adjusting screw if still
out
Notes
transmission L
a
EEOBO
Fig 9 Checking spark plug point
10
gap
Do not attempt to
screw
down idle ad
2
Fig 10 Throttle and idle adjusting
screws
l1aiDteDlDce
justing screw completely to avoid damage
to tip which will tend to cause maIfunc
CHECKING AND ADJUSTING DASH
POT
Automatic Transmission
tions
b
After idle
adjustment
shift the lever to
Not
has been made
plt
or
range
for
automatic transmission
c
Remove wheel chocks when
Proper
contact
lonnance
Do not
this idle limiter cap unless
If this unit is removed
it is
necessary to
stallation To
After
re
throttle
check
screws
amount of
adjust it
at the time
adjust proceed
adjusting
justing
or
Install
idle limiter cap in
adjusting
rotation in the
can
be obtained between
not
CO RICH
arm
rotate dash
pot to the proper position
idle
It is necessary that the idling speed of engine
and mixture have been well turned up and
speed
sure
ad
that the
position
screw
screw
of in
CO
that the
and
Installed On
be
to
lever
follows
as
contained in exhaust gases
meets the estahlished standard
sure
set
dash pot stem and throttle
Cap
remove
necessary
throttle
provides normal dash pot per
Adju tmenl of the proper contact
he made bv dash pot set
If normal
Idle Limiter
hetween
only
dash pot stem
can
running
TUDe up
making
further turn 18
direction
engine
Engine
it sufticiently
Turn throttle valve
speed
warm
by
hand
and read engine
when dash pot just touches the stopper
lever
Adjust
the position of dash pot by turning nut
speed is in the range of 1 600 to
until engine
1800 rpm
C
Then fasten loosened lock nut
rburctor
h
topper
Make
alation
sure
reduced
that the engine speed is smoothly
2 000 to t 000 rpm in about
from
three seconds
COlcan
JIsoy1dle
limiter Jp
ET031
Fig
11
Setting idle limiter cap
EE130
I
Advanced break er point
2
Retarded breaker point
Pha
difference
3
Fig 12 Dash pot adjustment
Fig 13 Dual point distributor
u
l1aiDteDlDce
uDe
up
DUAL POINT DISTRIBUTOR
Point gap
C 018 to
f
i trihlltor has two breaker
othl r with
po itp each
wn
h
in
The ditl
Figure
rence
in
a
e
e can
be
adjusted bv
point gap IS adjusted by
install distributor
angle
as
follows
proceed
If
dillerence of 7 crank
are
placed parallel
lht
1C lav
i
turned
engine
Using
OFF
and
hend
rotor
ref iliaI inlervah
be
must
I n addition
inspected
remove
at
cap and
t and carhon dc
sits from cap
du
lnd rotor Ii om time to time If cap is cracked
e11
all
1Il
0
Ipaking replace with
i
a
justment
must
Gap
Roth
tiOt
At
point
or
canHhaft
cessively
i
made by
loosening point
required for adjustment
must he checked from time to time
gap
this
surface is
rough take ot1 any
with tine sand paper of No 500
with oil slone
time
dwell
Adjust
loosening point
engine
lead
Disconnect
of
angle
advance
side
by
black
of
screw
wire
from
B
t
distributor harness and then connect it to Y
side
and
replace points together
point screw
After adjustment disconnect lead wire then
engine harness and distributor har
connect
ness
securely
Phase Difference
To check
on
phase dil1erence install
engine and proceed as follows
Disconnect
grease must be supplied
carn heel
Do not applv
1 When wear on each breaker
noticeable
tact
be
gauge is
irregularities
or
of
of distributor harness
Adjust dwell angle of retard side by loosening
Standard gaps of both points are 0 0177 to
Z17
0 0
in If the gap is ot1 the standard ad
When
black
vellowl of distributor I Retard
new one
Point
screwlS
lead wire connect B black
a
advance side
I
al
harnes
harness and B
ap lind Rotor lIead
examining dwell
on
engine and
Disconnect wiri ng harness of distributor from
01 and the advanced breaker point works
ll
angle
the
in thp pi imarv ignition circuit The retarded
hreaker point
when the relay is turned
ork
wht
in
49 to 550
pha
breaker points
two
Dwell
z
I
adju ting screw A phase
h
ilnf
i adopted
Th
points located op
phase ditlcrence as
con
wiring
harness of distributor from
engine harness
ex
point
with
an11
to
distributor
Using
a
lead wire connect B Iblackl of
harness and B
black
engine
of distributor harness
IAdvance sidel See Figure 15
EE135
Fig
12
14
Checking of distributor breaker point gap
Fog 15
Connecllead wire
lIaiDteDance
Spark timing
sontrol
system for Automatic T
TUDe up
smission
Spark timing
Throttle SW
Advance
Engine
start
Idling
Partial
throttle opening
ard
Ret
ON
0
ON
0
ON
0
Wide throttle
and
opening
high speed rousing
OFF
0
Adjuster plate
EEl38
set screws
EE136
Fig 16 Adjuster plate set
Fig
screws
18
Phase difference adjusting scale
To correct further
Referring
set
to
proceed
Figure
as
6 turn out
12 to 2 turns The
screw
follows
adjuster plate
screw
is located
at contact set on retard side
Using a notch in adjuster place as a hold turn
adjuster plate as required until correct delay
is ohtained Ignition is retarded when plate is
turned counterclockwise
Note
Fig 17
engine idling adjust ignition timing by
rotating distributor to specitications 112 800
advance side
Disconnect
lead
wire
from
B
tblack
distributor harness and then connect
yellow
With
of
it to Y
of distributor harness IRetard side
engine still idling check to determine
phase delay is 7 degrees in terms of
crank shaft angular displacement
that
to
make
graduations
on
breaker
One
plate
to
crankshaft
graduation corresponds
angular displacement of 4 degrees
to
With
rpm
Refer
adjustment
Tighten adjuster plate
adjustment
Make
set screws to secure the
that the ignition timing
specilications
sure
side is the
easier
ofadvance
After
adjustment remove lead wire and con
wiring harness of distributor to engine
harness securely
nect
13
lJaiDteDance
up
Tune
TUNE UP GUIDE
nd
l litiun
1J
1 t1illutl
fll1
1t 1T
tirnmll
e
dcgr
5
IB T O C
Dislrihlltol
I linl
in
lJP
Dwellanglc
degree
0
5510
45100
49
to
0177 toO 02t7
55
retard side 0 05
C
Id
iCf
n
rlnd
n er
F
lpadty
advance side 0 22
ilSiOulIl
lanc
MH
5
Idling ldjustmtnt
Manual Trnnsmission
Automatic Transmission
Dash
pot 3djuslrnenl
die
Anli
1
degree rpm
50 650
call
1 5
t05
t05
5
1 600
pm
em
lin Ib
35
to
retard side
to
0
range
1 800
55
30
to
48
conlrol system
lluottle switch
L18
operating angle
AfT
L16
t5tO
Lib
620
MfT
AfT
MfT
Thermo switch operating
Adjustment
50 800 retard side
COil
ling solenoid tightening torque kg
Spark timing
rpm
e
deg
of
operating
degK e
350
degree
400
degree
450
temperature or
pressure
OF
5 to 13
4 to 55
f a cO D
R C 0 0 set pressure
AfT
mmHg inHg
t 20
480
t8
t 0 787
9
MfT
mmHg inHg
t 20
500
19
t
7
787
0
A T C Air cleaner
AT
H
C Valve opening temperature
Or
OF
5
37
to
4S
100
to
1
8
llaiDteDlDce
TUDe up
TROUBLE SHOOTING
Probable
Condition
CANNOT
CRANK
Improper grade
ENGINE OR StOW
C
II
Defective
Replace
T
c
battery
wble in
Detective
lrter
st
light
Correcl
n
oloL
T ouble shooting procedure
the
Inspect
Hting
Sl
igmllon switch
tive
Defc
starting
goes off
motor
dims
il
Adjust
charge system
onnectiun trouble in
Wiring
When
with
Repla proper grade
Charge ballery
Loose fan belt
on
tive elion
DIscharged bat tery
CRANKING
Switch
rel
Repair
replace
Repair
replace
starting cin uil
with
light
ON
nsiderably
k baltery
Che
b Check
Check
When
light
51
s
nnection and
s
aller
able
olur
bright
k wiring
Che
cllOn
between
lt ery
h
nd
Slarter
OllH
h
k starter switch
Chel
Check starter
ulm
1
I
I
IUD8 UP
llaiDtelllDce
Condition
Probable
Corrective action
cause
Low
or no
Check for loose terminal
current
disconnection
or
primary circuit
Check for burned
Ignition system in
Burned distributor
trouble
Improper point
Defective
leak
ondenser
Clean
rotor
Clean
spark plug
Adjust
Defective ignition oil
Replace
Tcuit
la k of
fue
Dirty
high
connection
primary
tension cable
or
clogged
Fuel pump will
in
ot
Clogged
work
01
properly
work
Repair
properly
of float level
compreuion
Adjust
Disassemble
pipe of fud tank
breather
Incorrect
replace
Check tnd adjust
Correct
ed carburetor
dieseling
anti
Damaged
replace
Clean
pipe
Improper idling
do
Repair
Replace
fuel
Improper adjustment
or
replace
Supp1r
Carburetor choke will
Dirty
or
Replace
disconnection
or
fuel strainer
Dirty
Low
eplace
adjust plug gap
Improper ignition timmg
L005C
trouble
replace
Replace
ap and
Disconnection of
Fuel system
Repair
Adjust
gap
at rotor
Defective
point
points
Repair
olenoid
spark plug tightening
nd clean
nd clean
Replace
or
normal
defective
Tighten
to
viscosity
Replace
with proper
torque
or
replace gasket
gasket
it
Improper grade engine
low
Incorrect valve clearance
leak fromvaIve
Compression
Sticky
valve
Weak
Compression
Slicking
Worn
Trouble
Pour
or
leak
Remove cylinder head and
lap
Correct
alve
at
defective
piston ing
oil
Adjust
seat
stem
defective
grade
springs
Replace
cylinder head gasket
piston ing
replace
valve
nd
valves
lIve
guide
springs
Replace gasket
Replace pIston
Overhaul
cylinder
alve
ngs
engine
shooting procedure
the
engine
iI
from
plug
hole
nd
then
measure
cylinder compression
Compression
increases
Compression does not change
Trouble ill
or
18
cylinder
Compression
head
leak
gasket
or
piston ring
from valve cylinder head
Tune up
llaiDteDlDce
Condition
Probable
Corrective action
cause
IMPROPER ENGINE
IDLING
trouble
Fuelsyltem
carburetor jets
Clogged or damaged
Incorrect idle
Clean
adjustment
air cleaner
Clogged
Defective
replace
A1just
Rplace element
manifold gaskets
carbureto
or
insulator
Replace gasket
insulator
Improper
Low
float level
adjustment
Adjust
i
compreSlion
Previously mentioned
I
I
Others
Incorrect valve clearance
low
Extremely
Poor
Adjust
revolution
acceleration above
Adjust
1 000 rpm
Twin
carb
or
malfunction of the
spark plug
ignition coil
ignition system
tension
high
Incorrect basic
cable
nuts about
a
half
etc
ignition timing
8C D D
adjustment
Damaged
vacuum
Sticked
Adjust
Adjust
incorrect
Adjust
control solenoid
Replace
Replace
dash pot
stall
anti
Replace
breaker
alve clearance
Incorrect
ENGINE
idling adjusting
turn
Defect
point
Loosen
POWER NOT
UP TO NORMAL
Low
Previously mentioned
comprnsion
Ignition syltem
trouble
Incorrect
ignition timing
Adjust
Defective
spark plugs
Clean
adjust
Dress
or
Defective distributor
points
or
replace plugs
replace
points
Also
check
condenser
Fuel system
trouble
Malfunction of choke system
Clogged
Dirty
fuel
pipe
clogged
or
floating
or
Air ntake
trouble
syltem in
Replace
Repair
properly
Replace
cleaner
inhaling
from
or
eplace
Disassemble and clean
carburetor jets
Gagged air
Air
Clean
fuel strainer
Fuel pump will not work
Clogged
Adjust
valve
manifold
gasket
or
element
RepJace gasket
carburetor gasket
fl
IlainteDance
TUDe up
Condition
Owrheating
Probable
Corrective action
cause
Insufficient coolant
ReplenWt
Loose fan
Adjust
Worn
belt
Replace
defective fanbelt
or
Defective thermostat
Replace
Defective
Replace
water
or
Oogged
pump
Flush repair
radiator
leaky
Air in
Othen
Replace
with proper
Incorrect
ignition timing
Adjust
Defective
carburetor lean mixture
Overhaul carburetor
e
grade
each part of
e
Defective thermostat
Replace
Improper
octane fuel
Repbce
Improper
tire pressure
Inflate to
Clutch
Car
replace
Improper
brake
Adjust
dipping
Adjust
Dragging
NOISY
Retighten
cooling system
oil
or
Replace
Defective radiator mlct cap
ooling
Owen
fan belt
with specified
specifted
cooling system
oil
grade
octane
fuel
pressure
ENGINE
knodting
Overloaded engine
Use
Carbon
Disassemble
knocking
right
gear in
driving
cylinder
head
and
remove
carbon
Mechmicll
Timing knocking
Adjust ignition timing
Fuel knocking
Use
specified
Preignition misusing of spark plug
Use
specified spark plug
strong dull noise increases when engine
the place cause a
misflTe on each cylinder If the noise stop3
octane
fuel
kncdtinll
Crankshaft bearing
ThU
This is caused
knocking
is accelerated To locate
or
by
the
this
misfut
by
worn or
damaged bearings
worn
Renew
uneyen y
crankshaft
bearinp and adjust or change crankshaft
cylinder generates
the
Check lubrication system
than
the
Same
noise
Connecting rod
bearing knocking
This is
a
little
crankshaft
hisher pitched n9ise
knocking and also
as
the
of crankshaft bearinas
case
increases
when
engine is accelerated Cause a misfue
cylinder and if the noise deminiwi
almost completely
this crankshaft bearing
on
each
generates the noise
Piston and
noise
18
cylinder
When you
overlapping metalic noise
magnitude with the
revolution of enaine and which decreases u
engiI e is warmed up this noi3e is caused by
piston and cylinder To locate the place
cause amisfue on each cylinder
which
hear
an
increases
its
This
may
cylinder
turn will
excessive
erhaul
cause
and
an
lower
cause
I
abnormal
wearing
compression which
lower out put power
consumption
engine
of
oil
of
in
and
TUDe ail
IlaiDteDance
Probable
Condition
Piston pin noise
Water pump noise
This noise is heared at each ryighest and
lowest dead end of piston To locale the
place cause a misfire on ach cylinder
This
noise
may
damaged bearings
of iding parts
An
Others
Corrective action
cause
be
caused
or
the
by
by
timing
play
Renew
piston pin
on
or
piston
and
piston pin usembly
with
a
new
one
Adjust
Adjust
the tension of chain
Disassemhle engine and
ankshaft
on
wear
surface
chain
An excessive end
a
cause
piston pin hole
Replace water pump
worn
uneven
improper adjustment of alve clearance
Noise of
This may
new
main
bearing
This noise will be heared when clutch
Note
is disengaaed
Wear
on
Note
Uta noise will
clutch is disenpged
adjust drive shaft
Renew bush and
clutch pilot bushing
be
when
hur
ABNORMAL
COMBUSTION
back
fue after fire
run on
etc
Improper ignition timing
Improper
Fuel
system in trouble
Adjust ignition timing
Improper ignition timing
heat range of
carburetor
fire after fire
or
Damaged
back
specified spaTk plugs
spark plugs
e
manifold gasket
Uneven
f8C1iYe
o
eylinder hem
Run
Improperly adjusted
Excess
e
calburetor
and check it
level and check needle valve
Adjust
valve clearance
Remove head and gel rid of carbon
chamber
back fire after fire
valve spring
the
parh
Adjust
on
carbon in combustion
llaged
DaJ
Adjust
function of the noaL
idling
them with new
Disas efnb
Defective carburetor jet
Improper
Replace
Replace
it with
Tighten
it
a
new one
EXCESSIVE OIL
CONSUMPTION
Oil I
Loose oil
Loose
or
Loose
or
drain plug
damaged
oil pan
damaged
chain
Defective oil
crankshaft
Loose
or
seal in
damaged
gasket
over
cover
Renew
gasket
front
locker
Renew
and
rear
gasket
of
gasket
or
tighten
it
gasket
or
tighten
it
Renew oil
Renew
seal
gasket
or
tighten
it
but
ot
too
much
fmproper tightening of oil
mter
Renew
gasket
and
tighten
it with the proper
torque
Loose
or
damag ed oil
pressure
switch
Renew oil pressure switch
or
tighten
it
18
TUDe up
l1aiDteDIDce
Probable
Condition
Cylinder
Excessive oil
consumption
and
piston
Corrective action
cause
Overhaul
wear
of piston ring gap
location
Improper
reversely assembled piston
or
Remount
Renew
Repair
piston ing
Fatigue of valve
groove and
oil seal
ing
rings
renew
piston
piston and
seal
Replace
lip
and
with a new
lip
cylinder
piston ring
one
Renew valve or guide
Inadequate quality
of
engine oil
Use the
designated
oil
Previously mentioned
Engine overheat
POOR
piston
piston ings
or
Renew
Worn valve stem
Otben
new
ng
Damage piston rings
Worn
and
cylinder
FUEL ECONOMY
See the explanation
of the power deerea
Adjust
it
Defective acceleration ecovery
Adjust
it
Fuel leakage
Repair
pipes
Exceeding idling
Others
TROUBLE IN
revolution
to
or
the
designated
tighten
rpm
of fuel
the connection
OTHER
FUNCTIONS
Oecreased oil pressure
Inadequate
oil
Use the designated oil
quality
Previously mentioned
Overheat
Defective function
of
il
pump
regulator
Disassemble oil pump nd repair
or
enew
it
valve
Functional deterioration of oil pump
Repair
Blocked oil filter
Renew it
Increased clearance in various
sliding
part
or
replace
it with a new
one
Disassemble and replace the worn parts with
new ones
Oean it
Blocked oil strainer
Troubles
ExcessiYe
wear on
sliding pam
the
in oil gauge pressure switch
Oil pressure decreases
Defective quality
PO
contamination of oil
Previously
a
new
Change element
Previously mentioned
or
overcoal
fuel mixture
Decrease of oil
pressure
lnsufficient clearances
Improper fuel
with proper
Check the fuel system
Previously mentioned
Readjust
to the
Previously
mixture
one
mentioned
Exchange the oil
change element
Overheat
Overheat
20
it with
Defective air cleaner
Improper
Scuffing of sliding
or
Replace
designated
mentioned
Check the fuel
system
clearances
and
IDgine
DESCRIPTION
22
REMOVAL
23
INSTALLATION
DISASSEMBLY
24
Pistons and Connecting Rods
Cylinder Head
ASSEMBLY
Cylinder
Head
Piston and
Connecting Rods
24
27
27
27
28
29
Engine
30
OIL PUMP
36
Removal
36
Installation
37
21
r
B DglDe
crankshaft
DESCRIPTION
to
turn
out
smooth
cylinder block is
power
unit featuring deep skirting
The
feature a H C
and L18 engines
wedge shaped combustion
alminum heads and fully balanced
The
L16
valves
a
single
chamber
5 bearing
These
engines
are
equipped
EM256
Fig 19 Cross section view
22
dependable
cast in
with
a
single
BngiD8
downdraft
2 harreL
porates
special
a
carburetor
that
incor
device to control emissiuns
If
has shown that it is much easier
engine with transmission as a
Experience
to remove the
single
The
unit than to
engine
can
transmission
the engine
remove
then be
only
from
separated
Disconnect thc fuel tube from the fuel pump
the
assembly
equippcd with heater
engine attachment
remove
Disconncct accelerator control
choke wire at the carburetor side
its hoses at
linkage
and
Disconnect the wirings for the starter alter
n
tor
ignition coil oil pressure switch and
thcrmaI transmitter
REMOVAL
Hemove the clutcb
Scribe alignmcnt marks on hood around hood
hinges and remove hood from hinge
Completelv drain the cooling system engme
and transmission lubricant
Hcmove blow hy hosc ti
remove
om
rocker
cover
and
air cleaner
remove
the
car
Take oil hoth upper and lower radiator hoses
by removing thc hosc clamps Then loosen the
lixing holts of the radiator and take it
out in
sequence
Note
smission
remove
cooling pipes
Rcmove
engine
with
the
automatic
torque
tran
convertor
from the radiator
fan and
reverse
Disconnect the shift rods and select rods
t hen
remove
s
shart
cro
the
cross
a
sembly
and
bv
shail bracket from the side
Disconnect thc front exhaust tube from
exhaust manifold
pulley
and
remove
center tube
ting
the front
tube
pre mumer and
assembly
propeller
shaft
it from the companion
by disconncc
tlange of the gear
carrier
Jack up thc transmission a little and thcn
remove the rear engine mounting cross mem
ber
by removing
the
tixing
bolts of the engine
mounting insulator mounting
and hand brake cable
Flg 20 Removing clutch operating cylinder
thc
Disconnect the center tuhe from the rear tube
Disconnect the
equipped
Disconnect
the
memher
Disconnect the battery cable and
If
speedometer cable
tlat attaching plug connector from
lamp switch
Disconnect the
rcmoving the
Hemove the radiator grille
battcrv off the
and its
operating cylinder
spring
return
cross
member
clamp
Fig 21 Lilting engine
23
IDgine
Remove
tixing bolts securing
engine mounting insulators to cross
Hook
t
the
with
hooks
which
cylinder
the
cable
head
or
are
one
the front
Remove transmission from
chain to the
installed
on
stringers
the engine
at the front and the other at
rear
At this
DlSASSEMBL Y
member
drain engine oil and coolant by
removing drain plugs
Thoroughly
Place engine
lower the jack
lifting
transmission
placed
Idraw oil the
jack at
hoist
up
adequate stage
engine observing the
tension of wire and adjusting the position of
chain block so that the engine tilts in order to
make it cleared on the body At this lifting
take
care
body
side
gradually
under the
that accessories installed
do
not
touch
the
the
on
engine
and
transmission
assembly
Remove fan and fan
Remove
on
the
engine
R H
Remove oil tilter
Remove oil pressure switch
Install engine attachment to cylinder block
using bolt holes securing alternator bracket
Set engine
on
plug
the stand
Remove oil level gauge
Reverse the removal
to the
nect any
parts
engine
mounting
replaced
and
procedure but do not con
engine steadily until the
Remove clutch
insulators
Remove
high
Remove
spark plugs
power unit
weight
them
have
been
is taken
by
assembly
tension cable
Remove thermostat
Fig
22
Engine
on
ngine stand
housing
Fig 24 Removing manifolds
EM091
Fig 23 Removing thermostat housing
24
stand
pulley
engine mounting
and water drain
INSTALLATION
engine
Fig 25 Removing camshaft sprocket
BDgiDe
Remove rocker
cover
Remove carburetor
Remove intake and exhaust manifolds
Remove
engine mounting L
Remove crank
H
sprocket
Remove
head
from
cylinder
assembly Loosen
Figure 26
bolts
1 to 10 as shown in
the
convenience
Note
For
head
replacement
special
of
cylinder
Chain
tool
is prepared to sup
Stopper STt742000I
port timing chain during the service
timing
operation
By using this tool
marks on crankshaft sprocket and timing
pullev
Remove water pump
Remove fuel pump
Remove fuel pump drive
Remove camshaft
earn
EM095
Fig 26 Cylinder head bolt loosening sequence
fig 29 Removing chain tensioner and timing chain
j
1r
Jp
k
r
EM096
Fig 27 Supporting timing chain
Fig
28 Removing oil strainer and oil pump
I
W
Fig 30 Removing chain drive sprocket
Fig 31 Removing piston and connecting rod assembly
21i
I
r
IDgine
EM1Q2
Fig 32 Removing flywheel
Fig 36 Removing piston ring
STl651S000
ST I
3030001
J
EM099
Fig
33
Removing
rear
main bearing cap
EM103
Fig 37 Removing piston pin
I
I
Fig
34
Removing
rear oil
seal
Fig
38
Removing rocker
arm
EM105
Fig 35 Removing buffle plate and
28
net
Fig 39 Removing camshaft
BDgine
chain will be
unchanged So
aligning timing marks will
Cylinder
be saved
Loosen
valve
remove
rocker
so
much
Note Take
Remove oil pan and oil strainer
Remove oil pump and its drive
and chain drive
Take otr
crankshaft
Take
tool
drop
it
Crankshaft Main
oil seal
plate
lose valve spring seat
to
oil
Be
sure
leave camshaft bearing
to
Because
the
center
bearing
is
liable to be out of alignment
ASSEMBLY
Precautions
Use
thoroughIv
sure
When
and
cleaned
that oil
holes
parts
are
Particularly
toreign
clear of
matter
Remove crankshaft
cylinder
block net
Connecting Rods
piston rings with a ring remover
Pistons and
Remove
Note
make
Remove baffie
not
care
Bearing
del
rear
to
cam
caps
Cap Puller ST1651S0000 to remove center
and rear main bearing caps Keep them in or
H emove
and
seal valve collet and valve rocker guide
intact
Hemove tlywheel Be careful not to
special
not
care
gear
them in order
Use
take
bearings
Remove valves
worm
sprocket
bearing
time
lohes
and connecting rod assembly
connecting rod bearings and keep
Remove main
this
camshaft
damage
piston
Hemove
At
Note
thrower
not to lose valve rocker
care
Hemove camshaft
cover
Remove timing chain
oil
pivot lock nut and
by pressing down valve
guide
spindle
Remove chain tensioner
Remove
rocker
arm
spnng
Invert engine
Remove front
Head
the work for
Press
all t piston pin
Keep the disassembled parts in order
installing
bearings
Use
new
Do not
be
sure
to
packings
reuse
sliding parts
apply engine oil
such
as
to them
and oil seals
lock
washers that have been
removed
Keep tools and work benches clean
G
G
STl2070000
i
t
EM106
Fig 40 Removing valve
Exh aust
Fig
41
Intake
EM107
Valve components
rz
r
I
BDgme
Keep the
at
H
ure
a nd
and tools ready
near
follow
to
specitied tightening torque
order
tool
Using special
et
Applying
U
part
necessary
hand
valve spring
Assemble valve
alve
order
shown below
spring
springs
guide
ealant to eliminate water and oil leaks
e
Front
Front
Main
Notes
are
gasket Front side
cover gasket See Figure
cover
hlock and
Top
cover
affront
cover
see
of
cylinder
42
Figure
cylinder block
ide of rear main bem ing cap and each
of cvlindl r hlock See Figure 43
urlan
and
cap and
bearing
Cylinder
o
block
n
ylindt
Set
portions
lilldl r hloek
1
hlock
to rpar
at four
main
a
Check whether the valve face is free
from
b
foreign
The L16 and LIS
type valve
corner
Valve rocker pivot
Screw
mating
cover
bearing capl
110 nut apply sealant too much
Not
use
double
assembly
valve
nuts into
rocker pivots joined
pivot bushing
with
Set
locating plate
bearing
inside
and
caretullv
The
install camshaft
Do not
Applying
20
Points
1
25 mm
0 984 in
be
appl
Fig
44
Applying
Fig
45
Installing valve
sealant
Front cover and gasket
7 to
to
ed
II
U
sealant
all
I
I
E
i
EM151
S
Fig 43 Applying sealant Main bearing cap and cylinder
block
be
applied
sealant
EM152
EM153
scalant
to
to
in
damage the
oblong groove of locating
l
H ad
Cylind
assemhly and valve spring
l
lock
Camshaft assemblv
Points
42
engines
springs
cvlinder head
Vain
matter
Each
tront chain
to
42
SrI j lgurl I
28
in the
inner and outer valve
retainer valve collet and valve rocker
requiring sealant
Part
Fig
in po ition and tit valve
with oil seal
guide
sealant
Valve Lifter STt2070000
seat
ICylinder block
Ingine
plate
must be directed toward the front side of
springs with
engl ne
Install
camshaft
tighten it together
specilied torque
sprocket
on
camshaft and
with fuel pump
cam
6 ft lb
At this time check camshaft end
to the
a
arms
lw
pressing
down valve
screwdriver
Install valve rocker springs
After
assembling cylinder head
shaft
until No
turn
is at T D C
piston
cam
on
its
compreHsion stroke
Tightening torque
86 to
rocker
Install
Piston and
play
Connecting Rod
n pins and connecting
pistons
pist
the designated cylinder
Assemnle
rods to
Notes
a
Piston is pressed into connecting rod
fitting force is 0 5 to 1 5 tons and the
and
aid
of
special
tool
Stand ST13030001
Piston
Pin
Press
is necessary
When
pressing piston pin in connec
apply engine oil to pin and small
of connecting rod
ting rod
end
EM154
b Arrange
big end is
so
thatoil
jet
of connecting lod
directed toward the
right
side
of cylinder block
Fig 46 Installing camshaft sprocket
c
Be
with
sure
to
install
notch mark of
piston
piston
in
cylinders
head toward
the front of engine
EM155
Fig
47
Assembling cylinder head
EM1S7
Fig 49 Assembling piston and connecting rod
gd
l
STl3030001
o
EM158
Fig 48lnstalling piston pin
Fig 50 Installing piston ring
28
r
IDgiDe
I nstall piston
Front
rings
In tall top and second rings in
mal ked side
up
right position
Top ring is chromium pIated
tacting face
on
with the
Second
ring
has
larger taper
liner
con
surface than
top ring
bearing No 1 is also the same type
bearing No 5 The difference is
that an oil hole is provided in the front
bearing
as rear
All
bearings except
interchangeability
lower bearings
Applv engine
In the combined oil
tower
same as
ring
upper rail is the
oil
to
No 1
bearing
between
have
upper
an
and
main bearing surfaces
on
hoth sides of cylinder block and cap
one
Install crankshaft
I ix
hearings
ting
Od
I
Note
connecting rod and
on
con nee
cap
Clean
the
back
side
of
bearing
carefully
Install main
bearing
cap and
bolts to
tighten
pecitied torque
Tightening
tOl que
32 5 to 39 8 ft lb
Engine
The IIlst
tep in engine assemblv is to bolt
Engine Attachment ST05260001
pecial tool
to
right
cession
hand
side of
install block in
another
Stand ST050tSOOO
Engine
hlock
cylinder
In
suc
special
tool
with engine bot
tom up
Set main
beal ings at
the proper
portion of
cylinder block
Install
hatlle plate
including cylinder
block
net
Notes
Apply sealant
bearing
block
as
to
each side of
Arrange the parts so that the
bearing cap faces toward
engine
on
Prior
to
tightening
place bearing
shifting
rear
cap and each corner of
shown in Figure 43
cap in
arrow
mark
the front of
bearing
proper
main
cylinder
bolts
cap
position by
crankshaft in the axial direction
Notes
Only
center
bearing
No 3
is
flanged
a
type
All inter
same
bearings
No 2 and No 4
are
the
Tighten bearing cap bolts gradually in
separating two to three stages and out
wardly from center bearing in the
sequence as shown in Figure 52
After
type
cap bolts
securing bearing
tain that crankshaft turn
Rear
fi
0
liS
ll
D
ga
14
Fig 51 Main bearings
CD
@
J
m
L
D D D
113
112
III
EM159
30
ID
Front
ascer
smoothly
@
@
Fig 52 Torque sequence of cap bolts
@
60
BogiDe
Make
sure
that there exists proper end
cranksahft
play
at
Install side oil
cap Prior to
Crankshaft end
seals into
rear
installing applv
main
bearing
sealant to these
seals
play
Install
rear
oil
seal
tool
using special
Crankshaft Rear Oil Seal Drift STt5310000
Applv a lithium grease to sealing lip of oil
seal
0 0020 to 0 007t in
Install
rear end
plate
Install tlywheel securely
specitied torque
and
tighten
bolts to
Tightening torque
101 to 116 ft Ib
Fig 53 Checking crankshaft
end
Ij
play
Pi
r
ction
Fig 56 Installing piston rod assembly
Fig
54
Driving side oil seal
Fig 57 Piston ring direction
STl5310000
r
EM163
Ag 55 Installing
rear oil
seal
Fig 58 Installing connecting rod cap
31
Bngine
Insert pistons in
tool
pecial
corresponding cylinder using
Piston
or
Ring
Compres
EM03470000
Turn
crankshaft
T D C
on
Make
sure
until
Apply engine
Arrange
so
oil to
their
sliding parts
that the notch mark
that camshaft
piston
head faces to the front of engine
Install
piston rings
avoiding their fit in
pin directions
at 180
plate oblong
correct positions
When
on
piston
installing
all
sprocket location
aligned at
groove are
head
cylinder
make
valves
are
apart
from
rotate
crankshatl
and
Do
not
separately
because
Temporarily tighten
Tightening torque
Figure 60
lor Ll6
Tightening torque
23 to 28 ft lb
14 5ft lb
for LI8
Install
cranksahll
Note Make
Note
camshatl
valves will hit heads
two bolts 1
and
distributor
mating
marks of
sprocket
sure
that the
crankshaft sprocket faces to the front
bers face in the
Install
Big
end
same
direction
timing
chain
that there exists proper end play at
rod big end
play
0 0079 to 0 0118 in
Install
cylinder
Thoroughly
head
assembly
clean cvlinder block and head
sur
face
Do not
apply
sealant
to
any other part
cvlinder block and head surface
of
Fig 60 Tightening
f
sequence
J
L
@61
Oj
I
Fuel
o
1
2
Chain guide
I
eam
tensioner
Crank sprocket
s
earn
6
Chain uide
j
Fig 59 Checking big end play
pump drive
Chain
ID
32
of
2 shown in
Arrange connecting rods and con
necting rod caps so that the cylinder num
connecting
of
drive gear and fIt oil thrower
33 to 40 ft Ih
sure
sure
heads
pistons
Install connecting rod caps
Make
at
pistons
to each other
the thrust and
that
piston is
its compression stroke
notch and
Notes
1
No
Fig 61 Installing timing chain
sprocket
EM169
BDgine
Instal1 front
Notes
Make
sure
keys point
that crankshaft and camshaft
upwards
timing chain by making its mating
marks align with those of crankshaft
sprocket and camshaft sprocket at the
right hand side There are forty twa chain
links between twa mating marks of timing
adjusted When chain
elcessiveIy
adjust camshaft
No 2 hole is factary
stretches
sprocket
Use
a
at No 3 hole
set
Of timing marks and location
to
sealant
block and front
Figure
42
Apply
sealant
cover as
in
place
side of
front
gasket
cover
only
shown in
Install front
chain
gasket
Notes
Apply
Set
with
cover
ta
as
cylinder
shown in
the top of front
Figure 42
cover
with
head
gasket
in
place
Check
the
height
difference
between
cylinder block upper face and front cover
Its difference must be less
upper face
than 0 0059 in
hole numbers
Install chain
guide
to
cylinder
Nate
block
Install chain tensioner
Note
Adjust
sioner
Press
the
spindle
new
Apply
protrusion
of chain ten
to 0 in
replaced
cover
front
when front
types
of
bolts
are
a
cover
cover
is
grease
lithium
to
sealing lip of oil
seal
Tightening
oil seal in front
oil seal should be
different
that
used
torque
Size M8
10 3151
disassembled I
7 2 to 11 6 ft lb
Size M6
10 236 in
2 9 to 5 8 ft lb
Install
pression
pulley and water pump
piston at T D C on its com
crankshaft
then set
No
1
stroke
Crankshaft
pulley
nut
Fig 62 Installing chain tensioner
tightening torque
86 8 to 115 7 ft lb
EM 172
Fig 63 Installing runt
cover
Fig 64 Front
cover
bolts
33
r
BDgine
Finallv tighten
in
torque
tightening
Note that
head
three
sequence as
two
bolts to the
specitied
according to the
shown in Figure 60
steps
tvpes of bolts
are
8 0 to 10 8 ft lb
Notes
used
Assemble
Tightening torque
st
Tightening torque
oil
pump
and
making driving spindle
drive
pump hole
turn
t2H 9ft lb
Install oil pump
so that the
dle
2nd turn
together with drive spin
projection on its top is
4 ft lb
43
3rd turn
47 0 to 61 5 ft lb
Notes
41
Be
sure
After
to
tighten
two small bolts
has
engine
been
operated
for
several minutes if necessary retighten
Install oil
pump and distributor
dle into front
driving spin
E
67 Setting distributor driving spindle
EM175
Fig 65 Installing crankshaft pulley and water
8
LOO9
cover
Ftg
0
pump
o
A
0
A
0
B
B
0
B
0
8
0
o
A
B
O
0
A
Fig 68 Installing oil
pump
EM176
FIg 66 Cylinder head bolts
at
spindle
mark face to oil
Fig 69 Adjusting valve clearance
IDliD8
located in 11 25
tbe
smaUer
position At this time
shape will be placed
am
bow
toward the front
Do not
forget
to install
gasket
and
spacer
forget to
packings
spacer and block
Install
spacer and fuel pump
in criss
cross
performed
pattern and finally
thermostat
to install
and oil pan
Apply sealant to the step portions at four
mating surfaces as shown in Figure 44
Tightening
and
vacuum
housing thermostat and
positions Do not forget
to 4 3 to
gasket
Install rocker
cover
Note Bond
gasket
sealant
Then
cylinder
hea 1
Install
6 5 ft Ib torque
to rocker Cover
install
valve clearance to the
specitied
dimen
rocker
using
cover
to
spark plugs
Connect distributor to
Adjust
hose
water outlet in their
Notes
oil pan should be
pipes
pipes and hoses should be clamped
securely being careful not to allow them to in
terfere with adjacent or surrounding parts
instaU fuel pump
between
gasket
assembly and carburetor in
upward Tightening
All
inserted
Install oil strainer oil pan
Install carburetor
Install fuel
tightening torque
Note Do not
assembly
sulator with stamp facing
torque 3 6 to 7 2 ft lb
Install fuel pump water inlet elbow and front
engine slinger in their positions
Fuel pump
Install distributor
plug high
tension lead
wire
Hons
Install
Tightening torque
36 2 to
engine
mount
side
4 ft lb
43
Install clutch
assembly
Notes
First
clearance
set
to
the
cold
specifications
After
engine
has been assembled
run
it
finally adjust
warm specifications
for at least several minutes
the clearance to the
Install
rear
engine slinger
exhaust manifold
and intake manifold
Tightening torque
8 7 to 116 ft lb
Fig 70 Installing manitolds
L16 and LIB
Intake
0 2 0 0079
Exhaust
0 25 0 0098
Intake
0
25 0 0098
Exha1
Jsr
0
30 0 0118
Cold
Valve clearance
mm
in
Warm
bracket
on
left
hand
IDgiDe
Tightening torque
held within 0 315 to
8 7 to 15 9 ft lb
pressure is applied midway between
A pressed force is about 22 0 lb
Using
hoist
an
overhead
engine
hoist and
up away
from
lifting cable
engine stand and
then down onto
nator bracket
pulley
engine carrier Install alter
adjusting bar alternator fan
fan and fan belt in this order
check to be
sure
Then
that deflection of fan belt is
Install
engine
in when
472
0
mount bracket
right
thumb
pulleys
hand
oil
filter oil pressure switch oil level gauge and
water drain plug
When installing an oil
filter fasten it
cylinder
on
block
Note
Do not overtighten
Ieakage may occur
Pour engine oil up to specified
by
hand
filter
or
oil
level
OIL PUMP
Removal
Remove distributor
Drain engine oil
Remove front stabilizer
Remove
splash
Remove
oil
shield board
pump
body
with
drive
spindle
assembly
Fig
71
Installing clutch assembly
I
I
I
I
Front
ETOO7
Fig
72
Fig 74 Setting drive spindle
Fan belt tension
Pumch
mark
E LO 11
El009
Fig 73 Aligning punch mark and oil hole
38
Fog 75 Installing oil pump
BDgine
on
Installation
Before
installing
crankshaft
so
oil
pump
in
engine
turn
that No 1 piston is at T D C
top is located in
its
this
time
placed
the
11 25 a m
smaller
toward the front
bow
as
position
shape
will
shown in
at
be
Figure
74
Fill pump housing with engine oil then align
punch mark of spindle with hole in oil pump
as
shown in
Figure
73
Ascertain whether the engagement is order or
not by checking the top of spindle through
distributor
Using
drive
gasket
spindle assembly
a
new
pump and
that the projection
fitting
hole
install oil
so
Tighten
bolts
securing
oil pump to front
cover
1
B1ectrlcal IJStem
STARTER
Removal
40
40
CHARGING CIRCUIT DESCRIPTION
40
ALTERNATOR
41
Description
41
Removal
41
Installation
44
VOLTAGE REGULATOR
44
Description
44
Measure of Voltage
45
Adjustment
Charging Relay
47
48
ALTERNATOR
FUSES
FUSIBLE LINKS
49
EMISSION CONTROL DIAGRAMS
50
DISTRIBUTOR
52
Construction
52
Disassembly
Assembly
52
IGNITION COIL
53
56
Construction
56
Description
57
SPARK PLUGS
Description
Inspection
Cleaning and Regap
57
57
58
58
TROUBLE SHOOTING IGNITION
58
HEATER UNIT REMOVAL
59
TROUBLESHOOTING HEADLIGHT
TROUBLESHOOTING HORN
62
RADIO
63
RerilQyal
TROUBLESHOOTING
SPEEDOMETER
TROUBLESHOOTING HEATER
TROUBLESHOOTING RADIO
63
NOISE PREVENTION CHART
66
63
64
65
65
39
Ileetrical IJStem
STARTER
fJ
@
l
I
ShiflleYerpin
2
Gur
3
hilt
5
Shiftlcvcr
Dusl
switchAssy
Armature
8
Thrustw
9
Metal
Thrust
shcr
washer
II
shcr
Slopper
12
Pinion
opper
1
Pinion
COftr
7
10
13
ue
Masnetic
6
IS
tel
runDinSclutch
16
Field
coil
17
Yo
18
Brulfl
19
20
Broth
Brush
sprinS
21
Brush
holder Auy
22
Metal
23
Rear
2
Slopperelipe
e
EE007
over
Throush
bolt
76
Exploded view of starting motor
to
battery ground
cable
switch terminal
from
battery
to
cable
Disconnect black wire with
yellow
tracer from
and black battery
of magnetic
terminal
switch
Remove two bolts
gear
case
remove
securing starting motor to
assembly forward and
Pull starter
starting
@
@@@@
Removal
Disconnect
I
I
Fig
magnetic
L
Y@O
i
e1l
motor
operate all electrically operated units and
keep the battery fully charged
When
ignition
the
from
switch is
current
flows
through
the ignition switch
set
the
to
ON
battery
ground
voltage regulator
IG terminal primary side contact point PI
movable contact point P2 voltage regulator
F
terminal
alternator
coil and alternator
Figure
77
by
E
full line
to
F
terminal
terminal
arrow
as
ield
shown in
marks Then the
rotor in the alternator is excited On the other
Installation
charging circuit consists of the battery
regulator and necessary wiring to
alternator
connect
these
system is
parts
The
purpose
of this
to con vert mechanical energy from
the engine into electrical energy which is used
to
current
from
the
switch
CHARGING CIRCUIT DESCmPTION
The
flows
battery to
warning
ground through the ignition
lamp voltage regulator L terminal lamp
movable contact point
side contact point P4
P5
and voltage regulator E terminal as
shown by dotted line arrow marks Then the
warning lamp lights
hand
Installation is the reversal of removal
When
three
the
alternator
to
operate
phase alternating
alternating current is roc
the
by
positive and negative silicon
the stator coil This
tified
begins
current is induced in
IlectricalSptem
diodes
The
rectified
direct
reaches the alternator
On the other hand
reaches
N
and
of the output
voltage
minaI
shown in
terminals
N
terminal to
E
VCl
movable contact
point P5
voltage winding side
This
action
is excited and the
comes
causes
the full line
arrow
winding
creased
cessively
or
alternator
the
the
speed
voltage
movable
secondary
and alternator output voltage is
mediately This action causes
movable contact
P3
Thus the
contact
lIide contact
Then the rotor current is shut off
point
P2
rapid
P2
or
from
im
to separate
secondary
contact
vibration of the movable
breaking and completing
the rotor circuit maintains
put voltage
ased
decre
an
alternator out
constant
ALTERNATOR
circuit
marks
speed is increased or the
starts
to
rise
voltage
excessively the movable
contact
P2
is separated from the
point
side
contact
PI by the magnetic
primary
force of coil VC2 Therefore register Rl is
applied into the rotor circuit and output
voltage is decreased As the output voltage is
decreased the movable contact point P2 and
primary side contact PI comes into contact
once again
and the alternator voltage in
the rapid vibration of the
creases
Thus
movable contact point voltage constant
the
P3
point
into contact
When the alternator
When
into contact with
contact point P6
to turn off the warning
lamp and complete the voltage
by
comes
ter
ground through the coil VCI as
Figure 78 by the dotted line arrow
with
shown
point voltage
Inearly a half
and current flows from
voltage
marks Then the coil
as
output
E terminals
the neutral
E
regulator
or
current
A and
is
starts
contact
further
to
rise
point
in
ex
P2
Description
Alternator
Vehicle
510 and
LTl5005B
610 models
except for Canada
LTl60 19
SlOand610models
for Canada
LTl35 13B
620 model
Removal
Disconnect
negative battery
terminal
Disconnect two lead wires and connector from
alternator
r
I
I
t
T BlItt ry
1
I
I
t
I
r
i
J
J
Alternator
Voltage regulator
fig T7
Charging Circuit 1
tl
Ilectrical Sptem
r
itch
Ignition
r
ell
a
Btmery
8
Ii
T
c
0
5
0
i
2
E
r
o
I
S
l
E
Ii
t
Cl
J
Ln
Voltage regulator
Alternator
fig 78
Olarging Circuit 2
TROUBLE DIAGNOSES AND CORRECTIONS
Condition
Starting
ot
motor
wiD
operate
Probable
Discharged
batter
Starting motor
cranks slowly
or
Repair
Loose connections
Clean and
Defective
motor
Charge
Defective solenoid switch
of terminal
Defective brushes
Noisy starting
Corrective action
cause
Loose
startina
motor
securing bolt
replace battery
eplace
tighten
Replace
brushes
Remove
starting
and mab test
bolt
Tighten
Replace pinion
Poor lubrication
Fill in oil
Worn commutator
Disassemble
Worn brushes
Replace
Discharged battery
Charge
oose connection of terminal
l
Clean and
Worn brushes
Replace brushes
gear
motor
brushes
Or
Inspect
brushes
terminal
motor
Worn pinion gear
Locked
Olenoid switch
replace bartery
tighten terminal
brush
spring tension
or
repair brush
holder
Starting motor
uanks slowly
Dirty
or worn
Armature rubs
Defective
Starting
motor
operates but doe
not
rank engine
Starting motor will
not disengage even
ignition switch is
turned off
t2
Worn
field coil
solenoid switch
pinion
Locked
Worn
commutator
nd
epalf
Replace assembly
Repair or replace
switch
Replace pinion
pinion guide
Repair pinion guide
Replace ring
ringgur
Defective solenoid
Defective gear
Clean
switch
teeth
gear
Repair or replace
Replace
solenoid switch
defective gear
I1ectricalSptem
I
Pulley
2
Front
Slembly
Front bearing
4
Rotor
5
Rear bearing
6
Brush
1
RearcoVtr
8
Diode
Diode
9
10
IScmbly
sel
plate
aittmb y
over
h bolts
Throu
7
Rg 79
Exploded View of LT
150
58 LT 135 138
2
I
P
ssemb y
ulley
Front
over
J
Front
bearing
4
Rotor
5
Rear
6
t
J
bearin
7
Stator
Diode
8
Rear
9
set
pbtc
9
Brush
10
Diode
11
Through bolts
embly
embl
o
Rg
80
Exploded View of LT 160 19
a
Blectrical Sptem
3
Rg
B1
I
Fron
2
Rotor
4
5
Rear
J
Stalor
6
Enca
beuing
Pulley
Sectional View ot LT
d
diode
56 LT 135 136
150
@
5
Rear
Rotor
6
Brush
3
Startor
7
DiOde
4
Pulley
I
Front
bearinl
Flg 82
Loosen
adjusting
holder ssembly
eE121
Sectional View of L T 160 19
bolt
Installation
Installation is the reversal of removal
Remove alternator drive belt
Remove parts associated with alternator from
engine
Remove alternator from vehicle
VOLTAGE REGULATOR
Description
The
regulator
regulator and
basically
charge relay
consists
a
of
a
The
voltage
voltage
B1ectrical Iptem
VOLTAGE REGULATOR
of contact points a
lower set and upper set to control alternator
voltage An armature plate placed between
has two sets
regulator
the two sets
of contacts
downward
vibrates
or
complete
when closed
the
ground and
closed complete the
through a resistance
to
moves
upward
Measurement of
The lower contacts
the field circuit direct
field coil
is necessary to rotate
when
upper contacts
field circuit to
ground
produces
and
15 30Al
the
When the upper contacts
warning lamp goes
battery
with cables
charge relay is similar
voltage regulator
in construction to
closed
as
Check to be
as
are
engine
at
high speed
Connect DC voltmeter 05 30Vl
alternator output
The
VoItage
Regulator voltage is measured with regulator
assembled with alternator When measuring
voltage with regulator mounted on vehicle it
or
and
DC ammeter
resistor
0 25 ohms
shown
that all electrical loads such
sure
air conditioner radio etc
lamps
are
discon
nected
ignition
on
Before
starting engine
circuit
with
a
be
sure
and
minal of resistor 0 250
causes
violently
damaged
8
and
negative
side
Failure to follow this
terminal of ammeter
caution
to make short
cable between fuse side ter
needle
of ammeter to
reversely
resulting
swing
in
a
ammeter
Refer to the
regulator
following
chart to determine if
and relative parts
are
in
good
con
dition
Notes
a
Do
not
after
mediately
voltage im
measure
Do
driving
this
while
regulator is cold
Fig 83
View of Removing Cover
b To
measure
gradually
voltage raise engine speed
from
idling
to rated
speed
EEOSA
1
Point
10
Adjust pring
2
lower
II
Coil
3
ArmillurC
12
3mm O 11l11
4
Core
S
CnTl
1
Yoke
II
J
ap
lju
At
Lock
I
I
ifll pTin
rlnlE
2
n
dir
3
screw
p
Yoke
6
I
4
mm
0
1575
n
di
Crew
cw
14
Conlact
15
Upper
set
nber
a
Corutruction of
Armature
5
Core gap
6
Yoke gap
7
Yoke
8
Adju
Ag
e
Lock
Ul
II
Adjust spring
12
Coil
J3
3mmlO lJ81
n
di
n
di
screw
14
4mm
0 1575
w
IS
w
ting
Vultage egulator
ollag relU14tOT
84
CI
Cting
ConM
4
9
ul
10
Pointglp
Cliugc day
b
Contact
Uction
COfUt
set
of chart rrlay
Structural View
tI
IlectricallJStem
GENERATOR
A
CONNECTOR
E
WI RE HARNESS
Short
ircuit h
between
fuse side terminel and H
terminal of
before
ammeter
starting the operation
BATTERY
RESISTOR FOR
IDA
Rg 85
After
IJOV
Measuring Regulator Voltage with Regulator
I
Start
2
Rotate
engine
ngine
at
racing for several minutes ammeter reading
Afler
to
see
for several minutes
racing
Fully charged battery
I
ammeter
SA
reading
over
FuUy charged battery available
I
Replace with fuUy charged battery
Check
Vehicle
on
2 500 rpm for several minutes
below SA
2
V
VOLTMETER
MEASUREMENT AMMETER
Connect
a
not available
0 25 ohm resistor in series
if current falls below SA
1
I
Current falls below SA
Current does
nol
Recharge battery
fall below SA
and
see
if current falls below
SA
T
I
Reduce
engine speed to idling and then raise it
to
2
500 rpm while observing needle of voltmeter
1
I
Needle of voltmeter
held within limits shown in the below
of voltmeter out of limits shown in
following chart
Needle
table
lhe
Regulator functioning properly
Regulator
ou
or order
authoriled shop
Have it
repaired
at
llectrical
Iptem
Regulator model TLlZ 57 and TLlZ S8 HITACHI
Temperature oc oF
to
Volta ge V
75 to
14
14 60 to 15 60
0 32
10
50
20
6S
30
86
15 75
14
14 45 to 15 45
30
14
to
14 15
14 00
104
40
15 30
to
15 15
to
15 00
may be approx 0 3 V higber
the
rated
for two to three minutes af
than
Voltage
c
engine is started or more specifically
regulator becomes self heated
ter
when
should
Measurements
within
when
or
then
minute after
one
regulator
be
made
starting engine
is cold
regulator is of a temperature com
pensating type Before measuring voltage
d The
be
sure
to
tem
surrounding
measure
perature and correct measurements
cording to the table in the left hand side
ac
Ag 86
1
Contact set
2
Thickness gauge
3
4mm
4
CIOsshead screwdriver
O
1575in
dia
screw
Adjusting Core Gap
Adjustment
As the result of above measurement
when
regulating voltage is deviated from rated
value adjust regulator in accordance with the
following instructions
Inspect contact surface and if rough
lightly polish surface with fine emery paper
1
500
or
600
EE057
Measure each gap and adjust if necessary
Adjust core gap and point gap in that order
2
No
adjustment
3
Adjusting
Loosen
screw
is
core
4
which is used to
and
move
properly
4
required
for
yoke
secure
contact
contact set
or
on
yoke
3 mm
to secure upper contact
Ag
m
and
diameter used
move
dia
3
Crosshead screwdriver
4
Upper
contact
Adjusting Point Gap
upward
Figure 87
tact
0 1181
gauge
0 1181 in
downward
See Figure 86
screw
mm
screw
Adjusting point gap
Loosen
3
diameter
0 1575 in
upward
Thickness
2
gap
gap
mm
I
upper
con
5
or
downward
adequately
See
Adjusting voltage
Adjust regulating voltage
as
follows
II
lIeetricalSptem
Loosen
screw
terclockwise
See
Figure
securing adjusting
nut
lock
Turn this
clockwise to increase
to decrease
screw
or coun
regulating voltage
88
Charging relay
Normal relay operating voltage
is 8 to 10V
A terminal
measured at alternator
EE058
as
U
I
Wrench
2
Cro
3
Adjusting
4
Lock
it
Relay
self however operates at 4 to 5V
Use
a
DC voltmeter and set up
shown in
a
circuit
Fig 88
Connect
positive
screwdriver
screw
nut
as
Figure 89
l
ead
tenninal of voltmeter
lead
regulator
to
Adjusting Regulating Voltage
N
connector
terminal with negative terminal
grounded
Starl
3
engine
od
Take voltmeter
keep it idle
reading
aVail
l
Check
tween
fm
N
Over 5 2 Volts
Below 5 2 Volts
ntinuity
terminals
b
Pilot
of
lamp
gulator and alternator
If
Alternator circuit defective
od
lamp emainslit
lamp relay Oil
points Qui of rdef
Replace
1tregulor
remains lit
Pilot
Check fan belt tension
l
adjust
reet
as
remove
Pilot
egulator
necessary
ontact
if continuity exists
Over 5 2 Valls
Pilot
Pilot
does 001 lit
lamp
lamp clay assembly
TROUBLE DIAGNOSES AND CORRECTIONS
Condition
No
output
Probable
Correct
Dirty brushes
Qean
Loose connections
or
broken leads
Replace
rotor
Replace
diodes
Replace
rotor
rotor
Open
diodes
Shorted rotor
Grounded
BAT
Broken ran belt
t8
Repair
stator
terminaL
and brush
Retighten orsolder connections
Replace leads if ecessary
winding
Open
Shorted
replace brushes
Repair
stator
alternator
or
winding
Open
odition
CorrectiYe action
cause
slip rings
good
Including
Sticking brushes
and
is in
or
or
replace
replace
Replace insulator
Replace belt
stator
stator
springs
IlectrieallJStem
Excessive
Broken
Otltput
Replace
neutral wire color of wire is whitt
Poor
grounding
regula
tor
regulator operation
replace as required
and voltage
of alternator
Retighten terminal
Loose
output
or worn
Sticking
and
repair
or
connection
terminal
E
Replace
Broken ground wire color of wire is black
Low
wire
Check
Defective voltage regulator
wire
Retighten
fan belt
Correct
brushes
or
or
replace
belt
replace brushes
and
springs
if
and
repair
or
necessary
Low
Replace
brush spring tension
Partial
egulator operation
replace as required
Clean
ngs
short
springs
Check
Defective voltage regulator
Dirty slip
brush
ground
or
open
stator
Replace
stator
winding
Replace
rotor
Replace
diode
in
winding
Partially shorted
Open
Noisy
alternator
Loose
or
or
grounded
rotor
defective diode
Retighten mounting bolts
mounting
Loose drive
Defective
Retighten pulley correctly
puUey
Replace bearing
ball bearing
Improperly
Seat brushes
seated brushes
Fuses and Fusible Links
Alternator
Iu
tIi
E
M
P
r
re
N
r
N
tor
O
lp
correctly
t@C
wt
La
Qo
Lou
t
ftlor
br
A
p
1
Mitllubillhi
2 500
24
2 SOO
24 5
215@
5
AS203Al
L320
LS20
L521
PL521
PUlO
Engine compartment
ight
WPLSIO
R
Mit lbishi
AC1lli I2X2H
LOO
Engine compartment
riht fender well
high temp
U20
Mitsubishi
AS2030A2
LIB
Hitachi
41
LTl30
24
1
AI2
2 500
23
SPL3II
SHL3ll
Inside
500
22
L8ll0
KLBllO
Under instrumfttt panel
ight of steering column
HLSJO
Under
Hitachi
LTl45 35
2
500
5 000
45
34
Hitachi
LTl35 05
2 500
5 000
24
33
glove
nt
lmpa
c
sh tray
console
battery
alternA tor
Between
and
At alternator
at starter
Morethan
41
IlectricalSptem
EMISSION CONTROL DIAGRAMS
IGNITION KEY
TO
TJlIIUTO
OI
IGNmClC COIL
no
DUAL PenNY
OlSTRI8UTOII
I
NEUTRAl QEAfl SWITQt
ANCED
UlCER
RETARDED
BREAKER
I
CLUTOt PEDAL
CARSURfTDR
LENOID
lr
MTCH DETECTING CLOSE THIIOTTLE IlO5lnON
Datsun emission control system manual transmission
IGNITION WITOI
TO
ICHITlON
BATTERY
l
OISTRIJUTOfI
COIL
DUAL IIOINT
OISTRI8UTOII
AUTOMATIC
TRANSMISSION
TAROED
R
Pat
KE
swtTQt DETlCTING
nfROTTU
DI
CftN
POSlnON
SWITCH DETECTING CL
CIS
THROTTLE POSITION
Datsun emission control system with automatic transmission
50
IIectricalSptem
1
FROM
CARBURETOR
AIR CLEANER
FROM
FUEL TANK
2
TO
CllAHKCAlI
VAPOR VENT LINE
FLOW GUIDE VALVE
v lv
opan
when the pr
Ie
Ie over 0 4 in Hg
The
CV
lIE
FUEL TANK
Datsun evaporative emission control system
51
IIectricalSpt
Battery
I
ReslSlor
To starter
C
Retarded
breaker
P
point
Rotor bead
Coo
L
1
n
DiStri
Fig 89
IO
Ignition Systems Circuit Diagram
DISTRIBUTOR
CONSTRUCTION
Distributor model
Applied engine
0410 66A
LIS
0410 67
LI 6
The distributor for L1G and LIS
two breaker
other with
Figure
points
a phase
engines has
opposite to each
located
difference
as
External View of Distributor
shown in
90
The distributor follows the conventional de
The difference in
turning
fig 90
the
phase can
adjusting screw
be
adjusted by
sign except for the dual points i e
plate with contact points centrifugal
mechanism
A
phase
difference of 70 crank
ted Two breaker
points
is
adop
which consists of ad
and retard breakers
vance
angles
are
a1Iel with each other in the
placed
relay
12
unit
drive shaft
92 and 93 show
retard
breaker
switched
is
point
OFF
point
primary ignition
ON
works
and
works when the
See
Fig
91
an
and
exploded
view of the unit
Disassembly
To disassemble follow the below
breaker
ched
vacuum
Figures
in par
circuit
The
rotor
breaker
advance
when the
the
advance
relay
is swit
procedure
Take off cap and disconnect rotor head
Remove
vacuum
controller
Remove contact set
I1ectrical Iptem
Unscrew two contact breaker set
remove
Pull
contact breaker
knock
remove
pin
screws
and
When
assembly
and disconnect collar to
out
is to be removed
screw
since
screw
to
across
the entire rotating parts
cam
hold
can
head
cam
and
cam
bination
shaft
is
down
shaft
so
be restored at
first
Put
apply
set
the
by
matih mark
original
assembly
that
When governor weight and spring
nected be careful not to stretch
governor spring
After disassembling
remove
fastened
com
are
discon
or
deform
grease to governor
weights
Assembly
Assemblv
can
be made in
reverse
sequence of
for
101
Refer
to
Figure
disassembly
replacement and reassembly of
spring and cam
assembling distributor use caution
head positioning tip at cam is
hook side
governor spring circular
In
1
Advanced breaker
2
3
FIg
91
rded breaker
Ret
Phase difft
governor
rotor
point
pomt
rence
so
that
set
on
for governor spring A with
circular hook comes in long rectangular hole
Then
External View of Dual Points
weight pin
l
1
Center carbon
4
Condenser
7
Governor weight
2
Rotor head
S
Shaft
8
Cap
3
Breaker plate Contact
6
Hou ing
9
Side plug
Rg 92
Construction
13
I
iE1
asembly asembly
set
asembly
asembly
Shaft Colar Cam
J
23
set
weight spring
asembly
a
s
e
m
b
l
y
asembly asembly asembly control asembly apoisemblny t asembly point embly point asembly point asembly
head
Advanced plate Bolt Retard wiLearde Advance wire Retard wiEarrteh
point
cap
as
set
Governo Governo Screw Rot r Breakr Contac Conectr Vacum Screw Condesr Screw Distrbuo Carbon Fixng Condesr
for
4 5678 9
10 II 12 13
14 15 16 17 18 19
for
Screw
20 21
for
Lead for
22
23
Distrbuo
of
1
Compnets
i
I
I
7iJ
93
o
Flg
4
IlectricalSJStem
4
EE07D
Fig 94
EE074
Fig
Disassembling Vacuum Controller
Removing Rotation Parts
98
EE075
Fig 95
Removing Carn
Fig 99
Unscrewing Breaker Sets Screws
Q
s
b
i
EE141
Ag 96
Removing Contact Breaker
Fog 100
Exploded View
Also check
spring
A
is
to
be
in
sure
slit
in
that
cam
clearance between the two at
end of governor
EE073
Fig fJ11
Removing Knock Pin
operation
weight pin on opposite
rectangular hole
Meanwhile
in short
weight pin on
plate with a
beginning and
side comes
5
B1ectricalSptem
5
1
Shaft
enter
2
I
Governor
2
Clearance fOl
Ieighl
slart
end of advancin
6
Rectangular hook
printt R
am
plate
Weight pin
7
Circular hook
8
Gm
9
Rotor
3
Governor
4
5
EE071
Ag 101
and
angle
spring A
positioning tip
ernuT
Setting Governor s Spring and earn
IGNITION COIL
1
2
CD
4
@
l rillliJr
J
Sl
ndary
l
lnitlal
1
Tmin
It
Jp
C
@
@
EE143
Fig l02 Construction
18
4
Sprln
5
Side
h
Primary
7
S
8
In uhllllr HI
9
l
III
dar
n
nlcr
III
Segment
II
Case
il
IIectricalSJStem
It does not leave clearance either at the start
and end of advancing
check to be
With unit assembled
driven slit and rotor position tip 9
the same direction See Figure 101
After
before
assembly
installing
check
it
on
operation
engine
Ignition timing should
mounted on engine
be
sure
are
that
set in
ignition coil circuit helps
produce strong sparks from starting to
high speed full power operation
The resistor in the
The internal resistor limits to
safe flow of the primary
of governor
tested with
unit
current
a
maximum
through
coil and distributor contact points
the
Thus
it
protects the contact points during slow speed
operation when they are closed for long inter
vals
The
ignition
dled
as
a
coil and resistor should be han
matched set
IGNITION COIL
Description
The
ignition
nition coil
coil is of
case
good insulating
an
oil filled type The ig
which has
is filled with oil
and
heat
radiating
teristics
Description
greater ratio between
the primary and secondary windings to step
The
ignition
SPARK PLUGS
charac
coil has
a
The
spark
plugs
are
of the resistor type
up the
having 0 551 in threads and 0 0276 to 0 0315
in gap The inspection and cleaning should be
cause
made every suitable maintenance
battery voltage to the high voltage to
stronger sparks to jump the spark plug
gap
necessary
The cap is made of alkyd resin which offers
high resistance to electric arc and increased
Note
engine
insulation
number of heat range
i
All
spark
plugs
must be of the
If
installed
same
on
an
brand and
l
Carbon
Normal
period
replace
fould
Life
Overheating
Fig 103 Spark Plugs
17
IlectricalSptem
fuel pump pressure
Inspection
Remove spark plug
wire
by pulling
on
hotter
boot
not on wire itself
Remove
It is advisable to
Check electrodes and
inner and outer por
celains of plugs noting the type of
and the degree of electrode erosion
Brown to
electrode
slight
plug heat
grayish
tan
indicate
wear
After
cleaning
deposits and
spark
correct
gap to
specification
Install
spark plugs
Connect
the
and
insulator
on
electrode
speed driving
nition too rich fuel mixture
were
mostly
city weak ig
dirty air cleaner
parallel
Set
and torque each
It is advisable to
replace
with
spark plug
plug
to 11
blast
type
deposits
wires
a
sand
plugs having
A void excessive
show excessive
oil entrance into combustion chamber
through
pistons or excessive clearance
between valve guides and stems If the same
condition remains after repair use a hotter
plug
worn
and
rings
White
Overheating
or
light
gray insulator
bluish
gray brown spots and
burnt electrodes indicate engine overheating
Moreover the appearance results from in
with black
correct
or
ignition timing
loose
spark plugs
low
Fig 104 Selling Spark Plug Gap
TROUBLE SHOOTING IGNITION
Spark length
No
sparks at
all
Trouble location
Distributor
Causes
Remedies
of lead wire
low tension
Defective insulation of cap and
Point does
19nition coil
High
I
to
2
mm
irregular
18
0 0394
0 0787 in
or
tension cable
Distributor
Replace
Defective insulation of condenser
Breakage
to
small
blasting Clean and
but do not
remove carbon or oxide deposits
If deposits are too stub
wear away porcelain
born discard plugs
cleaner
hotter heat range
Wet black
spark pi ug
Cleaning and Regap
Clean spark plugs in
in
etc
Oil fouled
a
to 15 ft lb
Dry fluffy carbon deposits
slow
plugs having
dress electrodes with
and side electrodes in
range
by
with
replace
fine file to flatten the surfaces of both center
deposits
Carbon fouled
caused
a
colder heat range
spark plugs
Normal
plug
wrong selection of fuel
etc
at
open
Wire
breakage
short
Wire
coming off
ide
rotor
close
cuit of coil
head
Repair
Replace
Repair
Replace with new
Repair
Defective insulation
Replace
Point gap
Correcl
Oil
too
sticking
Point burnt
wide
on
point
too
much
Clean
Replace
ne
IlectricalSpt
T
ublt
Less than 6
mm
Trouble location
Cause
Spark plugs
Electrode gap
0 2362 in
Distributor
Correct
Broken neck of insulator
Replace
of
life
plug
leak of
eplace
replace
Clean
Correct
gap
electricity
of cap and
olor
head
Repair or replace
Defective insulation of condenser
Replace
Defective
arm
Oil shaft
Defective
spring of
Breakage
High tension code
or
Replace
Dirty point
il
or
Clean
Improper point
Ignitjo
wide
Too much carbon
Expiry
Engine misses
too
Remedies
rm
Replace assembly
of lead wire
Replace
Worn
out
or
shaky breahr plate
Worn
out
or
shaky
Layer
short circuit
Deterioration
f
Replace assembly
distributor shaft
of oferior
or
insulation
and
Replace assembly
quality
Replace
leak
Replace
of
with good
one
electricity
Spark plugs
Clean
Dirty
Leak
of
electricity
at
upper
porcelain
Repair
or
replace
nsulater
Engine causes
knocking very
Distributor
Improper
Coming
often
A
pin
and advance
off
or a
or
Correct the
timing
breakage
of governor
hole of governor
spring
portion
worn
Correct
or
fitting
replace
Replace
out
Engine does not
give enough
Spark plugs
Burnt
Distributor
Improper
too
much
and
Replace
etarded
Correct the
timing
Replace assembly
Dirty point
Clean
power
Point gap
After
cleaning spark plugs
renew
too
Correct
narrow
Clean
Dirty
Spark plugs
firing
sur
Disconnect connector of heater to
face of electrodes with file mentioned above
Then gap spark plugs to 0 0276 to 0 0315 in
hot water
round wire feeler
gauge All spark
new
or
used should have the
gap
checked
and
reset
by
Remove defroster hose
using
plugs
a
bending
electrode
fitting
Defective function of governor
ground
engine
well
pipe
Disconnect connector motor
Remove the two heater control wires at heater
unit
HEATER UNIT REMOVAL
Remove the four bolts and take out ventilator
Remove the four heater unit
Drain out coolant
fixing
bolts and
detach heater unit
18
syste1ll
J
uJ
a
E
t03
2
t
1
A
3
8
h
s
ii5
o
J
t
tD
3
0
ft
I
d
I
Ii
C
El
Ira
11
1
111
I
II
II
lU1
oo
7J
11
HP
IS
I
JI
III
l t
q
J
1 1
1
1
I
II
i
l
II
0
l
c
I i ti
1
lr
I
l
t
L
l
f
l
Ii
II
E
ilt
1
l II
1 I
il
1J lc
INi
I
II
ii
II
o
c
E
z
I
i
c
l
t
J2l
1
c
f
r
dJ
J
11 I
I III
W
r
0
T
J
I
Ii
I
I
l
il
o
1
e
rs
E
is
C
i
I l III
Xrf
Ii
rt
Ii i
IC
I
0
A
III
lW
I
l
1t
I IIiI
1 C
1
Itti1nT
I
Q
1
11
I
I
c
o
J
r
l
ir
II
lI
I
1
1
u
I
fiF
III r
lli
nnmm
m
1 Ii
i
s
Ti
f
i
I
@ s3iiLI
m
I
J SI
I
C
I
yl
nIII
1
J lJ
r
fuoO
i
r
II
4
lll
C
L
il
I
l
i
O
Wt
0
r
Ji3r
c
J
I
ll
l
F
J
r
r
e
o
I
it 111
t
I
0
hill IF
u
5
I
aft
IleCtricalSystem
Q
0
8
iii
P
1
aa
o
8
CD
a
1J
t
c
1l
g
c
o
E
c
E
l
E
a
c
cS
z
a
c
1
E
is
rraa 1
8
Il
dl
It
ir
t
g
lf1l
or
81
B1ectrical SpteJD
TROUBLE SHOOTING HEADLIGHT
Condition
lamps
Head
engine
shut
Probable
dim
idling
off
Corrective action
cause
Partly discharged battery
Charge battery
Defective cells in
Replace battery
or
High
battery
resistance in
light
Check
circuit
head
lamp
Make necessary
Faulty sealed beam units
Head
lamps
dim
istance
High
light
ci rcuit
lighting
Check
ground
sealed beam units
Faulty voltage
Replace sealed beam units
control unit
Test
voltage
control and
Make necessary
Loose
connections
wires in
lighting
or
damaged
ircuit
Light wiring nsulation damaged
producing momentary short
Lights
burn
cut
frequently
includ
circuit
connection
Make necessary repairs
Faulty
flicker
repairs
Replace sealed beam units
engine
running
above idle
Lights
including
circuit
connection
ground
oltage regulator setting
High
Loose
cOIUlections
in
Tighten connections
damag d wiring
Check
generator
repairs
and
check
for
light wiring and replace
or
tape damaged wires
Adjust voltage regulator
lighting
Check
circuitCor loose connections
circuit
LIght
will
not
Discharged battery
Recharge
light
battery
and
correct
cause
Loose
connections
in
lighting
Tighten
connections
Replace
bulbs
circuit
Burned out bulbs
Open
ing
or
not
lamps
light
will
or
sealed beam
unit
Replace lighting switch
switch
Open
Slop
corroded contacts in light
or
corroded contacts
signal
and
Switch
faulty
Wires
broken
in turn
switches
lighting
Replace
Replace
disconnected
turn
signal
and lighting
switches
or
switch
Make necessary repairs
loose
Bulb burned out
Loose connection
od
Replace
or
poorly ground
lamp body
82
Faulty n
sher unit
Burned out
that side
parking
Tighten loose connectIon
perly ground tamp body
or
pro
Check for shorts and replace fuse
Burned out fuse
Turning
signal
lamps light with
out btinklng
bulb
Replace flasher unIt
or
tail lamp
on
Replace
bulb
IIectricalSJStem
Blinking
on
Loose contact of bulb
one
Make necessary
repair
side too fast
of bulb
Improper capacity
Turn
indicator
lever
does
return
automati
mechanism
Faulty
not
of
Replace bulb
turn
signal
Replace with
new
parts
switch
cally
TROUBLE SHOOTING HORN
Condition
Probable
Horn does not
F
operate
burned
Improper
Dead
Replace
mtaet uf horn bulton
mtaet of
Repair
ch terminal
or
replace harness
Correct each terminal
battery
Improper
fuse
Check and repair horn button
f harness
Open circuit
Improper
Corrective action
cause
ut
yharge battery
contact
of
horn
Correct
relay
point
Open circuit
or
rong
nection of horn interior
Wear of horn
Low volume
Improper
improper tone
nector
ground
coo
Replace
point
contact
of fuse
contact of horn
Wear of horn
Crack in
repair horn
Adjust adjusting
or
Correct
000
Open circuit of harness
Improper
or
screw
contact
Repair
Correct horn
point
point
point
Adjust adjusting
diaphragm
Rephlce
screw
horn
RADIO
Removal
HORN RELAY
Disconnect all connections
1 i
z
z
g
ii
I8
i
2
lI
2
L
BATTERY
I
i
i
J
Remove
COIL
IOINT
Remove
knob
and
volume
control
ashtray
Remove cluster lid
lid
Ag 107 Horn Relay Wiring
tuning
knob
fixing
by unscrewing
four cluster
screws
Separate cluster lid finisher
by unscrewing lock nuts
board and radio
83
B1ectrical Spt
m
TROUBLE SHOOTING SPEEDOMETER
Condition
Probable
Speedometer does
Improper
Dot
cable union nut
operate
setting
Corrective action
cause
of
speedometer
Broken
speedometer
cable
Broken
speedometer drive gears
Defective speedometer
Swing
of
pointer
Excessive bend in
Correct
setting
Replace
cable
Replace
meter
Replace
meter
Correct cable
speedometer
installation
place cable
Broken
speedometer
Defective
f
Unsteady pointer
Improper
Replace speedometer
drive gear
speedometer
setting
of
Replace speedometer
speedometer
Correct
setting
cable
cable union nut
Defective
speedometer cable
Replace
Defective
speedometer
Replace speedometer
Excessive
Strange sound
eyncbronized
witbrunning
speed
bend
lack of lubricant
Replace
or
lubricate cable
and twist of meter cable inner wire
Defective
speedometer
Replace speedometer
Inaccurate
Replace speedometer
indication of
pointer
Defective
Improper
odometer
third gears in
gearing of second
speedometer
and
Improper feed caused by deforma
tion of pinion carrier
ry
1
Replace speedometer
1
Cil
@
@f
fig 108 Heater System
84
Replace speedometer
or
re
IIectricalSpteJD
TROUBLE SHOOTING HEATER
Condition
Probable
Corrective action
cause
Hot air does not
out
come
Motor does
not
operate
short
Open or
harness
circuit
of
feed
Check and
repair wiring harness
Defective switch
Replace switch
Defective motor
Replace motor
Fin is
Clean fin
Fan cannot be
rotated
smoothly by
hand
Hot air does
Dot
come
out
clogged
Slow rotation of fan
Replace
Looseness of fan
Repai r
motor
lesfJ
although
fan is
rotating
Air
stallation
temperature
is low
Hot wate r
Defective water pump
Repair water pump
does not
circulate
or
Bending
clogging
Check
or
clean
piping
hose
Defective
Water tem
of connectir g
hot water cock
Repair
Air is left in the hose
Purge
Defective thermostat
Replace thermostat
Defective water hose
Replace
Loose
Retighten
air out of hose
perature is
low
Water
rom
leakage
water hose
heater
clipping
Defective
of water hose
cylinder head gasket
Improper soldering of
Defective
Defroster
defroster
Vibrating
Bend
noise
or
heater
core
hose is removed
Looseness
leaking position
Correct
BUpport
of each fixing
Solder
Correct connection
break of defroster hose
Looseness of heater
clip
Replace gasket
or
replace
Tighten completely
Retighten each
screw
screw
TROUBLE SHOOTING RADIO
Condition
Pilot
not
lamp does
light when
switch is
on
Probable
Melt
Corrective action
cause
away fuse
Improper
Replace
connection
of
cable
or
Inspect and tighten
connector
Broken
Pilot lamp lights
does
but sound
not come out
pilot lamp
Replace
Improper
switch
Improper
connection
of antenna
Tighten
Improper
connection
of speaker
Tighten
Improper
circuit
operation
of radio itself
Repair
or
replace
Consult Service Shop of radio
manufacturer
85
B1ectrical I
em
NOISE PREVENTION CHART
Condition
Apparent
Repair
cause
Ignition system
Noise
with
present synchronized
engine revolution
High
tension cord
Ignition coil
Do not worry
about high tension cord
because anti noise cable is uBed
Keep
choke
wire
far
P08
coil
as
Set
0 5
IJ
a8
F
If
from
ignition
condenser at primary side
B terminal of
Note
away
l
f
ignition
coil
6
COI
the
is set at
ondary or
primbraker
p
engine will not
Connect with bond wire
between engine
and ignition coil locating
Secure
Distributor
side
area
of
body
ground of ignition coil
Secure contact
of carbon electric pole
and rotor
Eliminate excessive tips at rotor pole
or
cap pole scrubbing by driver
Check
veen
bet
stagger
rotor
and
starter
Charging system
Sound
of alternating current
Alternator
Set
0 5
F
Note
00 not add
If
more
nator
hen pressing down
leasing accelerator
noise
88
present
condenser
at
charging
terminal A
present
or
re
pedal
Regulator
Set 0 5
F
mote
condan
conden
coil
r
is added
alter
will be broken
condenser at
B
terminal of voltage regulator
or
Bat
Fuel Sptem
AIR CLEANER ELEMENT
68
AUTOMATIC TEMPERATURE
CONTROL AIR CLEANER
AIR CONTROL VALVE
Idle
Compensator
TEMPERATURE SENSOR
68
68
69
69
Removal
69
Installation
69
FUEL PUMP
Removal and
69
Disassembly
Inspection
Assembly
CARBURETOR
69
70
70
73
Removal
73
Disassembly
73
Float Chamber
74
ANTI DIESEUNG SOLENOID
74
Removal
74
Installation
74
BOOST CONTROLLED
DECELERATION DEVICE
Assembly and Installation
Cleaning and Inspection
JETS
74
74
74
75
81
raelSpt
AIR CLEANER ELEMENT
ThE air cleaner element is of
type and does
not
require
When the temperature of suction air around
the sensor reaches 37SC IIOOF or above
viscous paper
any cleaning until
a
the
sensor
actuates to
open the air control
When the temperature of suction air
around the sensor further rises and reaches
valve
replacement
lote
Do
before
not
brush
replacement
blast
or
element
above
480C
11S0Fl
the
control valve
air
completely opens
prevent the entrance of
hot air and allows under hood air alone to be
to
AUTOMATIC TEMPERATURE
CONTROL AIR CLEANER
The
temperature
cleaner is provided with a temperature
and
a vacuum
introduced into the carburetor
control
automatic
operated
valve The
air
See
Figure
111
sensor
AIR CONTROL VALVE
vacuum ac
ted upon the air control valve is controlled
the sensor See Figure 109
by
The
air control
described
If the temperature of suction air is low when
the engine is running the air control valve
s
i
c
n
valve acts
previously
ir a
IL
in
the
manner
and the temperature of
e
h sensor is always kept
at about 430C II 10oFl
closes the underhood air inlet and introduces
hot air
through
the
cover
the exhaust manifold
When the
which is installed on
See
Figure
is
engine
operating
fully
load the air control valve
110l
I
Air nlet
2
Vacuum
3
Temperature
Hot
rpipe
4
@
Ml
EC
5
Air
6
Idle
under
heavy
opens the un
pipe
molor
ntrol
s
y
censor
ass y
alve
compresalor
Rg l09 Automatic Temperature Control Air Cleaner
To manifold
I
3
Diaphragmspring
4
Diaphragm
5
Vacuum hose
6
Air bleed valve
Partwly
Hot
Hg
l10
inlet
I
Air
2
Air control
pipe
Hot Air Delivery Mold
Operation
open
7
Hot air
8
Temperature
ly
pipe
censor
ECOO7
During Cold Engine
I
Airinlclpipe
2
Air
3
Diaphrapn prins
Diaphrqrn
4
5
6
Air
7
fully open
Hot
PJPC
8
Temperature
ntrolvalvc
Vacuum hoses
fig 111
Underhood Air
b1cedvahrc
llsor
K
b1
Delivery
Engine Operation
ECOOB
Mold
lOuring
Hot
FuelSptem
derhood air inlet to obtain full power
dless ofthe temperature around sensor
regar
This control
of carburetor air temperatures
allows leaner carburetor calibration with ac
companying
reduced emissions than
Note Use
care
not to
damage
Connect hoses to their proper
Figure 115
conven
sensor
positions
See
FUEL PUMP
tional controls and also eliminates carburetor
icing
Removal and
Remove
Idle
Compensator
of the mixture
enriching
idle temperatures
temperatures
are
as
a
result of
Disassembly
assembly by unscrewing
pump
mounting
following order
two
The idle compensator is essentially ather
mostatic valve to compensate for excessive
fuel
nuts
and disassemble in the
high
When the under the hood
high
the bimetal located in
the air cleaner is heated
by
intake hot air and
Catch
ad hesivc
4
Hose
5 Tab
6 CHp
0 055 in dia orifice compensates for the
increased richness of into the intake manifold
mm
and the air fuel mixture in order to maintain
engine operation
Pipe
2
3 Fixed with
lifts the valve to open This pennits additional
fresh air that is properly calibrated by the 1 4
smooth idle
1
7 GaSket
Ag 112 Removal 01 Sensor
The idle compensator thermostatic valve par
tially opens at 650C l490F and fully opens
at 750C
l670F
Never attempt to disassemble this unit since
it is sealed for tightness and properly adjusted
for valve
timing
TEMPERATURE SENSOR
Removal
Flatten tabs of clip with
pliers
Ag 113 Installing Sensor
Pull off hoses
Note
Note
the
respective positions
they were removed
and clip
of
hoses from which
Take off sensor
Installation
Install
and
sensor
proper positions See
Insert
correct
See
clip Be
position
Fig
Press fit
tabs
gasket assembly
Figure 113
sure
in
Fig
to
hold
sensor
113 to avoid
In
the
at
its
damage
114
clips
into
pipe
while
straightening
Ag
114
Inserting Clip
81
aelSpteI l
l
Separate upper body and
screwing body set screws
Take off cap and cap
lower
body by
gasket by removing
un
cap
this
during
operation
diaphragm or oil seal
Drive out rocker
arm
not
damage
to
pin by using
a
press
or
hammer
screws
Unscrew elbow and connector
Inspection
Take off valve retainer
valve
retainer
easily
removed
To
remove
against spring
down
and
screws
diaphragm
force
by unscrewing
two
valves
two
press down its center
With
diaphragm pressed
pull rod touches
tilt it until the end of
the inner
wall
diaphragm
to
of
body Then release the
push rod Use care
unhook
Check upper
body
and lower body for cracks
are
Check val ve
for
valve
valve
assembly
spring Blow
wear on
valve and
assembly
with
breath to examine its function
Check
diaphragm
for small
holes
cracks
or
at the
portion
in
wear
Check rocker
arm
for
wear
contact with camshaft
Check rocker
may cause
Check all
malities
oil
pin
leakage
arm
for
wear
other components
replace with
and
A
worn
pm
for any abnor
new
parts if
necessary
Assembly
Reverse the order of
serve
Use
Ag 115 Connecting Hoses
1
OutIetvalve
2
Diaphragm
Diaphragm spring
3
4
Inlet valve
5
Rocker
the
new
following
gaskets
arm
fig 116 Schematic View ot Fuel Pump
70
disassembly Closely
instructions
ob
uelSJStem
Lubricate rocker
rocker
arm
rocker
arm
arm
link
and
pin before installation
To test the function
proceed
as
follows
Position fuel pump assembly about 3 3 ft
above fuel level of fuel strainer and connect a
pipe
from strainer to fuel pump
Operate
up
soon
pump is
Ag 117 Removing Pole Rod
rocker
after
arm
hand
by
rocker
arm
If fuel is drawn
is
released
fuel
functioning properly
i
o
2
@
1
Fuel pump cap
2
3
Cap gasket
Valve packing
4
Fuel pump
5
Valve
6
7
Diaphragm Ass y
Diaphragm spring
8
PUU rod
9
Lower
body
seal
10
Lower
body
seal
11
12
Inlet connector
13
Rocker
arm
14
Rocker
arm
15
Rocker
arm
16
Fuel pump packing
Spacer Cuel pump to
17
EF008
Ass y
valve Ass y
retainer
washer
Outlet connector
spring
side pin
cylinder block
FIg 118 Structure of Fuel Pump
71
I
ble d ble d tube hole valve
air
jet
air
jet
emulsion throtle
main slow slow main bypas
i
S S
9
S
S
S
15 16 17 18 19
ble d ble d
air air
slow gOW jet
st
2nd
P
P
I
S
20 21
hole valve
noz le venturi
throtle
slow bypas main smal
P
P
P
S
89
10 II 12
t
of
9
do
1
c
6
I
i
of
View
14
tube
valve smal main ble d
valve
Float Float Choke
S
Carbueto
3
venturi noz le
1
S
aic
emulsion
Primary Primary Main Primary
2 34 56 7
Sectional
119
Fig
Fuellptem
CARBURETOR
Remove pump lever and pump rod
Remove
Removal
Remove air cleaner
Disconnect fuel
connecting rod
cam
Remove thermostat
and
vacuum
lines from
cover
by unscrewing
three
set screws
car
buretor
Remove throttle lever
Remove four nuts and washers
retaining
car
buretor to manifold
1
Needle valve
2
Stopper plate
3
Filter
4
Filter
l
screw
S
Life carburetor off manifold
Remove and discard the
carburetor
and
used between
gasket
manifold
it
Replace
Nipple
o11
if
y
necessary
@
Disassembly
Do not
remove
Carburetor
Remove
ET040
throttle
plates
Fig
122
Removing Filter
assembly
throttle return
spring
from
primary
side
w
o
@
I
ET038
1
Ventui
2
Main air
3
Emuleion take
4
bleed
5
Secondary
Primary
Rg 120 Removing Thermostat
2
Chock chamber
Thermostat cover
CID
3
Pump lever
4
Throttle return spring
5
Pump
ET041
rod
Rg I23 Removing Venturies
1
2
fig
121
Removing Diaphragm Chamber
ET039
EF134
Flg 124 B C D D Securing Screws
73
aelSptem
l
Remove
et
choke chamber
screw
from
and
remove
secondary
Separate float
by unscrewing
by unscrewing four
spring
throttle return
side
After inotalling anti dieseling solenoid leave
more
than
12
hours without
carburetor
operation
chamber and throttle chamber
After replacement
four set
check to be
screws
that anti
Float Chamber
diaphragm chamber assembly
diaphragm chamber gasket
cam
over
start
and
engine
solenoid
dieseling
is in
good
and
con
Remove filter set
valve and stopper
nipple
screw
Notes
result in
getting
on
improper
valve
performance
or
clogged fuel passage
filter
needle
b
In
hold
plate
tool
Remove
cylinder plate pump cover piston
return
piston
spring and inlet valve by un
two
set
screws
screwing
c
installing valve use caution not to
body directly Instead use special
tightening nuts as required
After
to
installing
be certain
cracks
spring and
Do not allow adhesive
a
valve Failure to follow this caution would
and counter
spring
cam
and
lever
Remove injector
is
that fuel is not leaking
dition
Remove
Remove fast idle
sure
or
a
new
solenoid
that there is
check
leakage
no
otherwide deformation
outlet valve
BOOST CONTROLLED
Remove small venturies
emulsion
tubes from
main air bleeds and
and
primary
secondary
sides
DECELERATION DEVICE
Remove
B C D D
securing
Remove slow jet and slow air bleed
B C D n
assembly
Remove
When
primary and secondary
main jets
level
Remove
gauge cover float chamber
rubber seal float shaft colour and
level gauge
float
three
unscrewing
by
1
screws
Do
scrcw
not
unscrew
three
2
after
three
screwing
installing
securing screws 1 rescrew three BC D D
assembly screws 2 in order to prevent the
warp of B C D D body
Tighten torque
Remove power valve
Remove
return
spring hanger
17 to 35 in lb
plate
sleeve
fast idle lever
and throttle lever
ANTI DIESELING SOLENOID
Replace gaskets
Solenoid is cemented at
of
pair
a
pliers
factory
loosen
to
body
out
of
installing
all
solenoid
First
a
solenoid
or
three
pitches
without
all
disturbing
exposed threads
Stud Lock ofLOCTITE
Then torque
R
it is essential to
threaded parts of carburetor and
Supply screws in holes and turn
them in two
coat
interlock
disassembling
link and related
components
any of components
Installation
clean
In
if necessary
be careful not to bend
position
Before
screws
the above
with
or
setting
adhesive
equivalent
to 30 to 48 in lb
in
reverse
Removal
Use
Assembly and Installation
Follow disassembly and removal procedures
the
Careful
reassembly
operation
of all interlock parts
will
Cleaning
and
or
rest9re
deform
smooth
Inspection
Dirt gum water or carbon contamination in
or on exterior moving parts of a carburetor
are
often
mance
responsible
For this
upon careful
depends
while servicing
for
reason
unsatisfactory perfor
efficient carburetion
cleaning
and
inspection
ruel IJStem
Blow
all
pressed
passages and castings with com
air and blow oft all parts until dry
Check filter
Clean
and
screen
if
it
Note Do not pass drills or wires through
calibrated jets or passages as this may
enlarge orifice and seriously affect car
plugged replace
buretor calibration
Inspect operation
Check all
defective
especially
parts for wear If wear is noted
be replaced
Note
parts must
the following
Push connecting rod of
Check
fuel
linkage
into
of air and
assembly
must be
wear
If wear
replaced
ridges
idle
adjusting
a
or
remains
float
of
accelerating
pump Pour
and make throttle
chamber
lever operate And check condition of fuel in
jection from the accelerating nozzle
JETS
needle
for
The carburetor
performance depends on jets
why these components
and air bleeds That is
must be fabricated with utmost care To clean
out of roundness
Such
distorted
damage of diaphragm
Check throttle and choke shaft bores in throt
tIe chamber and choke chamber for wear or
Inspect
lint
chamber
diaphragm
Check float needle and seat for
is noted
is
or
for operating condition
and block passage of vacuum by finger And
when connecting rod becomes free check for
leakage
for dirt
burrs
or
condition requires replacement
Inspect gaskets to see if they appear hard or
brittle or if edges are torn or distorted If any
such condition
is
noted
they must be
replaced
them
cleaning sol vent and blow air on
Larger inner numbers stamped on the
indicate
jets
larger diameters Accordingly
main and slow jets with larger numbers
use
them
provice richer mixture and the smaller
bers the leaner mixture
Inversely
and slow air bleeds which
make the fuel
through
larger numbers
are
num
the main
for air to pass
they bear
leaner if
and the smaller numbers the
richer fuel
71
GaoUDI Sptem
DRAINING
FLUSHING
WATER PUMP
78
78
Removal
78
ssembly
Dis
Inspection
79
Installation
79
THERMOSTAT
Removal and Installation
RADIATOR
79
79
79
79
Removal and Installation
79
Inspection
80
1
Cooling Sptem
r
JJ
@
CiJ
C0013
FIg 125 Cooling System
The pump contains an
shaft which
a steel
DRAINING AND FLUSffiNG
To
drain
the
cooling system
remove
the
radiator cap release the drain cock at the bot
tom of the radiator and drain plug on the
right
side of the
system
is
cylinder
installed
block
the
set
If the heater
heater
bearings
the front
position
After the coolant is drained
completely
cover
assembly
a
The fan and
of
pulley
are
Loosen four
bolts
remove
retaining
shroud
centrifugal type
engine front cover
bolted at the pulley
a
hub
The pump shaft is supported by a double row
ball bearing press fit in an aluminum die cast
pump body The bearings
lubricated and sealed to
lubricant and entry of dirt
78
are
permanently
prevent
The inlet of the
clean container
WATER PUMP
the
on
ball
pump is connected to the radiator lower tank
by a hose
radiator and
is
the
close
and refill the system
on
in
temp
with clean water
Thwater 1ump
which is mounted
that turns
and the volute chamber is built in
Drain coolant into
plug
rotates
Removal
erature control valve at open
the drain cock and
impeller
loss
of
fill 126 Removing
Water Pump
fan shroud
to
Cooling IJStem
Loosen belt then
remove
fan blade and
pulley
and
gasket
from hub
assembly
Remove five bolts pump
from front cover
Disassembly
The water pump body is made of aluminum
and its bearing outer race is press fit For this
shaft bearing should not be
reason the body
disassembled
fig 127 Removing Thermostat
Inspection
Inspect pump assembly
for the following
con
ditions and replace it if necessary
Badly
rusted
or
corroded
body assembly
and
mostat housing
vane
Excessive end play
in
Loosen two securing nuts and remove water
outlet
gasket and thermostat from ther
or
roughness of bearings
After
stall
operation
checking thermostat satisfactorily
replacing with a new housing gasket
in
Reinstall water outlet and tighten securing
Installation
Make
sure
nuts
clean the
to
gasket
surfaces
on
pump and front cover Always use new gasket
when installing pump assembly Be sure to
tighten
Fill
bolts
Replenish
coolant and check for leaks
RADIATOR
uniformly
and check for leaks
cooling system
at
pump
pulley and fan blade and tighten
bolts
fixing
securely Install belt and adjust
Install fan
for proper tension
conventional down flow type
having the top and bottom tanks to distribute
The radiator is
the coolant flow
above
in
wax pellet type thermostat is mounted
the thermostat housing at the cylinder head
A
adjacent
to the inlet
manifold
The function of thermostat is to control the
atmospheric
valve
It
boiling
coolant
a
vacuum
valve
coolant temperature The
up and regulating
thermostats are designed to open and close at
radiator
predetermined temperatures
opemting properly should be
tested
as
and
if not
removed and
listed below
in the
to
maintain
13 Ib sq in
The
relief valve
pressure
valve and a vacuum
lf1
bIow
kglem2
On the contrary
warm
engine
designed
helps to prevent coolant loss from
by raising the pressure on the
below
facilitating
ver
for
reduced
fast
the
tical tube of the radiator core
consists of
flow of coolant
uniformly through
The mdiator filler cap is
09
a pre set pressure
THERMOSTAT
water outlet
a
the pressure is
as
atmospheric
allows
air
pressure
to
preventing the formation
cooling system
enter
re
the
the
of vacuum
The bottom tank on cars equipped with the
automatic transmission inoorplrates an oil
cooler for the transmission fluid
Removal and Installation
Drain coolant
Disconnect
outlet
Removal and Installation
partially
upper
radiator
Drain coolant into
hose
at
a
clean container
water
Remove front
grille
19
GooUDI SJStem
I
emove bolts retaining radiator from radiator
radiator upwards
side support3 and
remov
of
in
Install
radiator
reverse
sequense
removal
Inspection
Iadiator cap should be checked for pressure at
regular tune up intervals First check rubber
Ag 128 Radiator for Manual Transmission
seal Oil cap for tears cracks or deterioration
after cleaning it Then install radiator cap on
If
docs not hold pressure or will
a te ter
cap
not
release at thp proper
pressure
replace
cap
Disconnect
On
a
radiator upper
vehicle with
disconnect cooler
radiator
80
and lower hoses
automatic
transmission
inlet and outlet lines from
Also in pect radiator for water leakage using
a cap tester unde
applying a pressure of 17
lblsq in If uch the
replace radiator
or
defect is detected repair
Brakes
MASTER CYLINDER
82
Removal
82
Installation
82
FRONT DISC BRAKE
82
Description
82
Removal
82
Disassembly
Inspection and Repair
Piston Seal Replacement
Assembly and Installation
Pad Replacement
84
REAR BRAKE
Removal and
Inspection
Assembly
Disassembly
84
85
85
86
86
86
87
88
II
Brakes
MASTER CYLINDER
hydraulic
forces the
pressure from the master cylinder
out of the
piston of wheel
cylinder
Removal
caliper
Remove the clevis pin connecting the push rod
with the brake pedal and disengage the
til it contacts disc
master
cylinder
from the
pedal
Disconnect the brake tube from
pad by
These forces
cause
rotating
moment which increases reac
This is called self energizing
tion In this SC brake it is around
cylinder
As
Screw out master
remove
and
reaction force F
outer
tion force F
the master
pad forward un
simultaneously pushes
bore and thrusts inner
the
cylinder fixing
master cylinder from
nuts
and
pad
the dash
its elastic deformation
ward causing
thus
Installation
procedure
of
assuring
slip
is
piston
creased and when seal is deflected
board
Installation
movement
wears
ac
50
more
in
than
wiil slide out
piston
between seal and piston
constant clearance between
pad
and disc
is
reversal
a
but the
of the
removal
following operation
Removal
should
be added
Adjust the pedal height by changing
rod length of the master cylinder
Bleed air out of the master cylinder
the
Jack up the vehicle and support it
and remove the wheel
on
stands
push
Disconnect
the front
hose
brake
from
the
brake tube
Plug up the brake tube with a
wooden peg to avoid spilling fluid during
work on caliper
Note
FRONT DISC BRAKE
Screw out the bolts
Description
Figure 130 shows the relation of forces
As
brake
working
pedal is depressed
knuckle
I
@7cf
I
0
Fig I29 Tandem Master Cylinder
82
to the
the
caliper
remove
t
Push rod
2
Dust
3
Stopper ring
4
Piston
ass
5
PistOn
ass1y 8
6
Secondary piston cap
7
Pbton
8
Primary piston cap
Master cylinder body
9
6
lY
4
Y
caliper
assembly
Ii
j
I
flange
the
fixing
and
ass
y
cover
y
A
10
Reservoir band
11
Reservoir
12
Reservoir
13
Filter
14
Bleeder
15
Check valve
16
Check valve
17
Valve cap
18
Valve cap
ass
cap ass1y
screw
spring
ass
y
gasket
y
Brakes
4
3
I
2
9
11
I
6
QD1
@
1
Cylinder
2
Pi
3
Wiper eal
4
Eletainer
5
Piston
6
Clip
7
Shim
8
Pad
9
Caliper plate
eal
ton
10
Torsion
11
Cotter
12
Nut
13
Washer
14
Support bracket
15
Hold down
16
Pivot
17
Mounting
18
Spring
ipring
pin
I
10
17
pin
pin
bracket
Fig 130 Front Disc Brake
FIg 131 Sectional View ot Front Disc Brake
83
I
lk
Remove the
separate the
nut and the disc hub
spindle
rotor from the hub
and
assembly
Disassembly
the anti rattle
Remove
and then
plate
pick
clip from
pad
the
caliper
up the
Remove the tension
springs
plate
and pull the cylin
der out ofthe caliper
To take out
piston
apply
air
or
hydraulic
rubber
pressure from inlet hole Remove the
seal from the groove on the cylinder Remove
the retainer and wiper seal and then it can be
easily
taken out
Ag 132
and
Repair
cylinder assembly for oil leakage
damage and replace the cylinder
Inspection
Removing Front Brake Hose
Check the
and
any
assembly
ted
on
Note
if any abnormal condition is detec
it
Unlike
drum brakes
the wheel
the
cup of
seal of SC type
cylinder
piston
important functions
sealing retracting piston and automatic
If
pistonseal is damaged
adjusting
whole
replace
cylinder assembly as a unit
However if it is necessary to replace
piston seal replace wiper seal at the
When pads are replaced two or
same time
or seal
three times cylinder assembly
should be replaced though they still seem
to be in good condition
disc brake has three
Ag 133 Removing Caliper Assembly
fig
M
134 Removing Brake Disc
Fag
135
Removing Piston
Brakes
Check the
pad
is damag ed
in
in
or
for
thickness
replace
and crack
wear
become
worn
Inot
if it
to less than 0 04
the
including
metal
hacking plate
Check the
caliper
for
and
damages
replace
it
if any damag e is detected
Check the rotor
ccssive out of roundness and
ditioning by machining
reconditioning
Limit of
score
forth
so
ex
recon
required
fin
pivot pin Insert
avoiding tilting
t
two
inches
Standard rotor thickness 0 0394 in
and Installation
lnsc
the piston into the
t
pindle
cylinder
till the face
platc
springs
Kunout of the rotor should be less than 0 0048
Install the cylindcr into the caliper
in total indicator reading
seCure
an
ahnormal
distortion
r
or
condition
excessive
run
such
as
crack
is detected
out
the rotor
place
in
bv two
place
tor
ion
emble the hold down pin
spring
a
cotter
pin
hould
bc
replaced
on
caliper plate
the pivot pin washer spring
and nul in that ordcr Tighten nut
with
the
paying
piston
seal it
attention to the
her
to the nut
Sccurc the mounting bracket and
leakage is found
wa
and
and nut in this order to support bracket
lnsert
Piston Seal Replacement
If oil
gently
or piston hl ad hecomes almost flush with the
j ace of the I ptailwt of the wiper seal
tn
If
exists
Clean the mounting surface and disc surface
Attacb the disc to thc hub
Install tbc bub to tbe knucklc
in thickness is 0 331
damage
piston surface Insert the piston Take care
that the relieved position of the piston faces
on
Assembly
and if it shows
is
Clean the piston Check that no
and set
a
cotter
washer
complete
pin
following points
Aftcr
with
brake fluid
groove
seal
rinse
disassembly
taking
Insert
great
care
the
new
cylinder
seal into
not to
borc
the
damage the
wiper seal Apply a thin
specified grease to the cylindcr
Pry
up
and hold down
bracket
by
a
screw
up to the upper end of the
to
mOll Ilt i ng bracket Turn tbe caliper platc
drh
mak
and hook
sure
that it
can
slide
smoothly
Attach the
coati ng
of
hol
Fig 136 Measuring Runout of Disc
Install
the calipcr
assembly
to
the knuckle
flange
Ftg l37 Assembling Piston Seals and Retainer
85
Brakes
Attach
shim to inner
a
pad
proof and
for noise
Be
sure
to set the inner
center of chassis
pad
first
Draw the
inside
toward
Insert lower cuts
both
toward
caliper plate enough
on
ends of the
bracket
and then
contacts
the
pad into the mounting
push the pad until the pad
caliper plate
toward outside Insert
upper cuts and center indentation of outer
into the
Attach the anti rattle
pad
Pull the caliper
by
as
0 lIS to 0 157 in
Outer
pad
is loosened and
can
be
easily pulled
out
caliper plate inwards and remove
pad Wipe exposed surface of the piston
thoroughly Push the piston enough into the
cylinder bore Insert new pad into the caliper
plate
Draw the
REAR BRAKE
clip
Be
sure
by
the sticker
indicated
on
Removal and
Disassembly
Jack up the vehicle and support it
and remove the wheels
on
Replacement
The clearance between the
pad
and rotor is
adjusted automatically
Check the
pad
for
wear
after the first 6 000
miles and every 3 000 miles and thereafter
Pad thickness is
the
anti rattle
worn
to less than 0 04 in
cluding
pads
Note
easily checked by removing
clip When linings become
the metal
in thickness
not in
backing plate replace
Always replace the pads
using genuine parts
all
in full sets
of four
Remove the road wheel Remove the anti rat
tie
clip
from the caliper
plate
Fig 139 Pushing
Pin
t
Fig 138 Removing Anti Rattle Clip
88
plate
Push the piston
the direc
the clip
Pad
in
caliper plate
tion coincides
screw
inner
piston
Draw the
Loosen the bleed
outwards outward of chassis
heat insulation
Fig 140 Removing Pad
stands
Brakes
@i
J
c
r
jj
i
Fig
Release the
cross
parking
rod from
141
ectional
brake and disconnect the
the lever of the
rear
wheel
cylinder
springs
and then take out
tube from
the wheel
cylinder
and
so
and
is
score
forth
excessive out of
reconditioning
by
required
Drum inside out of
Nominal inner diameter
of the drum is 8999 in
Remove the wheel
ponents
show
roundness
roundness below 0 0020 in
the brake shoe assemblies
Disconnect the brake
Inspection
Drums If they
machining
Remove the brake drum
Remove the return
View of Rear Brake
as
adjust
cylinder by removing com
cover
plates
then it is ready to be
in the order of dust
shims
removed from the brake disc
The wheel
is
cylinder
removing the snap ring
in diameter is 9 040 in
If shoe
Linings
easily disassembled by
and dust
Limit of reconditioning
cover
seated
excess
soiled
or
linings
greasy
or
are
incompletely
deteriorated due to
heating repair or replace them If the
of the lining is found less than
in replace it
thickness
Remove the
adjuster assembly
Remove the brake disc
0 0591
Notes
a
If oil
or
grease
is
found
in
1
8
Brakes
1
V
Fig
clean
linings
tetrachloride
b
After
grind
or
thoroughly
gasoline
l42
with
Sectional View of Rear Brake
carbon
lining installation and bonding
lining face to a diameter equal
the
to that of the brake drum
Check
and
adjust
cams
for
When the wheel
cylinder is overhauled it is
replace cups even if ap
parently they are in satisfactory conditions
and they must be replaced if deformed due to
damage crack corrosion and ageing
recommendable
their
to
smooth
Assembly
operation
Assemble in the reverse order of disassembly
If
Springs
they
replace them
are
considerably
weak
Be careful not to
oil
or
smear the
brake
linings
with
grease
Check the brake disc for distortion
grease thinly to the sliding areas such
shoes and discs cam adjuster stud and
Apply
Check the bore of the wheel cylinder for
sign
of rust and
damage
88
exceeds 0 0059 in
as
spacer
If the clearance between the
piston
wear
cylinder and
replace them
the
Adjust the shoe
hydraulic system
clearance
and
bleed
the
rroDt
Suspension
6
5
1
Stnrt
mounting insulator
2
Coil
spring
3
Strut
assembly
4
Suspension
cross
5
bilizer
St
6
Tension rod
7
Transverse link
8
Steering knuckle
member
ann
7
Ag 143 Front Suspension Assembly
RECOMMENDATIONS
U
to the need for a
and
lonl
80
large number
alignment equipment it
of
special
is
recom
repairs to the front
completely equipped shop
mended that
a
end be left to
Steering
STEERING GEAR COMPONENTS
RECOMMENDATIONS
ASSEMBLY
STEERING LINKAGE
92
92
93
93
81
Steering
STEERING GEAR COMPONENTS
o
1
0
1
Steering
2
Shaft
3
Cover
sector shaft
4
Screw
adjurting
ar
ge
steering
housing
5
Shim
sector
6
0
roller shaft
Fig
worm
bearing
7
ing housing cover
Camp jacket column
8
Ass y bearing
144
9
Ass y
bearing
10
Ass y
nut
II
Assfy
column
steering
worm
ball
steering
column
Steering Gear Components
RECOMMENDATIONS
Due to the nepd for
tooJ
and al
82
ignment
a
large
number of
equipment it is
special
mended
recom
pOllenb be left to
that
repairs to the steering com
a completely equipped shop
Steering
ASSEMBLY
orque I 8
Tightening
Tightening
2 5
kg
torque 1 8
2
5
kg
m
Select the lhiml
0 01
0
03
18
1
13
0
13 0
m
0
ft
Ib
0004
1
18
thatthr c1
orque 1 8
ft lb
2
5
kg
13
m
0
18
1ft Ib
arance
0 0012
1
t17mm
6 693
1
i
J
r
IBIJ I
d
i
J
f
M
Apply
here
thod of the gear
assembly
greue
when
II
auembling
l
I
BEARING
be
PRE
LOAD ADJUSTMENT
the thickn
Adjust
0
to
6 0
kg
u of
the
worm
55
em
ahim
adjust
83
thou the
before the
1
of tbe
rque
lhaft
sector
steering
whrel
ames
fiaed
GtarumE
II
Tigbtening
1
2
torque
12
90
5
th
14kg
101 ft
Ib
of the
lurfac
ball
hit
ch
3
Lock the
4
Move the gear for
5
adjult
After this
Ild the
the
housing
uml p
the
al
tor
point
5haft
by turning
the
adju
t
crew
os
that the
ctor
5ha ft
ad
ther
ew
with the lock
mporarily
imel from
Ie
ra
the
ide
of the Beu
arm
E
nd
mak
turn
smoothly
between the bottom of
tlw T groove
ah
5h
tor
the location of the
m
The rtandard distance
the
Place the
AdJun
6
itlOD
lll
the
op of the s
ar arm
should be brtweeD 0
O
1
mm
0
0 0039
more
es of 2
proce
the
Finally
tban O
5
til
adjust
1
mm
0 0039
ome
within the
by
1
1
8
6
I
th
ew
ndard
turn
adjust
5Crew
funher
IIId
peat the
figure
nd lock
firmly
with the lock
OILING
Apply
IV
OIl
point
If the backlash
th
7
backl uh
t
uual
it MP90
sear
STANDARD
about O 33
The backlash should be 0
the
liter5
4U
3
S
S
pu
8lrnper
pli
flACK LASH
al
Ag
point
l45
0
the
ad the
ldius 22
75
turning angle
mm
0 896
of the
sectOr
of the
haft
sector
pitch
when tbe backlash
O
Sectional View of Steering Gear
STEERING LINKAGE
Fig l46 Front Bottom View of Steering Linkage
on
Vehicle
83
Bear Drive
SHOCK ABSORBERS
Suspension
96
Remvval
96
Inspection
96
Installation
96
DRIVE SHAFT
97
RECOMMENDATIONS
97
85
SuspensiOD
Bear Drive
8
7
I
1
6
I
5
1
Suspension member
7
Spring
2
Suspension
B
Shock absorber
3
Member
9
Drive
4
Differential mcunting insulator
10
shaft
Differential mounting member
5
Coil
11
Differential carrier
6
arm
mounting
insulator
spring
Bumper
seat
rubber
Fig 147 Rear Axle on Suspension
Installation
Installation uf the shock absorber is the
al ofthc procedure given for rcmoval
SHOCK ABSORBER
Removal
Open the
assembly
trunk and
remove
rever
the trunk finisher
Remove the double nuts which fasten the up
absorber to the body
per end of the rear shock
Remove
the shock absorber
mounting bracket
on
from
its
lower
the axle housing
Inspection
Test
the
shock
absorber
and
replace
if
necessary
Check for oil leakage and cracks
the shaft for
Inspect
the
rubber
bushings for damage
Replace the parts if
cracks and deformation
necessary
88
Also check
straightness
Ag 148 Installation of
End
Rear
Shock
Absorber
Upper
Bear Drive
Suspension
DRIVE SHAFT
8
Drive shaft
6
Boot band
11
Flange yoke
2
Drive shaft ball
7
Snap
12
Oil
3
Ball spacer
8
Sleeve
yoke
13
Needle
4
Drive shaft
9
Sleeve
yoke plug
14
Snap
5
Rubber boot
stopper
10
Rg
ng
ea
bearing
ing
Spider journal
149
Drive Shaft
RECOMMENDATIONS
Due to
required
the
large
and
number of
the
special tools
advanced
knowledge
it
is
recommended that
the
necessary
overhaul of the differential be left to a
properly equipped shop
87
Olutch
REMOV AL
102
RELEASE BEARING
REPAIR
102
Refacing
Pressure Plate
ADJUSTMENT
INSTALLATION
MASTER CYLINDER
103
103
104
104
105
Removal
105
Disassembly
Ins pection
Assembly
105
Installation
BLEEDING CLUTCH SYSTEM
106
106
106
106
81
Clutch
2
5
JJ
FL Y WHEEl
RING
12
o
II
1
1
11
Clutch disc
2
Clutch
cover
3
4
Bolt
assembly
with
plate
8
Bearing
sleeve
9
Clutch
elease
10
Bearing sleeve
11
Dust
Return spIing
bolder
cover
5
Lock washer
t2
6
Clutch
13
Withdrawal lever push
7
Retainer
t4
Lock
withdrawal lever
spring
nut
Rg 150 Outch Diaphragm Spring Type
M
bearing
spring
GEAR
Olutch
2
o
N
1
N
m
m
l
1
2
3
4
Clutch disc
9
Release lever
Clutch assembly
10
Relea
Clutch
11
Lock
t2
Release lever
cover
SUre
Pre
plate
e
tevet
at
nut
support
17
Retainer
18
Seasing
19
Clutch
pring
sleeve
20
eleue bearing
Bearing deeve holder spring
S
Prelllure
13
Retaining spring
21
Dun
6
Eye bolt pin
14
Bolt
22
Return
7
Pre
IS
Lock washer
23
Lock
16
Clutch
24
Withdrawal lever push
8
sure
rlU e
PreJ
plate
bolt
fpring
spring
retainer
F1g 151
withdrawal lever
Clutch
cover
pring
nut
nut
Coil Spring Type
101
11 uteb
the
Remove
transmission
assemblyTrom
the
clutch
the
Note Be
engine
insert
a
ST20600000l
special
screws
sure
not to soil with grease or oil
tool Clutch
aligning Bar
spring to
RELEASE BEARING
the clutch disc hub
on
support the clutch
Replace
Ib Coil
release lever control surface
spring type
if there is
wear causes
Temporarily
lock
If it is
If the release lever stopper is not
placed under each levers the release
Note
force
when
rough spot
too much
the release lever with the
release lever stopper
lever will be
over
Ioaded with excessive
clutch
the
assembly
is
judged
enough iJe
ausc
bearing
that the
front
cover
between
than 0 5
Loosen the six
there is step wear at the
with the withdrawal lever
bolts which
the
assembly to
by diagonal
are
flywheel
E
E
E
E
E
E
0
i
o
0
E
E
Bmm
r4H1
mm
52
m
Rg 152 Clutch Cover Assembly Diaphragm Spring Typel
grease is not
place the
diiuneter of
the
0 0197 in
or
mm
contacting surface
replace or repair
if there is excessive
i01
I
7
Replace
o
N
i
the
at a
mation
II
N
turn
selection until the spring
pressure is relieved
E
E
holding
a
more
the
if the inside
the transmission
and the inside
sleeve is
time
102
remaining
lCJlkage
of the
If the clearance
or wear on
or
play
removed
cover
the
the surface of the disc
spring type
al Diaphragm
Fully
completely and lift
assembly away from the flywheel
Remove
REMOVAL
wear
or
defor
Glatah
mm
A
E
E
lD
lD
N
0
B
Rg
l53
Clutch Cover Assembly Coil Spring Type
Fig 155 Installing Release Bearing
Ag l54 Removing Release Bearing
Refacing
can
plate
be refaced if the
uneven wear
the tension of clutch
pressure
specified
Pressure Plate
The pressure plate
face is rough or has
sur
In this case
springs working
will be weakened
from
The refacing limit is 1 0 mm 0 0394 in
standard di mension
REPAIR
on
the
If it needs to be cut
in
more
the unit must be
than 1 0 mm
replaced
After
0 0394
refacing
the out of flatness should be less than 0 1
mm
0 0039 in
103
Clutch
Note In
case
of the
type the pressure
refaced at any times
diaphragm spring
plate should not be
Note This will enable the parts to settle
down on their knife edges
Replacing Release Bearing
Removing the bearing
Remove the bearing
by using universal puller
the bearing in
Pressing
Replace the height finger and pillar by the
clutch actuating mechanism and actuate the
clutch several times by operating the handle
There
are two types of the release bearing
Specification of both bearings is quite the
but particular attention is required
same
Replace the height linger and recheck the
height of the release levers checked for run
out
as near the edge as possible
if the error
is more than 0 020 in adjust until it is true
within spec limit
INSTALLATION
because of different construction when in
the
stalling
bearing
into the bearing sleeve
as
follows
It is important to
from oil
type
Release
Diaphragm spring
Bearing Fitting press fit the bearing in place
on the bearing sleeve with the force of 400 kg
880 Ibs applied at the outer race as shown in
Fig 155
a
or
the
pillar into the base plate
high finger over the pillar
the
and
height of the release levers by
unscrewing the eye bolt nuts un
til the height when rotated just contact the
highest point on the tip of the release lev
Adjust
screwing
grease
assembly on the flywheel with
longer chamfered splined end of the disc
assembly towards the transmission
the
Set the
dummy
position
of the disc
assembly
104
156
or
Adjusting Release Lever Height
hub and
Tighten six bolts which are holding
a
cover assembly to the flywheel
time by diagonal selection
Note
There
flywheel
are
two
the clutch
turn
dowels
to locate the clutch cover
r
Ag
assembly by a
splined bore
the pilot bearing
drive shaft which fit the
of the flywheel
Screw the center
slip
friction facings free
Place the disc
of the disc
ADJUSTMENT
keep
Fig l57 Actuating Clutch
on
at
a
the
Olutch
O@
I
Cylinder
2
Return
9
Spring
seat
10
Valve
rtem
3
Pi
4
Secondary
11
12
S
Piston cup
13
6
Supply
valve
eat
7
Supply
valve
8
Supply
valve
Q 1J
17
Piston
18
Stopper ring
Stopper gasket
19
Boot
Calket
20
Oil reservoIr
Pwh rod
21
Reservoir band
14
Pwb Od bead
22
Reservoir cap
Item
IS
Weld
Dut
23
Cap seal
spring
16
Lock
nut
24
Pipe
spring
ton
cup
stop
ing
Hopper
Ie at
Ag l58 Clulch Master Cylinder
dummy
fully tightened
Remove the
shaft after these bolts
should be 11 to 16 lb ft
Tightening torque
Remove the clutch
aligning
bar Irelease lever
bearing
and
stopperl
Refit
the release
transmission
to
assembling
apply
grease
small
a
clutch disc be
amount of
MILG 2108
splines Neglecting
in clutch slippage
or
Removal
Remove
Disconnect the clutch hose from
push
master
the master
and drain out the fluid
Remove the
sure
Multipurpose
10924
the clevis pm installed at the
rod
cylinder
case
Note In
MASTER CYLINDER
are
securing bolts and take
cylinder assembly from the car
off the
to the disc
this caution will result
Disassembly
Remove the filler cap and drain out the fluid
105
Clutch
Pull back the rubber boot and
snap
and then the
ring
push
remove
the
Assembly
rod and ring
can
This
be removed
Unscrew the piston stopper screw and
the piston assembly completely
remove
The piston assembly can be separated by lif
ting the spring seat edge over the shouldered
end of the piston
accomplished by reversing the
disassembling procedure but the following
points should be observed
is
Prior to assembly piston cup should be soaked
in brake fluid Install piston cup taking care it
is
faced
correctly
Coat well
brake fluid to
cylinder
and
piston
and assemble them
Inspection
Prior to inspection all parts should be cleaned
washed
or
Note To clean
wash all parts of master
operating cylinder and pipings
cylinder
or
clean brake fluid must be used Never
mineral
oils
kerosene etc
such
as
as
gasoline
use
and
Installation
Installation
procedure
is
reversal
a
but the
of the removal
following operation should
be added
Adjust the pedal height by changing
length
the
push
rod
to do so will ruin the rub
ber parts of the hydraulic system To do
so will ruin the the hydraulic parts of the
Bleed air out of the
hydraulic system
hydraulic system
Check
sided
and piston for abnormal one
and damage and replace if found
wear
If the clearance between
more
than 0 005 in
Renew
and piston is
cylinder
replace cylinder
when
principle
disassembled It must also be replaced when
swell wear deformation due to fatigue and
damage etc are found
Damaged
etc
piston
dust
should be
cup
cover
in
oil
reservoir and cap
replaced
spring and inlet valve spring
replaced when they are broken or
Remove
the
must also
be
weak
bleed
screw
dust
cap
of the
operating cylinder open the bleed screw ap
proximately three quarters of a turn and at
tach
clean
immersing the open end into
receptacle containing a small amount
a
tube
a
of
brake fl u id
Fill the master
cylinder
recommended fluid and
strokes
entering
Piston
Replace clutch hose and tube if any abnormal
signs of damage or deformation are found
108
BLEEDING CLUTCH SYSTEM
cylinder
pump the clutch
reservoir with the
by using slow
pedal until the
full
fluid
the container is free from air bub
bles
Screw up the bleed screw on a down stroke of
the pedal remove the bleed tube and replace
the dust cap
TraDsmissioD
REMOV AL
J09
INSTALLATION
4 SPEED TRANSMISSION
III
Removal and Installa tion
113
RECOMMENDATIONS
113
113
l
lO
TraDsmissioD
11
I
I
I
i
I
Fig 159 3Forward Speed Transmission
C
I
Ll
Fig l60
108
4Forward
Speed Transmission
Transmission
FIg
161
3Forward Speed Transmission
REMOVAL
When
removing the transmission from
the
vehicle it is necessary to follow the undermen
tioned
procedure
Jack up the vehicle and support it with four
stands If available a hydraulic hoist or open
pit
can
be utilized
the
Disconnect
equalizer pivot
as
hand
brake
shown in
wire
Figure
Loosen the two exhaust center
and turn the
to the
premuffier complete
left as
will allow sufficient
shaft to be removed
pipe
Remove
the four
the
room
the
163
pipe clamps
with center
Figure
shown in
at
for the
164
This
propeller
propeller shaft by disconnecting
securing bolts
at
the companio n
flange of the gear carrier Seal the end of the
rear extension housing to prevent oil leakage
FIg I62 Underside of Vehicle
108
Transmission
Disconnect the
the
adapter
speedometer
in
See Fig
housing
drive cable from
the transmission
extension
165
Disconnect the lower shift rods from the shift
levers and remove the cross shaft assembly
from the transmission
the clutch
Remove
the clutch
Support
the oil
Fig
163
case
See
Fig
166
operating cylinder
housing
the engine with
pan
a
Do not locate
jack placed under
the jack under the
Disconnecting Hand Brake Wire
Fig 166 Disconnecting Remote Control Linkage
Rg 164 Removing Propeller Shaft
Cable
Ag l65 Disconnecting Speedometer
no
from
Fig 167 Detaching Clutch Operating Cylinder
Transmission
oil pan drain plug To prevent damage to the
oil pan insert a wooden block between the pan
Lower the
and jack
will allow sufficient
Remove
to be removed
the two
smission to the
attaching the tran
engine mount Place a
bolts
rear
jack
under the transmission and
four
bolts
cross
member to the
fixing
the
rear
body
remove
the
engine mounting
cline the
jack supporting the engine to in
engine in a rearward direction This
room
for the transmission
Remove the
taching
starting motor and the bolts at
housing to the engine
jack gradually and withdraw the
the clutch
Lower the
transmission
INSTALLATION
Installation of the transmission is the reversal
of the
procedure given for removal However
be given to the following
attention should
points
Notes
Fill the transmission with the
a
recommended gear oil MP 90
Oil
b
capacity
Adjust
push
the
45
0
U S
the clutch
rod
so
gal
operating cylinder at
play at the with
that the
drawaI lever will be 0 087 in
Fig
168
Cross Member Removal
Fig 169 4 Forward Speed Transmission
lD
Transmission
lISSION
TRANS
AUTOMATIC
@
CID
@
CID
@
@
i
@
@
j
@
if
rT
L
1
J
L
L
J
II
I
I
I
@
@
@
@
@
@
@
F
@
@
AT260
I
2
Transmission
Oil pump
case
II
Governor
Tightening torque CT
12
Output lihafl
bolts and nuts
3
Fronl clutch
13
Rear
4
Band
brake
14
Oil pan
5
Rear
clutch
15
Control valve
6
Front
ion
exlen
16
7
17
Input shaft
Torque converter
8
One way clutch
t8
Converter
9
Low
19
Drive plate
10
Reverse brakC
4 to 5
@T
14
to
kg
m
36 ft Ib
16
kg
m
101 to 116 ft Ib
housin1
0
0 8 kg m
4 3 to 5 8 ft Ib
6
View
of
3N71 B
0 5 to 0 7
to
6
to
kg
m
5 1 ft Ib
h
2 0 to 2 5
h
14 to 18 f Ib
3 to 1 8 kg m
1
4 to 13 ft
9
lb
@T
55
0
4 0
@T
Oil distributor
Fig 170 Cross Sectional
U2
@T
@T
@T
3
29 to
planetary gear
Rear planetary gear
of
Automatic Transmission
kg
to 0 75
to
m
kg
m
5 4 ft Ib
0 25 to 0 35 kg
1 9 to 2 5 ft Ib
m
Transmission
4 SPEED TRANSMISSION
port is securely placed between the upper sup
port plate and rubber insulator on one hand
and the lower support plate and rubber in
Removal and Installation
Removal
and
installation
of the 4 forward
sulator
on
speed transmission are similar to the
procedure given for the 3 speed transmission
However the 4 speed transmission is of the
floor shift type therefore in addition to com
pleting the operations described in the section
covering
the 3 forward
speed
transmission it
RECOMMENDATIONS
Due
the
to
disassembled
will be necessary to remove the shift lever
from the control lever bracket On the 4 speed
special
transmission
ped shop
the
rear
engine mounting
sup
the other
tools
that internal
complexity
of
transmission
necessary
repairs
it
as
is
be left to
setting
well
up
as
a
the
recommended
a
fully equip
U3
Bod Work
FRONT FENDER
Removal and Installation
HOOD
116
116
116
Removal and Installation
116
Adjustment
117
TRUNK LID
117
Removal and Installation
117
Torsion Bar Removal
and Adjustment
117
U5
Bod Work
FRONT FENDER
HOOD
Removal and Installation
Removal and Installation
Remove
head
the radiator
light
grill
head
light
and
finisher
Remove all bolts securing the fender and then
remove
the fender
Open
Scribe
on
Installation of the fender is the reversal of the
procedure given
for removal
hood and
place
a
protective cover over
damage to pain
the front fenders to prevent
ted areas
the location of the hinge straps
Ipenci
under surface of hood
Replace
hood
the bolts
With
attaching the hinge to
a helper remove
the aid of
hood
Fig
171
Removing the Fender
Fig 173 Removing the Hood Support Rod
ENCH
BOW
1
fill
U8
172
Removing the Hood
fig 174 Removing Trunk Lid
the
the
Bod
Uing
driver
screw
remove
as
shown in
Figure
173
Adjustment
adjust the
the hood support rod from the support
bracket
bolts
and
the
move
After the
position
tighten the hinge
Installation of the hood is the reversal of the
procedure given for removal However
the hinges within the scribe marks
hood release the
To
align
hood
ork
hinge attaching
the
to
desired
has been made
adjustment
bolts
TRUNK LID
Removal and Installation
trunk lid and place
Open
fenders and
damage
painted
to
With the aid of
attaching
panel
rear
a
a cover over
to
the
rear
protect them from
area
helper
bolts and
remove
remove
the trunk lid
trunk lid
See
Fig
174
Torsion Bar Removal and
Adjustment
fixing wire then using a
shown in Fig 175 remove the
Remove torsion bar
driver
screw
as
torsion bar
The tension of the torsion bar
by changing
use
Rg 175 Removing the Torsion Bar
3
r
5
s
Alo
1
of
a screw
i
II
4
cd
EGf
Ie
6
r
8
7
III
IN
111
1
I
10
J
1
i
10
0
I
dri ver
Outside handle
Out ide handle rod
3
Clip
4
Pull knob
5
uOJtcheon
6
Spring clip
1
7
Inside handle
I
8
Remote
9
Lockass y
I
cs
I
adjusted
2
J
I
be
1
t
j
can
the location of the bar with the
J
ontrol
10
Striker
11
Key cylinder
12
Bell crank
Rg 176 Door Lock Mechanism
117
Bod Work
1
z
3
Froot door
Bottom channel
3
Front
4
Regulater
U8
177
Window Regulator
egulator
ass
S
RaUer
Stopper
7
Connecting clip
8
Nyloo
9
Rear docx
Rear
y
handle
6
10
Fig
glass
1
2
guide
washer
glass
egulater
ass
y
Specifications
STARTER
120
DISTRIBUTOR
121
SPARK PLUGS
122
VALVES
I
OIL PUMP
122
GENERAL
123
ELECTRICAL
123
MANUAL TRANSMISSION
127
CARBURETOR
131
CLUTCH
ENGINE
134
TORQUE
INFORMATION
TUNE UP
136
138
LUBRICANTS SAE
138
CAPACITIES
139
PRESSURES
AUTOMATIC TRANSMISSION
140
PROPELLER SHAFT
144
BRAKE CHASSIS
ALIGNMENT
NOTES
WHEEL
146
147
D8
Specifications
STARTER
LI6 and LI8engines
Model
HITACHI
Type
S1l4 IOJP
HITACHI
For manual transmission
Voltage
12 Volts
Output
10KW
Slarling
current
No load
No load
rent
starter
1
Voltage
Less than 430 amps
Voltage
Less than 60 amps
revolution
6 Volts
SII4 126M
utomatic transmiuion
KW
Less than 540 amps
5 Volts
12 Volts
More than 7 000
pm
For
More than 6 000
Magnetic shift
Shift type of pinion gear
Number of teeth
on
pinion
Number of teeth
on
ring gear
9
gear
Weight
120
g
lb
5 1
10 42
5 8
12 8
SPECIFICATIONS AND SERVICE DATA
Specifications
Model
Item
o58
LTI50
510 and 610 models
AppliLable
to
Mak er
120
except
LTlJ5 1J8
510 and 610 models
620 model
for Canada
HITACHI
N lminal
Ground
for Canada
LTI6019
ating
polarity
12V SOA
Negative
12V 60A
12V 35A
Specifications
DISTRIBUTOR
SPECIFICATIONS AND SERVICE DATA
Distributor type
0410 67
D1O 66A
Make
HITACHI
Applied engine
Ll8 610
Ub
Qand
S
6Q
vehicle
Firing
1 42
order
Rotating direction
Counterclockwise
Ignition timing degree
SO B T D C
Idling adjustment
MIT
5u 800 rpm
AfT
5Uj6S0rpm
0
490
to
Advanced isde
02
to
Retarded side
O
Phase difference
70
vel angle degree
Condenser capacity
p
range
550
F
0 24
t 15
05
at
k
ngle
ldegree
All distributors
55 0 9177
45100
0
in
mm
Point gap
Point
Shaft
Jlll
di
lower pari
eT
p
hp
hafl
wren
in
1
r
in
in inner diameter
J1011
lram
Ic
0 50
lb
kg
pTt ssure
nd hOll
in
il1g
430
to
450
to
In
001
h arilnre
in
0
Shaft diameter upper pi
in
H
Repair limit
0 65
to
ti
III
I
C1c nam e nc
in
lIl
cro
shllf
lrod
un
mmfin
Clcilr
mce
b
lw
n
i
ot
and hole
lcqllyl
41 94
0
to
48
0
4Ml
0 4402
to
4 09
0
O G3R
0 0004
8
0 00 5
h
10
1 0003 I
00002
O JI50
1
0 0006
H 000 It
0015
II
x
1115
fi
J
9
lUISO
ltl
D002
tu
1
0
in
mm
4 972 104 990 0 1959100 1
in
5 000
tnm
ill
10
5 018 0 1
9
0 01 tnO 046 0 0004
to
tv
156J
0 0 11
n
Weight pivot diamctlo
Weighl hole diameter
7
02
440
t1l4
O
lllcter
0
I 1010 I 43
0005
C
to
ld Retarded side
AJvauccd
5
0 1976
O
OOI
121
SpecificatioDS
SP ARK PLUGS
SERVICE DATA AND SPECIFICATIONS
Make
NGK
Model
B6ES
and Ll8
Applied engine
Size
screw
dia
Ll6
14
reach
x
19
x
0 55
in
mm
x
0 75
0 7 to 0 8
Plug
mm
gap
in
0 028 to 0 031
1 5 to 2 5
Tightening torque
kg
m
11 0
ft lb
15 0
to
VALVES
654fO 1 661
In
42 Qtn42 2
Ex
33 0
33 2
1 299
10
1 307
In
42 01041 2
1 654
10
1 661
Ex
35 01035 2
1378101386
In
114 9
to
115 2
Ex
115 7
to
116 0 4 555
In
7 965
to
7 980 0 3136
Ex
7 945 107 960 0
lib
Valve head diameter
H
to
in
nun
LIB
Valve
L
Valve
lI6
length
in
mm
stem
D
LIB
diameter
Valve seat
angle
567
104
to
0 3142
LIB
in
mm
a
lI6
535
524104
4
In
Ex
3128 100 3134
45030
OIL PUMP
i lth
I
ning turque
Oil pump mounting bolts
kg
m
ftIb
1 to 15 8 010 II
Oil pump
kg
m
fl Ib
0 7101 0 5 1
kg
m
fl Ib
4
Cap
nut
cover
bolts
regulator
alve
to
5
29
to
to
72
26
Specifications
Oil preuure
at
idling
kg cm
Ib
in
0 8102
8
1110
40
Regulator valve spring
Free length
mm
in
Pressured length
mm
in
Regulator valve opening pressure
122
kgcm
5 2
52
34 8
Ib
n
5t05
3
067
I 370
0
501071
Specifications
GENERAL SPECIFICATIONS
Li8
Li6
Model
4 in line
Cylinder arrangement
Displacement
Bore and stroke
V31ve
mm
83
in
737 3 2677
Firing
I
iule
Engine
2 9016
85
1
4
rrlll
800
650 in
Compression
l
idle
fold
lHg
I
inllgl
I
BO
M T
390
AIT
Oil pressure
em
M T
Ih
4 in
15
c
N
35104 0 49 8
psi
kg
000 rpm
at
range
85
l
111
idle TPIll
Varm
3 0709
OH C
A T
at
3 3465
4 2
i
MIT
Engine
78
OH C
ngemenl
rder
108 01
770
1
1 595 62 80
in
cu
cc
MalHI 11 rransllil
AIT
n
1ge
ill 9
to
Transmission
Automatk
STARTING MOTOR SPECIFICATIONS
Specifications
Distributor
h
flcut
f
Sprint
Hum
llen
T
N
CUrr
D C1W
L
d
N
pi
DWtrilu lorCr1Iln
S
lb
67
61
66 6
MII
ubl
ME
rla
hI
HiluM
5
114
MIt
6667
1
912
72
2 1
1
5
1
5
1
AtI u
v
IltaTt
@
oJ
JI
Hitachi
J
E
ND
fIjq
O
HD
11 15@ 3 4
97
400
50
6 9@
2
411 53
00
LI6
Hitachi
01lh5ll
L2
Hitachi
D60652
4
At2
Hitachi
412
1
63
550
IA
Hlt chl
1
S
1
1
t1
13
4
2
1 5
1
5
1
1
122
1t4
HII
t
00
00
Hltochl
114 103
5
71
1
hl
114
72
19
PI
1
p
t
Cur
ehl
42
15
1
1O@
4
1
9
9@
J
9
5
500
4
12
6@
1
5
000
5@
96
12 5@
2 100
98
65@
13 8
1I7L
114
DISTRIBUTOR SPECIFICATIONS
C
Pol
M
y
DI trlbut
I
rlNo
Inllln
Dw
t
0
n
VD
U
srlnll
II
T
AIIIII
D
IlIe
Dnu1
IAd
lllrlr II
n
SIDrI
e
O
F
Inl
full
Inch
@
@
@
pm
pm
pm
V
cuu
AdII
hll
01
Ad
D
euuftl
@V
SIDrt
Itn
D407
I
6
9
7
51
0
dll
1 1
41
55O
4DO
5054
l
Mltfu
hl
021
16@
1
12@
475 5
12
6
1100
5r6
1
D411
J
6
01
53
50 55
I
1
411
n
4Q7
1
l
72
7i
Wi
04105
I
L
24
D
1200
I2
52
6
0
1
4955
1
411
4
011
022
cuu
dVDII
d
cII
t
1
016
02Q
d with S
I
1
1
1
1
@
IJ
1
4955
1
1
100
55
1200
@
@
@14
@11
12
1
1400
12
1 4
10@n
1500
1 411
00
@10
00
IO@
1
4
OGO
021
ID J
6
5
O@
40000
011
D412
41
2400
020
1
15@
11
OU
5@
@9
5@
9
12
00
x
123
Specifications
Electrical
1
1l
U
Battery and Starter
Specifications
StGTt
T
T
ModTl
l
V to
111
oI
A
Tn
I
U
od
No
rut
V
T
1
L
Tut
V
Ao
1
V
i
Wi
LUI1tJ
b
f
P
60
12
e
El
50
12
P
X A
G
R
12
X A
Po
50
12
Neg
40
SO
12
Xeg
V20
50
Ll6
50
60
PLSlO
WPL510
1
520
i
L521
8
500
40
N
A
500
0
NA
0
60
7 OIXl
60
7 000
9 5
fL5
7
12
Xeg
500
12
eg
480
6
0
7 000
11
12
NA
2
60
79
N
NA
A
31
A
N
o
6 000
30
28
60
12
7 000
60
12
5 000
9
60
12
7 000
31
10 50
40 50 60
LS21
L24
A
12
Xeg
460
6
0
A12
XA
12
Xeg
420
6
3
10 1
6 5
fore
Ltssthan
Electrical
CACTI
i
4IM
s
G
G
J
fiuubishi
RLA l
litsum hi
Rd
V
Ai
G
p
i
32
0
AC
Specifications
trul
c
i
G
N
60
500
60
NA
NA
A
NA
N
A
7 7
9 5
XA
A
1
044
Regulator
R
tA6
CouG
Go
rfJ
Gap
i
than
A i
P d
G
i
i
R
J
OI
I
Yoolt
i
NA
J 48
032
044
028 036
032 040
012 016
032
043
028 035
032 039
012
01614 15
032 043
028 035
032 035
012
015 14 15
12
U
032 043
o32
147
032 043
032
047
035 047
030 043
RL2220B5
Mit
R
uhishi
RL 2B
U20
liIslIhishi
RU220B5
LIB Hitachi
1m
030
043
32
0
047
035 039
020 024 016 020
032
043
032 047
012 01613
5 14 5
012
01614
15
012
01614
315 3
TL l li
L24 Hihlt hi
TI 1 Z 7
tn2
0 12
032 039
i
V
XOTF
t1 wllwlITU
124
024
019
@50F
Hitachi
TLI Z 37
hl
HiJ
Left
016 024
039
t
illl
Rillhl
t
t ltlllatOT
lClllatllr
d left
016
a
24
TLIZ 111
TLlZ 17
letennilloo with the
left
right
012
024 039
016
it
it
t
J
ltor
glll
tenninals
Illlm
s
pluJI
14
315 3
50F
Specifications
hlClemodel
Int
Appli
b
SIOllln
tlIO L1RI
O
1I6
Item
Mau
rldtype
ApplIed
HANSHIN
resister
mm
ll
hl
I68
Ce
HS 15
HITACHI
60R
St
6R
1
SIO
in
nIOrt
Ihl n7
n
17
1
1 4J
Kn
11
lb 8
n
LJ
0 1756
F
conduy
10
HANSHIN
I
V
voltage
Ptimu
Sparkpp
PlimlloiY
fC
HS IS
RC IS
8OF
f
Extern
J7
OCthaoF
Light Bulb Specifications
Wdlag
u
UlO
PLUO
15
8
5
8
up
Baclc
Headlights
31
31 5
Tail top
Parldng
B
Rear turn backup
License plate
Interior
HeadliRhts
Front parking
M p
Side
10
8
520
1
15
5
SO
8
5
25
1 5
5
turtI
Tail stop
LictrlIeplate
In rior
warning
nll
Instrumr
L521
PLS21
Radio
B
I
parking
37 5 50
37 5
25 B
parking
25 B
25
25
6
8
clcup
Headlights
Front parking
T i1 tum
37 5 50
37 5
25 8
25 B
25
25
bun
StOP
ckup
License
Interior
HLS3Q
plate
B
10
Headligh
Side marker
B
25
Stop
tum
Side marker license
Tall
te
pI
l
Reartun
ckup
15
turn
25 8
25 8
25
B
B
turn
top
5
35
B
50
turn
parking
Irtun
PL5lO
WPLSlO
J
Headlight
Stop tail
TilU
15
8
8
8
25
25
Turn
Instrument
Warning
mt
Interior
L
seplate
Side marken
Tail
License plate
Fog
Inspection
Parling
37 5 50
50
Headlights
B
31 5 50
37 5
Interior
rker
Front turn
50
25 5
2 l6
Headlighu
Stop
Backup
plate
Headlilthn
Fr
8
6
Inspection lamp
Front
License
25
plate
light
Warning lights
Instrument
SPUll
SRL3Il
v
50 42
21 6
216
Backup
PUll
RUll
l
Headlights
Front paning turn
Stnp tlil turn
L
plate
lnstrument panel
flasher
ming light
Turn
License
Interior
SPL310
Mlld
Instrument
40
25 S
28 B
warning glove
compartment clock
Four way Suhet
P
50
2311
75
7
23
23
23
J
23
B
125
Specifications
WIRING DIAGRAMS
III
CD
COOlI
y
o
0
Lr
utomatic transmwion
PLSIO
r
JIr
11
II
l
I t
G
11
iil
I
JlI
7
IF 11111I 1
1
11
r
i I
j
r
i
l
I
II
I
i
1
t4
L
cnm
Jfrdll
V
n
I
II IJ
r
r
jll
COLOIlCODE
n
1
i
I
I
III
i
o
l
I
I
d
i
l
J
tl
c
A
e
7lI
II
L
L
l
a
l
f
DPTlONAL EQU
PMEm
1
126
f
Jo
u
3
l
11
I
f
a
71
1rtJ
r
r
w
10
ltomatic
trarumission
Specifications
CO
COOl
I
v
0
PL510 standard traosmiuion
MANUAL TRANSMISSION
APPLICATION Of TRANSMISSION MODELS
Type of Transmission
N510 S V
3 Forward
speed
P510
NL510 S V
JNL510S
JN510SU
Column shift
Warner
edome
Applied Model
SlV PL510 Sl
type synchromesh
WP510U
WPL510
r
Final gear
1
gear
atio
R3W65L
lot
3 263
2nd
IS45
3rd
1000
Rev
3 355
19 5
4 375
1715
3 900
17 5
3 S99
IS 5
3 700
F4W63L
4
ro
Fmw
peed
FloofS uft
Warner
type synchromesh
f
lot
3382
PL510 S T
2nd
2 013
N510TU
3rd
1312
4th
1000
Rev
3 364
P510 S TV
JNL510 S T
P510TKU PL510TK
RPL510SWTV PL510TV
I
F4W63L
ht
WP510TU
WPL510T
3657
2nd
177
3 d
1 419
4th
1000
Rev
3 63R
16 5
3 700
I
I
i
127
I
Specifications
Manual Transmission Ratios
V
FiN
I
900
1 60
L320
94
L520
3 657
PUlO
PL411
Rn
No
N
3 015
301
173
1 00
No
6
177
1419
1 000
None
3 638
3 009
1726
1 000
No
6 462
1 419
1 000
None
3
NOM
4 125
177
2
6
636
518
3
1725
100
No
3 197
1725
100
No
N
125
1 000
N
5 159
3 945
94
1 490
3 945
403
2
1490
1 000
No
5 159
1 725
1000
N
None
4
3 94
2 40
1 49
100
None
5 159
3 657
2
177
1419
1 000
None
3 638
2 013
1312
1 000
None
3 365
3 197
RL411
SPL311
1i u
1
3 657
000
Tel
1562
2
941
521
PL
Tli
s
3 382
e
5
12
PL510
l7
5
SPJ
110
3 515
1 328
1000
None
SRL311
2 957
1858
1311
1 000
65
3 657
2 177
419
1
1
000
None
3
3 382
2 013
1312
1000
None
3 634
3 382
2 013
1312
1 000
N
3 634
3 549
2 197
420
1
1 000
None
3
2 957
1
857
1 311
1 000
852
3 757
2 169
1404
1 000
None
PL510
HLS30
LHllO
KLBllO
CD L60 transfer cue ratiOl
2 264
1
nd
I
Probable
Condition
140
2
2 922
638
164
922
3
640
I
CorrectivE
cause
ction
1
Loosened
bolts
retainer
gear camero
or
Defective
gasket
Loose tiller
Clogged
128
or
such
or
drain
or
as
side
aring
plug
damaged breather
nange
id
Tighten thebolts
to
specified torque
Replace defective parts with
Tighwn the plug
Repair
replace
or
ew
nes
Specifications
SERVICE DATA AND SPECIFICATIONS
Nominal diameter of
ring gear
mm
in
160
6 30
Gear carrier material
Malleable cast iron
Gear ratio number of teeth
3 700
with
37 10
AfT mQdel for
U S
nd Canada
111
4
Drive
pinion preload adjusted by
37 9
Shim
e Pinion
Dri
Preload
At
kg
em
in lb
without oil seal
7
with oil seal
S to 11
ompanion flange bolt hole
to
10
61
to
8 7
7 0 to 9 6
kg Ib
without oil seal
20
to
2 9
withoil seal
2 3
to
3 2 5 1 to 7 1
Thickness of
4 to
4
6
pinion height adjusting washer
mm
in
3 09
0 1217
3 12
0 1228
3 15
0 1240
3 18
0 1252
3 21
0 1264
3 24
0 127S
3 27
0 12S7
3 30
0 1299
3 33
0 1311
3 3S
0 1323
3 39
0 1335
3 42
0 134S
3 45
0 135S
48
3
0 1370
3 51
0 1382
3 54
0 1394
3 57
0 1406
3 60
0 1417
3 63
0 1429
3 6S
0 1441
129
Specifications
Thickness of
pinion bearing adjusting spacer
and washer
mm
in
Spacer
Washer
Side gelr and
pinion
5S 2
2 2t26
56 4
2 2205
56 S
2 2283
56 8
2 23S2
57 0
2 2441
57 2
2 2520
2 59
0
2 57
0 1012
2 55
0 1004
2 53
0
2 51
0 0988
49
2
0 0980
47
2
0 0972
45
2
0965
10
43
2
0 0957
41
2
0 0949
2 39
0 0941
10201
09961
2 37
0 0933
2 35
10 0925
2 33
0 0917
2 31
10 0909
mate
Thickness of side gear thrust
washer
mm
in
to
Q
0 80
0 0295
0 80
to
to
0 0315
0 85
to
to
gear
or
to
ide gear
mm
in
0 1
to
0 2
0 0039
to
ring gear and
drive pinion
mm
in
0 1
to
0 2
O 0039
Runnut of
reat
ide of
to
0 0079
iog gear
mm
gear
Thickness of side retainer
in
Less than 0 05
10 0020
in
0 20
0 0079
0 25
10 00981
0 30
0 0118
adjusting
shim
130
0 0079
ar
Backlash between
Side
0 03541
pinion mate and side
clearance between
and thrust washer
Ring
0 03351
0 90
0 0335
Backlash in
0 03151
0 85
mm
bearing standard with
mm
in
40
0
0 0158
0 50
10 0197
20 0 0 7874
Specifications
Specifications
Carburetor
r
f
I
l
1
il
U
I
t
f
C
Ir
l
t
i
h
l
SO
P
Leo
880
Pwlth
nission
LBO
079
EI
PUIO
145
El
75eD
750
320
1
85@
J
520
1
850
J
PUll
N
with
A
emission
control
L52ll
L501
1
R
950
R with
emisrion
control
23
Jrl
M
39 with
5 M 70
38W
6
38W
with
i
95
U20
SU
87
UOO
M nll
s
950
t
Sole
U20
with
32
uion
emi
N i1with
46W 5 N 25
with 46W 7
87
8
950
LIB
PL510
071
87
LIe
with emwion
lrol
071
87
L24
wth
D
95
95
23
N 21
079
ISO
13
rrT
950
emialon
control
HLS30
At2
with
71
78CD
emission
control
UllO
nJlllO
From
@
SOIt chamber top to fuelleYel
131
CDft
Nt
ft
8
l
i
l
t
tIn
E
14
e
i
I
14
14
14
45
024
1
40
0
55
55
I
il r
3
2nd
i
l
l
210
100 220 2nd 120
5
2
B
100 220 2nd 120
ec
I
Specifatons
0
f
48
100
B
tS
40
2
4Hlt
sec
B
tWsce
48
48
7
el
Carbueto
60
l
ii
70
80 BO
ec
h
135
60 60
BO
15C1
sec
ICf
14
92 140
827 024
788 06
1
788 06
102
022 1
180
022 LlSO
9B 115
96
827 024
1
81
90
I
i
c
f
42
0l
1
102 1
1
1
1
81
1
1
1
1
M
r
D2630A
M
4A
Hitachi VC42 Rochest 7015 3 Imgle throat downraft Nihonki kakl 2D3OCE dual thrOlt downl1ft Nlhonkl kat 2D3OC dUll throat downraft Niho ki hln D2630A dUIlI thm downraft Nihonlia blu
t
i
l
f
P
tI
L60
Pwlth eml
contrl
LOO
El
PUlO
320
El 1
J
520
1
J
PlAl
dual thro
downNt
CD P
400
8
n
131
1
1
4
I1
16
16
5
13
6
020
011
60
020
JIM
100
092
11
ec
200 100
220 100
180 100
C
ISO 100
46 18
see
48 16
ec
41
100
071
100 14
sec
16
96 130
315 512 pnm 315 433
C
240
ll5 155
C
f
1I1 1969 1
5
945 U02
394 456
1
01
62 1
495
i
240 120
35
551 710 nJ
7
495
1
1
1
C
2 200
l1 C
1
605
74
81
1
C
I
BO
1970
A
5
6
HJB38W
Ildedr
aft
Hitacln DCA306 throat downraft
l
dUIil
emJslon contml
5
1
L5U
Hitachi HJB38W SUtypeIlde raft Hitachi HJB38W SUtype Ide rah HitachI HJ46W SUtype Mikunil SoJex
R
Rwith emluon control
choke
PHH twm
f
7
8
S
96 135
155
315 pnm 216 SL2 2nd
900 1
I01
787
101
1
260
L81
c
1
180
1
f
with
083 110
255 118
106 118
l
5O
6
138 157
02
3
8
DAF328
6
4
2
0
1
024 1
181
1
10
Ilderaft Hitachi HJG46W HJC46W type Ilderaft Hitachi DAF328 dual throat downraft Hitachi auto DAF328 DAF328 PL521 Hitachi HJG46W ASU tyPsiderlh HitlChl DC 306 throat downrah
cont
16
with enul on control HLS30 AI2 with emis on COTltrol LBlIO KLBlO
with emiSIOn
with emlD n control
puna
du
itd
StI
24
U
U
U
1
16
1
1
i
CDat
8
ft
for
P
05
1 1
frpl
I
j
Vo
J
5
1
0 580
111 2
98 1
18
A
l
JIO
1
80
98
I2
11
Z
M
Irnl
39
15
34
B
5
020
5
18
1
N
without
1
00
57
8
5
020
020
020
012
012
012
e
e
46
5
stop
020
020
020
020
020
020
012
012
012
012
012
012
012
e
e
e
e
B
9
7
we
338 358
333
A
4
339 31
4
339 31
339 354
127 350
aX 9X
MX 00
X
XX
X
XX
87 76
81
86X 90
g
pl
1
d
t
lftM
98
lts
8
68
bl
0
98
A
10 60
A
N
88
0
PlA r RIAl
1I
d
Ii
A
A
N
N
N
Specifatons
Clutch
c
lI
tI
I
N
299 315
laid
N
D
I
fiJlI
J
Xd
D
X
IO B 14
f
14
87
12X
75
1S
226 32
I
176 41
7
1
7S
13
X
12X
87
1
UX
X
1
75
15
A
N
91 01
87
12X
1
75
X
87 5
12
14
XX
A
a5 N
7
00 92 A
740
XU
O
r
5
i
R
tlww
r
1
2
00
2
04 011
2
22
1
77
2
I
1
98 OI
77
1
i
1
I
211
14 1
1
4
6pr1
l
qUo
1
I
190 US6
180
A
N
132
@1
99
I
1
15 87
78 @1
1
101
178 56
1
17
169 @J
6@1
1S
92
2
179
00
161
2
diaphr
I587 99
@1
l
1
gm
c
roll
pring
ag
Prh
roll
i1
spring
sprinl
dlaph1 J
pbralJ
SPL310 SPL31 SRL31 PUIO WPL510 510 WPL510 15IO PL021
lHlOA
LBlO uBlO
i1
spring
spring
il
pring
diaphrgm sprina
roll
LS21
y
i
LOO
Eady L320
Lo
L320 PLUO PUl RUll
N
Specifications
SERVICE DATA AND SPECIFICATIONS
Pressure
I
spring
mm
2
mm
44
3
length
Fitted length
Free
29 2
load
right angle
Allowable min spring force
100
Qut of
l
j
I
0 0 in
l
kg
l
I
Ib
9 7 ill
0 196tl
1m
AJ7
14Din
I
f
h release lever
Clut
Release bearing ta diaphragm spring
release lever
1 2
clearance
J
l
Diaphragm spring ta flywheel height
Release lever ta flywheel height
1
O
O
j
0 04i
mm
t
10m
i
0 0
O
o
1
1 9ti8
in
ll j 1I
O
l
Hl
019
in J
t O
Clutch disc
ze
Facing
Outer dia
inside dia
x
1 O
200
thickness
7
Total friction
area
mtu
120
H7
12
362
O
x
tO
I
in
i02
6 11
Thickness of disc assembly
Free
8 6
Compressed
7
9 0
6
Material
HITACHI
Number of torsion spring
Allowable min depth of rivet head
G
from
facing
surface
Allowable facing ron out
Allowable free play of spline
nm
9
7
0
38G
J
17
HT50S
0 3
mm
0 Ollb in
O
mm
0 0197 in
0 4
rom
0 0157 in
1
O
0 3012
IllIl1
O
in
lU
31
in
I
AKEBOXO A50
Pressure platlll
Allowable refacing limit
Clutch
10
mm
0 0394 in
pedal
Pedal
height
when not depressed
182
stroke of pedal head
Pressing strength at full stroke
Free
Master cylinder
Dia
1m
0
mm
L
kg
15
87
0
3
1
in
R H
8 1 0 in
L H
1 in
98
33 Ib
clutch
master
Allowable
2
17
7
207
cylinder
max
mm
il
8 in
clearance between
cylinder and piston
Tightening torque
Clutch assembly securing bolt
2
mm
2
0 0051 in
Gkg
m
17
IS S
lb
ft
135
Specifications
ENGINE
TORQUE
n lBS
Op
I
elle
I
200
Ii
CI1
heo
ns
c
cti
b h
Ma
n
l
1
i3
7 O
i
i
J
5
54 2
1
S
4
I
32 5
It
cap
h
ft
2
9
J4 7
30 2
19
2
216
U
n
J
239
5
119
32
5
0I
lu
JIe 75 9
5
43 4
2
I
1t
011
9ii
i2
U
u
I
2
6 5
10
91
2
5
oli3
b
I
e
lu
nettu
ri
1o
ls
l
1
C
I
112 5
1
05
I
S
5 7
1
IS 2
U
1
15 7
uUay
nk
UO
130
7
lil15
boll
PISTONS
h lI
I
M
r
i
I
CI
I
I
CRANKSHAFT
I
d
B
BEARINGS
I
lnlll
Inch
01
C
I
Motna
I
ck
Shott
Jilek
tn
8
CI
Shoff
in
o
cI
i
Inch
0131
0016
h
n
t
u
B
Inch
I
N
ooa
I
001
Il
Cl
01
I
i
966
rlng
I
1
h ck
101111
RINGS
End 0
h
hto
I
Y
PINS
T
010
1
67
1
1
1 9n
0
Shft
h
1
Inch
1
0005
002
013
2 360
2 04
1
012
001
0027
01
a
012
U
20
0012
T
010
1
2045
0013
2 47
0024
012
1
0021
012
I
016
a
012
1
L I
121
1
001
I
009
12
1
7
012
a
2 161
1
012
002
0026
015
i
1
012
L U
001
T
1
009
12
1
67
012
0001
1
0021
0026
4
012
01S
1
012
1
1970
721
138
0017
014
012
035
617
1
770
1
1
967
1
0024
011
Specifications
VALVE ADJUSTMENT
I
V
L
V
h
I
Inch
cI
M
V
AIIIII
Clearenc
1
Vol
D
SteDl
to
h lI
S
o
lnl
h lll
lt
bh
ll
feu
014
19
IOut
0
@
64@
r
@
I
U
20
OO
QUIl
@
1l
00
1
00
@
l
Q17G
Intah
@l
ur21
t
1
001
1
0004
@
L
72
197072
4
oliID
OtOIl
L 24
l
2
10
r
Out
0 120
90100
1200
004
002
00
014
0 114
14
034
0
001
0312
00
il2
o
00
00
IS
0
3112
0
12
004
4o
I
001
014
4
@
5@ 1
1fw
56@ J
tb
o
ut
11l
OiG
0
00
I
19
bh
Inteke
IIII
00
00
160 172
l
bh
00
0 14
5@1
In@II001
00
00
0 112
00
j Enlllneh
t
ENGINE
GENERAL SPECIFICATIONS
I
Y
d
fn
I
ll
r
Inch
C
1e
Inch
I
2 174
I
J OSS
n
4U
196661
17
71
nm 1I1
Dltpl
ce
I
196
6
I
l
1
0
2
nS
2
6
3
433
17 2
3 261
n
M
Ma
CeI
I
R
8
l
97
k
@
21
19
1299
30
9
I
7
plll
@
5200
0
22
@
6000
92
U0
125
@
1
1 2
113
2
2 2
1
3
2
74
1200
j
2
756
11
12
1
1972
16
2
26
l
U2
2
4
1
12 2
1200
2
9
0
72
76
2
02
n
7
74
2 7
IT1
6t
U92
71
5
I
@
0
000
I
96
1 1
14
n
2
0
151
@
00
pm
I
1
I
6000
70
100
70
2100
@
4000
@
00
100
2600
2040
I
5
4000
0
3040
I
I
@4400
1
@
I
@
I
@
I
@
un
nd
@
100@
I
@S6OO1
@
OIlP
131@
151@56OO1
1595
71 5
7
00
117H
7
2
@
000
1595
902
n
76
2
I
97
6000
b
150@
2 902
@
b
SU
U
t
103
I
Ne
Cl
fl
n
I
2
5
73 76
P
U9S
09
2
T
H
0
lo4 60
42
50
noo
5
60
4400
5
60
4000
4
50
11171
137
Specifications
TUNEUP SPECIFICATIONS
I
I
I
SI
11I1I tllI
Dbtrlbvt
II
PlrI
e
Y
M
d
1
T
I
Elllln
1
I
66 61
J
G
191072
20
B
I
U
I
2Q
1 16
DO
l
with S
24
1
G
Rch
027
03
022
0
I
ell
D
A
Ihll
0
SO 55
1
I
027
027
01
016 020
031
035
017
022
1
55
o
on
017
0211
1
55
0311
035
Olt
D20
35
41
61
st
hI
MI
ltlt
t
the
ngine
at
normal
It
IS
11
11
I
4 1
1
I
Idlin
ldeg
rpm
M Tvehicle
e
800
A Tvehicle
io
650
D
3
n
pvn
62
3
mge
U4
r
liming
0
relard side
15
5
0
511 BTlX
15
5
0
SAE
o
tI
Or
F 1IA inc
API
il
dl il nall
n
IOW 30
IOW
10
lOW
IOW
O
W 20
lOW
IS ilSE
carOil
API
1
Ili
iJ
f1
EI
jIJ
0
tion
l
fPS
40W
Ily
he used for
hi h speeds
Icmpcrutures
00
1
1 BlOC
5
T
1lI
30 IOW 10
lOW 40 IOW 40
20 20W 4 0
10
90
140
vll
n
7
4 2
Recommended Lubricants
T
N
vlley
42
1
11
I
idling setting
Engine idling
S
vlley
2 4
I
Adjust
e
D
40
3
I
k
M
L
fTDC
ADJUSTMENT OF IDLING
138
h
l
04
e
012
0U
031
I
72
1
Inch
671
0
1
TI
I
75
Specifications
Capacities and Pressures
l1iru
Wttd l
RA t
U
r
ON
ke
lli
tln
fl
T
t
Yo
T
Pc
R
pt
Cool
f
m
11
s u
ql d
f
ur
d
rul
l
azi
e
t
a f
u
0
r
Hi
qtf
i
Wi
PiJi
T
WiLl
Filt
A
M
e
UI
S
LBO
36
S
PlAID
33
30
SIL1W
4
A
PIAlI
A
HUll
S1 11 1
A
1
Slt1
111
1
SI
11
111
ithtwlJ
twin I hoke
rhuretors
L
1 8
12O
i20
L
L521 3 8
1 L51O
52
WlL51D
5 2
PL521
4
A
20
3
8
2
u
J 5
4
4
3
4
R
s
6
4 7
2 6 front
nd rear
19
0
5 2
NA
NA
20
10
6
8
5 4
NA
1
8
113
6 9
NA
4
2
2
110
5 7
N
6
4
3
19
110
7
4
6
2 0
11 4
8
3 4 4
3
1
3
54
20
11 1
90
7
5
2
11 4
90
5
32
4
0
43
18
42
17
10
93
5
7
9
NA
N
8
4
6
4
IL4@
11
1l9
6
4
6
4
IIA@
21
11 9
68
2
7 2 with
heater
17
10
68
36
42
8
4
6
4 6
6
43
4
3
5
32
4
A
3
A
13
13
N
1 25
2
A
6
16
8
7 2 with
heater
3 4
13
6
4
3
1
2 6
4
3
11
7 4 with
heater
HLS30
4
7
43
32
LBllO
NA
29
43
32
witllollt power takeoff 7 8 rll
Q8 pb
4
@ 1 5 pts uil Oler
12 8
2
1
16
15 9
8 5
L1
57
44
1
NA
3
1
1
13
trnnder
138
SpecilicatioDS
AUTOMATIC TRANSMISSION
V
t
al
h rl
pring
In
1
i
10
Jla
No ul
free
II
length
mm
in
linl
lallllal
SSllrt
Prl
gULHllT
Prssute
Jdificr
1st
d
6
13
Uh lIl
Id shill
O OSI
3rd
timing
Throttle
Sulenoid
k Ip
downshift
k
lo
10 31501
06
6 0
36
0 24411
65
10 2559
0 55
50
0 0217
0 0354
0
0177
07
Secondary
140
governor
0 0276
0
12 0
16 0
5 6
14 0
5
0
26 8
Load
lb
q
55
23 5
0 925
90
2 8
62
0 1
0 3543
16 0
0
5
12
02
0 625
630
17 0
0
669
27 0
1063
18 8
4
1
140
3 1
0 55
12
192
0 740
4 2
5
12
0 60
492
0
3
1
210
0 60
0
827
19 0
3
1
2 19
1 055
0 748
48
5
21
0 846
5
11
om
218
0 858
3268
8
5
3346
0
15 0
1890
3
8
0
5
33
319
1
0 2205
1043
22 0
0866
0 1969
0
36 0
1417
0 1969
5 0
32 5
1280
14
4 8
10 078
45
0
Primary governor
15 0
10 0315
410
1 614
0 2165
08
02
Orifice check
5
32 0
260
1
18 0
6 2
10 0217
0 728
162
2
0 02761
0 01761
18 5
16 0
10
43 0
1693
5 0
0 7
09
Throttle elief
13 0
5
26
3 4
1276
004134
X O
55
0
und
Se
15 0
10 01571
length
mmOn
Jb2
004
0 7
ud
0
1O
10 5
I
to 04nl
OO
3rd shifl
1
lalled
d
tliJ
pfll11
I
25 1
0
988
453
0
75
0
0 02
0
2953
10 5
0 413
215
0 5
10
1
24
SpecifiCations
SERVICE DATA AND SPECIFICATIONS
General specifications
Torque
converter
Type
Stall
SYllImelrit l1 J e1emc
onverter ollpling
torque
alia
1t
I
lge
Sl
llfl
phJx
Ut
0
Transmission
Type
J
pl
Control elements
Multiple
disc
speed lorward
lIletal
ld
sp d
lI
r
r
iT
l
Jin
lr
clutch
Band brake
diMulstipcle
brah
One way clutch
Gear ratio
1st
458
2 d
1458
3rd
1000
Reverse
Selector positions
P
ParkJ
18
The transmission
shaft is fixed
R
Reverse
Backward
N
Neutral
The transmission
o Drive
llo
lIlr
illl
ltom
IL Till
llpl
bl qarku
utral
t
slarlc4
Up or downshillS
nd and
I
plal cd
Thl19inc
TI1
I
IU
hI
tlly
lIil
ill
tr
b
llll
bl
lOp
2 d lock
Fixed
Lock up
Fixed allow
ld
at
downshifls tWill
J
Oil pump
Type
11Ilernally
I
termeshing
l1
11
p
l
ar
pUlllp
Number of pump
Oil
Capacity
AUlOlllath transmissiOll fluid
5 5 liters 57 8 U S qls
Hydraulic control system
in
rull
IYlk
4718 Imp qls 1
7 Iill rs I
Approxil
JTdy
Imp qts
Dl
torque
7S U S
qh
lS
r
T1c
Controlled by detecting Ih nep ati e prc sllle
of intake manifold and the YOhllioll speed It
output shafl
Lubrication system
Fon ed lubrkation by
Cooling system
Water
cooler
coo
edbya
located
at
an
Iii pump
culaliOlHypc
the
Ixili JfY
dialOr
HI
Specifications
Specifications and adjustment
Automatic transmission
nsembly
X0400
Model code number
Torque
converter
assembly
the
tamped mark on
Front
16 8
TIC
lutch
Number of drive
Number
r1ates
in
mm
Clearance
Thickness of
3
3
of driven plates
in
mm
retaining plat
1 6
to
1 8 0 0630
to
0
0709
10 6 0 417
10 8
425
0
110 0 433
112 0441
114 0 449
116
457
0
Rear clutch
Number of drive
plates
Number of driven
Clearance
IttW
reverse
in
mm
Thickness of
retaining plate
in
mm
5 0 039
1
1 0 to
4 8 0 189
4
Clearance
in
mm
of
s
retaining plate
mm
in
0 80
105
to
118 0
465
12 0
472
0
12 2 0 4S0
12 4 0 488
t2 6 0 496
12 8
504
0
Brake band
Piston size
Big
mm
dia
Small dia
Governor
mark
64
520
2
40
575
1
E
strainer
assembly
Stamped mark
142
in
assembly
Stamped
0 059
4
plattos
Number of driven plates
Control valve
to
hrake
Number of drive
Thickn
4
4
plates
on
governor
body
35
0 031
to
0 041
Specifications
and stall revolution
Engine idling
control device
with emission
Engine
olution
Idling
rC
650
rpm
D
at
800 al
Stall revolution
Tightening torque
Drive
plate
to
Drive
plale
to
Converter
Piston stem lock
Control valve
Side
plate
Nut for
to
Governor
comelIer
30
5
i
I
Inhibitor
to
ace
to
to
plug
ver
body
inspection hole
parking
inserting position
extension
to
housing
manual
shaft
Control lever boll
Control lever bracket
to
to
floor
evel
two turns
after
IU i1
11
to
9
4
5
to
19102 5
0 25
to
0 35
19
to
36
to
19
to
to
07
to
to
0 35
5
2
5
1
5
2
3 6105 1
44
08
5 8
to
3 6105 1
30
to
40
22
to
29
30
to
5 0
22
to
36
07
to
J
5 0
14
to
1
08
to
11
s5
0
nut
COfltlOj lever knob
to
to
40
ase
to
Selector rod lock
rod
87
941013
5 to 0 7
0
case
1
1
0 35
case
connector to
18
5 to 0 7
0
transmission
II
3
to
06
ut
IX
3 61
75
0 25
COVeT
1hl
1
In
0
05
body
oil pump
to
t
0 55100 75
iI distributor
to converter
Turn back
13
case
ase
bolt
transmission
Selector range lever
0 7
1 210 I 5
body
reamer
oil pressure
charging pipe
to
5 tnO
0
onnecting nut
actuator
to
case
transmission
upper valve
to
to
0
0 5
band brake
transmiiSion
for oil cooler pipe
Oil cooler pipt
Suppor
case
5
1 5104 0
to
Manual shaft lock
lock nut
housing
extension
body
housing
Dust
30101c
0
lower alvc
to
alve
switch
Oil
5 0
to
control valve
Oil pump
Test
to
oOlrol valve
Oil strainer
6
40
nner
body
to
101
40
verter
adjuting
body
16 0
ngine
ut
One way clutch
to
00 u16
to
ase
Piston stem when
Lower vain
14 0
retainer to transmission
piSlon
ft lb
5 0
to
0
position
2 000
to
transmission
to
m
to
40
torque
housing
Transmission
Servo
kg
nhhaft
Transmission case
Oil pan
I 800
pm
position
N
to
0 75
055 100 75
to
0
08
tu
0
1
6 to
0
1
ItJ
0
0
h
40
to
79
4
5
In
4 0to 5 4
II
tll
5
tI
4
0
O
79
1010 15
5 8
30
to
S
10
to
tt
610
I t
I
I
I
1
lightening
143
Specilications
PROPELLER SHAFT
SERVICE DATA AND
SPECIFICATIONS
ut diD
Length
Propeller shaft
1 080
For Sedan
42 5
For
48 9
Axial
Sleeve
play of the spider journaJ
yoke spline
Spline
Maximum
lash
out
run
60 3
25
4
2
1 242
Wagon
to
mainshaft
wear
of
limit
propeller shaft
Spider journal diameter
wear
limit
75 0
x
dia
x
63 5
30
0 08
mm
o
0 08
71 8
0 0315 in
mm
0
mm
0 0197
06
mm
0 0236
mm
in
28
05
0 15
mm
0 0031
0 0059
j
Pennissible unbalance
35
Dynamic
Thickness of available snap
0 486 in
cm
gr
rings
Standard
white
2 00
mm
0 0787 in
Oversize
yellow
2 02
mm
0 0795
I
2 04
mm
0 0803 in
green
2 06
mm
O OSll in
blue
2 08
mm
0 0819 in
brown
2 10
mm
0 0827 in
colorless
2 12
mm
0 0835 in
pink
2 14
mm
0 0843 in
Tightening torque
Fixing
nuts of
flange yoke to
companion flange
144
oz
20
14
2 7
kg
m
20 nIb
at
5 800
p
m
Specifications
kg
Tightening torque
Drive
pinion
m
ft Ibl
17
ut
50 S to 57 8
2 6 5 to S 7
0 9 to 1
Side
etainer rolt
Side
flange fix bolt
1910 2 6
13 7 10 18 8
fix bolt
19 to 2 6
13 710 lS S
Rear
Rear
cover
cover
to
mounting member lock nut
Differential
Differential
to
drive shaft fix bolt
mounting
Companion flange
Oil dram
Oil
uspension member fix bolt
to
Differential carrier
to
nd filler
member
Variation
elf lock nul
propeller shaft fix bolt
6
8
43 410 57 S
5 to 7
3S 2 10 50 6
5 to 6
36 2 to
liter
DS
qt Imper qt
6 28 9 to 43 4
to
08
7 8 3 4
ethods
umbers
pressed by
o
pinion adjusting formula
GO
mm
u
T
W
N
S
I
Side
bearing adjusting formula
Tl
A
H
O OlJ
C
0 01
L
4
43
50 6 to 72 3
2 0 to 2 7 14 5 to 19 5
Oummv shaft
Dri
to
7 to 10
4
plug
i y ahOllO
Ipal
djll tiltg
I
122 9 to 144 6
20
7 to S
Ring gear bolt
I
to
T2
B
0 01
Gl
0 76
D
D
02
D
E
G2
0 76
F
145
Specifications
Brake
Specifications
C i
S
nJ
Bore
D
LM
r
w
Mu
R
Ii
C
Drum
Drum
J
R
n
F
1 60
rti
r
ur
u
c
R
t
1000
1 000
USO
11 5
115
93ll
KA
i
A
NA
S
A
Drum
Drum
875
1000
Drum
Drum
875
1000
93ll
PL411
Drum
Drum
875
1 000
93
HUll
Dbl
Dmm
875
2 000
9 1
Dbc
DrUllI
750
125
l i1
Dnllll
750
5
12
Drum
DrUIll
77
77
rnm
I
Drom
750
750
i50
Di1c
Drum
750
000
tln
9 1
WPL5lO
Disc
Dn
750
000
l U3
9
PL521
Drum
Drum
KA
KA
10 0
10 0
HLS30
Disc
Dnnn
875
2 125
875
10 7
9 0
Drum
688
1894
688
8 4
8 0
PIAW
SPL310
SPL311
SRLl11
320
1
520
1
L521
PL510
LBllO KLBllO
l
Disc
m
tf
r
CukT
IIq
J
C
u
r
k
T
10 0
0
10 0
1
g
1
Ru
r
B
q
9 0
9 0
R
1
Wltul
Pi
U
0
w
JIII
f
f
S
t
B
W
bd
lio
54
ll
l
10 0
KilO
i o
M
9 tJ
10
ill
UlO
11 2
11 2
W rlAIa
C
w
9 0
Alignment Specifications
Chassis and Wheel
Mod
1
81
9 0
55 3
d
ll
Ii
30
1 30
12
166
45
2S
25
2S
25 32
32
7 15
WL60
98
4
54 B
1 30
55 3
1 30
12 16
6
45
7 15
PUlO
5PL310
PUll
RU11
311
5P1
5RL3ll
L320
93 8
89 8
93 7
93 7
89 8
89 8
97 2
47 0
1030
1030
00
13
6030
3B
28036
47 1
1030
1026
06
13 6034
38
28036
75
47 2
0
1045
06 136015
38
28036
47 5
47 2
0
1045
13
6015
3B
28036
2
1 30
1025
08
12
6035
36016
29020
47 2
30
1025
08
12 6035
36016
29020
30
1 30
08
126
34
29030
1
08 12 6
34
29 30
35 478
3839
22030
47 5
47 8
50
47
50
46
1
3
46 7
SO
L520
99 B
49 2
49 9
510
P1
95 3
50 4
50
510
WP1
95 3
50
49 6
WI
PWI
99 B
49 2
49 9
j
HLS3O
90 7
83 3
83 0
LBllo JLBllO 90 0
48 8
49 0 40
SO 105O
20
3030
i Uo
ooded
148
1
5
202
3025
I
oSO
3 SO
50
2055
20 1020
040 1
10
35
5
103
10
12 24 7050
1020
08 126
50
os 20
OOS
1
11040
12040
24 7oSS
3B 39
2203
3030
34
29 30
13
32
31024
32024
42
3537
s
b
o
r
r
1
If
fIT7L7 7JrwF
wM
C Ju
i
J
7
cif
1
tI
lifftrf
u
UJ
1
4
I
IRING AND
AUTO BODYR
REFINISIUNG
by B B Weston
Every possible phase is
highly ompetitive auto body
ir tf
rep
ide
light of the correct repair techniques and tools to be used to return a damaged
n materials welding hand tools and auto body
auto to
likenew condition Topics such at
constrocti
in
this text Designed to serve as a shop mahual
few
of
the
areas
are
a
clearly
explained
design
just
major
for auto body men and as a reference tool for the owners of auto repair shop s it is a must for any well
equipped school shop or library
delves deeply
This b
discus
into the
and eXplained in
SBN
030
87749
9
58 95
X GltEA1 bY 13arrie Gill
MTOR RACING THE GRA
Banie Gill the internationally famous r
ej
ert has created a book that offers portraits of ten
f being the gre
of t1iem all
Graham
c ntenders for the honor
iver
dr
Jill tirIing M s J en
Jack Brabham Bruce McLaren
dt
I
Hawthorn
k
ikl
FangJQ
n
Huh
lt
ryIanuel
Ju@
enny
JunClm
and
nd Jackie Stewait Eaclimim is disCjlssed ii1 this book by the
writerS
o knew 1llm th e
best
s
sport
shiueCi his triumphs
agedies
SIde look at some ofthe world s most
h
Tl book
cOIof W
and
will
give
courageous
t
evet
racing enthusiast
1
c
liiI
il
di
lC
dj
ii
at
eve1 l
p
a s
1
s
s
t
w r
9tl
sl
n
11
c1nditi
CP
This book Contains
and garage
ldeil
fncl
dshieId
rtqntrol
wipe
wi
lwmdiftsow
speedqm
power
voted to controls for the
JD1 b
ELECTRO
it
RE5l
by
Edward J
5 95
eters
and
c
eIe
adjustment
i
c
cloc
Ysl1ers a
nd
eId
wmdshi
s
and
sign
There
tum
Wipers
l
1
l87749
SB
128 3 paper
N 87749 129 1
1
i
9
3 95
lcore
are
fsimple and very useful electric devices that can be made at home for the car
circuits for the car that warn of danger from ice arid overheating an autoinatic
and an automatic sidelight switch Two projects that will be Of great help in the
SBN 87749
32 1
5 95
YOuRBIUTISH SPORTSCAR by Charles Williams
This bOOK will liel
t ers of British made cars tune them for maximum power and speed TUNING
ORTSCAR gives a non technical but practical guide to how f8InllY cars can be made
YOUR BRITIS
TUNING
to behave mpre liKe sport cars An added feature is a list of major Americ8n suppliers of the British IlUide
in this book TUNING YOUR BRITISH SPORTSCAR is profusely illustrated with
auto parts discuss
and
iJii
grams
SBN 87749
f
ij
T
f
FOR CAR AND GARAGE by R M Marston
L
li
photos
4
handicapped
S
JECTS
l8iring
rej
garage are a e
atiilgbattery charger and a speed control for electric drills
f
described by ll d and easily understandable instructions and ilustrateq by clear
Each project
is
diagrams All necessary components ate listed fot each device This book wilI l e ofgreat value to all car
owners meMtanics and electricians
many
II
Mezo
on the latest autom
ccessory developments and
for the imtomobile Qwner anll theprofessionaI mechanic
li Hters
o
b
e reIease signals cigare
teitieatis e
t
r
mdl
SBN 87749 229 8
AeBESSORIESIDE
oslJm1Jtho
liv
ly and
y
rJbTI
U
fresh
sPfirtsmen
t
lof
a
df
165 8
7 95
ti
E