1
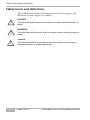
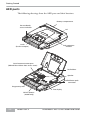
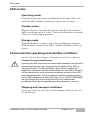
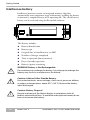
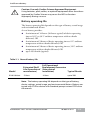
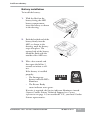
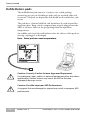
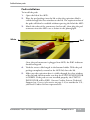
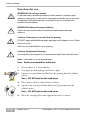
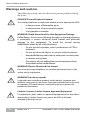
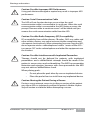
QUICK REFERENCE GUIDE
POWERHEART® AED
G3 PLUS 9390A AND 9390E
70-00915-01 D
Information in this document is subject to change without notice. Names and data
used in the examples are fictitious unless otherwise noted.
CE Mark Declaration
The CE marking of conformity indicates that the device having this symbol on its
immediate label meets the applicable requirements of the European Medical Device
Directive.
Trademark Information
Cardiac Science, the Shielded Heart logo, Quinton, Burdick, HeartCentrix,
HeartCentrix‚ Powerheart‚ FirstSave‚ Mastertrak‚ MDLink‚ STAR‚ Intellisense‚
Rescue Ready‚ RescueCoach‚ Rescuelink‚ RHYTHMx‚ and Survivalink are
trademarks of Cardiac Science Corporation. All other product and company names
are trademarks or registered trademarks of their respective companies.
Copyright © 2011 Cardiac Science Corporation. All Rights Reserved.
Patents
This device is covered by the following U.S. and foreign patents:
5,792,190; 5,999,493; 5,402,884; 5,579,919; 5,749,902; 5,645,571; 6,029,085; 5,984,102;
5,919,212; 5,700,281; 5,891,173; 5,968,080; 6,263,239; 5,797,969; D402,758; D405,754;
6,088,616; 5,897,576; 5,955,956; 6,083,246; 6,038,473; 5,868,794; 6,366,809; 5,474,574;
6,246,907; 6,289,243; 6,411,846; 6,480,734; 6,658,290; 5,850,920; 6,125,298;
EP0725751; EP0757912; EP00756878
Other U.S. and foreign patents pending.
Cardiac Science Corporation
3303 Monte Villa Parkway
Bothell, WA 98021, USA
800.426.0337 (USA)
425.402.2000
[email protected]
www.cardiacscience.com
ii
70-00915-01 D
EC REP
MDSS GmbH
Schiffgraben 41
D-30175 Hannover
Germany
Powerheart® AED G3 Plus 9390A and 9390E
Contents
Contents
Chapter 1: Product Information and Safety
Contact information ................................................................................ 1-2
Product models ........................................................................................ 1-3
Product references.................................................................................... 1-3
Warranty information.............................................................................. 1-3
Safety terms and definitions ..................................................................... 1-4
Chapter 2: Getting Started
Unpacking and inspecting........................................................................ 2-1
AED parts................................................................................................ 2-1
AED modes ............................................................................................. 2-3
Operating mode ............................................................................... 2-3
Standby mode................................................................................... 2-3
Storage mode .................................................................................... 2-3
Environmental operating and standby conditions .................................... 2-3
Shipping and transport conditions .................................................... 2-3
Intellisense battery ................................................................................... 2-4
Battery operating life......................................................................... 2-5
Battery shelf life ................................................................................ 2-6
Battery installation............................................................................ 2-7
Defibrillation pads ................................................................................... 2-8
Pad installation ................................................................................. 2-9
Directions for use ........................................................................... 2-10
70-00915-01 D
Contents
iii
Contents
Chapter 3: How to Perform a Rescue
Warnings and cautions............................................................................. 3-2
Step 1: Assess the patient.......................................................................... 3-4
Step 2: Prepare the patient ....................................................................... 3-4
Step 3: Place pads..................................................................................... 3-5
Step 4: Analyze the heart rhythm ............................................................. 3-6
Step 5: Deliver a shock ............................................................................. 3-7
Step 6: Administer CPR........................................................................... 3-7
Step 7: Prepare the AED for the next rescue........................................... 3-10
iv
Contents
70-00915-01 D
1
Product Information
and Safety
Contents
◆
Contact information
1-2
◆
Product models
1-3
◆
Product references
1-3
◆
Safety terms and definitions
1-4
Before Operating the Powerheart G3 AED:
◆
Become familiar with the various safety alerts listed in the Safety
chapter of the Operator and Service Manual.
◆
Safety alerts identify potential hazards using symbols and words to
explain what could potentially harm you, the patient, or the
Powerheart G3 AED.
Powerheart® AED G3 Plus 9390A and 9390E
70-00915-01 D
1-1
Product Information and Safety
Contact information
Inside the United States:
To order additional Powerheart G3 AEDs or accessories, contact
Cardiac Science Customer Care:
◆
Toll Free (USA): 1.800.426.0337 (option 2)
◆
Telephone: +1.425.402.2000 (option 2)
◆
Fax: +1.425.402.2001
◆
Email: [email protected]
Cardiac Science provides 24-hour telephone technical support. You can
also contact Technical Support though fax, email, or live web chat.
There is no charge to the customer for a technical support call. Please
have the serial and model numbers available when contacting Technical
Support. (The serial and model numbers are located on the underside
of the AED.)
◆
Toll Free (USA): 1.800.426.0337 (option 1)
◆
Telephone: +1.425.402.2000 (option 1)
◆
Fax: +1.425.402.2022
◆
Email: [email protected]
◆
Web site: http://websupport.cardiacscience.com/webchat/
Outside the United States:
Contact your local Cardiac Science representative to order devices or
accessories and to receive technical support for your AED products.
1-2
70-00915-01 D
Powerheart® AED G3 Plus 9390A and 9390E
Product models
Product models
This guide is for Powerheart G3 Plus model 9390E and Powerheart G3
Plus Automatic 9390A AED models. They share a basic set of features
and differences are noted throughout the manual.
Product references
For purposes of retaining simple, clear instructions in this manual, note
the product references used. Features, specifications, operating
instructions and maintenance common to product models will be
referred to as:
“Powerheart G3 AED”, “AED”, or “device” refers to both Powerheart
G3 model 9390E and Powerheart G3 Automatic model 9390A AEDs
unless otherwise noted.
Warranty information
The Powerheart G3 AED customer documentation and any and all
information contained herein do not constitute any warranty as to the
Powerheart G3, Powerheart G3 Automatic or any related products in
any manner whatsoever. The Limited Warranty chapter in the Operator
and Service Manual serves as the sole and exclusive warranty provided
by Cardiac Science regarding Powerheart G3 AED products.
Powerheart® AED G3 Plus 9390A and 9390E
70-00915-01 D
1-3
Product Information and Safety
Safety terms and definitions
The symbols shown below identify potential hazard categories. The
definition of each category is as follows:
!
DANGER
This alert identifies hazards that will cause serious personal injury or
death.
!
WARNING
This alert identifies hazards that may cause serious personal injury or
death.
!
Caution
This alert identifies hazards that may cause minor personal injury,
product damage, or property damage.
1-4
70-00915-01 D
Powerheart® AED G3 Plus 9390A and 9390E
2
Getting Started
Contents
◆
Unpacking and inspecting
◆
AED parts
2-2
◆
AED modes
2-3
◆
Intellisense battery
2-4
◆
Defibrillation pads
2-8
2-1
This section presents information on unpacking and setting up the
AED.
Unpacking and inspecting
Every attempt is made to ensure your order is accurate and complete.
However, to be sure that your order is correct, verify the contents of the
box against your packing slip.
If you have any questions about your order, contact Customer Care (see
Contact information on page 1-2).
Powerheart® AED G3 Plus 9390A and 9390E
70-00915-01 D
2-1
Getting Started
AED parts
The following drawings show the AED parts and their locations.
Battery compartment
Rescue Ready
status indicator
Lid
Latch
(Push in to open)
Pad expiration
window
Serial communication port
(Behind blue rubber data access cover)
Pad holders
Speaker
Defibrillation pads
connector
Diagnostic panel
Text display
SHOCK button
(9390E only)
2-2
70-00915-01 D
Powerheart® AED G3 Plus 9390A and 9390E
AED modes
AED modes
Operating mode
Defined as having the battery installed and the lid open. This is the
mode the AED would be in during an actual rescue situation.
Standby mode
When the battery is installed, but the lid is closed. In this mode the
AED is not being used in a rescue. The device will conduct its routine
self-tests to ensure proper operation.
Storage mode
When the battery is removed, such as during shipping or transport.
With the battery removed, the AED is unable to perform self-tests or
rescues.
Environmental operating and standby conditions
See the Technical Data chapter in the Operator and Service Manual.
!
Caution: Temperature Extremes.
Exposing the AED to extreme environmental conditions outside of its
operating parameters may compromise the ability of the AED to
function properly. The Rescue Ready® daily self-test verifies the
impact of extreme environmental conditions on the AED. If the daily
self-test determines environmental conditions outside of the AED’s
operating parameters, the Rescue Ready indicator could change to
red (not Rescue Ready) and the AED may issue a “SERVICE REQUIRED”
alert to prompt the user to move the AED to environmental
conditions within the acceptable operating parameters at once.
Shipping and transport conditions
For up to 1 week. See the Technical Data chapter in the Operator and
Service Manual.
Powerheart® AED G3 Plus 9390A and 9390E
70-00915-01 D
2-3
Getting Started
Intellisense battery
Intellisense batteries contain an integrated memory chip that
automatically stores important usage information, enabling the battery
to maintain a complete history of its operating life. The actual battery
history can be reviewed using the Rescuelink software.
This history includes:
◆
Battery identification
◆
Battery type
◆
Original date of installation in an AED
◆
Number of charges completed
◆
Time in operation (hours:minutes)
◆
Days of standby operation
◆
Battery capacity remaining
!
WARNING! Battery is Not Rechargeable.
Do not attempt to recharge the battery. Any attempt to recharge the
battery may result in an explosion or fire hazard.
!
Caution: Lithium Sulfur Dioxide Battery.
Pressurized contents: never recharge, short circuit, puncture, deform,
or expose to temperatures above 65°C (149°F). Remove the battery
when discharged.
!
Caution: Battery Disposal.
Recycle or dispose of the lithium battery in accordance with all
federal, state and local laws. To avoid fire and explosion hazard, do not
burn or incinerate the battery.
2-4
70-00915-01 D
Powerheart® AED G3 Plus 9390A and 9390E
Intellisense battery
!
Caution: Use only Cardiac Science Approved Equipment.
Using batteries, pads, cables, or optional equipment other than those
approved by Cardiac Science may cause the AED to function
improperly during a rescue.
Battery operating life
The battery operating life depends on the type of battery, actual usage
and environmental factors.
A new battery provides:
◆
A minimum of 14 hours (18 hours typical) of device operating
time at 20°C to 30°C ambient temperature with no shocks
delivered, OR
◆
A minimum of 9 hours of device operating time at 0°C ambient
temperature with no shocks delivered, OR
◆
A minimum of 9 hours of device operating time at 50°C ambient
temperature with no shocks delivered, OR
◆
up to 290 shocks (typical)
Table 2-1: Normal battery life
Model
Full Operational
Replacement Guarantee
Estimated Shelf
Life (from date of (from date of
installation)
Typical Shocks
manufacture)
9146 Lithium
5 Years
4 Years
up to 290
Note: The battery operating life depends on the type of battery,
device settings, actual usage, and environmental factors. Battery was
tested with G3 Plus device with Standard prompt set and CPR set to
60 seconds.
Powerheart® AED G3 Plus 9390A and 9390E
70-00915-01 D
2-5
Getting Started
Battery shelf life
The batteries have a shelf life of five years from the date of
manufacture. Shelf life is defined as the length of time a battery can be
stored at room temperature, prior to installation into AED, and still
meet the specifications under battery operating life.
Note: Storing the battery outside its specific range (0-50°C) will
decrease battery life.
2-6
70-00915-01 D
Powerheart® AED G3 Plus 9390A and 9390E
Intellisense battery
Battery installation
To install the battery:
1.
With the label on the
battery facing the AED
battery compartment,
insert the battery as shown
in the drawing.
2.
Push the latched end of the
battery firmly into the
AED, as shown in the
drawing, until the battery
snaps into place. The
exposed side of the battery
should be flush with the
outside of the AED case.
3.
Wait a few seconds and
then open the lid for 5
seconds to initiate a selftest.
If the battery is installed
properly:
•
The Smartgauge
battery indicator LEDs
illuminate
•
The Rescue Ready
status indicator turns green.
0%
100%
If service is required, the Service indicator illuminates instead.
Contact Cardiac Science Technical Support (see Contact
information on page 1-2) or outside the U.S., your local Cardiac
Science representative.
Powerheart® AED G3 Plus 9390A and 9390E
70-00915-01 D
2-7
Getting Started
Defibrillation pads
The defibrillation pads come in a ready-to-use, sealed package
containing one pair of self-adhesive pads with an attached cable and
connector. The pads are disposable and should be discarded after each
rescue.
The pads have a limited shelf life and should not be used beyond the
expiration date. Keep a fresh, unopened pair of pads plugged into the
AED at all times. Refer to the pad package label for operation
temperatures.
An audible and visual alert will indicate after the self-test if the pads are
missing, unplugged, or damaged.
Note: Store pads at room temperature.
!
Caution: Use only Cardiac Science Approved Equipment.
Using batteries, pads, cables, or optional equipment other than those
approved by Cardiac Science may cause the AED to function
improperly during a rescue.
!
Caution: Possible Improper AED Performance.
Using pads that are damaged or expired may result in improper AED
performance.
2-8
70-00915-01 D
Powerheart® AED G3 Plus 9390A and 9390E
Defibrillation pads
Pad installation
To install the pads:
1.
Open the lid of the AED.
2.
Place the pad package into the lid so that the expiration label is
visible through the clear window on the lid. The expiration date of
the pads will then be readable without opening the lid of the AED.
3.
Match the color of the connectors (red to red), then plug the pad
connector into the AED case as shown in the photograph.
White
Red
Once the pad connector is plugged into AED, the PAD indicator
should extinguish.
4.
Tuck the excess cable length in the bottom holder. With the pad
package completely secured to the AED lid, close the lid.
5.
Make sure the expiration date is visible through the clear window
of the lid and check to make sure that the STATUS INDICATOR
is GREEN. If the pads are not installed properly, the STATUS
INDICATOR will be RED. Contact Cardiac Science Technical
Support (see Contact information on page 1-2) or outside the U.S.,
your local Cardiac Science representative.
Powerheart® AED G3 Plus 9390A and 9390E
70-00915-01 D
2-9
Getting Started
Directions for use
!
!
!
!
WARNING! Do not reuse pads.
Used pads may not adhere properly to the patient. Improper pad
adhesion may result in skin burns. Improper pad adhesion may result
in improper AED performance. Used pads may cause patient-topatient contamination.
WARNING! Reduced therapy delivery.
Failure to remove blue liner completely could impact therapy
delivery.
Caution. Short-term use only. Not for pacing.
DO NOT open defibrillation pads package until ready to use. Short
term use only.
Pads are not intended for use in pacing.
Caution. Equipment Damage.
Do not pull on the lead wire to separate the pads from the blue liner.
Note: Store pads at room temperature.
Note: Pads are intended for adult use.
1.
Ensure skin site is clean and dry.
2.
Tear open the foil package and remove pads.
3.
Separate one pad from the blue liner by peeling from the tabbed
corner.
Note: DO NOT pull on the lead wires.
4.
Place pad on skin in either location shown.
5.
Separate the second pad from blue liner by peeling from the
tabbed corner.
Note: DO NOT pull on the lead wires.
6.
2-10
Place the second pad on the opposite location as shown.
70-00915-01 D
Powerheart® AED G3 Plus 9390A and 9390E
3
How to Perform a
Rescue
Contents
◆
Warnings and cautions
3-2
◆
Step 1: Assess the patient
3-4
◆
Step 2: Prepare the patient
3-4
◆
Step 3: Place pads
3-5
◆
Step 4: Analyze the heart rhythm
3-6
◆
Step 5: Deliver a shock
3-7
◆
Step 6: Administer CPR
3-7
◆
Step 7: Prepare the AED for the next rescue
3-10
Read the Operator and Service Manual before using this device. Follow
the instructions provided in this chapter in the order given.
This section presents information about how to use the AED to
perform a rescue.
These are the general steps in performing a rescue:
1.
Assess the patient.
2.
Prepare the patient.
3.
Place the defibrillation pads.
4.
Analyze the patient’s ECG.
5.
Deliver a defibrillation shock.
6.
Administer CPR.
Powerheart® AED G3 Plus 9390A and 9390E
70-00915-01 D
3-1
How to Perform a Rescue
Warnings and cautions
The following cautions must be observed to prevent problems during
the rescue.
!
!
!
!
!
3-2
DANGER! Fire and Explosion Hazard
To avoid possible fire or explosion hazard, do not operate the AED:
•
In the presence of flammable gases
•
In the presence of concentrated oxygen
•
In a hyperbaric chamber
WARNING! Shock Hazard and Possible Equipment Damage
Defibrillation shock current flowing through unwanted pathways
is potentially a serious electrical shock hazard and potential
damage to the equipment. To avoid this hazard during
defibrillation abide by all of the following:
•
Do not touch the patient, unless performance of CPR is
indicated
•
Do not touch metal objects in contact with the patient
•
Keep defibrillation pads clear of other pads or metal parts
in contact with patient
•
Disconnect all non-defibrillator proof equipment from
the patient before defibrillation
WARNING! Electric Shock and Fire Hazard
Do not connect any telephones or unauthorized connectors to the
socket on this equipment.
WARNING! Do not reuse pads.
Used pads may not adhere properly to the patient. Improper pad
adhesion may result in skin burns. Improper pad adhesion may result
in improper AED performance. Used pads may cause patient-topatient contamination.
Caution: Use only Cardiac Science Approved Equipment
Using batteries, pads, cables, or optional equipment other than those
approved by Cardiac Science may cause the AED to function
improperly during a rescue.
70-00915-01 D
Powerheart® AED G3 Plus 9390A and 9390E
Warnings and cautions
!
!
!
!
Caution: Possible Improper AED Performance
Using pads that are damaged or expired may result in improper AED
performance.
Caution: Serial Communication Cable
The AED will not function during a rescue when the serial
communication cable is connected to its serial port. When the serial
communication cable is connected to the AED during a rescue, the
prompt “Remove cable to continue rescue” will be heard until you
remove the serial communication cable from the AED.
Caution: Possible Radio Frequency (RF) Susceptibility
RF susceptibility from cellular phones, CB radios, FM 2-way radios and
other wireless devices may cause incorrect rhythm recognition and
subsequent shock advisory. When attempting a rescue using the AED,
do not operate wireless radiotelephones within 1 meter of the AED –
turn power OFF to the radiotelephone and other like equipment near
the incident.
Caution: Possible Interference with Implanted Pacemaker
Therapy should not be delayed for patients with implanted
pacemakers and a defibrillation attempt should be made if the
patient is unconscious and not breathing. The AED has pacemaker
detection and rejection, however with some pacemakers the AED
may not advise a defibrillation shock.
When placing pads:
!
•
Do not place the pads directly over an implanted device.
•
Place the pad at least an inch from any implanted device.
Caution: Moving the Patient During a Rescue
During a rescue attempt, excessive jostling or moving of the patient
may cause AEDs to improperly analyze the patient’s cardiac rhythm.
Stop all motion or vibration before attempting a rescue.
Powerheart® AED G3 Plus 9390A and 9390E
70-00915-01 D
3-3
How to Perform a Rescue
Step 1: Assess the patient
Determine that the patient is over 8 years of age or weighs more than
55 pounds (25 kg) and is both:
◆
Unresponsive
◆
Not breathing
DO NOT delay therapy to determine the patient’s exact age or weight.
See the directions for use accompanying pediatric pads to replace adult
pads with pediatric pads. If you do not have pediatric pads, use adult
pads to apply therapy.
CALL EMERGENCY MEDICAL SERVICES!
Note: When the patient is a child under 8 years of age or weighs less
than 55 pounds (25kg), the AED should be used with the Model 9730
Pediatric Attenuated Defibrillation Pads. If you do not have pediatric
pads, use adult pads to apply therapy.
Step 2: Prepare the patient
1.
Place the AED next to the
patient so the lid is on top.
Note: Lay the AED flat
(horizontal) as shown.
2.
Open the AED lid.
3.
Wait until the LEDs illuminate.
When the AED prompts…
Do this…
“Stay calm. Follow these voice
instructions. Make sure 911 is
called now.”
Call emergency services.
“Begin by exposing the patient’s
bare chest and torso. Remove or
cut clothing if needed.”
Remove clothing from the patient’s chest.
Ensure that the patient’s skin is clean and dry.
Dry the patient’s chest and shave excessive hair if
necessary.
3-4
70-00915-01 D
Powerheart® AED G3 Plus 9390A and 9390E
Step 3: Place pads
Step 3: Place pads
When the AED prompts…
Do this…
“When patient’s chest and torso are Keeping the pads connected to the AED, tear
exposed, remove square foil
open the package.
package from lid of AED. Tear open Remove the pads from the package.
foil package across dotted line and Leave the package attached to the pad wires.
remove pads.”
“Next, separate one of the white
pads completely from blue plastic
liner. Begin peeling from the
tabbed corner.”
With a firm, steady pull,
peel one pad away from
the blue plastic liner.
It does not matter which
pad to use.
Note: Do not pull on the
lead wires.
“Firmly place the pad without the
liner on the patient, exactly as
illustrated. This pad can be placed
on either of the two locations
shown.”
Place the pad without the
liner on the bare upper
chest as shown.
“Next, peel the blue plastic liner off
of the second white pad. Firmly
place the second pad on the
opposite location, exactly as
illustrated.”
Pull the blue liner from the
second pad.
Note: Do not pull on the
lead wires.
Place the pad on the bare
lower chest as shown.
Note: Cardiac Science’s standard defibrillation pads are nonpolarized and can be placed in either position as shown on the pad
package.
Powerheart® AED G3 Plus 9390A and 9390E
70-00915-01 D
3-5
How to Perform a Rescue
Step 4: Analyze the heart rhythm
When the AED prompts…
Do this…
“Do Not Touch Patient. Analyzing Heart
Rhythm. Please Wait.”
The AED begins analyzing the cardiac
rhythm of the patient.
Do not touch the patient.
Wait for the next prompt.
During the analysis phase, you may hear one or more of these prompts:
If the AED prompts…
This is the problem…
Do this…
“Make sure pad connector The pads are disconnected
is plugged into AED.”
from the AED.
Ensure that the connector
is properly plugged into
the AED.
“Press pads firmly to
patient’s bare skin.”
The pads are not properly
placed or are loose.
Ensure that pads are firmly
placed on clean, dry skin.
“Analysis interrupted. Stop
patient motion.”
The AED restarts the
analysis.
The patient is excessively
jostled or there is a strong
electromagnetic emitting
device nearby (within 5
meters).
Remove the electronic
device or stop the excessive
motion.
3-6
70-00915-01 D
Powerheart® AED G3 Plus 9390A and 9390E
Step 5: Deliver a shock
Step 5: Deliver a shock
When the AED prompts…
Do this…
“Preparing shock. Move away from the
patient.”
Ensure that no one is touching the patient.
For the Powerheart AED G3:
Ensure that no one is touching the patient.
Press the Shock button.
If you do not press the Shock button
within 30 seconds of hearing the prompt,
the AED disarms the charge and prompt
you to start CPR.
When the AED is ready to deliver a
defibrillation shock, the Shock button
flashes.
“Press red flashing button to deliver
shock”
For the Powerheart AED G3 Automatic:
“Shock will be delivered in three, two,
one.”
The AED delivers a shock.
Ensure that no one is touching the patient.
After the AED delivers the defibrillation
shock:
“Shock delivered.”
Wait
“It is now safe to touch the patient.”
Wait
When the AED is charged, it continues to analyze the patient's heart
rhythm. If the rhythm changes and a shock is no longer needed, the
AED prompts, “Rhythm changed. Shock cancelled,” and then prompts
you to start CPR.
Step 6: Administer CPR
After the AED delivers a shock or detects a nonshockable rhythm, it enters CPR mode.
Note: Your AED may have either Traditional
(compressions and breaths) CPR (Table 3-1) or
compressions-only CPR (Table 3-2 on page 3-9)
enabled.
Powerheart® AED G3 Plus 9390A and 9390E
70-00915-01 D
3-7
How to Perform a Rescue
!
WARNING! Equipment not functioning.
If the AED stops functioning during a rescue, continue to perform CPR
as needed until EMS personnel arrive.
Table 3-1: Traditional CPR (compressions and breaths)
When the AED prompts…
Do this…
“When instructed give patient 30
rapid compressions. Then give two
breaths.”
“Place heel of one hand on center of
chest between nipples. Place heel of
other hand directly on top of first
hand. Lean over patient with elbows
straight. Press the patient’s chest
down rapidly one-third depth of
chest, then release.”
Give the patient chest compressions:
Place the heel on one hand on the chest
between the nipples.
Place the heel of the other hand on top of the
first hand.
Lean over the patient, keeping your elbows
straight.
Press the patient’s chest down rapidly onethird the depth of the chest, then release.
“Start CPR.”
Perform chest compressions as directed by the
AED.
“Stop compressions.”
Stop the chest compressions.
“Give breath.” (repeated)
Give the patient two breaths.
“Continue with compressions.”
Give the patient chest compressions, as
directed above.
Follow the countdown timer on the text
display for the number of compressions and
breaths.
3-8
70-00915-01 D
Powerheart® AED G3 Plus 9390A and 9390E
Step 6: Administer CPR
Table 3-2: Compressions-only CPR
When the AED prompts…
Do this…
“Place heel of one hand on center of
chest between nipples. Place heel of
other hand directly on top of first
hand. Lean over patient with elbows
straight. Press the patient’s chest
down rapidly one-third depth of
chest, then release.”
Give the patient chest compressions:
Place the heel on one hand on the chest
between the nipples.
Place the heel of the other hand on top of the
first hand.
Lean over the patient, keeping your elbows
straight.
Press the patient’s chest down rapidly onethird the depth of the chest, then release.
“Start CPR.”
Perform chest compressions as directed by the
AED.
This cycle continues until the CPR time expires. At the end of CPR,
the AED prompts, “Stop CPR”. The AED returns to the ECG Analysis
Mode (see Step 4: Analyze the heart rhythm on page 3-6).
If the patient is conscious and breathing normally, leave the pads on the
patient's chest connected to the AED. Make the patient as comfortable
as possible and wait for Emergency Medical Services (EMS) personnel
to arrive.
Powerheart® AED G3 Plus 9390A and 9390E
70-00915-01 D
3-9
How to Perform a Rescue
Step 7: Prepare the AED for the next rescue
After transferring the patient to EMS personnel, prepare the AED for
the next rescue:
3-10
1.
Retrieve the rescue data stored in the internal memory of the
AED.
2.
Use Rescuelink software installed on a PC (see the Data
Management chapter in the G3 Plus Operator and Service Manual).
3.
Connect a new pair of pads to the AED
(see Pad installation on page 2-9).
4.
Close the lid.
5.
Verify that the status indicator on the AED
handle is green.
70-00915-01 D
Powerheart® AED G3 Plus 9390A and 9390E
Cardiac Science Corporation • 3303 Monte Villa Parkway, Bothell, WA 98021 USA • 425.402.2000
• US toll-free 800.426.0337 • Fax: 425.402.2001 • [email protected]
Orders and Customer Care (US and International) • 425.402.2000 • US toll-free 800.426.0337
• Fax: 425.402.2001 • [email protected]
Technical Support • (US) Fax: 425.402.2022 • [email protected]
• http://websupport.cardiacscience.com/webchat/ • (International) [email protected]
Cardiac Science International A/S • Kirke Vaerloesevej 14, DK-3500 Vaerloese, Denmark • +45.4438.0500
• Fax: +45.4438.0501 • [email protected]
United Kingdom • The Manse, 39 Northenden Road, Sale, Manchester, M33 2DH, United Kingdom
• +44.161.926.0000 • [email protected]
France • Parc de la Duranne, 565, Rue René Descartes, F-13857 Aix-en-Provence Cedex 3, France
• +33.4.88.19.92.92 • [email protected]
Central Europe (D, A, CH) • Oskar-Schindler-Strasse 3, D-50769 Köln, Germany
• +49.0.221.33734.300 • [email protected]
China • 6/F South Building, 829, Yi Shan Road, Shanghai 200233, China • +86.21.6495.9121
• [email protected]
Cardiac Science, the Shielded Heart logo, Quinton, Burdick,
HeartCentrix, HeartCentrix‚ Powerheart‚ FirstSave‚
Mastertrak‚ MDLink‚ STAR‚ Intellisense‚ Rescue Ready‚
RescueCoach‚ Rescuelink‚ RHYTHMx‚ and Survivalink are
trademarks of Cardiac Science Corporation. Copyright ©
2011 Cardiac Science Corporation. All Rights Reserved.
70-00915-01 D
*70-00915-01*