1
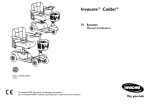
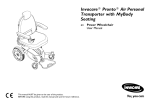
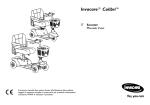
Invacare® Colibri™
EN Scooter
User Manual
This manual MUST be given to the user of the product.
BEFORE using this product, read this manual and save for future reference.
©2014 Invacare® Corporation
All rights reserved. Republication, duplication or modification in whole or in part is prohibited without
prior written permission from Invacare. Trademarks are identified by ™ and ®. All trademarks are
owned by or licensed to Invacare Corporation or its subsidiaries unless otherwise noted.
Contents
1
General . . . . . . . . . . . . . . . . . . . . . . . . . . . . . . . . . . . . . . 5
1.1
Introduction . . . . . . . . . . . . . . . . . . . . . . . . . . . . . . 5
1.2
Symbols in this manual . . . . . . . . . . . . . . . . . . . . . . . 5
1.3
Type classification and intended use . . . . . . . . . . . . . 6
1.4
Warranty . . . . . . . . . . . . . . . . . . . . . . . . . . . . . . . . 6
1.5
Service life. . . . . . . . . . . . . . . . . . . . . . . . . . . . . . . . 6
2
Safety. . . . . . . . . . . . . . . . . . . . . . . . . . . . . . . . . . . . . . . . 7
2.1
General safety notes . . . . . . . . . . . . . . . . . . . . . . . . 7
2.2
Safety information with regard to care and
maintenance . . . . . . . . . . . . . . . . . . . . . . . . . . . . . . 8
2.3
Safety information on electromagnetic
interference. . . . . . . . . . . . . . . . . . . . . . . . . . . . . . . 8
2.4
Safety information on driving and freewheel
mode . . . . . . . . . . . . . . . . . . . . . . . . . . . . . . . . . . . 9
2.5
Labels on the product . . . . . . . . . . . . . . . . . . . . . . . 10
3
4
Components . . . . . . . . . . . . . . . . . . . . . . . . . . . . . . . . . .
3.1
Key features . . . . . . . . . . . . . . . . . . . . . . . . . . . . . .
3.2
Operating console arrangement . . . . . . . . . . . . . . . .
3.2.1 Status Display . . . . . . . . . . . . . . . . . . . . . . . . . . . . .
3.2.2 Battery charge display . . . . . . . . . . . . . . . . . . . . . . .
13
13
13
13
14
Setup . . . . . . . . . . . . . . . . . . . . . . . . . . . . . . . . . . . . . . . .
4.1
Adjusting the armrest width . . . . . . . . . . . . . . . . . . .
4.2
Adjusting the armrest angle . . . . . . . . . . . . . . . . . . .
4.3
Replacing armrest pads. . . . . . . . . . . . . . . . . . . . . . .
4.4
Disengaging the seat to rotate it or remove it . . . . . .
4.5
Adjusting the seat height. . . . . . . . . . . . . . . . . . . . . .
4.6
Adjusting the tiller angle . . . . . . . . . . . . . . . . . . . . . .
15
15
15
16
16
16
17
5
Usage . . . . . . . . . . . . . . . . . . . . . . . . . . . . . . . . . . . . . . . .
5.1
Getting in and out . . . . . . . . . . . . . . . . . . . . . . . . . .
5.2
Before driving for the first time. . . . . . . . . . . . . . . . .
5.3
Taking Obstacles . . . . . . . . . . . . . . . . . . . . . . . . . . .
5.3.1 Maximum obstacle height . . . . . . . . . . . . . . . . . . . . .
5.3.2 Safety information when ascending obstacles . . . . . . .
5.3.3 The correct way to overcome obstacles . . . . . . . . . .
5.4
Driving up and down gradients . . . . . . . . . . . . . . . . .
5.5
Parking and stationary . . . . . . . . . . . . . . . . . . . . . . .
5.6
Pushing the scooter by hand . . . . . . . . . . . . . . . . . . .
5.6.1 Disengaging Motors . . . . . . . . . . . . . . . . . . . . . . . . .
5.7
Driving the scooter . . . . . . . . . . . . . . . . . . . . . . . . .
19
19
19
20
20
20
20
20
21
21
21
22
6
Electrical system. . . . . . . . . . . . . . . . . . . . . . . . . . . . . . .
6.1
Electronics protection system . . . . . . . . . . . . . . . . . .
6.1.1 The main fuse . . . . . . . . . . . . . . . . . . . . . . . . . . . . .
6.2
Batteries . . . . . . . . . . . . . . . . . . . . . . . . . . . . . . . . .
6.2.1 General information on charging . . . . . . . . . . . . . . . .
6.2.2 General instructions on charging . . . . . . . . . . . . . . . .
6.2.3 How to charge the batteries . . . . . . . . . . . . . . . . . . .
6.2.4 How to disconnect the batteries after
charging . . . . . . . . . . . . . . . . . . . . . . . . . . . . . . . . .
6.2.5 Storage and Maintenance . . . . . . . . . . . . . . . . . . . . .
6.2.6 Instructions on using the batteries. . . . . . . . . . . . . . .
6.2.7 Transporting batteries . . . . . . . . . . . . . . . . . . . . . . .
6.2.8 General instructions on handling the batteries . . . . . .
6.2.9 How to handle damaged batteries correctly. . . . . . . .
6.3
5 A battery charger . . . . . . . . . . . . . . . . . . . . . . . . .
6.3.1 Symbols found on the product . . . . . . . . . . . . . . . . .
6.3.2 Features . . . . . . . . . . . . . . . . . . . . . . . . . . . . . . . . .
6.3.3 LED display . . . . . . . . . . . . . . . . . . . . . . . . . . . . . . .
6.3.4 Caution. . . . . . . . . . . . . . . . . . . . . . . . . . . . . . . . . .
6.3.5 Operating instructions . . . . . . . . . . . . . . . . . . . . . . .
6.3.6 Troubleshooting . . . . . . . . . . . . . . . . . . . . . . . . . . .
23
23
23
23
23
23
24
26
26
26
27
27
27
28
28
28
28
28
29
29
6.3.7
Technical specifications . . . . . . . . . . . . . . . . . . . . . . 29
7
Transport . . . . . . . . . . . . . . . . . . . . . . . . . . . . . . . . . . . .
7.1
Transport - General information . . . . . . . . . . . . . . . .
7.2
Dismantling the scooter for transport . . . . . . . . . . . .
7.2.1 Removing/Installing the battery box. . . . . . . . . . . . . .
7.2.2 Removing the drive unit . . . . . . . . . . . . . . . . . . . . . .
7.3
Reassembling the scooter . . . . . . . . . . . . . . . . . . . . .
31
31
31
31
32
32
8
Maintenance . . . . . . . . . . . . . . . . . . . . . . . . . . . . . . . . . .
8.1
Maintenance introduction . . . . . . . . . . . . . . . . . . . . .
8.2
Cleaning the mobility device . . . . . . . . . . . . . . . . . . .
8.3
Inspection checks. . . . . . . . . . . . . . . . . . . . . . . . . . .
34
34
34
34
9
After Use. . . . . . . . . . . . . . . . . . . . . . . . . . . . . . . . . . . . . 36
9.1
Disposal . . . . . . . . . . . . . . . . . . . . . . . . . . . . . . . . . 36
10 Troubleshooting . . . . . . . . . . . . . . . . . . . . . . . . . . . . . . .
10.1 Diagnosis and fault repair . . . . . . . . . . . . . . . . . . . . .
10.1.1 Error diagnosis . . . . . . . . . . . . . . . . . . . . . . . . . . . .
10.1.2 Error codes and diagnostic codes . . . . . . . . . . . . . . .
10.2 Resetting the circuit breaker. . . . . . . . . . . . . . . . . . .
37
37
37
37
39
11 Technical data. . . . . . . . . . . . . . . . . . . . . . . . . . . . . . . . . 40
11.1 Technical specifications . . . . . . . . . . . . . . . . . . . . . . 40
General
Dear user,
This manual may contain information that pertains to models sold
only in certain countries. In this case the information will be clearly
marked as pertaining to a particular country-specific version. We
reserve the right to make any alterations on the grounds of technical
improvements.
Thank you for purchasing our product! We hope you will enjoy
your new scooter.
1.2 Symbols in this manual
This manual contains important hints and information on:
In this user manual warnings are indicated by symbols. The warning
symbols are accompanied by a heading that indicates the severity
of the danger.
1 General
1.1 Introduction
•
•
•
Safety
Operation
Care and maintenance.
Take care to read the user manual thoroughly before
starting out on your first journey.
If you find that the font size in the print version of the user manual
is difficult to read, you can download it as a pdf from the Invacare
website. This can then be scaled on screen to a font size that is more
comfortable for you.
This product has been designed to fit the needs of different types of
users with different requirements.
The decision whether the model is suitable for the user may only be
taken by medical specialists with appropriate aptitude.
WARNING
Indicates a hazardous situation that could result in
serious injury or death if it is not avoided.
CAUTION
Indicates a hazardous situation that could result in
minor or slight injury if it is not avoided.
IMPORTANT
Indicates a hazardous situation that could result in
damage to property if it is not avoided.
Gives useful tips, recommendations and information
for efficient, trouble-free use.
Invacare or their statutory representatives can accept no liability in
cases in which the mobility product has not been adapted to suit
the user's disabilities.
Some maintenance and settings can be carried out by the user.
Certain adjustments do however require technical training and may
only be carried out by your Invacare specialist dealer. Damages and
errors caused by nonobservance of the user manual or as a result of
incorrect maintenance are excluded from all guarantees.
1576371-B
5
Invacare® Colibri™
This product complies with Directive 93/42/EEC
concerning medical devices. The launch date of this
product is stated in the CE declaration of conformity.
Requirements:
This symbol identifies a list of various tools,
components and items which you will need in order
to carry out certain work. Please do not attempt to
carry out the work if you do not have the listed tools
available.
1.3 Type classification and intended use
This vehicle was designed for persons whose ability to walk is
impaired, but who are still in terms of their eyesight and physically
and mentally able to operate an electric vehicle. It has been classified
according to EN 12184 as a class A mobility product. This means
it is a compact, manoeuvrable vehicle mainly for internal use and not
necessarily capable of negotiating outdoor obstacles.
1.4 Warranty
The terms and conditions of the warranty are part of the general
terms and conditions particular to the individual countries in which
this product is sold.
1.5 Service life
We estimate a service life of five years for this product, provided it
is used in strict accordance with the intended use as set out in this
document and all maintenance and service requirements are met.
The estimated service life can be exceeded if the product is carefully
used and properly maintained, and provided technical and scientific
advances do not result in technical limitations. The service life can
also be considerably reduced by extreme or incorrect usage. The fact
that we estimate a service life for this product does not constitute an
additional warranty.
You can find precise information about speeds, turning radius, driving
range, maximum safe slope, maximum obstacle height and permissible
operating conditions in chapter 11 Technical data, page 40.
Please also pay attention to all safety information in chapter 2 Safety,
page 7 .
The vehicle was successfully tested according to German and
international standards as to its safety. It satisfies the requirements
according to RoHS 2011/65/EU, REACH 1907/2006/EC and DIN
EN 12184 including EN 1021-1/-2. It was also tested successfully
according to EN60529 IPX4 as to its resistance to spray water, and is
therefore well suited for weather conditions such as typical middle
European weather conditions.
6
1576371-B
Safety
2 Safety
2.1 General safety notes
WARNING!
Risk of injury if this scooter is used in any other
way than the purpose described in this manual!
– Adhere strictly to the instructions in this user manual.
Risk of injury if the scooter is driven when your
ability to drive is impaired by medication or
alcohol!
– Never drive any vehicle under the influence of
medication or alcohol.
Risk of damage or injury if the scooter is
accidentally set into motion!
– Switch the power system off before you get in, get out
or handle awkward objects.
– Be aware that the motor brakes are automatically
deactivated when the motors are disengaged. For this
reason, freewheel operation is only recommended on
flat surfaces, never on gradients. Never leave your
vehicle on a gradient with its motors disengaged.
Always re-engage the motors immediately after
pushing the vehicle.
1576371-B
WARNING!
Risk of injury if the power is switched off while
the vehicle is in motion, due to it coming to an
abrupt, sharp stop!
– If you have to brake in an emergency, simply release
the throttle and allow the scooter to come to a
complete stop.
– If fitted, pull the handbrake until the scooter comes
to a stop.
– Only switch the vehicle off while in motion as a last
resort.
Risk of injury if the scooter is transported in
another vehicle with the occupant seated in it!
– Never transport the scooter with the occupant seated
in it.
Risk of injury if you fall off the scooter!
– If restraining systems are installed (such as seat belts),
use them each time you drive the scooter.
Risk of fire or breaking down due to electric
devices being connected!
– Do not connect any electric devices to your vehicle
that are not expressly certified by Invacare for this
purpose. Have all electrical installations done by your
authorised Invacare Dealer.
7
Invacare® Colibri™
CAUTION!
Risk of injury if maximum permissible load is
exceeded!
– Do not exceed the maximum permissible load (refer
to 11 Technical data, page 40).
Risk of injury when lifting heavy components!
– When maintaining, servicing or lifting any part of your
scooter, take into account the weight of the individual
components, especially the batteries! Be sure at all
times to adopt the correct lifting posture and ask for
assistance if necessary.
Risk of injury by moving parts!
– Make sure that no injury is incurred by moving parts
of the scooter, like wheels or a seat lifter (if fitted),
especially when children are around.
Risk of injury from hot surfaces!
– Do not leave the mobility device in direct sunlight for
prolonged periods. Metal parts and surfaces such as
the seat and armrests can become very hot.
Risk of technical failure and injury if unauthorized
spare parts and components are used!
– Only use original Invacare spare parts, which have
been approved for use with this vehicle.
8
2.2 Safety information with regard to care and
maintenance
CAUTION!
Risk of accident and loss of warranty if
maintenance is insufficient
– For reasons of safety and in order to avoid accidents
which result from unnoticed wear, it is important that
this electric mobility product undergoes an inspection
once every year under normal operating conditions
(see inspection plan contained in service instructions).
– Under difficult operating conditions such as daily travel
on steep slopes, or in the case of use in medical care
cases with frequently changing wheelchair users, it
would be expedient to carry out intermediate checks
on the brakes, accessories and running gear.
2.3 Safety information on electromagnetic
interference
This electric vehicle was successfully tested in accordance with
International standards as to its compliance with Electromagnetic
Interference (EMI) regulations. However, electromagnetic fields,
such as those generated by radio and television transmitters, and
cellular phones can influence the functions of electric vehicles. Also,
the electronics used in our vehicles can generate a low level of
electromagnetic interference, which however will remain within the
tolerance permitted by law. For these reasons we ask you to please
observe the following precautions:
1576371-B
Safety
WARNING!
Risk of malfunction due to electromagnetic
interference
– Do not switch on or operate portable transceivers or
communication devices (such as radio transceivers or
cellular phones) when the vehicle is switched on.
– Avoid getting near strong radio and television
transmitters.
– In case the vehicle should be set in motion
unintentionally or the brakes are released, switch it
off immediately.
– Adding electrical accessories and other components
or modifying the vehicle in any way can make it
susceptible to electromagnetic interference. Keep in
mind that there is no sure way to determine the effect
such modifications will have on the overall immunity
of the electronic system.
– Report all occurrences of unintentional movement of
the vehicle, or release of the electric brakes to the
manufacturer.
1576371-B
2.4 Safety information on driving and freewheel
mode
WARNING!
Risk of injury if the vehicle tips over
– Only ever negotiate gradients up to the maximum
tilt-resistant gradient and only with the backrest in
an upright position, and the seat lifter in the lowest
position (if installed).
– Only ever drive downhill at a maximum of 2/3 of the
top speed. Avoid abrupt braking or accelerating on
gradients.
– If at all possible, avoid driving on slippery surfaces
(such as snow, gravel, ice etc.) where there is a risk
of you losing control over the vehicle, especially on a
gradient. If driving on such a surface is inevitable, then
always drive slowly and with the utmost caution.
– Never attempt to overcome an obstacle when on an
uphill or downhill gradient.
– Never attempt to drive up or down a flight of steps.
– Always approach obstacles straight on. Ensure that
the front wheels and rear wheels move over the
obstacle in one stroke, do not stop halfway. Do not
exceed the maximum obstacle height (refer to 11
Technical data, page 40).
– Avoid shifting your centre of gravity as well as abrupt
changes of direction when the vehicle is in motion.
9
Invacare® Colibri™
WARNING!
Risk of injury if the vehicle tips over (continued)
– Never use the vehicle to transport more than one
person.
– Do not exceed the maximum permissible load.
– When loading the vehicle, always distribute the weight
evenly. Always try to keep the centre of gravity of
the vehicle in the middle, and as close to the ground
as possible.
– Note that the vehicle will brake or accelerate if you
change the driving speed while it is in motion.
Risk of injury if you collide with an obstacle
when driving through narrow passages such as
doorways and entrances
– Drive through narrow passages in the lowest driving
speed and with due caution.
WARNING!
Risk of tipping
Antitippers (stabilizers) are only effective on firm ground.
They sink in on soft ground such as grass, snow or mud if
the mobility device rests itself on them. They lose their
effect and the mobility device can tip over.
– Only drive with extreme care on soft ground,
especially during uphill and downhill journeys. In the
process pay increased attention to the tip stability of
the mobility device.
– Keep in mind that the mobility device as a class A
product is mainly for internal use and therefore not
necessarily capable of negotiating outdoor obstacles.
2.5 Labels on the product
WARNING!
The centre of gravity for the scooter is higher
than that of an electric wheelchair.
There is an increased tipping hazard when negotiating
bends.
– Reduce speed before negotiating bends! Only
accelerate when you have come out of the bend.
10
1576371-B
Safety
A
E
Pull the battery box latch to the front to release the battery
box for removing
European representative label on the seat post
B
F
This product has been supplied from an environmentally
aware manufacturer. This product may contain substances
that could be harmful to the environment if disposed of
in places (landfills) that are not appropriate according to
legislation.
Quick info how to disassemble the scooter. Read the user
manual for more information.
C
•
Voltage warning sign label
•
Battery label under the cover
D
The 'crossed out wheelie bin' symbol is placed on
this product to encourage you to recycle wherever
possible.
Please be environmentally responsible and recycle this
product through your recycling facility at its end of life.
G
Possible pinch point at seat post when battery box is
removed
1576371-B
Drive unit warning sign label
11
Invacare® Colibri™
H
The product needs to be tied down at indicated anchor
points with a lashing system during transport.
This product may not be used as a vehicle seat.
Disengaging lever label indicating the “Push” and “Drive”
position of the lever
I
Identification label sticker on the seat post containing the
following symbols:
See above
J
Date of manufacture
This product complies with Directive 93/42/EEC concerning
medical devices. The launch date of this product is stated
in the CE declaration of conformity.
12
This symbol indicates the maximum width to which an
armrest may be adjusted. Pulling the armrest out further
can cause it to fall out of its fixation.
1576371-B
Components
3 Components
3.2 Operating console arrangement
3.1 Key features
A
Operating console (3)
B
Lever for adjusting tiller inclination (4)
C
Unlocking lever for swivelling and removing seat (front
below seat) (2)
D
Disengaging lever (1)
A
Battery charge display (1)
B
Speed controller (5)
C
Drive lever (6)
D
Keyswitch (ON/OFF) (4)
E
Horn (2)
F
Status display / ON/OFF diode(3)
3.2.1 Status Display
NOTE:
– The ON/OFF diode is used as a fault display (status
display). It will flash if there is a problem with the
scooter. The number of flashes indicates the type of
error. Refer to 10.1.2 Error codes and diagnostic
codes, page 37.
1576371-B
13
Invacare® Colibri™
3.2.2 Battery charge display
• All diodes illuminate: maximum driving range
• Only red and yellow diodes illuminate: reduced driving range.
•
Recharge the batteries at the end of your journey.
Only red LEDs illuminate/blink, electronic beeps 3x:
battery reserve = severely restricted driving range.
Recharge batteries immediately!
NOTE:
– Overdischarge protection: after a certain drive time
on reserve battery power the electronics system
switches the drive off automatically and brings the
Scooter to a standstill. If you do not drive your
Scooter for a while the batteries will "recuperate" and
allow a further, but short, journey. However, after a
very brief journey the red diodes will illuminate again
and the electronic system will beep three times. This
procedure leads to battery damage and should be
avoided if possible!
14
1576371-B
Setup
4 Setup
4.1 Adjusting the armrest width
WARNING!
Serious injury hazard if one of the armrests
falls out of its bracket because they have been
adjusted to a width which exceeds the permissible
value
– The width adjustment is fitted with small stickers with
markings and the word "STOP". The armrests must
never be pulled out further than the point at which
the word "STOP" is completely legible.
– Always tighten the fixing screws properly once
adjustments have been completed.
1.
2.
3.
Turn the knobs to loosen the fixing for the armrest.
Adjust the armrests to the required width.
Retighten the knobs.
4.2 Adjusting the armrest angle
CAUTION!
Pinch point may occur when adjusting the arm
angle
– Pay attention to your fingers.
1.
2.
3.
4.
5.
6.
Lift up the armrest.
Loosen the jam nut A.
Adjust the socket screw B up or down to the desired arm angle
position.
Tighten the jam nut.
To determine the same angle for the opposite armrest, count
the exposed threads after the jam nut has been tightened.
Repeat STEPS 1-4 for opposite armrest, if necessary.
The knobs for releasing the armrests are located under the seat A.
1576371-B
15
Invacare® Colibri™
4.3 Replacing armrest pads
1.
2.
3.
4.
Remove the two mounting screws A that secure the armrest
pad B to the arm C.
Remove the old armrest pad.
Install the new armrest pad and securely tighten with the existing
mounting screws.
If necessary, repeat STEPS 1-3 to replace the other armrest pad.
The seat lever A is located under the seat in the front.
Rotating the seat
4.4 Disengaging the seat to rotate it or remove
it
1.
2.
The seat can be turned to one side to make getting in and out of the
scooter easier. The seat is also easier to remove from this position.
Removing the seat
1.
2.
Pull the lever upwards to disengage the seat.
Turn the seat to the side.
Pull the lever upwards to disengage the seat.
Hold the seat firmly by the backrest and front edge and remove
it upwards.
Installing the seat
1.
2.
3.
Lower the seat assembly onto the seat post.
Allow the seat to drop into the locked position.
Lift up on the seat assembly to ensure the seat is secure.
4.5 Adjusting the seat height
The seat height can be adjusted to 390, 410, or 430 mm.
16
1576371-B
Setup
Requirements:
•
1.
2.
4.6 Adjusting the tiller angle
2 x open-ended spanners 17 mm
WARNING!
Risk of injury if tiller is not locked into position
– Ensure that the tiller is properly adjusted before
driving the scooter.
– After making any tiller angle adjustments and before
use, the tiller MUST be securely locked into position.
Otherwise, a fall from the scooter could occur causing
bodily injury and/or damage to the scooter. Gently,
push/pull against tiller to ensure that the tiller is
securely engaged into the adjustment plate.
Remove the seat.
Remove the seat post locking bolt A using both open-ended
spanners.
The tiller locks into one of three positions. The tiller can also be
folded down for transportation and storage.
Adjusting the tiller angle
3.
1.
4.
Adjust the seat height.
Replace the securing bolt and tighten.
2.
3.
4.
Rotate or pull out the tiller adjustment lever A until the pin
disengages from the mounting hole.
Move the tiller to the desired position.
Release or rotate the tiller adjustment lever to lock the pin into
the desired mounting hole B.
Gently push/pull against tiller to ensure that the tiller is securely
locked.
Folding down the tiller
1576371-B
17
Invacare® Colibri™
1.
2.
3.
4.
Rotate or pull out the tiller adjustment lever A until the pin
disengages from the mounting hole.
Fold down the tiller.
Release or rotate the tiller adjustment lever to lock the pin
above the tiller base B.
Gently push/pull against tiller to ensure that the tiller is securely
locked.
You can now use the tiller as a handle to transport the front frame
assembly:
18
1576371-B
Usage
5 Usage
5.1 Getting in and out
1.
Lift the detent lever A up.
The armrests can be swivelled upwards to assist getting in and out.
The seat can also be rotated to assist getting in and out.
2.
Turn the seat to the side.
Information on turning the seat
– The detent automatically engages again in eighth-turns.
5.2 Before driving for the first time
Before you take your first trip, you should familiarise yourself well
with the operation of the vehicle and with all operating elements.
Take your time to test all functions and driving modes.
1576371-B
19
Invacare® Colibri™
NOTE
– If installed, make sure to properly adjust and use the
postural belt each time you use the wheelchair.
5.3.3 The correct way to overcome obstacles
Sitting comfortably = Driving safely
Before each trip, make sure that:
•
•
•
•
You are within easy reach of all operating controls.
The battery charge is sufficient for the distance intended to be
covered.
The postural belt (if installed) is in perfect order.
The rear mirror (if installed) is adjusted so you can look behind
at all times without having to bend forward or shift your seating
position.
5.3 Taking Obstacles
5.3.1 Maximum obstacle height
You can find information about maximum obstacle heights in the
chapter entitled 11 Technical data, page 40.
5.3.2 Safety information when ascending obstacles
WARNING!
Risk of tipping over
– Never approach obstacles at an angle but at 90
degrees as shown below.
– Put your backrest into an upright position before
climbing an obstacle.
20
Right
Wrong
Driving up over an obstacle
1.
Approach the curb or obstacle slowly head-on. Shortly before
the front wheels touch the obstacle, increase the speed and
reduce only after the rear wheels have also climbed the obstacle.
Driving down off of an obstacle
1.
Approach the curb or obstacle slowly head-on. Before the front
wheels touch the obstacle, reduce speed and keep it until also
the rear wheels have come down off of the obstacle.
5.4 Driving up and down gradients
For information concerning the maximum safe slope, refer to 11
Technical data, page 40.
1576371-B
Usage
WARNING!
Risk of tipping over
– Only ever drive downhill at a maximum of 2/3 of the
top speed.
– If your scooter is fitted with an adjustable backrest,
always return the backrest of your seat to an upright
position before ascending slopes. We recommend
that you lean the backrest slightly to the rear before
descending slopes.
– Never attempt to ascend or descend a slope on
slippery surfaces or where there is a danger of
skidding (such as wet pavement, ice etc).
– Avoid trying to get out of the scooter on an incline
or a gradient.
– Always drive in a straight direction along the road or
path you are travelling on, rather than attempting to
zigzag.
– Never attempt to turn around on an incline or a slope.
5.5 Parking and stationary
If you park your vehicle, or leave it idle or unattended for
a longer period:
1.
Switch off the power supply (keyswitch) and remove key.
5.6 Pushing the scooter by hand
The motors of the scooter are fitted with automatic brakes,
preventing the scooter from rolling away out of control when
the power supply is switched off. When pushing the scooter, the
magnetic brakes must be disengaged.
1576371-B
5.6.1 Disengaging Motors
CAUTION!
Risk of the vehicle running away
– When the motors are disengaged (for push operation
whilst freewheeling), the electromagnetic motor
brakes are deactivated. When the vehicle is parked,
the levers for engaging and disengaging the motors
must without fail be locked firmly into the "DRIVE"
position (electromagnetic motor brakes activated).
The lever for engaging and disengaging the motor is located on the
right-hand side at the rear.
Disengaging the drive
1.
2.
Switch off the scooter (keyswitch).
Pull the disengaging lever A up.
The drive is now disengaged.
Engaging the drive
1.
Push the disengaging lever A down.
The drive is now engaged.
21
Invacare® Colibri™
5.7 Driving the scooter
WARNING!
Risk of injury from the unintended rolling of the
vehicle
When stopping the vehicle, the drive lever needs to
return entirely to the middle position to activate the
electromagnetic brakes. If there is any obstruction
stopping the lever from returning to the middle position,
the electromagnetic brakes cannot be activated. This can
lead to the vehicle rolling unintentionally.
– Ensure that the drive lever is in the middle position, if
the vehicle is to remain stationary.
1.
Switch the power supply on (keyswitch).
The operating console display illuminates. The scooter is ready
to drive.
WARNING!
Any changes to the drive program can affect the
driving characteristics and the tipping stability
of the vehicle.
– Changes to the drive program may only be carried out
by trained Invacare specialist dealers.
– Invacare supplies all mobility products with a standard
drive program ex-works. Invacare can only give a
warranty for safe vehicle driving behavior - especially
the tipping stability - for this standard drive program.
NOTE:
– To brake quickly, simply let go of the drive lever. It
will then automatically return to the middle position.
The scooter will brake.
NOTE:
– If the scooter is not ready to drive after switching on,
check the status display (refer to 3.2.1 Status Display,
page 13 and chapter 10.1 Diagnosis and fault repair,
page 37).
2.
3.
4.
Set the required speed with the speed controller.
Pull the right-hand drive lever carefully to travel forwards.
Pull the left-hand drive lever carefully to travel in reverse.
NOTE:
– The control system is programmed with standard
values in the works. Your Invacare dealer can carry
out programming tailored to fit your requirements.
22
1576371-B
Electrical system
6 Electrical system
NOTE
– A defective main fuse may be replaced only after
checking the entire electric system. An Invacare
specialised dealer must perform the replacement. You
can find information on the fuse type in chapter 11
Technical data, page 40.
6.1 Electronics protection system
The vehicle's electronics are fitted with an overload-protection
system.
If the motors are put under considerable strain for a longer period of
time (for example, when driving up a steep hill) and especially when
the ambient temperature is high, then the electronic system could
overheat. In this case the vehicle's power is reduced gradually until
it finally comes to a halt. The status display shows a corresponding
error code (refer to10.1.2 Error codes and diagnostic codes, page
37). By switching the power supply off and back on again, the error
code is cancelled and the electronics are switched back on. It will
take approximately five minutes until the electronics have cooled
down enough for the motors to restore full power again.
When the motors are stalled by an insurmountable obstacle, such as
a high curb, and the vehicle driver allows the motors to strain against
this hindrance for more than 20 seconds without moving, then the
electronics will automatically switch off to prevent the motors from
being damaged. The status display shows a corresponding error
code (refer to10.1.2 Error codes and diagnostic codes, page 37). By
switching off and back on again, the error code is cancelled and the
electronics are switched back on.
6.1.1 The main fuse
The entire electric system is protected against overload by two
master fuses. The master fuses are mounted on the positive battery
cables.
1576371-B
6.2 Batteries
Power is supplied by two 12 V batteries. The batteries are
maintenance-free and only need regular charging.
In the following, you find information on how to charge, handle,
transport, store, maintain, and use batteries.
6.2.1 General information on charging
New batteries should always be fully charged once before their first
use. New batteries will be at their full capacity after having run
through approx. 10 - 20 charging cycles (break-in period). This
break-in period is necessary to fully activate the battery for maximum
performance and longevity. Thus, range and running time of your
mobility device could initially increase with use.
Gel/AGM lead acid batteries do not have a memory effect as NiCd
batteries.
6.2.2 General instructions on charging
Follow the instructions listed below to ensure safe use and longevity
of the batteries:
•
•
Charge 18 hours prior to initial usage.
We recommend charging the batteries daily after every
discharge even after partly discharge, as well as each night over
night. Depending on the level of discharge, it can take up to 12
hours until the batteries are fully charged again.
23
Invacare® Colibri™
•
•
•
•
•
•
•
When the battery indicator reached the red LED range, charge
the batteries for 16 hours minimum, neglecting the charge
complete display!
Try to provide a 24 hour charge once a week to make sure that
both batteries are fully charged.
Do not cycle your batteries at a low state of charge without
regularly recharging them fully.
Do not charge your batteries under extreme temperatures.
High temperatures above 30 °C are not recommended for
charging as well as low temperatures below 10 °C.
Use only charging devices in Class 2. This class of chargers may
be left unattended during charging. All charging devices which
are supplied by Invacare comply with these requirements.
You cannot overcharge the batteries when using the charger
supplied with your vehicle, or a charger that has been approved
by Invacare.
Protect your charger from sources of heat such as heaters
and direct sunlight. If the battery charger overheats, charging
current will be reduced and the charging process delayed.
6.2.3 How to charge the batteries
1.
24
Make sure you read and understand the battery charger's user
manual, if supplied, as well as the safety notes on the front and
rear panels of the charger.
1576371-B
Electrical system
WARNING!
Risk of explosion and destruction of batteries if
the wrong battery charger is used
– Only ever use the battery charger supplied with your
vehicle, or a charger that has been approved by
Invacare.
– Never charge 12 Ah batteries with a 5 A battery
charger. Always use a 2 Ah battery charger.
Risk of electric shock and damage to the battery
charger if it gets wet
– Protect the battery charger from water.
– Always charge in a dry environment.
Risk of short circuit and electric shock if the
battery charger has been damaged
– Do not use the battery charger if it has been dropped
or damaged.
Risk of electric shock and damage to the batteries
– NEVER attempt to recharge the batteries by attaching
cables directly to the battery terminals.
Risk of fire and electric shock if a damaged
extension cable is used
– Only ever use an extension cable if it is absolutely
necessary. In case you must use one, make sure it
is in good condition.
Risk of injury if using the wheelchair during
charging
– DO NOT attempt to recharge the batteries and
operate the wheelchair at the same time.
– DO NOT sit in the wheelchair while charging the
batteries.
1576371-B
25
Invacare® Colibri™
The charging socket is located under the seat
1.
2.
3.
4.
Switch off the scooter.
Fold up the charging socket protective cap.
Connect the battery charger to the scooter.
Connect the battery charger to the power supply.
6.2.4 How to disconnect the batteries after charging
1.
2.
3.
6.2.6 Instructions on using the batteries
CAUTION!
Risk of damaging the batteries.
– Avoid ultra-deep discharges and never drain your
batteries completely.
•
Disconnect the battery charger from the power supply.
Disconnect the battery charger from the scooter.
Close the charging socket protective cap.
6.2.5 Storage and Maintenance
Follow the instructions listed below to ensure safe use and longevity
of the batteries:
•
•
•
•
•
Always store the batteries fully charged.
Do not leave the batteries in a low state of charge for an
extended length of time. Charge a discharged battery as soon
as possible.
In case your mobility device is not used for a longer period
of time (that is more than two weeks), the batteries must be
charged at least once a month to maintain a full charge and
always be charged before use.
Avoid hot and cold extremes when storing. We recommend to
store batteries at a temperature of 15 °C.
Gel and AGM batteries are maintenance-free. Any performance
issues should be handled by a properly trained mobility device
technician.
•
•
•
•
•
•
26
Pay attention to the Battery Charge Indicator! Charge the
batteries when the Battery Charge Indicator shows that battery
charge is low.
How fast the batteries discharge depends on many
circumstances, such as ambient temperature, condition of the
surface of the road, tire pressure, weight of the driver, way of
driving and utilisation of lighting.
Try to charge the batteries always before you reach the red LED
range.
The last 2 LED (one red and one orange) mean a remaining
capacity of 20 — 30 %.
Driving with blinking red LED means an extreme stress for the
battery and should be avoided under normal circumstances.
When only one red LED is blinking, the Battery Safe feature
is enabled. From this time, speed and acceleration is reduced
drastically. It will allow you to move the mobility device slowly
out of a dangerous situation before the electronic finally cuts off.
This is deep discharging and should be avoided.
Be aware that for temperatures below 20 °C, the nominal
battery capacity starts to decline. For example, at -10 °C
the capacity is reduced to about 50 % of the nominal battery
capacity.
To avoid damaging the batteries, never allow them to be fully
discharged. Do not drive on heavily discharged batteries if it is
not absolutely necessary, as this will strain the batteries unduly
and shorten their life expectancy.
The earlier you recharge the batteries, the longer they live.
1576371-B
Electrical system
•
•
The depth of discharge affects the cycle life. The harder a
battery has to work, the shorter is its life expectancy.
Examples:
– One deep discharge stresses the same as 6 normal cycles
(green /orange display off).
– The battery life is about 300 cycles at 80% discharge (first 3
LED off), or about 3000 cycles at 10% discharge.
Under normal operation, once a month the battery should be
discharged until all green and orange LED are off. This should be
done within one day. A 16 hour charge afterwards is necessary
as reconditioning.
6.2.9 How to handle damaged batteries correctly
CAUTION!
Corrosion and burns from acid leakage if
batteries are damaged
– Remove clothes that have been soiled by acid
immediately.
After contact with skin:
– Immediately wash affected area with lots of water.
After contact with eyes:
– Immediately rinse eyes under running water for
several minutes; consult a physician.
6.2.7 Transporting batteries
The batteries supplied with your electric vehicle are not hazardous
goods. This classification is based on the German GGVS Hazardous
Goods Road Transport Ordinances, and the IATA/DGR Hazardous
Goods Rail Transport / Air Transport Ordinances. Batteries may be
transported without restrictions, whether by road, rail or by air.
Individual transport companies have, however, guidelines which can
possibly restrict or forbid certain transport procedures. Please ask
the transport company regarding each individual case.
6.2.8 General instructions on handling the batteries
• Never mix and match different battery manufactures or
•
•
technologies, or use batteries that do not have similar date
codes.
Never mix gel with AGM batteries.
Always have your batteries installed by a properly trained
mobility device technician. They have the necessary training and
tools to do the job safely and correctly.
1576371-B
•
•
•
•
Always wear safety goggles and appropriate safety clothing when
handling damaged batteries.
Place damaged batteries in an acid-resistant receptacle
immediately after removing them.
Only ever transport damaged batteries in an appropriate
acid-resistant receptacle.
Wash all objects that have come into contact with acid with
lots of water.
Disposing of dead or damaged batteries correctly
Dead or damaged batteries can be given back to your dealer or
directly to Invacare.
27
Invacare® Colibri™
6.3 5 A battery charger
6.3.1 Symbols found on the product
6.3.3 LED display
Green flashes
Waiting for connection to battery
This product complies with Directive
93/42/EEC concerning medical devices. The
launch date of this product is stated in the CE
declaration of conformity.
Orange flashes
Pre-charge
Orange
Charging
Green and orange flashes
Charged 85 %
C-Tick (Australian EMC)
Green
Fully charged
Red flashes
Defect
This product complies with German and, if
available, European safety requirements.
6.3.4 Caution
• Before using the battery charger, read all instructions and
•
Insulation class: Class II
•
6.3.2 Features
•
•
•
•
•
•
•
1.
2.
3.
4.
28
3Mains socket
5Battery charging plug
2 POWER LED display
1CHARGING LED display
cautionary markings.
In order to extend the service life of the charger, you should not
leave the electric vehicle connected to it for prolonged periods.
Turn of the power after charging.
Do not use the charger for totally discharged batteries or when
the batteries are faulty.
Use the charger in a well ventilated room.
Only use the charger for gel or AGM batteries (16-60 Ah).
Do not use for a voltage input other than that specified.
The temperature of case will rise when charging. Avoid to touch
the case directly.
"Output Connector Not For Current lnterrupting".
For continued protection against risk of fire, replace only with
same type and ratings of fuse.
To reduce the risk of fire and electric shock, install in a
temperature-and humidity-controlled indoor area relatively free
of conductive contaminants.
1576371-B
Electrical system
•
Power Supply Cord: Use UL Listed detachable power supply
cord-No. 18 AWG, 2 conductors, flexible cord, rated 10 A,
VW - 1, 105 C, minimum 1.8 m , maximum 3 m long. Provided
with a molded–on, non–polarized attachment plug with a 15 A,
125 V (NEMA1-15P) configuration and a molded-on connector
which mates with the power inlet. The following cord types
may be used:
•
•
Flexible cord type
S , SE,SO,SP-3 , SPT -3 , ST, STO, SJ , SJE, SJO , SJT, SJTO
6.3.5 Operating instructions
1.
2.
3.
4.
Make sure the battery charger output voltage is the same as the
output voltage of the connecting battery.
Connect the power cord. The LED indicates red and green flash
when AC power is on.
Connect the battery charger to the battery.
Start charging. Refer to 6.3.3 LED display, page 28.
6.3.6 Troubleshooting
• If the POWER LED (red) is off:
•
– Check that the charging cable is correctly connected.
– If the LED still does not light, the battery charger may be
faulty. Contact your dealer.
If the CHARGING LED is off:
– Check that the charging cable is correctly connected.
– If the battery is fully charged, the charger will switch to trickle
charge mode and the CHARGING LED light goes out.
– If the charging process was not started (orange LED), the
battery could be faulty. Contact your dealer.
1576371-B
•
•
If the green CHARGING LED keeps flashing, it cannot turn to
indicate charging:
– Check if the battery is connected successfully.
– Check if the output connection is short or open.
– If the battery connection is ok, the battery charger may be
faulty.
If the POWER LED (red) keeps flashing:
– Check if the battery connection is reversed.
– Check if the output connection is short or open.
– Check if the environment temperature is too low (< 0 °C)
– If the POWER LED keeps flashing, the battery charger may
be faulty.
If the CHARGING LED does not change from orange to green:
– The battery cannot be charged correctly. It may be faulty.
Stop charging and contact your dealer.
If the CHARGING LED changes from orange to green
immediately:
– The battery is either fully charged or faulty. Contact your
dealer.
6.3.7 Technical specifications
Item
Battery charger (switch mode)
Model
4C24050A
Output
current (DC)
5A±5%
Charging
voltage (DC)
28.8 V
Floating
voltage (DC)
27.6 V
29
Invacare® Colibri™
Input current
(AC)
2.5 A max.
Input voltage
(AC)
100 - 240 V, 50/60 Hz
Degree of
efficiency
AC-DC 80%
Operating
temperature
0 °C – 40 °C
Switching
method
Switch mode
Charging
method
Constant current, two levels of constant voltage
Battery
application
24 V gel or AGM batteries (16 Ah – 60 Ah)
Output
detection
1.
2.
3.
4.
5.
Operating
Humidity
20 % – 85 %
Dimensions L
xWxH
190 mm x 100 mm x 55 mm
Weight
965 g
Color
Black
30
Short-circuit protection
Reverse power protection
Overheat protection
Charging plug protection
Automatic cut off when reaching 12 hours
constantly charging
1576371-B
Transport
7 Transport
CAUTION!
Risk of injury from unsecured scooter parts
Removing the battery box will release the LITE-LOCK™
mechanism allowing the front frame assembly to separate
from the rear frame assembly.
– Do not lift or move the scooter without the battery
box unless you want to disassemble it. Refer to 7.2
Dismantling the scooter for transport, page 31.
7.1 Transport - General information
WARNING!
Risk of severe or fatal injuries in the event of a
traffic accident if this mobility device is used as a
vehicle seat! It does not fulfill the requirements
of ISO 7176-19:2001.
– Under no circumstances should this mobility device
be used as a vehicle seat or to transport the user in
a vehicle.
Removing the battery box
1.
Remove the seat. Refer to 4.4 Disengaging the seat to rotate it
or remove it, page 16.
2.
7.2 Dismantling the scooter for transport
Please proceed as follows to dismantle the scooter for transport:
1.
2.
3.
4.
Remove the seat. Refer to 4.4 Disengaging the seat to rotate it
or remove it, page 16.
Remove the battery box. Refer to Removing/Installing the
battery box.
Remove the drive unit. Refer to 7.2.2 Removing the drive unit,
page 32.
Fold the tiller down to the lowest locked position. Refer to 4.6
Adjusting the tiller angle, page 17.
7.2.1 Removing/Installing the battery box
CAUTION!
Risk of strains from lifting heavy parts!
– Use proper lifting techniques.
1576371-B
Grab the handle of the battery box, pull the battery box latch A
with your thumb and remove the battery box.
Installing the battery box
1.
2.
3.
Remove the seat. Refer to 4.4 Disengaging the seat to rotate it
or remove it, page 16.
Holding the battery box handle, carefully lower the battery box
on to the battery tray in the scooter.
Press down the battery box to engage the connector on the
battery box with the connector on the scooter base.
31
Invacare® Colibri™
4.
5.
Ensure the battery box latch A engages the mounting hole in
the seat post.
Reinstall the seat. Refer to 4.4 Disengaging the seat to rotate it
or remove it, page 16.
7.2.2 Removing the drive unit
CAUTION!
Risk of strains from lifting heavy parts!
– Use proper lifting techniques.
The drive unit separates from the chassis.
7.3 Reassembling the scooter
CAUTION!
Risk of strains from lifting heavy parts!
– Use proper lifting techniques.
1.
1.
2.
Pull up the seat post to lift up the chassis.
3.
32
Unfold the tiller. Refer to 4.6 Adjusting the tiller angle, page 17.
Pull up the seat post to lift up the chassis and hook the chassis
onto the drive unit.
Refit the battery box. Refer to 7.2.1 Removing/Installing the
battery box, page 31.
1576371-B
Transport
4.
5.
Make sure the latch A of the battery box is locked.
Refit the seat. Refer to 4.4 Disengaging the seat to rotate it or
remove it, page 16.
1576371-B
33
Invacare® Colibri™
8 Maintenance
8.1 Maintenance introduction
The term “Maintenance“ means any task performed to ensure that
a medical device is in good working order and ready for use as
intended. Maintenance encompasses different areas, such as everyday
care and cleaning, inspection checks, repair tasks and refurbishment.
8.2 Cleaning the mobility device
When cleaning the mobility device, pay attention to the following
points:
•
•
•
•
NOTE
– Have your vehicle checked once a year by an
authorised Invacare dealer in order to maintain its
driving safety and roadworthiness.
Only use a damp cloth and gentle detergent.
Do not use any abrasive or scouring agents.
Do not subject the electronic components to any direct contact
with water.
Do not use any high-pressure cleaning devices.
Disinfection
Spray or wipe disinfection using a tested and recognised product is
permitted. A list of the current permitted disinfectants is available
from the Robert Koch Institute at http://www.rki.de.
8.3 Inspection checks
The following table lists inspection checks that should be performed by the user and their intervals. If the mobility device fails to pass one of the
inspection checks, please refer to the chapter indicated or contact your authorised Invacare dealer. A more comprehensive list of inspection
checks and instructions for maintenance work can be found in the service manual for this device, which can be obtained from Invacare. That
manual, however, is intended to be used by trained and authorised service technicians, and describes tasks which are not intended to be
performed by the user.
Inspection work (to be carried out by user)
Before each journey
Weekly
Monthly
Horn:
Check function Please contact your dealer in case of failure.
Tires:
Check for foreign bodies (glass splinters, nails) and damage. Replace tire if
necessary.
Batteries / electrical system
34
1576371-B
Maintenance
Inspection work (to be carried out by user)
Before each journey
Weekly
Monthly
Check battery charging status. Charge batteries if necessary (refer to6.2.3
How to charge the batteries, page 24).
Checked all connecting plugs for condition and stable connections. Press
connecting plugs firmly together if necessary.
Wheel lock (if fitted):
Check wheel lock function. Please contact your dealer if the brake is defective.
1576371-B
35
Invacare® Colibri™
9 After Use
9.1 Disposal
•
•
•
•
•
•
•
36
The equipment wrapping is potentially recyclable.
The metal parts are used for scrap metal recycling.
The plastic parts are used for plastic recycling.
Electric components and printed circuit boards are disposed
of as electronic scrap.
Exhausted or damaged batteries can be returned to your
medical equipment supplier or Invacare.
Disposal must be carried out in accordance with the respective
national legal provisions.
Ask your city or district council for details of the local waste
management companies.
1576371-B
Troubleshooting
You can find detailed descriptions of individual flash codes, including
possible causes and fault repair, in the section entitled 10.1.2 Error
codes and diagnostic codes, page 37.
10 Troubleshooting
10.1 Diagnosis and fault repair
The electronic system offers diagnostic information to support the
technician during the recognition and rectification of faults on the
scooter. If there is a fault, the status display flashes several times,
pauses, then flashes again. The type of fault is displayed by the number
of flashes in each group, which are also known as the "flash code".
10.1.1 Error diagnosis
If the scooter shows a failure, please use the following guide to locate
the fault.
NOTE:
– Before making any diagnosis, ensure that the scooter
has been switched on at the keyswitch.
The electronic system reacts differently depending on the seriousness
of the fault and its effect on user safety. It can, for example:
•
•
•
Show the flash code as a warning and allow both driving and
normal operation to continue.
Display the flash code, stop the scooter and prevent further
travel until the electronic system has been switched off and
switched on again.
Display the flash code, stop the scooter and not permit further
travel until the fault has been rectified.
If the status display is OFF:
•
•
Check whether the keyswitch is SWITCHED ON.
Check whether all cables are correctly connected.
If the status bar indicator is FLASHING:
•
Count the number of flashes and then proceed to the next
section.
10.1.2 Error codes and diagnostic codes
Flash code
Fault
Consequence for the
scooter
1
Battery must be charged
Continues to drive
•
The batteries are discharged. Charge the battery as soon as
possible.
2
Battery voltage too low
Stops driving
•
•
The batteries are depleted. Charge batteries.
If you switch the scooter off for a few minutes, the battery can
often recuperate to such a stage that a short journey is still
possible. You should only do this in an emergency, however,
because this causes the batteries to become excessively
discharged.
1576371-B
Comments
37
Invacare® Colibri™
Flash code
Fault
Consequence for the
scooter
3
Battery voltage too high
Stops driving
Comments
•
•
4
Power time exceeded
Stops driving
•
•
•
The battery voltage is too high. If the battery charger is
connected, disconnect it from the scooter.
The electronic system charges the batteries when running
downhill and when braking. This fault is caused when the
battery voltage becomes too high during this process. Switch
the scooter off and on again.
The maximum current was exceeded over too long a period,
probably because the motor was overloaded or has been
working against an immovable resistance. Switch the scooter
off, wait a few minutes and then switch on again.
The electronic system has determined a motor short-circuit.
Check the wiring harness for short-circuit and check the
motor.
Contact your Invacare dealer.
5
Brake failure
Stops driving
•
•
Ensure that the disengaging lever is in the engaged position.
There is a defect in the braking coil or in the cabling. Check
the magnetic brake and cabling for open or short-circuited
circuitry. Contact your Invacare dealer.
6
No neutral position when
switching Scooter on.
Stops driving
•
Drive lever is not in neutral when the keyswitch was turned.
Put the drive lever in neutral, turn the power off and then
turn on again.
It may be necessary to replace the drive lever. Contact your
Invacare dealer.
•
7
Fault in speed potentiometer
Stops driving
•
•
38
The drive lever electronics could be faulty or incorrectly
connected. Check the cabling for open or short-circuited
circuitry.
Potentiometer is not correctly adjusted. Put the potentiometer
into the centre position.
1576371-B
Troubleshooting
Flash code
Fault
Consequence for the
scooter
8
Motor voltage error
Stops driving
•
The motor or its cabling is defective Check the cabling for
open or short-circuited circuitry.
9
Miscellaneous internal fault
Stops driving
•
Contact your Invacare dealer.
10
Push/freewheel mode error
Stops moving
•
The scooter has exceeded the permissible maximum speed
during pushing or freewheeling. Switch the electronics system
off and on again.
Comments
10.2 Resetting the circuit breaker
WARNING!
– NEVER defeat or bypass the circuit breaker.
– ONLY replace with a circuit breaker of the same
rating.
– Key must be removed from ignition before resetting
circuit breaker.
– Resetting the circuit breaker may be needed if the
scooter does not turn on and the reset button has
popped out about 6 mm.
1.
1576371-B
To reset, press the circuit breaker button A located on the
front of the battery box.
39
Invacare® Colibri™
11 Technical data
11.1 Technical specifications
The technical information provided hereafter applies to a standard configuration or represents maximum achievable values. These can change if
accessories are added. The precise changes to these values are detailed in the sections for the respective accessories.
Permissible operating and storage conditions
Temperature range for operation according to ISO 7176-9:
•
-25° … +50 °C
Temperature range for storage according to ISO 7176-9:
•
-40° … +65 °C
Electrical system
Motor
•
1 x 200 W
Batteries
•
•
2 x 12 V/12 Ah (C20) leakproof/AGM
2 x 12 V/18 Ah (C20) leakproof/AGM
Main fuse
•
40 A
Charging device
For 12 Ah batteries
For 18 Ah batteries
Output current
•
2A±
•
5A±5%
Output voltage
•
24 V nominal (12 cells)
•
28.8 V nominal (12 cells)
Input voltage
•
200 - 250 V nominal
•
100 - 240 V nominal
Operating temperature
(surroundings)
•
-25° ... +50 °C
•
0° ... +40 °C
Storage temperature
•
-40° ... +65 °C
Tires
Tire type
40
•
•
200 x 50 puncture-proof
210 x 65 puncture-proof
1576371-B
Technical data
Driving characteristics
Speed (dependent on country - please ask your
dealer which speed is available in your country.)
•
•
6 km/h
8 km/h
Min. braking distance
•
•
1000 mm (6 km/h)
1500 mm (8 km/h)
Max. safe slope ***
•
6° (10.5 %)
Max. climbable obstacle height
•
45 mm
Turning diameter
•
•
1940 mm (3–wheel)
2200 mm (4–wheel)
Drive range in accordance with ISO 7176-4:2008 *
•
•
16 km (18 Ah batteries)
11 km (12 Ah batteries)
Overall length
•
1010 mm
Max. total width
•
610 mm
Total height
•
840 mm
Seat height **
•
490 mm
Seat width
•
465 mm
Seat depth
•
400 mm
Armrest height
•
225 mm
Dimensions
Weight
Curb weight
1576371-B
3–wheel
•
•
41.7 kg (12 Ah batteries)
46.4 kg (18 Ah batteries)
4–wheel
•
•
44.2 kg (12 Ah batteries)
48.9 kg (18 Ah batteries)
41
Invacare® Colibri™
Components weight
Front section
•
•
13.1 kg (3–wheel)
15.6 kg (4–wheel)
Drive unit
•
9.6 kg
Seat
•
9.6 kg
Battery box 12 Ah
•
9.4 kg
Battery box 18 Ah
•
14.1 kg
Loading
•
136 kg
Max. front axle load
•
60 kg
Max. rear axle load
•
130 kg
Max. load
Axle loads
* Note: The drive range of a mobility device is strongly influenced by external factors, such as the charging state of the batteries, surrounding
temperature, local topography, road surface characteristics, tire pressure, weight of driver, drive style and use of batteries for lighting, servos etc.
The specified values are theoretical maximum achievable values measured according to ISO 7176-4:2008.
** Measured without seat cushion
*** Static stability according to ISO 7176-1 = 9° (15.8 %)
Dynamic stability according to ISO 7176-2 = 6° (10.5 %)
42
1576371-B
Notes
Australia:
Invacare Australia PTY. Ltd.
1 Lenton Place, North Rocks N.S.W.
2151, Sydney, Australia
Tel. +61-2-8839-5333
Fax +61-2-8839-5353
[email protected]
www.invacare.com.au
Canada:
Invacare Corporation
570 Matheson Blvd E Unit 8
Mississauga Ontario
L4Z 4G4 Canada
800–668–5324
United Kingdom:
Invacare Limited
Pencoed Technology Park, Pencoed
Bridgend CF35 5AQ
Tel: (44) (0) 1656 776 222
Fax: (44) (0) 1656 776 220
[email protected]
www.invacare.co.uk
Eastern Europe & Middle East:
Invacare GmbH, EDO
Kleiststraße 49
D-32457 Porta Westfalica
Tel: (49) (0)57 31 754 540
Fax: (49) (0)57 31 754 541
[email protected]
www.invacare.eu.com
Ireland:
Invacare Ireland Ltd,
Unit 5 Seatown Business Campus
Seatown Road, Swords, County Dublin
Tel : (353) 1 810 7084
Fax: (353) 1 810 7085
[email protected]
www.invacare.ie
European representative:
EMERGO EUROPE
Molenstraat 15
2513 BH, The Hague
The Netherlands
1576371-B
2014-03-25
*1576371B*
Making Life’s Experiences Possible™
New Zealand:
Invacare New Zealand Ltd
4 Westfield Place, Mt Wellington,
Auckland
Tel: 0064 9 917 3939
Fax: 0064 9 917 3957
[email protected]
www.invacare.co.nz
Manufacturer:
CHIEN TI ENTERPRISE CO. LTD.
No. 13, Lane 227, Fu Ying Road
Hsin Chuang, Taipei, Taiwan
R.O.C.