1
INSTALLATION, OPE,RATION AND
SERVICE MANUAL
RECREATIONAL VEHICLE
DROP.IN COOKTOPS
Models
SD2 . SD3
FOR YOUR SAFETY
WARNING: lF THE INFORMATION lN THIS MANUAL lS NOT FOLLOWED EXACTLY, A
FIRE OR EXPLOSION MAY RESULT CAUSING PROPERTY DAMAGE, PERSONAL
INJURY OR DEATH.
DO NOT STORE OR USE GASOLINE OR OTHER FLAMMABLE VAPORS AND LIQUIDS
IN THE VICINITY OF THIS OR ANY OTHER APPLIANCE.
WHAT TO DO IF YOU SMELL GAS
O DO NOT TRY TO LIGHT ANY APPLIANCE. EXTINGUISH ANY OPEN FLAME
INCLUDING CIGARETTES.
O EVACUATE ALL PERSONS FROM THE VEHICLE.
O DO NOT START THE VEHICLE'S ENGINE OR ELECTRIC GENERATOR.
o DO NOT TOUCH ANy ELECTRTCAL SWTTCH (TNCLUDtNG LTGHTS) OR USE ANY
PHONE OR RADIO IN THE VEHICLE.
. SHUT OFF THE GAS SUPPLYAT THE GAS CONTAINER (BOTTLE) OR SOURCE.
O IMMEDIATELY CALL YOUR GAS SUPPLIER FROM A NEIGHBOR'S PHONE.
FOLLOW THE GAS SUPPLIER'S INSTRUCTIONS.
O IF YOU CANNOT REACH YOUR GAS SUPPLIER, CALL THE FIRE DEPARTMENT.
. DO NOT TURN ON THE GAS SUPPLY UNTIL THE GAS LEAK(S) HAVE BEEN
REPAI RED.
INSTALLATION AND SERVICE MUST BE PERFORMED BY A QUALIFIED INSTALLER,
SERVICE AGENCY OR THE GAS SUPPLIER.
IMPORTANT:
INSTALLER: PROVIDE THIS MANUAL TO THE OWNER/USER OF THE RECREATIONAL VEHICLE.
OWNER: RETAIN THESE INSTRUCTIONS AND WARRANTY FOR FUTURE REFERENCE.
READ THIS MANUAL CAREFULLY BEFORE OPERATING APPLIANCE.
FOLLOW ALL SAFETY NOTICES AND WARNINGS.
ALL TECHNICAL AND WARRANTY QUESTIONS SHOULD BE DIRECTED TO THE COMPANY
LISTED ON THE WARRANTY, OR RATING PLATE LOCATED UNDERNEATH THE MAIN TOP.
Suburban
ManufactLlring
a subsidiary or
C
ompany
AIRXCEL, lnc.
SUBURBAN MANUFACTURING COMPANY
Post Office Box 399
Dayton, Tennessee 37321
423-775-2131
FAX 423-775-7015
INTRODUCTION
4. Before placing drop-in cooktop into cabinet, determine which one of the three
1. Your Drop-in Cooktop has been certified by Underwriters Laboratories (UL)
knockout openings in the burner box (left side, right side or rear) will be used for
routing of the gas supply tubing to the pressure regulator. After making selection,
knockoul the 1 inch plug. Place drop-in cooktop into the prepared opening and
secure to cabinet with four (4) wood screws. (Not provided)
for the U.S.A. and Canada for use with LP/Propane gas only.
2. Your cooktop is one of the following models: SD2 or SD3.
3. Model number letter designation:
5. Route gas line through opening in burner box and connect the gas line to the
3/8" flare fitting inside the burner box. Place nylon brushing ovei gas line and
insert brushing into opening in burner box.
S - Suburban
D - Drop-in
# - Number of burners
4. The complete model, serial number and stock number are located on the UL
label located under the top. This information will be needed when servicing
appliance or ordering parts. Record the information below and retain for future
reference. Replacement parts can be ordered through your local dealer or
Suburban Service Center. To obtain information on locating a local service
agency, call Suburban I\,4anufacturing Company, Customer Service Department,
(423) 775-2131.
Model No.
Stock No.
Serial No.
Date of Purchase
..,
.,zt'
//
CAUTION: Gas supply tubing within the confines of the appliance
connection shall be rigid or semi-regid metallic tubing.
6. Be sure all openings in the cabinetry around lhe gas line are sealed at time
of installation.
CAUTION: lt is imperative that the cabinet in which the cooktop is placed
be separated from other appliances so that the combustion air supply to
the top burners can not be affected in any way by any forced-air heating
appliance or its return air system or by any other source of positive or
negative air pressure. A negative air pressure created by another forced
air appliance may draw the flame down around the top burners and into
the cooktop resulting in damage to the burners and cooktop, as well as
possible personal injury and/or damage to vehicle. A positive draft could
cause the burner flame to lift-off the burner and go out resulting in an
uncontrolled escape of gas. Whenever the gas fumes reach an open
flame or another ignition source, an explosion and/or fire will occur
in property
and/or loss of life.
.-/ "'7'-'"
" .ii
7. Be sure burner knobs are in "olf' position. Turn on gas supply. Check
all
connections for Ieaks.
Figure
WARNING: Never check for leaks with an open flame. Apply a soap and
water solutlon to all ioints to see if bubbles are formed.
1
NOTE: The appliance must be disconnected from the gas supply piping system
of that system at test pressure in access
during any pressure testing
of '112 PSIG.
The appliance must be isolated from the gas supply piping during any pressure
testing of the gas supply piping system at test pressure equal to, or less than,
1/2 PSIG.
8. Remove the top and the grate(s) from their packing.
..:UL LABEL
a. Remove the protective rubber feet from the plastic bag and slip over the
grate legs.
5. The cooktop is designed certified for use with LP/Propane gas only. Do not
attempt to convert to natural gas.
6. Gas supply pressure for checking of the regulator setting shall be at least
1" W.C. above the suggested manifold pressure.
b. lnstall the grate(s) on the top.
c. Remove the grate retainer clips from the pack-out bag and install the clips
over the burner grate legs from the underside of the stove top. Squeeze
the ends of the clips together and slip over the ends of the burner grate.
9. Position the top over the burners and secure in place with two (2) thumb
screws and two (2) nylon washers provided.
Minimum Gas Supply Pressure - 1 1" W.C.
Maximum Gas Supply Pressure - 14 " W.C.
10. Your Suburban Drop-in Cooktop is now ready for operation. Before
operating, read the safety information and operating instructions contained in this
manual.
INSTALLATION
WARNING! lnstallation of this appliance must be made in accordance with
the written instructions provided in this manual. No agent, representative
or employee of Suburban or other person has the authority to change,
or waive anv Drovision of the instructions contained in this manual.
1. In the U.S.A., the installation must conform with state or other codes or in the
absence of such codes, refer to the latest edition of:
a. Standard for Recreational Vehicles ANSI A1 1g.2/AFPA 501C
b. National Fuel Gas Code ANSI 2223.1
DISTANCE TO COMBUSTIBLE
S DIRECTLY ABOVE COOK.TOP 24'
ln Canada, the installation must be in accordance with:
a. Standard CAN/CSA Z-240.4.2-M86, Installation Requirements for
Propane Appliances and Equipment in Recreational Vehicles.
13'' MAXIMUM
b. Any applicable local codes and regulations
OVERHEAD
CABINET DEPTH
2. Minimum clearances from combustible walls above and below counter:
Below Counter
lenter of Burner Head(s) to adjacenl vertical
:ombustible material above the cooking surface
lurners.
Models
Sides, Rear and
Bottom
Right Sidewall
SD2
0"
5 718"
5UJ
0"
5 5/8"
Left Sidewall
)
Backwall
I 16
8"
o
o
3. Cut-out dimensions illustrated in Figure 2 are as follows
Figure 2
Dimensions
Model
SD2
B
16 3/8
115t8
C
2 3t16
nn
D
E
3/4" min.
18"
SD3
18 15/16
16 1/8
21116
2 3/8" min
'Minimum acceptable spacing between adiacent
adjacenl SD2 models
21
SAFETY INFORMATION
Listed below are some very important facts that you should follow. They are
listed for your protection and safety.
1. Have your dealer show you where the main gas shut-off valve
is located and
how to shut it off in an emergency.
2. Use your cooktop only for its intended use. It is not to be used as a means to
heat your RV. Using your cooktop in lhis manner can result in personal
injury/property damage and/or loss of life.
3. lf the cooktop is near a window, proper precautions should be taken to
prevent curtaans from blowing over burners creating a f\re hazard.
4. Keep the area around the cooktop clean and clear of any combustible
materials, gaso[ne or other flammable vapors and liquids.
5. Do not leave children alone or unsupervised in area where cooktop is being
used. The top burners, burner grates and other areas near the burners become
hot enough to cause severe burns.
6. Children should be taught that the cooktop is not a toy. They should not
be
allowed to play with the controls or any other parts of the appliance.
7, Do not store items of interest to children in cabinets above or near the
13. Turn pan handles inward or toward back of cooktop and out of the way of
people walking past cooktop and/or out of the reach of children. Do not turn
handles to where they are over the burners.
'14. Do not use water on grease fires- Never pick-up a flaming pan. Smother a
flaming pan with a lid or flat pan. Flaming grease outside the pan can be
extinguished with baking soda or a multipurpose dry chemical fire extinguisher.
15. Never leave top burner(s) unattended.
a. For such reasons as down drafts that could be created by opening and
closing of cabinet doors or doors within the RV or by positive or negative
air pressures affecting burners due to improper installation. (See
paragraph 6 under lnstallation.) The burner could extinguish resulting in
gas escaping into the RV. Remember, gas to burners is controlled
manually, you must turn gas "ON and ""OFF".
b. A boil over could occur and the spill could ignite.
16. Flame size
a. Never extend the flame beyond the outer edge of the utensil. A higher
flame simply wastes heat and energy.
b. Correct flame size is determined by utensil size and material, what you
are cooking and whether or not you are cooking with liquid.
cooktop. Children climbing on the appliance to reach items could be seriously
injured.
8. Do not wear Ioose fitting clothing or long-hanging sleeved clothing while using
the appliance. lf they contact the open flame of the burner, they could ignite and
cause severe burns.
9.
Use only dry potholders to remove hot utensils. Using damp potholders on hot
surfaces could result in burns to hands. Do not use a towel or bulky cloth for a
pot holder. The cloth could contact open flame and cateh fire.
10, Never heat an unopened container. Pressure build-up within the container
can cause it to explode.
11. Keep cooktop clean. The build-up of grease and food boil-over and/or
spillage can create a fire hazard.
12. Avoid using your cooktop or any other appliance if you smell gas. Do not
assume that the smell of gas in your RV is normal. Any time you detect the odor
of gas, it is to be considered life threatening and corrected immediately.
Extinguish any open flames including cigarettes and evacuate all persons from
the vehicle. Shut off gas supply at LP gas bottle. (See safety notice on front
cover of this manual.)
Figure 3
'1 7. To prevent
damage to the cook top, top burners, or top grate, never operate
a top burner without a pan in place. The top burners, especially the high input
burner (if equipped), should not be operated on high for an extended period of
time.
Use the high flame setting to begin, then reduce the flame to a lower setting to
continue cooking. Never use cookware which extends beyond one inch of the
grate, or rests over two operating top burners. This will cause excessive heat
build-up which results in damage to the grate, top burner, and cook top.
1. Make sure all controls are "OFF" and the drop-in cooktop is cool before
OPERATING INSTRUCTIONS
1. Know which knob controls which burner. Always be sure the correct burner
cleaning.
is turned on.
2. Make sure that all cooktop surfaces, burner grates and burners are cool
2. Depress knob and turn fully counter-clockwise
\
to "Lite" position.
a. Verify sufficient gas supply before attempting to light the burner. Air in the
gas line will significantly delay burner ignition. The burner may light
unexpectedly as the air in the Iine clears and is replaced by LP gas. This
unexpected ignition could burn you. Air in the gas lines may occur after
the vehicle gas bottle and/or tank is refilled, during and after servicing
other appliances on same gas line, etc.
b. Do not attempt to light more than one burner at a time.
c. lmmediately light burner by holding a long match near the burner ports.
CAUTION: Hand held ignitors may be used but be sure they are the
type designed for lighting open flame burners.
3. lf any burner should extinguish after initial lighting or due to accidental blowout, turn gas off by turning control knob clockwise
minutes before attempting
a
to "OFF", wait five (5)
to relight the burner. Failure to follow
these
instructions could result in a fire or explosion.
lf the burner should go out while cooking, or if there is an odor of gas, turn
control knob(s) clockwise I to "OFF". Wait five (5) minutes for gas odor to
disappear. lf gas odor is still present - Do not relight burners. See "What To Do
lf You Smell Gas" on the front cover of this manual.
4. To turn burne(s) "OFF", turn the appropriate control knob clockwise
"OFF'.
I
to
before cleaning or disassembling cooktop.
3. Do not use oven cleaners, bleach or rust removers on the cooktop or bumer
grates.
4. Do not obstruct the flow of combustion and ventilation air.
5. Clean all surfa,:es as soon as possible after boil overs or spillovers.
6. Use warm soapy water only to clean the burner grales, cooktops, painted
surfaces, porcelain surfaces, stainless steel surfaces and plastic items on your
drop-in cooktop. Do not use grit or acid-type cleaners.
7. Do not use steel wool or abrasive cleaners. They will damage your drop-in
cooktop. Use only non-abrasive plastic scrubbing pads-
8. Do not allow foods containing acids (such as lemon or tomato juice, or
vinegar) to remain on porcelain or painted surfaces. Acids may remove the
glossy finish.
9. Do not wash warm porcelain surfaces. Allow these areas to cool before
cleaning. You could burn yourself or the porcelain could crack.
10. Pitting and discoloration will result if spills are allowed to remain for any
length of time on stainless steel.
11. Do not allow spillovers to remain on the burner caps. The caps could be
permanently stained if spillovers are not cleaned up promptly.
WARNING! Be sure all control knobs are turned "OFF" when you are not
cooking. Someone could be burned or a fire could start if a burner is
left on or unattended even if onlv momenl
12. lf any of the burner ports or the orifice are clogged, carefully clean with a
small wire or needle. Be sure not to enlarge ports. Never use a wire brush for
cleaning burner ports or orifice. Never use any brush which may "shed" bristles,
which may become lodged in the orifice or burner ports and cause a fire or
MAINTENANCE
WARNING! lf the user of this appliance fails to maintain it in the condition
in which it was shipped from the factory or if the appliance is not used
solely for its intended purpose or if appliance is not maintained in
accordance with the instructions in this manual, then the rask of a fire
and/orthe production of carbon monoxide exists which can cause personal
or loss of life.
explosion.
TO REMOVE THE STOVE TOP
1. Remove the two (2) thumb screws from the sides of the stove top. Lift the
stove top clear of the burner box.
2. To reinstall top, reverse the procedure.
TO REMOVE GRATE(S)
1. Remove the top.
2. From the underside
of the top, remove the clips from the grates by squeezing
the ends of the clips together to release the tension of the grate.
3. To reinstall grate(s) reverse the procedure.
LIMITED WARRANTY
SUBURBAN RECREATIONAL VEHICLE RANGE APPLIANCE
LIMITED TWO YEAR WARRANTY
This Suburban product is warranted to the original purchaser to be free from defects in material and workmanship under normal use and
maintenance foi a period of two years from date of purchase whether or not actual use beg ins on that date. All porcelain parts, includ ing top burner
grates, are warranted as commercially acceptable only as of the date the product was manufactu red. lt is the responsibility of the cons_umer/owner
io establish the warranty period. Suburban does not use warranty registration cards for its slandard warranty. You are required to furnish proof
of purchase date through a Bill of Sale or other payment record.
Suburban will replace any parts that are found defective within the first two years and will pay a warranty service allowance dlrectly to the
authorized Subuiban Service Center at rates mutually agreed upon between Suburban and its authorized service centers. Replacement parts
will be shipped FOB the shipping pointwithin the Continental United States, Alaska and Canada to authorized service centers performing such
repairs. nit treignt, shipping and delivery costs shall be the responsibility of the owner. The exchanged part or unit will be warranted for only the
unexpired portion of the orrginal warranty Before havinq warrantv repairs made, confirm that the se,ryr,gg.ag9,!,cy i,s"9t 1{hgi?99?-ejvlge=center
fOT SUbUTbAN. DO NOT PAV THE SERVICE AGENCY FOR WARRANTY REPAIRS; SUCH PAYMENTS WILL NOT BE REIMBURSED.
Suburban reserves the right to examine the alleged defect in the range appliance or component parts, and it is the ownefs obligation to relurn
the range appliance and/or component parts to Suburban or its representative. When returning a range appliance, it must include all component
parts aid the serial number plate. Returned component parts
m ust be
individually tagged and identified with the range appliance's model number,
serial number and date of installation.
For warranty service, the owner/user should contact the nearest authorized Suburban Service Center, advising th_em of the model and serial
numbers (located underneath the main 1op) and the nature of the defect. Transportation of the unit to and from the Service Center and/ortravel
expenses of the Service Centerto your location is the responsibility of the owner/user. lf you cannot locate an authorized service center locally,
the service agency chosen to perform warranty repairs must contact our Service Department a\ 423-775-2131 for authorization. Unauthorized
repairs made will not be paid by Suburban.
LIMITATION OF WARRANTIES
ALL IMPLIED WARRANTIES (INCLUDING IMPLIED WARMNTIES OF MERCHANTABILITY) ARE HEREBY LIMITED IN DURATION TO THE
PERIOD FOR WHICH EACH LIMITED WARRANTY IS GIVEN. SOME STATES DO NOT ALLOW LIMITATIONS ON HOW LONG AN IMPLIED
WARRANW LASTS SOTHEABOVE LIMITATIONS MAY NOTAPPLYTO YOU. THE EXPRESSEDWARRANTIES MADE IN THIS WARRANry
ARE EXCLUSIVE AND MAY NOT BE ALTERED, ENLARGED, OR CHANGED BY ANY DISTRIBUTOR, DEALER OR OTHER PERSON
WHOMSOEVER.
SUBURBAN WILL NOT BE RESPONSIBLE FOR:
1. Normal maintenanceasoutlinedintheinstallation,operatingandserviceinstructionsowner'smanual includingcleaningof componentparts
and cleaning or replacement of the burner orifice.
2.
lnitial checkouts and subsequent checkouts which indicate the range appliance is operating properly, or diagnosis without repair.
3. DamageorrepairsrequiredasaconsequenceoffaultyorincorrectinstallationorapplicationnotinconformancewithSuburbaninstructions.
4. ANY DAMAGE (CRACKS, CHIPS, SCRATCHES, ETC-) TO ANY PAINTED OR PORCELAIN ENAMEL PARTS.
5. Failure to operate due to loose or disconnected wires; waler or dirt in controls, fuel lines and gas tanks; improper gas
6. Cleaning or adjustment of components; electrode, burner tube, pilot and thermocouple.
7. Costs incurred in gaining access to the range appliance.
8.
9.
pressure, Iow voltage.
Parts or accessories not supplied by Suburban.
Freight charges incurred from parts replacements.
10. Damage or repairs needed as a consequence of any misapplication, abuse, unreasonable use, unauthorized alteration, improper service,
improper operation or failure to provide reasonable and necessary maintenance.
'11. Suburban products whose serial number has been altered, defaced or removed.
12. Suburban products installed orwarranty claims originating outside the Continental U.S.A., Alaska, Hawaii and Canada.
13. Damageasaresultoffloods,winds, lightning,accidents,corrosiveatmosphereorothercondrtionsbeyondthecontrol of Suburban.
14, ANY SPECIAL, INDIRECT OR CONSEQUENTIAL PROPERTY, ECONOMIC OR COMMERCIAL DAMAGE OF ANY NATURE
WHATSOEVER. Some states do not allow the exclusion of incidental or consequential Camages, so the above limitation may not apply to you.
NO REPRESENTATIVE, DEALEROR OTHER PERSON ISAUTHORIZEDTOASSUME FORSUBURBAN MANUFACTURING COMPANYANY
ADDITIONAL, DIFFERENT OR OTHER LIABILIry IN CONNECTION WITH THE SALE OF THIS SUBURBAN PRODUCT.
This warranty gives you specific legal rights, and you may also have other rights which vary from state to state.
IF YOU HAVE A PRODUCT PROBLEM
FIRST:
lf your RV has its original range appliance and is still under the RV manufacturer's warranty, follow the steps described in your RV owner's manual.
SECOND:
Contact a conveniently located recommended Suburban Service Center. Describe to them the nature of your problem, make an appointment, if
necessary, and provide for delivery of the range appliance io the selected service center.
THIRD:
To obtain information on locating a local service agency, contact:
Suburban Manufacturing Company
Customer Service Department
Post Office Box 399
Dayton, Tennessee 37321
(423)775-2131,Ex1
1
Part Number 202553
9-1-01
SUBURBAN MANUFACTURING COMPANY
Post Office Box 399
Dayton, Tennessee 37321
Suburban
Manufacturing Company
a subsidiary or
AIRXCEL, lnc.
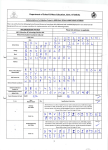
REPLACEMENT PARTS LIST
FOR DROP-IN COOK TOPS
MODELS SD2 . SD3
Only factory authorized parts are to be used. Do not attempt to repair defective
When ordering repair parts from your dealer or a Suburban Service Center, always
give the following information:
1. Part Number (Not ltem No.)
23.
4.
Part Description
Model No., Serial No.
Number of Parts Required
PARTS LIST. MODEL SD2
Item
No. Description
1 Bolt, Valve Mounting (2 Required)
2 Manifold (Two Burner)
3 Top Burner Valve (2 Required)
5 Regulatot.....
6 Fitting 3/8 Flare x 1/4 NPT
7 Bushing, Burner Tube (2 Required) . . . . .
B Top Burner (Right)
9 Knob Burner (2 Required)
10 Top Assembly (2 Burner) Almond
(--Y
-w
--l
al--d
-r<
'\f.-'
1s
&I
'
.'r,i
-I.- W-'''\ ,.
irs lz--\-.r-*f.--x-'
l
-W -t7 ;
=..(
-\i+)XL-_\i#^;
/,-.r'. --,-i\:\
.
",>
'
11
tl
11
IJ
14
1E
16
17
18
19
20
21
22
5Oa4-B
.
121916
171515
161142
.. . .
....161140
.
... . 171513
. 121931
.... 010827
. . 140219
. .270244L
Top Assembly (2 Burner) Black .
2702ABK
Top Assembly (2 Burner) White
.27024WH
Top Assembly (2 Burner) Stainless . . . . . . . .2702AST
Washer, Flat(Nylon) (2Required)
121565
Main Top Mounting Screw (2 Required) - .
121887
Wire Grate (Long)
031 025
Rubber Pad (4 Required)
140214
Clip, Grate n'etainer 12 iequired)
. 121910
Nut, 10-24 Keps (2 Required) . .
......120717
Top Burner (Left) .
......010828
Bushing Universal
.
071047
Burner Box Assembly (2 Burner) (Not a replaceable part)
.121905
Screw 1 0-24 x 114 (2 Required) .
Cover Plate, Manifold
. . 0633108K
Screw B-18 x 3/16, Type B
(2 Required - NO SUBSTITUTE)
1 21 893
Fastener, Tinnerman (2 Required)
121662
.
.
....... ....
.
.
.... .
.
.
.. .
.
.
Fom No-
.. . .
.
..-nt2)
a-!>.-"-t<'
Part
Number