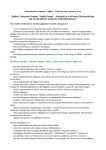
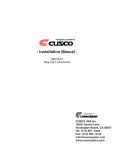
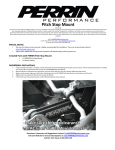
1
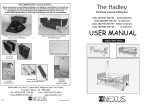
INSTALLATION INSTRUCTIONS
PART#: SMX-GM725
FITS: Chevrolet/GMC
•2007-2016 Silverado/Sierra/Suburban/Tahoe
1500 4WD/2WD/AWD
Thank you for choosing SuspensionMaxx for your
vehicle. This kit is designed to add suspension travel
and increase front and ground clearance. Specially
designed tools and experience are required to complete
the installation properly. These parts should only be
installed by a qualified mechanic otherwise an unsafe
vehicle and/or injury may result. Consult manufactures
service manual for proper torque specifications and
procedures. Instructions are supplied for the leveling
kit installation only. Safety is important. Use safe
working habits.
WARNING!
This suspension system will enhance off road performance and increase
ground clearance. Larger tires will increase vehicle roll center height.
The vehicle will handle and respond to driver steering and braking differently from a stock factory equipped passenger car or truck. Extreme
care must be used to prevent loss of control or vehicle rollover during
abrupt maneuvers both on and off-road. Failure to operate this vehicle
safely can result in vehicle damage, serious injury or death to the driver
and passengers. Always wear your seat belt and reduce your speed,
avoid sharp turns, inclines and abrupt maneuvers. Tread lightly, respect nature and enjoy the Off-Road Experience! Help keep it available
for future generations.
INSTRUCTIONS
SuspensionMAXX kits are designed to be easily installed
and completely reversible to the factory supplied settings.
These instructions are supplied for ease of installation,
correct procedures and safety. Automotive experience
recommended.
REQUIRED TOOLS
•
•
•
•
•
•
Load-rated floor jack
Safety stands x2
Wheel Chocks
Metric tool set
Torque Wrench
Loctite threadlocker for all fasteners
Thank You!
SuspensionMAXX Inc.
Again, Thank you for your purchase! Enjoy your SuspensionMAXX leveling system!
Questions? E-mail us at [email protected] or call 1.888.629.9226
STEP 1: Removal
STEP 1: Removal (Continued)
1. Jack and support front of vehicle under frame with
load rated jack stands. (Allow the suspension to
relax fully by supporting the frame)
2. Installation will be performed on both left and right
sides together.
3. Mark lug and wheel location. Remove front wheels
on both sides.
4. Mark lower strut location that faces outward.
5. Remove 2 lower strut mounting bolts with a 15mm
socket. (Fig 1.2)
6. Remove 2 lower strut clip nuts with flat head screw
driver or small pry bar.
NOTICE: Repeat procedure on both sides of the vehicle
before continuing.
7. View upper strut frametower.
NOTICE: Wire loom attachment clip locations. Pry closely
upward on plastic retainers to free from mounting stud
threads, as these will be reused later.
8. Use an 18mm wrench to remove 3 tall tower nuts
in triangle arrangement. DO NOT REMOVE CENTER
STRUT PISTON SHAFT NUT!
9. Slide lower strut inward off of lower control arm.
NOTICE: Wire loom attachment clip locations. Pry closely
upward on plastic retainers to free from mounting stud
threads, as these will be reused later.
10.Hold strut and pry down on sway bar with pry bar
which will lower the control arm allowing for removal of the strut. Gently lower strut assembly downward 1 to 2 inches. Guide strut assembly up and in
between the upper A-Arm. Be sure to clear inner CV
boot.
FIG. 1-1
For vehicles with Auto-ride or Magnetic-ride
Part#: SMX-725M ONLY
11.Select number of shims to be installed in place on
top of strut mount. See “Lift Option Height Chart” on
next page.
1. Verify if your vehicle
has the Electronic
Ride Control option.
Check the glove box
lid for the GM code
LIFT OPTION HEIGHT CHART
“RPO Z55” (Auto-ride)
or “RPO Z95” (Magnetic-Ride) This code
INCLUDEDPARTS
verifies that your
vehicle does include
active ride control
suspension.
NOTICE: If your vehicle
does not include this
option continue to
STEP 2 (Removal).
FIG. 1-2
0.25”
0.5”
0.75”
STRUT MOUNT
EXTENDER
(3/4” Thick)
1.5”
1.75”
2.0”
FIG. 0-2
2. Temporarily disconnect linkage from upper control
arm bracket with 10mm open-end wrench. ( Fig 0.1)
1.0”
2.25”
SHIM
2.5”
*Spacer Thickness is not directly proportional to lift height. Spacer thickness is
less than overall lift amount height.
Again, Thank you for your purchase! Enjoy your SuspensionMAXX leveling system!
Questions? E-mail us at [email protected] or call 1.888.629.9226
STEP 1: Removal (Continued)
12.Reinstall strut with selected shims installed on
top. Prying down on the sway bar is required in the
same procedure as Step 10. Hand tighten three new
supplied short flanged nuts onto exposed threads on
top strut mount.
NOTICE: Repeat procedure 7-12 on both sides of the vehicle
before continuing.
1. NOTICE: For 1.75-2” you do not need to disconnect upper ball joint to complete installation. For customers lift
their vehicle 2.25-2.5” disconnecting the upper ball joint
is required.
STEP 2A: For 1.75-2” of Lift
1. Pry down on sway
bar with pry bar
which will lower the control
arm allowing for
installation of
the Strut Mount
Extender.
“SUSPENSIONMAXX”
FIG. 2A-1
side facing up.
2. Align mounting holes install
supplied bolt,
washers and nuts.
Torque to 35ft/lbs
(FIG 2A-1)
3. Torque 3 upper
strut mount nuts
FIG. 2A-2
to 25ft/lbs.
(FIG 2A-2) Reinstall wire loom clips.
STEP 2B: For 2.25-2.5” of Lift (Recommended)
1. Lightly support
lower A-arm with
bottle jack or foot
jack
2. Unlock the ABS
wire loom clip,
allowing the ABS
wire to be free
FIG. 2B-1
from the clip.
(FIG 2B-1)
3. Remove ball joint nut with 18mm wrench
4. Use the “Kent J-42188-B” tool to separate Kent J-42188-B
upper ball joint taper.
CAUTION: Do not DAMAGE CV boot when lowering, and closely watch ABS cable as well.
STEP 2B: For 2.25-2.5” of Lift (Alternative Method)
NOTICE: We recommend the procedure above. Use the
alternative method at your own risk.
1. Lightly support lower A-arm with bottle jack or foot
jack
2. Unlock the ABS wire loom clip, allowing the ABS wire
to be free from the clip. (FIG 2B-1)
3. Loosen upper ball joint nut with 18mm wrench,
3-5 threads, until an air gap is achieved and the nut
spins freely. Pry downward on the suspension, strike
the knuckle with a brass drift and hammer to shock
the taper and unseat the ball joint.
4. Pry down on sway bar with pry bar which will lower
the control arm allowing for installation of the Strut
Mount Extender. “SUSPENSIONMAXX” side facing up.
NOTICE: Use EXTREME Caution during the step above,
closely monitor ABS wire and CV Axel clearances to prevent
damage.
5. Align mounting holes install supplied bolt, washers
and nuts. Torque to 35ft/lbs (FIG 2A-1)
6. Reconnect ball-joint. Apply pressure by pumping the
bottle jack under the lower control arm.
7. Raise the lower A-Arm with the bottle jack on the
outermost point on the control arm.
NOTICE: Use caution when jacking under the lower control
arm as it may cause the vehicle to raise off jack stands.
8. Pry downward on the upper control arm realigning
the upper ball joint with the knuckle. Thread on
upper ball joint nut.
NOTICE: Prying downward on the upper A-Arm will seat
taper and hold the stud from rotating as you tighten the
18mm ball joint nut. Some ball joint tapers have Allen hex
to hold ball joint stud while seating the taper.
Torque to 37ft/lbs plus an additional 1/4 turn.
(FIG 2A-2)
FIG. 2B-2
Again, Thank you for your purchase! Enjoy your SuspensionMAXX leveling system!
Questions? E-mail us at [email protected] or call 1.888.629.9226
9. Reinstall ABS wire into A-Arm Clip.
10.Torque upper 3 strut mount nuts to 25ft/lbs.
11.Reinstall wire loom clips.
12.Install wheels.
13.Perform wheel alignment to specifications below.
WHEEL ALIGNMENT SPECS W/ LEVELING KIT
CAMBER0.5Deg. +/- 0.5Deg.
CASTER2.0Deg. +/- 1.0Deg.
(LEFT TO RIGHT MUST BE EQUAL +/- 0.25Deg.)
TOTAL TOE
1/8in. +/- 1/8in.
MAGNETIC-RIDE CONTROL (Continued)
1. Bolt on adjustable relocation bracket with a
5mm Allen wrench. Reference the chart for
correct positioning based on the lift of the
vehicle. Relocate linkage arm into the bracket. Both linkage and bracket bolt must be
kept in line vertically. Use supplied nut to
fasten linkage arm.
FIG. 3-1
FIG. 3-2
Height Adjustment Diagram
Vertical
Alignment
Again, Thank you for your purchase! Enjoy your SuspensionMAXX leveling system!
Questions? E-mail us at [email protected] or call 1.888.629.9226