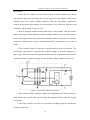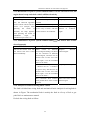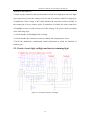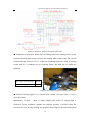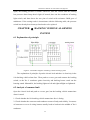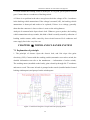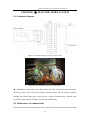
1
Service Manual
Maintenance of Wheel Loader
Electrical Equipment
SHANDONG LINGONG CONSTRUCTION MACHINERY CO.,
LTD
Maintenance Manual of Loader Electrical Equipment
Maintenance of Wheel Loader
Electrical Equipment
SHANDONG LINGONG CONSTRUCTION
MACHINERY CO.,LTD
Address: Lingong Industry Park, Linyi Economic
Development Zone, Shandong, china
Tel:+86 539 8785597
Fax: +86 539 8785618
Email: [email protected]
Website:
http://www.sdlg.cn
2
Maintenance Manual of Loader Electrical Equipment
Service Manual
Concise Guide
All reasonable steps have been taken to ensure that this publication is
correct and complete, but should any user be in doubt about any detail,
clarification may be sought from Shandong Lingong construction
machinery Co. Ltd. or their accredited representative. The information in
this document is subject to change without notice and should not be
construed as commitment by Shandong Lingong construction machinery
Co. Ltd. Shandong Lingong construction machinery Co. Ltd accepts no
responsibility for any errors that may appear in this document.
Shandong Lingong construction machinery Co. Ltd, P. R. China
All rights reserved. The contents of this publication may not be
reproduced in any form, or communicated to a third part without prior
written permission of Shandong Lingong construction machinery Co. Ltd.
3
Maintenance Manual of Loader Electrical Equipment
CHAPTER Ⅰ
POINTS FOR ATTENTION AND BASIC INFORMATION IN
MAINTENANCE OF LOADER ELETRICAL EQUIPMENT·······················································6
1.1 Operating specification and points for attention in maintenance of electrical system ········6
1.2 The using method of digital multimeter ············································································8
1.3 The basic circuit knowledge of engineering machinery·····················································9
1.4 Points for attention and marginal data in maintenance of electrical appliance ·················12
CHAPTER Ⅱ THE PRINCIPLE OF POWER SYSTEM···························································27
2.1 The explanation of principle ···························································································27
2.2 The introduction of main components·············································································29
2.2.1 Electric lock ·········································································································29
2.2.2 Fuse······················································································································30
2.2.3 Relay····················································································································31
2.2.3.1 Intermediate relay (JD2914) ······································································31
2.2.3.2 Battery relay ······························································································32
2.2.3.3 Starting relay and flameout relay ·······························································33
2.2.4 Flameout electromagnet (only part of vehicle type)··············································34
2.2.5 Generator ·············································································································35
2.2.5.1 The principle of generator··········································································35
2.2.5.2 The connection method of Weichai generator used in LG953 ····················37
2.2.5.3 The method to judge whether the generator generates electricity normally
and treatment measures ·························································································37
2.2.6 Starting motor ······································································································38
2.2.7 Storage battery ·····································································································41
2.2.8 Power switch········································································································42
2.3 Example for maintenance of system common faults ·······················································43
2.3.1 Maintenance of power system common faults——Whole vehicle no electric ······43
2.3.2 Maintenance of power system common faults——Turn off electric lock, but
engine doesn’t stop and whole vehicle still has electricity·············································44
2.3.3 Maintenance of power system common faults——10A electric fuse is burn down
frequently······················································································································44
2.3.4 Analysis for fault in starting whole vehicle···························································44
CHAPTER Ⅲ INSTRUMENT SYSTEM ··················································································46
3.1 Schematic diagram of instrument system ········································································46
3.2 Explanation of main parts ·······························································································46
3.2.1 Instrument panel assembly ···················································································46
3.2.2 Temperature sensor ······························································································47
3.2.3 Braking barometer································································································47
3.2.4 Fuel level sensor···································································································48
3.2.5 Alarm-pressure switch··························································································48
3.3 Example for maintenance of system common faults ·······················································48
3.3.1 Abnormal indication of thermometer····································································48
3.3.2 Abnormal indication of fuel level ·········································································48
CHAPTER Ⅳ AUTOMATIC RESET SYSTEM········································································50
4.1 Schematic diagram··········································································································50
4
Maintenance Manual of Loader Electrical Equipment
4.2 Explanation of system function·······················································································50
4.3 Maintenance of system fault ···························································································52
CHAPTER Ⅴ LIGHTING SYSTEM·························································································53
5.1 Circuit of front combination lamp ···················································································53
5.1.1 Schematic diagram ·······························································································53
5.1.2 Explanation of principle ·······················································································53
5.1.3 Maintenance of system common fault—the headlight doesn’t light······················53
5.2 Circuit of work light, taillight and interior trimming light···············································54
5.3 Circuit of steering light ···································································································55
5.4 Circuit of lamplet ············································································································56
5.5 Circuit of brake light·······································································································57
CHAPTER Ⅵ BACKING VEHICLE ALARMING SYSTEM ··················································59
6.1 Explanation of principle··································································································59
6.2 Analysis of common fault ·······························································································59
CHAPTER Ⅶ WIPER AND CLEANER SYSTEM ···································································60
7.1 Explanation of principle··································································································60
7.2 Maintenance of common fault·························································································61
7.2.1 Wiper motor doesn’t work····················································································61
7.2.2 Nozzle doesn’t spray water···················································································61
CHAPTER Ⅷ ELECTRIC HORN SYSTEM·············································································62
8.1 Schematic diagram··········································································································62
8.2 Maintenance of common fault·························································································62
CHAPTER Ⅸ STANDBY SOCKET SYSTEM ·········································································63
9.1 Explanation of principle··································································································63
9.2 Maintenance of common fault·························································································64
5
Maintenance Manual of Loader Electrical Equipment
CHAPTER Ⅰ POINTS FOR ATTENTION AND BASIC
INFORMATION IN MAINTENANCE OF LOADER
ELETRICAL EQUIPMENT
The content of this manual is compiled on the basis of the condition of product
production, and every product is in incessant improvement and protection. So the
manual has different vision. Please repair and maintain strictly observe the
maintenance and service manual which are obtained from the Lingong distributor
when buying loader. To repair the loader in correct method is very important to use it
safely and reliably. The basic maintenance methods listed in the manual are all based
on the electrical appliance diagrams, so please understand the principle diagrams
deeply before repairing. Make sure understand and remember the information of
safety, warning and points for attention before maintenance, otherwise your loader
will be damaged. The manual has mistakes inevitably because of the limitation of
editor. Criticism from every user and maintenance personnel is warmly expected.
1.1 Operating specification and points for attention in maintenance of
electrical system
When repair the loader electrical system, please obey the following points strictly.
Otherwise small fault will become great accident to lead to greater economic loss.
When repairing, please disconnect the power of main engine before disconnecting the
connection between conductor and connector, otherwise the wiring harness will be
damaged and the fuse will be fused, even the fire will occur due to the short circuit of
conductor. Identify the signal of conductor correctly. Each conductor on the wiring
harness corresponds to a signal with single or double figures. Please distinguish
between “3” and “8”, “6” and “9”, “5” and “6”, “0” and “8”, “1” and “7” and etc. to
avoiding taking trouble.
Connect the connector: When connecting the connectors (especially for the
collect connectors), please watch the letters and figures on connector carefully (such
as CN-1A, CN2-B and etc.) to avoid connecting by mistake. Connect the connectors
6
Maintenance Manual of Loader Electrical Equipment
by mistake will lead to unexpectable fault from fuse fused to fire of whole machine.
When unplug the connector, please hand the body of connector and push the lock
catch of connector to separate to two directions, and grasp the conductor to unplug
directly is not allowed. When connect the connector, make sure watch the connector
whether it is locked, otherwise, please connect again until the lock catch is locked.
When maintaining the connectors of waterproof, water mustn’t enter into the inside of
connector, otherwise, connect again after drying.
Use circuit detecting instrument correctly: 1. When using each circuit detecting
instrument, firstly understand the working principle and using condition, prohibit
using improperly. 2. When measuring voltage and electric current, select proper
measuring range to avoid destroying the instrument. 3. Prohibit measuring voltage in
the position of electric current and resistance.
Understand the circuit principle diagram: The principle diagram is the
relationship diagram of each component in the electrical system when they are
working normally. Understand the function of each component in circuit and the
effect of occurring fault until you spell over the principle diagram, so judge the fault
phenomenon correctly and quickly. Avoid disassembling blindly to save maintenance
time.
Understand the meaning of “ground” correctly: The negative electrode of storage
battery is “ground”. Negative electrode ground is often employed in construction
machinery, that is to say, connect the negative electrode of storage battery on the body
of complete appliance (including the metallic conductor connecting frame with cab).
So the complete appliance also is “ground” when it is connected with the negative
electrode of storage battery. When detect the voltage and resistance of one check point,
the red pen of multimeter connects with the check point, and the black pen connects
with any position of complete appliance body (Notice: There is no paint, oil or dust.).
Bind the wiring harnesses and conductors correctly: 1. Never fold or bend the
wiring harness with strength; 2.Keep away from moving components to prevent
snapped or worn; 3.Prevent the friction against sharp angularity of metal; 4.Keep
away from oil and water as possible as you can; 5.Keep away from the position with
7
Maintenance Manual of Loader Electrical Equipment
high temperature as possible as you can (for example the body of engine).
If there is wear on the conductors and wiring harnesses, bandage and replace
them immediately, and fix the wiring harness in safe place. Use the fuse rightly: When
replacing the fuse, the fuse with same specification must be used. When it is
emergency, copper wire can’t be used. The fuse used in this product should accord
with the relevant regulation in the QC/T420 《Fuse Used in Vehicle》. So, if the fuse
should be replaced, please use the fittings which accord with the requirement of
Lingong and never buy in the market randomly.
1.2 The using method of digital multimeter
The method in measuring dc voltage
1. Put
the
switch
on
the
required
measurement range of voltage (The
system voltage of this loader usually is
12V OR 14V, so often use the DC 200v),
2. Connect black pen with “COM” jack,
and connect red pen with “VΩ” jack,
3. Connect red pen with check point and
connect black pen with ground, then the
reading is the voltage of check point.
ⅠThe method in measuring resistance
Figure 1-1 VC98 series of digital multimeter
Connect black pen with “COM” jack, and connect red pen with “VΩ” jack, and
then put the switch on the required measurement range of resistance. Connect the pens
on the both ends of resistor to be measured, and then the reading is the resistance
value.
ⅡThe method in measuring diode
Put the measurement range on the position of “
”, and then connect black
pen with “COM” jack and connect red pen with “VΩ” jack. Then connect red pen with
cathode of diode and connect black pen with anode of diode, and the reading should
be small.
8
Maintenance Manual of Loader Electrical Equipment
The more detailed using method, safety requirements and points for attention can
refer to the service manual of multimeter.
1.3 The basic circuit knowledge of engineering machinery
ⅠThe definition of circuit
The pathway to form current by connecting positive and negative electrode of
power and electrical equipments with conductors is called circuit or loop.
ⅡOhms law
In circuit, the current is proportional to voltage, and inversely proportional to
resistance, which is called ohms law. Express with equality:
Current (I) = Voltage (U)/Resistance (R)
ⅢSingle lead type and Negative ground
In industrial power supply system, connect the metal shell of electrical
equipment with zero line of power system, which is called protective zero terminating.
The purpose is that cut off the power rapidly when connect live wire of electrical
equipment with ground. Prevent high voltage from applying on the electrical
equipment to harm personal safety.
Connecting metal shell of electrical equipment with ground is called protective
earthing terminating. When the insulator of electrical equipment is destroyed or there
is electric on the shell, conduct the current into earth by protective earthing wire to
protect personal safety. The above earth and zero terminating are both protective
measurements.
Using electricity in vehicle and engineering machinery is absolutely different
from the earth or zero terminating which mentioned above. We usually connect
cathode of storage battery with electrical equipment and connect anode with frame,
that is to say, metallic frame body instead of one conductor in the circuit. The circuit
formed in the method is called single lead type. At present, low voltage circuit formed
in vehicle and engineering machinery all over the world is regulated to be negative
ground.
ⅣThe voltage in engineering machinery
The nominal voltage in vehicle or engineering machinery is mostly 12V or 24V,
9
Maintenance Manual of Loader Electrical Equipment
which is usually distinguished like this: Gasoline vehicle applies 12V electrical
system, but diesel vehicle applies 24V electrical system. All of engineering machinery
use diesel vehicle, so the electrical system is 24V. But very few diesel vehicles apply
12V electrical system (For example Lingong export loader LG918 with
KANGMINGSI engine, small-sized excavator LG655 with YANGMA engine and
LG670 with KANGMINGSI engine).
As to human, prove by many experiments: The DC or AC is harmful to human
body as long as it is more than 36V. When it is less than 36V, there is no harm even if
human contract with charged body directly. So the voltage under 36V is called safety
voltage.
Ⅴ The basic connecting method of circuit
Series connection: all loads are connected one by one to form a pathway. Its
characteristic is the same current is conducted through each load. The total resistance
of series connection is equal to the sum of every resistance.
Parallel connection: the same terminal of all loads connects with cathode of
power, and the other terminal connects with anode, which is called parallel connection.
Most circuits in vehicle and engineering machinery use the parallel connection.
Ⅵ Voltage drop causing by the resistance of circuit
There is resistance in all conductors, so a certain voltage drop will be produced
when the current conducting through the conductors. There are two factors affecting
voltage drop: One is the conductor itself (section area), the other is the resistance
lying between conductor and frame or that in the connector. For example, connect the
electricity lock, turn on the headlight, and then start the diesel vehicle. The headlight
become darkened during starting, which is leaded by voltage of storage battery drop
when large current conducting through circuit.
Ⅶ Three kinds of effect of current
Three kinds of effect can be produced when the current conducting through
circuit: that is thermal effect, chemical effect and magnetic effect. For example, the
filament will heat and luminous when current conducting through bulb, this is thermal
effect of current; when storage battery supplies electricity for electrical equipment,
10
Maintenance Manual of Loader Electrical Equipment
there is current conducting through electrolyte in the storage battery and there is
bubble produced on the surface of polar plate, this is called chemical effect of current;
when there is current conducting through the coils of instrument, the pointer will
swing, which induced by the magnetic line around the coils, this is called magnetic
effect of current.
Ⅷ Power
The current does work when it implements every electric effect. The electric
work supplied or consumed in one second is called electric power, and the signal is P.
The power is proportional to the product of voltage and current, that is: P=U*I.
Ⅸ Resistor
Resister is a component that consumes electric energy and turns electric energy
into heat energy completely. For example, the component to adjust wind speed in the
air conditioning system is a resister.
Ⅹ Capacitor
The unit of capacitor is F (Farad). The role of capacitor is: storage the direct
power energy, proportional to capacitance, proportional to charging voltage. The
characteristic of capacitor: DC can’t conduct through capacitor but AC can. And the
higher is frequency of AC, the more easily to conduct.
Ⅺ Coil (self-inductance)
The unit of self-inductance is H (Henry). Wind the conductor in the same
direction continuously to form coil. But AC is difficult to conduct, and the higher is
frequency of AC, the more difficultly to conduct. For example, every relay,
electromagnet and electromagnetic instrument using in engineering machinery are all
the examples of coil application.
Ⅻ Diode
Diode is a semiconductor device which only can conduct current in one direction.
The main application in engineering machinery is: silicon rectifier diode and zener
diode on the generator, and freewheeling diode on the relay.
ⅩⅢIntegrated circuit
Integrated circuit is a circuit block which assembles resistant, capacitor, diode
11
Maintenance Manual of Loader Electrical Equipment
and transistor on the semiconductor substrate to form certain function.
1.4 Points for attention and marginal data in maintenance of
electrical appliance
ⅠSwitch of power (normal configuration of more than 9*6)
Series of 50 vehicles usually locate on the frame at left and back of vehicle, and series
of 30 vehicles usually locate in the right storage battery. When open the left door of
loader hoop or the cover of storage battery box (seen in the Figure 1-2), the anode
switch of storage battery can be seen.
(1) Anode switch locating on the frame at left
(2) Anode switch locating in the right
and back of vehicle
storage battery box
Figure 1-2 The position of power switch
Turn off state of power switch: Turn the handle of anode switch anticlockwise to
the state of turning off to turn off the power of whole vehicle electric system. The
switch must be in state of turning off when the vehicle doesn’t work.
Turn on state of power switch: Before starting the vehicle, make sure turn the
handle of anode switch clockwise to the state of turning on.
The anode switch is different from start switch. Turn off the anode switch, that is,
turn off the electric system of whole vehicle. But when turn off the start switch,
storage battery still connect with whole vehicle system, so part of electrical
components still work.
Never turn off the anode switch of storage battery when the engine is running,
otherwise the electrical system of whole vehicle will be damaged.
Ⅱ Start switch
12
Maintenance Manual of Loader Electrical Equipment
Start switch (also called electrical lock) is classified into four gear positions:
1. Auxiliary——Plug in the key of start switch, and then turn one gear position
anticlockwise. The gear position is automatic reset (after loosening, it can turn to
“OFF” gear automatically). This gear position hasn’t used at present.
2. OFF——In this gear position, oil way of engine is cut off to stop, and the power
control circuit of whole machine is cut off. As to export vehicle, except alarm
lamp, other lamps such as indoor lamp, headlight, front side lamp, taillight, back
side lamp, working lamp and all indicator lights on the instrument panel can’t be
lightened. All lights of other vehicles can’t be lightened.
Notice: Only in this gear position can plug in or draw out the key of start switch.
3. ON——Plug in key of start switch, then turn to the first gear position clockwise.
When in this gear position, the electrical system of whole vehicle can work
normally.
4. START——Plug in key of start switch, then turn to the second gear position
clockwise. In this gear position, starting motor can work to start the engine. After
engine starting successfully, please loosen key of start switch immediately. This
gear position isn’t self-holding, and after loosening the start switch turns to the
“ON” gear of start switch automatically.
Notice:
Before starting engine, please confirm the anode switch turn on and speed change
operating handle in neutral position.
The time of starting engine is not more than 10 seconds; The time between two
starting operations is 30 seconds at least, and the times of starting continuously can’t
more than three times; If more than three times, start again after cooling starting
motor and flameout electromagnet sufficiently, otherwise the using life of storage
battery will reduce and cooling starting motor and flameout electromagnet may be
destroyed.
Ⅲ Instrument assembly, Horn switch
The monitoring instruments, alarm system and steering indicating system of loader
are all assembled on the instrument assembly under steering wheel. Instrument system
13
Maintenance Manual of Loader Electrical Equipment
can display oil temperature of torque converter, cooling water temperature, speed
change oil pressure, fuel position, oil pressure of engine, braking air pressure, speed,
emergency braking alarm, service braking low voltage alarm, whole vehicle working
hours counter, left and steering lamps and etc. 18 items in all. (The above instruments
and alarming contents will change according to different vehicle type and
configuration).
ⅰMonitor instrument (Take export vehicle 958 and domestic vehicle 953 as example,
other vehicle type is basically same):
958 instrument assembly is made up of 7 instruments, and 953 instrument
assembly is made up of 5 instruments. Take instrument panel of LG958 as explanation.
The explanation of instruments used in operating machine is as follow. Understand
their operation method and function completely.
◆ Water thermometer of engine.
This indicator shows the temperature of cooling water in engine.
When the pointer of water thermometer is in the range of green area
(60℃~100℃), the temperature of water is normal.
If the pointer is in range of red area, stop to check. Please park in the safe and
convenient for maintenance position.
Check the exhaust fan and belt of engine, and also the water level of water tank.
Drive or work again after trouble rescinded.
When check the exhaust fan, belt of engine and the water level of water tank,
please avoid burning due to high temperature and avoid clamping injury due to
moving parts.
◆ Oil temperature indicator of torque converter.
When the pointer of oil temperature indicator is in the range of green area
(60℃~120℃), the temperature of oil is normal. When the pointer is in the red area,
please stop to check.
When the pointer is in range of red area, please park in the safe and convenient
for maintenance position. Check the transmission and oil level of transmission. Drive
or work again after trouble rescinded.
14
Maintenance Manual of Loader Electrical Equipment
◆ Working hours counter.
This indicator shows the working time of machine. The reading can regard as
reference for overhaul and maintenance.
◆ Oil pressure gauge of transmission.
Represent the pressure of hydraulic oil in shift control system. This gauge often
classifies into two types: The oil pressure gauge of transmission configured on
exported vehicle usually hasn’t red or green areas, but the oil pressure gauge of
transmission configured on domestic vehicle usually has red and green areas.
(1) Oil pressure gauge of transmission (without red and green areas).
When the pointer is in the range of (13~17) × 100kPa or(18.85~24.65)×10PSI,
the pressure of oil is normal. Stop to check when pointer is in the other areas.
(2) Oil pressure gauge of transmission (with red and green areas).
When the pointer is in green area, the pressure of oil is normal. Stop to check
when pointer is in the other areas.
◆ Braking barometer.
Represent the pressure of air in braking system. This indicator often classifies
into two types: The braking barometer configured on exported vehicle usually hasn’t
red or green areas, but the braking barometer configured on domestic vehicle usually
has red and green areas.
(1) Braking barometer (without red and green areas).
When the pointer is in the range of (4~8) × 100kPa or(5.8~11.6)×10PSI, the
pressure of air is normal. Stop to check when pointer is in the other areas.
(2) Braking barometer (with red and green areas).
When the pointer is in green area, the pressure of air is normal. Stop to check
when pointer is in the other areas.
◆ Fuel level gauge.
The gauge represents the surplus of fuel in the fuel tank.
◆ Speedometer.
The gauge represents the running speed of vehicle.
15
Maintenance Manual of Loader Electrical Equipment
1.Oil pressure gauge of transmission 2. Braking barometer 3. Working hours counter 4.Left
steering lamp 5. Indicator light 6. Speedometer 7. Right steering lamp 8. Fuel level gauge
9. Water thermometer of engine 10. Oil temperature indicator of torque converter 11.Start
switch 12. Combination switch 13.Switch of watering can 14.Switch of windshield wiper
15.Cover plate 16.Switch of taillight 17. Switch of headlight 18. Switch of back headlight
19. Switch of alarm lamp
Figure 1-3 Instrument panel and rocker switch assembly (LG958)
ⅱGeneral indicating lamps on the instrument panel
Figure 1-4 General indicating lamps on the instrument panel
◆ Preheat indicating lamp: When install the function of preheat on the engine, the
lamp light to represent the engine is in the state of preheating. The time of
preheating is not too long.
◆ Oil pressure alarm lamp: After turning on the starting switch, the lamp is lightened
immediately; after starting engine, it goes out in a moment. Otherwise, the
16
Maintenance Manual of Loader Electrical Equipment
lubricating oil level is too low or fault occurs in lubricating system, and flameout
immediately to check the engine.
◆ Charging indicator: The indicator lights when turn on the starting switch; when
charging the engine, the indicator goes out; if the lamp lights when engine is
running, check the charging circuit.
◆ Power cutting indicating lamp: Lamp on represents power is cut, and lamp off
represents power is not cut.
When step on the left brake pedal or put down the park emergency braking
button, the power is cut and lamp turns on; when step on the right brake pedal, the
power is not cut and lamp turns off.
◆ Emergency steering indicating lamp: The lamp turns on when install the function
of emergency steering and vehicle carry out steering emergently while the
emergency steering pump is running.
◆ Parking brake indicating lamp: The lamp turns on when put down switch of
parking brake or braking air pressure is low; the lamp turns off when braking air
pressure is normal or turn the switch of parking brake to release braking.
◆ Braking air pressure alarm lamp: The lamp is lightened to alarm when braking air
pressure is lower than 0.4MPa.
◆ Far light indicating lamp: The lamp turns on when front headlight turns on.
◆ Computer box working indicating lamp: Reserving device.
◆ Fuel rough filtration indicating lamp: Lamp on represents fuel rough filter is
blocked, please clean or replace it.
ⅲ The position of horn switch is shown in the Figure 1-5.
Figure 1-5 Horn switch
The horn switch locates in the center of steering wheel, and it is normal open
17
Maintenance Manual of Loader Electrical Equipment
contact.
Ⅳ Lamp, lamp switch
Figure 1-6 Front combination lamp and working lamp
Figure 1-8 Interior trimming ceiling lamp
Figure 1-7 Rear lamp
Figure 1-9 Taillight
The lamps of whole machine are divided into front combination lamp (one for
both sides), rear lamp (one for both sides), interior trimming ceiling lamp, front and
rear light (one for both sides in front of cab, selection fitting at the back of cab),
taillight (one for both sides), and rotating alarm lamp installed on the cab electively.
In which, the front combination lamp includes front light, front steering lamp and
clearance lamp.
Steering lamp is controlled by the steering switch on instrument panel.
1. Switch of alarm lamp
After closing the switch of alarm lamp, front and rear steering lamps (four lamps
in all) turn on simultaneously. When stop emergently in the condition of emergency
the lamp plays a role of warning.
18
Maintenance Manual of Loader Electrical Equipment
Figure 1-10 Wane switch assembly
2. Switch of rear light
Switch of rear light controls the left and right rear light on or off simultaneously.
The position of rear light is shown in the Figure 1-10.
3. Switch of backlight lamp
Switch of backlight lamp controls front and rear clearance lamps (four lamps in
all), wane switch backlight and instrument backlight lamp on or off.
4. Switch of working lamp
Switch of working lamp controls working lamps on the ceiling of cab on or off
simultaneously. The position of working lamp is shown in the Figure 1-6.
There is a backlight lamp on each wane switch. When switch of backlight lamp
is in the closing state, indicating lamp of switch turns on, and vice versa.
(1) Wane type switch of front light
(2) Combination type switch of front light
(combine with steering switch)
Figure 1-11 Switch of front light
The position of switch of front light is shown in Figure 1-11. The switch of front
light has three gear positions: far light, close light and closure.
Ⅴ Semi-automatic operating system (suitable for electronic transmission)
Semi-automatic operating system is made up of speed change operating handle,
electronic control box, speed change operating electromagnetic valve and emergency
19
Maintenance Manual of Loader Electrical Equipment
braking button. The operation of system is very safe and simple because of using
special microprocessor intelligent control system. The system also has the functions
of neutral gear locking, interlock protection of neutral gear and starting, direct
reversing, downshifting forcibly, automatic power cutting and self-protection of
system with failure.
ⅰCommon operation
Figure 1-12 speed change operating handle
The speed change operating handle lies under the steering wheel.
Put the handle back and forth (refer to the arrow in the Figure 1-12) to operate
the vehicle to process (handle in the position of “F”) and draw back (handle in the
position of “R”); handle in middle position is neutral gear (handle in the position of
“N”).
Emergency braking button is near to the right of seat (refer to the Figure 1-13).
When put down the button, the vehicle is in the state of emergency braking. Pull the
button up to release emergency braking.
Position of second gear
Figure 1-13 Park emergency braking button
Figure 1-14 Shifting operation of speed change
gear (the position of gear 2 is shown in figure)
20
Maintenance Manual of Loader Electrical Equipment
Function
of KD
Figure 1-15 Neutral gear locking switch
Figure 1-16 Function of KD key
Before driving, remember to rotate up the park emergency braking button to release
braking, otherwise, the braking system will be destroyed!!! (Refer to Figure 1-13).
To ensure the driving safety, please wear safety belt before driving and confirm the
condition of brake is good, working device is in vehicle moving status, and there is no
barrier or person around the vehicle!!!
Rotate the end of speed change handle to go to four different gears. There are
first, second, third, fourth gear (four gears in all) to process, but there are only first,
second, third gear (three gears in all) to draw back. The third and fourth gear on the
handle to draw back is same.
ⅱFunction introduction
1. Neutral gear locking function
In the condition of neutral gear, put the neutral gear locking switch to the
position of “N” (Shown in Figure 1-15), so the handle can’t be put back or forth and
locked in the position of neutral gear. Put the locking switch in the position of “D” to
release the neutral gear locking. Using the switch can prevent misoperation.
When speed change operating handle is locked in the position of neutral gear, never
carry out the shifting operation of advancing or drawing back forcibly without releasing
neutral gear locking, otherwise the speed change operating handle will be destroyed!!!
2. Interlock protection of neutral gear and starting function
Electrical system of whole vehicle has the function of neutral gear/starting
interlock protection, that is to say, start the engine only when the speed change
operating handle is in the position of neutral gear. This can prevent accidents
occurring when starting vehicle suddenly.
21
Maintenance Manual of Loader Electrical Equipment
3. Direct reversing function
The speed change operating handle hasn’t the function of reversing interlock, so
the driver can reverse directly according to the speed.
● As to forward first and second gear, turn to corresponding reverse gear
directly at any time (namely 1F<==>1R and 2F<==>2R).
● As to forward third and fourth gear, turn to corresponding gear after reducing
the speed (loosen the throttle).
4. Downshifting forcibly function (KD key)
In the Figure 1-16, the direction of arrow is the operating direction. When the
gear is set on the forward second gear (or the reverse second gear), please put down
the button of downshifting forcibly (KD key) on the speed change operating handle,
then the gear of transmission can shift to forward first gear (or reverse first gear)
automatically. Once shift to other gears, the function of downshifting forcibly stops
automatically. Release the function of downshifting forcibly in the following
methods:
● Put down the downshifting forcibly key (KD key) again.
● Change the driving direction;
● Rotate the handle to shift gear.
The function combined with direct reversing function to make shifting gear
frequently convenient when the loader shovels and loads materials. For example, the
loader drives in the speed of forward second gear. When near to the materials, put
down the KD key, downshift to forward first gear automatically. After loading
materials completely, shift to reverse gear again, then shift to reverse second gear
automatically. So the loader drives backward in speed of second gear to improve work
efficiency.
5. Power cutting function (braking and out of shifting function)
When driver steps on the foot braking pedal or puts down the emergency braking
button, electronic control box detects the signal and then control the speed change
operating valve to cut off the power of transmission.
Brake at the same time cut off the power output of transmission utilization of
22
Maintenance Manual of Loader Electrical Equipment
braking and out of shifting function to improve the efficiency of braking. Meanwhile,
protect the transmission and transmission system and also increase the utilization ratio
of engine and work efficiency of working devices.
Braking and out of shifting function only plays a role in process or reverse first
and second gear. When the loader is in the high speed gear, the electronic control box
can not cut off the power of transmission to ensure the driving safety.
Notice:
When fault occurs in speed change operating system of vehicle, please disassemble
the speed change operating system without authorization!!!
If the barrier can not be removed, please contact with the special maintenance station
or after service company. When work or drive normally, please select the driving power
cutting function, otherwise, affect the braking performance, shorten the life of braking
system and transmission system!
6. Self-protection of system with failure
Electronic monitoring box monitors continuously input signal from speed change operating
handle and speed sensor and also the output signal from electromagnetic valve. If
abnormal information combination (such as line cut off, open circuit of electronic control
box ground line, bizarre signal) appears or the power exceeds the regular restriction and
open circuit occurs, electronic control box shifts to neutral gear immediately to lock all
signals. So prevent misoperation greatly to ensure the driving safety.
Boom joystick
Bucket joystick
(1) Single handle type
(2) Double handles type
Figure 1-17 Operating handle of boom and bucket
23
Maintenance Manual of Loader Electrical Equipment
Ⅵ Boom lifting limiting space and floating device and bucket level limiting space
device (The function realizes in pilot control)
Install the operating handle of lift arm and bucket at the right of seat. Use the
boom lifting limiting space and floating device and bucket level limiting space device
fully can reduce effectively the labor intensity to operate the working device and
increase the comfort of operation.
●Boom lifting limiting space device:
When push the boom joystick to the extremely back position, boom joystick is raised
by boom and keep catching by electromagnet (boom joystick does not bounce back to
neutral position after loosening). Boom rises all the time until rises to the limiting
position, then the boom limiting space switch begins working. So the electromagnet
lose magnetic and the boom joystick bounces back to the neutral position under the
effect of reset spring, then the boom doesn’t lift no longer.
●Boom floating device:
When push the boom joystick to extremely front position, boom joystick is catch
by boom floating electromagnet (now, the driver can lose hold, and the boom joystick
doesn’t bounce back to neutral position). At the moment, boom is in the state of
floating. Pull the boom bar back to neutral position to release the boom floating state.
When operate the boom to lower, push the boom joystick to floating state, and
then the boom drops under the effect of dead weight. At the moment, the right hand
can carry out other operations (for example put the bucket horizontally) to increase
the work efficiency.
Push the boom joystick to the floating position when carry out the shoveling and
loading operation. So the bucket fluctuates with the ground to avoid the damage to
ground.
No matter what state is the vehicle in, confirm there is no any barrier or person around the
vehicle before carrying out the operation of boom and bucket. Otherwise, lead to the
damage of device and casualty!!!
●Bucket level limiting space device:
24
Maintenance Manual of Loader Electrical Equipment
If the bucket is in the condition of unloading, push the bucket joystick to the
extremely back position and the bucket electromagnet is catch by bucket tilt-back
keeping electromagnet to keep in the extremely back position (boom joystick does not
bounce back to neutral position after loosening). The bucket turns back all the time
until the bucket is in the level place, and the bucket level limiting space switch begins
working. So the bucket tilt-back keeping electromagnet loses magnetic due to power
down. The bucket joystick bounces to neutral position under the effect of reset spring
and the bucket stop in the level position. When push the bucket joystick to the
extremely back position again, the bucket joystick isn’t catch (bounce automatically
after loosening) because of the limiting space keeping function of bucket level
limiting space switch to keep bucket tilt-back keeping electromagnet in the state of
power off. Push the bucket joystick forward and the bucket turnover. When exceed the
bucket level position, the bucket level limiting space switch resets and the bucket
automatic level function recovers. Then push the bucket joystick to extremely back
position and it will keep in the extremely back position. The bucket joystick in the
extremely front position has not the keeping function. During the bucket tilting from
most bucket tilt-back angle to unloading angle, push the bucket joystick forward all
the time (bucket joystick will bounce back to neutral position after loosening). The
bucket will not pause when crossing the level position.
Ⅶ Wiping system, washing system and reserve socket
ⅰWiper and washer
The whole vehicle equips with front and back wipers, and the control switch is at the
lower right of cab foreground.
1. Wiper switch on the front-window
The wiper switch on the front-window has three gears: stop, low speed and high speed.
The wiper in the “stop” position can reset automatically.
2. Washer switch on the front-window (install on some vehicle type)
Figure 1-18 Wiper switch
Figure 1-19 Washer switch
25
Maintenance Manual of Loader Electrical Equipment
Put down the switch of washer, and the washer begins working to inject water in
kettle on the windowpane. The switch of washer can reset automatically after
loosening, and then the washer stops injecting water.
3. Wiper switch on the back-window (install on some vehicle type)
The wiper switch on the back-window has two gears: stop and run. The wiper in
the “stop” position can reset automatically.
Check frequently whether the water in kettle is running out to avoid cleaning the
windowpane without water and leading to visual intrusion.
When the environmental temperature is lower than 0℃, discharge the kettle to empty or
inject into the antifreeze, otherwise, the kettle can not work because of icing over and
even frozen to be bad.
ⅱSpare socket
Spare socket is a power interface of DC 24V, and the maximum power is 200W.
Ⅷ Retreat alarm system
Figure 1-20 Backing car alarm
The backing car alarm is in the back cover of engine (shown in Figure 1-20).
When the speed change operating handle is in the position of backing car, the backing
car alarm can sound automatically.
26
Maintenance Manual of Loader Electrical Equipment
CHAPTER Ⅱ THE PRINCIPLE OF POWER SYSTEM
2.1 The explanation of principle
Figure 2-1 Schematic diagram of power system
Explanation of principle: (take 958 exported vehicle as example, the principle of other
vehicle type is basically similar)
1. After turning on the power switch (anode switch), the voltage of storage battery
(series connection of two storage batteries, the nominal voltage is 24V) conducts
through No. 56a line, 60A large fuse and No. 56 line to one contact of power relay,
then conducts through No. 3 conductor, connector CN1, 5A electric lock fuse and No.
121 conductor to the power terminal (B-B2)of electric lock. In addition, No.3
conductor supplies power for interior trimming ceiling lamp through 10A interior
trimming ceiling lamp fuse and No.21 conductor.
2. Turn on the electric lock (turn electric lock to ON), then the B-B2 terminal
27
Maintenance Manual of Loader Electrical Equipment
connects with M, No.121 conductor connects with No.28 conductor. So the current
conducts through No.28 conductor, connector CN1 and coil of battery relay to ground
(Notice: regard No. 0 line as ground line in all loaders from our company, don’t repeat
again in the following text). After conducting electricity to battery relay, contact
switch then turns on, so connect No.56 conductor with No.2 and 2a conductor. The
voltage conducts through No.2 conductor to flameout relay contact, starting relay
contact and each channel fuse in the twenty channels fuses box. Then the voltage
arrives to all loaders of electric equipments in the whole vehicle.
3. Turn the electrical lock to starting (START) gear:
◆Connect B-B2 terminal, G2 terminal, S terminal and M terminal with each other.
Turn on the No.121 conductor, No.60 conductor and No.28 conductor.
◆As to the vehicle with electronic control transmission, if the gear shifting handle is
in the neutral gear, the controller outputs 24V voltage to the coil of starting linkage
intermediate relay through No.59 conductor. The starting linkage intermediate relay
gains electricity and the contactors close. Turn on the No.60 conductor and No.22
conductor, and then the current conducts through No.22 conductor and coil of to
ground. So the contactors of starting relay close, and turn on the No.2 conductor and
No.1 conductor. Then the current conducts through No.2 conductor, connector CN1
and No.1 conductor to electromagnetic switch coil of starting motor. The starting
motor begins working.
◆The current conducts through No.22 conductor, connector CN1 and holding coil of
flameout electromagnet in the same time to ground. The contactors of flameout relay
close and the No.2 conductor and No.29 conductor turn on, and then the current
conducts through No.2 conductor, No.29 conductor, connector CN20 and starting coil
of flameout electromagnet to ground. So the flameout electromagnet coil begins
working and the oil way of fuel opens.
◆The starting motor drives flywheel of engine to rotate, and then the engine starts.
◆After the engine starts, the generator under the driving of rotating pulley begins to
generate electricity (the nominal voltage is 28V). On the one hand, the generator
charges up the storage battery through 70A large fuse, No.2 conductor, contactors of
28
Maintenance Manual of Loader Electrical Equipment
battery relay, No.56 conductor, 60A large fuse and cathode output cable of storage
battery, on the other hand, the generator supplies electricity for loaders of whole
vehicle from 70A fuse to shunt fuse.
4. After engine starts, the driver loosens the key of electric lock, and the electric lock
automatically resets to the “ON” gear. No.28 and 60 conductors are cut off the
electricity and contacts of starting relay are disconnected, and No.1 conductor is cut
off the electricity, and then the starting motor stops; meanwhile, disconnect the
contacts of starting relay, and the No.29 conductor and drawing coil of flameout
electromagnet is cut off electricity. But the holding coil still works, and the oil way of
fuel continues opening, and then the engine continues running.
5. Turn off the electric lock (turn the electric lock to “OFF” gear). The No.28
conductor and holding coil of flameout electromagnet are cut off the electricity, and
then the engine stops and the generator doesn’t generate electricity any more;
meanwhile, coil of battery relay is cut off the electricity, contactors turn off, No.2
conductor is cut off the electricity, so the loaders of whole vehicle is cut off electricity
(the function is only limited in the vehicle with flameout electromagnet) .
6. Turn off the power switch, and then the whole vehicle is cut off electricity.
2.2 The introduction of main components
2.2.1 Electric lock
Figure 2-2 JK412A type electric lock
Figure 2-3 08081-10000 type electric lock
1. JK412A type electric lock: (export vehicle type) See in Figure 2-2.
a. The electric lock has B-B2, M, S, G1 and G2 five pins in all. The G1 and G2 pin
are not used generally.
b. B-B2 pin is power pin and connects with No. 121 conductor; M pin is firing pin
and connects with No. 28 conductor; S pin is starting pin and connects with No. 60
29
Maintenance Manual of Loader Electrical Equipment
conductor.
c. The functional gear figure of this electric lock is shown in the above table
(Explanation: “O” stands for turning on, for example, if turn the power to “ON” gear,
B-B2 connects with M).
d. The method in judging whether the electric lock is destroyed: disconnect the
connection of No. 121, 28 and 60 conductors with electric lock, and then remove the
electric lock from vehicle, and check with 200 ohm grade of digital multimeter
according to the following table.
2. 08081-10000 type electric lock: (ordinary vehicle type) See in Figure 2-3.
a. The electric lock has B, BR, R1, R2, C and ACC six pins in all.
b. B pin is power pin and connects with No. 21 conductor; BR pin is firing pin and
connects with No. 28 conductor; R2 pin is starting pin and connects with No. 22
conductor.
c. The functional gear figure of this electric lock is shown in the above table
(Explanation: “O” stands for turning on, for example, if turn the power to “ON” gear,
B-BR connects with ACC).
d. The method in judging whether the electric lock is destroyed: disconnect the
connection of No. 21, 22, 27, 28 and 92 conductors with electric lock, and then
remove the electric lock from vehicle, and check with 200 ohm grade of digital
multimeter according to the following table.
Notice: If the vehicle starts successfully, the driver loosens the key of electric
lock and the electric lock doesn’t reset to “ON” gear. Please turn off the power
immediately to stop the engine; if the engine does still not stop, please cut off
the anode of power immediately! Otherwise, the starting motor, flameout
electromagnet and storage battery will be destroyed badly.
2.2.2 Fuse
Fuse: Fuse plays a very important role for safety protection in the circuit. Substance
and installation position are shown in Figure 4 to Figure 6.
Notice: The chip fuse used in the product should accord with the related regulation
about QC/T 420 “Fuse used in vehicle”. So when replace the fuse, please use the
30
Maintenance Manual of Loader Electrical Equipment
required fittings by Lingong and forbid buying in the market randomly.
Figure 2-4 Chip fuse
Figure 2-5 ZC-812 Waterproof fuse
Figure 2-6 Eight way fuse box
The colors of every kind of chip fuses are shown in the following table:
ATS10-5A
ATS7.5 -7.5A
tan
coffee
ATS10-10A
ATS15-15A
red
ATS20-20A
blue
yellow
ATS25-25A
clear
Judge the fuse whether fused in the method of visual measurement; also
measure with resistance 200 ohm gear of multimeter, the measured value of two pins
of fuse without fusing is about 1 ohm.
The installation position of fuse is shown in Figure 2-6.
2.2.3 Relay
2.2.3.1 Intermediate relay (JD2914)
Figure 2-7 Installation position of intermediate relay
Figure 2-8 Shape of intermediate relay
JD2914
Some kinds of vehicles adopts JD2914 type relay, and they are used as gear/start
linkage, retreat alarm and lighting control respectively. The installation position is
shown in Figure 10. The relay has 85, 86, 87, 87a, 30 five terminals in all. There is a
coil between 85 terminal and 86 terminal, and the resistance is about 330 ohm. There
is a normal open contact between 30 terminal and 87 terminal as well as a normal
closed contact between 30 terminal and 87a terminal.
31
Maintenance Manual of Loader Electrical Equipment
Figure 2-9 Schematic diagram of relay
● The working principle of relay is shown in Figure 2-9. After the coil is energized,
30 terminal connects with 87 terminal and disconnects with 87a terminal; after the
coil is cut off electricity, 30 terminal disconnects with 87 terminal and connects with
87a terminal.
● The method in judging whether the relay is destroyed: Measure with the resistance
gear of multimeter: the resistance between 85 and 86 is about 330Ω; the resistance
between 30 and 87 is infinite. Connect 85 with the cathode of DC 24V power and
connect 86 with anode of DC 24V power, and 30 and 87 should conduct with each
other.
Figure 2-10 Installation position of battery relay
Figure 2-11 Working principle of battery relay
2.2.3.2 Battery relay
The contact of this relay is copper plate surface contact type, and the installation
position is shown in Figure 2-10. There are four terminals on the contactor. There is a
coil between two small bolts, and the resistance is about 54Ω. There is a contact
between two big bolts. The working principle of contactor is shown in the Figure 2-11.
When there is certain current conducting through the coil, the two contacts conduct.
When coil is broken, the two contacts are broken.
32
Maintenance Manual of Loader Electrical Equipment
The method in judging whether the contactor is destroyed: Measure with the
resistance gear of multimeter: the resistance between two small bolts is about 54Ω;
the resistance between two big bolts is infinite. Connect cathode of DC 24V power
with one small bolt and connect anode with the other small bolt, and then the two big
bolts should conduct with each other.
2.2.3.3 Starting relay and flameout relay
Flameout relay
Starting relay
Figure 2-12 Installation position of starting relay and flameout relay (only take 956 as example)
The two relays are the same type, and both of them are short-term working. The
installation position is shown in Figure 2-12. The contactor has four terminals. There
is a coil between two small bolts, and the resistance is about 26Ω. There is a contact
between two big bolts.
The working principle of relay is mostly similar to battery relay. The difference
is the two contacts of the relay are semi spherical shape.
The method in judging whether the relay is destroyed: Measure with the
resistance gear of multimeter, the resistance between two small bolts is about 26Ω; the
resistance between two big bolts is infinite. Connect cathode of DC 24V power with
one small bolt and connect anode with the other small bolt, and then the two big bolts
should conduct with each other.
33
Maintenance Manual of Loader Electrical Equipment
Figure 2-13 Installation position of flameout relay
2.2.4 Flameout electromagnet (only part of vehicle type)
As to different vehicle type, the working principle of flameout electromagnet is
different. The current general type is power off and shut-off oil type, that is to say,
gain electricity to open oil circuit and power off to close oil circuit.
Flameout electromagnet connects with red, white and black wires outside. The
coil (holding coil) resistance between red and black wire is about 40Ω, and the coil
(drawing coil) resistance between white and black wire is about 1Ω.
Notice when connecting the wires: red-28, white-29, black-0, and Never connect
reversely! Otherwise, the flameout electromagnet will be burn down or the lines of
whole vehicle will fire.
34
Maintenance Manual of Loader Electrical Equipment
Figure 2-14 Judge the fault conditions of flameout electromagnet
The method in judging whether the flameout electromagnet works normally:
Open the electric lock, the pull rod of flameout electromagnet can’t move. When turn
the electric lock to “START” gear instant, the pull rod should move forward rapidly.
Open the oil way of fuel and loosen the key of electric lock. After the electric lock
automatically resets to “ON” gear, the pull rod should not move (that is, keep the oil
way in the state of opening). Otherwise, tell that the flameout electromagnet can’t
work normally. The specific fault judgment is shown in Figure 2-14.
In addition, the installation of flameout electromagnet needs to assure the
coaxiality and stroke of pull rod. When replace the flameout electromagnet, install it
strictly observe the requirement.
2.2.5 Generator
2.2.5.1 The principle of generator
The schematic diagram of principle of generator is shown in Figure 2-15. The
generator is made up of rotor, stator, transmission belt pulley, fan, front and back end
cover and electric brush. The excitation winding usually winds on the rotor and the
stator uses “Y” shape connection. The rectifier is generally six tubes bridge full-wave
35
Maintenance Manual of Loader Electrical Equipment
rectification.
1. When the DC voltage acts on the both ends of excitation winding, the current
will generate magnetic field. Under the driving of generator, the magnetic field rotates
following the rotor. Under rotating magnetic field, the three-phase symmetrical
winding will generate three phases sine electromotive force with same frequency and
amplitude, and the phase contrast is 120°.
2. Rectify using the unidirectional conductivity. At any instant, only the positive
diode connecting with the highest potential winding conducts; also, only the negative
diode connecting with the lowest potential winding conducts; repeated cycle like this,
six diodes conduct in turn to gain a stable pulsating DC voltage between two ends of
loader.
3. The terminal voltage of generator is proportional to speed of generator. The
speed range of generator is so big that the terminal voltage of generator changes in a
large range. That can’t meet the requirement that electrical equipments on the transfer
machine should use constant voltage. So the constant voltage regulator must be set.
Figure 2-15 Schematic diagram of generator
4. The constant voltage regulator changes the magnitude of excitation current by
make and break of switch tube, which change the magnetic field to stable the voltage
of generator.
5. The filter capacitor can filter out peak pulse and high frequency interference
emitted by generator.
36
Maintenance Manual of Loader Electrical Equipment
2.2.5.2 The connection method of Weichai generator used in LG953
Figure 2-16 Generator
The generator is general kit diesel engine. Take the generator matched in Weichai
engine of domestic 50 type loader as example: the working voltage is 28V, the current
is 55A, and constant voltage regulator is set inside. See the Figure 2-16.
The generator has three terminals, they are:
B+: generator power supply output terminal.
D+: charging indicating signal.
W+: phase output terminal, can be used as timer signal, and also can be used as
tachometer signal.
Parallel connect generator with storage battery to supply electricity for electrical
equipments of whole vehicle. Before the machine starting, the storage battery supplies
electricity; after the machine starting, the generator supplies electricity, meanwhile,
generator supplies electricity for storage battery.
Warning: Forbid generator supplying electricity for electrical equipments without storage
battery.
Warning: Forbid checking whether the generator generates electricity in the method of
instant short circuit of cathode and anode of generator to generate spark, so as not to burn
out silicon diode and affect the regulator.
Notice: Terminal——B+ connects with No. 2a conductor, terminal——D+ connects
with No. 20 conductor, terminal——W connects with No. 73 conductor. Never make
a faulty connection! Otherwise, the silicon diode will be burn out, and then lead to
worse fault.
2.2.5.3 The method to judge whether the generator generates electricity normally
37
Maintenance Manual of Loader Electrical Equipment
and treatment measures
1. Check with the DC voltage 200V of multimeter. Open the electric lock to
measure the terminal voltage of generator (connect red pen with D+ of generator and
connect black pen with ground), and record the reading of multimeter (the reading is
actually the terminal voltage of storage battery, usually less than 26V); Start the loader,
measure the terminal voltage of generator again and record the reading of multimeter
(the reading is about 28V if generator works normally). The latter reading should be
higher than the former one.
2. If generator doesn’t generate electricity:
Firstly, check whether the driving belt of generator is too loose.
Close the electric lock and check whether the wire connecting terminals of
generator connect wires correctly, tightly and reliably with wrench.
Check whether the grounding of generator is reliable.
If still can not work out a solution to the problem, please contact with the
maintenance service of Lingong or diesel engine manufacturer.
2.2.6 Starting motor
The starting motor is general kit diesel engine. It is made up of electromagnetic
switch, direct current motor, forked plectrum and transmission gear. The starting
motor converts electric energy of battery into mechanical energy by direct current
motor, and the transmission gear drives engine flywheel, and then the starting of
engine comes true.
Warning: The starting motor should stop immediately after engine starts, otherwise, the
transmission gear destroys, direct current motor burns down, flameout electromagnetic
destroys and seriously affect the capacity and life of storage battery.
Connecting wire is shown in Figure 2-17. Main contact connects with cathode output cable
of storage battery, and connect S terminal with No. 1 conductor. Remember! Never make
a faulty connection!
Warning: Forbid and metal conductor closing to contact 1 and contact 2 randomly!
Especially, after vehicle vibrates and runs for a long time, the fuel tube near the starting
motor and other metals can not contact or friction with contacts and terminals. Otherwise,
38
Maintenance Manual of Loader Electrical Equipment
it is possible that the whole vehicle fires.
Contact 2
S terminal
Contact 1
Figure 2-17 Wiring diagram of starting motor
Notice: Please check whether the connecting of contact and terminal is reliable.
Before checking, make sure turn off the power anode. Otherwise, short-circuit spark
may be produced to destroy the wrench and terminal.
The explanation of principle is shown in the Figure 2-18.
Figure 2-18 The inner mechanism and principle specification of starting motor
Turn on the power switch, the 24V terminal voltage of battery arrives to contact
1. Turn the electric lock to “START” gear, and then the No. 1 conductor gains
electricity (24V). Meanwhile, the current conducts through holding coil and drawing
coil. The electromagnetic resultant force produced by the two coils make core to
move right, and drive moving contact disc to move right, and then contact 1 conducts
with contact 2. The current conducts through storage battery——contact 1——
contact 2——direct current motor coil to rotate the direct current motor; The iron core
39
Maintenance Manual of Loader Electrical Equipment
moves right to drive forked plectrum, and push transmission gear to move left and
then mesh with engine flywheel; The direct current motor drives flywheel to rotate,
and the engine begins to start.
During the process of starting (the dozen seconds when electric lock in the
“START” gear), No. 1 conductor always has electricity (24V), and contact 1 conducts
with contact 2 all the time and the contact voltage is 24V. So the voltage of both ends
of drawing coil is equal and there is no current conducting. Now, the iron core keeps
in the starting state under electromagnetic force of holding coil. After starting
successfully, the driver loosens the key of electric lock, and the electric lock resets to
“ON” gear automatically, and then the No. 1 conductor is cut off electricity
immediately. In a moment, the current conducts through contact 1——contact 2——
pushing drawing coil——S terminal——holding coil——ground. So the current
direction of holding coil is contrary to that of pushing drawing coil, and both
producing magnetic fields are opposites. The force and electromagnetic force of iron
core cancel out, so the iron core resets to initial position under spring force. Now
contact 1 disconnects with contact 2, and current doesn’t conduct through drawing
coil and holding coil, and also the transmission gear resets to initial position. The
starting motor stops working.
The judgment to normal faults of starting motor:
1. Fault phenomenon: Close the anode switch, then the starting motor runs
automatically.
Judgment: Caused by contacts sintered (moving contact disc cements with contact
1 and 2).
Treatment method: Grind contacts and moving contact disc again or replace
electromagnetic switch or replace starting motor.
2. Fault phenomenon: When starting, the starting motor has no any response.
Judgment and treatment method: Check the voltage of No.1 conductor at the S
terminal of starting motor while turn electric lock to “START” gear. If the reading is
zero, check the electric lock, starting relay, storage battery, etc. If the voltage is
normal, turn on the electric lock again to measure whether the contact 1 has electricity.
40
Maintenance Manual of Loader Electrical Equipment
If no electricity, check the storage battery, storage battery line and anode switch. If the
voltage of contact 1 is normal, make sure that the faults of starting motor itself lead to
start failure. Further detect as follow: Turn the electric lock to “START” gear to check
the voltage of contact 2 on starting motor. If no electricity, the electromagnetic switch
has fault and replace it; If the voltage is normal, the direct current motor has fault and
replace starting motor assembly.
2.2.7 Storage battery
(6-QW-120B, also call battery)
Figure 2-19 Series connection of two storage batteries
The whole vehicle uses series connection of two VARTA or other storage
batteries. The anode of first storage battery connects with ground crossing power
switch (or connect with ground directly). Connect cathode with the anode of storage
battery, and connect the cathode of second storage battery with starting motor and
storage battery relay. See the Figure 19. The storage battery is reversible DC power
and parallel connection with generator to supply electricity for electrical equipment.
The storage battery can supply 200-600A starting current for starting motor in a short
time (5-10S). The storage battery is equal to large capacitance and can absorb the
voltage appearing in the circuit to protect electric components from breakdown.
Warning: Please don’t close to the storage battery with open fire to avoid explosion.
Warning: When carry out the daily maintenance of storage battery, please read the safety
information on the nameplate of storage battery carefully. Otherwise, serious physical
injury may be caused.
Notice: The installation of storage battery must be fasten and reliable to avoid chipping
when vehicle driving and shaking.
41
Maintenance Manual of Loader Electrical Equipment
Know the state of storage battery electric quantity according to change in color
of electric eye (also called state of charge display densimeter). Green——Normal,
Black——Need to charge, Light (or white)——Battery scrap.
The vehicle can’t start which likely caused by electric quantity of battery is not
enough or the cables of battery don’t connect reliably.
Notice: Check the cable connection of battery and grounding point frequently. Before
checking, please break the anode of power!
Before assembling and disassembling the battery cables, please break the anode of
power! When assembling, install the pile head of cathode firstly, and then install the
pile head of anode; when disassembling, remove the pile head of anode firstly, and
then remove the pile head of cathode, lest the short-circuit spark destroys pile head of
battery and wrench.
The method to detect terminal voltage of storage battery: Detect with DC 200V
of multimeter. Red pen connects with storage battery cathode output cable pile head
and black pen storage battery anode pile head, and then the reading of multimeter is
the terminal voltage of storage battery (usually from 24V to 26V).
More detailed information can refer to the use and maintenance specification of
storage battery.
2.2.8 Power switch
(K01K18-A, also called anode switch, installed on the more than 9*6 vehicle
type):
The power switch controls the connection and break of storage battery anode and
vehicle frame (ground). Close the power switch, and the anode of storage battery
connects with vehicle frame. Open the electric lock, the electrical apparatus loads of
whole vehicle gain electricity; Break the power switch, the anode of storage battery
disconnects with vehicle frame, so the circuit of whole vehicle can’t form loop. Even
if open the electric lock, the whole vehicle can’t gain electricity and can’t start. The
installation position of power switch is shown in Figure 2-20. The operation of power
switch: “O” is the disconnecting position, “∣” is the closing position.
Warning: When the loader stops working, please disconnect the power switch, lest
42
Maintenance Manual of Loader Electrical Equipment
phenomenon of the leakage of electricity and other accident occurs!
If the whole vehicle line fires, or the engine doesn’t stall after closing electric lock, or other
accident occurs, please turn off the power switch immediately!
Figure 2-20 Power switch
Before connecting battery cable or fastening terminal of battery again or removing battery
lines, please be sure to break this switch for safety!
2.3 Example for maintenance of system common faults
(Take LG958 electrical apparatus as example)
2.3.1 Maintenance of power system common faults——Whole vehicle no electric
Fault Feature
Turn on the electric lock,
don’t listen to the sound
of power relay closing,
and then the electrical
Fault Reason
Treatment Method
Anode switch doesn’t close
Close anode switch
Anode switch is destroyed
Replace anode switch
“Capacity Loss” of battery seriously
Charge again or replace battery
Fusing of 60A fuse
Replace 60A fuse
apparatus loads of Fusing of 10A electric lock fuse Replace 10A fuse
whole vehicle have no in the fuse box of No. 3 line
electric ( For example, Electric lock is destroyed
Replace electric lock
when
switch
lamp
when
switch
wiper,
wiper
etc.).
operating
the
of luminaire, the
doesn’t lighten;
operating
the
of windshield
the windshield
doesn’t move,
DK2312A type power relay is destroyed
Replace power relay
Terminals of battery line are
loosen
Check the four wiring pile heads
of storage battery, wiring contact
of battery and battery wiring
terminal of anode switch and
fasten again.
Connectors of wiring harness are
loosen
Connect
again
Other reasons
Make
treatment
43
the
connectors
corresponding
Maintenance Manual of Loader Electrical Equipment
2.3.2 Maintenance of power system common faults——Turn off electric lock, but
engine doesn’t stop and whole vehicle still has electricity
Fault Feature
Fault Reason
After turning off the electric
lock, the electrical apparatus
loads of whole vehicle still have
electric ( For example, when
operating
the
switch
of
luminaire, the lamp lightens;
when operating the switch of
windshield
wiper,
the
windshield wiper works, etc).
The contacts of power relay are
sintered
Replace power relay
The electric lock is destroyed
Replace electric lock
Due to the No. 3 conductor of
power relay is loosen, and then
contact with No. 28 conductor.
Connect fixing wiring
harness or conductor
again
Treatment Method
2.3.3 Maintenance of power system common faults——10A electric fuse is burn
down frequently
Fault Feature
Fault Reason
Treatment Method
Turn on the electric lock. The
10A electric lock fuse is burn
down immediately.
Short circuit of flameout
electromagnet holding coil (Draw
out the connector of flameout
electromagnet, and then turn on
electric lock. If fuse isn’t burn
down again, it can be concluded
that it is the fault).
Replace
flameout
electromagnet.
Short circuit of power relay
(Remove the No. 3 conductor
of power relay, and then turn on
electric lock. If fuse isn’t burn
down again, it can be concluded
that it is the fault)。
Replace power relay.
No.3 conductor short connects
with ground due to wear or other
reasons.
Bind and fasten wiring
harness again.
2.3.4 Analysis for fault in starting whole vehicle
The fault is divided into wiring fault and mechanical fault. Analysis for wiring fault is
shown in Figure. The mechanical fault is mainly the fault in oil way of fuel or gas
path. Refer to maintenance manual.
Exclude the wiring fault as follow:
44
Maintenance Manual of Loader Electrical Equipment
Circuit fault
Whether whole vehicle has
electricity
Turn electric lock to start gear and check S terminal
Check electric lock
Observe whether the flameout
electromagnet moves
Check the signal line of start relay
45
Maintenance Manual of Loader Electrical Equipment
CHAPTER Ⅲ INSTRUMENT SYSTEM
3.1 Schematic diagram of instrument system
Instrument
system
includes
instrument
panel
assembly,
sensor
and
alarm-pressure switch. The schematic diagram is shown in Figure 3-1 (Take LG958 as
example, other vehicle types can take it as reference).
Figure 3-1 The schematic diagram of instrument and alarm system
3.2 Explanation of main parts
(Take 958 as example)
3.2.1 Instrument panel assembly
Figure 3-2 Instrument panel
46
Maintenance Manual of Loader Electrical Equipment
The instrument panel assembly includes engine water thermometer, fuel level
gauge, braking barometer, speedometer, oil temperature indicator of torque converter,
variable oil pressure gauge and working hour meter seven instruments in all. Several
alarm indicator lights are all luminous diodes, and they supply necessary warn when
whole vehicle is in the running state.
3.2.2 Temperature sensor
The vehicle sets two temperature sensors to monitor the oil temperature of torque
converter and water temperature of engine. The temperature sensor is equal to
thermistor, and the resistance of it becomes smaller as the temperature increases.
(Room temperature: 26~226Ω; 115℃: 26.4Ω)
Figure 3-3 Shape of temperature sensor
Figure 3-4 Oil temperature indicator of torque converter
3.2.3 Braking barometer
Figure 3-5 Internal structure of braking barometer
The deformation of patch beryllium hydrogen copper is caused by pressure
variation, thus lead to the resistance pointer inner sensor slip, and change the
magnitude of current to realize the swing of instrument pointer. See Figure 3-5.
47
Maintenance Manual of Loader Electrical Equipment
3.2.4 Fuel level sensor
The fuel level sensor is actually discrete slide resistance. The resistance reduces
as oil level rising. It is installed on the fuel tank.
3.2.5 Alarm-pressure switch
The whole vehicle sets two pressure switches, which are brake low pressure
alarm and low oil pressure alarm. The specific installation position is shown in the
following figure.
Figure 3-6 brake low pressure alarm switch
Figure 3-7 low oil pressure alarm switch
When the braking pressure is lower than 0.45MPa and oil pressure is lower than
0.08MPa, alarm indicator light both indicates to warn.
3.3 Example for maintenance of system common faults
(Take exported type 958 with Kangmingsi as example)
3.3.1 Abnormal indication of thermometer
Remove the sensing wires on the temperature sensor down (The oil and water
temperature of torque converter correspond to No. 15 and 14 conductor respectively).
If the sensing wires connect with ground, the instrument will show full-scale. If the
sensing wires hang in the air, the instrument will show minimum scale. Then we can
judge the instrument and circuit are good. If the sensor is destroyed, replace the sensor.
Otherwise, check the circuit. If the circuit is good, there is fault in the instrument.
3.3.2 Abnormal indication of fuel level
Remove the sensing wire (No. 19 conductor) of fuel level sensor. If the sensing
wires connect with ground, the instrument will show full-scale. If the sensing wires
hang in the air, the instrument will show minimum scale. Then we can judge the
instrument and circuit are good. If the sensor is destroyed, replace the sensor.
48
Maintenance Manual of Loader Electrical Equipment
Otherwise, check the circuit. If the circuit is good, there is fault in the instrument.
49
Maintenance Manual of Loader Electrical Equipment
CHAPTER Ⅳ AUTOMATIC RESET SYSTEM
(Used combined with pilot control)
4.1 Schematic diagram
The schematic diagram is shown in Figure 4-1.
Figure 4-1 The electrical appliance diagrams of automatic reset system
4.2 Explanation of system function
● Boom lifting limit device:
The device is made up of magnet and proximity switch installed on the boom (refer to
Figure 4-2) and electromagnet coil on the pilot control valve. There is a red indicator
light on the proximity switch; When the indicator light is far away from metal
induction object, the proximity switch closes and red light is lightened. The black
output line transmits ground signal to electromagnetic coil in the pilot control valve. If
the driver pulls the boom joystick to the end, the magnetic circuit closes. The
magnetic force generated by electromagnet coil can catch the boom joystick (now, the
driver can loosen his hand and the boom joystick can’t spring back to neutral position).
The boom always lifts until it closes to the proximity switch. At the moment of
closing, the proximity switch cuts the output signal and red light goes out. So the
magnetic force of electromagnetic coil disappears and boom joystick springs back to
50
Maintenance Manual of Loader Electrical Equipment
neutral position automatically under spring force, and then the boom doesn’t lift any
more.
● Boom floating device:
The device doesn’t include proximity switch. There only is a boom floating coil
located on the pilot control valve. After open the electric lock, the coil always gains
electricity. When the driver push joystick to foremost, the magnetic circuit closes and
the magnetic force generating by electromagnet coil can catch the boom joystick (now,
the driver can loosen his hand and the boom joystick can’t spring back to neutral
position). The big and small cavities of boom tank conduct with tube by pilot valve
through controlling distributing valve. The pressure of big and small oil cavities both
are zero and the pressure difference is also zero. If driver pushes joystick to floating
position during shoveling operation, the bucket fluctuates with the fluctuation of
ground; If diver pushes boom joystick to floating position to operate the boom to drop,
boom can drop with the fastest speed under deadweight, so that improve work
efficiency.
● Bucket stable limit device:
The device is made up of proximity switch on scoop cylinder (refer to Figure 4-3) and
electromagnet coil on pilot control valve. There is a red indicator light on the
proximity switch; When red light indicates the state of proximity switch and there is
dislocation between shrinking rod and proximity switch, the proximity switch closes,
and then red light is lightened and black output line transmits ground signal. If driver
pushes joystick to final end when bucket is in the angle of loading, magnet force
generating by electromagnet coil can catch the bucket joystick (now, the driver can
loosen his hand and the bucket joystick can’t spring back to neutral position). The
bucket will always collect back until the proximity switch closes to shrinking rod. The
proximity switch is broken, red light distinguishes, electromagnet coil loses power
and magnet force disappears. Then the bucket joystick springs back to neutral position
automatically under dead weight. The bucket stops at the leveling position and doesn’t
collect back any more.
51
Maintenance Manual of Loader Electrical Equipment
Figure 4-2 Boom and proximity switch Figure 4-3 Bucket shrinking rod and proximity switch
4.3 Maintenance of system fault
● Check whether 10A fuse is fusing.
● Check whether every connector connects well.
● Check the clearance between metallic object and proximity switch (no more than
8-10mm generally)
● Check whether proximity switch is destroyed: Open the electric lock. When
metallic object is approaching, the red light is lightened (the black output line should
connect with ground by measuring with multimeter).
● Check the pilot coil: The resistances of three pilot coils are all about 100-200Ω.
52
Maintenance Manual of Loader Electrical Equipment
CHAPTER Ⅴ LIGHTING SYSTEM
5.1 Circuit of front combination lamp
5.1.1 Schematic diagram
The schematic diagram (take LG958 as example) is shown in Figure 5-1.
Figure 5-1 The schematic diagram of front combination lamp, steering lamp and alarm lamp circuit
5.1.2 Explanation of principle
After opening the electric lock, the 10A headlight fuse in twenty channels fuses
box gains electricity (24V) and conduct through No. 44 conductor to combination
switch, meanwhile, conduct through No. 35 conductor to the contact of front
combination lamp far and close light relay. When combination switch is broken, both
No. 49 conductor and No.50 conductor don’t gain electricity and left and right lamps
don’t work. When combination switch in the state of far light or close light, the No.
49 or 50 conductor gains electricity (24V), and front combination lamp far and close
light relay gains electricity. When the contact closes, front combination lamp far or
close light filament gains electricity (24V), so the left and right headlights work in the
corresponding gear at the same time.
Combination switch: The installation position is shown in Figure 5-4.
5.1.3 Maintenance of system common fault—the headlight doesn’t light
1. Check whether the bulb is blackening. If is, we can determine that the bulb is
53
Maintenance Manual of Loader Electrical Equipment
destroyed, and replace it.
2. Draw out the connector, and put the dimmer switch in far light gear and close light
gear respectively. Detect the voltage of No. 49 and 50 conductor with DC voltage gear
of multimeter. If the voltage is 24V, check whether the connector connects reliably. If
the connection is loose, connect again. If connection is reliable, the inner connection
of headlight is loose or bulb is destroyed. If the voltage is 0V, please check according
to the following steps.
3. Check whether 10A headlight fuse is fusing.
4. Check whether the connection connects reliably and wiring harness wears.
5. Refer the attachment—combination switch information to check the function of
dimmer gear.
5.2 Circuit of work light, taillight and interior trimming light
Figure 5-2 Schematic diagram of taillight
54
Maintenance Manual of Loader Electrical Equipment
Figure 5-3 Working schematic diagram of head and back light
● The four lights on the ceiling of cab are defined as head lights and back lights. The
two lights on the back cover are defined as taillights. The switch of interior trimming
light is provided itself. The detailed information of taillight and work light can refer to
the attachment—rocker switch information.
● Schematic diagram: Refer to Figure 5-2 and 5-3.
● The basic principle and maintenance of system fault are mostly similar to
headlight circuit, and don’t explain here.
5.3 Circuit of steering light
● Schematic diagram: Refer to Figure 5-1.
● Introduction of main components:
1. The substance and installation position of combined switch can refer to Figure 5-4
and 5-5. The switch of steering light is realized by part of functions of combined
switch. The color of three using pin conductors is grey, yellow and white respectively.
The grey conductor connects with steering flashing power (No. 33 conductor), and
yellow conductor connects with left turn signal wire (No. 6 conductor), and white
conductor connects with right turn signal wire (No. 7 conductor).
55
Maintenance Manual of Loader Electrical Equipment
Figure 5-4 Combined switch
Figure 5-5 Installation position of combined switch
2. Flash relay (SG252): The three pins of flasher are defined as: B——power terminal,
connect with No. 21 conductor; L——flashing signal output terminal, connect with
No. 33 conductor; E——ground, connect with No. 0 conductor. When work normally,
the flash relay will send out slight “DA” sound, and the frequency is about 50 times
per minute. Otherwise the flash relay is determined to be destroyed.
3. Switch of alarm light: Switch of parking light controls four steering lights and two
steering indicating lamps on the instrument panel. Turn on the switch, four steering
lights and two steering indicating lamps will flash at the same time to warn ambient
vehicle. The detailed information can refer to the attachment——rocker switch
information.
● The basic principle and maintenance of system fault are mostly similar to
headlight circuit, and don’t explain here.
5.4 Circuit of lamplet
● Schematic diagram: Refer to Figure 5-6.
56
Maintenance Manual of Loader Electrical Equipment
Figure 5-6 Schematic diagram of lamplet circuit
● The installation position of lamplet is shown in Figure 5-7 and Figure 5-8.
● The basic principle and maintenance of system fault are mostly similar to
headlight circuit, and don’t explain here.
Figure 5-7 Combined headlight—Left
Figure 5-8 Left taillight
5.5 Circuit of brake light
(Braking circuit with electronic control transmission)
● Schematic diagram: Refer to Figure 5-9.
57
Maintenance Manual of Loader Electrical Equipment
Figure 5-9 Schematic diagram of braking light circuit
● Explanation of principle: When step on braking pedal, the braking pressure in the
position of braking light switch can close the braking light switch contact. The current
conducts through 10A fuse, No. 57 conductor of braking light fuse, switch of braking
switch and No. 8 conductor to two braking lights, and then the two lights are
lightened.
Don’t step on braking pedal
Break
Step on braking pedal
Pass
Figure 5-10 Installation position of braking light switch
● Switch of braking light: It is a normal open contact. Act when about 1.3 bar to
close the contact.
Maintenance of fault——How to judge whether the switch of braking light is
destroyed: Firstly, determine whether the braking pressure is normal (Open the
electric lock. If the driving braking low pressure alarm lamp on the instruments panel
58
Maintenance Manual of Loader Electrical Equipment
lights, the braking pressure is normal, otherwise, start the vehicle until the braking
low pressure alarm lamp doesn’t light) If normal, draw out the conductor of braking
light switch, and then detect the two pins of switch with resistance 200Ω gear of
multimeter. If the testing result is inconsistent with the following table, the pressure
switch has already been destroyed and needs to be replaced.
CHAPTER Ⅵ BACKING VEHICLE ALARMING
SYSTEM
6.1 Explanation of principle
Figure 6-1 Schematic diagram of backing vehicle alarming system
The explanation of principle: Open the electric lock and there is electricity in the
10A backing vehicle alarm fuse. Then push to reverse gear and connect the backing
switch, so the No. 9 conductor gains electricity and backing buzzer sends out the
buzzing sound. Meanwhile, the backing lights on left and right taillight are lightened.
6.2 Analysis of common fault
Open the electric lock and push to reverse gear, but the backing vehicle annunciator
doesn’t sound.
1. Check whether the 10A backing vehicle annunciator fuse is fusing.
2. Check whether the connector and conductor connect firmly and reliably. Looseness
of connector or wear of wiring harness usually leads to broken in the middle of No.9
conductor.
59
Maintenance Manual of Loader Electrical Equipment
3. Check whether the backing switch is destroyed. If it is good, please push to reverse
gear. Connect the two conductors of backing switch.
4. If there is no problem in the above test, please check the voltage of No. 9 conductor
in the backing vehicle annunciator. If the voltage is normal (24V), the backing vehicle
annunciator is destroyed and needs to be replaced; If there is no voltage, generally
show that the connector is loose or there is wear on the wiring harness.
Analysis of common fault: Open electric lock. Whatever gear to push to, the backing
vehicle annunciator always sounds; this kind of fault is usually caused by adhesion of
backing switch contact, while caused by short circuit between No.9 conductor and
some supply line in the very few case.
CHAPTER Ⅶ WIPER AND CLEANER SYSTEM
7.1 Explanation of principle
1. The principle of cleaner: Open the electric lock, and 10A wiper fuse gains
electricity (24V). Connect with the washing switch (automatic reset rocker switch, the
detailed information can refer to the attachment——information of rocker switch).
The washing motor (installed on the kettle) gains electricity through No.37 conductor
and stars to work. The water in kettle is pumped to the nozzle (installed under forward
looking windowpane) and sprayed on the windowpane.
Figure 7-1 Schematic diagram of wiper and water spraying kettle
60
Maintenance Manual of Loader Electrical Equipment
2. The principle of wiper: The wiper motor is permanent magnet motor and uses
cathode controlling method. As Figure shows that the wiper motor connects with five
conductors outside. Among them, the red conductor is supply line (public lead wire of
high gear armature and low gear armature), the black conductor is reset line, the blue
conductor is another brush lead wire of high gear armature, the white conductor is
another armature lead wire of low gear armature. After opening electric lock, the
No.37 conductor gains electricity (24V). If the wiper switch (the detailed information
can refer to the attachment——information of rocker switch) is in “Ⅰ” gear, pin 37
connects with pin 25 and motor runs in low gear; If the wiper switch is in “Ⅱ” gear,
pin 37 connects with pin 26 and motor runs in high gear; If turn off the wiper switch
( “Ⅰ” gear becomes “OFF” gear), pin 24 connects with pin 25, and the current
conducts through No.25 conductor—pin 24 of wiper switch—low gear armature—
ground because wiper doesn’t stop in initial position at the instant of closing the
switch. (Explain: There is an automatic stopping device inside to make sure that the
wiper can stop in initial position all the time. When wiper is in initial position, the
reset wire connects with ground.)
7.2 Maintenance of common fault
7.2.1 Wiper motor doesn’t work
1. Check whether the 10A fuse is fusing.
2. Check whether the switch of wiper is destroyed.
3. Check whether the connector is loose and whether there is wear on the wiring
harness.
4. Check whether the wiper motor armature is short circuit or open circuit.
7.2.2 Nozzle doesn’t spray water
1. Watch whether the motor runs and pumps water.
2. Check whether the waterway is disconnected (water pipe is disconnected or
bound too compact).
3. Check whether the nozzle is blocked.
61
Maintenance Manual of Loader Electrical Equipment
CHAPTER Ⅷ ELECTRIC HORN SYSTEM
8.1 Schematic diagram
Figure 8-1 Schematic diagram of electric horn circuit
Figure 8-2 The installation position of electric horn
●
Explanation of principle: Open the electric lock, and 10A electric horn fuse gains
electricity (24V). Press down the switch of electric horn, and the current conducts
through 10A electric horn fuse—electric horn—switch of electric horn—ground, then
the electric horn (shown in Figure 8-2) buzzes continuously.
8.2 Maintenance of common fault
Open the electric lock and press down the switch of electric horn, but the electric horn
62
Maintenance Manual of Loader Electrical Equipment
doesn’t sound:
1. Check whether 10A electric horn fuse is fusing.
2. Check whether the switch of electric horn (the button switch in the middle of
traversing mechanism) works normally. Under normal condition, press down switch
of electric horn, and then the No.12 conductor connects with ground.
3. Check whether the connector is loose and whether there is wear on the wiring
harness.
4. Check whether the electric horn is destroyed (Connect one terminal with 24V
power, and connect the other terminal with ground. If the electric horn doesn’t sound,
it is determined that the electric horn is destroyed.).
CHAPTER Ⅸ STANDBY SOCKET SYSTEM
9.1 Explanation of principle
Figure 9-1 Schematic diagram of standby socket circuit
Figure 9-2 Installation position of standby socket
Open the electric lock, and 10A electric horn fuse gains electricity (24V).
Connect with standby socket through No.77 and No. 0 conductor. When it is
necessary to externally connect with power, insert socket to gain electricity after
connecting external connection and plug correctly. Make sure that the electric power
isn’t more than 200W. The standby socket supply a standard DC 24V power interface,
which can be used to externally connect with electric water heater, interphone and etc.
The installation position is shown in Figure 9-2.
63
Maintenance Manual of Loader Electrical Equipment
9.2 Maintenance of common fault
The standby socket can’t work normally:
1. Check whether 10A electric horn fuse is fusing.
2. Check whether the connector is loose and whether there is wear on the wiring
harness.
3. Check whether the standby socket is destroyed.
64