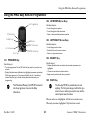
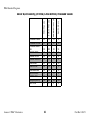
1
Invacare® MK6i™Electronics Field Reference Guide EN GENERAL ........................................................................................................2 USING THE MK6I EASY REMOTE PROGRAMMER ..........................23 GLOBAL LIMITED WARRANTY (EXCLUDING CANADA) ...........3 MK6I PERFORMANCE ADJUSTMENTS ...............................................26 CANADA LIMITED WARRANTY ............................................................4 MK6I STANDARD PROGRAMS .............................................................39 SAFETY .............................................................................................................5 USING THE MEMORY CARD .................................................................51 MK6I ELECTRONICS ...................................................................................7 POWERED SEATING ................................................................................56 MK6I JOYSTICKS ........................................................................................12 CALIBRATION MENU ..............................................................................63 MK6I DISPLAYS ...........................................................................................14 USER SETTINGS/DIAGNOSTICS ...........................................................77 PROPORTIONAL ALTERNATIVE CONTROLS ................................18 CONNECTED DEVICES ...........................................................................90 DIGITAL ALTERNATIVE CONTROLS .................................................20 EMI INFORMATION ..................................................................................93 USING THE MK5 PROGRAMMER WITH MK6I ELECTRONICS ...22 NOTES ...........................................................................................................95 DEALER: keep this manual. The procedures in this manual MUST be performed by a qualified technician. For more information regarding Invacare products, parts, and services, please visit www.invacare.com. General General 2.1 Symbols Warnings Signal words are used in this manual and apply to hazards or unsafe practices which could result in personal injury or property damage. See the information below for definitions of the signal words. ! WARNING Warning indicates a potentially hazardous situation which, if not avoided, could result in death or serious injury. CAUTION Caution indicates a potentially hazardous situation which, if not avoided, may result in property damage or minor injury or both. IMPORTANT Indicates a hazardous situation that could result in damage to property if it is not avoided. Gives useful tips, recommendations and information for efficient, trouble-free use. Invacare® MK6i™Electronics 2 Part No 1141471 Global Limited Warranty (Excluding Canada) Global Limited Warranty (Excluding Canada) PLEASE NOTE: THE WARRANTY BELOW HAS BEEN DRAFTED TO COMPLY WITH FEDERAL LAW APPLICABLE TO PRODUCTS MANUFACTURED AFTER JULY 4, 1975. This warranty is extended only to the original purchaser who purchases this product within any country excluding CANADA when new and unused from Invacare or a dealer. This warranty is not extended to any other person or entity and is not transferable or assignable to any subsequent purchaser or owner. Coverage under this warranty will end upon any such subsequent sale or other transfer of title to any other person. For products purchased in Canada, please refer to the Canada Limited Warranty. This warranty gives you specific legal rights and you may also have other legal rights which vary from state to state. Invacare warrants all electronics and electrical components (excluding batteries), motors, powered seating actuators and gearboxes to be free from defects in materials and workmanship for a period of one (1) year from the date of purchase from Invacare or a dealer, with a copy of the seller’s invoice required for coverage under this warranty. If within such warranty periods any such product component shall be proven to be defective, the product component shall be repaired or replaced, at Invacare's option with refurbished or new parts. This warranty does not include any labor or shipping charges incurred in replacement part installation or repair of any such product. Product repairs shall not extend this warranty - coverage for repaired product shall end when this limited warranty terminates. Invacare's sole obligation and your exclusive remedy under this warranty shall be limited to such repair and/or replacement. For warranty service, please contact the dealer from whom you purchased your Invacare product. In the event you do not receive satisfactory warranty service, please write directly to Invacare at the address on the bottom of the back cover. Provide dealer's name address, date of purchase, indicate nature of the defect and, if the product is serialized, indicate the serial number. Do not return products to our factory without our prior consent. LIMITATIONS AND EXCLUSIONS: THE FOREGOING WARRANTY SHALL NOT APPLY TO SERIAL NUMBERED PRODUCTS IF THE SERIAL NUMBER HAS BEEN REMOVED OR DEFACED, PRODUCTS SUBJECT TO NEGLIGENCE, ACCIDENT, IMPROPER OPERATION, MAINTENANCE OR STORAGE, COMMERCIAL OR INSTITUTIONAL USE, PRODUCTS MODIFIED WITHOUT INVACARE'S EXPRESS WRITTEN CONSENT (INCLUDING, BUT NOT LIMITED TO, MODIFICATION THROUGH THE USE OF UNAUTHORIZED PARTS OR ATTACHMENTS); PRODUCTS DAMAGED BY REASON OF REPAIRS MADE TO ANY COMPONENT WITHOUT THE SPECIFIC CONSENT OF INVACARE, OR TO A PRODUCT DAMAGED BY CIRCUMSTANCES BEYOND INVACARE'S CONTROL, AND SUCH EVALUATION WILL BE SOLELY DETERMINED BY INVACARE. THE WARRANTY SHALL NOT APPLY TO PROBLEMS ARISING FROM NORMAL WEAR AND TEAR OR FAILURE TO ADHERE TO THE PRODUCT INSTRUCTIONS. A CHANGE IN OPERATING NOISE, PARTICULARLY RELATIVE TO MOTORS AND GEARBOXES DOES NOT CONSTITUTE A FAILURE OR DEFECT AND WILL NOT BE REPAIRED; ALL DEVICES WILL EXHIBIT CHANGES IN OPERATING NOISE DUE TO AGING. THE FOREGOING EXPRESS WARRANTY IS EXCLUSIVE AND IN LIEU OF ANY OTHER WARRANTIES WHATSOEVER, WHETHER EXPRESS OR IMPLIED, INCLUDING THE IMPLIED WARRANTIES OF MERCHANTABILITY AND FITNESS FOR A PARTICULAR PURPOSE, AND THE SOLE REMEDY FOR VIOLATIONS OF ANY WARRANTY WHATSOEVER, SHALL BE LIMITED TO REPAIR OR REPLACEMENT OF THE DEFECTIVE PRODUCT PURSUANT TO THE TERMS CONTAINED HEREIN. THE APPLICATION OF ANY IMPLIED WARRANTY WHATSOEVER SHALL NOT EXTEND BEYOND THE DURATION OF THE EXPRESS WARRANTY PROVIDED HEREIN AND INVACARE SHALL NOT BE LIABLE FOR ANY CONSEQUENTIAL OR INCIDENTAL DAMAGES WHATSOEVER; SOME STATES DO NOT ALLOW THE EXCLUSION OR LIMITATION OF INCIDENTAL OR CONSEQUENTIAL DAMAGE, OR LIMITATION OF HOW LONG AN IMPLIED WARRANTY LASTS, SO THE ABOVE EXCLUSION AND LIMITATION MAY NOT BE APPLICABLE. THIS WARRANTY SHALL BE EXTENDED TO COMPLY WITH STATE/PROVINCIAL LAWS AND REQUIREMENTS. Part No 1141471 3 Invacare® MK6i™Electronics Canada Limited Warranty Canada Limited Warranty This warranty is extended only to the original purchaser who purchases this product within Canada when new and unused from Invacare or a dealer. This warranty is not extended to any other person or entity and is not transferable or assignable to any subsequent purchaser or owner. Coverage under this warranty will end upon any such subsequent sale or other transfer of title to any other person. This warranty gives you specific legal rights and you may also have other legal rights which vary from state to state. Invacare warrants all electronics and electrical components (excluding batteries) to be free from defects in materials and workmanship for a period of two (2) years from the date of purchase from Invacare or a dealer, with a copy of the seller’s invoice required for coverage under this warranty. If within such warranty periods any such product component shall be proven to be defective, the product component shall be repaired or replaced, at Invacare's option with refurbished or new parts. This warranty does not include any labor or shipping charges incurred in replacement part installation or repair of any such product. Product repairs shall not extend this warranty - coverage for repaired product shall end when this limited warranty terminates. Invacare's sole obligation and your exclusive remedy under this warranty shall be limited to such repair and/or replacement. For warranty service, please contact the dealer from whom you purchased your Invacare product. In the event you do not receive satisfactory warranty service, please write directly to Invacare at the address on the bottom of the back cover. Provide dealer's name address, date of purchase, indicate nature of the defect and, if the product is serialized, indicate the serial number. Do not return products to our factory without our prior consent. LIMITATIONS AND EXCLUSIONS: THE FOREGOING WARRANTY SHALL NOT APPLY TO SERIAL NUMBERED PRODUCTS IF THE SERIAL NUMBER HAS BEEN REMOVED OR DEFACED, PRODUCTS SUBJECT TO NEGLIGENCE, ACCIDENT, IMPROPER OPERATION, MAINTENANCE OR STORAGE, COMMERCIAL OR INSTITUTIONAL USE, PRODUCTS MODIFIED WITHOUT INVACARE'S EXPRESS WRITTEN CONSENT (INCLUDING, BUT NOT LIMITED TO, MODIFICATION THROUGH THE USE OF UNAUTHORIZED PARTS OR ATTACHMENTS); PRODUCTS DAMAGED BY REASON OF REPAIRS MADE TO ANY COMPONENT WITHOUT THE SPECIFIC CONSENT OF INVACARE, OR TO A PRODUCT DAMAGED BY CIRCUMSTANCES BEYOND INVACARE'S CONTROL, AND SUCH EVALUATION WILL BE SOLELY DETERMINED BY INVACARE. THE WARRANTY SHALL NOT APPLY TO PROBLEMS ARISING FROM NORMAL WEAR AND TEAR OR FAILURE TO ADHERE TO THE PRODUCT INSTRUCTIONS. A CHANGE IN OPERATING NOISE, PARTICULARLY RELATIVE TO MOTORS AND GEARBOXES DOES NOT CONSTITUTE A FAILURE OR DEFECT AND WILL NOT BE REPAIRED; ALL DEVICES WILL EXHIBIT CHANGES IN OPERATING NOISE DUE TO AGING. THE FOREGOING EXPRESS WARRANTY IS EXCLUSIVE AND IN LIEU OF ANY OTHER WARRANTIES WHATSOEVER, WHETHER EXPRESS OR IMPLIED, INCLUDING THE IMPLIED WARRANTIES OF MERCHANTABILITY AND FITNESS FOR A PARTICULAR PURPOSE, AND THE SOLE REMEDY FOR VIOLATIONS OF ANY WARRANTY WHATSOEVER, SHALL BE LIMITED TO REPAIR OR REPLACEMENT OF THE DEFECTIVE PRODUCT PURSUANT TO THE TERMS CONTAINED HEREIN. THE APPLICATION OF ANY IMPLIED WARRANTY WHATSOEVER SHALL NOT EXTEND BEYOND THE DURATION OF THE EXPRESS WARRANTY PROVIDED HEREIN AND INVACARE SHALL NOT BE LIABLE FOR ANY CONSEQUENTIAL OR INCIDENTAL DAMAGES WHATSOEVER; SOME STATES DO NOT ALLOW THE EXCLUSION OR LIMITATION OF INCIDENTAL OR CONSEQUENTIAL DAMAGE, OR LIMITATION OF HOW LONG AN IMPLIED WARRANTY LASTS, SO THE ABOVE EXCLUSION AND LIMITATION MAY NOT BE APPLICABLE. THIS WARRANTY SHALL BE EXTENDED TO COMPLY WITH STATE/PROVINCIAL LAWS AND REQUIREMENTS. Invacare® MK6i™Electronics 4 Part No 1141471 Safety Safety The Safety section contains important information for the safe operation and use of this product. 3.1 General Guidelines ! WARNING DO NOT use this product or any available optional equipment without first completely reading and understanding these instructions and any additional instructional material such as owner’s manuals, service manuals or instruction sheets supplied with this product or optional equipment. If you are unable to understand the warnings, cautions or instructions, contact a healthcare professional, dealer or technical personnel before attempting to use this equipment - otherwise, injury or damage may occur. Procedures other than those described in this manual MUST be performed by a qualified technician. ACCESSORIES WARNINGS Invacare products are specifically designed and manufactured for use in conjunction with Invacare accessories. Accessories designed by other manufacturers have not been tested by Invacare and are not recommended for use with Invacare products. NOTICE THE INFORMATION CONTAINED IN THIS DOCUMENT IS SUBJECT TO CHANGE WITHOUT NOTICE. Part No 1141471 5 Invacare® MK6i™Electronics Safety 3.2 Repair or Service Information 3.3 WARNING Set-up of the Electronics Control Unit is to be performed only by a qualified technician. The final adjustments of the controller may affect other activities of the scooter. Damage to the equipment could occur if improperly set-up or adjusted. A qualified technician MUST perform the initial set up of this wheelchair. also, a qualified technician must perform all procedures in the service manual. Operation Information WARNING Performance adjustments should only be made by professionals of the health care field or persons fully conversant with this process and the driver's capabilities. Incorrect settings could cause injury to the driver, bystanders, damage to the wheelchair and surrounding property. After the wheelchair has been setup/adjusted, check to make sure that the wheelchair performs to the specifications entered in the setup procedure. If the wheelchair does not perform to specifications, turn the wheelchair Off IMMEDIATELY and re-enter setup specifications. Repeat this procedure until the wheelchair performs to specifications. Updated versions of this manual are available on www.invacare.com. Invacare® MK6i™Electronics 6 Part No 1141471 MK6i Electronics MK6i Electronics JOYSTICKS • Two choices for standard joysticks - Basic - SPJTM+ (Non-expandable - 1 drive mode) or CMPJ+ (Color MPJTM + Expandable - 4 drive modes). • PSF and PSR - MK6i versions of the Personalized Style Joysticks are available. • A full array of alternative proportional and digital driver controls are also available. SPJ+ CMPJ+ CONTROLLERS • Six controllers cover the entire current MK6i platform: • MK660 ACC - 2 Pole motors • MK690 and MK690 ACC - 4 Pole motors • MK6TT - TrueTrack motors • G-Trac™ for power wheelchairs with 2-Pole motors • G-Trac for power wheelchairs with 4-Pole motors • MK6i Controllers allow changing from a non-expandable system, (one drive mode), to an expandable system (four drive modes), simply by removing the SPJ+ joystick, adding a necessary cable, and plugging in an CMPJ+, PSR+, PSF+ joystick or a MK6i Display. CONNECTORS • • • • Part No 1141471 Universal connectors make it easy to add or remove options, & eliminate the daisy chain. All MK6i options plug into the system using the same connector – in the same location. No more questioning the type of connector, or where to plug in. Locking securement tabs assure solid connections. 7 Invacare® MK6i™Electronics MK6i Electronics SMART ACTUATORS • • • • An option on Formula™CG Powered Tilt, Recline, and Power Center Mount Programmable up and down limits. “Automatic Positioning” (memory seating) pre-set powered seat positions. Positioning for pressure relief, safely driving inclines / declines, positioning for activities of daily living. PROFESSIONAL MEMORY CARD • • • • • A New Professional Memory Card places the features of Laptop IVS into the palm of your hand. Allows saving Individual Drive profiles and multiple system profiles in one place. Create Libraries of ready to install custom profiles. View Help Library, advanced diagnostics and troubleshooting tips. Standard with all programmers. USB ready version comes with a card reader with a USB adapter. • • • • • • Larger brighter LCD screen. Crisp Text and Icons for easy viewing, even in sunlight. Allows alternative controls to be used with an expandable electronic platform. View all four drives, all at once. View Standard programs names programmed into each drive. Insert a Memory Card and turn the Display into the programmer for that wheelchair. • • • • • Utilizes the Color LCD screen of the CMPJ+ with the same features. Used with alternative drive controls in place of the Color CMPJ+ joystick. Provides a low profile - simple screen for the power wheelchair to view drive/profile/status/mode. 3 switches provide Power On/Off, Mode Select and Drive Select. Stereo port provides for one or two switches programmable in the calibrations menu. DISPLAY (FULLSIZE) MINI DISPLAY Invacare® MK6i™Electronics 8 Part No 1141471 MK6i Electronics MK6I PROGRAMMER • • • • Based on a MK5™ foundation – same rules – similar keystrokes. View values for all four drives – all at once. Can still use a MK5 programmer with access to EVERYTHING except “Help” screen. New Programmable features include: • Three Scanning modes (Refer to View/Scan on page 67.) • Automatic Positioning (Refer to Automatic Positioning on page 62.) • Mouse/IR Control (Refer to MK6i IR Control/Mouse Emulation Programming Manual, Part No. 1160891). FOUR WAY SWITCH BOX (4WSB) • Present with ALL multiple actuator systems. • Provides a 9 Pin Port for any separate 4 Quadrant switch to operate powered seating. • No charge compatible switches include the “4 Way Toggle” and the “4 Quadrant Push Buttons”. 4 Way Toggle 4 Quadrant Push Buttons MULTIPLE ACTUATOR INTERFACE BOX (S4WSB) • Replaces above 4-way switch box when operating multiple actuators through the Driver control. • Provides a 9 Pin port for any separate 4 Quadrant ATTENDANT switch to operate powered seating. • Provides two Additional ports, “A” and “B” for accessory powered seating switches. • Port A - Cycles/selects through connected actuators. • Port B - Operates the selected actuator in an up/down control method. • HCPCS code E2311 Part No 1141471 9 Invacare® MK6i™Electronics MK6i Electronics nXc™-ACM (nXc ACTUATOR CONTROL MODULE) • Required when using the nXc joystick with a two actuator powered seating system • Provides sensor inputs for max back angle, drive slowdown and drive lockout. • Provides stereo port for external powered seating switches. SINGLE ACTUATOR NODE (SANODE) • Added to any Expandable system (4 drives) to allow operating a single actuator system through the Driver Control • Not compatible with the SPJ+ joysticks (Non-expandable systems) • HCPCS code E2310 AUXILIARY MODULE 12 (AUX12M6) • Provides two 9 pin ECU outputs with 4 switch closures each. • Less than half the size of the original ECU boxes. AUXILIARY MODULE 32 (AUX34M6) • Same as Auxiliary Module 12 with an additional mono port to add a 5th switch and allow 5 switch closures through the output. Invacare® MK6i™Electronics 10 Part No 1141471 MK6i Electronics “Y” SPLITTER CABLE • Allows adding a second switch to the Mode Port of the MK6i Driver Control Options. • Switch functions are programmable (Calibrations menu) • Not compatible with SPJ+ joysticks. 24 VOLT AUXILIARY POWER SOURCE • Provides an accessory lead for devices requiring auxiliary power (e.g. electronic switches). G-TRAC™MODULE G-Trac Description • G-Trac uses an electronic gyro module and special controller developed to enhance the tracking and control capabilities of the chair from very slow speeds to fast speeds. Side sloped terrain (even slightly), obstacles at only one wheel or encountered on one side ahead of the other (such as door thresholds), steps and curbs approached at an angle, and soft or rough uneven terrain all make it difficult for power chairs to stay on course without veering to one side or the other. These situations are especially challenging for drivers using head controls, switch controls, Sip-n-Puff systems and alternative joystick controls to negotiate. GTrac makes it possible to drive a power chair in these environments in a more controlled and easier manner. • The G-Trac technology can be used with the standard 2 and 4 pole motors on many Invacare Powered Wheel Chairs, including the TDX® Spree, TDX SC, TDX SI, TDX SP, Power Tiger, Storm Torque SP, and Storm Ranger X G-Trac is an option on the order form, is available with expandable (4-drive) electronic systems, and is not available with the Gearless Brushless GB™(GB) motors. G-Trac Installation • G-Trac can only be installed at the factory. Part No 1141471 11 Invacare® MK6i™Electronics MK6i Joysticks MK6i Joysticks SPJ+ (NON-EXPANDABLE SYSTEMS) • • • • • Single drive Push buttons - On/Off, speed select and horn LED battery and speed indicators Charger port Quick disconnect cord MK6I SPJ+ W/PSS (FOR POWERED SEATING) Mono Port • All features of SPJ+ • Mono port for powered seating switch MK6I SPJ+ W/ACC (WITH ACTUATOR CONTROL) Mode Button • All features of MK6i SPJ+ w/PSS • Mode button to allow powered seating operation through the joystick • HCPCS code E2310. Mono Port Invacare® MK6i™Electronics 12 Part No 1141471 MK6i Joysticks CMPJ+ (STANDARD PROPORTIONAL JOYSTICK) AND NXC (NON-EXPANDABLE COLOR JOYSTICK) CMPJ+ nXc • • • • • • Color screen Speed control pot Large, backlit LCD display with icons to reflect programmed modes in each drive Memory card reader Charger port Built-in swivel mount CMPJ+ NXC • • • • • Toggle On/Off and mode select • One programmable drive • One Stereo Switch Port: Programmable w/single actuator systems, used for NXC-ACM with two actuator systems Toggle On/Off and drive select Four programmable drives Built-in mode button Switch Ports: One for remote On/Off switch, One with two programmable functions available (drive select, mode switch or actuator control) PSF (PROPORTIONAL JOYSTICK) • Same features as CMPJ+ except no mono port for remote On/Off • Toggle On/Off Drive Select - speed pot standard. • No Switch or Left-Right On/Off options. PSR (PROPORTIONAL JOYSTICK) • Same features as CMPJ+ • Toggle On/Off switch can be on left or right • 3 switch option choices • Toggle On/Off drive select - speed pot standard • Push button On/Off and push button drive select • Push button On/Off and speed pot Part No 1141471 13 Invacare® MK6i™Electronics MK6i Displays MK6i Displays 6.1 Display Features DISPLAY • • • • • • • • The MK6i Display can have up to four alternative drive controls (plus an attendant over-ride control) active on the wheelchair. View all four drives at once. View all programmed modes available in each drive. View standard program name or custom name programmed for each drive. View system name. The system name is the name for all four drives. Choose Standard View or Enhanced view (Refer to standard on page 67). Convert into a MK6i Programmer using the Invacare Memory Card. Two ports - Remote On/Off Switch Port and Mode/Actuator/Drive Select Switch Port. Remote On/Off Switch Port Mode/Actuator/ Drive Select Switch Port DISPLAY - ENHANCED VIEW Invacare® MK6i™Electronics 14 Enhanced view shows one drive at a time with enlarged icons. Monochrome icons are used on the MK6i display. Part No 1141471 MK6i Displays DISPLAY - STANDARD VIEW Standard Program Assigned to Highlighted Drive System Name Active Drive Mode Battery Level Additional Programmed Active Modes Arrow Indicates Additional Modes Available Status Icon Message Status Area Part No 1141471 When a chair is programmed with at least one drive using G-Trac and the controller and gyro installed, there are two status icons that are displayed. The first icon, , is displayed if the selected drive has G-TRAC turned on. If G-Trac is turned off in a drive, the displayed icon is . 15 Invacare® MK6i™Electronics MK6i Displays Display Status Icons ICON Display Available Modes STATUS ICON Drive Mode (1 through 4) Attendant Over-ride Attendant Control Automatic Positioning Charger Plugged in DLO DRIVE MODE “Warning” Actuator Control Through Driver Control Drive Lockout Disabled ECU Output activated (1 through 4) Standby Mode Active RIM Mode Activated G-Trac On (See Note) Drive Select Mode Activated G-Trac Off (See Note) No Driving 3-Speed Digital Driving Mode Activated Mouse Mode Infra Red (IR) Mode Invacare® MK6i™Electronics 16 Part No 1141471 MK6i Displays 6.2 Mini-Display Features MINI-DISPLAY • • • • • Power Button Drive Select Button Mode/Actuator/ Drive Select Switch Port The MK6i Mini-Display can have up to four alternative drive controls (plus an attendant over-ride control) active on the wheelchair. View all programmed modes available in each drive. View standard program name or custom name programmed for each drive. Mode/Actuator/Drive Select Switch Port. Uses the same LCD display as the CMPJ+ Mode Button DISPLAY VIEW Color MPJ+ icons are used on the MK6i mini-display. Available Modes in this Drive (Must be Programmed. Top, Highlighted Icon Indicates Selected Mode) Status/Info Message Area Part No 1141471 17 Drive Profile Name Battery Gauge Display Status Indicator Clock Invacare® MK6i™Electronics Proportional Alternative Controls Proportional Alternative Controls COMPACT JOYSTICK (1558M6) • • • • • A proportional 4 Quadrant (directional) driver control. The most versatile of proportional driver controls. Used for hand control, chin control, foot control, elbow control, midline control or attendant control. Programming parameters can compensate for impaired upper extremity/head/foot control function. Requires MK6i Display if used as a “stand alone” control. ASL MICRO EXTREMITY • • • • • A proportional 4 Quadrant control with Built in Mode switch (Activated by depressing the inductive). Minimal pressure required for activation. Primarily for users with good finger dexterity but otherwise minimal upper extremity function. Mounting includes hand or chin mount. Requires MK6i Display if used as a “stand alone” control. PSR/PSF JOYSTICKS • Both PSR and PSF have four drive modes. • PSF = Inductive in front, On/Off - drive select toggle and speed potentiometer mounted standard. No switch options or Right/Left options available with MK6i version. • PSR = Inductive in the rear and choice for three combinations of two switches using Toggle, push buttons or speed potentiometer. Invacare® MK6i™Electronics 18 Part No 1141471 Proportional Alternative Controls ASL STEALTH MUSHROOM JOYSTICK (ASLPSMJI) • • • • A proportional 4 Quadrant (directional) driver control. Modeled after a track ball design, this is a good option for those driving with shoulder and arm function rather than hand/finger. Can be Traditional Side Mounted - Mid Line Mount - Recess mounted in a Lap Tray. Replaces traditional “Goal Post” adaptation for some SCI Hand Control users. RIM Head Control (1500M6) • 3 Quadrant Proportional Head Control. • A Reset Switch Toggles the Forward command to Reverse (Can be bypassed under some circumstances). • Permits proportional head driving requiring standard joystick force. Peachtree (PHC-3) • • • • • • Part No 1141471 3 Quadrant Proportional Head Control. Proportional forward/reverse - digital left/right. Reset switch built into occipital pad to access / change modes, toggle RIM from forward to reverse, etc. Access to ALL Programming Parameters - Drives – ECU functions. Forward Head movement operates Forward / Reverse quadrants. Lateral Head movement (tilt) operates Left / Right quadrants. 19 Invacare® MK6i™Electronics Digital Alternative Controls Digital Alternative Controls 8.1 Sip N’ Puff Controls (SNPM6) • 4 Quadrant Non-Proportional Driving. Intra-Oral Pressure - NOT Breath Control. Pressure requirements can be calibrated to user’s abilities. • Quadrants can be re-assigned from Factory Set directions (through axes selection) to meet users needs. Factory Setting: Hard Puff = Forward, Soft Puff = Right, Hard Sip = Reverse, Soft Sip = Left. ASL Head Array • • • • 3 Quadrant Driver Control (3 Proximity Switches: Occipital pad & Temporal Wings of the Head Rest). Size & Configuration options available. Mode switch (mechanical or electrical) used to toggle Rim functions Forward / Reverse. Choose from four standard reset switches: proximity, beam, egg and wobble; or add own custom. ASL Proximity Switch Array • Can be mounted into any orientation for a gross-movement, no-force switch system (Shown here with Driving Platform). ASL SNP Head Array • Combines the ASL switch head array (left and right directions) with Sip n’ Puff (forward and reverse). • Any Puff (hard or soft) = Forward Command, Any Sip = Reverse. • Left & Right are digital commands (proximity switches) in the wings of the head rest. Invacare® MK6i™Electronics 20 Part No 1141471 Digital Alternative Controls ASL Stealth Ultra Head Array • 3 Quadrant Digital Driver Control (3 Proximity Switches: Occipital pad & Temporal Wings of the Head Rest). • Provides head support through the sub-occipital pad. • Temporal pads are adjustable, & swing away for transfers. ASL Fiber Optic Array • Can be mounted into any orientation for a minimal-movement, no-force switch system. • Options include 4 Quadrant & 3 Quadrant systems. Tash®Mini Joystick • 4 Quadrant Digital Joystick requiring minimal force & minimal throw to activate. (Depressing the joystick downward accesses a fifth switch, used for reset. • Used for Hand Control when there is reduced hand wrist movement / strength / endurance. Often used in a midline mount or can be used in a traditional side mount. • Chin Control when there is reduced head / neck movement. • Can be Bib mounted or used with swing away midline mounts. Tash Wafer Board • Four “Directional” membrane switches with a fifth switch for “Re-Set”. • Also available in a “Star” configuration. • An option when there is limited hand dexterity, but at least moderate upper extremity control. Single Switch Scanner • A Single Switch Driving System, Scanning rate is adjustable. • Can utilize any mechanical or electrical switch that has a 1/8” phono plug. • The display scans each quadrant. When the quadrant led is turned on for the desired direction, the user holds the switch down and the wheelchair drives in that direction. Part No 1141471 21 Invacare® MK6i™Electronics Using the MK5 Programmer with MK6i Electronics Using the MK5 Programmer with MK6i Electronics The MK5 programmer allows access to ALL MK6 programming with the exception of the HELP key. The primary difference is that only one drive can be viewed at a time. Select ADVANCED MENU to see the full MK6 programming screens. Refer to Using the MK6i Easy Remote Programmer on page 23 for more programming information. LCD Display POWER Key MENU Key DRIVE 1-4 SPEED RESPONSE >> ADVANCED MENU __% __% Remote Programmer SAVE Key UP Key SELECT Key DOWN Key Plugs directly into drive control or display. Invacare® MK6i™Electronics 22 Part No 1141471 Using the MK6i Easy Remote Programmer Using the MK6i Easy Remote Programmer MK6i 10.2 UP/DOWN Arrow Keys Programmer Use these keys to: • Scroll through menu options. • Scroll through the Help information. • Raise or lower selected performance values. UP Arrow Key PWR/INFO Key LEFT 10.3 LEFT/RIGHT Arrow Keys SAVE Key Arrow Key SELECT Key Use these keys to: RIGHT Arrow Key • Scroll along menu line items. • Branch further in the menu structure. • Return to the previous screen. DOWN Arrow Key 10.4 SELECT Key 10.1 PWR/INFO Key Use this key to: Use this key to: • Turn the programmer On and Off. Hold the key down for more than two seconds. • Display Help information (definitions for highlighted parameters and values). While the programmer is On, press and hold this key for 1 second then release. Press this key to dismiss the help information and return to programming. 10.5 SAVE Key • Display adjustable values or selection choices when parameters are highlighted. • Choose the new value or selection choice. • Begin memory card transfer when prompted. The Professional Memory Card MUST be inserted into the programmer to access the Help information. The Save key MUST be pressed twice to save anything. The first press always confirms that you want to save or where you want to save, and the second press saves the values. When an entire row is highlighted - All 4 drives are saved at once. When only one value is highlighted - Only that drive is saved. Part No 1141471 23 Invacare® MK6i™Electronics Using the MK6i Easy Remote Programmer 10.6 Selecting a Parameter Use the Up/Down arrow keys to select the desired parameter to adjust. Use the Right arrow key to open the desired parameter’s menu, if “>>>” is displayed. ‘ MK6I PROGRAMMING PARAMETER SPEED RESPONSE PERFORMANCE ADJUST STANDARD PROGRAMS MEMORY CARD POWERED SEATING CALIBRATIONS DIAGNOSTICS D1 100 100 >>> >>> >>> >>> >>> >>> D2 100 100 10.7 Menu Descriptions For descriptions of the parameters refer to the chart at the bottom of this page or these sections: Refer to MK6i Performance Adjustments on page 26. Refer to MK6i Standard Programs on page 39. Refer to Using the Memory Card on page 51. Refer to Powered Seating on page 56. Refer to Calibration Menu on page 63. Refer to User Settings/Diagnostics on page 77. PERFORMANCE ADJUSTMENT DESCRIPTION SPEED 100% SETS MAXIMUM OVERALL SPEED. • MORE • • • |||||||||||||||| LESS D4 100 100 • • • • • • LCD DISPLAY LESS D3 100 100 Screen shown to the left is for reference only. Speed and Response values may differ. nXc Joystick Only: There is only one drive available on the nXc joystick. RESPONSE 100% |||||||| Invacare® MK6i™Electronics A proportional 4 Quadrant (directional) driver control. 100% means 100% of programmed performance adjustment settings. Cannot be more than 100% of programmed values. Changes affect all of the speed parameters (Forward, Turning and Reverse Speeds) SETS OVERALL RESPONSE OF THE WHEELCHAIR TO JOYSTICK COMMANDS. • MORE • • • 100% means 100% of programmed performance adjustment settings. Response can be increased up to 200% for quicker response to commands. Response can be lowered for softened or delayed response to commands. Changes affect Accelerations, Braking, Decelerations and Tremor Dampening. 24 Part No 1141471 Using the MK6i Easy Remote Programmer 10.8 MK6i Programming Outline PERFORMANCE ADJUSTMENT NAME FWD SPEED FWD ACCEL FWD BRAKE REV SPEED REV ACCEL REV BRAKING TURN SPEED TURN ACCEL TURN DECEL TREMOR DAMP POWER LEVEL G-TRAC TORQUE TRACTION JOYSTICK THROW AXES SELECT INPUT TYPE COLOR THEME MOM/LATCH DIGITAL 3 SPEED LATCH TYPE MOM REVERSE SLEEP MODE STANDBY SELECT STANDBY TIME STANDBY IN ECU STANDBY IN MOUSE RIM DRIVE SELECT (ECU1) (ECU2) (ECU3) (ECU4) (ASM1) (ASM2) MOUSE MOUSE SETTINGS MOUSE AXES *MOUSE B MOUSE SETTINGS MOUSE AXES IR CONTROL NO DRIVING LIGHT CONTROL (COLOR ONLY) STANDARD PROGRAMS MEMORY CARD ANALOG DRIVE PRGM >>> STORE TO CARD READ FROM CARD SYSTEM>>> STORE TO CARD READ FROM CARD SEATING CONTROL>>> STORE TO CARD READ FROM CARD INDR_AVG MOD_OUTDR SPEED_LVL RAMPS_CURB INDR_LRNR VERY SLOW MEC 1500_RIM DIGITAL 3SPD_DIG ASL_INDR ASL-OUTDR SNP_LNR VERY SLOW 1 SP SNP VIEW SCAN * RF mouse only module: Mouse ONLY module for software version 2.2 or higher. Part No 1141471 25 POWERED SEATING DRIVE LOCKOUT ACT CONTROL STD PRG>>> ACTUATOR SELECTION FWD REV LEFT RIGHT SEATING ADJUST TILT RECLINE CNTR LEGS RIGHT LEG ADJUST LEFT LEG ADJUST LEFT AP PRGM RIGHT AP PRGM CALIBRATIONS NAME DRIVE CONFIG MOTOR BALANCE MOTOR CALIBRATE ACC 1 ACC 2 TTJC ACTUATOR ACC DCI MONO PORT 1 MONO PORT 2 DISPLAY ORIENT CONTRAST VIEW/SCAN INIT TIME REPEAT TIME 4W STD PRGM >>> 4-WAY SWITCH>>> HARD PUFF CAL SOFT PUFF CAL SOFT SIP CAL HARD SIP CAL SPEED POT MAX PACM6 ADJUST DIG ATT ADJUST TILT CAL BACK ANGLE RECLINE CAL CENTER LEG CAL START IN DRIVE ATT POWER OVERIDE AUDIBLE IND PRS TIME IR SETTINGS ERASE ALL DIAGNOSTICS JOYSTICK TILT RECLINE LEG ELEVATE FAULT LOG CLEAR FAULT LOG VERSION Invacare® MK6i™Electronics MK6i Performance Adjustments MK6i Performance Adjustments 11.1 Performance Adjustment Enhancements in MK6i View Scan Name Enables or disables scanning features to be active in a particular drive. The name of any Standard Program saved to a drive will be displayed on the LCD screen of the MK6i Joystick or Display. Changes in performance adjustment values from standard will defer to a default name (e.g. Drive 1). Drive profiles can be re-named by selecting “NAME” under the Performance Adjustment menu. Traction A reduction of speed when going into or coming out of turns. The higher the value the greater the reduction. Does not affect direct turning speed. Helpful to soften veer correction during latched driving modes. Name Changes Forward Braking/Reverse Braking Remote Select has been renamed DRIVE SELECT. The Braking Adjust parameter of the MKIV and MK5 Performance menu has been split into two separate parameters, one for Forward only and the other for Reverse. Standby Mode has been renamed SLEEP MODE. Momentary Mode Select has been renamed DIGITAL 3 SPEED. Reverse Acceleration 11.2 Using the MK5 Programmer to Make Performance Adjustments The ability to adjust acceleration in reverse or how quickly the wheelchair achieves programmed reverse speed has been added. 1. 2. 3. Tremor Dampening Tremor dampening was previously a Standard Program used for individuals with tremors or ataxic upper extremity/hand movements. By adding a Tremor Dampening adjustment parameter to the Performance menu, any Standard Drive Profile from very slow to faster can be easily adjusted to accommodate tremors. DRIVE 1 > DRIVE 2 DRIVE 3 DRIVE 4 PROP ATTENDANT DIG ATTENDANT Torque - Redefined Torque values are now displayed in ohms, a more accurate way to display what is actually occurring when values are changed. Slight changes in values programmed can have significant effects on driving. Invacare® MK6i™Electronics Select ADVANCED MENU. Select PERFORMANCE ADJUST. Select the desired drive for performance adjustments. 26 Part No 1141471 MK6i Performance Adjustments 11.3 SPJ+ Performance Adjustments FORWARD SPEED TURNING SPEED ACCELERATION FWD ACCELERATION REV TURN ACCELERATION TURN DECELERATION BRAKING FORWARD BRAKING REVERSE REVERSE SPEED TREMOR DAMPENING TORQUE DCI OPERATION DCI MONITORING ENABLE ACTUATORS There is only one drive that can have the following adjustments: When programming the SPJ+ joystick with MK6 electronics, the handheld programmer will display “MK5”, this is normal. Part No 1141471 27 Invacare® MK6i™Electronics MK6i Performance Adjustments 11.4 CMPJ+ Joystick, nXc Joystick, Display or Mini-Display Performance Adjustments CMPJ+ Joystick nXc Joystick Each drive can have the following adjustments: NAME FWD SPEED FWD ACCEL FWD BRAKE REV SPEED REV BRAKE TURN SPEED TURN ACCEL TURN DECEL TREM DAMP POWER LEVL G-TRAC TORQUE TRACTION JSTK THROW AXES SEL INPUT TYPE COLOR THEME MOM/LATCH Display LATCHED TYPE** MOM REVERSE Mini-Display SLEEP MODE** STBY SEL STANDBY TIME STANDBY IN ECU** RIM CONTROL DRIVE SEL* ECU1* ECU2* ECU3* ECU4* ASM1 ASM2 NO DRIVING MOUSE MOUSE SETTINGS MOUSE AXES MOUSE B MOUSE B SETTINGS MOUSE B AXES IR CONTROL LIGHT CONTROL VIEW/SCAN - DISPLAY ONLY 3 SPEED DIGITAL** PSR * Mode switch required unless STANDBY SEL is turned on. ** Mode switch ALWAYS required. PSF Invacare® MK6i™Electronics 28 Part No 1141471 MK6i Performance Adjustments 11.5 Performance Adjustment Definitions LCD DISPLAY PERFORMANCE ADJUSTMENT DESCRIPTION Allows the name of a saved standard drive program to be changed. Sets a 10 character Name for each drive. This is displayed on various screens during normal operation. NAME SPEED_LVL ˆ • • • • Sets maximum forward speed. FWD SPEED 80% LESS ||||||||||||| FWD ACCEL 30% LESS |||| FWD BRAKE 35% LESS ||||| MORE ||||||| REV ACCEL 30% LESS |||| Part No 1141471 • Generally reduced for learning modes, indoor use, when precise maneuvering is required, or driving with digital controls. • Generally increased for outdoors, open level terrain, and “experienced” drivers. Time taken to reach maximum forward speed. • Typically referred to as “Response” by the driver. MORE • 100% = quickest acceleration. • Reduced to accommodate tremors or ataxia. Maximum braking force available to Stop or Slow the wheelchair. • 100% = maximum. MORE • Affects only the forward quadrants. • Generally increased when quick response and precise maneuvering of the wheelchair is needed at lower speeds. Sets the maximum reverse speed, independent of turning and forward speed. REV SPEED 50% LESS Move the joystick right/left to move the carat (ˆ) to the desired letter to change. Move the joystick up/down to change the letter. Changing any performance parameters will change the name to default “Drive #” Use underscore to separate names. DO NOT leave blank spaces. MORE • Generally set at low levels. Time taken to reach maximum Reverse speed. • Typically referred to as “Response” by the Driver. MORE • 100% = quickest acceleration. • Reduced to accommodate tremors or ataxia. 29 Invacare® MK6i™Electronics MK6i Performance Adjustments LCD DISPLAY REV BRAKE 35% LESS ||||| TURN SPEED 50% LESS ||||||| TURN ACCEL 35% LESS ||||| PERFORMANCE ADJUSTMENT DESCRIPTION Maximum braking force available to Stop or Slow the wheelchair in Reverse. • Affects only the reverse quadrant. MORE • Generally increased when quick response and precise maneuvering of the w/c is needed at lower speeds. Sets Maximum Turning Speed – Independent of Forward Speed. • Generally kept near 15% - 25% for most driving profiles. MORE • Fast Turning Speeds are generally not Recommended for safety. • Often set equal or nearly equal to forward speed with very slow driving. How quickly the wheelchair reaches the programmed turning speed. • Also typically referred to as “Response” by the Driver. MORE • Reduced to accommodate tremors or ataxia. • First suggested parameter to address if chair is too responsive to driver commands. How quickly the wheelchair “brakes” out of a turn when returning joystick to neutral. TURN DECEL 35% LESS MORE ||||| TREM DAMP 50% LESS ||||||| POWER LEVEL 50% LESS ||||||| Invacare® MK6i™Electronics • Turning Deceleration affects only the Left & Right Joystick Quadrants. Accommodates Upper Extremity Tremors / Ataxia. • Previously a Standard Program – Now an Adjustment. MORE • Higher levels = softer (delayed) response to joystick commands (accelerations & decelerations). • Lower levels = Increased or faster Response to joystick commands. Sets the Max power (current) available to the motors / drive wheels, or the point at which the wheelchair will stall at an obstacle or under a load. MORE • Will not effect “normal” driving, only with inclines, obstacles, etc. • Generally set low with pediatrics, cognitive or visually impaired, and New Drivers. • Generally set high for switch drivers, rough terrain, indoors at slow speeds over thick carpeting, etc. 30 Part No 1141471 MK6i Performance Adjustments LCD DISPLAY PERFORMANCE ADJUSTMENT DESCRIPTION G-TRAC > ON OFF • Each of the 4 drives can be programmed to use the G-Trac feature, or have G-Trac disabled in that drive. To accomplish, use a Hand Held Programmer and select the Performance Adjustments menu item. Scroll down to GTRAC and set it for ON or OFF. TORQUE 36 A function of Time & Power. How quickly programmed Power Level is reached. LESS ||||| DCI OPERATION (SPJ+ ONLY) OFF AFTERMARKET (OR “NORMALLY OPEN”) INVACARE (OR “NORMALLY CLOSED”) • ALL FOUR quadrants are affected by the programmed torque level. MORE • High = immediate ramping up to programmed power level. Recommended for Slow Speeds, Switch drivers, rough terrains, curbs, significant obstacles. • Low = slower ramping up to programmed power level. Recommended for faster speeds, level terrains, new drivers - even at some slower speeds. • MK6i Torque levels are noted in Ohms. • Small changes to torque have a significant impact. • Recommendation is to change only in 4 Ohm increments to determine if needs are met. Determines Drive Lock Out Function for systems utilizing any version of the SPJ+ Joystick OFF • Disables Drive Lock Out for tilt or recline systems (manual or power), • Recommended setting for chairs without tilt or recline seating systems NORMALLY OPEN/AFTERMARKET • Setting for some systems using aftermarket powered seating systems. Consult the aftermarket seating manufacturer for more information. NORMALY CLOSED/INVACARE • Setting used for Invacare tilt or recline systems (manual or power). Part No 1141471 31 Invacare® MK6i™Electronics MK6i Performance Adjustments LCD DISPLAY DCI MONITORING (SPJ+ ONLY) >IVC MANUAL SEATING (OR “CONTINUOUS”) IVC POWER SEATING (OR “LATCHING”) PERFORMANCE ADJUSTMENT DESCRIPTION Determines the method Drive Lock Out status is monitored by the controller CONTINUOUS/IVC MANUAL SEATING • Status of the drive lockout switch is continuously monitored for change. • Use this setting for manual tilt or recline systems. • Recommended for some aftermarket powered seating systems. Consult the aftermarket seating manufacturer for more information. LATCHING/IVC POWER SEATING • Monitors the Drive Lockout Input switch ONLY during power up, and after actuator operation • This setting is recommended for Invacare powered seating systems ACC 1 (2) (SPJ+ ONLY) OFF ON TRACTION 30% LESS ||||| JSTK THROW MOVE JOYSTICK TO: FORWARD_ REVERSE_ LEFT_ RIGHT_ AND THEN NEUTRAL_ FORWARD REVERSE LEFT RIGHT AXES SEL >FORWARD >REVERSE >LEFT >RIGHT Invacare® MK6i™Electronics Allows setting actuator to operate through the SPJ+ with ACC Joysticks when ACC is used on the TDX Spree Power Wheelchair with power tilt. ACC 1 = ELEVATE, ACC2 = TILT A reduction of the speed when going into and coming out of turns. • The higher the value, the greater the reduction in speed. MORE • Set at 0% for the majority of wheelchair users. • Increasing values may be helpful to soften veer correction in “latched” driving mode, or to dampen veer correction speed for aggressive drivers. Used to calibrate joystick throw. • Sets the point for reaching full speed in relation to joystick displacement. • Values DO NOT return to default settings unless Manually Re-Set. • Used with individuals having reduced ROM available for joystick operation. Assigns / Re-Assigns joystick commands to a desired direction. • • • • Useful when changing “Joystick Operation” in relation to “Joystick Position”. Each of the four input axes can be redirected to any output axis, or turned off. Settings DO NOT refer back to default unless manually re-set. “Select” Key on Programmer cycles through output choices. 32 Part No 1141471 MK6i Performance Adjustments LCD DISPLAY INPUT TYPE MPJ MK6I MPJ+, PSR+, PSF+ COMP MEC COMPACT JOYSTICK MICRO EXTREMITY / MINI PROP PEACHTREE ANALOG 1500 CONTROL SNP DIGITAL ASL DIG PROPORTIONAL INVACARE RIM PERFORMANCE ADJUSTMENT DESCRIPTION Used to Add / Change Assigned driver control in one or more drives. • • • • • • Choose desired driver control for each drive according to this list. Only available when more than one Driver control is connected. Only driver controls connected will be displayed. Only systems with 4 drive modes may add additional driver controls. Two driver controls of the same Input Type cannot be used on one chair. To increase the combinations of driver controls allowed, the following changes were made from MK5 to MK6i: • MK5 SWITCH JOY has been divided into MK6i Digital - ASL Digital • MK5 1812 has been divided into MK6i Analog - MEC - Peachtree • ASL Mushroom and Magitek Controls use ANALOG. SIP-N-PUFF NON-PROPORTIONAL ASL SYSTEMS ONLY COLOR THEME Sets the background color. • Available with Color MPJ+ Joystick only. • Color Choices: BLUE, SILVER, WHITE, SALMON, PINK, BUCI. MOM/LATCH > MOM LTCH Part No 1141471 Determines the mode for FORWARD driving commands. • Momentary commands are only active while the command is being given. • Latched commands remain active after release of the driver control - until 2 reverse commands or emergency stop switch is activated. • Left & Right commands are ALWAYS momentary. (See “MOM/REVERSE”). • Available on proportional & digital controls on 4 drive systems. • Latched driving requires mode switch / emergency stop switch. 33 Invacare® MK6i™Electronics MK6i Performance Adjustments LCD DISPLAY LATCHED TYPE >CRUISE CTL 1 SPD 3 SPD 3 SPD U/D 5 SPD 5 SPD U/D MOM REVERSE > MOM LTCH DIGITAL 3 SPEED > 3 SPEEDS 1 SPEED SLEEP MODE > ON OFF Invacare® MK6i™Electronics PERFORMANCE ADJUSTMENT DESCRIPTION Allows different speeds in Latched driving. Present if Latched mode is selected • • • • • 1 SPEED = 1 Forward Speed. 3 SPEEDS = 3 stepped Speeds (1/3 percentages of forward speed). 5 SPEEDS = 5 stepped Speeds (1/5 set percentages of forward speed). CRUISE CTL = Default = Cruise Control (set speed determined by driver). Stepped latch will increase one step in speed with each successive forward command. A reverse command stops the wheelchair. Used to provide speed selections in latched modes without changing drives. • In 3 SPD U/D and 5 SPD U/D, each successive FORWARD command ramps up to the next step, each successive REVERSE command steps down one step. In U/D mode, a SUSTAINED REVERSE command STOPS the chair, as does activating the “Emergency Stop Switch”. • In cruise control, speed will continuously ramp up as the forward command is sustained, and maintain the speed reached when releasing the forward command. Speed decreases in the same rate with a reverse command. Two reverse commands within one second (or an emergency stop switch) stops the wheelchair. Allows Reverse to be set as either MOMENTARY or LATCHED. • Available only when “Latched” mode driving is selected. • On sets reverse as momentary, Off sets reverse in Latched. • Helpful for some sip-n-puff users backing into spaces. Allows either 1 or 3 driving speeds for Digital Controls in Momentary Mode (Previously named “Momentary Mode Select”) • 1 SPEED provides only one forward speed. • 3 SPEEDS provides 3 forward speeds, (1/3, 2/3, or full programmed speed), selected with a mode (re-set) switch prior to driving. • “3 SPEEDS” provides speed selections using digital driver controls - without changing drives. • Present only when digital driver control is selected under Input Type. Allows the Wheelchair to enter an “Inactive (resting) Mode” mode after a set period of time with no driver control activity. (Previously named StandBy Mode) • • • • Used with drivers who cannot access the On/Off switch during periods of no activity. Used to prevent “accidental operation” when in a resting mode. A Mode Switch (Reset) is required to return the wheelchair to operating mode. Disappears from the menu if Standby Select is On. 34 Part No 1141471 MK6i Performance Adjustments LCD DISPLAY STBY SEL > ON OFF STANDBY TIME 60 S LESS |||||||| STANDBY IN ECU > ON OFF RIM CONTROL > ON OFF Part No 1141471 PERFORMANCE ADJUSTMENT DESCRIPTION Sends the wheelchair into resting mode. Driver commands then SELECT next operating function – BYPASSING the “Reset Switch”. Once in Standby mode: • • • • FORWARD command ALWAYS returns the wheelchair back to Drive Mode. RIGHT Command = Remote Drive Select Mode (if turned on). Subsequent Left command changes to next drive. LEFT Command = ECU functions, then Powered Seating Functions (if turned on). Disappears from the menu if Sleep Mode is On. Sets the time before for a Wheelchair will enter into “STAND BY” (resting) Mode • Range is from 2 seconds to 120 seconds. MORE • Present only when “Sleep Mode” or “Standby Select” is activated. • ON allows “Normal” Stand-By Function. • OFF eliminates Stand-By in ECU modes, but REQUIRES a Mode switch to exit ECU mode (Helpful during mouse emulation or Aux. Comm. operation through the driver control when Sleep Mode or Standby Select is also needed elsewhere, but they interfere). • Present only if Sleep Mode or Standby Select is On. Allows three commands (quadrants) to drive 4 directions. • Pressing a Mode switch (reset) changes the forward command to reverse driving. • Pressing the switch again toggles the command back to forward driving. • To eliminate the need for the mode switch: • Turn ON Standby Select • To activate “Reversing” without mode switch: • Allow the chair to enter Standby Mode • A left command activates Reversing • A forward command returns to normal driving. 35 Invacare® MK6i™Electronics MK6i Performance Adjustments LCD DISPLAY DRIVE SELECT > ON OFF ECU 1 (2, 3, OR 4) > OFF MOM MOTOR LATCHED COMM PERFORMANCE ADJUSTMENT DESCRIPTION Drive Select: Allows Left Driver Command to change drives (1, 2, 3, 4) • • • • MUST be turned on in all drives to be accessed through the Driver Command. Uses a Reset switch (or Standby Select) to enter & exit Remote Select (Drive Select) mode. A LEFT driver command will advance to the next drive number activated. Standby Select bypasses reset switch requirement to enter mode. • Right command activates Drive Select. • Left command advances drives. • After allowing the wheelchair to re-enter Standby Select Mode, Forward command returns to driving. Sets performance settings for devices connected to an ECU Port. Each output (1, 2, 3, or 4) appears separately in the menu. (Requires COM12, or COM 34). • OFF Disables that output. (Recommended if no device is connected to it.). • MOM.MOTOR allows each driver command to operate in the momentary mode. • LATCHED places the driver commands in the latched mode, requiring an opposite direction command to turn off. (Suggested for pneumatic operation of Tilt / Recline when operating through a COM unit). • COMM allows immediate response of the relays – used with computers or communication devices. Also allows two relays to be closed at once (i.e., Forward & Right) for diagonal (veer) capability. ASM 1 (2) > OFF MOM MOTOR LATCHED COMM Auxiliary Seating Module: MOTION CONCEPTS HELIX BOX ONLY Replaces ECU12 / ECU34 when operating MC Seating through Driver Control. MOUSE > OFF 3 QUADRANT 4 QUADRANT Activates Wireless Mouse Emulation through the Driver Control. MOUSE SETTINGS>>> Invacare® MK6i™Electronics • OFF Disables that output (Recommended if no device is connected to it.). • MOM.MOTOR allows each driver command to operate in the momentary mode. • LATCHED places the driver commands in the latched mode. • OFF Disables mouse control for that drive. • 3 Quadrant: Forward toggles Mouse up / down. Right toggles Mouse left / right. Left = Mouse Click, Double Click, Latch. • 4 Quadrant: Up – Down – Left – Right Mouse Control. NOTE: Proportional Mouse Speeds controlled through PC Control Panel Digital Mouse Speeds programmed in Calibrations Menu. Refer to MK6i IR Control/Mouse Emulation owners's Operator and Programming Manual, part number 1160891. 36 Part No 1141471 MK6i Performance Adjustments LCD DISPLAY MOUSE AXES FORWARD > VERT REVERSE > R-CLK LEFT > L-CLK RIGHT > HORZ MOUSE B PERFORMANCE ADJUSTMENT DESCRIPTION Assigns / Re-Assigns driver control commands to desired mouse function. Available ONLY when 3 Quadrant Mode is selected. • Assignments are separate from driving axes selections. • To allow “Right Click” as a choice for a mouse axis: • Must have a 4 Quadrant Control. • Choose “3 QUADRANT” in Mouse mode set-up. • Reverse can then be set to “Right Click” if needed. • VERT = Mouse movement toggles between Up and Down. • R-CLK = Mouse Right Click. • HORZ = Mouse movement toggles between Left and Right. • L-CLK = Mouse Left Click. For MOUSE “B” adjustments refer to MOUSE, MOUSE SETTINGS and MOUSE AXES. • USB mouse associated with the RF Mouse Only Module for software versions 2.2 or higher. IR > OFF 3 QUADRANT 4 QUADRANT Activates Control of Infrared Devices Enabled from Calibrations menu. NO DRIVING > ON OFF Allows Driving to be turned off for that particular drive. LIGHT CONTROL > ON OFF Part No 1141471 • OFF Disables IR Control for that drive. • 3 Quadrant: Forward command disabled (Head Array Users can use back pad as head rest). Right = scrolls through Menu. Left = Selects Icon. • 4 Quadrant: Left – Right scroll through icons, Forward Command Selects Icon. • Eliminates driving to dedicate that drive to another activity. • Helpful when performing multiple activities through the driver control to reduce choices users need to make. • Can be used to eliminate access to drives (until user is ready to add functions / features). Allows lights to be turned on/off through the drive control in that drive. 37 Invacare® MK6i™Electronics MK6i Performance Adjustments LCD DISPLAY VIEW/SCAN > ON OFF Invacare® MK6i™Electronics PERFORMANCE ADJUSTMENT DESCRIPTION Allows Scanning to be turned off or on for that particular drive. • • • • • • • Available on the MK6i Display only. Scanning Modes (Row column, Sequential, Enhanced) are chosen in the “Calibrations” menu. Particular drives to be scanned are chosen here. When scanning in “Sequential” mode, it can be helpful to limit the number of drives scanned. Any driver command will initiate scanning. Any driver command will select highlighted icon. Scanning will return to resting mode after 3 cycles. 38 Part No 1141471 MK6i Standard Programs MK6i Standard Programs 12.1 Standard Program Descriptions STANDARD PROGRAM INDOOR JOYSTICK AVE MODERATE OUTDOOR SPEED/LEVEL TERRAIN RAMPS & CURBS MODE INDOOR LEARNER VERY SLOW DRIVING MEC TYPE Proportional Proportional Proportional Proportional Proportional Proportional Proportional LEARNER 3 SPD MOM ASL INDOOR / LEARNER ASL OUTDOOR/FASTER LEARNER SIP & PUFF VERY SLOW 1SPD S&P LEARNER 1500 RIM Digital Digital Digital Digital Digital Digital Part No 1141471 DESCRIPTION Average joystick user – an Indoor program (FACTORY SETTING DRIVE 1) Medium speed for rougher terrain (FACTORY SETTING DRIVE 2) High speed program for flat level surfaces (FACTORY SETTING DRIVE 3) Medium Speed with High Power & High Torque (FACTORY SETTING DRIVE 4) Slow settings for Indoor learning Slowest driving standard program A Program with Sensitivity & Acceleration settings already softened. Ideal for Micro extremity & Mini Proportional Joysticks A Momentary switch (non-proportional) program with 3 forward & 1 reverse speed A Momentary switch (non-proportional) program ideal for drivers new to ASL systems A Momentary switch program ideal for drivers experienced with ASL systems A Learning Program for SIP N Puff in Momentary Mode A Slow Program for SIP N Puff with 1 latched forward speed A Learning Program for the RIM Head Control 39 Invacare® MK6i™Electronics MK6i Standard Programs Invacare® MK6i™Electronics MOD. OUTDOOR SPEED LEVEL TERRAIN RAMPS & CURB VERY SLOW DRIVING MEC INDOOR LEARNER ASL INDOOR ASL OUTDOOR SNP LEARNER LEARNER 3 SPEED MOM VERY SLOW 1 SPEED SNP LEARNER 1500 RIM FORWARD SPEED FORWARD ACCEL FORWARD BRAKING REVERSE SPEED REVERSE ACCEL REVERSE BRAKING TURN SPEED TURN ACCEL TURN BRAKING TREMOR DAMP POWER LEVEL TORQUE (OHMS) TRACTION INDOOR JOYSTICK AVE. MK660 W/ACC (2-POLE MOTORS) STANDARD VALUES (RWD: POWER TIGER) 45 20 50 30 20 55 12 15 40 35 100 144 0 75 25 50 30 25 55 20 20 45 35 100 144 0 95 20 50 30 20 55 20 20 45 35 100 144 0 50 15 60 25 20 60 15 15 60 35 100 156 0 15 20 50 15 20 55 15 15 40 35 100 144 0 25 20 50 12 20 50 15 15 40 35 100 144 0 30 20 50 12 20 50 15 15 40 35 100 144 0 20 20 50 12 20 50 15 15 40 35 100 144 0 40 20 50 12 20 50 15 15 40 35 100 144 0 30 20 50 12 20 55 15 15 40 35 100 144 0 30 20 50 12 20 50 15 15 40 35 100 144 0 15 20 50 12 20 50 15 15 40 35 100 144 0 30 20 50 12 20 50 15 15 40 35 100 144 0 40 Part No 1141471 MK6i Standard Programs Part No 1141471 MOD. OUTDOOR SPEED LEVEL TERRAIN RAMPS & CURB VERY SLOW DRIVING MEC INDOOR LEARNER ASL INDOOR ASL OUTDOOR SNP LEARNER LEARNER 3 SPEED MOM VERY SLOW 1 SPEED SNP LEARNER 1500 RIM FORWARD SPEED FORWARD ACCEL FORWARD BRAKING REVERSE SPEED REVERSE ACCEL REVERSE BRAKING TURN SPEED TURN ACCEL TURN BRAKING TREMOR DAMP POWER LEVEL TORQUE (OHMS) TRACTION INDOOR JOYSTICK AVE. MK660 A/ACC (2-POLE MOTORS) STANDARD VALUES (CWD: TDX SPREE, TDX SC, PRONTO M71) 45 20 50 35 20 45 15 15 35 35 100 144 0 75 20 50 35 20 55 20 20 45 35 100 144 0 95 20 50 45 20 55 20 20 45 35 100 144 0 50 15 50 25 20 45 12 15 25 35 100 156 0 15 20 50 15 20 55 12 15 35 35 100 144 0 30 20 50 25 20 50 15 15 35 35 100 144 0 30 20 50 20 20 50 15 15 35 35 100 144 0 20 20 50 15 20 50 15 15 35 35 100 144 0 35 20 50 20 20 50 12 15 35 35 100 144 0 35 30 50 15 20 55 15 15 35 35 100 144 0 35 20 50 20 20 50 12 12 35 35 100 144 0 20 30 50 15 20 55 15 35 35 35 100 144 0 30 20 50 20 20 50 15 15 35 35 100 144 0 41 Invacare® MK6i™Electronics MK6i Standard Programs Invacare® MK6i™Electronics EURO-M61 (2) SPREE/SC/M71 (2) RWD-2P (1) FORWARD SPEED FORWARD ACCEL FORWARD BRAKING REVERSE SPEED REVERSE ACCEL REVERSE BRAKING TURN SPEED TURN ACCEL TURN BRAKING TREMOR DAMP POWER LEVEL TORQUE (OHMS) TRACTION M51/M61 (2) MK660 W/ACC AND SPJ+ JOYSTICK (2-POLE MOTORS) STANDARD VALUES 95 25 95 25 95 20 95 20 50 40 25 55 25 30 30 35 100 144 0 80 40 25 55 25 30 30 35 100 144 0 50 35 20 55 20 20 45 35 100 144 0 55 35 25 55 20 15 35 35 100 144 0 42 Part No 1141471 MK6i Standard Programs Part No 1141471 MOD. OUTDOOR SPEED LEVEL TERRAIN RAMPS & CURB VERY SLOW DRIVING MEC INDOOR LEARNER ASL INDOOR ASL OUTDOOR SNP LEARNER LEARNER 3 SPEED MOM VERY SLOW 1 SPEED SNP LEARNER 1500 RIM FORWARD SPEED FORWARD ACCEL FORWARD BRAKING REVERSE SPEED REVERSE ACCEL REVERSE BRAKING TURN SPEED TURN ACCEL TURN BRAKING TREMOR DAMP POWER LEVEL TORQUE (OHMS) TRACTION INDOOR JOYSTICK AVE. MK690 OR MK690ACC MOTORS STANDARD VALUES (RWD: STORM, TORQUE3, TORQUE SP, RANGER X) 45 20 50 30 20 55 15 15 40 35 100 36 0 75 20 50 30 25 55 20 20 45 35 100 36 0 95 20 50 30 20 55 25 20 45 30 100 36 0 50 15 60 25 20 60 15 15 60 35 100 48 0 15 20 50 15 20 55 10 15 35 35 100 48 0 25 15 50 18 15 55 12 15 45 40 100 44 0 30 20 50 25 20 55 12 15 40 35 100 36 0 15 20 50 15 20 55 10 20 40 35 100 48 0 35 20 50 15 20 55 12 15 40 35 100 40 0 25 20 50 15 20 55 18 50 35 35 100 40 0 30 20 50 15 20 55 12 15 40 35 100 40 0 16 20 50 15 20 55 16 25 35 35 100 40 0 30 20 50 15 20 55 12 15 40 35 100 36 0 43 Invacare® MK6i™Electronics MK6i Standard Programs MOD. OUTDOOR SPEED LEVEL TERRAIN RAMPS & CURB VERY SLOW DRIVING MEC INDOOR LEARNER ASL INDOOR ASL OUTDOOR SNP LEARNER LEARNER 3 SPEED MOM VERY SLOW 1 SPEED SNP LEARNER 1500 RIM FORWARD SPEED FORWARD ACCEL FORWARD BRAKING REVERSE SPEED REVERSE ACCEL REVERSE BRAKING TURN SPEED TURN ACCEL TURN BRAKING TREMOR DAMP POWER LEVEL TORQUE (OHMS) TRACTION INDOOR JOYSTICK AVE. MK690 OR MK690ACC MOTORS STANDARD VALUES (CWD: TDX SP, PRONTO M91) 45 20 45 30 20 45 15 15 35 35 100 36 0 75 20 35 35 20 55 20 20* 45 35 100 36 0 95 20 40 40 20 55 20 20* 45 35 100 36 0 50 10 45 25 20 45 12 15 35 40 100 48 0 15 20 50 15 20 55 8 15 35 35 100 48 0 20 10 50 10 15 55 10 10 45 50 100 42 0 30 20 50 25 20 50 12 15 35 40 100 36 0 15 25 50 11 20 55 11 15 35 35 100 36 0 32 20 50 15 20 55 11 12 35 35 100 40 0 25 25 50 15 20 55 12 15 35 35 100 48 0 30 20 50 21 50 55 11 12 35 35 100 36 0 15 25 50 15 20 55 11 15 35 35 100 48 0 30 20 50 25 20 50 12 15 35 45 100 36 0 NOTE: On M91™ wheelchairs this value is 15. Invacare® MK6i™Electronics 44 Part No 1141471 MK6i Standard Programs Part No 1141471 INDOOR LEARNER INDOOR AVERAGE MOD OUTDOOR SPEED LEVEL TERRAIN RAMPS AND CURBS MICRO PROPORTIONAL LEARNER 1500 RIM ASL INDOOR ASL OUTDOOR SNP LEARNER VERY SLOW 1 SP SNP LEARNER 3 SPEED DIGITAL SPJ+ FORWARD SPEED FORWARD ACCEL FORWARD BRAKING REVERSE SPEED REVERSE ACCEL REVERSE BRAKING TURN SPEED TURN ACCEL Turn Decel TREMOR DAMP POWER LEVEL TORQUE (OHMS) TRACTION VERY SLOW 2- POLE CWD TDX SI AND TDX SI HEAVY DUTY 15 20 45 10 20 45 10 10 40 30 100 88 0 30 20 45 15 20 45 12 12 40 30 100 88 0 45 20 45 20 20 45 15 15 40 30 100 88 0 75 20 45 30 20 45 20 20 50 30 100 80 0 95 20 50 35 20 45 25 20 50 30 100 80 0 40 15 55 20 20 45 15 15 45 30 100 80 0 25 15 45 15 20 45 10 12 40 30 100 88 0 30 20 45 15 20 45 12 12 40 30 100 88 0 20 20 45 10 20 45 12 10 40 30 100 88 0 35 20 45 15 20 45 15 12 40 30 100 88 0 25 20 45 10 20 45 12 15 40 30 100 88 0 15 20 45 10 20 45 8 15 40 30 100 88 0 30 20 45 15 20 45 10 15 40 30 100 88 0 95 20 50 35 20 45 20 20 50 30 100 80 0 45 Invacare® MK6i™Electronics MK6i Standard Programs Invacare® MK6i™Electronics 46 RWD 4P (1) CWD M91/SP CWD M91 HD (4) FORWARD SPEED FORWARD ACCEL FORWARD BRAKING REVERSE SPEED REVERSE ACCEL REVERSE BRAKING TURN SPEED TURN ACCEL TURN BRAKING TREMOR DAMP POWER LEVEL TORQUE (OHMS) TRACTION TDX 4P (5) MK690, MK690 W/ACC AND SPJ+ JOYSTICK STANDARD VALUES 95 20 50 40 20 55 25 15 40 35 100 32 0 95 20 47 25 15 55 25 15 23 35 100 32 0 95 20 50 50 20 55 20 25 30 35 100 32 0 95 20 50 40 20 55 20 20 20 40 100 36 0 Part No 1141471 MK6i Standard Programs Part No 1141471 MOD. OUTDOOR SPEED LEVEL TERRAIN RAMPS & CURB VERY SLOW DRIVING MEC INDOOR LEARNER ASL INDOOR ASL OUTDOOR SNP LEARNER LEARNER 3 SPEED MOM VERY SLOW 1 SPEED SNP LEARNER 1500 RIM FORWARD SPEED FORWARD ACCEL FORWARD BRAKING REVERSE SPEED REVERSE ACCEL REVERSE BRAKING TURN SPEED TURN ACCEL TURN BRAKING TREMOR DAMP POWER LEVEL TORQUE (OHMS) TRACTION INDOOR JOYSTICK AVE. MK6TT MOTORS STANDARD VALUES (RWD: STORM ARROW) 45 20 40 12 20 55 15 20 50 35 100 15 0 75 20 45 15 20 55 20 20 45 40 100 10 0 100 20 45 20 20 55 20 20 45 40 100 5 0 50 10 50 12 20 55 15 20 50 35 100 70 0 15 12 50 5 15 55 5 20 50 35 100 15 0 20 12 50 5 15 55 10 15 50 40 100 15 0 30 12 40 10 15 55 10 15 50 35 100 5 0 12 10 40 8 20 55 8 10 45 35 100 25 0 32 10 40 8 20 55 10 10 45 35 100 50 0 20 10 40 5 20 50 8 15 35 25 100 75 0 30 10 40 10 20 55 8 20 30 35 100 25 0 8 10 40 5 20 50 5 15 35 25 100 25 0 30 12 50 10 15 55 15 15 50 35 100 20 0 47 Invacare® MK6i™Electronics MK6i Standard Programs Invacare® MK6i™Electronics MOD. OUTDOOR SPEED LEVEL TERRAIN RAMPS & CURB VERY SLOW DRIVING MEC INDOOR LEARNER ASL INDOOR ASL OUTDOOR SNP LEARNER LEARNER 3 SPEED MOM VERY SLOW 1 SPEED SNP LEARNER 1500 RIM FORWARD SPEED FORWARD ACCEL FORWARD BRAKING REVERSE SPEED REVERSE ACCEL REVERSE BRAKING TURN SPEED TURN ACCEL TURN BRAKING TREMOR DAMP POWER LEVEL TORQUE (OHMS) TRACTION INDOOR JOYSTICK AVE. MK6TT MOTORS STANDARD VALUES (CWD: TDX SR) 45 20 40 15 20 55 18 20 50 35 100 15 0 75 20 45 20 20 55 20 20 45 40 100 10 0 100 20 45 20 20 55 22 20 45 40 100 5 0 50 10 50 15 20 55 18 20 50 35 100 75 0 15 12 50 5 15 55 5 20 50 35 100 15 0 20 12 50 5 15 55 8 15 50 40 100 15 0 30 12 40 5 15 55 10 15 50 35 100 5 0 8 15 45 5 20 50 5 15 35 25 100 75 0 32 10 40 5 20 55 10 15 30 35 100 75 0 20 15 45 5 20 50 5 15 35 25 100 75 0 30 10 40 10 20 55 8 20 30 35 100 75 0 5 15 45 4 20 50 5 15 35 25 100 75 0 30 10 40 10 20 55 8 15 30 35 100 50 0 48 Part No 1141471 MK6i Standard Programs Part No 1141471 MOD. OUTDOOR SPEED LEVEL TERRAIN RAMPS & CURB VERY SLOW DRIVING MEC INDOOR LEARNER ASL INDOOR ASL OUTDOOR SNP LEARNER DIGITAL 3 SPEED VERY SLOW 1 SPEED SNP LEARNER 1500 RIM SPJ+ FORWARD SPEED FORWARD ACCEL FORWARD BRAKING REVERSE SPEED REVERSE ACCEL REVERSE BRAKING TURN SPEED TURN ACCEL TURN BRAKING TREMOR DAMP POWER LEVEL TORQUE (OHMS) TRACTION INDOOR JOYSTICK AVE. 2 POLE SSD MOTORS STANDARD VALUES (FWD: FDX) 45 20 45 20 20 45 15 15 20 35 100 80 0 75 20 45 30 20 45 20 20 60 35 100 80 0 95 20 45 30 20 45 20 20 65 35 100 80 0 40 15 60 20 20 45 15 15 60 35 100 100 0 15 20 45 10 20 45 8 10 40 40 100 92 0 25 15 45 10 20 45 10 12 40 40 100 88 0 30 20 45 15 20 45 12 12 40 40 100 88 0 18 20 45 10 20 45 8 10 40 40 100 100 0 35 20 45 15 20 45 12 12 40 40 100 100 0 25 20 45 15 20 45 12 10 30 30 100 100 0 30 20 45 10 20 45 12 15 30 30 100 100 0 15 20 45 10 20 45 8 10 40 30 100 100 0 30 20 45 15 20 45 12 12 40 40 100 88 0 95 20 45 30 20 45 20 20 65 35 100 80 0 49 Invacare® MK6i™Electronics MK6i Standard Programs Invacare® MK6i™Electronics MOD. OUTDOOR SPEED LEVEL TERRAIN RAMPS & CURB VERY SLOW DRIVING MEC INDOOR LEARNER ASL INDOOR ASL OUTDOOR SNP LEARNER DIGITAL 3 SPEED VERY SLOW 1 SPEED SNP LEARNER 1500 RIM SPJ+ FORWARD SPEED FORWARD ACCEL FORWARD BRAKING REVERSE SPEED REVERSE ACCEL REVERSE BRAKING TURN SPEED TURN ACCEL TURN BRAKING TREMOR DAMP POWER LEVEL TORQUE (OHMS) TRACTION INDOOR JOYSTICK AVE. 4 POLE SSD MOTORS STANDARD VALUES (FWD: FDX) 45 20 40 15 20 60 12 15 35 40 100 36 0 75 20 40 20 20 55 15 20 45 35 100 36 0 95 20 40 25 20 55 15 20 45 35 100 36 0 30 15 45 15 20 60 12 15 35 40 100 48 0 15 20 50 10 20 60 6 15 35 40 100 48 0 25 15 50 15 10 60 10 10 45 40 100 40 0 30 20 45 15 20 60 10 15 35 40 100 40 0 18 25 45 10 20 55 6 20 45 45 100 40 0 30 25 50 15 20 55 8 20 45 45 100 40 0 25 30 50 15 20 55 8 15 45 45 100 44 0 30 30 50 15 20 55 8 20 45 45 100 44 0 15 30 50 10 20 55 6 15 45 45 100 44 0 30 20 45 15 20 60 10 15 35 40 100 40 0 95 20 40 25 20 55 12 20 45 35 100 36 0 50 Part No 1141471 Using the Memory Card Using the Memory Card 13.1 Description The memory card allows programming parameters to be transferred from the power wheelchair to files on the memory card, where the parameters can be stored or organized. These parameters can be transferred to other wheelchairs as long as the motors, drive configurations, and driver controls are the same. The entire profile (all drives at once) may be saved or transferred. The individual drive profiles (1 through 4) may also be saved or transferred. 13.2 Basic Memory Card ‘ MK6I PROGRAMMING PARAMETER D1 D2 SPEED 100 100 RESPONSE 100 100 PERFORMANCE ADJUST >>> STANDARD PROGRAMS >>> MEMORY CARD >>> POWERED SEATING >>> CALIBRATIONS >>> DIAGNOSTICS >>> Features of the basic memory card: • Standard on delivery with all power wheelchairs with rehab (expandable) driver controls. • Only used to backup/restore programmed settings/adjustments for one wheelchair. • Does not contain advanced diagnostics, help screens, software updates, or file structure. • Not compatible with SPJ+ joysticks. 13.3 Professional Memory Card D3 100 100 D4 100 100 Features of the professional memory card: • Standard with all MK6i programmers. • Available with the USB card reader. • Contains advanced diagnostics, help screens, software updates, and file storage/retrieval. • Not compatible with SPJ+ joysticks. Part No 1141471 51 Invacare® MK6i™Electronics Using the Memory Card 13.4 Using the Basic Memory Card Card Slot Card Slot The basic memory card is recommended for storing a backup copy of final programming settings. This card can be attached to the wheelchair or left with the user. If the display or driver control need exchanging, the memory card serves to restore the original settings. Additional backup copies of the program values can be saved to the professional memory card. For the basic memory card to restore final program settings, the file name (system name) on the card MUST match the system name of the MK6i Display or the MK6i Joystick. To change the system name of the display or the joystick, Refer to System name on page 64. Display Display Mode Button SELECT Key To use the basic memory card: 1. Insert the basic memory card into the card slot of the MK6i display or driver control. 2. Turn the wheelchair On. 3. Use the joystick (forward/reverse) or display (up/down arrows) to select: • STORE TO CARD - Create a back up file. • READ FROM CARD - Restore programming settings. 4. Press one of the following to begin storing or reading: • Display - Press the Select key. • CMPJ+, PSR or PSF joysticks and Mini-Display- Press the mode button. • nXc Joystick - Push the On/Off/Mode switch up. Invacare® MK6i™Electronics Mini-Display Display For this procedure, refer to FIGURE 13.1. CMPJ+ Joystick nXc Joystick Card Slot Card Slot Mode Button On/Off/ Mode Switch Joystick Joystick FIGURE 13.1 Using the Basic Memory Card 52 Part No 1141471 Using the Memory Card 13.5 Using the Professional Memory Card Updating the Professional Memory Card 1. 2. 3. 4. 5. 6. 7. 8. 9. 10. Go to www.invacare.com. Log into the website. Click Technical Zone. Click Software Downloads under the Diagnostics heading. Download the MK6i Software Update and save to your desktop. Insert the MK6i professional memory card into a SD card reader and plug the card reader into the USB port of your computer. Open the MK6i update folder. Open the “MK6_ver X.X Update.exe” file. Select (highlight) the drive location of the professional memory card when prompted. Select “OK” and the card will automatically be updated. Updating MK6i Software 1. 2. 3. 4. 5. 6. Ensure the wheelchair is Off. Insert the updated professional memory card into the card slot of the MK6i display or the CMPJ+ joystick. Turn the wheelchair On. The screen shows “Firmware X.X.X is Available.” Perform one of the following: • MK6i Display - Press Save to begin the update process. • MK6i CMPJ+ Joystick - Press the Mode Switch to begin the update process. The screen shows: • “Erasing” followed by a progress bar. • “Programming” followed by a progress bar. After programming is complete, the screen shows one of the following: • MK6i Display - the first screen for using the Display as a programmer. • MK6i CMPJ+ Joystick - the first screen for Through the Joystick Programming. Part No 1141471 53 Invacare® MK6i™Electronics Using the Memory Card Saving or Installing a Drive Program, a System or a Seating Profile 1. 2. 3. 4. 5. 6. For this procedure, refer to FIGURE 13.2 on page 55. Insert the professional memory card into the MK6i display or driver control. Turn the wheelchair on. Select MEMORY CARD on the menu. Select the desired profile: • DRIVE PROGRAM- An individual drive for performance adjustments only. • SYSTEM - All four drives for performance adjustments and powered seating. • SEATING CONTROL - An individual drive for powered seating programming. Select the desired action: • SAVE - Transfers files to the memory card. • READ - Transfers files to the power wheelchair. Perform one set of the following steps based on the selection from step 4: • SYSTEM is selected i. Select FOLDER to display the selected folder from a list of folders to save to or read from. ii. Press Select (display) or the mode button (joysticks) to select a folder. iii. Select NAME to display/change the current system name (if saving) or to display a list of all system names in the folder (if reading). iv. Press Select (display) or the mode button (joysticks) to select a system. v. Select START to begin the reading or saving process. • DRIVE PROGRAM or SEATING CONTROL is selected i. Use the Select key (display) or the mode button (joysticks) to select the desired drive to save to or read from. ii. Select FOLDER to display the selected folder from a list of folders to save to or read from. iii. Press Select (display) or the mode button (joysticks) to select a folder. iv. Select NAME to display the current drive or seating profile name (if saving) or to display a list of all drives or seating profile names in the folder (if reading). v. Press Select (display) or the mode button (joysticks) to select a system. vi. Select START to begin the reading or saving process. Invacare® MK6i™Electronics 54 Part No 1141471 Using the Memory Card FIGURE 13.2 Professional Memory Card Saving and Installing Flow Chart Part No 1141471 55 Invacare® MK6i™Electronics Powered Seating Powered Seating 14.2 Powered Seating Menu 14.1 Main Menu ‘ nXc Joystick Only - The nXc joystick will display only one programable drive. MK6I PROGRAMMING PARAMETER D1 D2 SPEED* 100 100 RESPONSE* 100 100 PERFORMANCE ADJUST >>> STANDARD PROGRAMS >>> MEMORY CARD >>> POWERED SEATING >>> CALIBRATIONS >>> DIAGNOSTICS >>> D3 100 100 MK6I PROGRAMMING D1 D2 DRIVE LOCK OUT ON ON ACT CONTROL 4SW 4SW ACT CTL STD PRGM NONE NONE ACTUATOR SELECT >>> SEATING ADJUST >>> D4 100 100 D3 ON 4SW NONE D4 ON 4SW NONE *NOTE: Parameter is not available for programing on the nXc joystick. 14.3 Drive Lock Out Allows choice for Drive Lock Out to be enabled or disabled in individual drives. DRIVE LOCKOUT > ON OFF • Select On to enable drive lockout for the selected drive. • Not available for SPJ+ joysticks. • To disable drive lock out on conventional single actuator systems, choose “OFF” under <ACC DCI> in the calibrations menu. 14.4 Actuator Control An actuator control setting MUST be selected to operate powered seating through the driver control. The actuator control menu determines the method for operation of actuators through a driver control that is accessed through a mode switch or stand-by select. Invacare® MK6i™Electronics 56 Part No 1141471 Powered Seating This menu appears only when there is a multiple actuator interface box or SANODE installed on the seating system. ACTUATOR CONTROL OFF > 4-SWITCH LATCH. 4SW 4 SW-2 LEVELS 4SWL-2 LEVELS MOM.1SW LATCH.1SW CAPS • OFF - disables driver control operation of the powered seating for that drive only. • 4 SW - Directions of driver command mirror Actuator Selection choices; Momentary mode. • LATCH 4 SW - Same as 4 SW, but in latched mode. First command initiates actuators, repeated command stops actuator. • 4 SW - 2 Levels - Recommended for head Controls in RIM mode. Dedicates left and right commands while turning off forward (occipital pad) command. • Mode Switch activates level 1, then level 2 • Level 1 - Left driver command = Forward actuator selection, Right driver command = Reverse actuator selection. • Level 2 - Left drive command = Left actuator selection, Right driver command = Right actuator selection. • Standby Select bypasses mode switch requirement and allows Left command (held down) to cycle through each level. • Level 1 - Forward - Reverse actuator selections • Level 2 - Left - Right actuator selections • MOM.1SW - Intended primarily for Head Control drivers operating with RIM. • Mode switch cycles through each actuator selection choice. Right command operates selected choice. • Standby Select allows left command (held down) to cycle through each actuator selection choice. Right command operates selected actuator (Momentary Mode). • LATCH.1SW - Right command operates the actuators in a latched mode. The first command activates, repeated command releases. • CAPS (Cycling Actuators with Powered Seating) - displays only one actuator (large icon) on the display screen at a time. • 4 Quadrant Mode • Left and Right driver control commands cycle through available actuators. • Forward driver control command operates the actuator toward upright position. • Reverse driver control command operates the actuator in the opposite direction. • 3 Quadrant Mode: • Left command cycles through available actuators. • Right command operates actuator in toggle (up/down) mode. Part No 1141471 57 Invacare® MK6i™Electronics Powered Seating 14.5 Actuator Control Standard Program STD PRG NONE TRLE TRL TR TE T-ONLY TL RL E-ONLY L-ONLY • • • • Invacare® MK6i™Electronics Allows Pre set Actuator Selection Choices assigned to specific joystick quadrants. Selections can be customized using the actuator selection. i.e. Tilt Only: Forward = Tilt UP, Reverse = Tilt DOWN, Left & Right = OFF, etc. To view pre-set assignments for quadrant directions of the different standard programs, Refer to 4w sTD pgM on page 70. 58 Part No 1141471 Powered Seating 14.6 Actuator Selection Actuator Functions The actuator selection menu allows each quadrant (button) of the 4-way switch to be assigned to a specific actuator function. Operating the powered seating through the driver control will mirror actuator selection configured for that drive. An actuator selection MUST be made for at least one quadrant to operate the actuator through the driver control. Each actuator function listed below has a choice for U/D (Up/Down), Up or Down and corresponding icons. • • • • • • • • Select an individual quadrant in an individual drive by highlighting only that function or select the same quadrant for all drives by highlighting the entire row. This is an example of the types of actuator functions that could be assigned to each direction in the Actuator Selection Menu: Display Icons Tilt Operation Actuator Selection Menu >> FWD REV LT RT TILT RECL LEGS ELEVATE RIGHT LEG LEFT LEG R&Lg (Recline & Legs) GENERIC (using the Controller actuator) Recline Operation TILT U/D RECLINE & LEGS U/D ELEVATE UP ELEVATE DOWN Center Leg Operation Right Leg Operation Left Leg Operation Elevate Operation Shark Power Module Actuator Operation Part No 1141471 59 Invacare® MK6i™Electronics Powered Seating Example Screens: Actuator Operation - Monocrome Display and MPJ+ Joystick 4 Switch Mode Through The Driver Control Conventional Actuator Smart Actuators Display MPJ+ Display MPJ+ Example Screens: Actuator Operation - Color MPJ+/nXc Joysticks and Mini-Display 4 Switch Mode Through The Driver Control Invacare® MK6i™Electronics Smart Actuators 60 Conventional Actuator Part No 1141471 Powered Seating 14.7 Seating Adjust The Seating Adjust menu allows the assignment of the maximum angles and the speed of the actuators. Automatic positioning programs are also set from this menu. SEATING ADJUST TILT ADJUST RECLINE ADJUST LEGS ADJUST RIGHT LEG ADJUST LEFT LEG ADJUST LEFT AP PROGRAM RIGHT AP PROGRAM >>> >>> >>> >>> >>> >>> >>> Adjusting the Actuators ADJUSTMENT OPTIONS When adjusting Smart Actuators note the following: • Only Tilt, Recline and Center Mount Legs are available with Smart Actuators. • Only Smart Actuators allow programming Max Up or Down Angles. Part No 1141471 TILT ADJUST SPEED UP SPEED DOWN MAX UP ANGLE (SMART ACTUATORS) MAX DOWN ANGLE (SMART ACTUATORS) RECLINE ADJUST SPEED UP SPEED DOWN MAX UP ANGLE (SMART ACTUATORS) MAX DOWN ANGLE (SMART ACTUATORS) LEGS ADJUST SPEED UP SPEED DOWN MAX UP ANGLE (SMART ACTUATORS) MAX DOWN ANGLE (SMART ACTUATORS ONLY) RIGHT LEG ADJUST SPEED UP SPEED DOWN LEFT LEG ADJUST SPEED UP SPEED DOWN 61 Invacare® MK6i™Electronics Powered Seating Automatic Positioning The LEFT AP PROGRAM and RIGHT AP PROGRAM are used to set Automatic Positioning. Automatic Positioning is a program for a set of actuators to move to a desired position with a single driver command. • Only Smart Actuators can be programmed in Automatic Positioning. • Each program (sequence) can have up to 6 steps. There are two programs (sequences) available for Automatic Positioning settings: • Left AP Program - Sets the sequence for tilting and/or reclining back and is ALWAYS a left driver command. • Right AP Program - Sets the sequence for returning to an upright sitting position and is ALWAYS a right driver command. The Right AP Program can be in a different sequence than the Left AP Program. • Different automatic positioning programs can be set for each drive. • The actuator choices for AP Programs are: • • • • • 1. 2. 3. 4. 5. 6. NONE TILT RECLINE LEG RECLINE AND LEGS MK6I PROGRAMMING Select POWERED SEATING > SEATING ADJUST > LEFT AP PROGRAM. Highlight the desired drive or an entire row for the actuator and press Select. Make the actuator selection from the choices on the list and press Select. Highlight the desired drive or an entire row for the angle and press Select. Press Select again to accept the warning shown on the screen. Use the up and down arrow keys to operate the actuators. 7. 8. 9. . This will place the seat in the desired position. D1 D2 D3 1. ACTUATOR NONE NONE NONE D4 NONE 1. ANGLE 0 0 0 0 2. ACTUATOR NONE NONE NONE NONE 2. ANGLE 0 0 0 0 3. ACTUATOR NONE NONE NONE NONE 3. ANGLE 0 0 0 0 4. ACTUATOR NONE NONE NONE NONE 4. ANGLE 0 0 0 0 5. ACTUATOR NONE NONE NONE NONE 5. ANGLE 0 0 0 0 6. ACTUATOR NONE NONE NONE NONE 6. ANGLE 0 0 0 0 NOTE: To remove automatic positioning from a drive, set Actuator 1 to “NONE” for the left and the right in the AP Program Menu. Press select when the seat is in the desired position. Repeat STEPS 1-7 for additional actuators. Repeat STEPS 1-8 for the Right AP program to return the seat to the upright position. Invacare® MK6i™Electronics PARAMETER 62 Part No 1141471 Calibration Menu Calibration Menu 15.1 About Calibrations 15.3 Calibration Menu The Calibrations Menu appears on wheelchairs with CMPJ+, PSR or PSF joysticks or MK6i Display. CALIBRATIONS All calibrations are global. Any calibration saved to one drive, is automatically saved to all four drives. 15.2 Main Menu Screen shown to the right is for reference only. Speed and Response values may differ. MK6I PROGRAMMING SYSTEM NAME HARD PUFF CAL* DRIVE CONFIG SOFT PUFF CAL* MOTOR BALANCE HARD SIP CAL* CALIBRATE MOTORS SOFT SIP CAL* ACC 1 SPEED POT MAX* ACC 2 PACM ADJUST* TTJC ACTUATOR* DIG ATT ADJUST* ACC DCI TILT CALIBRATE* MONO PORT 1 RECLINE CALIBRATE* MONO PORT 2 C. MOUNT LEGS CAL* PARAMETER D1 D2 D3 D4 DISPLAY ORIENT* BACK ANGLE* SPEED 100 100 100 100 START IN DRIVE* RESPONSE 100 100 100 100 VIEW / SCAN* (MK6I DISPLAY ONLY) PERFORMANCE ADJUST >>> INIT TIME* AUDIBLE IND STANDARD PROGRAMS >>> REPEAT TIME* IR SETTINGS* MEMORY CARD >>> 4W STD PGM* PRS TIME POWERED SEATING >>> 4 WAY SWITCH ERASE ALL CALIBRATIONS >>> *NOTE: Calibration is not available for programing on the nXc joystick. DIAGNOSTICS >>> Part No 1141471 63 ATT PER OVERIDE Invacare® MK6i™Electronics Calibration Menu 15.4 Calibration Menu Description CALIBRATION LCD DISPLAY SYSTEM NAME SYSTEM NAME INVACARE_ DRIVE CONFIG DESCRIPTION Create the Name for the System’s Programming Settings • Name will be displayed on the Top Right corner of the MK6i Display. • Use the Programmer Left & Right Arrow keys to position the Insertion Point (“_”). • Use the Programmer Up and Down Arrow keys to change the letter / number. • Blank Spaces Not allowed. Name will end at that point. Switches motor outputs without switching motor connectors. Turning speed is modified to improve driving feel & control. Select the configuration to match the wheelchair. DRIVE CONFIG >>4P CWD M91 & SP 2P RWD 2P CWD 4P RWD 4P RWD HD 4P CWD TDX 4P CWD HD GB RWD GB CWD MOTOR BALANCE • The wheelchair will not perform as designed without the correct drive confiuration selected and saved. • This setting MUST be changed and saved each time a CMPJ+, PSR, PSF or Display is added or replaced. GB RWD and GB CWD are available only on the TDX - SR. G-Trac controller supports 4P CWD M91 & SP, 4P RWD, 2P-CWD, 2P-RWD and TDX-SI Ensures that left and right motors operate equally. MOTOR BALANCE 32 LEFT • Can be used to correct for slight veer (i.e. with some digital controls). RIGHT ||||||| Calibrates motors. MOTOR CALIBRATION • For Gearless Brushless GB™ motors only. • Raise / Support Drive wheels off the ground. • Follow Instructions on Programmer. Invacare® MK6i™Electronics 64 Part No 1141471 Calibration Menu CALIBRATION ACC FUNCTION (ON ALL WHEELCHAIRS EXCEPT FDX) LCD DISPLAY DESCRIPTION Sets which actuator operates directly through the controller, not through an additional actuator module. >>OFF TILT RECLINE • Allows display icons, programming options and drive lockout settings to match ELEVATE the chair configuration (i.e., tilt only, tilt and recline, etc.) LEG • Set according to this chart: NOTE: FDX With Conventional Actuators ONLY TILT actuator is assigned to ACC 1. ACC SETTINGS CONVENTIONAL SMART NOTE: TDX Spree ONLY - ELEVATE is assigned to No Actuators OFF OFF ACC 1. TILT is assigned to ACC 2. Tilt Only Tilt - In. Pwr Legs Tilt - Center Mount Legs Tilt and Elevate Tilt, Elevate, Center Mount Legs Tilt, Elevate, Ind. Pwr Legs Recline Only, Recline Ind. Pwr Legs Recline - Center Mount Leg Tilt Recline Tilt Recline CM Leg TTJC ACTUATOR NOTE: Not available on nXc joystick. Part No 1141471 TILT TILT LEG ELEVATE LEG ELEVATE RECLINE OFF OFF OFF ELEVATE ELEVATE ELEVATE OFF LEG OFF LEG OFF OFF OFF Through the Joystick Control. >>TILT RECLINE ELEVATE • Only present with Multiple Actuators and the SANODE. • Allows choice of operating only one actuator through the joystick if multiple actuators are in the system. 65 Invacare® MK6i™Electronics Calibration Menu CALIBRATION LCD DISPLAY ACC DCI >>OFF DESCRIPTION Determines Tilt Switch Function for the Actuator assigned to the ACC Controller (conventional Actuators and ACC Controllers only) Allows turning Drive Lock out OFF on Single Actuator Systems or setting how the Controller monitors the Drive Lockout Switch (only when Actuator is operating through the ACC of the Controller) Standard settings are: INVACARE MANUAL (OR CONTINUOUS) INVACARE POWER (OR LATCHING) MONO PORT 1 MONO PORT 2 DISPLAY ORIENT NOTE: Not available on nXc joystick. Invacare® MK6i™Electronics • OFF: Standard for IVC Tilt and Recline combination systems, any system w/ Power Center Mount Leg or Tilt w/Elevate and systems with smart actuators. Also allows disabling drive lockout for Conventional Single Actuator Systems • IVC Manual (Continuous): Drive Lockout switch status is continually monitored. Used with IVC Manual Tilt or Recline systems and some aftermarket Powered Seating Systems • IVC Power (Active): Formula CG Single Actuator powered seating systems MONO PORT 1 OFF >>DRIVE SELECT MODE SWITCH <ACTUATOR> UP/DOWN <ACTUATOR> UP <ACTUATOR> DOWN Assigns the Function of the Left Mono Port on the MK6i Display & Multiple Drive Joysticks. MONO PORT 2 OFF >>DRIVE SELECT MODE SWITCH <ACTUATOR> UP/DOWN <ACTUATOR> UP <ACTUATOR> DOWN Allows a second switch function in the Right Mono Port of the MK6i Display & Multiple Drive Joysticks. • Drive Select allows the mono switch to change Drives 1 through 4. • Mode/Reset allows the Switch to function as a reset switch. • <Actuator> Up/Down allows the switch to operate the actuator (up/down mode) when one actuator is connected to the system. • Mono Port 1 is the default if not using a “Y” cable (splitter). • If a second function is selected, a “Y” Splitter cable –Stereo to two mono – is required to access the second switch port or else a stereo switch (2 PB, 2 WT) may be used. Only available when CMPJ+, PSF or PSR is on the wheelchair. DISPLAY ORIENT NORMAL INVERTED • Choose Normal for CMPJ+ or PSF. • Choose Inverted for PSR. 66 Part No 1141471 Calibration Menu CALIBRATION LCD DISPLAY VIEW/SCAN NOTE: Not available on nXc joystick. STANDARD ENHANCED >>ROW/COLUMN SCAN SEQUENTIAL SCAN ENHANCED SCAN DESCRIPTION Selects view mode on MK6i Display. • When a scan mode is selected, only those drives with Auto Scan turned on in the performance adjustment menu will be active. • Each scan repeats 3 times. Standard View - All 4 Drives at once in grid format. Part No 1141471 67 Invacare® MK6i™Electronics Calibration Menu CALIBRATION LCD DISPLAY DESCRIPTION Enhanced View - One drive only in expanded view. VIEW/SCAN (CONTINUED) NOTE: Not available on nXc joystick. Row/Column Scanning • After initiating the scan with a driver command, each column is highlighted, one at a time. • Any driver command selects the column when it is highlighted. • A second driver command highlights individual icons in that column, one at a time. • A third driver command selects individual icons, placing the wheelchair in that active mode. Enhanced Scan • After initiating the scan with a driver command, each drive configuration, with all active icons, is displayed on the LCD, one at a time. • Any driver command selects the block (a drive and its icons) when it is highlighted. • A second driver command highlights individual icons in that block, one at a time. • A third driver command selects individual icons, placing the wheelchair in that active mode. Invacare® MK6i™Electronics 68 Part No 1141471 Calibration Menu CALIBRATION LCD DISPLAY DESCRIPTION Sequential Scan VIEW/SCAN (CONTINUED) NOTE: Not available on nXc joystick. • Each icon in the active drive is enlarged and displayed one at a time. • Any driver command selects the icon, placing the wheelchair in that active mode. INIT TIME NOTE: Not available on nXc joystick. INIT TIME .4S LESS MORE ||||| REPEAT TIME NOTE: Not available on nXc joystick. REPEAT TIME LESS .10S MORE Used to determine when scanning starts after the chair becomes idle, for instance after the chair is not driving or seating feature is stopped. • After repeating the scan 3 times, the chair will enter a resting mode. • Any driver command will initiate the scan again. Used to determine the amount of time the scanning screen will dwell on a highlighted item before moving to the next item. ||||| Part No 1141471 69 Invacare® MK6i™Electronics Calibration Menu CALIBRATION LCD DISPLAY 4W STD PGM NOTE: Not available on nXc joystick. TRLE TRL TR TE T-ONLY TL RL E-ONLY L-ONLY STANDARD PROGRAM DESCRIPTION The Standard Programs Menu allows the choice of preconfigured actuator selections (switch assignments) for operation of the 4-way toggle or Quad push buttons. • Selections can be customized using the 4 Way Switch Settings. SWITCH DIRECTION TILT-RECLINE-ELEVATE-LEGS FORWARD (TREL) REVERSE LEFT TILT-RECLINE-LEGS (TRL) TILT-RECLINE (TR) TILT-ELEVATE (TE) Invacare® MK6i™Electronics ACTION TILT UP/DOWN RECL & LEG UP/DOWN ELEVLATE UP/DOWN RIGHT LEGREST UP/DOWN FORWARD TILT UP/DOWN REVERSE RECLINE UP/DOWN LEFT LEGREST UP RIGHT LEGREST DOWN FORWARD TILT UP REVERSE TILT DOWN LEFT RECLINE UP RIGHT RECLINE DOWN FORWARD TILT UP REVERSE TILT DOWN LEFT ELEVATE UP RIGHT ELEVATE DOWN 70 Part No 1141471 Calibration Menu CALIBRATION 4W STD PGM NOTE: Not available on nXc joystick. LCD DISPLAY STANDARD PROGRAM TILT ONLY (T-ONLY) TILT-LEG (TL) RECLINE & LEGS (RL) ELEVATE ONLY (E-ONLY) POWER LEGS ONLY (L-ONLY) Part No 1141471 DESCRIPTION SWITCH DIRECTION FORWARD ACTION TILT UP REVERSE TILT DOWN LEFT OFF RIGHT OFF FORWARD TILT UP REVERSE TILT DOWN LEFT LEGREST UP RIGHT LEGREST DOWN FORWARD RECLINE & LEGS UP REVERSE RECLINE & LEGS DOWN LEFT LEGS UP RIGHT LEGS DOWN FORWARD ELEVATE UP REVERSE ELEVATE DOWN LEFT OFF RIGHT OFF FORWARD LEGS UP REVERSE LEGS DOWN LEFT OFF RIGHT OFF 71 Invacare® MK6i™Electronics Calibration Menu CALIBRATION 4 WAY SWITCH LCD DISPLAY 4-WAY SWITCH FWD REV LT RT HARD PUFF SOFT PUFF MIN HARD SIP S SOFT SIP NOTE: Not available on nXc joystick. || Invacare® MK6i™Electronics DESCRIPTION Allows customization of the operation of the 4 way switch to meet users needs. -TILT U/D -RECL & LEGS U/D -ELEVATE UP -ELEVATE DOWN • Select switch quadrant (FWD, etc.) to view list of choices. • Each actuator function listed below has a choice for U/D (Up/Down), Up or Down and corresponding icons. • OFF • TILT • RECL • LEG • ELEVATE • RIGHT LEG • LEFT LEG • RECL & LEG Calibrates pressures required to activate hard / soft, puff & sip of commands. HARD PUFF CAL. .70 MAX H • Separate screens for each of the 4 pressures. • Select command to calibrate. Follow instructions below. Save on completion. • GOAL: Separate “S” & “H” values sufficiently for easy distinction between Hard & Soft commands – AND set values low enough to assure they can be consistently achieved. Values should be between .10 and 1.28. • In a Hard calibration mode, use the up/down arrows to raise and lower the H value which MUST be met as the user puffs/sips. • In a Soft calibration mode, use the up/down arrow keys to raise and lower the S value, which MUST be met as the user puffs/sips. 72 Part No 1141471 Calibration Menu CALIBRATION LCD DISPLAY DESCRIPTION Instructions for Sip-n-Puff Calibration: HARD PUFF SOFT PUFF HARD SIP SOFT SIP (CONTINUED) NOTE: Not available on nXc joystick. 1. 2. 3. 4. 5. 6. 7. 8. Puff into the Sip-N-Puff tubing and see how far the bars light up to right. Use the up/down arrow keys to change the H value right or left to match the distance the bars moved. Ask the user to puff hard again to check for consistency reaching the set level. Once the user is consistent reaching the value being calibrated, use the Menu key to return to the menu and proceed to the next calibration (Soft Puff Calibration). Repeat STEPS 1-3 for the Soft Puff Calibration, setting the value low enough for easy distinction between a soft and hard puff. Repeat for Soft Sip calibration. Repeat for Hard Sip Calibration. Save changes. Additional Tips for Success • Teach the user to use their mouth muscles to create the pneumatic pressures, not their lungs or with exhaling. This helps teach that it is intra-oral pressure that makes Sip-n-Puff work, not lung capacity. • Eliminate excess pneumatic tubing on set-up of the system by mounting the interface box close to where the breath tube kit is mounted. The less volume of air the user has to move, the easier it is to activate. • Be certain to eliminate all possible leaks in the system with good connections - especially where the pneumatic straw is connected. • Teach the user to place the entire straw in their mouth to ensure a good seal. SPEED POT MAX Sets the point on the speed pot (CMPJ+, PSR or PSF) at which max speed is attained. SPEED POT MAX 77 • Generally set to 77 for CMPJ+ and 277 for PSR or PSF Part No 1141471 73 Invacare® MK6i™Electronics Calibration Menu CALIBRATION LCD DISPLAY TILT CALIBRATE TILT CALIBRATE RECLINE CALIBRATE MOVE DOWN CM LEGS CALIBRATE SET DOWN ANGLE NOTE: Not available on nXc joystick. MOVE UP SET UP ANGLE BACK ANGLE NOTE: Not available on nXc joystick. BACK ANGLE 95 START IN DRIVE NOTE: Not available on nXc joystick. START IN DRIVE >>LAST USED DRIVE 1 DRIVE 2 DRIVE 3 DRIVE 4 ATT PWR OVERRIDE NOTE: Not available on nXc joystick. ATT PWR OVERRIDE PACM6 ADJUST NOTE: Not available on nXc joystick. PACM6 ADJUST DIGITAL ATTENDANT CONTROL NOTE: Not available on nXc joystick. DIGITAL ATTENDANT CONTROL Invacare® MK6i™Electronics DESCRIPTION Calibrating Tilt, Recline or Center Mount Legs, requires a Pitch-Angle Gauge. > __° > __° • For Custom Actuators Only. 1. Select MOVE DOWN. 2. Use the down arrow key to tilt the system all the way. 3. Press the Select key. 4. Select SET DOWN ANGLE. 5. Measure the angle of the seat using the Pitch-Angle Gauge. 6. Use the arrow keys to set the SET DOWN ANGLE to the gauge measurement. 7. Repeat for MOVE UP and tilt the system all the way up. The angle of the back relative to the seat. • The back angle plus the tilt angle determines the drive lockout angle. • A value between 85° and 105°, typically set at 95°. • Only displayed with smart actuators on tilt only systems. Allows Setting the Drive Mode (1 through 4) the wheelchair powers up into. • RETURN TO LAST USED allows the wheelchair to power up into the drive it was in when last powered down. • DRIVE 1 allows the wheelchair to ALWAYS return to 1 when turned on. Allows Setting the Attendant Power Overide Mode. • ON, the wheelchiar can not be turned off unless the attendant control is also off. • OFF, the wheelchiar can be turned off regardless of the status of the attendant control. Provides access for programming all driving Performance Adjustment Settings for the Proportional Attendant Control. Provides access for programming all driving Performance Adjustment Settings for the Digital Attendant Control. 74 Part No 1141471 Calibration Menu CALIBRATION LCD DISPLAY AUDIBLE IND AUDIBLE IND > OFF STD RIM Part No 1141471 DESCRIPTION Available only on MK6i Display and Color MPJ+ Joystick only. Turns on auditory feedback (series of beeps to indicate the active mode). • OFF - No audible beeps. • STD - Audible beeps as follows: (no beeps when driving in reverse) Drive Mode is Active: 2 short beeps Remote Drive Select: 3 short beeps Drive Level is advanced: 1 short & 1 long = Drive 1 2 short & 1 long = Drive 2 3 short & 1 long = Drive 3 4 short & 1 long = Drive 4 RIM Mode: 1 long beep ECU: 1 long beep = ECU ONE 2 long beeps = ECU TWO 3 long beeps = ECU THREE 4 long beeps = ECU FOUR Powered Seating: 1 short beep = 4 switch mode or Automatic Positioning Mode 1 long & 1 short beep = Level 1 - 4 switch/2 level 1 long & 2 short beeps = Level 2 - 4 switch/2 level Standby Select Mode (or Sleep Mode): 1 very long beep • RIM = All STD beeps above, PLUS, continuous intermittent beeping when driving in reverse using RIM mode 4 long beeps = Pressure Relief Signal activated. (This occurs automatically, is not chosen when changing modes) • ASM1: 1 long beep • ASM2: 2 long beeps • IR mode: 1 long beep + 1 short beeps + 1 long beep • Mouse Mode: 1 long beep + 2 short beeps + 1 long beep 75 Invacare® MK6i™Electronics Calibration Menu CALIBRATION LCD DISPLAY PRS TIME PRS TIME 30 M LESS DESCRIPTION Pressure Relief Signal • Can be set from 0 to 60 minutes. • Requires a Mode Switch. • The PRS TIME menu sets a time for an audible warning (on Display only) that it is time to change positions. The Display will show PRESS RESET and the wheelchair will not operate until Reset is pressed. MORE |||||||| ERASE ALL IR SETTINGS>>> NOTE: Not available on nXc joystick. ERASE ALL allows the CMPJ+/Display settings to be set to the factory default standard programs. There is a confirmation screen that appears and a reminder to SET THE DRIVE CONFIGURATION (in the Calibration Menu) after the Erase All completes. If drive configuration is not set, the display will indicate “Please Set Drive Configuration”. To correct this condition, choose and save the appropriate Drive Configuration in the Calibrations menu. Refer to MK6i IR Control/Mouse Emulation owners's Operator and Programming Manual, part number 1160891. Invacare® MK6i™Electronics ERASE ALL 76 Part No 1141471 User Settings/Diagnostics User Settings/Diagnostics 16.1 User Settings Depress the mode button of the CMPJ+ joystick for 10 seconds and the User Settings screen will appear with four choices. Move the joystick forward or reverse to scroll through list. Move the joystick to the right to select a user setting. User Settings USER SETTINGS SET DATE AND TIME BATTERY VOLTAGE CONNECTED DEVICES Set Date and Time Battery Voltage Fault Codes Connected Devices • SET DATE AND TIME - Sets the clock on the color CMPJ+ joystick. Adds date and time stamp to error codes. • Move the Joystick Up or Down to change the highlighted value (hour, minute, AM/PM, month, day, year) • Move the joystick Right or Left to select a value or the Set icon. • Highlight the Set icon and move the joystick forward to enter new date and time. • BATTERY VOLTAGE - Displays current battery voltage. This is a diagnostic test a user can perform prior to a service call. • FAULT CODES - Displays time and date stamped fault codes. This information can be helpful to a provider prior to making a service call. • CONNECTED DEVICES - Displays device connections. Refer to Connected Devices on page 90. 16.2 Diagnostics Menu >> JOYSTICK STATUS FAULT LOG TILT ACTUATOR RECLINE ACTUATOR CM LEG ACTUATOR VERSION Part No 1141471 77 Invacare® MK6i™Electronics User Settings/Diagnostics Joystick Status The JOYSTICK STATUS menu displays joystick throw settings for each quadrant when actively moving the joystick inductive. DRIVE 1 INPUT FWD REV LEFT RIGHT 0 0 0 0 Fault Log A professional memory card is required in the MK6i Programmer to view error code and troubleshooting information. Fault codes in the Color MPJ+ Joystick are date and time stamped. The FAULT LOG displays a history of error codes, including those intentionally caused during factory testing. Highlighting the Error code and pressing the INFO key on the MK6i programmer will display Cause of Error code and troubleshooting steps to resolve the error. FAULT LOG E32 E28 E04 E28 E09 E19 Clear Fault Log A professional memory card is required in the MK6i Programmer to view error code and troubleshooting information. Erases fault log list from view on the hand held programmer. Erased faults can still be viewed through MK6 IVS. CLEAR FAULT LOG E32 Invacare® MK6i™Electronics E28 E09 78 E19 Part No 1141471 User Settings/Diagnostics Tilt Actuator, Recline Actuator and CM Leg Actuator The TILT ACTUATOR, RECLINE ACTUATOR AND CM LEG ACTUATOR menu displays information about the actuators and allows actuator movement. • • • • • Smart actuators in the system will show position angle and amp draw. Conventional actuators connected to the ACC controller will not be displayed. Conventional actuators connected using an actuator module (e.g., TRAM (tilt recline actuator module) will show amp draw not position angle. POS - Displays the current position of the smart actuator. Pressing the Up or Down arrow keys on the programmer will move the actuator and display the position change and amp draw of the actuator. USE ARROWS TO MOVE TILT POS=__° AMPS=±0.0 Version The VERSION menu displays the software version of all components recognized in the MK6i System. VERSION TRAM 1.33 4WSB 1.33 MPJ+ 1.3.0 16.3 Diagnostic Codes MK6i SPJ+, MK6i SPJ+ w/PSS or MK6i SPJ+ w/ACC Joysticks The joystick information gauge and the Remote Programmer give indications of the type of fault or error detected by the control module. When a fault is detected, the wheelchair will stop and not drive. The lights on the information gauge display and/or service indicator light will flash. The number or type of flashes indicates the nature of an abnormal condition. An error code and a quick description of the fault will begin to scroll across the Remote Programmer display. If multiple faults are found, only the first fault encountered by the control module program will be displayed. Refer to the Power Wheelchair Service Manual for detailed troubleshooting and repair instructions. A table of the diagnostics codes and their causes follows. The fault log displays a four digit number. The first two digits are the diagnostic code and the remaining two digits are the sub code. Refer to the service manual for detailed descriptions. Part No 1141471 79 Invacare® MK6i™Electronics User Settings/Diagnostics INFORMATION GAUGE DISPLAY DIAGNOSTICS DESCRIPTION DISPLAY DEFINITION COMMENTS Information Gauge Display Invacare® MK6i™Electronics All LEDs are off. Power is off. All LEDs are on. Power is on. Fewer than three LEDs on implies reduced battery charge. Left RED LED is flashing. Battery charge is low. The batteries should be charged as soon as possible. Left to Right “chase” alternating with steady display. Joystick is in programming, inhibit and/or charging mode. The steady LEDs indicate the current state of the battery charge. All LEDs are flashing slowly. Joystick has detected Out-ofNeutral-at-Power-Up mode. Release the joystick back to Neutral. 80 Part No 1141471 User Settings/Diagnostics SERVICE INDICATOR LIGHT DIAGNOSTICS NUMBER OF FLASHES 1 2 DIAGNOSTICS CODE* E0100 E0200 ERROR CODE DESCRIPTION User Fault Battery Fault 3 4 5 6 7 E0300-E0308 E0400-E0408 E0500-E0504 E0600-E0604 E0700-E0702 Left Motor Fault Right Motor Fault Left Park Brake Fault Right Park Brake Fault Remote Fault 8 9 10 11 E0800-E0812 E0900-E0901 E1000 E1100 Controller Fault Communications Fault General Fault Incompatible/incorrect Remote Part No 1141471 POSSIBLE SOLUTION Release joystick to neutral and try again. Check the batteries and cable. Try charging the batteries. Batteries may require replacing. Check the left motor, connections and motor cable. Check the right motor, connections and motor cable. Check the left park brake connections and cable. Check the right park brake connections and cable. Check the communications bus, connections and wiring. Replace the remote. Check connections and wiring. Replace power module. Check connections and wiring. Replace Bus cable. Check all connections and wiring. Contact Invacare Technical Service. Wrong type of remote connected. Ensure the branding of the joystick matches that of controller unit. 81 Invacare® MK6i™Electronics User Settings/Diagnostics MK6i CMPJ+, MK6i Display, MK6i PSR and MK6i PSF CMPJ+, DISPLAY, PSR AND PSF ERROR CODE GROUPS ERROR CODE SECTION DESCRIPTION E01-E99 MK6 System E100-E299 Wxx Controller Warnings The MK6 CMPJ/Display generates these errors and encompasses features such as input devices, system integrity and device connections. The Motor Controller generates these errors. Warnings are normal operational conditions that warrant the operator’s attention. They are predominantly information. Icons display and text displays to represent different conditions. A serious fault condition is noted by a symbol on the display and a symbol on the CMPJ, PSR and PSF joysticks. In the following table, a stop sign is used to indicate a serious condition. When this symbol is displayed, a condition exists that will cause the wheelchair to not perform its expected function. A warning condition is noted by a symbol. Text will display that clarifies the condition that may cause a feature to perform in an unexpected manner. ERROR CODE E01 (FWD) E02 (REV) SYMPTOM JOYSTICK FAULT displays and the wheelchair does not drive. E03 (LFT) PROBABLE CAUSE The joystick or input device is sending a value outside of the reverse, forward, left or right limits. SOLUTIONS Replace joystick or input device. E04 (RGT) Invacare® MK6i™Electronics 82 Part No 1141471 User Settings/Diagnostics ERROR CODE SYMPTOM PROBABLE CAUSE E09 (LEFT) LEFT PARK BRAKE FAULT displays and wheelchair does not drive. Motor, Controller or other electrical device (Error code E9 or E10). E10 (RIGHT) RIGHT PARK BRAKE FAULT displays and wheelchair does not drive. Motor, Controller or other electrical device (Error code E9 or E10). E14 Battery Fault displays and the wheelchair does not drive. The controller has determined the batteries need to be replaced. Replace batteries. E18 NEUTRAL TESTING displays. The joystick neutral test has failed. Release the joystick and try to get the joystick back into the center-most position. E19 BAD JOYSTICK CAL VALUES displays and the wheelchair does not drive. The joystick calibration values are outside of the expected range. Recalibrate the joystick (joystick throw procedure). E28 CHARGER PLUGGED IN displays. Battery charger connected. Unplug battery charger from the wheelchair if charging is complete. E32 JOYSTICK TIMEOUT displays and the wheelchair does not drive Joystick or input device is disconnected. Turn off power, reconnect the joystick of input device and turn power on. E41 CONTROLLER STARTUP FAULT displays and the wheelchair drives slowly. The controller has determined a fault during a previous turn-off process. Turn the wheelchair off and back on. E102 GB GRNL FAULT Unidentifiable Error Call Technical Services. Part No 1141471 83 SOLUTIONS Ensure motor lock/levers are engaged before turning power on. Call Technical Services. Invacare® MK6i™Electronics User Settings/Diagnostics ERROR CODE SYMPTOM PROBABLE CAUSE SOLUTIONS E103 GB FAULT - CYCLE PWR Possible Controller Failure Turn chair off and then back on. If fault repeats, replace controller and recalibrate motors. E104-E105 GB CTRL FAULT Left Current Sensor Error Replace controller and recalibrate motors. E106-E107 GB CTRL FAULT Right Current Sensor Error Replace controller and recalibrate motors. E108-E109 CURR CAL FAULT Current Calibration Error No action required - Factory Test Only E110-E111 GB CTRL FAULT Left (on CWD)/Right (on RWD) Current Sensor Error Call Technical Services. Replace controller and recalibrate motors. E112-E113 GB CTRL FAULT Right (on RWD)/Left (on CWD) Current Sensor error Call Technical Services Replace controller and recalibrate motors. E114-E127 CURR CAL FAULT Current Calibration Error No action required - Factory Test Only E128 M2 MOTOR FAULT Left Motor (M2) (on RWD)/Right (on CWD) Over Current Fault Check Left Motor (M2) (on RWD)/Right (on CWD) and Cabling. E129 M1 MOTOR FAULT Right Motor (M1) (on RWD)/Left (on CWD) Over Current Fault Check Right Motor (M1) (on RWD)/Left (on CWD) and Cabling. E130, E132 M2 MTR CAL Left Motor (RWD)/Right Motor (CWD) - Too much drag/load Recalibrate motor. E131, E133 M1 MTR CAL Right Motor (RWD)/Left Motor (CWD) - Too much drag/load Recalibrate motor. E134-E139 SW FAULT Controller Software Fault Replace the controller. Call Technical Service. Invacare® MK6i™Electronics 84 Part No 1141471 User Settings/Diagnostics ERROR CODE SYMPTOM PROBABLE CAUSE SOLUTIONS E140, E141 CTLR PWR FAULT Check Joystick Cabling Check all connections for physical damage. Check Joystick and Joystick Cabling. E142 LOW BATTERY Low battery Recharge batteries. Replace batteries if not corrected after charging. E143 HI BATT VOLTS High Battery Fault Check Battery Voltage. Call Technical Service. E144 M2 MTR FAULT Left Motor (on RWD)/Right Motor (on CWD) brake coil short circuit Check Left Motor (M2) (on RWD)/Right Motor (on CWD) Cabling. E145 M1 MTR FAULT Right Motor (on RWD)/Left Motor (on CWD) brake coil short circuit Check Left Motor (M2) (on RWD)/Right Motor (on CWD) Cabling. E146-E150 GB CTRL FAULT GB Controller Failure Replace controller and recalibrate motors Call Technical Service E151, E152 M2 MTR FAULT Left Motor (on RWD)/Right Motor (on CWD) Hall Sensor Fault Check Left Motor (M2) (on RWD)/Right Motor (on CWD) Cabling. E153, E154 M1 MTR FAULT Right Motor (on RWD)/Left Motor (on CWD) Hall Sensor Fault Check Right Motor (M1) (on RWD)/Left Motor (on CWD) Cabling. E155, E157 GB CTRL FAULT Current Calibration Lost Turn chair off and then back on. If error repeats, replace controller and recalibrate motors. Part No 1141471 85 Invacare® MK6i™Electronics User Settings/Diagnostics ERROR CODE SYMPTOM PROBABLE CAUSE SOLUTIONS E156 MTR NOT CAL Motors not calibrated Recalibrate motors. E158-E160 GB CTRL FAULT Software error Turn chair off and then back on. If error repeats, replace controller and recalibrate motors. E161 GB CTRL FAULT GB Controller Fault Turn chair off and then back on. If error repeats, replace controller and recalibrate motors. E162-E164 GB CTRL FAULT Controller/Motor Short/Open Check all connections. E165-E171 GB CTRL FAULT Direct Input Joystick Fault Replace controller and recalibrate motors. E172, E174 M2 SHORT/OPEN Motor/Controller Short/Open M2, Right Motor (on RWD)/Left Motor (on CWD) Check all connections. E173, E175 M1 SHORT/OPEN Motor/Controller Short/Open M1, Left Motor (on RWD)/Right Motor (on RWD) Check all connections. E176 OVERHEAT Rollback - Battery Allow controller to cool off w/power on. E177 OVERHEAT Rollback - M2 Allow controller to cool off w/power on. Possible bad M2 motor (Right Motor on RWD, Left Motor on CWD). E178 OVERHEAT Rollback - M1 Allow controller to cool off with power on. Possible bad M1 motor (Left Motor on RWD, Right Motor on CWD). Invacare® MK6i™Electronics 86 Part No 1141471 User Settings/Diagnostics ERROR CODE SYMPTOM PROBABLE CAUSE SOLUTIONS E179 OVERHEAT Rollback - Controller temperature too high Allow controller to cool off w/power on. E180 SHORT TO FRAME Voltage on frame Check wiring for short to frame of chair. Replace controller and recalibrate motors. Replace motors. E181-E183 GB CTRL FAULT General type controller failure. Replace controller and recalibrate motors. E200 Controller not connected Input device does not recognize the controller. Turn chair off and then back on. If fault repeats, replace the cable from the Display or CMPJ+/PSF+/PSR+ to the controller. If fault repeats, replace Display or Joystick. If fault repeats, replace Controller. E201 General controller fault General controller fault Turn chair off and then back on If fault repeats, replace controller. E202 LEFT MOTOR FAULT displays Displayed when a problem with the left motor is detected. Left on RWD - Right on CWD Check motor lock engagement (clutch). Check motor connection plug. Verify left/right by switching motor plugs. If fault follows motor, replace motor. If fault does not follow motor, replace controller. and the wheelchair does not drive. Part No 1141471 87 Invacare® MK6i™Electronics User Settings/Diagnostics ERROR CODE SYMPTOM PROBABLE CAUSE SOLUTIONS RIGHT MOTOR FAULT Displayed when a problem with the right motor is detected. Right on RWD - Left on CWD Check motor lock engagement (clutch). Check motor connection plug. Verify left/right by switching motor plugs. If fault follows motor, replace motor. If fault does not follow motor, replace controller. REMOTE FAULT displays and This is displayed when the controller determines an incorrect configuration. Replace the controller. CONTROLLER FAULT This is displayed when the controller fails a power-up test. Replace the controller. E206 CONTROLLER WRONG REMOTE displays and the wheelchair does not drive. This is displayed when he controller has determined an invalid configuration. Check all connections and wiring. E207 CONTROLLER SETUP FAULT displays and the wheelchair does not drive. This is displayed when the controller module does not recognize the MK6 CMPJ+/Display as a valid device. Replace the controller. E208 G-TRAC FAULT is displayed The G-Trac module or controller is not functioning correctly. Replace the G-trac module and/or the controller. Please note that the chair will drive with this error displayed, however, the G-trac feature is disabled and the chair performs without the benefit of the G-Trac features. E203 displays and the wheelchair does not drive. E204 the wheelchair does not drive. E205 displays and the chair does not drive. Invacare® MK6i™Electronics 88 Part No 1141471 User Settings/Diagnostics ERROR CODE (None) SYMPTOM DEACTIVE displays and the wheelchair will not drive. PROBABLE CAUSE If the wheelchair has a TIAM and RIAM, this message is displayed when the Tilt angle, the recline angle or the combined tilt and recline angle are greater than 20° from fully upright (beyond the drive lock-out angle of 20°). SOLUTIONS Return the system to upright position. If the wheelchair has a TRAM or TIAM, this message is displayed when the tilt switch is open. (None) MAX BACK ANGLE displays. The wheelchair back has reached the maximum programmed back angle on a wheelchair with a TIAM, RIAM or TRAM. The wheelchair back will not go past the programmed maximum back angle. This is normal behavior. (None) CONTROLLER INHIBITED The system is tilted or reclined beyond the drive lock-out angle of 20°. Return the system to the upright position. displays and the wheelchair does not drive. Incorrect ACC DCI setting in the calibration menu. (None) SLOW DOWN is displayed and The elevating seat is elevated. the wheelchair drives slowly. Part No 1141471 89 Return elevating seat to the lowest position to drive at full speed. Invacare® MK6i™Electronics Connected Devices Connected Devices 17.1 Connected Devices 17.2 This screen is displayed if a Mode Select switch is depressed (held active) for 10 seconds. An icon representing all devices that are connected to the chair will be displayed. Display DISPLAY ICON MONOCHROME MPJ+ ICON Monochrome MPJ+ COLOR MPJ+/MINI-DISPLAY Color MPJ+/Mini-Display CONNECTED DEVICE DESCRIPTION Intelligent Tilt Actuator Intelligent Recline Actuator Intelligent Center Leg Actuator Elevate Actuator Generic Tilt Actuator Generic Recline Actuator Generic Leg Actuators Generic Right Leg Actuator Invacare® MK6i™Electronics 90 Part No 1141471Part No 1141471 Connected Devices DISPLAY ICON MONOCHROME MPJ+ ICON COLOR MPJ+/MINI-DISPLAY CONNECTED DEVICE DESCRIPTION Generic Left Leg Actuator Intelligent CG Tilt Shark Power Module (SPM) Actuator SANODE or Single Actuator Control Interface 4-way Switch Box Multiple Actuator Control Box RIM Control ECU 1/2 and ECU 3/4 Proportional Attendant Control Compact Joystick Sip and Puff Control Digital Attendant Control Micro Extremity Control Peachtree Control ASL Digital Control Part No 1141471 91 Invacare® MK6i™Electronics Connected Devices DISPLAY ICON MONOCHROME MPJ+ ICON COLOR MPJ+/MINI-DISPLAY CONNECTED DEVICE DESCRIPTION Generic Analog Control This is displayed if the controller supports G-Trac Mouse Only IR/Mouse Not Available Not Available Invacare® MK6i™Electronics Light Mode 92 Part No 1141471Part No 1141471 EMI Information EMI Information 18.1 Electromagnetic Interference (EMI) From Radio Wave Sources Powered wheelchairs and motorized scooters (in this text, both will be referred to as powered wheelchairs) may be susceptible to electromagnetic interference (EMI), which is interfering electromagnetic energy (EM) emitted from sources such as radio stations, TV stations, amateur radio (HAM) transmitters, two way radios, and cellular phones. The interference (from radio wave sources) can cause the powered wheelchair to release its brakes, move by itself, or move in unintended directions. It can also permanently damage the powered wheelchair's control system. The intensity of the interfering EM energy can be measured in volts per meter (V/m). Each powered wheelchair can resist EMI up to a certain intensity. This is called its "immunity level." The higher the immunity level, the greater the protection. At this time, current technology is capable of achieving at least a 20 V/m immunity level, which would provide useful protection from the more common sources of radiated EMI. There are a number of sources of relatively intense electromagnetic fields in the everyday environment. Some of these sources are obvious and easy to avoid. Others are not apparent and exposure is unavoidable. However, we believe that by following the warnings listed below, your risk to EMI will be minimized. The sources of radiated EMI can be broadly classified into three types: 1. Hand-held Portable transceivers (transmitters-receivers with the antenna mounted directly on the transmitting unit. Examples include: citizens band (CB) radios, “walkie talkie”, security, fire and police transceivers, cellular telephones, and other personal communication devices). Some cellular telephones and similar devices transmit signals while they are ON, even when not being used. 2. Medium-range mobile transceivers, such as those used in police cars, fire trucks, ambulances and taxis. These usually have the antenna mounted on the outside of the vehicle; and 3. Long-range transmitters and transceivers, such as commercial broadcast transmitters (radio and TV broadcast antenna towers) and amateur (HAM) radios. Other types of hand-held devices, such as cordless phones, laptop computers, AM/FM radios, TV sets, CD players, cassette players, and small appliances, such as electric shavers and hair dryers, so far as we know, are not likely to cause EMI problems to your powered wheelchair. Part No 1141471 93 Invacare® MK6i™Electronics EMI Information Powered Wheelchair Electromagnetic Interference (EMI) Because EM energy rapidly becomes more intense as one moves closer to the transmitting antenna (source), the EM fields from hand-held radio wave sources (transceivers) are of special concern. It is possible to unintentionally bring high levels of EM energy very close to the powered wheelchair's control system while using these devices. This can affect powered wheelchair movement and braking. Therefore, the warnings listed below are recommended to prevent possible interference with the control system of the powered wheelchair. Electromagnetic interference (EMI) from sources such as radio and TV stations, amateur radio (HAM) transmitters, two-way radios, and cellular phones can affect powered wheelchairs and motorized scooters. FOLLOWING THE WARNINGS LISTED BELOW SHOULD REDUCE THE CHANCE OF UNINTENDED BRAKE RELEASE OR POWERED WHEELCHAIR MOVEMENT WHICH COULD RESULT IN SERIOUS INJURY. WARNING 1) DO NOT operate hand-held transceivers (transmitters receivers), such as citizens band (CB) radios, or turn ON personal communication devices, such as cellular phones, while the powered wheelchair is turned ON; 2) Be aware of nearby transmitters, such as radio or TV stations, and try to avoid coming close to them; 3) If unintended movement or brake release occurs, turn the powered wheelchair OFF as soon as it is safe; 4) Be aware that adding accessories or components, or modifying the powered wheelchair, may make it more susceptible to EMI (NOTE: There is no easy way to evaluate their effect on the overall immunity of the powered wheelchair); and 5) Report all incidents of unintended movement or brake release to the powered wheelchair manufacturer, and note whether there is a source of EMI nearby. Important Information 1) 20 volts per meter (V/m) is a generally achievable and useful immunity level against EMI (as of May 1994) (the higher the level, the greater the protection); 2) This device has been tested to a radiated immunity level of 20 volts per meter. 3) The immunity level of the product is unknown. Modification of any kind to the electronics of this scooter as manufactured by Invacare may adversely affect the EMI immunity levels. Invacare® MK6i™Electronics 94 Part No 1141471 Notes Notes Part No 1141471 95 Invacare® MK6i™Electronics Invacare Corporation www.invacare.com USA One Invacare Way Elyria, Ohio USA 44036-2125 800-333-6900 © 2011 Invacare Corporation. All rights reserved. Republication, duplication or modification in whole or in part is prohibited without prior written permission from Invacare. Trademarks are identified by ™ and ®. All trademarks are owned by or licensed to Invacare Corporation or its subsidiaries unless otherwise noted. Part No 1141471 Rev I- 03/11