1
F.
In–Out ports), empty, and install the
Activated Carbon Post Filter. Firmly tighten
the Housing hand tight only.
Start Up
At time of start up and each time the filters are
changed the system should be sanitized (also see
Operation and Maintenance Sec. V, B.1–4, page
12).
2. Installing the R.O. Membrane:
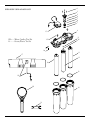
•Remove the R.O. Membrane Housing, (the
middle one), and empty.
1. Sanitizing the system. Use a drip pan to aid
clean–up.
•Insert the Membrane up into the manifold.
(The O–rings should be up toward the
manifold.) Check the Housing O–ring for
proper position in its groove, engage and
firmly tighten the Housing hand tight only.
NOTE: The system should be sanitized
BEFORE installing the Sediment/Carbon
Prefilter, the Activated Carbon Post Filter or
the R.O. Membrane.
•Use a good quality unscented 51⁄4% liquid
chlorine household bleach.
3. Rinsing the system:
•Slowly open the Feed Water Saddle Valve
fully counter clockwise.
•Open the Dispensing Faucet by lifting the
black handle and open the Holding Tank
Shut–Off Valve (the handle should be
parallel with the valve body).
•The Holding Tank Valve should be open.
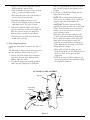
•Check the Air Gap Window on the
Dispensing Faucet to be sure that the drain
water is flowing. (Refer to Figure 2, page 8.)
The R.O. System is now making water.
•Remove the plug on the underside of
the manifold labelled “SEDIMENT/
CARBON”. Pour one capful of bleach (this is
approximately 2 tsp. or 10 ml) into one of the
white Housings. Insert a Housing O–ring into
the Housing groove, (press firmly in place).
Engage and firmly tighten the Housing hand
tight only.
•Do not open the Faucet for at least 8 hours.
•Do not use the first three full tanks of water.
CAUTION: The R.O. Membrane is shipped
with a preservative in it. To ensure proper
rinsing of the R.O. Membrane it is important
to wait at least 8 hours before emptying each
tank.
•Remove the plugs labelled “MEMBRANE”
and “ACTIVATED CARBON” from the
underside of the manifold. To each of the
remaining white Housings, add one capful of
bleach. Insert a Housing O–ring, engage and
firmly tighten the Housings hand tight only.
When the Faucet is first opened, expect air
and carbon fines (very fine black powder)
from the In–Line and Activated Carbon Post
Filters to be rinsed out. This is normal for
the first tank of water or after the Activated
Carbon Post Filters are changed.
•Slowly open the Feed Water Saddle Valve
(turning counter clockwise).
•As soon as the water begins to come out of
the Dispensing Faucet, close the Faucet.
SECTION V. OPERATION & MAINTENANCE
•Let stand for 15 minutes.
A. Normal Operation
NOTE: During this time, check the system
carefully for leaks.
1. It is normal for the Total Dissolved Solids (TDS)
of the water to be higher than normal during
the first 5 gallons of operation; this is due to the
sanitizing solution and the new Post Filters. After
this water is rinsed to drain, the removal rate
should stabilize at a value of greater than 75%.
The optional Water Quality Monitor measures
the TDS reduction and gives an indication of
proper performance. Water pressure affects the
production rate and quality.
•At the end of 15 minutes, CLOSE the Feed
Water Saddle Valve and open the Dispensing
Faucet.
•Allow the Holding Tank to completely
drain, then remove the Sediment/Carbon
Filter Housing (the farthest of the three from
the In–Out ports), empty, and install the
Sediment/Carbon Prefilter. Firmly tighten the
Housing hand tight only.
2. R.O. systems produce drinking water at
relatively slow rates; it can take up to 5 hours
or more to fill the Holding Tank. Normal
•Remove the Activated Carbon Filter Housing
(the closest of the three to the
11