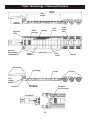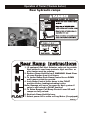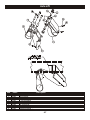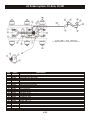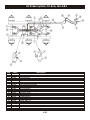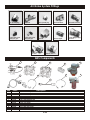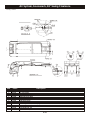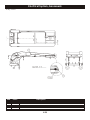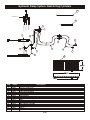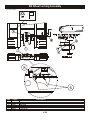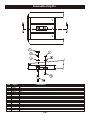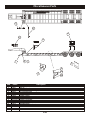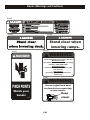
1
HYDRAULIC DETACHABLE GOOSENECK TRAILER
Replacement Parts & Service Manual
and Operating Instructions
This manual covers the following models:
T-70DTG, T-100DTG, T-110DTG, T-120DTG
The Standard for the Road Ahead!
towmaster.com
A forward from Towmaster Trailers to our valued customers and dealers.
In this manual you will find service information and replacement parts for your current
Towmaster trailer. We have put forth our best effort to provide you with common
operations and replacement part information. However, Towmaster Trailers builds many
custom trailers for various customers and cannot guarantee that your trailers features
are outlined in this manual. If you encounter this problem please contact your dealer. If
they cannot be of assistance please feel free to call our Parts Department.
To ensure a more productive call have your trailer’s VIN number (serial number) ready
as that will be needed to locate your correct replacement parts and answer your
technical questions. As a reminder, we do not sell parts directly to you; we only sell
parts through our dealer network. The team here at Towmaster Trailers will make every
effort to get you back up and running and keep your ownership as trouble free as
possible.
Contact Information
Towmaster Trailers
61381 U.S. Hwy 12
Litchfield, MN 55355
800-462-4517 Toll Free
320-693-7921 Company Fax
866-239-2221 Parts Department
www.towmaster.com
Thank you!
Towmaster Trailers
Table of Contents
Read and understand complete manual before using trailer.
SECTION 1
1
SECTION 2
2
SECTION 3
3
SECTION 4
4
Trailer Specs
Operation Instructions
Warnings
Replacement Parts
SECTION 5
More Information
5
4
SECTION 1
Trailer Specs
Trailer and Dealer Information
1.1
Truck Requirements/ Operating Ranges
1.2
Towmaster Trailer Limited Warranty
1.3
Reporting Safty Defects
1.4
Trailer Terminology
1.5-1.6
1
Trailer and Dealer Information
Trailer Information
Date purchased:
Model purchased:
VIN (Serial) Number:
Axle Serial Numbers (each axle has its own)
Axle 1:
Axle 4:
Axle 2:
Axle 5:
Axle 3:
Dealer Information
Dealer:
Address:
Phone:
Fax:
Please have serial number available for all orders.
1.1
Truck Requirements/Operating Ranges
P.S.I. - 2,800 to 3,000
G.P.M. - 10 GPM minimum, 25 GPM maximum
Swing Clearance - See truck dimensions (page 5)
5th Wheel Height - 47" - 52" See truck dimensions (page 5)
Hydraulic Connections - See below...
Coupler
Nipple
Towmaster p/n 37-5972
Towmaster p/n 37-5971
COUPLER
BODY SIZE
THREAD SIZE (NPTF)
DIMENSION A (OVER-ALL LENGTH)
DIMENSION B (HEX SIZE)
DIMENSION C (LARGEST DIAMETER)
NIPPLE
BODY SIZE
THREAD SIZE (NPTF)
DIMENSION D (OVER-ALL LENGTH)
DIMENSION E (EXPOSED LENGTH)
DIMENSION F (HEX SIZE)
DIMENSION G (LARGEST DIAMETER)
3/4"
3/4-14
3.36
1.62
1.90
1.2
3/4"
3/4-14
2.28
1.18
1.38
1.59
Towmaster Trailer Limited Warranty
Limited Warranty
Manufacturer warranties each new product manufactured by us to be free from defects in material and
workmanship for a period of one year from date of delivery to the original purchaser. Warranty starts from the
date of sale as long we receive the filled-out warranty card. If we do not receive the warranty card, warranty
starts from the ship date of the trailer.
Our obligation under this warranty is to replace, free of charge, at our factory or at the dealer’s place of
business, any part proven defective within the time limit of this warranty.
This warranty does not cover: (1) new products which have been operated in excess of rated capacities, (2)
misuse or accidents, (3) vehicles which have been altered, modified or repaired in any manner not authorized
by our company, (4) second hand or used vehicle. In no way shall the manufacturer be held liable for
consequential damages such as rentals of substitute vehicles, loss of profits or other commercial losses.
Further, new vehicle tires are warranted by their respective manufacturers and are not warranted by us.
Manufacturer will handle disposition of warranties on all other purchased components such as axles,
suspensions, wheels, and other purchased parts in conjunction with their respective manufacturers, and under
the terms of their respective warranty policies.
The manufacturer must receive immediate notification of a defect and no allowance will be made for repairs
without manufacturer’s prior consent or approval. Manufacturer does not pre-authorize any dealership for
warranty work. You must call our warranty service department to receive an authorization number. If the work
performed is not preauthorized with a claim number, it may be deemed void. Defective parts must be returned
Customer Registration Required
Federal regulations require motor vehicle manufacturers to maintain a record of original
owners of their equipment. Our warranty registration fulfills this requirement. Please make
Manufacturer reserves the right to modify, without notice, specific designs and specifications as deemed advisable on the
trailers described herein without obligation in regards to trailers previously sold. The manufacturer also reserves the right to
discontinue any model or models without obligation in regards to trailers previously sold. Written warranty covers each
1.3
Reporting Safety Defects
Towmaster Trailers INC.
61381 U.S. Hwy 12
Litchfield, MN 55355
Reporting Safety Defects:
If you believe that your vehicle has a defect which could cause a crash or could cause
injury or death, you should immediately inform the National Highway Traffic Safety
Administration (NHTSA) in addition to notifying Towmaster, Inc.
If NHTSA receives similar complaints, it may open an investigation, and if it finds that a
safety defect exists in a group of vehicles, it may order a recall and remedy campaign.
However, NHTSA cannot become involved in individual problems between you, your
dealer, or Towmaster, Inc.
To contact NHTSA, you may either call the Auto Safety Hotline toll-free at 1-800-424-9393
(or 366-0123 in Washington, DC area) or write to:
NHTSA
U.S. Department of Transportation
400 7th Street SW NSA-11
Washington, DC 20590.
You may also obtain other information about motor vehicle safety from the
http://www.safecar.gov.
1.4
Trailer Terminology - Gooseneck
Upper
Gooseneck
Weldment
Gooseneck
Lift Arm
Load Block
Handle
Load
Blocks
Hydraulic
Controls
Kingpin
Air and Electrical
Receptacles
Load
Plate
1-800-462-4517
1.5
Under
Carriage
Weldment
Gooseneck
Kingpin
Trailer Terminology - Frame and Trunnion
Triple axle model shown.
Deck
Length
Over-all
Length
Swing
Clearance
Approach
Plate
Hose and
Wire Stowage
Compartment
Decking
Chain
Storage
Cross
members
Frame (Bed)
Open
Boom
Well
Side
Beam
Main
Frame
Bolster
Gooseneck
Out-Rigger
D-rings
Trunnion
Front
Loading
Ramps
Load Pin
Gooseneck
Lock Handle
5th Wheel
Lock Assembly
Gooseneck
1.6
SECTION 2
Operation Instructions
Introduction
2.1
Detaching Trailer
2.2-2.3
Attaching Goosneck To Trailer
2.4-2.5
Air Raise/ Lower Kits
2.5
Rear Hydraulic Ramps
2.6
Outrigger Boards, Flasher Kits,
Rear Lift Axle
2.7
Stinger Shim Adjustment
2.8
2
Operation of Trailer (Titanium Series)
INTRODUCTION
These instructions are designed to make you familiar with the operation of our product. It is not
intended for the purpose of training or to replace common knowledge in operating a detachable
gooseneck trailer. Make sure you read these instructions before using the Towmaster Titanium
detachable gooseneck trailer.
There are references at the end of these instructions to find your local and state laws regarding the
use of a trailer. Please follow all local, state and federal regulations.
OPERATION INSTRUCTIONS
1. IMPORTANT! Read and understand all safety decals and
the operating decal prior to using the trailer!
These decals are placed in key areas on the trailer and point out
instructions and important safety factors in those areas. Failure
to understand these instructions could cause serious injury.
2. The Titanium Series detachable gooseneck trailer features
a king pin hitch system for use with tractor truck fifth-wheels.
Make sure the truck fifth-wheel is in the proper location so that
the gooseneck can be properly detached and reattached to the
trailer bed.
3. Before using the trailer, make sure you are in a safe location
and parked on solid ground. Make sure the truck and trailer are
in a straight line and on as level ground as possible.
2.1
Operation of Trailer (Titanium Series)
DETACHING TRAILER
4. Start the hydraulic system so that oil is flowing to the
gooseneck. If your trailer has the pony motor option, start the
pony motor according to the instructions on the pony motor
decal.
5. Detach the air and electrical lines from the gooseneck to the
trailer bed and store them in the storage area at the front of the
trailer bed near the front ramp.
6. Using the hydraulic control levers, raise the gooseneck until
the load blocks can be rotated and the handle attached to the
holder to keep the load blocks out of the way.
7. Using the hydraulic controls, lower the gooseneck and trailer
to the ground and continue lowering until the load pins are
centered in the load plate holes.
DANGER! Watch your feet! Stand clear from trailer deck
when lowering the trailer to the ground!
2.2
Operation of Trailer (Titanium Series)
DETACHING TRAILER
8. Lower the gooseneck lifting arm to the truck frame using the
front hydraulic control lever. Lower it only to touch the frame
enough to support the gooseneck.
9. Firmly pull the lock release handle to release the fifth-wheel
lock on the trailer bed. If your trailer is equipped with the Air LockPin Release, push the release button
to release the fifth-wheel lock. Stand
clear of the lock release handle when
operating the Air Lock-Pin Release.
10. Slowly drive forward and adjust the lifting arm accordingly so
the gooseneck load plates clear the ground by 1.5” to 2”, but do
not drag on the ground.
11. Flip down the front ramps and carefully load or unload the
equipment.
2.3
Operation of Trailer (Titanium Series)
ATTACHING GOOSENECK TO TRAILER
12. Adjust the gooseneck so that the load plate is approximately
1-1/2” above the ground. Do this by lifting the gooseneck with
the gooseneck lifting arm hydraulic controls.
TOO FAR
POTENTIAL
DAMAGE
PERFECT
APPROACH
13. CAUTION! If the gooseneck is too
high and does not approach the main
deck properly, damage could occur to
the fifth-wheel lock. Make sure you
approach the main deck properly with
the gooseneck.
14.Adjust the undercarriage if necessary, then slowly back to the
trailer bed.
MUST TOUCH
Lock handle shown in UNLOCKED position.
15. The gooseneck will self-align into the fifth-wheel on the trailer
bed. Back up until the gooseneck locks in place and the lock
handle is in the lock position (all the way in).
Lock handle shown in LOCKED position.
16. Raise the gooseneck lift arm (shoe plate).
2.4
Operation of Trailer (Titanium Series)
ATTACHING GOOSENECK TO TRAILER
17. Raise the gooseneck and trailer until the load blocks can be
rotated and positioned in the desired ride position.
18. Lower the gooseneck and trailer to transport position (load
blocks resting on the base). Visually check to make sure the load
blocks are on the same cams.
19. Connect the air and electrical lines.
Instructions for other options
There are other options available for the Titanium Series detachable gooseneck. Instructions on
how to operate these options follow.
Air Raise/Lower Kits
This option allows you to raise or lower the rear of the trailer to
clear objects, grades, railroad rails and more.
To raise:
Pull the air control knob to allow air to the raise and lower
controls. You will see the needle on the gauge show air
pressure.
Lift the lever to raise the rear suspension and lower the lever to
lower the rear suspension.
When finished, push the air control knob to stop air from entering
the controls.
2.5
Operation of Trailer (Titanium Series)
Rear hydraulic ramps
1. (If equipped) Pull Hyd. Selector valve out to provide
Hyd. power to rear ramp controls. Hyd. wet line or
pony motor must be running.
2. Remove Ramp Hold-Up bars. WARNING! Stand Clear
of ramp Danger Area at all times.
3. To Lower Ramp: Push Ramp Control Lever DOWN
until ramps reach the ground.
4. Lock Ramp Control Lever down in the FLOAT
position before loading/unloading trailer.
Note: Damage will occur to ramps or Hyd. system if
valve is not locked in FLOAT position.
5. To Raise Ramps: Pull Ramp Control Lever UP until
ramps are fully raised.
6. Reattach Ramp Hold-Up bars.
7. Select power off to valve or Pony Motor (if equipped)
450030
2.6
Operation of Trailer (Titanium Series)
Outrigger boards with hold-downs
With this option, you can carry the outrigger boards in the open
areas of the deck. The hold-downs (shown) are spring loaded.
Follow the instruction decal.
Battery pack with flasher for marker lights
This kit allows the flashers to be used when the trailer deck is
detached from the gooseneck. Unplug the electrical plug from
the receptacle and plug it into the flasher kit receptacle located in
the line storage area.
Rear lift axle
The rear lift axle should only be used in an empty condition only!
This kit reduces wear when transporting the trailer without a
load.
At the rear of the trailer you will find the raise/lower valve.
To raise the rear axle: Pull the knob.
To lower the rear axle: Push the knob.
When the axle is lowered it becomes a part of the working
suspension.
2.7
SECTION 3
Warnings
GVWR and Tire Safty Information
3.1-3.11
3
GVWR and TIRE SAFETY INFORMATION
General
A recent law was enacted that requires trailer manufacturers to place a tire and
loading information decal placed near the serial tag on a trailer as well as detailed
information on loading and tires in the owner’s manual on all trailers with a
GVWR (Gross Vehicle Weight Rating) of 10,000 lbs. or less. This section of our
manual covers the required information.
Tire and Safety Information
This portion of the User’s Manual contains tire safety information as required by 49 CFR 575.6.
Section 1.1 contains “Steps for Determining Correct Load Limit - Trailer”.
Section 1.2 contains “Steps for Determining Correct Load Limit – Tow Vehicle”.
Section 1.3 contains a Glossary of Tire Terminology, including “cold inflation pressure”, “maximum inflation pressure”,
“recommended inflation pressure”, and other non-technical terms.
Section 1.4 contains information from the NHTSA brochure entitled “Tire Safety – Everything Rides On It”.
This brochure, as well as the preceding subsections, describes the following items;
Tire labeling, including a description and explanation of each marking on the tires, and information about the DOT Tire
Identification Number (TIN).
Recommended tire inflation pressure, including a description and explanation of:
A. Cold inflation pressure.
B. Vehicle Placard and location on the vehicle.
C. Adverse safety consequences of under inflation (including tire failure).
D. Measuring and adjusting air pressure for proper inflation.
E. Tire Care, including maintenance and safety practices.
Vehicle load limits, including a description and explanation of the following items:
A. Locating and understanding the load limit information, total load capacity, and cargo capacity.
B. Calculating total and cargo capacities with varying seating configurations including quantitative examples
showing / illustrating how the vehicles cargo and luggage capacity decreases as combined number and size of
occupants’ increases. This item is also discussed in Section 3.
C. Determining compatibility of tire and vehicle load capabilities.
D. Adverse safety consequences of overloading on handling and stopping on tires.
1.1. Steps for Determining Correct Load Limit – Trailer
Determining the load limits of a trailer includes more than understanding the load limits of the tires alone. On all trailers
there is a Federal certification/VIN label that is located on the forward half of the left (road) side of the unit. This
certification/VIN label will indicate the trailer’s Gross Vehicle Weight Rating (GVWR). This is the most weight the fully
loaded trailer can weigh. It will also provide the Gross Axle Weight Rating (GAWR). This is the most a particular axle
can weigh. If there are multiple axles, the GAWR of each axle will be provided.
If your trailer has a GVWR of 10,000 pounds or less, there is a vehicle placard located in the same location as the
certification label described above. This placard provides tire and loading information. In addition, this placard will show
a statement regarding maximum cargo capacity. Cargo can be added to the trailer, up to the maximum weight specified
on the placard. The combined weight of the cargo is provided as a single number. In any case, remember: the total
weight of a fully loaded trailer can not exceed the stated GVWR.
3.1
GVWR and TIRE SAFETY INFORMATION
Tire and Safety Information - Continued
1.1. Steps for Determining Correct Load Limit – Trailer (continued)
For trailers with living quarters installed, the weight of water and propane also need to be considered. The weight of
fully filled propane containers is considered part of the weight of the trailer before it is loaded with cargo, and is not
considered part of the disposable cargo load. Water however, is a disposable cargo weight and is treated as such. If
there is a fresh water storage tank of 100 gallons, this tank when filled would weigh about 800 pounds. If more cargo is
being transported, water can be off-loaded to keep the total amount of cargo added to the vehicle within the limits of
the GVWR so as not to overload the vehicle. Understanding this flexibility will allow you, the owner, to make choices
that fit your travel needs.
When loading your cargo, be sure it is distributed evenly to prevent overloading front to back and side to side. Heavy
items should be placed low and as close to the axle positions as reasonable. Too many items on one side may
overload a tire. The best way to know the actual weight of the vehicle is to weigh it at a public scale. Talk to your dealer
to discuss the weighing methods needed to capture the various weights related to the trailer. This would include the
weight empty or unloaded, weights per axle, wheel, hitch or king-pin, and total weight.
Excessive loads and/or underinflation cause tire overloading and, as a result, abnormal tire flexing occurs. This
situation can generate an excessive amount of heat within the tire. Excessive heat may lead to tire failure. It is the air
pressure that enables a tire to support the load, so proper inflation is critical. The proper air pressure may be found on
the certification/VIN label and/or on the Tire Placard. This value should never exceed the maximum cold inflation
pressure stamped on the tire.
1.1.1. Trailers 10,000 Pounds GVWR or Less
TIRE AND LOADING INFORMATION
The weight of cargo should never exceed:
TIRE
SIZE
COLD TIRE PRESSURE
FRONT
REAR
SPARE
kg
lbs
See owners
manual for
additional
information
45-XXXX
1. Locate the statement, “The weight of cargo should never exceed XXX kg or XXX lbs.,” on your vehicle’s placard.
See figure 1-1.
2. This figure equals the available amount of cargo and luggage load capacity.
3. Determine the combined weight of luggage and cargo being loaded on the vehicle. That weight may not safely
exceed the available cargo and luggage load capacity.
The trailer’s placard refers to the Tire Information Placard attached adjacent to or near the trailer’s VIN (Certification)
label at the left front of the trailer.
1.1.2. Trailers Over 10,000 Pounds GVWR (Note: These trailers are not required to have a tire information
placard on the vehicle)
1. Determine the empty weight of your trailer by weighing the trailer using a public scale or other means. This step
does not have to be repeated.
2. Locate the GVWR (Gross Vehicle Weight Rating) of the trailer on your trailer’s VIN (Certification) label.
3. Subtract the empty weight of your trailer from the GVWR stated on the VIN label. That weight is the maximum
available cargo capacity of the trailer and may not be safely exceeded.
3.2
GVWR and TIRE SAFETY INFORMATION
Tire and Safety Information - Continued
1.2. Steps for Determining Correct Load Limit – Tow Vehicle
1. Locate the statement, “The combined weight of occupants and cargo should never exceed XXX lbs.,” on your
vehicle’s placard.
2. Determine the combined weight of the driver and passengers who will be riding in your vehicle.
3. Subtract the combined weight of the driver and passengers from XXX kilograms or XXX pounds.
4. The resulting figure equals the available amount of cargo and luggage capacity. For example, if the “XXX” amount
equals 1400 lbs. and there will be five 150 lb. passengers in your vehicle, the amount of available cargo and luggage
capacity is 650 lbs. (1400-750 (5 x 150) = 650 lbs.).
5. Determine the combined weight of luggage and cargo being loaded on the vehicle. That weight may not safely
exceed the available cargo and luggage capacity calculated in Step # 4.
6. If your vehicle will be towing a trailer, load from your trailer will be transferred to your vehicle. Consult the tow
vehicle’s manual to determine how this weight transfer reduces the available cargo and luggage capacity of your
vehicle.
1.3. Glossary Of Tire Terminology
Accessory weight
The combined weight (in excess of those standard items which may be replaced) of automatic transmission, power
steering, power brakes, power windows, power seats, radio and heater, to the extent that these items are available as
factory-installed equipment (whether installed or not).
Bead
The part of the tire that is made of steel wires, wrapped or reinforced by ply cords and that is shaped to fit the rim.
Bead separation
This is the breakdown of the bond between components in the bead.
Bias ply tire
A pneumatic tire in which the ply cords that extend to the beads are laid at alternate angles substantially less than 90
degrees to the centerline of the tread.
Carcass
The tire structure, except tread and sidewall rubber which, when inflated, bears the load.
Chunking
The breaking away of pieces of the tread or sidewall.
Cold inflation pressure
The pressure in the tire before you drive.
Cord
The strands forming the plies in the tire.
Cord separation
The parting of cords from adjacent rubber compounds.
Cracking
Any parting within the tread, sidewall, or inner liner of the tire extending to cord material.
CT
A pneumatic tire with an inverted flange tire and rim system in which the rim is designed with rim flanges pointed
radially inward and the tire is designed to fit on the underside of the rim in a manner that encloses the rim flanges
inside the air cavity of the tire.
3.3
GVWR and TIRE SAFETY INFORMATION
Tire and Safety Information - Continued
Curb weight
The weight of a motor vehicle with standard equipment including the maximum capacity of fuel, oil, and coolant, and, if
so equipped, air conditioning and additional weight optional engine.
Extra load tire
A tire designed to operate at higher loads and at higher inflation pressures than the corresponding standard tire.
Groove
The space between two adjacent tread ribs.
Gross Axle Weight Rating
The maximum weight that any axle can support, as published on the Certification / VIN label on the front left side of the
trailer. Actual weight determined by weighing each axle on a public scale, with the trailer attached to the towing vehicle.
Gross Vehicle Weight Rating
The maximum weight of the fully loaded trailer, as published on the Certification / VIN label. Actual weight determined
by weighing trailer on a public scale, without being attached to the towing vehicle.
Hitch Weight
The downward force exerted on the hitch ball by the trailer coupler.
Innerliner
The layer(s) forming the inside surface of a tubeless tire that contains the inflating medium within the tire.
Innerliner separation
The parting of the innerliner from cord material in the carcass.
Intended outboard sidewall
The sidewall that contains a white-wall, bears white lettering or bears manufacturer, brand, and/or model name molding
that is higher or deeper than the same molding on the other sidewall of the tire or the outward facing sidewall of an
asymmetrical tire that has a particular side that must always face outward when mounted on a vehicle.
Light truck (LT) tire
A tire designated by its manufacturer as primarily intended for use on lightweight trucks or multipurpose passenger
vehicles.
Load rating
The maximum load that a tire is rated to carry for a given inflation pressure.
Maximum load rating
The load rating for a tire at the maximum permissible inflation pressure for that tire.
Maximum permissible inflation pressure
The maximum cold inflation pressure to which a tire may be inflated.
Maximum loaded vehicle weight
The sum of curb weight, accessory weight, vehicle capacity weight, and production options weight.
Measuring rim
The rim on which a tire is fitted for physical dimension requirements.
Pin Weight
The downward force applied to the 5th wheel or gooseneck ball, by the trailer kingpin or gooseneck coupler.
Non-pneumatic rim
A mechanical device which, when a non-pneumatic tire assembly incorporates a wheel, supports the tire, and attaches,
either integrally or separably, to the wheel center member and upon which the tire is attached.
Non-pneumatic spare tire assembly
A non-pneumatic tire assembly intended for temporary use in place of one of the pneumatic tires and rims that are
fitted to a passenger car in compliance with the requirements of this standard.
3.4
GVWR and TIRE SAFETY INFORMATION
Tire and Safety Information - Continued
Non-pneumatic tire
A mechanical device which transmits, either directly or through a wheel or wheel center member, the vertical load and
tractive forces from the roadway to the vehicle, generates the tractive forces that provide the directional control of the
vehicle and does not rely on the containment of any gas or fluid for providing those functions.
Non-pneumatic tire assembly
A non-pneumatic tire, alone or in combination with a wheel or wheel center member, which can be mounted on a
vehicle.
Normal occupant weight
This means 68 kilograms (150 lbs.) times the number of occupants specified in the second column of Table I of 49 CFR
571.110.
Occupant distribution
The distribution of occupants in a vehicle as specified in the third column of Table I of 49 CFR 571.110.
Open splice
Any parting at any junction of tread, sidewall, or innerliner that extends to cord material.
Outer diameter
The overall diameter of an inflated new tire.
Overall width
The linear distance between the exteriors of the sidewalls of an inflated tire, including elevations due to labeling,
decorations, or protective bands or ribs.
Ply
A layer of rubber-coated parallel cords.
Ply separation
A parting of rubber compound between adjacent plies.
Pneumatic tire
A mechanical device made of rubber, chemicals, fabric and steel or other materials, that, when mounted on an
automotive wheel, provides the traction and contains the gas or fluid that sustains the load.
Production options weight
The combined weight of those installed regular production options weighing over 2.3 kilograms (5 lbs.) in excess of
those standard items which they replace, not previously considered in curb weight or accessory weight, including
heavy duty brakes, ride levelers, roof rack, heavy duty battery, and special trim.
Radial ply tire
A pneumatic tire in which the ply cords that extend to the beads are laid at substantially 90 degrees to the centerline of
the tread.
Recommended inflation pressure
This is the inflation pressure provided by the vehicle manufacturer on the Tire Information label and on the Certification
/ VIN tag.
Reinforced tire
A tire designed to operate at higher loads and at higher inflation pressures than the corresponding standard tire.
Rim
A metal support for a tire or a tire and tube assembly upon which the tire beads are seated.
Rim diameter
This means the nominal diameter of the bead seat.
Rim size designation
This means the rim diameter and width.
3.5
GVWR and TIRE SAFETY INFORMATION
Tire and Safety Information - Continued
Rim type designation
This means the industry of manufacturer’s designation for a rim by style or code.
Rim width
This means the nominal distance between rim flanges.
Section width
The linear distance between the exteriors of the sidewalls of an inflated tire, excluding elevations due to labeling,
decoration, or protective bands.
Sidewall
That portion of a tire between the tread and bead.
Sidewall separation
The parting of the rubber compound from the cord material in the sidewall.
Special Trailer (ST) tire
The "ST" is an indication the tire is for trailer use only.
Test rim
The rim on which a tire is fitted for testing, and may be any rim listed as appropriate for use with that tire.
Tread
That portion of a tire that comes into contact with the road.
Tread rib
A tread section running circumferentially around a tire.
Tread separation
Pulling away of the tread from the tire carcass.
Treadwear indicators (TWI)
The projections within the principal grooves designed to give a visual indication of the degrees of wear of the tread.
Vehicle capacity weight
The rated cargo and luggage load plus 68 kilograms (150 lbs.) times the vehicle’s designated seating capacity.
Vehicle maximum load on the tire
The load on an individual tire that is determined by distributing to each axle its share of the maximum loaded vehicle
weight and dividing by two.
Vehicle normal load on the tire
The load on an individual tire that is determined by distributing to each axle its share of the curb weight, accessory
weight, and normal occupant weight (distributed in accordance with Table I of CRF 49 571.110) and dividing by 2.
Weather side
The surface area of the rim not covered by the inflated tire.
Wheel center member
In the case of a non-pneumatic tire assembly incorporating a wheel, a mechanical device which attaches, either
integrally or separably, to the non-pneumatic rim and provides the connection between the non-pneumatic rim and the
vehicle; or, in the case of a non-pneumatic tire assembly not incorporating a wheel, a mechanical device which
attaches, either integrally or separably, to the non-pneumatic tire and provides the connection between tire and the
vehicle.
Wheel-holding fixture
The fixture used to hold the wheel and tire assembly securely during testing.
3.6
GVWR and TIRE SAFETY INFORMATION
Tire and Safety Information - Continued
1.4. Tire Safety - Everything Rides On It
The National Traffic Safety Administration (NHTSA) has published a brochure (DOT HS 809 361) that discusses all
aspects of Tire Safety, as required by CFR 575.6. This brochure is reproduced in part below. It can be obtained and
downloaded from NHTSA, free of charge, from the following web site:
http://www.nhtsa.dot.gov/cars/rules/TireSafety/ridesonit/tires_index.html
Studies of tire safety show that maintaining proper tire pressure, observing tire and vehicle load limits (not carrying
more weight in your vehicle than your tires or vehicle can safely handle), avoiding road hazards, and inspecting tires
for cuts, slashes, and other irregularities are the most important things you can do to avoid tire failure, such as tread
separation or blowout and flat tires. These actions, along with other care and maintenance activities, can also:
- Improve vehicle handling
- Help protect you and others from avoidable breakdowns and accidents
- Improve fuel economy
- Increase the life of your tires.
This area presents a comprehensive overview of tire safety, including information on the following topics:
- Basic tire maintenance
- Uniform Tire Quality Grading System
- Fundamental characteristics of tires
- Tire safety tips.
Use this information to make tire safety a regular part of your vehicle maintenance routine. Recognize that the time you
spend is minimal compared with the inconvenience and safety consequences of a flat tire or other tire failure.
1.5. Safety First–Basic Tire Maintenance
Properly maintained tires improve the steering, stopping, traction, and load-carrying capability of your vehicle.
Underinflated tires and overloaded vehicles are a major cause of tire failure. Therefore, as mentioned above, to avoid
flat tires and other types of tire failure, you should maintain proper tire pressure, observe tire and vehicle load limits,
avoid road hazards, and regularly inspect your tires.
1.5.1. Finding Your Vehicle's Recommended Tire Pressure and Load Limits
Tire information placards and vehicle certification labels contain information on tires and load limits. These labels
indicate the vehicle manufacturer's information including:
- Recommended tire size
- Recommended tire inflation pressure
- Vehicle capacity weight (VCW–the maximum occupant and cargo weight a vehicle is designed to carry)
- Front and rear gross axle weight ratings (GAWR– the maximum weight the axle systems are designed to carry).
Both placards and certification labels are permanently attached to the trailer near the left front.
1.5.2. Understanding Tire Pressure and Load Limits
Tire inflation pressure is the level of air in the tire that provides it with load-carrying capacity and affects the overall
performance of the vehicle. The tire inflation pressure is a number that indicates the amount of air pressure– measured
in pounds per square inch (psi)–a tire requires to be properly inflated. (You will also find this number on the vehicle
information placard expressed in kilopascals (kpa), which is the metric measure used internationally.)
3.7
GVWR and TIRE SAFETY INFORMATION
Tire and Safety Information - Continued
Manufacturers of passenger vehicles and light trucks determine this number based on the vehicle's design load limit,
that is, the greatest amount of weight a vehicle can safely carry and the vehicle's tire size. The proper tire pressure for
your vehicle is referred to as the "recommended cold inflation pressure." (As you will read below, it is difficult to obtain
the recommended tire pressure if your tires are not cold.)
Because tires are designed to be used on more than one type of vehicle, tire manufacturers list the "maximum
permissible inflation pressure" on the tire sidewall. This number is the greatest amount of air pressure that should ever
be put in the tire under normal driving conditions.
1.5.3. Checking Tire Pressure
It is important to check your vehicle's tire pressure at least once a month for the following reasons:
- Most tires may naturally lose air over time.
- Tires can lose air suddenly if you drive over a pothole or other object or if you strike the curb when parking.
- With radial tires, it is usually not possible to determine underinflation by visual inspection.
For convenience, purchase a tire pressure gauge to keep in your vehicle. Gauges can be purchased at tire
dealerships, auto supply stores, and other retail outlets.
The recommended tire inflation pressure that vehicle manufacturers provide reflects the proper psi when a tire is cold.
The term cold does not relate to the outside temperature. Rather, a cold tire is one that has not been driven on for at
least three hours. When you drive, your tires get warmer, causing the air pressure within them to increase. Therefore,
to get an accurate tire pressure reading, you must measure tire pressure when the tires are cold or compensate for the
extra pressure in warm tires.
1.5.4. Steps for Maintaining Proper Tire Pressure
Step 1: Locate the recommended tire pressure on the vehicle's tire information placard, certification label, or in the
owner's manual.
Step 2: Record the tire pressure of all tires.
Step 3: If the tire pressure is too high in any of the tires, slowly release air by gently pressing on the tire valve stem
with the edge of your tire gauge until you get to the correct pressure.
Step 4: If the tire pressure is too low, note the difference between the measured tire pressure and the correct tire
pressure. These "missing" pounds of pressure are what you will need to add.
Step 5: At a service station, add the missing pounds of air pressure to each tire that is underinflated.
Step 6: Check all the tires to make sure they have the same air pressure (except in cases in which the front and rear
tires are supposed to have different amounts of pressure).
If you have been driving your vehicle and think that a tire is underinflated, fill it to the recommended cold inflation
pressure indicated on your vehicle's tire information placard or certification label. While your tire may still be slightly
underinflated due to the extra pounds of pressure in the warm tire, it is safer to drive with air pressure that is slightly
lower than the vehicle manufacturer's recommended cold inflation pressure than to drive with a significantly
underinflated tire. Since this is a temporary fix, don't forget to recheck and adjust the tire's pressure when you can
obtain a cold reading.
1.5.5. Tire Size
To maintain tire safety, purchase new tires that are the same size as the vehicle's original tires or another size
recommended by the manufacturer. Look at the tire information placard, the owner's manual, or the sidewall of the tire
you are replacing to find this information. If you have any doubt about the correct size to choose, consult with the tire
dealer.
3.8
GVWR and TIRE SAFETY INFORMATION
Tire and Safety Information - Continued
1.5.6. Tire Tread
The tire tread provides the gripping action and traction that prevent your vehicle from slipping or sliding, especially
when the road is wet or icy. In general, tires are not safe and should be replaced when the tread is worn down to 1/16
of an inch. Tires have built-in treadwear indicators that let you know when it is time to replace your tires. These
indicators are raised sections spaced intermittently in the bottom of the tread grooves. When they appear "even" with
the outside of the tread, it is time to replace your tires. Another method for checking tread depth is to place a penny in
the tread with Lincoln's head upside down and facing you. If you can see the top of Lincoln's head, you are ready for
new tires.
1.5.7. Tire Balance and Wheel Alignment
To avoid vibration or shaking of the vehicle when a tire rotates, the tire must be properly balanced. This balance is
achieved by positioning weights on the wheel to counterbalance heavy spots on the wheel-and-tire assembly. A wheel
alignment adjusts the angles of the wheels so that they are positioned correctly relative to the vehicle's frame. This
adjustment maximizes the life of your tires. These adjustments require special equipment and should be performed by
a qualified technician.
1.5.8. Tire Repair
The proper repair of a punctured tire requires a plug for the hole and a patch for the area inside the tire that surrounds
the puncture hole. Punctures through the tread can be repaired if they are not too large, but punctures to the sidewall
should not be repaired. Tires must be removed from the rim to be properly inspected before being plugged and
patched.
1.5.9. Tire Fundamentals
Federal law requires tire manufacturers to place standardized information on the sidewall of all tires. This information
identifies and describes the fundamental characteristics of the tire and also provides a tire identification number for
safety standard certification and in case of a recall.
1.5.9.1. Information on Passenger Vehicle Tires
P
The "P" indicates the tire is for passenger vehicles.
Next number
This three-digit number gives the width in millimeters of the tire from sidewall edge to sidewall edge. In general, the
larger the number, the wider the tire.
Next number
This two-digit number, known as the aspect ratio, gives the tire's ratio of height to width. Numbers of 70 or lower
indicate a short sidewall for improved steering response and better overall handling on dry pavement.
R
The "R" stands for radial. Radial ply construction of tires has been the industry standard for the past 20 years.
Next number
This two-digit number is the wheel or rim diameter in inches. If you change your wheel size, you will have to purchase
new tires to match the new wheel diameter.
Next number
This two- or three-digit number is the tire's load index. It is a measurement of how much weight each tire can support.
You may find this information in your owner's manual. If not, contact a local tire dealer. Note: You may not find this
information on all tires because it is not required by law.
M+S
The "M+S" or "M/S" indicates that the tire has some mud and snow capability. Most radial tires have these markings;
hence, they have some mud and snow capability.
3.9
GVWR and TIRE SAFETY INFORMATION
Tire and Safety Information - Continued
Speed Rating
The speed rating denotes the speed at which a tire is designed to be driven for extended periods of time. The ratings
range from 99 miles per hour (mph) to 186 mph. These ratings are listed below. Note: You may not find this information
on all tires because it is not required by law.
Letter Rating
Q
R
S
T
U
H
V
W
Y
Speed Rating
99 mph
106 mph
112 mph
118 mph
124 mph
130 mph
149 mph
168* mph
186* mph
* For tires with a maximum speed capability over 149 mph, tire manufacturers sometimes use the letters ZR. For those
with a maximum speed capability over 186 mph, tire manufacturers always use the letters ZR.
U.S. DOT Tire Identification Number
This begins with the letters "DOT" and indicates that the tire meets all federal standards. The next two numbers or
letters are the plant code where it was manufactured, and the last four numbers represent the week and year the tire
was built. For example, the numbers 3197 means the 31st week of 1997. The other numbers are marketing codes
used at the manufacturer's discretion. This information is used to contact consumers if a tire defect requires a recall.
Tire Ply Composition and Materials Used
The number of plies indicates the number of layers of rubber-coated fabric in the tire. In general, the greater the
number of plies, the more weight a tire can support. Tire manufacturers also must indicate the materials in the tire,
which include steel, nylon, polyester, and others.
Maximum Load Rating
This number indicates the maximum load in kilograms and pounds that can be carried by the tire.
Maximum Permissible Inflation Pressure
This number is the greatest amount of air pressure that should ever be put in the tire under normal driving conditions.
1.5.9.2. UTQGS Information
Treadwear Number
This number indicates the tire's wear rate. The higher the treadwear number is, the longer it should take for the tread to
wear down. For example, a tire graded 400 should last twice as long as a tire graded 200.
Traction Letter
This letter indicates a tire's ability to stop on wet pavement. A higher graded tire should allow you to stop your car on
wet roads in a shorter distance than a tire with a lower grade. Traction is graded from highest to lowest as "AA","A",
"B", and "C".
Temperature Letter
This letter indicates a tire's resistance to heat. The temperature grade is for a tire that is inflated properly and not
overloaded. Excessive speed, underinflation or excessive loading, either separately or in combination, can cause heat
build-up and possible tire failure. From highest to lowest, a tire's resistance to heat is graded as "A", "B", or "C".
3.10
GVWR and TIRE SAFETY INFORMATION
Tire and Safety Information - Continued
1.5.9.3. Additional Information on Light Truck Tires
Please refer to the following diagram.
Load Range
BC
UBELESS DOT
L T
MA
L9
DIA
A
RA
S 2XXXXXX C
OR
PLIE
LO
AD
B
00 L
13
ER
S
MAX
P
RE
S
35
E
M
AX
SI
D
MANUF
AC
T
LT23
5/8
5
SI
L2
P
TIRE
M
M
US 2XXXX
XC
D4PL
EA
OR
TR
D
AL
W
DE
6
03
+S
6
R1
UR
Light Truck line
Severe snow
conditions
D 114/111Q
NA
Maximum load and inflation
information and load inflation limits
Tires for light trucks have other markings besides those found on the sidewalls of passenger tires.
LT
The "LT" indicates the tire is for light trucks or trailers.
ST
An "ST" is an indication the tire is for trailer use only.
Max. Load Dual kg (lbs) at kPa (psi) Cold
This information indicates the maximum load and tire pressure when the tire is used as a dual, that is, when four tires
are put on each rear axle (a total of six or more tires on the vehicle).
Max. Load Single kg (lbs) at kPa (psi) Cold
This information indicates the maximum load and tire pressure when the tire is used as a single.
Load Range
This information identifies the tire's load-carrying capabilities and its inflation limits.
1.6. Tire Safety Tips
Preventing Tire Damage
- Slow down if you have to go over a pothole or other object in the road.
- Do not run over curbs or other foreign objects in the roadway, and try not to strike the curb when parking.
Tire Safety Checklist
- Check tire pressure regularly (at least once a month), including the spare.
- Inspect tires for uneven wear patterns on the tread, cracks, foreign objects, or other signs of wear or trauma.
- Remove bits of glass and foreign objects wedged in the tread.
- Make sure your tire valves have valve caps.
- Check tire pressure before going on a long trip.
- Do not overload your vehicle. Check the Tire Information and Loading Placard or User’s Manual for the maximum
recommended load for the vehicle.
More information may be found at http://www.natm.com.
3.11
SECTION 4
Replacement Parts
Hub/ Drum Assembly, Stud Piloted 4.1
Hub/ Drum Assembly, Hub Piloted 4.2
Brake Assembly, non ABS and ABS 4.3
Suspension, Spring (Hutchens) 4.4
Suspension, Air- Ride, Front Section (Ridewell) 4.5
Suspension, Air-Ride, Center and RearSection (Ridewell) 4.6
Axle Lift 4.7
Pivot Busing & Eccentric Bolt Replacement (Ridewell) 4.8
Alighment of Axle 4.9
Wheels and Tires 4.10
Air Brake System, Tandem Axle, 2S/1M 4.11
Air Brake System, Tandem Axle, 4S/2M 4.12
Air Brake System, Tri-Axle, 2S/2M 4.13
Air Brake System, Tri-Axle, 6S/3M 4.14
Air Brake System, Tri- Axle, Non ABS 4.15
Air Brake System Fittings/ ABS Components 4.16
Air System, Gooseneck, 96” Swing Clearance 4.17
Tandem Axle Air Ride Suspension Air System 4.18
Tri-Axle Air Ride Suspension Air System 4.19
Tri-Axle Air Ride Suspension Air System with Lift on Rear Axle 4.20
Dual Hydraulic System, Wet Line & Pony Motor 4.21
4
Continued
Replacement Parts
Hydraulic System (Wet Line) 84” Swing Gooseneck
4.22-4.23
Hydraulic System (Wet Line) 96” Swing Gooseneck
4.24-4.25
11HP Honda Power Supply , Standard
Pony Motor Hydraulic/Mounting, 11HP Honda
4.26
4.27-4.28
Electrical System, Gooseneck
4.29
Wiring Harness
4.30
Lighting
4.31
84” & 96” Goosneck Assemblies, Replacement Parts
4.32-4.33
Ramps, Springs and Cantilever
4.34
Hydraulic Ramp System- Single Acting Cylinder
4.35
Hydraulic Ramp System- Dual Acting Cylinder
4.36
Fenders
4.37
5th Wheel Locking Assembly
4.38-4.39
Removeable King Pin
4.40
Stinger
4.41
Miscellaneous Parts
4.42
Decals
4.43-4.50
4
Hub/Drum Assembly, Stud Piloted
Item
1
2
3
4
5
6
7
Part #
252150
252156
252153
252154
252160
252165
252171
Description
hub casting
3/4-16 stud
wheel bearing cup, outer
wheel bearing cup, inner
16.5 x 7" brake drum
abs tone ring
hex nut
4.1
Hub/Drum Assembly, Hub Piloted
Item
1
2
3
4
5
6
7
Part #
252150
252153
252154
252157
252160
252170
252165
Description
hub casting
wheel bearing cup, outer
wheel bearing cup, inner
M22 wheel stud
16.5 x 7" brake drum
M22 x 1.5 swivel flange nut
100 tooth tone ring
4.2
Brake Assembly, non ABS and ABS
5
8
7
12
11
15
4
6
1
2
17 16
3
18
24
10
14
13
19
16A
Item
1
2
3
4
5
6
7
8
9
10
11
12
13
14
15
16
16A
17
18
19
20
21
22
23
24
Part #
Description
25-2200
25-2201
25-2241
25-2240
r.h. hub and drum assembly, non abs
r.h. hub and drum assembly, abs
l.h. hub and drum assembly, non abs
l.h. hub and drum assembly, abs
25-2219
25-2218
25-2217
25-2216
31-1700
31-1701
31-1702
31-1703
31-1704
31-1705
31-1706
25-2206
31-1710
31-1711
25-2231
25-2230
25-2051
25-2003
25-2004
25-2005
25-2226
31-1715
31-1716
31-1717
31-1718
31-1719
37-5011
spindle nut, inner
spindle nut, outer
washer
star washer
shoe and lining assembly ½” 16.5 x 7”
return spring
tension spring
anchor pin
r.h. cam bracket
l.h. cam bracket
slack adjuster
bolt and nut kit
cam, r.h.
cam, l.h.
bearing cone, inner
bearing cone, outer
oil seal
hub cap
hub cap (for hubodometer)
gasket
bolt and lock washer
spacer, steel
spacer, steel
snap ring
spacer, steel
snap ring
hubodometer
25-2220
25-2244
25-2245
25-2246
spider welding spec
abs sensor clip (not shown)
abs sensor lead (not shown)
abs block (not shown)
4.3
9
20 21
22 23
Suspension, Spring (Hutchens)
7
3
2 2A
12
4A
1
20
2B
18
5 5A
19
6 6A
Item
1
2
2A
2B
3
4A
5
5A
6
6A
7
8
9
10
11
12
13
14
15
16
17
18
19
20
Part #
29-0026
29-0029
29-0029R
29-0029L
29-0030
29-0027
29-0032
29-0032A
29-0034
29-0034A
29-0036
29-0038
29-0040
29-0042
29-0044
29-0029
29-0048
29-0050
29-0052
29-0054
29-0056
29-0058
29-0060
29-0062
10 11
Description
front spring hanger
center spring hanger w/ equalizer, 49" axle spacing
rh center spring hanger w/ equal., 54 ½" axle spacing
lh center spring hanger w/ equal., 54 ½" axle spacing
rear spring hanger
3 leaf spring, 24,000 lb. cap.
non-adjustable torque arm, 49" axle spacing
non-adjustable torque arm, 54 ½" axle spacing
adjustable torque arm, 49" axle spacing
adjustable torque arm, 54 ½" axle spacing
u-bolts 7/8" x 5" rd x 11 3/4"
washer 7/8"-14
hex nut 7/8"-14
torque arm bolt, 1"-14 x 5"
lock nut 1"-14
center spring hanger w/ equalizer
hex nut 5/8"-18
hex bolt 5/8" x 4 ½"
washer 5/8" shakeproof
sleeve spacer
step bolt 5/8" x 18 x 3/4"
double washer-lock tab 5/8"
bottom plate, u-bolt
spring seat, 3/4" high
4.4
8
9
13 14 15 16 17
Suspension, Air-Ride, Front Section (Ridewell)
8
2
2 3
1
2
2
3
2
5
2
4
1
2
3
4
5
6
7
8
9
10
11
12
Part #
6
9
10
12
Item
7
11
Description
29-4014
air ride suspension kit, complete
29-4096
29-4090
29-4079
29-4074
29-4092
29-4078
29-4081
29-4082
29-4080
29-4062
29-4103
29-4102
bushing sleeve assembly only
kit, bushing replacement
wear washer only
anti-turn washer only
eccentric bolt only
nut for eccentric bolt only
bolt, shock absorber
nut, shock absorber
shock absorber
airspring
washer, beam
bolt, beam
4.5
Suspension, Air-Ride, Center and Rear Section (Ridewell)
2
1
13 9
11
13 7
10 13
13 6
13
13 4
13 5
8
13 3
Item
1
2
3
4
5
6
7
8
9
10
11
12
13
Part #
Description
29-4012
9’ air ride suspension kit, complete
29-4060
29-4061
29-4071
29-4072
29-4073
29-4074
29-4075
29-4079
29-4078
29-4076
29-4077
29-4080
29-4062
29-4070
hanger assembly, l.h.
hanger assembly, r.h.
washer only
nut only
bolt only
anti-turn washer only
eccentric bolt only
wear washer only
nut for eccentric bolt only
bushing assembly only, l.h.
bushing assembly only, r.h.
shock absorber
airspring only
kit, bushing replacement (specify l.h. or r.h.)
4.6
12
Axle Lift
Item
1
2
3
4
5
6
7
8
9
10
11
Part #
16-6029
29-4043
29-4044
29-4045
29-4046
29-4047
29-4048
29-4049
29-4050
29-4051
29-4052
29-4053
Description
air spring, #7808
3/8 lock washer
HHCS, 3/8 x 7/8 lg
HHCS, 3/4 x 5 lg
1" lock tooth washer
HHCS, 1" x 5" lg
36" nylon strap
3/4" oval lock nut
split bushing with sleeve
sleeve, 3/4" i.d. x 3" long
underslung lift beam
4.7
Pivot Bushing & Eccentric Bolt Replacement (Ridewell)
4.8
Alignment of Axle
4.9
Wheels and Tires
4
1 1A
2 2A
3
5
* 255/70R x 22.5, load range H, 16 ply, is rated for 5,070 lbs. @ 120psi (dual wheel application)
* 270/80R x 22.5, load range H, 16 ply, is rated for 6,175 lbs. @ 120psi (dual wheel application)
Item
1
1A
2
2A
3
4
5
Part #
Description
27-0080
27-0081
27-0800
27-0084
27-0790
37-5011
25-2004
tire only, 255/70R x 22.5 Load H
tire only, 275/80R x 22.5 Load H
wheel only, budd, 8.25 x 22.5
wheel only, hub-piloted, 8.25 x 22.5
wheel only, hub-piloted, 8.25 x 22.5, aluminum
hubodometer only
hub cap/hubodometer mount, 20K
27-4070
27-4071
27-4072
27-4075
27-4076
27-4077
assembly, tire/wheel, 255/70 x 22.5 tire and hub piloted 8.25 x 22.5 wheel (27-0080 & 27-0084)
assembly, tire/wheel, 255/70 x 22.5 tire and budd 8.25 x 22.5 wheel (27-0080 & 27-0800)
assembly, tire/wheel, 255/70 x 22.5 tire and hub piloted aluminum wheel (27-0080 & 27-0790)
assembly, tire/wheel, 275/80 x 22.5 tire and hub piloted 8.25 x 22.5 wheel (27-0081 & 27-0084)
assembly, tire/wheel, 275/80 x 22.5 tire and budd 8.25 x 22.5 wheel (27-0081 & 27-0800)
assembly, tire/wheel, 275/80 x 22.5 tire and hub piloted aluminum wheel (27-0081 & 27-0790)
4.10
Air Brake System, Tandem Axle, 2S/1M
ref. dwg.: 16-6027
Item
1
2
3
4
5
6
7
8
9
10
11
12
13
14
15
16
17
18
19
20
21
Part #
Description
31-4515
35-0101
35-0107
35-0183
35-0177
35-0103
air chamber, park, type 30/30
3/8" air brake hose, 24"
3/8" air brake hose, 32"
spring brake valve, ABS system
ecu/valve 2S/1M
3/8" air brake hose, 54"
35-0400
35-0404
35-0112
35-0085
35-0003
35-0070
35-0136
35-0156
37-5984
37-5988
comp. fitting, 1" pipe, 3/4" hose straight
90 deg. elbow, 1" pipe, 3/4" hose
3/4" synflex air brake hose
air tank, 2800 cu. in.
3/4" sq. head plug
drain valve with 5 ft. pull cable
blue 3/8" nylon air brake tubing
red 3/8" nylon air brake tubing
male elbow, 90 deg.
bulkhead fitting
35-0071
35-0927
35-0926
coupling, 3/8" brass
nipple m/pipe, 3/8”, air
coupler m/pipe, 3/8”, quick connect, air
4.11
Air Brake System, Tandem Axle, 4S/2M
ref. dwg.: 16-6033
Item
1
2
3
4
5
6
7
8
9
10
11
12
13
14
15
16
17
18
19
20
21
Part #
Description
31-4515
35-0101
35-0107
35-0183
35-0173
35-0103
air chamber, park, type 30/30
3/8" air brake hose, 24"
3/8" air brake hose, 32"
spring brake valve
ecu/valve
3/8" air brake hose, 54"
35-0400
35-0404
35-0112
35-0085
35-0003
35-0070
35-0136
35-0156
37-5984
37-5988
comp. fitting, 1" pipe, 3/4" hose
90 deg. elbow, 1" pipe, 3/4" hose
3/4" synflex air brake hose
air tank, 2800 cu. in.
3/4" sq. head plug
drain valve with 5 ft. pull cable
blue 3/8" nylon air brake tubing
red 3/8" nylon air brake tubing
male elbow, 90 deg.
bulkhead air
35-0071
35-0927
35-0926
coupling, 3/8" brass
nipple m/pipe 3/8”, air
coupler m/pipe, 3/8”, air
4.12
Air Brake System, Tri-Axle, 2S/2M
ref. dwg.: 16-6026
Item
1
2
3
4
5
6
7
8
9
10
11
12
13
14
15
16
17
18
19
20
21
Part #
Description
31-4515
35-0100
air chamber, park, type 30/30
3/8" air brake hose, 97"
35-0183
35-0178
35-0102
35-0107
35-0085
35-0070
35-0103
spring brake valve, ABS system
ecu/valve 2S/2M
3/8" air brake hose, 44"
3/8" air brake hose, 32"
air tank, 2800 cu. in.
drain valve with 5 ft. pull cable
3/8" air brake hose, 54"
35-0003
35-0136
35-0156
37-5984
37-5988
3/4" sq. head plug
blue 3/8" nylon air brake tubing
red 3/8" nylon air brake tubing
male elbow, 90 deg.
bulkhead fitting
35-0071
35-0927
35-0926
35-0080
coupling, 3/8” brass
nipple m/pipe 3/8”
coupler m/pipe 3/8”
air tank, 1488 cu. in.
4.13
Air Brake System, Tri-Axle, 6S/3M
ref. dwg.: 16-6031
Item
1
2
3
4
5
6
7
8
9
10
11
12
13
14
15
16
17
18
19
20
21
Part #
Description
31-4515
35-0100
35-0177
35-0183
35-0173
35-0102
35-0107
35-0085
35-0070
35-0103
air chamber, park, type 30/30
3/8" air brake hose, 97"
ECU valve
spring brake valve
ecu valve
3/8" air brake hose, 44"
3/8" air brake hose, 32"
air tank, 2800 cu. in.
drain valve with 5 ft. pull cable
3/8" air brake hose, 54"
35-0003
35-0136
35-0156
37-5984
37-5988
3/4" sq. head plug
blue 3/8" nylon air brake tubing
red 3/8" nylon air brake tubing
male elbow, 90 deg.
bulkhead fitting
35-0071
35-0927
35-0926
35-0080
coupling, 3/8 brass
nipple m/pipe 3/8” air
coupler m/pipe 3/8” Quick connect, air
air tank, 1488 cu. in.
4.14
Air Brake System, Tri-Axle, Non ABS
ref. dwg.: 16-6032
Item
1
2
3
4
5
6
7
8
9
10
11
12
13
14
15
16
17
18
19
20
21
Part #
Description
31-4515
35-0100
air chamber, park, type 30/30
3/8" air brake hose, 97"
35-0183
35-0480
35-0102
35-0107
35-0085
35-0070
35-0103
spring brake valve
relay valve
3/8" air brake hose, 44"
3/8" air brake hose, 32"
air tank, 2800 cu. in.
drain valve with 5 ft. pull cable
3/8" air brake hose, 54"
35-0003
35-0136
35-0156
37-5984
37-5988
3/4" sq. head plug
blue 3/8" nylon air brake tubing
red 3/8" nylon air brake tubing
male elbow, 90 deg.
bulkhead anchor
35-0071
35-0927
35-0926
35-0080
coupling, 3/8 brass
nipple m/pipe 3/8” air
coupler m/pipe 3/8” Quick connect, air
air tank, 1488 cu. in.
4.15
Air Brake System Fittings
350003
350008
350015
350028
350031
3/4" sq. head plug
branch tee
3/8" sq. head plug
3/8" street elbow
3/8" male connector
350033
350034
350048
350126
350400
90 deg. male swivel
elbow, 1/4" pipe
90 deg. male swivel
elbow, 3/8" pipe
pipe tee
3/8" hex nipple
comp. fitting, 1" pipe
3/4" hose
350404
350041
90 deg. elbow, 1 pipe,
3/4" hose
reducer, 3/4" - ½"
ABS Components
1
2
3
5
9
7
8
Item
Part #
10
6
Description
1
2
3
35-0177
35-0178
35-0173
ecu/valve assembly, 2s/1m
ecu/valve assembly, 2s/2m (triple axle only)
ecu/valve assembly, 4s/2m
5
6
7
8
9
35-0187
35-0196
35-0194
35-0161
35-0163
35-0198
abs diagnostic cable (optional)
sensor spring clip (Wabco)
sensor with molded socket
power cord (2s/1m)
power cord (4s/2m)
sensor extension with plug
10
11
35-0225
35-0500
Air line filter, Blue supply
Air line filter, Red supply
4.16
11
Air System, Gooseneck, 96" Swing Clearance
ref. dwg.: 16-6012
Item
1
2
3
4
5
6
7
8
9
10
11
12
13
Part #
37-0832
36-0013
36-0016
35-0926
35-0927
37-5988
37-5987
37-5983
37-5984
37-5985
37-5986
35-0050
35-0052
35-0156
35-0136
Description
1 1/4” rubberized hose clamp
nut, 1/4-nc
1/4" lock-washer
type 30 coupler m/pipe, Quick connect, air
type 30 nipple m/pipe, air
bulk head anchor fitting
tag service
tag emergency
male elbow, 90 deg.
male connector, 3/8"
bulk head/glad hand, frame coupling stud
glad hand service
glad hand emergency
nylon brake hose, red
nylon brake hose, blue
4.17
Tandem Axle Air Ride Suspension Air System
ref. dwg.: 16-6025
Item
1
2
3
4
5
6
7
8
Part #
370471
370470
350032
350033
350117
350118
355998
355870
Description
height control valve
pressure protection valve
tee, 1/4MNPT x 3/8 tube
90 deg. elbow, 1/4MNPT x 3/8 tube
3/8 tube yellow, brake
3/8 tube green, brake
3/8 tube x 1/4MNPT
3/8 tube tee
4.18
Tri Axle Air Ride Suspension Air System
ref. dwg.: 16-6023
Item
1
2
3
4
5
6
7
8
Part #
370471
370470
350032
350033
350117
350118
355870
355998
Description
height control valve
pressure protection valve
tee, 1/4MNPT x 3/8 tube
90 deg. elbow, 1/4MNPT x 3/8 tube
3/8 tube yellow, brake
3/8 tube green, brake
3/8 tube tee
3/8 tube x 1/4MNPT
4.19
Tri Axle Air Ride Suspension Air System with Lift on Rear Axle
ref. dwg.: 16-6020
Item
1
2
3
4
5
6
7
8
9
10
11
12
13
14
15
16
Part #
379476
370477
370475
370471
370470
375996
350033
350118
350113
350119
376020
376022
350117
355870
355998
314602
Description
100psi valve
lift axle control valve
pilot valve
height control valve
pressure protection valve
3/8 tube 1/4MNPT tee
3/8, 90 deg. elbow
3/8 tube green, brake
1/4 tube black
3/8 tube orange, brake
1/4 tube 1/8MNPT
3/8 tube 1/8 MNPT 90deg. elbow
3/8 tube yellow, brake
3/8 tube tee
3/8 tube 1/4MNPT
lift axle brake valve shut-off
ref. dwg. no. 166020
4.20
Dual Hydraulic System, Wet Line & Pony Motor
ref. dwg.: 16-6022
Item
1
2
3
4
5
6
7
8
9
10
11
12
13
14
15
16
17
18
Part #
37-0311
37-0312
37-0320
37-0502
37-5978
37-5975
37-5966
37-5967
37-5961
37-5963
37-5978
37-5962
37-5968
37-5155
37-5158
37-5965
37-5969
37-5156
Description
8”x 8” Hyd Cylinder
9”x 9” Hyd Cylinder
4”x 10” Hyd Cylinder
2 spool control valve
O-ring fitting
male tee
female hose asm.
female hose asm.
female hose asm. union
female hose asm.
male O-ring pipe fitting
supply hose asm. 84” swing
supply hose asm. 96” swing
supply hose asm. 108”swing
supply hose asm. 114” swing
return hose asm. 84” swing
return hose asm. 96” swing
return hose asm. 108” swing
19
20
21
22
23
24
25
26
27
28
37-5157
37-5964
37-5601
35-0504
35-0503
35-0017
12-6440
37-6035
37-6035
37-4305
37-5160
4.21
return hose asm. 114”swing
female hose asm.
90 deg. fitting
head unit filter
element filter
pipe adapter nipple
hyd. reservior
90 deg. fitting
pony motor
check valve
hose asm.
Hydraulic System (Wet Line) 84" Swing Gooseneck
ref. dwg.: 16-6001, pg. 1 of 2
Item
1
2
3
4
5
6
7
8
9
10
11
12
13
14
15
16
17
18
19
20
21
22
23
24
25
26
27
28
29
30
31
32
33
34
Part #
Description
16-6001
37-5972
37-5971
37-5969
37-5970
37-5962
37-5965
37-0502
37-5966
37-0320
37-5967
37-5964
37-5963
37-5978
37-5961
37-5975
quick coupler , female
nipple, male
pipe adapter, return
bulkhead w/ lock nut
supply hose, 108"
return hose, 116"
control valve
rod end, 30" (4 x 10)
cylinder, 4 x 10
butt end, 24" (4 x 10)
main cyl top hose, 39"
main cyl bot hose, 50"
o-ring, jic
hose, union, 19"
tee adapter
37-5977
37-0311
37-5976
37-5968
37-5981
36-0202
36-0201
37-0245
07-0320
37-5979
07-0321
37-5980
37-0832
36-0206
½" - ½", 90 deg. o-ring, jic
cylinder, 8 x 8
½" - 3/4", 90 deg. o-ring, jic
3" rubber grommet
bolt, 3/8-unc hhcs x 1", grade 5
3/8 flat washer
3/8 lock washer
grease zert, 1/4 ase
bottom pin, 8 x 9 cyl
cotter pin, 1/4 x 3
top pin, 8 x 8 cyl
grease zert, 1/4-45 deg.
hose clamp
1/4-unc lock nut
37-5126
37-5125
dust plug
dust cap
4.22
Hydraulic System (Wet Line) 84" Swing Gooseneck
ref. dwg.: 16-6001, pg. 2 of 2
4.23
Hydraulic System (Wet Line) 96" Swing Gooseneck
ref. dwg.: 16-6011, pg. 1 of 2
Item
1
2
3
4
5
6
7
8
9
10
11
12
13
14
15
16
17
18
19
20
21
22
23
24
25
26
27
28
29
30
31
32
33
34
Part #
Description
16-6011
37-5972
37-5971
37-5969
37-5970
37-5968
37-5969
37-0502
37-5966
37-0320
37-5967
37-5964
37-5963
37-5978
37-5961
37-5975
quick coupler
nipple
pipe adapter
bulkhead w/ lock nut
supply hose, 126"
return hose, 134"
control valve
rod end, 30" (4 x 10)
cylinder, 4 x 10
butt end, 24" (4 x 10)
main cyl top hose, 39"
main cyl bot hose, 50"
o-ring, jic
hose, union, 19"
tee adapter
37-5977
37-0311
37-5976
37-5968
37-5981
36-0202
36-0201
37-0245
07-0320
37-5979
07-0321
37-5980
37-0832
36-0206
½" - ½", 90 deg. o-ring, jic
cylinder, 8 x 9
½" - 3/4", 90 deg. o-ring, jic
3" rubber grommet
bolt, 3/8-unc hhcs x 1", grade 8
3/8 flat washer
3/8 lock washer
grease zert, 1/4 ase
bottom pin, 8 x 9 cyl
cotter pin, 1/4 x 3
top pin, 8 x 9 cyl
grease zert, 1/4-45 deg.
hose clamp
1/4-unc lock nut
37-5126
37-5125
dust plug
dust cap
4.24
Hydraulic System (Wet Line) 96" Swing Gooseneck
ref. dwg.: 16-6011, pg. 2 of 2
4.25
11HP Honda Power Supply, Standard
ref. dwg.: 16-6024
Item
1
2
3
4
5
6
7
8
9
10
11
12
13
14
15
16
17
18
19
20
21
22
23
24
25
26
Part #
16-6024
37-6180
37-6182
12-5026
37-5057
37-5055
37-5058
37-6170
39-9026
36-0081
36-0082
36-0103
36-0017
36-0205
36-0206
35-0215
36-0777
36-0776
37-5056
36-0207
39-1546
39-1547
37-5200
06-4311
37-6168
37-6008
06-4225
Description
11HP Honda
.31 c.i. pump
engine mount
coupler, 1" bore
coupler spacer
coupler, .63 bore
starter switch
rubber boot
bolt, HHCS 5/16-unf x 1", grade 5
bolt, HHCS 5/16-unf x 2", grade 5
5/16 lock washer
HHCS 1/4-unc x 1 1/4
1/4 flat washer
1/4-unc lock nut
battery
J-bolt
battery hold-down
fuel shut off
bolt, HHCS 1/4-unc x 1", grade 5
red wire, 40"
black wire, 40"
5/16 rubber plug
throttle cable mount
control cable
cable end mount
ignition mount plate
4.26
Pony Motor Hydraulic/Mounting, 11HP Honda
ref. dwg.: 16-6000, pg. 1 of 2
Item
1
2
3
4
5
6
7
8
9
10
11
12
13
14
15
16
17
Part #
37-0311
37-0312
37-0320
37-0502
37-5978
37-5975
37-5966
37-5967
37-5961
37-5963
37-5978
37-5963
37-5964
37-5964
37-5601
35-0504
35-0017
8”x 8” Cyl
9”x 9” Cyl
4”x 10” Cyl
control valve
male O-ring fitting
male tee
female hose asm.
female hose asm.
female hose asm. union
female hose asm.
male pipe O-ring fitting
female hose asm.
female hose asm.
female hose asm.
90deg. fitting
head unit filter
pipe adapter nipple
Description
Item
Part #
18
19
20
21
12-6440
37-6035
37-6180
37-5160
4.27
Hyd reservoir
90 deg. fitting
pony motor
hose asm.
Pony Motor Hydraulic/Mounting, 11HP Honda
ref. dwg.: 16-6000, pg. 2 of 2
4.28
Electrical System, Gooseneck
ref. dwg.: 16-6013
Item
1
2
3
4
5
Part #
39-7074
35-0013
36-0016
36-0207
39-7180
Description
harness, complete standerd
nut, 1/4"-nc
1/4" lock washer
HHCS 1/4-unc x 1"
24" cable extension
4.29
Wiring Harness
Item
1
2
3
4
5
6
Part #
Description
39-7074
Standerd Detach light package full wiring harness
39-7260
39-7261
39-7262
39-7263
39-7264
39-7265
Nose lead
Middle section
Tail lead
Tail section
Gooseneck front section
Gooseneck rear section
4.30
Wiring Harness
8
7
Item
1
2
3
4
5
6
7
8
Part #
Description
39-7064
Detach extra light package full wiring harness
39-7071
39-7065
39-7069
39-7068
39-7066
39-7067
39-7063
Nose lead
Middle section
Tail lead
Tail section
Gooseneck front section
Gooseneck rear section
Battery pack flasher kit
LED strobe light kit w/mounted switch
4.31
Lighting
ref. dwg.: 16-6014
4A
4
2
3 3A 7 7A
10
9 9A
Item
1
2
3
3A
4
4A
4B
5
6
7
7A
8
9
9A
10
Part #
39-7074
39-3000
39-3007
39-2745
39-3001
39-3003
39-2760
39-3006
39-3009
39-2740
39-3011
39-3016
39-3016
39-3022
Description
wiring harness
2 ½" round grommet, flush mount
2 ½" amber marker light
2 ½" amber marker light (L.E.D.)
oval tail light grommet
Oval tail light
Oval tail light L.E.D.
mid-ship marker light
abs light
2 ½" red marker light
2 ½" red marker light (L.E.D.)
license light
4 ½" stop/turn/tail light
4 ½" stop/turn/tail light (L.E.D.)
4 ½" round grommet
4.32
8
84" and 96" Gooseneck Assemblies, Replacement Parts
ref. dwg.: 16-6002 & 16-6010, pg. 1 of 2
2007
Models and Older
142.00
3
3A
3B
3
3A
3B
20
3
Item
3
3A
3B
4
5
6
7
8
9
10
11
12
13
14
15
16
17
18
19
20
Part #
12-5056
12-6165
12-6177
12-5072
12-5071
12-5070
07-0325
36-0030
06-4195
36-0018
36-0807
12-5046
12-5072
37-5982
12-5074
37-0460
37-5973
36-0408
37-5974
33-2809
3B
3A
Description
Low Profile load block weldment
Standerd load block weldment
High lift load block weldment
pivot pin weldment
l.h. load block pin weldment
r.h. load block pin weldment
load block handle
nut, ½" ny-lock
pin cap
lock washer, ½"
HHCS ½-unc x 1.00
lift arm weldment
lift arm pin weldment
cotter pin, 1/4 x 2
linkage rod assembly
pin, ½ x 1 ½
cotter pin, 1/8 x 1
5/8 lock washer
Hex Head Cap Screw 5/8-unc x 3" plated
2" king pin
4.33
84" and 96" Gooseneck Assemblies, Replacement Parts
ref. dwg.: 16-6002 & 16-6010, pg. 2 of 2
2008
Models
Item
1
2
3
4
5
6
7
8
9
10
11
12
13
14
Part #
12-5044
12-5170
12-6662
12-5056
12-6165
12-6177
12-6468
07-0325
35-4008
12-6469
12-5074
37-5974
36-0408
12-6471
06-4195
36-0018
36-0807
12-6473
Description
Under Carriage 24” Loaded deck height for 8’6” & 9’ wide models
Under Carriage 24” Loaded deck height for 9’6” & 10’ wide models
Under Carriage 20” Loaded deck height for 8’6” & 9’ wide models
Low load height block
15
37-0239
Cotter Pin 3/16” x 2”
Med/Standerd load height block
16
37-0312
Cylinder 9” Bore
High load height block
37-0311
Cylinder 8” Bore
LH load block pin
17
37-5979
Cotter Pin 1/4” x 3”
Load block handle
18
12-6371
Detach shoe
Lock nut ½”nylock
19
37-0320
Cylinder 4” x 10”
RH load block pin
20
Call Factory with serial number to attain proper fit
Linkage assembly
21
07-0625
Lower Cylinder pin
Bolt 5/8”- 11UNC 3”
22
07-0626
Upper Cylinder pin
Washer 5/8”
Pivot pin
Pin Cap
Lock washer ½”
Bolt, ½”-13UNC x 1” Gr.8
Lift arm pin
4.34
Ramps, Springs and Cantilever
1
3
2
4
5
6
7
8
9
Item
1
2
3
4
5
6
7
8
9
Part #
12-5041
12-5089
12-5098
12-5075
12-5078
07-0307
07-0050
07-0016
37-0580
37-0582
37-0622
37-0234
37-0235
Description
standard front loading ramp
3rd (center) ramp
front paver ramp
5 ft. cleat style rear ramp (for use with 30" beavertail)
cantilever
ramp rod, stress-proof, 1 ½" x 22 3/8"
cantilever rod, stress-proof, 1 ½" x 41 ½"
ramp rod, 1" x 22"
ramp helper spring, lift off beavertail, l.h. (3/8")
ramp helper spring, lift off beavertail, r.h. (3/8")
ramp helper spring, lift off ground (5/8")
roll pin, 5/16" x 1 ½" (not shown)
roll pin, 5/16" x 3" (not shown)
4.35
Hydraulic Ramp System- Single Acting Cylinder
16
17
15
14
23
24
22
18
18
19
20
21
22
21 23
24
19
20
Item
1
2
3
4
5
6
7
8
9
10
11
12
13
14
15
16
17
Part #
37-0302
35-6002
35-6000
37-4001
37-6001
37-6002
37-6200
37-4003
37-5988
37-4004
37-5971
37-5972
37-4005
37-6003
12-5087
12-5092
07-0327
37-0235
Description
cylinder, lower, 3 ½ x 16
hose assy, cylinder to tee
tee bulkhead, #6 JIC
hose tee to valve
90 deg. elbow, 8MJ-8MB90
90 deg. elbow, 6MJ-8MB90
single spool valve
deck length hose
bulkhead, 8MJ-8MJBKHD
pigtail hose
nipple
quick coupler
hose jumper
fitting, male boss, 6MJ-8MB
3 ft. x 8 ft. cleat style hydraulic rear ramp (for use with 36" beavertail)
ramp hold-up
ramp rod
roll pin, 5/16" x 3" ramp rod keeper (not shown)
4.36
37-3502
06-6033
37-9096
37-9094
37-9094
37-9103
37-9097
Hyd Flow Controller
Flow Controller Mount
Tee Fitting 12MJ-MJ-MB
Return Hyd. Hose
Supply/Power Hyd. Hose
90deg. Elbow 16MJ-16MB
45deg. Elbow 12MJ-MB
Hydraulic Ramp System- Dual Acting Cylinders
16
ROD END CYL
17
POWER LINE
BUTT END CYL
RETURN LINE
7
5
6
1
13
12
9
8
3
14
10
11
4
2
15
Item
1
2
3
4
5
6
7
8
9
10
11
12
13
14
15
16
17
Part #
37-0302
35-6002
35-6000
37-4001
37-6001
37-6002
37-6188
37-4003
37-5988
37-4004
37-5971
37-5972
37-4006
37-6003
12-5087
12-5092
07-0327
37-0235
Description
cylinder, lower, 3 ½ x 16
hose assy, cylinder to tee
tee bulkhead, #6 JIC
hose tee to valve
90 deg. elbow, 8MJ-8MB90
90 deg. elbow, 6MJ-8MB90
single spool float valve
deck length hose
bulkhead, 8MJ-8MJBKHD
pigtail hose
nipple
quick coupler
hyd. hose rod end
fitting, male boss, 6MJ-8MB
3 ft. x 8 ft. cleat style hydraulic rear ramp (for use with 36" beavertail)
ramp hold-up
ramp rod
roll pin, 5/16" x 3" ramp rod keeper (not shown)
4.37
Fenders
Item
1
2
3
4
5
Part #
37-3034
06-7073
06-7098
06-7074
06-7099
Description
Gooseneck Fender,, Aluminum
L.H. Bottom mount
L.H. Top Mount
R.H. Bottom Mount
R.H. Top Mount
4.38
5th Wheel Locking Assembly
ref. dwg.: 16-6007
Item
1
2
3
4
5
6
7
Part #
16-6006
12-5086
12-5068
37-1120
36-0304
36-0030
Description
5th wheel locking assembly
lock handle assembly
5th wheel pin assembly
cable clamp
spring (sold with rebuild kit)
9/16" nut
½" ny-lock nut
4.39
5th Wheel Locking Assembly
ref. dwg.: 16-6006
Note: Items without part numbers are not replacement
parts, and are available with complete assembly only.
Item
1
2
3
4
5
6
7
8
9
10
11
12
13
14
15
16
17
18
19
20
21
22
23
24
25
26
Part #
Description
16-6006
37-6600
5th wheel locking assembly (complete)
rebuild kit (includes all items except 1, 16, 17 and 25)
12-5042
lock weldment
pin
torsion spring
lock guard
lock jaw
lock pin
cotter pin, 1/4 x 2
yoke
cam plate
yoke shaft
lock nut, 3/4-16
washer, 1 ½ o.d. x 13/16 i.d.
rubber washer
lock adjustment tag
secondary lock
pivot bar weldment
tee pivot lock
bolt, 5/8-18 x 1 3/4
washer
roller
bolt, ½-10 x 1 3/4
washer, 1 3/4 o.d. x 9/16 i.d.
roller
locknut, ½-20
spacer block
spring
37-6601
12-5043
12-5057
08-1026
4.40
Removable King Pin
Item
1
2
3
4
5
6
7
Part #
37-0121
36-1050
36-1051
37-0122
37-0123
37-0124
36-1052
Description
hair pin
nut
washer
king pin
plug
cover plate
wing nut
4.41
Miscellaneous Parts
11
12
8
10
4
1
2
3
9
5
5A
6
Item
1
2
3
4
5
5A
5B
6
6A
7
8
9
10
11
12
Part #
5B
Description
12-5041
front loading ramp
07-0307
ramp rod
37-5979
cotter pin
12-5025
double out-rigger (front out-rigger)
06-5402
Top out-rigger bracket
12-6090
Out-rigger
06-5403
Bottom out-rigger bracket
37-4000
40,000lbs capacity
37-4002
35,000lbs capacity
12-6315
1" D-ring and clip, with Side rail stiffner
Call Factory with trailer serial number
37-0802
Towmaster mud flaps (one pair)
37-0804
mud flaps, generic (one pair)
37-6072
registration holder
07-0325
load block handle
07-0313
lock handle bar
4.42
TO
WM
AS
TE
R
Decals (Warnings and Cautions)
These decals are located on various parts of your trailer, please be
aware of all DANGER, WARNING, CAUTION and ATTENTION decals.
Ignoring these decals, or not following proper operating
instructions may result in serious injury or death.
45-0240
45-0241
45-0242
45-0115
45-0017
45-4150
45-4150
45-4152
45-4154
45-4155
45-0705
45-2080
45-3310
45-4206
45-3314
45-0009A
45-3301
45-4201
45-3200
45-4203
45-3323
45-4218
45-4202
45-0012
45-0013
45-3322
45-4216
45-4213
45-3324
45-2925
45-4204
45-1240
45-1362
45-0014
45-4214
45-1415
45-4208
45-3312
45-3313
45-3311
45-4210A
45-3402
45-7101
45-4217
Kit T-70DTG
Kit T-100DTG
Kit T-110DTG
Kit T-120DTG
Towmaster, large neck
Titanium, large neck
T-70DTG
T-100DTG
T-110DTG
T-120DTG
800-462-4517,web address
Caution, Warning, Danger
Danger,Stand Clear when lowering deck
Danger,Stand Clear when lowering ramps
Danger,Pinch Point
Warning, Wheel nut torque
Waring, Clean glad hand
Warning, Disconnect wet line
Warning, Secure load by DOT Standards
Warning, No side loading
Warning, Overload hazard
Warning, Axle settings, shims
Caution, Outrigger planks
Caution, Stinger retainer pin
Caution, Lift Axle
Caution, Flip axle air suspension dump valve
Caution, Adjust shims with load
Caution, Proper gooseneck hookups
Attention, Outrigger boards used with outrigger
Attention, Registration Holder
Attention, Selector options
Attention, Green Brake
Bi-fold ramp operation
Suspension dump valve operation
Stinger Lock Pin operation
Air Brake system wiring
"Hydraulic Oil"
"Return"
"Power"
"Lock Handle"
Hyd. ramp operation
Detaching neck operation
Pony motor operation
Air Pressure adjustment operation
4.43
Decals (Warnings and Cautions)
452080
454206
453310
Stand clear when
lowering ramps.
450009A
453314
WARNING
DANGER
For proper performance, all new axles should have
the following checked at the specific intervals:
Wheel Nut Torque:
Upon delivery, at 10, 25 and 50 miles and weekly
thereafter. KEEP THEM TIGHT!
Brake Adjustment:
At 200 miles and 3,000 miles and every 3,000
miles thereafter.
Tire Pressure:
Upon delivery and per tire manufacturer’s
450009A
requirements.
453301
WARNING
PINCH POINTS
Watch your
hands!
Screen in glad hand must
be clean before connecting
to tow vehicle.
Keep
clean!
453314
453301
4.44
Decals (Warnings and Cautions)
454202
454201
CAUTION
WARNING
Outrigger plank storage locks must
be in the locked position for traveling.
Disconnect wet line
from truck before
using pony motor!
LOCKED
UNLOCKED
Outrigger plank
454201
453200
454202
454203
WARNING
Load must be
secured
according to D.O.T.
standards.
(Follow DOT Federal Motor Carrier Safety
Regulations §392.9, §393.100 and §393.102.)
453200
450029
450013
450013
4.45
Decals (Warnings and Cautions)
453402
HYDRAULIC DETACHABLE OPERATING INSTRUCTIONS
CAUTION
BEFORE OPERATING THIS TRAILER,
READ AND UNDERSTAND THE TRAILER OPERATION MANUAL
Detach Instructions
1.
2.
3.
4.
5.
6.
7.
8.
9.
Park truck and trailer in a straight line and
on as level ground as possible.
Start hydraulic system.
Detach air and electrical lines, roll up
and put them in their storage area.
Raise gooseneck until loadblocks can
be rotated up.
While holding loadblocks in the up position,
lower the gooseneck to the ground.
Continue lowering gooseneck until there is
approximately 1/4” gap below loadpin
and loadplate.
Lower gooseneck lifting arm to truck frame.
Pull lock handle to the unlocked position.
Drive forward, adjust lift arm accordingly.
Transport position
Raise gooseneck
Rotate loadblock
Gooseneck lift arm
Hookup Instructions
1.
2.
3.
4.
5.
6.
7.
8.
9.
Adjust gooseneck height (should be 1.50 dim.
under loadplate to ground).
Adjust undercarriage (if needed).
Back up truck slowly until lock latches.
Undercarriage will self-align with trailer (if not,
pull ahead and adjust accordingly).
Be sure the lock handle is in the locked position.
Raise gooseneck/deck until loadblocks can be
rotated down to the desired deck height.
Lower gooseneck/deck to transport position.
Raise gooseneck lift arm.
Connect air and electrical lines.
Lock handle
1/4” gap
NOTE: Before backing up, adjust gooseneck
lift arm (1-1/2” ground clearance)
453402
457101
PONY MOTOR INSTRUCTIONS
STARTING A COLD ENGINE:
Push button in on control cable head, while holding the control knob and
pull cable out until it stops (this is the choke position).
STARING A WARM ENGINE:
DO NOT USE THE CHOKE. Move the control knob slightly past the idle
position.
CHOKE
OFF
Turn key to the start position and hold it there until engine starts. When the
engine starts, allow the engine switch to return to the (ON) position. When
engine starts to run rough, turn the control knob clock-wise until engine
runs smooth.
DO NOT use the starter for more than 5 seconds or starter damage may
occur. If the engine fails to start, release the switch, wait 10 seconds and try
starting again.
STOPPING THE ENGINE:
Push the control knob all the way in to the kill position. Do not shut the key
off to stop the engine. After engine quits, turn key to the (OFF) position.
4.46
ON
START
TWIST
FOR
THROTTLE
KILL
457101
45-0015
Decals (Warnings and Cautions)
454213
454217
454216
454207
454218
4.47
Decals (Warnings and Cautions)
45-3323
45-3322
45-4214
+
45-0014
450014
45-3324
4.48
Decals (Warnings and Cautions)
452925
454208
ATTENTION
Registration
Holder
453312
RETURN
Parts and Service Manual enclosed.
To receive an additional 6 months
warranty of MAIN FRAME only, return
your warranty registration within 14
days. See your dealer for details.
453313
POWER
452925
453311
454204
ATTENTION
SELECTOR OPTIONS
451240
ATTENTION
IN
OUT
Neck Controls
Rear Ramp
Controls
A "green brake" is an unground,
unburnished brake. Normal
manufacturing tolerances dictate
that there is a break-in period
required after which the lining will
seat into a perfect concentric
situation. During this break-in
period, the user must be aware
454204
453401
451240
45-4210A
451415
AIR BRAKE SYSTEM WIRING
4 OR 5 WIRE SCHEMATIC
TRAILER ABS
WARNING LAMP
IN TRACTOR
ECU INTERNAL GROUND (5 WIRE CABLE ONLY)
WHITE AND YELLOW
7 WAY
+
I.D. LIGHTS
4
TAIL & MARKER LIGHTS
WHT
POWER
SOURCE
BLK
LT
TRAILER ABS
WARNING LAMP
WHITE (GROUND)
5
BRN BLUE (CONSTANT POWER)
BLU
RT
GRN
YEL
RED
RED (STOP)
GREEN AND WHITE
3
2
1
ECU POWER
CONNECTOR
GROUND
ABS ONLY
451415
4.49
Decals (Warnings and Cautions)
450017
454150
454151
T-70DTG
454152
454154
450705
800-462-4517
towmastertrailers.com
4.50
SECTION 5
Misc. Information
Payload Ratings 5.1
Recommended Outrigger Loadings 5.2
Height Control Valve 5.3
Height Control Valve Replacement 5.4
Preventative Maintance- Ridewell Suspension 5.5
Torque Specs./ Suggested Preventative Maintance 5.6
Preventative Maintenance- Wheel Bearing 5.7-5.8
5th Wheel Lock - Lubrication Hole Template 5.9
Brake Disassembly/ Assembly 5.10
Recommended Brake Adjustment Procedure 5.11
5
4
Payload Ratings
ALL PAYLOAD RATINGS ARE AT 55+ M.P.H. Trailers are NOT shipped with BRAKE
CAB CONTROL equipment. Contact our parts department for information on
specialized controllers.
All payload ratings are approximate, and will vary slightly with the actual
finished trailer weight. Please see detail specifications for exact Gross Vehicle
Weight Rating (GVWR). Trailer payload capacity is defined as the GVWR less the
actual trailer weight. Please note that this payload capacity is a maximum to not
be exceeded, and may only be achieved when the trailer is carefully loaded so that
the gooseneck bears its full rated load.
Payload capacity will be reduced if the trailer is loaded such that the gooseneck
bears less than its full rated loading. Care should be taken that moving the load
back to reduce gooseneck weight does not overload the axles and tires. The
certification tag on the trailer lists the Gross Axle Weight Rating (GAWR), which is
the maximum total weight allowed on the axles/tires. Total axle/tire weight allowed
is the GAWR times the number of axles. The tag also lists the GVWR.
When selecting a trailer, always allow a capacity safety margin to account for
non-uniform loading, growth in load and accessories weight, and the multitude of
other unforeseen circumstances that occur in equipment transportation.
GAWR = axles, rims and tires
GVWR = trailer payload capacity plus the trailer weight (tare wt#).
5.1
Recommended Outrigger Loadings
PROPER LOADING TECHNIQUE
Because outriggers (sometimes called swinging side brackets or extension brackets)
are often used to extend the useful width of the deck by approximately 12" on each side
(or 24" total), the proper loading technique is very important.
RECOMMENDED PRACTICE
It is recommended that the centerline of the vehicle tracks, tires or grousers be "in-line"
or "inboard" of the outside edge of the deck.
!! CAUTION !!
Outrigger brackets are designed for use only with 2" thick boards, so the use of thicker
boards and/or loading practices that disregard these recommendations may result in
outrigger failures (breakage) and subsequent equipment damage and personal injury.
C
L tracks
maximum recommended width
not to exceed width of trailer
5.2
C
L tracks
Height Control Valve
5.3
Height Control Valve Replacement
5.4
Preventive Maintenance - Ridewell Suspension
5.5
Torque Specifications / Suggested Preventive Maintenance
5.6
Preventive Maintenance - Wheel Bearings
5.7
Preventive Maintenance - Wheel Bearings
5.8
5th Wheel Lock Assembly- Lubrication Hole Template
5.9
Brake Disassembly / Assembly
5.10
Recommended Brake Adjustment Procedure
A "green brake" is an unground, unburnished brake.
Normal manufacturing tolerances dictate that there is
a break-in period required after which the lining will
seat into a perfect concentric situation. During this
break-in period, the user must be aware that additional
brake adjustments will be mandatory to achieve
optimum braking performance.
5.11
Portions of this manual were used with the expressed
authority of Dexter Axle, but Dexter Axle is not responsible
for the accuracy of the information contained herein.
Towmaster means; quality, value, dependability.
Towmaster, Inc., 61381 U.S. Highway 12, Litchfield, MN 55355
800-462-4517
Parts Dept. Fax: 320-693-5703
www.towmaster.com
PROUDLY
Employee Owned
Employee Pride
U.S.A. Made!
Towmaster, Inc. offers a complete line of trailers from small pans and tilts to drop deck trailers to deck over
models and large tilts and detachable gooseneck trailers. See your Towmaster Trailers dealer or visit our
website to learn more. Manufacturer reserves the right to modify, without notice, specific designs and
specifications as deemed advisable on the trailers described herein without obligation in regards to trailers
previously sold. The manufacturer also reserves the right to discontinue any model or models without
obligation in regards to trailers previously sold. Written warranty covers each trailer. No other warranty
expressed or implied is made. Warranty on tires and brakes through original manufacturer. All
dimensions approximate.
47-9401 : 6/2007