1
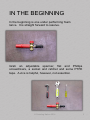
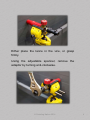
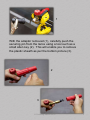
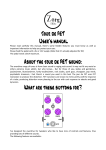
FOAM LANCE SERVICE
MANUAL
A STEP BY STEP GUIDE
DETAILING NATION FOAM LANCE
SERVICE MANUAL
Welcome to the Foam Lance Service Manual. Within these
hallowed pages, you shall find a step by step guide to
servicing your lance.
Why would you do this I hear you ask? Well, over time,
snow foam solution deposits in the gauze of the lance (the
bit that makes all the magical foam), causing the flow to be
interrupted, making it more like sleet as opposed to snow.
With a small selection of tools, and a short amount of time,
you will be able to restore your lance to optimum
performance once again.
© Detailing Nation 2014
2
IN THE BEGINNING
In the beginning is one under performing foam
lance. It is straight forward to resolve.
Grab an adjustable spanner, flat and Phillips
screwdrivers, a socket and ratchet and some PTFE
tape. A vice is helpful, however, not essential.
© Detailing Nation 2014
3
Either place the lance in the vice, or grasp
firmly.
Using the adjustable spanner, remove the
adaptor by turning anti-clockwise.
© Detailing Nation 2014
4
1
With the adaptor removed (1), carefully push the
securing pin from the lance using a tool such as a
small allen key (2). This will enable you to remove
the plastic sheath as per the bottom picture (3).
2
3
© Detailing Nation 2014
5
With the lance in a vice, or holding firmly, use the
adjustable spanner to remove the adaptor
connecting piece from the lance body, revealing
the injector as per the picture below.
© Detailing Nation 2014
6
Using a flat head screwdriver, carefully turn anticlockwise the injector, removing and storing in a safe
place.
© Detailing Nation 2014
7
Using the flat head screwdriver, gently prise the
blades from the lance body. These can be quite firm,
so use caution.
© Detailing Nation 2014
8
With the lance in a vice
or firmly grasped, use
the adjustable spanner
to remove the blade
holder from the lance
body.
Inside the blade
holder
is
the
gauze. This is the
part
we
are
cleaning
or
replacing.
© Detailing Nation 2014
9
From the back end of the
blade holder section (from
which you have removed
the blades), use a small
allen key (or similar tool) to
gently push the gauze free
from the holder.
One gauze, ready to
clean or replace. To
clean, soak in regular
household
kettle
descaler overnight.
One blade holder, free
of the gauze. Note the
small opening in which
the injector pushes the
foam solution.
© Detailing Nation 2014
10
Use the Phillips screwdriver to remove the lance adjuster.
Carefully remove and put to one side, the O-ring pictured
below.
© Detailing Nation 2014
11
Gently loosen the lance
shaft from the body at this
point.
Hold the body of
the lance in a vice
(or hold firmly), and
using
a
small
socket,
gently
remove the pickup
inlet from the body
of the lance as
shown.
© Detailing Nation 2014
12
Remove the pickup inlet from the body of
the lance as above. Now remove the
lance shaft from the body as below.
© Detailing Nation 2014
13
With the body now completely separate from all parts
of the lance, carefully examine all holes, and ensure
they are free of product. Clean using a pin, or similar
thin tool.
© Detailing Nation 2014
14
POINT OF RETURN
At this point, the lance is completely disassembled.
It is now that you replace the gauze with either a
new or cleaned item, and begin reassembly.
Ensure you have all of the pieces below.
© Detailing Nation 2014
15
Apply PTFE (plumbers) tape to the thread as
shown above, a few wraps should be sufficient.
Then carefully reattach the lance shaft to the body
as per the picture below.
© Detailing Nation 2014
16
Secure the lance body in a vice (or hold firmly) and
tighten the shaft onto the body using the adjustable
spanner. Then reapply the O-ring you removed
earlier as per the picture below.
© Detailing Nation 2014
17
Reattach the lance adjuster to the top of the body with
the screw. Apply PTFE tape to the end of the lance
shaft as shown above
Then, reinsert the gauze into the blade holder, and
apply to the end of the lance shaft. Refit the pickup inlet
to the bottom of the body in reverse of the removal.
© Detailing Nation 2014
18
Firmly push the blades back on to the blade
holder as above, leaving the partially
reassembled lance looking as below, ensuring
the blades are vertical.
© Detailing Nation 2014
19
Replace the plastic part of the shaft to the lance, and
replace the pin carefully into the locating hole, firmly
pushing into place.
Reinsert the injector into the body, and apply PTFE tape
to the adaptor connector on both ends. Secure the
adaptor to the bar, then the bar/adaptor to the body.
© Detailing Nation 2014
20
CONGRATULATIONS!
Ladies and gentlemen, you have now
successfully completed a full service of your
Detailing Nation foam lance. Be proud of your
achievements.
GO FOAM!
© Detailing Nation 2014
21