1
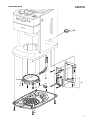
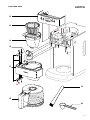
Coffee Maker
HD7751
Philips Consumer Lifestyle
Service Manual
PRODUCT INFORMATION
TECHNICAL INFORMATION
Safety info
- This product meets the requirements regarding
interference suppression on radio and TV.
- After the product has been repaired, it should function
properly and has to meet the safety requirements as
officially laid down at this moment.
-
Voltage
Frequency
Power consumption
Standby power
Contents jug
Colour setting HD7740
Filter size
Dimensions (L x H x W)
Temperature coffee after brewing
SAP coding
:
:
:
:
:
:
:
:
:
:
220 - 240 V
50 - 60 Hz
1000 W
0.5 W
1200 cc
Black / Metal
1x4
310 x 430 x 215 mm
80 °C
HD7751
OPTIONAL (accessories)
- No specific issues
Published by Philips Consumer Lifestyle
12/04
Printed in the Netherlands
© Copyright reserved
Subject to modification
DISASSEMBLY- AND RE-ASSEMBLY ADVICE
HD7751
A. Heating element removal
1. Turn the appliance upside down and remove the
bottom from the base by unscrewing the 4 screws A
under the rubber foot.
2. Remove the heating element by unscrewing the
5 screws B.
3. Remove the tubes from the heating element and
disconnect the wires.
5. During installation of the grinder motor be aware of
the position of the Knob compared with the position
of gearwheel 4. On gearwheel 4 you will see an arrow
and when this arrow points to the marked line, the
Indication on the knob has to point to number 5.
This means the flat side of gearwheel 1 has to be on the
side off the front panel.
B. PCB removal
1. Turn the appliance upside down and remove the
bottom from the base by unscrewing the 4 screws A
under the rubber foot.
2. Remove the 2 screws C.
3. Disconnect the wires.
Gearwheel 4
Flat
side
Stronger coffee
Gearwheel 1
Milder coffee
White / neutral wire
Black / Red wire
Grinder motor
Black / Black wire
Synchronous motor
Panel connection
Brown
wire
Black
wire
Blue
wire
Red
wire
C. Grinder Motor removal
1. Unscrew the bean tray by unscrewing the 3 screws D.
2. Unscrew the 8 screws E on the top cover. Be
aware of the 2 screws under the tank lid. They are
protected by plastic caps, and can be very hard to
remove. You can try blowing them out with a shot
of compressed air, otherwise you may have to use a
drill to get them out. New caps are available as 12nc:
4222 459 48871 (Pos 6.).
3. Remove the 7 screws F en 4 screws G from the grinder
motor. (See picture with Pos 11 Grinder Motor)
4. Disconnect the Black / Red wire on the PCB.
(See instructions B). Unfortunately there is a ferrite
bead around the leads preventing easy removal, it may
be necessary to cut out a small piece of the plastic
bridge in the appliance to get it out.
Remark;
How to set the motor grinder in a stronger or milder coffee
position?
When in the maximum setting, the coffee is not strong or mild
enough; the motor grinder can be changed in a stronger coffee
position by turning the gearwheel 4 a couple of gear teeth to
the left. The motor grinder can be changed in a milder coffee
position by turning the gearwheel 4 a couple of gear teeth to the
right.
D. Front panel removal
1. Remove the 2 screws H.
2. Disconnect the wire flat cable on the PCB.
(See instructions B).
Be aware to use the rails when refitting the front panel
with the base, and be aware to guide the wires along the
motor correctly.
E. Filter holder Housing removal
1. Turn the appliance upside down and remove the
2 screws I. (See picture pos 17 filter holder housing)
2. Remove the axle, and remove the filter holder housing.
2-7
HD7751
REPAIR INSTRUCTIONS
De-scaling
If the water system is nearly or less clogged by scale then
operate the coffeemaker a few times with vinegar or with a
10-15% solution of either vinegar-acid, citric acid or tartar
acid, into cold tap water.
Do not use other de-scaling agents as these may harm the
appliance.
If this procedure does not restore the function, then switch
off the coffeemaker when the acid has passed through during
approximately 3 min. Keep the appliance in this condition
overnight and continue/repeat the cleaning operation.
After the de-scaling procedure, operate the coffeemaker twice
with tap water in order to rinse away any residual substances.
ELECTRICAL DIAGRAM
Black
LCD
PCB
Conn 2
9
B (Grey)
Motor
AC
Conn 1
M
Synchronous
Motor
M
Grinder
Motor
Black
SW2
SW1
S4 (Grey)
S3 (Grey)
S1 (Grey)
S2 (Grey)
Black
Motor
DC
Red
Open
Switch
Control
PCB
Heat
Warm 2
H1 (Black)
Thermal
Fuse
W2 (Red)
H2 (Black)
Close
Switch
Heater +
Warm
Plate
On/Off
Switch
L
Mains N
L
Warm 1
N
H3
(Black)
X4 (White)
Brown
Blue
W1 (Blue)
Thermostat
H4 (White)
3-7
PARTS LIST
= changed
HD7751
Pos
Service code
Description
1
2
3
4
5
9965 100 49915
4222 459 48901
4222 459 48941
9965 100 49914
4222 459 48931
Heating element
PCB
Bean tray lid
Bean tray assy
Tank lid
6
7
8
9
10
4222 459 48871
4222 459 48961
4222 459 48971
4222 459 51781
4222 459 54591
Screw cap
Cleaning window
Sealing ring
Knob
Top cover
11
12
13
14
15
4222 459 48851
9965 100 49916
4222 459 51761
4222 459 48911
4222 459 48881
Grinder motor
Panel assy
Permanent filter
Filter holder + dripstop
Hinge
17
18
19
20
21
4222 459 48921
4222 459 54551
4222 459 48951
4222 247 35400
4222 459 53231
Filter holder housing
(Eu)
Jug assy
Metal / Black
Brush
Spoon
Hose incl. checkvalve and spring
22
23
24
4222 459 53651
9965 100 54955
9965 100 54134
Locker assy
On/Off switch
Synchro motor assy
220 - 240 V
220 - 240 V
220 - 240 V
220 - 240 V
4-7
EXPLODED VIEW
HD7751
9
8
COAR
SE
1
7
6
5
4
3
2
FINE
2-10
STRE
NGTH
F
/OF
ON
CALC
RESE
T
10
8
6
4
23
2
21
1
B
5x
C
2x
2
A
4x
5-7
EXPLODED VIEW
HD7751
3
D
3x
4
5
6
7
6
E
8x
8
9
10
9
8
COAR
SE
1
7
6
5
4
3
2
FINE
F
7x
22
24
11
G
4x
2-10
STRE
NGTH
F
/OF
ON
CALC
RESE
T
10
8
6
4
2
6-7
EXPLODED VIEW
12
HD7751
2-10
STRE
NGTH
CALC
RESE
T
13
H
2x
14
F
/OF
ON
15
10
8
6
4
2
17
I
2x
19
18
20
7-7