1
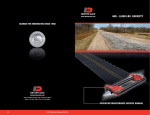
Service Information
for
With patented stainless steel wheel
bearing protectors.
Spindle
Spring Loaded Seal
Bearing
Cap
Hub
Patent No.
5,054,859
Check Valve
Overflow
Cavity
Grease
Fitting
Stainless Steel
Bearing Protector
Double
O-Rings
TRAILER BUDDY® AXLE
Your trailer is equipped with the Trailer Buddy® Axle. This system has a number of
unique features not found on conventional trailer axles. It is the finest quality axle
assembly available and is designed for long-term, trouble-free performance. The
following information is provided to answer questions you may have regarding
maintenance of the product.
FULL
The hub is full of grease when the blue
Autocheck® ring is visible. The cap on
the end of the blue ring contains messy
grease overflow.
GREASE
NEEDED
CAP
1
Filling the hub with grease is especially
easy. Simply remove the cap to reveal the
convenient grease fitting. Add grease until
the blue Auto Check® ring is visible.
5200# AXLES (6 or 8 lug with old-style protector)
Some 5200# axles feature the old-style blue Auto Check visual indicator ring. When the
ring is slightly outboard from the steel retaining ring, the hub is properly filled. If the
blue ring has receded flush with the steel ring add grease until the blue ring starts to
move. It’s that simple!
GREASE RELIEVING OUT FRONT OF YOUR 5200# AXLE
The protector has a built-in automatic pressure relief feature that prevents overfilling the
hub and also prevents rear seal damage. If you try to put too much grease into the hub it
will come right back out around the edge of the piston as you trail. No harm will occur;
you may get grease on your wheels. If you don’t like grease on your wheels, add a
Trailer Buddy bra.
WHEN TO CHECK
Checking when hubs are warm minimizes overfilling. Checking prior to launching
ensures full hubs when the axle is submerged. Adding grease after submersion is too
late!
RECOMMENDED LUBRICANT
You can match the grease already in your hub by using Trailer Buddy Wheel Bearing
Grease or use any other good quality, #2 grade multi-purpose grease. Use a water
repellent grease if you’d like, but it’s not necessary because water won’t enter a properly
filled hub. Grease consists of oil, soap and additives. (The soap in any particular grease
has one of several chemical bases [lithium, calcium, etc.]). Oil sometimes separates
from the soap and may leak out of the protector or under the rear seal. This is normal
and won’t create any problems.
BEARING REPACKING
There is no need to repack bearings if a good quality lubricant is used and the lubricant
level is properly maintained.
PRESSURIZED SYSTEM WON’T DAMAGE SEALS
The slight (3 psi) pressure your protector maintains inside the hub WILL NOT damage
inner seals. Adding grease with a power gun at a service station WILL damage seals!
Fill ONLY with a hand gun!
2
TRAILER BUDDY® BRA (for 5200# axles)
To keep grease that escapes from the protector off of trailer wheels, you can install the
Trailer Buddy® Bra. It fits over the protector and is easily removable for checking the
lubricant level. It’s available at your dealer.
HOW TO REMOVE A BEARING PROTECTOR
The protector is held in the hub by an interference fit. To remove one, lay a block of
wood against the side of it and strike the wood with a hammer. Place the wood on the
opposite side and hit it again. Continue this procedure until you “walk” the protector out
of the hub. Don’t disassemble the protector to attempt to remove it.
To install a protector, line it up with the hub, lay a block of wood over the front of the
protector and strike the wood with a hammer. The protector is designed to fit tightly
into the hub; therefore, it must be carefully aligned with the hub before hammering.
BEARING ADJUSTMENT
If the bearings need to be adjusted or replaced you must contact UFP first. We will help
diagnose the problem and send instructions to assure that the work is done correctly.
Failure to contact UFP before the work is begun may void the warranty.
Wheel bearings have been precisely torque-set at the factory. To maximize bearing life,
we suggest you check bearing adjustment at least once a year by following this
procedure. Jack up one side of the trailer. Grip the edge of the tire and see if you can
rock or move it. If you can move the outer edge of the wheel more than 1/8” remove the
bearing protector, the cotter pin and spindle nut retainer. While rotating hub tighten the
spindle nut to 18-20 inch pounds, which is slightly more than “finger tight”. Don’t
overtighten. When the nut is positioned properly the wheel should turn easily and there
should be no end play (lateral movement) of the hub with respect to the spindle.
To replace the nut retainer, find a position where it will fit over the spindle nut so that the
cotter pin can be inserted without having to loosen or tighten the nut. Insert a new cotter
pin. Recheck end play. Spread the ends of the cotter pin to keep it in place. Replace the
protector and add grease as necessary to move the piston outboard about 1/8 inch.
3
BEARINGS
Tapered roller bearings, identical to those currently used on many automobiles, are used.
Replacements are readily available.
Axle
Load Capacity
1500#-2500#
2900#-3750#
4200#
5200# (6 Bolt) 2.328”
5200# (6 Bolt) 2.441”
5200# (8 Bolt)
Inner
Cone
Cup
L44649
L68149
L68149
25580
25580
25580
L44610
L68110
L68110
25520
25520
25520
Outer
Cone
Cup
L44649
L44949
L68149
LM67048
15123
14125A
L44610
L44610
L68110
LM67010
15245
14276
GREASE SEALS
Each hub has a rear (inner) seal which keeps grease from leaking out of the back of the
hub. The spring-loaded seals used on your axle are the best available for the application.
The axle spindles are equipped with permanent, polished stainless steel seal surfaces for
the seals to rotate on. By maintaining the grease level, the system continuously
lubricates the seal lips. This system should provide up to 100,000 miles of service
(many years of use for most trailers) before seals need to be replaced.
GREASE LEAKAGE AT REAR SEAL
Visually check seals periodically. No rotating seal is perfect. It’s normal to see a film of
oil around the seal area. A slight amount of grease leakage won’t hurt anything, but if
the leakage becomes excessive it’s time to eliminate the problem. This usually means
disassembling the hub and replacing the seal.
On axles with drum brakes, you must remove the drum to check the seal condition. If
you don’t have to add grease to the brake axle, the seal is working properly. On the other
hand, if you find you are constantly adding grease or have to add an excessive amount of
grease, the seal is probably leaking or the brake is overheating. You should remove the
hub drum and check the brake and seal. Grease leakage can’t be tolerated on axles with
brakes because if grease gets on brake linings the brakes won’t help stop the trailer.
REPLACING SEALS
The hub or hub drum must be removed from the axle and the seal forced out. It is
impossible to remove the seal without damaging it. So if you remove it for some reason,
plan on replacing it. Because seals are a high quality design not widely available, you
will have to obtain a replacement from the dealer, a bearing supply company, the trailer
manufacturer or Unique Functional Products.
4
Seals currently in use are:
Axle Load
Capacity
1500#-2500#
2900#-3750#
5200# (6 Bolt)
5200# (8 Bolt)
Seal Outer &Inner
Diameter
1.98” x 1.38”
2.33” x 1.68” or
2.56” x 1.68”
3.38” x 2.13”
3.38” x 2.13”
Inner
Bearing Cone
L44649
L68149
L68149
25580
25580
SEAL CONVERSION INFORMATION
Seal
Description
198-138-SP1-1
233-168-SP2-1
256-168-SP2-1
338-213-SP2-1
SPINDO SEAL
Replacement Part Numbers
Trailer
Buddy
NOK
CR
07026
AB1990EO 13557
07027
AD2527EO 16657
07028
AD2528EO –––––
07040
AD8717EO 21352
National
482163N
473317
–––––
–––––
Marine dealers stock Trailer Buddy replacement seal kits, called Spindo® Seal. These
are replacement seal systems for use on axle spindles NOT manufactured by us. They
aren’t intended for your equipment (which has a superior seal system).
WHEEL BOLTS (OR CONE NUTS)
If you remove a wheel from a hub it is very important to properly tighten the wheel bolts
when you reinstall the wheel.
Mount the wheel on the hub and start the wheel bolts into the hub as far as possible by
hand. Then, using a proper lug wrench, tighten each wheel bolt moderately tight. Work
your way around the wheel, tightening every other bolt until all bolts have been
tightened. Then work your way around the wheel again, using the every other bolt
sequence, and tighten each bolt to torque recommended by trailer manufacturer.
It is important that the wheel be centered on the hub. The wheel may reseat itself
slightly during the first miles of travel after installation. After 100-200 miles of travel,
check wheel bolt tightness. Check periodically thereafter.
DISC BRAKE ADJUSTMENT
Not necessary, they are self-adjusting.
DRUM BRAKE ADJUSTMENT
Drum brakes should be adjusted in the same manner as old-fashioned automobile brakes.
Your marine dealer or an automotive service facility can adjust your brakes. Our 10”
drum brakes have a capped hole to permit brake lining inspection and access to the
brake shoe adjustment star wheel. Remove the trailer wheel to access the inspection
hole.
5
Warning: The removal of high spots on brake linings during initial
break-in may result in excessive clearance between linings and drum.
Therefore, brake shoe adjustment should be checked after the first 300
miles of travel. Thereafter, periodically check brake adjustment depending on service
conditions such as miles traveled and downhill braking. Poorly adjusted brakes
increase actuator travel and decrease stopping capability.
Trailer Buddy self adjusting, ventilated rotor disc brakes are now available on new
trailers and as replacements on your existing trailer. Contact your dealer or the trailer
manufacturer for details.
REPLACEMENT BRAKE PARTS FOR DRUM BRAKES
The following information will be helpful if you wish to purchase parts locally.
Brake
FMSI
Hub-Drum
Brake
Wheel Cylinder
Brake Shoe
Bolt Pattern
Type
Diameter (1)
Number (2)
5 bolt
10” x 2 1/4”
1 1/8” uniservo
154
6 or 8 bolt
12” x 2”
1 1/8” uniservo
62
(1)
(2)
Wheel cylinder repair kits are available at most auto parts stores. Take old
wheel cylinder parts with you when buying replacement parts.
FMSI stands for Friction Materials Standards Institute, an industry group that
assigns a standard number to every brake lining manufactured. Stores selling
brake shoes should have a catalog to cross reference their products to an FMSI
number.
BRAKE ACTUATOR
Most trailers use a surge type hydraulic actuator to actuate brakes. Make sure it is
operating properly and contains sufficient brake fluid. Contact the trailer manufacturer
for specific service instructions.
BRAKES AREN’T WATERPROOF
Unfortunately, the waterproof brake hasn’t been invented yet. Brake manufactures have
taken steps to extend the service life of brakes, but eventually water immersion can
cause trouble. Salt water is worse than fresh. If the actuating system operates properly,
and the brakes are correctly adjusted but won’t work, it’s best to check the brake
components. Replace any malfunctioning or badly rusted parts. Disc brakes offer better
service life and require less maintenance than drum brakes.
REPLACEMENT PARTS
If you can’t find replacement parts locally, we’ll be glad to ship them from our factory.
We are confident that our products will contribute to your boating pleasure by
eliminating worry and trouble with trailer running gear. If we can be of service or
answer any questions, please contact us.
6
FIVE YEAR LIMITED WARRANTY
Trailer Buddy Axle Systems are guaranteed against bearing failure and against defects in
materials or workmanship under normal use and service for a period of five years after
the date of trailer purchase by the first owner.
Limitations of Coverage
This warranty does not cover:
Normal wear and tear. Damage resulting from failure to keep bearings lubricated.
Damage caused by accidents, road hazards, overload, or modification of products
Failure attributable to improper assembly of, or damage to components if hub is
removed from axle spindle.
Damage caused by use of wheels not supplied by trailer manufacturer.
Failure of drum brakes (they are warranted by the brake manufacturer), worn
brake linings, or corrosion or damage of brake components caused by moisture or
improper adjustment.
Disc brakes are warranted for two years against defects in material and
workmanship. They are not warranted against damage caused by overload or
worn brake pads.
This warranty is limited to defective parts replacement only. Charges for installing
replacement parts, damage incurred to other equipment as well as incidental or
consequential damages connected therewith are excluded.
Some states do not allow the exclusion or limitation of incidental or consequential
damages, so the above limitations may not apply to you.
Repair or Replacement Procedure
If a failure or defect occurs during the warranty period, promptly contact warrantor’s
(UFP) customer service department. Until such notice is received, UFP will not be
responsible for any repair or replacement costs. UFP, at its option, may require return of
the axle assembly or the component in question to the factory, transportation charges
prepaid.
UFP will replace; FREE OF CHARGE, either the entire axle assembly or the part that
proves defective, at its option. Any part found not to be defective will be returned
freight collect with an explanation.
Use of Vehicle Identification Number (VIN)
The VIN is a 17-digit number located on the trailer identification label on the left side of
the trailer. Be sure to include the VIN number and the date of trailer manufacture in all
communications with UFP.
Purchaser’s Rights
This warranty gives you specific legal rights, and you may also have other rights, which
vary, from state to state.
Product Improvement
UFP has a policy of continuous product improvement. We reserve the right to change or
improve the design of our products without assuming any obligation to modify any
product previously manufactured.
33598
135 Sunshine Lane • San Marcos, CA 92069
760-744-1610 • Fax 760-744-1616 • www.ufpnet.com