1
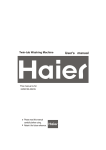
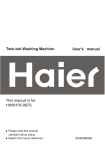
Twin-tub washing machine
SERVICE MANUAL
Model HWM65-187S
Features
Full plastic cabinet
Choose water current and washing time
Choose spinning time
Sperate washing and spinning
Full plastic washing tub and spinning tub
Manual code:SM HWM65-187S
Edition: 2008.04.17
CONTENTS
1.Contents
1
2. Features
2
3. Specifications
3
4. Safety precautions
4
5. Warning and cautions
5
6. Net dimension
6
7. Installation and accessory parts
7
8. Parts and functions
10
9. Maintenance service and trouble shooting
11
10. Wiring diagram
15
1
FEATURES
Features
Full plastic cabinet
Choose water current and washing time
Choose spinning time
Sperate washing and spinning
Full plastic washing tub and spinning tub
2
Specification
3
SAFETY PRECAUTIONS
Please insert the power cord into special
receptacle with rated voltage.Be sure to
use single-phase two pins receptacle.
The earthing terminal must be earthed
reliably.If possible,please adopt electric
leakage protector.
When the machine is normally using, please
put the power plug at the location easily to
be inserted and extracted by hand. Be sure
to pull the plug off when there'spower failure,
or the machine is being moved, cleaned or
when it is idle.
If the power cord is bad, to avoid risk it is required to replace.
Keep the pin of the power plug clean.
In case the washing machine is installed
on ground with carpet , do not block the
ventilation hole with carpet.
Do not use water hotter than 50 C .
Ventilation hole at
the bottom of the
washing machine
Do not put the machine at damp place
like the bathroom . Never wash it with
water. Do not place wet laundries on the
control panel.
Do not share one receptacle with other
electric appliances. Do not use it in
case that the power plug is damaged
or the inserting into the receptacle is
loose.
4
Do not wash water-proof laundries such
as the raincoat, bicycle shelter etc. To
avoid abnormal vibration during spinning.
WARNING AND CAUTIONS
Do not stretch hands into the working
machine. It is dangerous even if the
rotation is slow. Take special care of
the children.
Do not decompose, repair or alter the
machine by yourself.
Do not put any hot or heavy items
( such as the kettle with hot water )
on the washing machine.
Do not wash laundries with volatile
materials (such as thinner, petrol etc.).
l
Petro
Handicapped or children without care
shall not use the machine.
5
Thinner
Keep the machine away from direct
sunlight and heat source like the
heater.
NET DIMENSION
690
37 6
Unit
mm
Figure 1
INSTALLATION AND ACCESSORY PARTS
The drainage shall be smooth with the drain hose.
1.put the drain hose up to suitable position. .
0.7m<H <1.2m
2.Do not step on or press the drain hose.
Notes: the highest point of drain pipe should be
higher than the water level of washing tub
for avoiding to siphon phenomenon during drain.
6
INSTALLATION AND ACCESSORY PARTS
Figure 1 indicates the ex factory installation
position of the drain hose.
Soft item
Figure 1
Extend the drain hose from the side of spin tub.
Put soft items on the ground. Lean the machine
down gently with the front surface facing the
ground. Take off the drain hose from the cabinet.
Take the hose out of the fixing groove.
(See to Figure 3).
Soft item
Figure 2
Embed the drain hose into the groove along the side
of the spin tub in the order of (1)~(3), heading for the
side of the spin tub. (See to Figure 3).
Embed the drain hose into the groove with
hands. Take care not to damage the drain
hose in fastening the fixing clamp.
Figure 3
Extend to the
spin tub side
7
Embed into the
groove in turn
INSTALLATION AND ACCESSORY PARTS
Points of Attention in After-sales Service
Be sure to switch off the power during dismantling or repair.
Be sure to use insulated wiring terminals and insulation box in connection of the wires, and
crimp and fix to proper position with suitable tools.
In welding connections with electric iron, be sure to twist the wires before welding, and insulate
with insulation tapes.
In welding the wires with electric iron, be sure not to touch the resin part and insulation part of
each switch.
The inlay connection wires and terminals shall not be loose or drop.
Do not make the wires touch the moving parts like the belt, pulley of the motor, brake bar etc.
Do not make the wires touch the sharp edges and high-temperature area.
In case that there are metal parts with the wires, do not make the wires touch the metal parts.
Insulation materials are needed between them.
After assembly, the washing machine shall act normally. Check if it leaks and if the sound and
vibration are normal.
Dismantling and installation of the control panel component
Loosen the fastening screws. Pull towards the direction
indicated in the figure to dismantle the control panel. In
installation the beard shall lock into the installation hole
of the major frame. (Figure 6)
Figure 6
Dismantling and installation of the spin tub
frame component
Push the points marked with " " as indicated in
the figure and pull the spin tub frame towards
upper left direction to dismantle the spin tub frame
components. In installation, after set the rear side
of the spin tub frame to proper position, push the
four points marked with " " downwards by force
to resume its original position. (Figure 7)
Dismantle
Installation
Spin tub frame
Figure 7
Spin tub shaft
Bearing seat
Oilite bearing
Dismantling and installation of
the spin tub
Inner lining of
the bearing seat
Fastening screw
Dismantle the spin tub frame component.
Loosen the fastening screw of the spin tub
shaft. The spin tub then can be taken out.
In installation, be sure to inlay the bulge of
the inner lining of the brake wheel into the
groove of the spin tub shaft. (Figure 8
Inner lining of the
brake wheel
Fastening screw of
the brake wheel
Brake wheel
Spin motor shaft
Figure 8
8
INSTALLATION AND ACCESSORY PARTS
Dismantling and installation of the base frame
Dismantle the back cover. Loosen the wires. Loosen the
fastening screw of the spin tub shaft. Separate the shaft
from the brake wheel. Loosen the brake hook. Take off
the brake cable frame from the installation groove of the
twin-tub. Take off the V-belt. Take out the drain hose from
the groove of the base frame. Loosen the fastening screw
between the base frame and the cabinet to dismantle the
base frame component.
Dismantling and installation of the bearing seat
Once the bearing seat is taken off, it can not be utilized again. Therefore do
not dismantle
it as far as possible. In case that it has to be replaced, please dismantle it as
per following
sequence, then install a new bearing seat.
Dismantle the spin tub . Then pull out the bearing seat.
Cut off the inner lining claw inside the bearing seat with cutting pliers and
take it out.
Install the new bearing seat and inner lining.
Wrong
Right
Figure 9
9
PARTS AND FUNTIONS
Wash selector
Wash timer
Outer cover of the spin tub
Water-filling entrance
Inner cover of the spin tub
Spin timer
Major frame
Control panel
Overflow filter
Water level adjusting
lever
Lint filter
(installed by user)
Valve cover
Pulsator
Spin tub
Wash tub
Drain hose
Cabinet
Wash tub cover
Base frame
Figure 10
10
MAINTENANCE SERVICE AND TROUBLE SHOOTING
Insert the power plug , but the machine does not work
Wash part
Check if the wash timer is opened ?
NO
Open the wash timer.
YES
Check if the power source is available?
NO
Switch on the power.
YES
Check if the contact between
the plug and receptacle is good?
NO
Replace the plug
or receptacle.
No
Replace with new power
supply cord.
NO
Inlay the connecting
wire again.
YES
Check if the power supply
cord is good
YES
Check if the inlay of
the connecting wire
terminal is good?
YES
Check if the fuse is good?
NO
Replace the fuse.
YES
Check if the capacitor
is good?
NO
Poor contact or inferior
inside of the wash timer
NO
Replace the capacitor
YES
Replace the wash timer
11
NO
Check if the motor is good?
NO
Replace the motor
MAINTENANCE SERVICE AND TROUBLE SHOOTING
Spin part
Check if the spin timer
is opened ?
NO
Open the spin timer.
YES
Check if the power source
is available?
NO
Switch on the power.
NO
Replace the plug
or receptacle.
NO
Replace with new
power supply cord.
NO
Inlay the connecting
wire again.
YES
Check if the contact between
the plug and receptacle is good?
YES
Check if the power supply
cord is good?
YES
Check if the inlay of
the connecting wire
terminal is good?
YES
Check if the fuse is good?
NO
Replace the fuse.
YES
Check if the capacitor
is good?
YES
Check if the micro-switch is closed?
NO
Replace the capacitor.
NO
Repair the micro-switch,
make it closed.
YES
Check if the motor is good
YES
Check if the brake system
is detached?
NO
Repair the brake system.
12
NO
Replace the motor.
MAINTENANCE SERVICE AND TROUBLE SHOOTING
There is metal rubbing noise in braking
Add the brake or replace
the brake arm.
NO
If the brake arm
has brake block ?
The washing noise is too large
Is the motor noise large?
YES
Replace the motor.
NO
Fasten the motor tightly.
YES
Adjust the tension of the belt.
NO
Is the motor fastened tightly?
YES
Is the belt too loose
or too tight?
NO
Is the radiating pulley loose?
YES
Fasten the radiating pulley.
NO
Is the pulsator rubbing the
bottom of the twin-tub?
YES
Adjust the gap between the
pulsator and the twin-tub.
8.4 The pulsator only rotates towards one direction
Is the wiring of
the wash timer proper?
YES
Replace the wash timer
13
NO
Adjust the wiring to
proper position.
Trouble-shooting Answers to question
(If there's breakdown, please pull off the power plug before checking) The following
phenomena are not breakdowns sometimes. Please confirm again before
it to repair.
Phenomena
The machine does
not act.
The draining
does not work
There's abnormal
sound during washing
There's abnormal
sound and violent
vibration during
spinning
The reason
Is there power failure?
Is the power plug loose?
Is the pulsator twisted by
foreign materials?
Use it when the power is on.
Insert the power plug tightly.
Remove the foreign materials?
Is the drain hose put down?
Is the drain hose blocked by
foreign material?
Are there laundries falling to
the outer side of the spin tub?
Put down the drain hose?
Remove the foreign material?
Are there hair pin, coins or
metal items brought inside
the tub?
Remove the hair pin, coins or
metal items
Is the machine slanting?
Is the gland pressed evenly?
Are there laundries falling to
the outer side of the spin tub?
Are the laundries in spin tub
too much?
Level the machine properly.
Pressed the gland evenly
Remove the laundries
14
Please contact the after-sales
service department.
Remove a little laundries
WIRING DIAGRAM
Purple
Spin timer
Safety switch
Purple
Orange
Grey
M
1 Spin
motor
C2
Brown
S2
S1
Wash timer
Fuse
a
Red
C1
b
1
M
Yellow
Blue
Wash
motor
Blue
Figure 12
There is overload protector installed in the motor. In case that the motor is overload or meets
breakdown in working, the protector will act and stop the motor. When the breakdown is
removed, the motor will resume normal working.
Actual Circuit Diagram
Control
Panel
wash timer
spin timer
microswitch
orange orange
red yellow
brown brown
purple
Grey
fuse
brown blue
Yellow/green
red
Cabinet
wash
motor
yellow
purple
yellow
Grey
red
capacitor
purple
Grey
spin
motor
blue
Figure13
15
Sincere Forever
Group
Haier Industrial Park, No.1, Haier Road
266101, Qingdao, China
http://www.haier.com