1
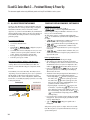
Troubleshooting & Service for EL/VS Systems
60 Hz
1
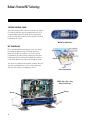
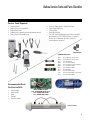
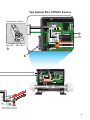
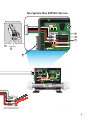
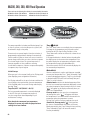
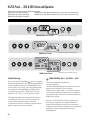
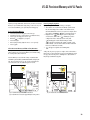
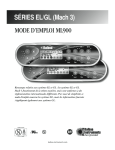
Balboa’s Patented M7 Technology
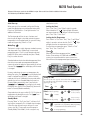
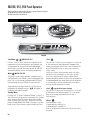
TOPSIDE CONTROL PANEL
The control panel activates functions at the touch of a button.
Each function will echo from the circuit board to the LCD in
a corresponding manner. The panel will also display diagnostic messages that enable the service technician to easily
troubleshoot the system.
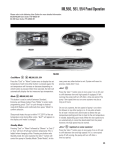
ML700 Top Side Panel
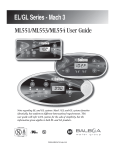
M7 TECHNOLOGY
M7 is a patented Balboa technology that uses two sensors
inserted at the opposite ends of the heater element to
determine flow, dry fire conditions, etc. The two sensors
located within the heater housing compare the inlet water
temperature with the outlet water temperature. It works no
matter which direction the water flows through the heater.
The sensors in combination with specific software allow the
spa to be controlled without the use of external pressure
switches, flow switches, or temperature sensors.
Panel Construction
VS501 with a Cut-a-way
View of the Heater
Sensor
2
Sensor
Table of Contents
Balboa’s Patented M7 Technology . . . . . . . . . . . . . .
Balboa Service Tools and Parts Checklist . . . . . . . . . . .
Important Information -- Product Identification . . . . . . . .
Troubleshooting & Servicing Spa and Electrical Equipment . .
G.F.C.I. Troubleshooting . . . . . . . . . . . . . . . . .
If Correct Wiring is Verified . . . . . . . . . . . . . . .
To Disconnect the Heater . . . . . . . . . . . . . . . .
Voltage Checks: Breaker Box, G.F.C.I. & System Box . . . .
Wiring Checks . . . . . . . . . . . . . . . . . . . . .
Spa Behavior -- Start-up Information . . . . . . . . . . .
Priming Mode . . . . . . . . . . . . . . . . . . . .
Heater Start up Information . . . . . . . . . . . . . . .
Diagnosing M7 Topside Control Panels . . . . . . . . . . . .
Checking the System Power Input Fuse . . . . . . . . . .
ML Series Panels -- For Use with EL and GL Systems . . . .
ML900 Panel Operation . . . . . . . . . . . . . . . . .
ML700 Panel Operation . . . . . . . . . . . . . . . . .
ML550, 551, 554 Panel Operation . . . . . . . . . . . .
ML200, 240, 260, 400 Panel Operation . . . . . . . . . . .
VL Series Panels -- For use with VS and GS Systems . . . .
VS/GS Panel -- 300 & 500 Series and Operation. . . . . . .
EL and GL Series Mach 3 -- Persistent Memory & Power Up .
EL - GL, about Persistent Memory . . . . . . . . . . . .
Power Up Display Sequence, Software ID . . . . . . . . .
VS-GS Persistent Memory with VL Panels . . . . . . . . .
Testing the Circuit Board Output . . . . . . . . . . . . .
Balboa’s Quick TestTM Test Kit . . . . . . . . . . . . . .
To Use the Balboa Quick Check . . . . . . . . . . . . .
Testing the Sensor Set . . . . . . . . . . . . . . . . .
Changing a System Circuit Board . . . . . . . . . . . . .
How to Remove a System Circuit Board . . . . . . . . . .
How to Replace a System Circuit Board . . . . . . . . . .
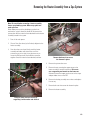
Removing the Heater Assembly from a Spa System . . . . .
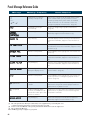
Panel Message Reference Guide . . . . . . . . . . . . .
.
.
.
.
.
.
.
.
.
.
.
.
.
.
.
.
.
.
.
.
.
.
.
.
.
.
.
.
.
.
.
.
.
.
.
.
.
.
.
.
.
.
.
.
.
.
.
.
.
.
.
.
.
.
.
.
.
.
.
.
.
.
.
.
.
.
.
.
.
.
.
.
.
.
.
.
.
.
.
.
.
.
.
.
.
.
.
.
.
.
.
.
.
.
.
.
.
.
.
.
.
.
.
.
.
.
.
.
.
.
.
.
.
.
.
.
.
.
.
.
.
.
.
.
.
.
.
.
.
.
.
.
.
.
.
.
.
.
.
.
.
.
.
.
.
.
.
.
.
.
.
.
.
.
.
.
.
.
.
.
.
.
.
.
.
.
.
.
.
.
.
.
.
.
.
.
.
.
.
.
.
.
.
.
.
.
.
.
.
.
.
.
.
.
.
.
.
.
.
.
.
.
.
.
.
.
.
.
.
.
.
.
.
.
.
.
.
.
.
.
.
.
.
.
.
.
.
.
.
.
.
.
.
.
.
.
.
.
.
.
.
.
.
.
.
.
.
.
.
.
.
.
.
.
.
.
.
.
.
.
.
.
.
.
.
.
.
.
.
.
.
.
.
.
.
.
.
.
.
.
.
.
.
.
.
.
.
.
.
.
.
.
.
.
.
.
.
.
.
.
.
.
.
.
.
.
.
.
.
.
.
.
.
.
.
.
.
.
.
.
.
.
.
.
.
.
.
.
.
.
.
.
.
.
.
.
.
.
.
.
.
.
.
.
.
.
.
.
.
.
.
.
.
.
.
.
.
.
.
.
.
.
.
.
.
.
.
.
.
.
.
.
.
.
.
.
.
.
.
.
.
.
.
.
.
.
.
.
.
.
.
.
.
.
.
.
.
.
.
.
.
.
.
.
.
.
.
.
.
.
.
.
.
.
.
.
.
.
.
.
.
.
.
.
.
.
.
.
.
.
.
.
.
.
.
.
.
.
.
.
.
.
.
.
.
.
.
.
.
.
.
.
.
.
.
.
.
.
.
.
.
.
.
.
.
.
.
.
.
.
.
.
.
.
.
.
.
.
.
.
.
.
.
.
.
.
.
.
.
.
.
.
.
.
.
.
.
.
.
.
.
.
.
.
.
.
.
.
.
.
.
.
.
.
.
.
.
.
.
.
.
.
.
.
.
.
.
.
.
.
.
.
.
.
.
.
.
.
.
.
.
.
.
.
.
.
.
.
.
.
.
.
.
.
.
.
.
.
.
.
.
.
.
.
.
.
.
.
.
.
.
.
.
.
.
.
.
.
.
.
.
.
.
.
.
.
.
.
.
.
.
.
.
.
.
.
.
.
.
.
.
.
.
.
.
.
.
.
.
.
.
.
.
.
.
.
.
.
.
.
.
.
.
.
.
.
.
.
.
.
.
.
.
.
.
.
.
.
.
.
.
.
.
.
.
.
.
.
.
.
.
.
.
.
.
.
.
.
.
.
.
.
.
.
.
.
.
.
.
.
.
.
.
.
.
.
.
.
.
.
.2
.5
.6
.7
.8
.8
.8
.9
14
15
15
15
16
19
21
22
23
24
28
32
34
38
38
38
39
40
40
40
41
42
42
42
43
44
3
Diagrams (in alphabetical order)
300/300F/500Z Series Panel . . . . . . . . . . . . . . . . . . . . . . . . . . . . . . . . . . . . . . . . . . . . . . . . . .34
500DZ Series Panel . . . . . . . . . . . . . . . . . . . . . . . . . . . . . . . . . . . . . . . . . . . . . . . . . . . . . . .34
500SZ Series Panel . . . . . . . . . . . . . . . . . . . . . . . . . . . . . . . . . . . . . . . . . . . . . . . . . . . . . . .34
Balboa QuickCheckTM Part No. 70002 . . . . . . . . . . . . . . . . . . . . . . . . . . . . . . . . . . . . . . . . . . . .40
Ground-Fault Circuit Interrupter/Circuit Breaker (G.F.C.I.) . . . . . . . . . . . . . . . . . . . . . . . . . . . . . . . . 8
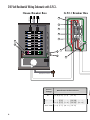
120 Volt Residential Wiring Schematic with G.F.C.I. . . . . . . . . . . . . . . . . . . . . . . . . . . . . . . . . . . . .10
240 Volt Residential Wiring Schematic with G.F.C.I. . . . . . . . . . . . . . . . . . . . . . . . . . . . . . . . . . . . .12
Ground in System Enclosure . . . . . . . . . . . . . . . . . . . . . . . . . . . . . . . . . . . . . . . . . . . . . . . . . 7
Heater Element Specifications Are Shown on the Heater Tube Label . . . . . . . . . . . . . . . . . . . . . . . . . 6
ML260, ML240, ML200 . . . . . . . . . . . . . . . . . . . . . . . . . . . . . . . . . . . . . . . . . . . . . . . . . . . . .28
ML400 . . . . . . . . . . . . . . . . . . . . . . . . . . . . . . . . . . . . . . . . . . . . . . . . . . . . . . . . . . . . . . .28
ML550 . . . . . . . . . . . . . . . . . . . . . . . . . . . . . . . . . . . . . . . . . . . . . . . . . . . . . . . . . . . . . . .24
ML551 . . . . . . . . . . . . . . . . . . . . . . . . . . . . . . . . . . . . . . . . . . . . . . . . . . . . . . . . . . . . . . .24
ML554 . . . . . . . . . . . . . . . . . . . . . . . . . . . . . . . . . . . . . . . . . . . . . . . . . . . . . . . . . . . . . . .24
ML700 Top Side Panel . . . . . . . . . . . . . . . . . . . . . . . . . . . . . . . . . . . . . . . . . . . . . . . . . . . . . 2
Recommended Parts For Service Calls . . . . . . . . . . . . . . . . . . . . . . . . . . . . . . . . . . . . . . . . . . . 5
Service Tools Required . . . . . . . . . . . . . . . . . . . . . . . . . . . . . . . . . . . . . . . . . . . . . . . . . . . . 5
“Molex” Type, ML/GL Connector . . . . . . . . . . . . . . . . . . . . . . . . . . . . . . . . . . . . . . . . . . . . . . 6
On Every System, an Identification Label Is Placed on top of the Casing . . . . . . . . . . . . . . . . . . . . . . . . 6
On Every System, a Wiring Diagram Is Placed Inside the Door . . . . . . . . . . . . . . . . . . . . . . . . . . . . . 6
Panel Construction . . . . . . . . . . . . . . . . . . . . . . . . . . . . . . . . . . . . . . . . . . . . . . . . . . . . . . . 2
“Phone Plug” RJ Type, VL/GS Connector . . . . . . . . . . . . . . . . . . . . . . . . . . . . . . . . . . . . . . . . . . 6
“Phone Plug” RJ Type, VL/VS Connector . . . . . . . . . . . . . . . . . . . . . . . . . . . . . . . . . . . . . . . . .32
Terminal Block 1 & F5 Fuse on a VS500Z Board . . . . . . . . . . . . . . . . . . . . . . . . . . . . . . . . . . . . . .19
VS500 Board . . . . . . . . . . . . . . . . . . . . . . . . . . . . . . . . . . . . . . . . . . . . . . . . . . . . . . . . . . .42
VS501 with a Cut-a-way View of the Heater . . . . . . . . . . . . . . . . . . . . . . . . . . . . . . . . . . . . . . . . 2
4
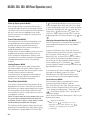
Balboa Service Tools and Parts Checklist
Service Tools Required
UÊ
UÊ
UÊ
UÊ
UÊ
Ammeter (50A)
Balboa Six-in-one Screwdriver
Digital Multi-meter
Padlock (to lock electrical disconnect during service)
Pliers: Slip Joint & Needle nose
UÊ
UÊ
UÊ
UÊ
UÊ
Precision Thermometer - Digital Fever Type
Quick CheckTM Test Kit
Silicone Tube
Small Wire Cutters
Two 3/8” Open End Wrenches (one wrench should be
ground down to 5/32” [0.156”] thickness in order to
access the nut between the heater strap and
heater element connector)
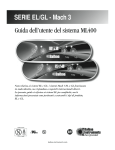
20618
JUMPER LOGIC
COMMON FUSES USED
30074
30075
30122
30595
30076
30596
30142
30123
30137
21447
30136
FUSE 1 AMP FAST BLOW GLASS
FUSE 5 AMP FAST BLOW GLASS
FUSE 10A BLOWER
FUSE 10A POWER INPUT
FUSE 15 AMP FAST BLOW CERAMIC
FUSE 15A POWER INPUT
FUSE 20A POWER INPUT
FUSE 20A PUMP
FUSE 25A POWER INPUT
FUSE 25A POWER INPUT HIGH SURGE
FUSE 30A POWER INPUT
Recommended Parts
For Service Calls
UÊ
UÊ
UÊ
UÊ
UÊ
Extra Board(s)
Extra Panel(s)
Fuses
Jumpers
Heater Assembly
MORE COMMON BOARDS:
22972 BOARD BARE VS500 (shown)
21998 BOARD BARE GL2000
27116 BOARD BARE EL5000
53649 ML700
Heater Assembly
5
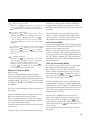
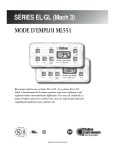
Important Information -- Product Identification
Two Types of Plug-in Connectors:
“Molex” Type,
ML/GL Connector
On Every System, an Identification
Label Is Placed on top of the Casing
Heater Element Specifications Are Shown
on the Heater Tube Label
On Every System, a Wiring Diagram
Is Placed Inside the Door
6
“Phone Plug” RJ Type,
VL/GS Connector
Troubleshooting & Servicing Spa and Electrical Equipment
HIGH VOLTAGE CAN SERIOUSLY INJURE OR KILL!
ONLY EXPERIENCED TECHNICIANS SHOULD SERVICE THIS EQUIPMENT.
DO NOT remove the protective covers from any electrical enclosure, or attempt to service any
related electrical device, unless you are a qualified electrician or service professional.
DANGER
Risk of electric shock. Before working with any electrical
connections, make certain that the Main Power breaker from
the house breaker box has been turned off.
WARNING
All electrical work must be performed by a qualified
electrician and must conform to all local codes.
IMPORTANT
Due to the danger of severe electrical shock, locate all
power disconnects before servicing a spa. Precautions must
be taken whenever working with breaker boxes, G.F.C.I.’s, or
service disconnects.
UÊ Always refer to the wiring diagram which is included
with each system on the inside of the system box cover.
Use this diagram for voltage measurement points, and
for proper reconnection of wires.
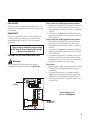
A terminal marked “GROUND” is provided within
the System Control Center enclosure. To reduce
the risk of electrical shock, connect this terminal
to the grounding terminal
of the electric supply panel
with a continuous green
insulated copper wire
equivalent in size to the
circuit conductors supplying
this equipment, but no
smaller than #12 AWG.
Ground in System Enclosure
Safety Tips
UÊ Keep children and pets away.
UÊ Be aware of your surroundings. Standing in water while
repairing a spa puts you at serious risk.
UÊ Avoid working in cramped or crowded conditions.
UÊ Consider placing a padlock on the service panel to lock
out anyone who might power up the system.
7
G.F.C.I. Troubleshooting
Keep in mind that a majority of G.F.C.I. tripping problems can be attributed to incorrect wiring. G.F.C.I. troubleshooting usually finds
the problem.
IF CORRECT WIRING IS VERIFIED
TO DISCONNECT THE HEATER
UÊ Check to see if the proper G.F.C.I. is installed.
UÊ Check the label in the system box near TB1 to determine
the maximum amperage draw for the system.
UÊ Be sure the G.F.C.I. is rated for more amperage than the
system will draw.
UÊ For a 240 V dedicated system, a 2-pole G.F.C.I. with no
load neutral is acceptable.
UÊ For a 120/240 V system, the G.F.C.I. must include a load
neutral out.
UÊ If the white load neutral wire is routed from the G.F.C.I.
neutral bar directly to TB1 in the system box, then the
G.F.C.I. will trip when a 120 V device is activated.
UÊ For a detailed wiring checklist, please review the
previous segment of this manual on proper G.F.C.I. wiring
or the G.F.C.I. manufacturer’s instructions.
UÊ If the wiring is correct and the G.F.C.I. will not reset, then
unplug the pump and try to reset the G.F.C.I.
UÊ If the G.F.C.I. trips again, then unplug the blower and
reset the G.F.C.I.. If the G.F.C.I. continues to trip, then do
the same procedure for the ozone generator.
UÊ If the G.F.C.I. stops tripping after you unplugged one of
the spa’s components, turn off the power to the spa then
plug in each component except the one that tripped the
G.F.C.I.
UÊ Power up the system. If the G.F.C.I. no longer trips,
then you have correctly identified the problem.
Repair or replace the component as instructed by
the spa manufacturer.
UÊ If you have unplugged all of the spa’s components and
the G.F.C.I. still doesn’t reset, then the problem is most
likely a ground fault in the heater.
UÊ First, turn off the main circuit breaker, then remove both
heater straps or wires from the system heater output,
not the heater itself.
UÊ After restoring the power, try to reset the G.F.C.I. again.
If it no longer trips after the system calls for heat, then
replace the heater.
UÊ If the G.F.C.I. still trips, look for pinched or shorted
wires at the transformer. Make sure that the screws
that attach the transformer to the system box
have not pinched or damaged the insulation of the
transformer wires.
UÊ If the transformer wires are undamaged, check for any
other pinched wires. Refer to the wiring diagram to
verify the correct wiring of the control system.
UÊ If everything looks to be in perfect working order, then
the G.F.C.I. may be defective.
WARNING: THE OWNER SHOULD TEST AND
RESET THE G.F.C.I. ON A REGULAR BASIS TO
VERIFY ITS FUNCTION.
8
Ground-Fault Circuit
Interrupter/Circuit
Breaker (G.F.C.I.)
Voltage Checks: Breaker Box, G.F.C.I. & System Box
When checking for proper voltage, keep in mind that the acceptable voltage range is + 10% of the recommended voltage.
Acceptable voltage when 120 V is specified is between 108 and 132 V.
Acceptable voltage when 240 V is specified is between 216 and 264 V.
Diagrams are on the following pages.
Voltage Verification - Most G.F.C.I. Problems Are Due To Low Voltage
IMPORTANT:
IF THE VOLTAGE IS NOT WITHIN THE ACCEPTABLE RANGE, CALL AN ELECTRICIAN
OR THE LOCAL ELECTRIC COMPANY TO DIAGNOSE THE PROBLEM.
CHECK THE VOLTAGES AT:
1. Breaker Box Voltage Check
2. G.F.C.I. Line-In Voltage Check.
3. G.F.C.I. Load Out Voltage Check
4. System Box Check At Tb1
120 VOLT SYSTEMS - 120V ± 10% - 108V - 132V
240 VOLT SYSTEMS - 240V ± 10% - 216V - 264V
No More Than 2% (5 Volt AC) Difference Between Voltage
at the Breaker Panel And Voltage at the System.
UÊ CHECK UNDER PEAK LOADS -- TWO TYPES OF PEAK LOADS
1. Spa System Peak Loads - Pumps, Heater, Blower & Light On
2. Household Peak Loads - May Be In Afternoon On Hot Day
Use Recording Meter If Possible - Records Max & Min Volts
UÊ -/,Ê
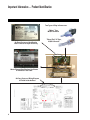
" /,"Ê-9-/Ê,/Ê--1Communication Between Topside & System Board In Most Systems
Press Button - Message Sent To System Board
System Board Performs - Message Sent Back To Topside & Relay Opens Or Closes
LED or Icon Is Turned On or Off - Hear Or See Relay Open Or Close
In Most Cases, If This Happens, There Is No Problem With The Topside Panel Or System Board
UÊ 8*ÊÊÊÊ-*Ê/Ê-Ê "/Ê7", ÊÊÊÊÓÊ",ÊÎÊ-9Ê-/*-Êt
1. Press Light Button
Light LED or Icon Turns ON, But Spa Light Is NOT ON
Topside & Board Are Good, Check Downstream
Light LED or Icon Is NOT ON
Topside Or System Board May Be Bad, Continue
2. Plug In Spare Topside Panel - Easier To Check For Bad Topside
Light LED or Icon Now Turns ON
Original Topside Is Bad - R&R Topside Panel
Light LED or Icon Is NOT ON
Original Topside Is Good, Do Not Replace
System Board Is Bad - R&R System Board
3. Spa Light Is Still NOT ON - Check Downstream
Same Procedure For Other Functions
Jets, Blower, Heater, Time, Program, Mode, Etc.
Diagrams Are On The Following Pages.
9
120 Volt Residential Wiring Schematic with G.F.C.I.
G.F.C.I Breaker Box
120 VAC
Neutral
120 VAC
House Breaker Box
8
ON
ON
ON
ON
ON
ON
OFF
OFF
OFF
OFF
OFF
OFF
OFF
OFF
OFF
OFF
OFF
ON
ON
ON
10
OFF
ON
ON
OFF
OFF
OFF
ON
OFF
6
5
ON
ON
11
ON
ON
7
9
4
Outside Ground Rod
Correct
Voltage
0v
108V - 132V
10
When Probes Are Placed Across
[2 - 3] [4 - 6] [4 - 7] [5 - 8] [9-10]
[1 - 3] [4 - 5] [4 - 8] [5 - 6] [5 - 9]
[6 - 8] [7 - 8] [9 - 11] [10 - 11]
Spa System Box 120VAC Service
Bottom view of G.F.C.I
CLASS G FUSE 30A
K6
F5
J73
G
C
WHT AC
J11
J25 J63
J15
J23
W1
NEUTRAL
WHITE
NEUTRAL
WHITE
120/240VAC
16/40A MAX 60Hz
HOT
BLACK
HOT
BLACK
TORQUE
RANGE
FOR TB1:
27-30 IN. LBS.
HOT
RED
HOT
RED
USE ONLY
COPPER
CONDUCTORS:
#6 AWG MIN.
K4
F4 FUSE .3A 250V
2
1
K3
K2
TB1
J32 J33
Black (Hot)
White White
F2
RED AC
Balboa
5
HTR2
HTR1
3
NEUTRAL
WHITE
HOT
BLACK
HOT
BLACK
TORQUE
RANGE
FOR TB1:
27-30 IN. LBS.
HOT
RED
HOT
RED
C
C
E.GND
K5
W2
W7
F1
FUSE 3A 250V
G
G
G
J20
J1
J2
J18
NEUTRAL
WHITE
120/240VAC
16/40A MAX 60Hz
T1
F4 FUSE .3A 250V
W2
C
C
C
G
W1
USE ONLY
COPPER
CONDUCTORS:
#6 AWG MIN.
J29
J47
12V
Light
J25 J63
J15
J29
K1
J73
Ozone
J11
J23
G
K6
F5
WHT AC
W4
CLASS G FUSE 30A
K4
K3
K2
TB1
SWITCHBANK A
U4
S1 TST
SEN. A
J32 J33
J43
HTR2
HTR1
E.GND
F2
RED AC
Balboa
SEN. B
MADE IN U.S.A
COPYRIGHT 2005
J6
J7
J8
BALBOA INSTRUMENTS INC.
VS500Z
P/N 22972 REV D
4.0 kW
HOT
RED
HOT
RED
HOT
BLACK
TORQUE
RANGE
FOR TB1:
27-30 IN. LBS.
HOT
BLACK
NEUTRAL
WHITE
120/240VAC
16/40A MAX 60Hz
NEUTRAL
WHITE
USE ONLY
COPPER
CONDUCTORS:
#6 AWG MIN.
K4
TB1
Test for Voltages by placing
probes on these locations
J32 J33
Electric Installation 120VAC_092608.eps
11
240 Volt Residential Wiring Schematic with G.F.C.I.
G.F.C.I Breaker Box
10
120 VAC
Neutral
120 VAC
House Breaker Box
11
ON
ON
ON
ON
ON
ON
OFF
OFF
OFF
OFF
OFF
OFF
OFF
OFF
OFF
OFF
OFF
ON
ON
ON
13
ON
ON
OFF
OFF
OFF
OFF
OFF
ON
ON
14
8
7
ON
15
ON
ON
9
6
12
5
Outside Ground Rod
Correct
Voltage
0v
12
When Probes Are Placed Across
[3 - 4] [5 - 8]
[5 - 9]
[12 - 13]
108V - 132V
[1 - 3] [5 - 6]
[2 - 3] [5 - 7]
[5 - 10]
[5 - 11]
[12 - 14]
[12 - 15]
216V - 264V
[1 - 2] [6 - 7]
[10 - 11]
[14 - 15]
[13 - 14]
[13 - 15]
Spa System Box 240VAC Service
Bottom view of G.F.C.I
CLASS G FUSE 30A
K6
F5
J73
G
C
WHT AC
J11
J25 J63
J15
J23
W1
NEUTRAL
WHITE
NEUTRAL
WHITE
120/240VAC
16/40A MAX 60Hz
HOT
BLACK
HOT
BLACK
TORQUE
RANGE
FOR TB1:
27-30 IN. LBS.
HOT
RED
HOT
RED
USE ONLY
COPPER
CONDUCTORS:
#6 AWG MIN.
Black (Hot)
7
K4
F4 FUSE .3A 250V
2
K3
K2
TB1
White White
3
1
J32 J33
F2
RED AC
Red (Hot)
Balboa
6
HTR2
HTR1
4
NEUTRAL
WHITE
HOT
BLACK
HOT
BLACK
HOT
RED
HOT
RED
C
G
C
E.GND
K5
W2
W7
F1
FUSE 3A 250V
G
G
J20
J1
J2
J18
NEUTRAL
WHITE
TORQUE
RANGE
FOR TB1:
27-30 IN. LBS.
T1
F4 FUSE .3A 250V
C
C
C
G
W1
USE ONLY
COPPER
CONDUCTORS:
#6 AWG MIN.
120/240VAC
16/40A MAX 60Hz
J29
J47
W2
12V
Light
J25 J63
J15
J29
K1
J73
Ozone
J11
J23
G
K6
F5
WHT AC
W4
CLASS G FUSE 30A
K4
K3
K2
TB1
U4
S1 TST
SWITCHBANK A
SEN. A
J32 J33
MADE IN U.S.A
COPYRIGHT 2005
J43
HTR2
HTR1
E.GND
F2
RED AC
Balboa
SEN. B
J6
J7
J8
BALBOA INSTRUMENTS INC.
VS500Z
P/N 22972 REV D
4.0 kW
HOT
RED
HOT
RED
HOT
BLACK
TORQUE
RANGE
FOR TB1:
27-30 IN. LBS.
HOT
BLACK
NEUTRAL
WHITE
120/240VAC
16/40A MAX 60Hz
NEUTRAL
WHITE
USE ONLY
COPPER
CONDUCTORS:
#6 AWG MIN.
K4
TB1
Test for Voltages by placing
probes on these locations
J32 J33
Electric Installation 240VAC_092608.eps
13
Wiring Checks
SYSTEM BOX WIRE GAUGE CHECK
WIRING CHECK PRECAUTIONS
UÊ When working in a system box always be aware that it
may contain high voltage.
UÊ Always keep your fingers and hand tools away from any
wiring or circuit board when the power is on. Touching
anything in these areas can result in serious injury.
UÊ All service calls, no matter how minor, should include a complete wiring check, beginning with the
house breaker.
CHECK FOR LOOSE CONNECTIONS OR
DAMAGED WIRES
IMPORTANT
UÊ Make sure the power is off before you touch any wiring.
UÊ Once the power is off, carefully examine all wires for
cuts or defects.
CLASS G FUSE 30A
F5
BLK AC
J61
J62
J11
J16 J25 J63 J64
J15
NEUTRAL
WHITE
TB1
HOT
BLACK
TORQUE
RANGE
FOR TB1:
27-30 IN. LBS.
HOT
RED
K4
Using non-copper wire can be dangerous, and also can be
the cause of a spa’s malfunction. If non-copper wire
is used at any point, we do not recommend servicing the
spa until an electrician replaces it with the proper gauge
copper wire.
IMPORTANT
WHT AC
J66 J65
When inspecting the wiring for any control system, note
that connections for the incoming wires are clearly labeled
at the main terminal block.
UÊ 30A service – minimum ten gauge copper wire.
UÊ 40A service – minimum eight gauge copper wire.
UÊ 50A service – minimum six gauge copper wire.
These wires must connect the house breaker box,
through the local disconnect, to the main terminal block.
The wiring diagram inside the system box shows the main
terminal block as TB1.
This service must be single phase. Any abnormal voltage reading requires an electrician. Do not attempt to fix
these types of problems yourself. High voltage can
seriously injure or kill.
TB1
J32 J33 J34
J36
J35
J37
RED AC
Balboa
Power System
Minimum wire size
Use Copper ONLY,
with 90 o C insulation
Ampere Rating of
G.F.C.I. Circuit-breaker
0 A to 16 A
#12 AWG
20
16 A to 20 A
#10 AWG
25
20 A to 24 A
#10 AWG
30
24 A to 28 A
#8 AWG
35
28 A to 32 A
#8 AWG
40
32 A to 36 A
#6 AWG
45
36 A to 40 A
#6 AWG
50
Total Ampere Rating of
14
Spa Behavior -- Start-up Information
See manufacturer’s owners manual or reference card for general information on operating the spa, including programming
filters and other settings that are changed from the topside control panel.
PRIMING MODE
HEATER START UP INFORMATION
In Priming Mode, the “Mode” button toggles the ozone on/off
(with a 15-second time-out). This can be useful if you want to
verify ozone generator operation without waiting for a filter
cycle. This feature is not available on smaller panels where
Mode is a multi-button sequence, since such a sequence
exits Priming Mode.
On M-7 systems, the heater goes through a testing phase
every time it starts up to assure that there is adequate
water flow. This provides sophisticated dry fire and low flow
protection. It can be confusing if you don't know what to
expect. Step by step, here is what happens. (Note that the
timing/temperature details may be slightly different on some
older M7 systems.)
UÊ Prior to heating, the pump is run for at least two
minutes, and then the temperature difference between
the sensors is assessed. It must be 2°F/1.0°C or less for
heating to proceed, otherwise an error is issued.
UÊ The heater turns on for 6.5 to 18 seconds (depending
on heater voltage and wattage). At this point, the heat
indicator on the panel is "solid." During this time the
panel is not immediately responsive.
UÊ The heater turns off for 90 seconds, making sure that the
water flow keeps the temperature rise small and short.
(Abnormal water flows, or lack of water, will produce
a large and/or long temperature rise, and the system
faults in that situation.) At this point, the heat indicator
on the panel may appear to "shimmer" or "dim" (on some
panels this may be less obvious from certain angles and
more obvious from other angles, or in different lighting).
UÊ If the dry fire test has passed, heating turns back on to
heat the spa. The heat indicator on the panel returns
to "solid".
UÊ During spa heating, a difference between the sensors
of 2°F/1.0°C, or perhaps 3°F/1.5°C (at least with 4-6kW
240V heaters), is considered normal. A significantly
higher difference, however, is usually indicative of a
flow problem, and will cause a fault which disables
the heating for at least a minute (and then restarts the
whole above process).
GENERAL FILTER INFORMATION
UÊ On any system with a Deluxe panel, the filter times
and durations are completely programmable from the
topside control panel, and the first filter may not run
for many hours after power-up. If you want the filter
to run sooner, you have to either reprogram the filter or
advance the time to just before the filter start.
UÊ On all other systems, the first filter starts 6 minutes after
power-up and the duration can be chosen (either using
button sequences on the topside control panel or via a
DIP switch) between several preset choices. Note that if
you let Priming Mode exit automatically after 4 minutes,
you have 2 more minutes before the first filter runs after
power-up. Exiting Priming Mode by pressing the “Temp,”
Warm,” or “Cool” buttons, allows up to 6 minutes
available before the first
filter runs.
IMPORTANT INFORMATION: If the filter settings have just
been changed, it may take up to 24 hours for the filter cycle
to reflect the changes. This is especially likely when changing
from a very long filter duration (such as Continuous), to a
short one, or vice versa.
UÊ The low-speed pump (on non-circ) and ozone generator
(if installed) will run during the filter cycles.
UÊ The blower runs for 30 seconds at the start of each filter
cycle. This will maintain water quality in the air channel.
UÊ The pumps (other than pump 1 in non-circ, including
pump 1 in circ) will run for 5 minutes at the start of each
filter cycle.
15
Diagnosing M7 Topside Control Panels
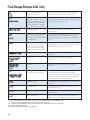
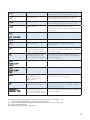
Panel messages are a quick clue toward solving a variety of problems. Here are the most common messages and what
they mean.
PRELIMINARY PANEL CHECK
UÊ If the problem is not obvious, look on the topside control
panel for diagnostic messages.
If no messages are seen, run through all spa functions
and note any inconsistent operation.
UÊ Most error messages are stored in the fault log. To view
the fault log, the spa must be in test mode and the spa
light must be turned on.
Once you have determined that proper voltage is running
through the circuit board and transformer, continue to the
topside control panel. A panel that is not functioning properly
may include the following symptoms: low voltage such as
missing or scrambled segments, missing icons on the LCD,
non-functional LED’s, or nonfunctional buttons. If any of these
symptoms are present, perform the following:
UÊ Turn the power off and unplug the panel from the
circuit board.
UÊ Then, plug in your test panel and restore power. If everything functions normally, replace the topside panel.
UÊ Disconnect ozone generator (if applicable).
UÊ If you still see symptoms of low voltage, such as a
sluggish, blank or partially blank panel, or if the display
or the LED’s do not function at all, turn the power off;
unplug the ozone generator (if equipped); then restore
power to the system. If the problem persists, turn off the
power and replace the circuit board.
16
PANEL DISPLAY MESSAGES
THE PANEL DISPLAYS:
,
, or
At least one of the sensors has detected water temperatures
of 118ºF inside the heater. Or,
THE PANEL DISPLAYS:
,
, or
One of the sensors has detected the temperature
of the water coming into the heater to be 110ºF,
and so the water in the spa is likely to be that hot.
These indicate that the spa has shut down due to an
overheat situation.
NOTE: Overheating may occur if the low-speed pump is set
to operate for extended periods of time, or if the incorrect
pump is installed. In rare cases (usually warmer climates), the
circulation pump may also cause overheating.
MOST PROBABLE OVERHEATING CAUSES,
INSPECT THESE FIRST
UÊ Check slice or ball valves. Make sure that they
are open.
UÊ Make sure the correct pump is installed.
UÊ Clean the filter/skimmer if there is any blockage.
UÊ Check heater element alignment.
UÊ Check for debris on the heater element.
UÊ In extremely hot weather, check for proper
cabinet ventilation.
UÊ Make sure the temperature sensor is fully inserted
into the sensor fitting on the heater.
UÊ Check for excessive filter duration.
NOTE: A common programming mistake is overlapping filter
times that may cause the spa to filter continuously.
UÊ Check the water level.
UÊ Check the water temperature with an accurate
temperature thermometer. Remove the spa cover and
allow the water to cool to below 108° F. Adding cool
water may be necessary. Touch any button to reset
the system. If the water is still hotter than the set
temperature, press the blower button (if applicable) to
cool the spa.
If the Problem Recurs, test the Sensor Set.
THE PANEL DISPLAYS:
,
,
, or
or
THE PANEL DISPLAYS:
THE PANEL DISPLAYS:
,
, or
Indicates the sensor detects a possible freeze condition.
This Freeze Condition message does not appear on M-7
software showing a Software Version ID of 01 or greater. This
is a normal spa function; no further action is necessary.
When either sensor reads below 40° F, the system
provides freeze protection. It automatically activates the
pump (and the heater if necessary) to circulate the water and
warm the plumbing. The equipment stays on until the sensors
detect that the spa temperature has risen to within 15ºF of
the set temperature. The other pumps and the blower will
purge for 30 seconds to 2 minutes at the end of the freeze
condition. If pump 1 was turned on due to this reason alone,
this message will appear for up to two minutes right after
very cold water is detected.
NOTE: In rare cases, rapid system overheat causes sensor
error messages. Be sure to rule out possible situations like no
flow or no water.
NOTE: Internal freeze protection only functions when there
is proper power running to the spa, and the control system
is operational. Using an optional freeze sensor may be
necessary in extreme climates to prevent plumbing damage,
but will only work properly if placed inside the spa skirt in the
coldest area.
All spa models are different in shape and size and
have different thermal characteristics; therefore,
Balboa Water Group cannot be held responsible
for freeze damage to the spa’s plumbing. Testing
is the responsibility of the spa manufacturer and
must be done to determine the best location for the
freeze sensor.
THE PANEL DISPLAYS:
THE PANEL DISPLAYS:
,
,
, or
or
This indicates that the spa has shut down due to an open or
faulty sensor. If the problem recurs, test the sensor set. (See
Testing the Sensor Set.)
,
, or
This indicates that the sensors are out of balance.
If alternating with temperature, it may just be a temporary
condition. If flashing by itself, spa is shut down.
If the panel also displays “Service Req’,” spa is shut down.
If the spa shuts down due to this error, one (or both) of the
sensors are probably reading several degrees off. If the
problem recurs, test the sensor set.
,
, or
This indicates that the auxiliary sensor detects a
possible freeze condition. This is a normal spa function;
no further action is necessary.
When the auxiliary sensor reads around 40°F (actual
temperature dependent on specific auxiliary sensor used), the
system provides freeze protection. It automatically activates
all of the pumps and the blower to circulate water and warm
the plumbing.
17
Diagnosing M7 Topside Control Panels (cont.)
NOTE: This auxiliary freeze protection functions at all times,
even when another fault condition has occurred and has
otherwise shut the spa down.
Any time the lower of the two temperature sensors
goes below 45°F, all pumps/blowers turn on. They continue
to run for 4 minutes after the temperature reaches 45°F
or above. As soon as the temperature falls below 45°F
again, this process restarts. This “simplified” sensor freeze
protection functions at all times, even when another fault
condition (other than total sensor failure) has occurred and
has otherwise shut the spa down.
THE PANEL DISPLAYS:
,
, or
This indicates that a substantial difference in
temperature between sensors has been detected
during heating.
This could indicate a flow problem. Check water level in spa.
Refill, if necessary. If the water level is okay, make sure the
pumps have been primed. On the fifth occurrence of
the above message the panel will display:
, or
This indicates a persistent flow problem. The heater
is shut down while all other spa functions continue to run
normally. Power on the spa must be cycled before the heater
will function again.
On the third consecutive occurrence of the above message (without a successful heating cycle in between) the
panel will display:
,
, or
Spa is shut down and will not reset in 15 minutes. Press any
button to reset manually.
THE PANEL DISPLAYS:
,
,
or
This indicates that the temperature is completely
unknown because the pump has not yet run for 2 minutes
after Priming Mode was exited. This is only displayed for 2
minutes at power-up.
SOME TROUBLESHOOTING SCENARIOS
You find out the system is in “OHH.” This alone doesn't
explain a lot. What led up to the “OHH” is much more
important. If it's a Prestige, review the fault log carefully.
Otherwise, see if the user has any additional information (for
example, how long before the “OHH” was the spa panel last
checked, and how hot was the water then). If the spa has
cooled, see whether the problem can happen again, this time
watching carefully to see if there are additional clues leading
to the “OHH” (for example, other messages that appear
shortly before the “OHH” happens).
THE PANEL DISPLAYS:
,
, or
This indicates that there is not enough water in the
heater. Spa shuts down for 15 minutes.
This could indicate poor flow or air bubbles in the heater.
18
You find out the system keeps showing “HFL,” or is now
in “LF,” or is shut down due to a "dry" fault. Put the spa in
test mode with the light on, so that you see the two sensor
temperatures. Are they normal (within 1°F/0.5°C) when
not heating? How far apart are they when heating? “HFL”
happens when they are 6°F/3°C apart (4°F/2°C on 120V
and other low-heater-wattage systems), see how quickly
that happens after heating starts. If it's getting close to that
right away, it's probably a consistent flow problem, but if it's
nowhere close to the “HFL”-causing temperature difference,
the flow problem may be intermittent or only occur in certain
specific situations.
LOW VOLTAGE
At Balboa, it’s been our experience that the majority of the
problems associated with electronic control systems are due
to low voltage.
BROWN OUTS
“Brown outs” can have an effect on the spa’s operation in
a variety of ways. The control panel may go blank, have
scrambled messages on the LCD, or only a few features
will function.
If the system is getting the proper voltage
at TB1, but still doesn’t operate, then test for
a blown power input fuse.
CHECKING THE SYSTEM POWER INPUT FUSE
Warning
These procedures are performed while the system is
powered up and running under peak loads. Be careful.
CLASS G FUSE 30A
F5
BLK AC
J61
J62
If your system uses 120V peripheral devices (below):
UÊ Measure between the white TB1 terminal and F5 power
input fuse on the side farthest away from the circuit
board edge (opposite the F5 silk screen). You should see
120 volts.
UÊ If the system is equipped with the additional F6 power
input fuse, measure F6 in the same manner. You should
also see 120 volts.
If your system uses 240V peripheral devices (below):
UÊ Measure between the red TB1 terminal and F5 power
input fuse on the side farthest away from the circuit
board edge (opposite the F5 silk screen). You should see
240 volts.
UÊ If the system is equipped with the additional F6 power
input fuse, measure F6 in the same manner. You should
also see 240 volts.
UÊ If you determine that there is no voltage at one or both
locations, then the system power input fuse(s) need to
be replaced. Only use a fuse of the same type and amp
rating when you replace any of these fuses.
Elite System
UÊ Measure fingers 5 and 6 of the circuit board. You should
see either 120V or 240V, depending upon the system
configuration.
UÊ If you determine that there is no voltage at fingers 5
and 6, then the system power input fuse needs to be
replaced. This fuse is located in the large fuse block
inside the system box. This configuration utilizes a 30A
time delay fuse.
WHT AC
F5 Fuse
J66 J65
J11
J16 J25 J63 J64
J15
NEUTRAL
WHITE
HOT
BLACK
Terminal Block 1 & F5
Fuse on a VS500Z Board
HOT
RED
K4
TORQUE
RANGE
FOR TB1:
27-30 IN. LBS.
TB1
J32 J33 J34
J36
J37
RED AC
J35
TB1 Marking
on Board
Balboa
19
Diagnosing M7 Topside Control Panels (cont.)
UÊ NOTE FOR ALL SYSTEMS In each situation, the most
likely reason for the system power input fuse to blow
is a pump problem. However, on occasion, a blower
problem may also cause this fuse to blow if a 10A blower
fuse is not built in.
Once the power input fuse has been changed
UÊ Probe the red wire and the white neutral wire. Again,
voltage must be between 108 and 132 V.
UÊ Check the voltage between the black and red
wires again. Acceptable voltage range is between 216
and 264 V.
THESE READINGS SHOULD BE TAKEN UNDER
PEAK LOAD CONDITIONS.
Important
If the voltage is not in the acceptable range, call an
electrician or the local electric company to diagnose
the problem.
TO DETERMINE THE CAUSE OF A BLOWN POWER
INPUT FUSE
Perform the following sequence of tests.
Test the System
UÊ Turn the power off.
UÊ Be sure to replace the system power input fuse with the
same type.
UÊ Unplug the blower and all pumps.
UÊ Restore the power and verify system operation.
UÊ If the fuse blows, then re-check the internal system
wires and connector for burns, cracks or cuts in
insulation.
UÊ If the fuse does not blow, turn the power off and plug in
the pump.
NOTE: Be sure to test each device individually.
Test the Blower
UÊ
UÊ
UÊ
UÊ
Plug in the blower.
Power up the system and activate the blower.
If the fuse blows, then there is a blower problem.
If the fuse does not blow, the combined pump and
blower amperage may be excessive. To verify this, first
check with your spa manufacturer for amperage draw
limits on each device.
UÊ Since the blower should now be running, you can check
the amperage draw with an ammeter by measuring
around the black blower wire and compare with
manufacturer’s specifications.
TEST THE AMPERAGE DRAW
UÊ Turn off the power,
disconnect the blower,
make sure the pump is
plugged in, and restore
power.
UÊ Start the pump and
switch to high speed (if
available), this should
draw the most current.
UÊ Make sure all jets and
valves are open.
UÊ Check the amperage
at the red pump wire.
Compare your reading
with manufacturer specifications. (If the other plug-in
devices exist, they should be tested in the same way.)
UÊ If the amperage draw for each device is within
manufacturer’s specifications, the problem could be a
nuisance spike in the pump, or water in the blower.
NOTE: These slow-blow fuses are not always discolored
when blown. Always test continuity of a fuse with
an ohmmeter.
Test the Pump
UÊ Restore the power and activate the pump.
UÊ If the fuse blows, there is a pump problem.
UÊ If the fuse does not blow, turn off the power.
20
NOTE: Miswiring of the spa is the most common reason for
this fuse to blow. However, a lightning strike in the area is a
possible, though less likely, cause of the failure.
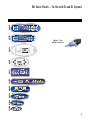
ML Series Panels -- For Use with EL and GL Systems
ML900
Time
Warm
Jets 1
Jets 2
Jets 3
Option
Mode/Prog Cool
Invert
Fiber
Light
Blower
F1
F2
PL
TL
Warm
Light
Blower
Mode/Prog Cool
Jets 1
Jets 2
F2
PL
TL
“Molex” Type,
ML/GL Connector
ML553
ML554
ML700
Time
F1
Light
Warm
ML551
Mode
Heat
Jets 2
Cool
Blower
Heat
Cool
ML200 ML240
Warm
Jets 1
Jets 2
Blower
Light
Mode
Heat
Jets
Aux
Temp
ML260
ML400
ML550
Jets 1
Jets
Jets
Jets
Aux
Light
Aux Temp Light
Aux Temp Light
Temp
Light
21
ML900 Panel Operation
Diagnostic Messages section for the ML900 is unique. Refer to the User Guide for additional information.
User Guide for panel ML900 is 40568-99.
Initial Start-up
Locking the Panel
When your spa is first actuated, it will go into Priming mode
(after displaying some configuration information). Please
see “Spa Behavior -- Start-up Information” for additional
information.
Press “Time” “Jets 1” then “Warm” within 3 seconds. When
locked, the PL “ PL ” light will light. All buttons are frozen
except the “Time” button. To unlock the panel, press “Time”
“Jets 1” then “Cool.”
Locking the Set Temperature
The Priming mode will last for up to 4 minutes and then the
spa will begin to heat and maintain the water temperature
in the Standard mode. You can exit Priming mode early by
pressing “Warm” or “Cool.”
Mode/Prog
This button is used to switch between standard, economy,
and sleep modes. Press “Mode/Prog” to enter mode
programming, press “Cool” to cycle through to desired mode
(LCD flashes until confirmed), then press “Mode/Prog” to
confirm selection
Press “Warm” or “Cool” then “Time,” “Jets 1,” and “Warm”
within 3 seconds to activate the lock. The TL “ TL ” light
will light when the set temperature is locked.
To unlock the set temperature, press “Warm” or “Cool” then
“Time,” “Jets 1” and “Cool.”
Time
When time hasn’t been programmed, the “
” icon
flashes. (Time settings on EL1000 and some EL2000 systems
are not preserved in the event of power loss; time will have
to be reprogrammed upon each power up.)
Standard mode maintains the desired temperature. Note
that the last measured spa temperature displayed is current
only when the pump has been running for at least 1 minute.
The “
” icon will display until the mode is changed.
Time
Warm
Jets 1
Jets 2
Jets 3
Option
Mode/Prog
Cool
Invert
Fiber
Light
Blower
F1
F2
PL
TL
Economy mode heats the spa to set temperature only during
filter cycles. The “
” icon will display until mode is
changed. Pressing “Jets 1” while in Economy mode puts the
spa in Standard-In-Economy mode, which operates the
same as Standard Mode, then reverts to Economy Mode
” and
automatically after 1 hour. Both the “
“
” icons display in this mode. During this time,
a press of the “Mode/Prog” button will revert to Economy
Mode immediately.
Setting the Time
Once the spa has been properly connected the first time (every power
up on the EL1000 and some EL2000 systems), notice the “
” icon
appearing on the screen.
Time
then
Press
Mode/Prog
Sleep mode heats the spa to within 20°F (11°C) of the set
temperature only during filter cycles. The “
” icon
will display until mode is changed.
Warm
Select the hour by pressing
Cool
Press
Standby Mode
Pressing “Warm” or “Cool” then “Jets 2” will turn off all
spa functions temporarily. This is helpful when changing
a filter. Pressing any button resets the spa. On some
systems the “Jets 1” button will control the pump in
Standby Mode (“Drain Mode”). In this case, press any
other button to exit.
22
Or
(Each press changes
the time by 1 minute)
to enter.
Mode/Prog
Warm
Select minutes by pressing
Press
Mode/Prog
Time
Press
Or
Cool
(Each press changes
the time by 1 minute)
to exit the time setting procedure and enter the
optional filter cycle programming. (Exits programming
on some EL1000 and some EL2000 systems.)
to exit programming.
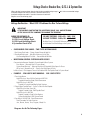
ML700 Panel Operation
Diagnostic Messages section for the ML700 is unique. Refer to the User Guide for additional information.
User Guide for panel ML700 is 40520-99.
Initial Start-up
other button to exit.
When your spa is first actuated, it will go into Priming
mode (after displaying some configuration information).
Please see “Spa Behavior -- Start-up Information” for
additional information.
Locking the Panel
The Priming mode will last for up to 4 minutes and
then the spa will begin to heat and maintain the water
temperature in the Standard mode. You can exit Priming
mode early by pressing “Warm” or “Cool.”
Mode/Prog
This button is used to switch between standard, economy,
and sleep modes. Press “Mode/Prog” to enter mode
programming, press “Cool” to cycle through to desired
mode (LCD flashes until confirmed), then press “Mode/
Prog” to confirm selection.
Standard mode maintains the desired temperature. Note
that the last measured spa temperature displayed is
current only when the pump has been running for at least
1 minute. The “
” icon will display until the mode
is changed.
Press “Time” “Jets 1” then “Warm” within 3 seconds.
When locked, the PL “ PL ” light will light. All buttons
are frozen except the “Time” button. To unlock the panel,
press “Time” “Jets 1” then “Cool.”
Locking the Set Temperature
Press “Warm” or “Cool” then “Time,” “Jets 1,” and “Warm”
within 3 seconds to activate the lock. The TL “ TL ” light
will light when the set temperature is locked.
To unlock the set temperature, press “Warm” or “Cool”
then “Time,” “Jets 1” and “Cool.”
Time
When time hasn’t been programmed, the “
” icon
flashes. (Time settings on EL1000 and some EL2000
systems are not preserved in the event of power loss;
time will have to be reprogrammed upon each power up.)
Time
Warm
Light
Blower
Mode/Prog
Cool
Jets 1
Jets 2
F1
F2
PL
TL
Economy mode heats the spa to set temperature only
” icon will display until
during filter cycles. The “
mode is changed. Pressing “Jets 1” while in Economy
mode puts the spa in Standard-In-Economy mode, which
operates the same as Standard Mode, then reverts to
Economy Mode automatically after 1 hour. Both the
“
” and “
” icons display in this mode.
During this time, a press of the “Mode/Prog” button will
revert to Economy Mode immediately.
Setting the Time
Once the spa has been properly connected the first time (every power
” icon
up on the EL1000 and some EL2000 systems), notice the “
appearing on the screen.
Time
then
Press
Mode/Prog
Warm
Sleep mode heats the spa to within 20°F (11°C) of the set
temperature only during filter cycles. The “
” icon
will display until mode is changed.
Standby Mode
Pressing “Warm” or “Cool” then “Jets 2” will turn off all
spa functions temporarily. This is helpful when changing
a filter. Pressing any button resets the spa. On some
systems the “Jets 1” button will control the pump in
Standby Mode (“Drain Mode”). In this case, press any
Select the hour by pressing
Or
Cool
Press
(Each press changes
the time by 1 minute)
to enter.
Mode/Prog
Warm
Select minutes by pressing
Press
Mode/Prog
Time
Press
Or
Cool
(Each press changes
the time by 1 minute)
to exit the time setting procedure and enter the
optional filter cycle programming. (Exits programming
on some EL1000 and some EL2000 systems.)
to exit programming.
23
ML550, 551, 554 Panel Operation
Please refer to the following User Guides for more detailed information:
ML551/ML554 User Guide: P/N 40632-99
ML 550 User Guide: P/N 40569-99
Light
Mode
Warm
Light
Warm
Mode
Heat
Jets 1
Jets 2
Blower
Heat
Jets 1
Cool
Jets 2
Cool
Blower
ML551
ML554
Heat
Cool
Warm
Jets 1
Jets 2
Blower
Light
Mode
ML550
Cool/Warm
ML500, 551, 554
Jets 1
Press the “Cool” or “Warm” button once to display the set
temperature. Each time either button is pressed again, the
set temperature will increase or decrease depending on
which button is pressed. After three seconds, the LCD will
automatically display the last measured spa temperature.
Press the “Jets 1” button once to turn pump 1 on or off, and
to shift between low and high speeds if equipped. If left
running, the pump will turn off after a time-out period. The
pump 1 low speed time-out on some systems may be as
long as 4 hours.
Mode
On non-circ systems, the low speed of pump 1 runs when
the blower or any other pump is on. It may also activate
for at least 1 minute every 30 minutes to detect the spa
temperature (polling) and then to heat to the set temperature
if needed, depending upon mode. When the low speed turns
on automatically, it cannot be deactivated from the panel;
however, the high speed may be started.
ML500, 551, 554
This button is used to switch between Standard, Economy,
and Sleep modes. Press “Mode” to enter mode programming,
press “Cool” to cycle through to desired mode (LCD flashes
until confirmed), then press “Mode” to confirm selection.
Sleep mode heats the spa to within 20°F (11°C) of the set
temperature only during filter cycles. “
” will appear on
the display until mode is changed.
Standby Mode
Pressing “Cool” or “Warm” followed by “Blower” or “Jets 2” or
“Aux” will turn off all spa functions temporarily. This is helpful
when changing a filter. Pressing any button exits Standby
mode. On some systems the “Jets 1” button will control the
pump in Standby Mode (“Drain Mode”). Then press any other
button to exit. System reverts to previous mode after 1 hour.
24
Jets 2
(optional on some systems)
Press the “Jets 2” button once to turn pump 2 on or off, and
to shift between low and high speeds if it is a two-speed
pump. If left running, the pump will turn off after a
time-out period.
Blower
1-speed operation: on/off,
2-speed operation: med/hi/off, or
3-speed operation: lo/med/hi/off.
If left on, the blower will automatically turn off after a timeout period.
NOTE: If your system does not have a “Blower” button, and
is labeled as ”Jets 3” instead, please refer to the respective
User Guide listed above.
Light
Some systems are equipped with both a spa light and a fiber
optic light; however, only one can be accessed by this panel.
(Larger panels may be purchased so that both the spa light
and fiber optic light can be utilized.) Depending upon how
your spa is equipped and configured, the “Light” button will
operate in one of three ways:
The first filter cycle (“day”) begins 6 minutes after the spa is
powered up. The second filter cycle (“night”) begins 12 hours
later. Filter duration is programmable for 1-12 hours (“ ”-“
”). The default filter duration can vary from system to
system. To program, press “Cool” or “Warm,” then “Jets 1.”
Press “Cool” or “Warm” to select the filter duration. Press
“Jets 1” to select the number of filter cycles. The display will
show “ ” (both “day” and “night” cycles); “ ” (day cycle
only); or “ ” (“night” cycle only). Press “Cool” or “Warm” to
adjust, then press “Jets 1” to exit the programming mode. For
continuous filtration, use “
” and “ ”.
Freeze Protection
1) Press the “Light” button to turn the spa light on and off,
and to shift between dim and bright settings if your light
is dimmable.
2) If a fiber-optic light with wheel is installed, press the
“Light” button once to start the light and wheel; press
it again to stop the wheel, and then again to turn the
light off.
3) If a fiber-optic light without a separate wheel stop is
installed, press the “Light” button to turn it on and off.
Both a spa light and a fiber optic light may be used
simultaneously on the EL8000 and EL5000 systems with a
different panel.
If any light is left on, it will automatically turn off after a
factory programmed time period.
Preset Filter Cycles
On all systems, the pump and the ozone generator will run
during filtration. At the start of each filter cycle, the blower
will run briefly on its highest speed to purge the air channels.
The lowest speed of any other pumps and the mister will
also run briefly. On some circ systems, pump 1 may also run
for the duration of the filter.
(Note: This panel cannot be used to program filter cycles
for systems that are programmed by time rather than by
duration. For these systems, a larger panel is needed and the
following description does not apply.)
If the temperature sensors within the heater detect a low
enough temperature, then the pump(s) and the blower
automatically activate to provide freeze protection.
The pump(s) and blower will run either continuously or
periodically depending on conditions.
In colder climates, an optional additional freeze sensor may
be added to protect against freeze conditions that may
not be sensed by the standard sensors. Auxiliary freeze
sensor protection acts similarly except with the temperature
thresholds determined by the switch. See your dealer
for details.
Locking Features
If this panel is used as the main panel, locking features will
not be available.
If this panel is used as a remote or additional panel, it will
lock when the main panel is locked. To unlock this panel,
unlock the main panel.
In the same way, the set temperature can be locked and
unlocked by a main panel. When the set temperature is
locked, it cannot be changed from either panel.
Clean-up Cycle (optional)
When a pump or blower is turned on by a button press, a
clean-up cycle begins 30 minutes after the pump or blower
is turned off or times out. The pump and the ozone generator
will run for one to four hours, depending on the system (on
some systems, you can change this setting.)
25
ML550, 551, 554 Panel Operation (cont.)
Circ Pump (optional)
User Preferences
If your system is equipped with a circ pump, it may be
configured to work in one of three different ways:
1) The circ pump operates continuously (24 hours) with the
exception of turning off for 30 minutes at a time when
the water temperature reaches 3°F (1.5°C) above the set
temperature (most likely to happen in very hot climates).
2) The circ pump stays on continuously, regardless of water
temperature.
3) The circ pump will come on when the system is checking
temperature (polling), during filter cycles, during freeze
conditions, or when another pump is on.
There are several aspects of spa operation that you can
customize using the User Preferences submenu.
Ozone (optional)
On most systems, the ozone generator (if installed) runs
during filter cycles (except when pump 1 is operating at high
speed on a non-circ system) and during clean-up cycles. On
some systems, the ozone generator operates whenever the
pump runs.
If your system is configured with the optional ozone suppress
feature, the ozone generator will turn off for 1 hour any time
a function button (Jets 1, Jets 2, Blower, etc.) is pressed.
Displaying Info About Your Spa
There are several pieces of information about your spa that
can be called up from the panel, but are only needed in
special cases.
To access this information, press “Cool” or “Warm” then
“Jets 1”, then “Light”. (Each press must be within 3 seconds
of the previous press.) Then press “Cool” until you see “
” on the display. Press “Jets 1” to see the SSID (a series of
3 numbers, such as 100 133 10, which indicates the precise
revision of the software in your spa), followed by the Mach
software version number (such as 2.1), followed by “
” and then your spa’s network ID number (consisting of both
letters and digits displayed in 5 steps).
If you need to see this series of numbers again, and “
”
is once again on the display, just press “Jets 1” again.
When done, press the “Light” button (more than once if
necessary) until you see the normal temperature display.
26
Press “Cool” or “Warm” then “Jets 1”, then “Light”. (Each press
must be within 3 seconds of the previous press.) At this
” is not showing on the display, press “Cool”
point, if “
” on the display. Then press “Jets 1” to
until you see “
enter the User Preferences submenu.
Once in the User Preferences submenu, press “Cool” or
“Warm” to cycle between these settings:
– Suppress Reminders
When set to “
”, reminders are never displayed on the
panel. When set to “
”, reminders are displayed on the
panel periodically.
– Temperature in Celsius
When set to “
”, temperatures are displayed on the panel
in degrees Celsius. When set to “
”, temperatures are
displayed in Fahrenheit.
– 24-hour Time Display
When set to “
”, time is displayed in 24-hour (military)
format (00:00 is midnight, 23:00 is one hour before
midnight). When set to “
”, time is displayed in 12-hour
(am/pm) format (12:00 is midnight, 11:00 pm is one hour
before midnight).
– Clean-up Cycle Duration (some systems only)
When set to “
”, Clean-up Cycles are disabled. When set
to “
” through “
”, the number indicates how many
hours each Clean-up Cycle will run.
– Dolphin II Address
When set to “
”, no addressing is used. Use this setting
for a Dolphin I, or for a Dolphin II which is set for no address
(which is the Dolphin II factory default). When set to
“
” through “
”, the number is the address (see your
Dolphin II manual for details).
Editing User Preferences
View the setting.
The left two characters (before the decimal point) tell
you what setting you’re viewing or editing, the right most
character (after the decimal point) tells you the value of that
setting (for example, “ ” for Yes or “ ” for No).
If the value is flashing, you’re editing it. If the value is not
flashing, you’re just viewing it.
Press “Jets 1” to switch editing of the value on (flashing) or
off (not flashing). Once you’re editing the value (it’s flashing),
use the “Cool” or “Warm” buttons to change the value to the
one you want.
After you change the value, you must press “Jets 1” again to
stop the flashing before the change will register, and before
you can view or edit another setting.
If you don’t interact with the menu for more than 30 seconds,
it may time out.
If you press “Light” to back out of the menu, or pause
long enough for it to time out, while a value was flashing,
the changes you were making to that setting are not
remembered. But changes you previously made to other
settings will be in effect.
Any User Preferences that you change will stay in effect
“forever” or until you change them again (unless the spa’s
“persistent memory” is reset by a service technician), and
will override the factory defaults for those settings.
Note: The G.F.C.I. section does not apply on EL
systems used outside the United States.
This G.F.C.I. section does not apply to GL Systems.
WARNING: THE OWNER SHOULD TEST AND
RESET THE G.F.C.I. ON A REGULAR BASIS TO
VERIFY ITS FUNCTION.
G.F.C.I. PROTECTION
Your spa may be equipped with a G.F.C.I. Protection feature. If
your spa does have this feature enabled, the G.F.C.I. Trip Test
must occur to allow proper spa function.
Within 1 to 7 days after startup, the spa will trip the G.F.C.I.
to test it. (The number of days is factory programmed.) The
G.F.C.I. must be reset once it has been tripped. After passing
the G.F.C.I. Trip Test, subsequent G.F.C.I. trips will indicate a
ground fault or other unsafe condition requiring the power to
the spa to be shut off.
G.F.C.I. TRIP TEST PROCEDURE
The installer can cause the G.F.C.I. Trip Test to occur sooner
by initiating it with the following button sequence.
Press “Warm”, then “Jets 1”, then “Light.” (Each press must be
within 3 seconds of the previous press.) Press the “Warm”
button repeatedly until “
” is displayed. Press “Jets 1” to
select it. Press the “Warm” button until “
” is displayed.
Press “Jets 1” to initiate the G.F.C.I. Trip Test.
The G.F.C.I. should trip within several seconds and the spa
should shut down. If it does not, shut down the power and
manually verify that a G.F.C.I. breaker is installed and that
the circuit and spa are wired correctly. Verify the function
of the G.F.C.I. with its own test button. Restore power to the
spa and repeat the G.F.C.I. Trip Test.
Once the G.F.C.I. is tripped by the test, reset the G.F.C.I.
and the spa will operate normally from that point. You can
verify a successful test by navigating to the “
” item
as described above, pressing “Jets 1” and then pressing
the “Warm” button until you see “
”. The code signifies
G.F.C.I. Status - Passed. The system will exit this menu in 30
seconds if no buttons are pressed.
27
ML200, 240, 260, 400 Panel Operation
Please refer to the following User Guides for more detailed information:
ML400 User Guide: P/N 40570-99
ML260 User Guide: P/N 40633-99
ML240 User Guide: P/N 40634-99
ML200 User Guide: P/N 40571-99
Heat
Jets
Jets
Aux
Temp
Aux
Temp
Light
Light
ML400
The pump responsible for heating and filtration (pump 1 low
on non-circ systems, or the circ pump on circ systems) will
be referred to simply as the pump.
ML260, ML240, ML200
Timeouts refer to a preset length of time that a function is
programmed to operate before shutting off automatically.
Certain conditions (filters or freeze) can cause a function to
operate longer, while faults can cause a function to operate
for a shorter length of time. The system keeps track of
timeouts regardless of other conditions occurring.
In multi-button sequences, if buttons are pressed too quickly
in sequence, they may not register
Temp
ML400
Press the “Temp” button once to display the set temperature.
To change the set temperature, press the pad a second
time before the LCD stops flashing. Each press of the
“Temp” button will continue to either raise or lower the set
temperature.
If the opposite direction is desired, release the pad and let
the display revert to the current water temperature. Press
the pad to display the set temperature, and again to make
the temperature change in the desired direction.
After three seconds, the LCD will automatically display the
last measured spa temperature.
Initial Start-up
Mode ML400
When your spa is first actuated, it will go into Priming mode
(after displaying some configuration information).
The Priming mode will last for up to 4 minutes and then the
spa will begin to heat and maintain the water temperature
in the Standard mode. You can exit Priming mode early by
pressing “Temp”.
Temp Set (80°F - 104°F/26.0°C - 40.0°C)
The last measured temperature is constantly displayed
on the LCD. Your spa’s set temperature range may
vary from range shown above depending on your
manufacturer’s settings.
Note that the last measured spa temperature
displayed is current only when the pump has been
running for at least 1 minute.
28
A button combination is used to switch between standard,
economy, and sleep modes. Press “Temp” followed by “Light”
to enter mode programming, press “Temp” to cycle through
to desired mode (LCD flashes until confirmed), then press
“Light” to confirm selection.
Standard mode maintains the desired temperature. Note
that the last measured spa temperature displayed is current
only when the pump has been running for at least 1 minute.
“
” will appear on the display momentarily when you
switch into Standard Mode.
Economy mode heats the spa to the set temperature
only during filter cycles. “
” will appear solid when
the temperature is not current and will alternate with the
temperature when the temperature is current.
Pressing “Jets” while in Economy mode puts the spa in
Standard-In-Economy mode, (“ ”) which operates
the same as Standard Mode, then reverts to Economy
Mode automatically after 1 hour. During this time, pressing
“Temp” followed by “Light” will revert the mode to
Economy immediately.
Sleep mode heats the spa to within 20°F (11°C) of the set
temperature only during filter cycles. “
” will appear on
the display until mode is changed.
Standby Mode ML400
Pressing “Temp” followed by “Aux” or “Jets 2” or “Blower”
will turn off all spa functions temporarily. This is helpful
when changing a filter. Pressing any button exits Standby
mode. On some systems the “Jets” button will control the
pump in Standby Mode (“Drain Mode”). In this case, press
any other button to exit. System will revert to previous mode
after 1 hour.
Jets ML400
Press the “Jets” button once to turn pump 1 on or off, and
to shift between low and high speeds if equipped. If left
running, the pump will turn off after a time-out period. The
pump 1 low speed time-out on some systems may be as long
as 4 hours.
On non-circ systems, the low speed of pump 1 runs when
the blower or any other pump is on. It may also activate
for at least 1 minute every 30 minutes to detect the spa
temperature (polling) and then to heat to the set temperature
if needed, depending upon mode. When the low speed turns
on automatically, it cannot be deactivated from the panel;
however, the high speed may be started.
Circ Pump (optional) ML400
If your system is equipped with a circ pump, it may be
configured to work in one of three different ways:
1) The circ pump operates continuously (24 hours) with
the exception of turning off for 30 minutes at a time when
the water temperature reaches 3°F (1.5°C) above the set
temperature (most likely to happen in very hot climates).
2) The circ pump stays on continuously, regardless of water
temperature.
3) The circ pump will come on when the system is checking
temperature (polling), during filter cycles, during freeze
conditions, or when another pump is on.
Light ML400
If your system has a second pump but your panel does
not have a “Jets 2” button, use the “Aux” button to control
pump 2. Press the “Jets 2” button once to turn pump 2 on
or off, and to shift between low and high speeds if it is a
two-speed pump. If left running, the pump will turn off after
a time-out period.
Some systems are equipped with both a spa light and a fiber
optic light; however, only one can be accessed by this panel.
(Larger panels may be purchased so that both the spa light
and fiber optic light can be utilized.) Depending upon how
your spa is equipped and configured, the “Light” button will
operate in one of three ways:
1) Press the “Light” button to turn the spa light on and off,
and to shift between dim and bright settings if your light is
dimmable.
2) If a fiber-optic light with wheel is installed, press the
“Light” button once to start the light and wheel, press it
again to stop the wheel, and then again to turn the light off.
3) If a fiber-optic light without a separate wheel stop is
installed, press the “Light” button to turn it on and off.
Again, both a spa light and a fiber optic light may be used
simultaneously on the EL8000 and EL5000 systems with a
different panel.
If any light is left on, it will automatically turn off after a
factory programmed time period.
Blower (optional on some systems) ML400
Ozone (optional) ML400
If your system has a blower (and only one pump), but your
panel does not have a “Blower” button, use the “Aux” button
to control the blower.
1-speed operation: on/off;
2-speed operation: med/hi/off; or
3-speed operation: lo/med/hi/off.
If left on, the blower will automatically turn off after a timeout period.
On most systems, the ozone generator (if installed) runs
during filter cycles (except when pump 1 is operating at high
speed on a non-circ system) and during clean-up cycles. On
some systems, the ozone generator operates whenever the
pump runs.
If your system is configured with the optional ozone suppress
feature, the ozone generator will turn off for 1 hour any time a
function button (Jets, Jets 2, Blower, etc.) is pressed.
Jets 2 (optional on some systems) ML400
29
ML200, 240, 260, 400 Panel Operation (cont.)
Clean-up Cycle (optional ML400)
When a pump or blower is turned on by a button press, a
clean-up cycle begins 30 minutes after the pump or blower
is turned off or times out. The pump and the ozone generator
will run for one to four hours, depending on the system.
(On some systems, you can change this setting; see User
Preferences section.)
Freeze Protection ML400
If the temperature sensors within the heater detect a low
enough temperature, then the pump(s) and the blower
automatically activate to provide freeze protection.
The pump(s) and blower will run either continuously or
periodically depending on conditions.
In colder climates, an optional additional freeze sensor may
be added to protect against freeze conditions that may
not be sensed by the standard sensors. Auxiliary freeze
sensor protection acts similarly except with the temperature
thresholds determined by the switch. See your dealer
for details.
Locking Features ML400
If this panel is used as the main panel, locking features
will not be available. If this panel is used as a remote or
additional panel, it will lock when the main panel is locked.
To unlock this panel, unlock the main panel.
In the same way, the set temperature can be locked and
unlocked by a main panel. When the set temperature is
locked, it cannot be changed from either panel.
Preset Filter Cycles ML400
On all systems, the pump and the ozone generator will run
during filtration. At the start of each filter cycle, the blower
will run briefly on its highest speed to purge the air channels.
The lowest speed of any other pumps and the mister will
also run briefly. On some circ systems, pump 1 may also run
for the duration of the filter.
(Note: This panel cannot be used to program filter cycles
for systems that are programmed by time rather than
by duration. For these systems, a larger panel is needed
and the following description does not apply.)
The first filter cycle (“day”) begins 6 minutes after the spa is
powered up. The second filter cycle (“night”) begins 12 hours
later. Filter duration is programmable for 1-12 hours (“ ”-“
30
”). The default filter duration can vary from system to
system. To program, press “Temp” then “Jets.” Press “Temp”
to select the filter duration. Press “Jets” to select the number
of filter cycles. The display will show “ ” (both “day” and
“night” cycles); “ ” (day cycle only); or “ ” (“night” cycle
only). Press “Temp” to adjust, then press “Jets” to exit the
programming mode. For continuous filtration, use “
” and
“ ”.
Displaying Information About Your Spa ML400
There are several pieces of information about your spa that
can be called up from the panel, but are only needed in
special cases.
To access this information, press “Temp” then “Jets”, then
“Light”. (Each press must be within 3 seconds of the previous
” on the
press.) Then press “Temp” until you see “
display. Press “Jets” to see the SSID (a series of 3 numbers,
such as 100 133 10, which indicates the precise revision of
the software in your spa), followed by the Mach software
” and then
version number (such as 2.1), followed by “
your spa’s network ID number (consisting of both letters and
digits displayed in 5 steps).
If you need to see this series of numbers again, and “
” is
once again on the display, just press “Jets” again.
When done, press the “Light” button (more than once if
necessary) until you see the normal temperature display.
User Preferences ML400
There are several aspects of spa operation that you can
customize using the User Preferences submenu.
Press “Temp” then “Jets”, then “Light”. (Each press must be
within 3 seconds of the previous press.) At this point, if “
” is not showing on the display, press “Temp” until you see
“
” on the display. Then press “Jets” to enter the User
Preferences submenu.
Once in the User Preferences submenu, press “Temp” to cycle
between these settings:
– Suppress Reminders
”, reminders are never
When set to “
”,
displayed on the panel. When set to “
reminders are displayed on the panel
periodically.
– Temperature in Celsius
”, temperatures are displayed
When set to “
on the panel in degrees Celsius. When set to “
”, temperatures are displayed in Fahrenheit.
– 24-hour Time Display
”, time is displayed in 24-hour
When set to “
(military) format (00:00 is midnight, 23:00 is
one hour before midnight). When set to “
”, time is displayed in 12-hour (am/pm) format
(12:00 is midnight, 11:00 pm is one hour before
midnight).
– Clean-up Cycle Duration (some systems only)
”, Clean-up Cycles are disabled.
When set to “
” through “
”, the number
When set to “
indicates how many hours each Clean-up Cycle
will run.
– Dolphin II Address
”, no addressing is used. Use
When set to “
this setting for a Dolphin I, or for a Dolphin II
which is set for no address (which is the
”
Dolphin II factory default). When set to “
”, the number is the address (see
through “
your Dolphin II manual for details).
Editing User Preferences ML400
View the setting.
The left two characters (before the decimal point) tell
you what setting you’re viewing or editing, the right most
character (after the decimal point) tells you the value of that
setting (for example, “ ” for Yes or “ ” for No). If the value
is flashing, you’re editing it. If the value is not flashing, you’re
just viewing it.
Press “Jets” to switch editing of the value on (flashing) or off
(not flashing).
Once you’re editing the value (it’s flashing), use the “Temp”
buttons to change the value to the one you want.
After you change the value, you must press “Jets” again to
stop the flashing before the change will register, and before
you can view or edit another setting.
If you don’t interact with the menu for more than 30 seconds,
it may time out.
If you press “Light” to back out of the menu, or pause long
enough for it to time out, while a value was flashing, the
changes you were making to that setting are not remembered. But changes you previously made to other settings will
be in effect.
Any User Preferences that you change will stay in effect
“forever” or until you change them again (unless the spa’s
“persistent memory” is reset by a service technician), and
will override the factory defaults for those settings.
G.F.C.I. Protection ML400
Your spa may be equipped with a G.F.C.I. Protection feature. If
your spa does have this feature enabled, the G.F.C.I. Trip Test
must occur to allow proper spa function.
Within 1 to 7 days after startup, the spa will trip the G.F.C.I.
to test it. (The number of days is factory programmed.) The
G.F.C.I. must be reset once it has been tripped. After passing
the G.F.C.I. Trip Test, subsequent G.F.C.I. trips will indicate a
ground fault or other unsafe condition requiring the power to
the spa to be shut off.
G.F.C.I. Trip Test Procedure: ML400
The installer can cause the G.F.C.I. Trip Test to occur sooner
by initiating it with the following button sequence.
Press “Temp”, then “Jets”, then “Light.” (Each press must be
within 3 seconds of the previous press.) Press the “Temp”
” is displayed. Press “Jets” to
button repeatedly until “
select it. Press the “Temp” button until “
” is displayed.
Press “Jets” to initiate the G.F.C.I. Trip Test.
The G.F.C.I. should trip within several seconds and the spa
should shut down. If it does not, shut down the power and
manually verify that a G.F.C.I. breaker is installed and that the
circuit and spa are wired correctly. Verify the function of the
G.F.C.I. with its own test button. Restore power to the spa
and repeat the G.F.C.I. Trip Test.
Once the G.F.C.I. is tripped by the test, reset the G.F.C.I.
and the spa will operate normally from that point. You can
verify a successful test by navigating to the “
” item
as described above, pressing “Jets” and then pressing the
“Temp” button until you see “
”. The code signifies G.F.C.I.
Status - Passed.
The system will exit this menu in 30 seconds if no buttons
are pressed.
31
VL Series Panels -- For use with VS and GS Systems
Warm
Blower
Light
Mode / Prog
Cool
Jets 1
Jets 2
Time
Warm
Blower
Light
Mode/Prog
Cool
Jets 1
Jets 2
Mode
Warm
VL702S
Blower
Heat
Jets 1
VL701S
Blower
Jets 2
Light
Mode
Cool
Warm
Heat
Jets 2
Light
Cool
VL600S
VL700S
Jets 1
32
DELUXE SYSTEMS
Time
Jets
Warm
Mode
Blower
Light
Jets Blower Light Heat
Cool
STANDARD SYSTEMS
VL801D
VL802D
p
“Phone Plug” RJ Type,
VL/VS Connector
VL406U
VL406T
Jets
Warm
Light
Cool
Heat
Jets
Temp
Blower
Light
Heat
“Phone Plug” RJ Type,
VL/VS Connector
Set
Heat
VL403
Jets
Light
Note:
VL404 and VL403 have red
LED’s on black background
Heat
Blower
Jets
Temp
Light
VL402
Blower
Heat
Jets
Heat
Blower
Jets
Temp
Light
Set
VL200 VL240
VL260
VL400
VL401
Light
DUPLEX SYSTEMS
VL404
Blower
Blower Jets
Blower Jets
Temp Light
Temp Light
33
VS/GS Panel -- 300 & 500 Series and Operation
Please refer to the User Guides for additional information.
500 Z Series User Guide: P/N 40789
300/300F Series User Guide: P/N 40839 (for systems with software V38 only)
500 SZ Series User Guide: P/N 40790
300/300F Series User Guide: P/N 40887 (for systems with software v41 only)
500 DZ Series User Guide: P/N 40788
Temp
Te
mpp
J ts
Je
Blow
Bl
ower
er
300/300F/500Z Series Panel
Warm
Cool
Mode
Warm
Cool
Mode/Prog
Time
Initial Start-up
Your spa will enter Priming Mode ( ) when it is energized.
During Priming Mode, press “Jets” button(s) repeatedly and
be sure all pumps are free of air. Priming Mode lasts less
than 5 minutes. Press “Temp” to exit. After Priming Mode,
the spa will run in Standard Mode (see Mode section).
Some panels may not have a “Temp” button. On these
panels the “Set,” “Warm,” or “Cool” buttons are used.
The pump responsible for heating and filtration (pump 1
low-speed on non-circ system, or the circ pump on circ
systems) will be referred to simply as the pump.
In multi-button sequences, if the buttons are pressed too
quickly in sequence, they may not register.
Blower
Light
Note: Button shapes and labels may vary.
Jets
500DZ Series Panel
34
Note: Button shapes and labels may vary.
Jets
500SZ Series Panel
Ligh
Li
g t
gh
Blower
Light
Note: Button shapes and labels may vary.
TEMP CONTROL (80°F - 104°F/26°C - 40°C)
The last measured water temperature is
constantly displayed.
The water temperature displayed is current only when the
pump has been running for at least 2 minutes.
On panels with a single “Temp” or “Set” button, to display
the set temperature, press the button once. To change the
set temperature, press the button a second time before the
display stops flashing.
Each press of the button will continue to either raise or
lower the set temperature. If the opposite direction is
desired, allow the display to revert to the current water
temperature. Press the button to display the set temperature,
and again to make the temperature change in the
desired direction.
On panels with “Warm” and “Cool” buttons, to display the set
temperature, press “Warm” or “Cool” once. To change the set
temperature, press a temperature button again before the
display stops flashing. Each press of “Warm” or “Cool” will
adjust the set temperature.
After three seconds, the display will stop flashing and begin
to display the current spa temperature.
JETS
Jets 1 500Z, 500DZ, 500SZ Series
Press “Jets 1” to turn pump 1 on or off, and to shift between
low and high speeds (if equipped). The low-speed will turn
off after 4 hours. High-speed will turn off after 15 minutes.
Low-speed may run automatically at times, during which it
cannot be deactivated from the panel, but high-speed may
be operated.
Jets 2/Jets 3/Blower (If equipped)
Press the corresponding button once to turn the device on or
off. The device will turn off after 15 minutes. Pump 2 may be
two-speed on some systems.
Some systems use this one button to control two devices.
The first button press will activate one device. Press again
to have both devices active. Press again to turn off the first
device only. Press one more time to turn both devices off.
Jets 300F (Software v. 41)
Press “Jets” to turn the pump on or off, and to shift between
low and high speeds (if equipped). If left running, the pump
will turn off after a preset length of time, which on some
systems may be as long as 2 hours for low speed. Low speed
may run automatically at times, during which it cannot be
deactivated from the panel, but high speed may be operated.
The ozone generator (if installed) will activate anytime low
speed is running.
Jets 300, 300F (Software v. 38)
Press “Jets” to turn the pump on or off, and to shift between
low and high speeds (if equipped). The low speed will turn
off after 4 hours. High speed will turn off after 15 minutes.
Low speed may run automatically at times, during which it
cannot be deactivated from the panel, but high speed may
be operated. The ozone generator (if installed) will activate
anytime low speed is running.
LIGHT
Press “Light” to operate the spa light. Turns off after 4 hours.
SETTING THE TIME OF DAY
When the spa is first powered up, the words SET TIME
will flash on the display. Press “Time,” then “Mode/Prog,”
then “Warm” or “Cool.” The time will begin changing in
one-minute increments. Press “Warm” or “Cool” to stop the
time from changing. Press “Time” to confirm.
MODE/PROG
Mode 500Z
UÊ Depending on system configuration, mode changing may
not be available and will be locked in Standard Mode.
UÊ Mode is changed by pressing “Temp,” then “Light”.
UÊ STANDARD Mode maintains set temperature. will be
displayed momentarily when you switch into Standard
Mode.
UÊ ECONOMY Mode heats the spa to the set temperature
only during filter cycles. will display when water temp
is not current, and will alternate with water temp when
the pump is running.
UÊ SLEEP Mode heats the spa to within 20°F/10°C of the
set temperature only during filter cycles. will display
when water temp is not current, and will alternate with
water temp when the pump is running.
Mode 500SZ
UÊ Mode is changed by pressing “Warm” or “Cool,” then
pressing “Mode.”
UÊ STANDARD Mode maintains set temperature.
will be displayed momentarily when you switch into
Standard Mode.
UÊ ECONOMY Mode heats the spa to the set temperature
only during filter cycles.
will display when water
temp is not current, and will alternate with water temp
when the pump is running.
UÊ SLEEP Mode heats the spa to within 20°F/10°C of the
set temperature only during filter cycles.
will display
when water temp is not current, and will alternate with
water temp when the pump is running.
35
VS/GS Panel -- 300 & 500 Series and Operation (cont.)
Mode/Prog 500DZ
UÊ Mode is changed by pressing “Warm” or “Cool,” then
pressing “Mode/Prog” button.
UÊ Standard Mode maintains set temperature and the
STANDARD icon will be displayed.
UÊ ECONOMY Mode heats the spa to the set temperature
will display when water
only during filter cycles.
temp is not current, and will alternate with water temp
when the pump is running. The ECONOMY icon will be
displayed.
UÊ SLEEP Mode heats the spa to within 20°F/10°C of the
set temperature only during filter cycles.
will display
when water temp is not current, and will alternate with
current water temp when the pump is running.
Mode 300, 300F
UÊ Depending on system configuration, mode changing may
not be available and will be locked in Standard Mode.
UÊ Mode is changed by pressing “Temp,” then “Light”.
UÊ STANDARD Mode maintains set temperature. will be
displayed momentarily when you switch into Standard
Mode.
UÊ ECONOMY Mode heats the spa to the set temperature
only during filter cycles. will display when water temp
is not current, and will alternate with water temp when
the pump is running.
UÊ SLEEP Mode heats the spa to within 20°F/10°C of the
set temperature only during filter cycles. will display
when water temp is not current, and will alternate with
water temp when the pump is running
FILTER CYCLES
Preset Filter Cycles 500Z
UÊ The first preset filter cycle begins 6 minutes after the
spa is energized. The second preset filter cycle begins 12
hours later. Filter duration is programmable for 2, 4, 6, or
8 hours or for continuous filtration (indicated by ). The
default filter time is 2 hours.
UÊ To program, press “Temp,” then “Jets 1.” Press “Temp” to
adjust. Press “Jets 1” to exit programming.
UÊ For non-circ systems, low-speed pump 1 and the ozone
generator (if installed) run during filtration.
36
UÊ For circulation systems, the circ pump and the ozone
generator (if installed) run 24 hours. In hot environments,
the circ pump may turn off for 30 minute periods,
except during filter cycles. At the beginning of each
filter cycle all other equipment will run briefly to purge
the plumbing.
Preset Filter Cycles 500SZ
UÊ The first preset filter cycle begins 6 minutes after the
spa is energized. The second preset filter cycle begins 12
hours later. Filter duration is programmable for 2, 4, 6, or
).
8 hours or for continuous filtration (indicated by
The default filter time is 2 hours for non-circ systems and
4 hours for circ systems.
UÊ To program, press “Warm” or “Cool,” then “Jets 1.”
Press “Warm” or “Cool” to adjust. Press “Jets 1” to
exit programming.
UÊ In hot environments, the circ pump may turn off for
30 minute periods, except during filter cycles. At the
beginning of each filter cycle all other equipment will run
briefly to purge the plumbing
Preset Filter Cycles 500DZ
UÊ The first preset filter cycle starts at 8:00 AM and ends
at 10:00 AM. The second preset filter cycle starts at 8:00
PM and ends at 10:00 PM.
UÊ For non-circ systems, low-speed pump 1 and the ozone
generator (if installed) run during filtration.
UÊ For circulation systems, the circ pump and the ozone
generator (if installed) run 24 hours. In hot environments,
the circ pump may turn off for 30 minute periods, except
during filter cycles. At the beginning of each filter
cycle, all other equipment will run briefly to purge the
plumbing.
Preset Filter Cycles 300F (Software v. 41)
UÊ The first preset filter cycle begins 6 minutes after the
spa is energized. The second preset filter cycle begins 12
hours later.
UÊ Filter duration is programmable for 1, 2, 3, 4, 5, 6, 7, or 8
hours. The default filter time is 1 hour.
UÊ To program, press “Temp,” then “Jets.” Press “Temp” to
adjust. Press “Jets” to exit programming.
Preset Filter Cycles 300, 300F (Software v. 38)
UÊ The first preset filter cycle begins 6 minutes after the
spa is energized. The second preset filter cycle begins 12
hours later.
UÊ For 300-series systems, filter duration is programmable
for 2, 4, 6, or 8 hours or for continuous filtration (indicated
by ). The default filter time is 2 hours.
UÊ For 300F-series systems, filter duration is programmable
for 1, 2, 3, 4, 5, 6, 7, or 8 hours or for continuous filtration
(indicated by ). The default filter time is 1 hour.
UÊ To program, press “Temp,” then “Jets.” Press “Temp” to
adjust. Press “Jets” to exit programming.
OZONE
For non-circ systems (if installed) runs during filtration.
For circulation systems (if installed) runs 24 hours.
Optional Filter Cycle Programming 500DZ
UÊ You are not required to change the filter cycles, but if you
wish to, press “Time,” “Mode/Prog,” “Mode/Prog” within
3 seconds. SET START FILTER 1 (AM) will appear. Press
“Warm” or “Cool” to reset the filter start time.
UÊ Press “Mode/Prog” to see SET STOP FILTER 1 and
adjust the time with “Warm” or “Cool” as done above.
Press “Mode/Prog” to see SET START FILTER 2 (PM)
and proceed as above. Press “Mode/Prog” to see
SET STOP FILTER 2 and proceed as above. Press “Mode/
Prog” to confirm.
LOCKING THE PANEL 500DZ
UÊ Press “Time,” “Blower,” and “Warm” within 3 seconds.
The Panel is now locked. To unlock the panel, press the
“Time,” “Blower,” and “Cool” within 2 seconds.
UÊ Note: On some systems, “Jets 1,” instead of “Blower,” is
used in Lock/Unlock sequences.
LOCKING THE TEMPERATURE 500DZ
UÊ Press “Warm,” “Time,” “Blower,” and “Warm” within
3 seconds. The “Warm” and “Cool” buttons are now
disabled. To unlock the temperature, press “Time,”
“Blower,” and “Cool” within 2 seconds.
UÊ Note: On some systems, “Jets 1,” instead of “Blower,” is
used in Lock/Unlock sequences.
37
EL and GL Series Mach 3 -- Persistent Memory & Power Up
This document applies when using ML Series panels with any EL or GL Mach 3 series system.
EL - GL, ABOUT PERSISTENT MEMORY
Any time you change DIP Switches or Software Configuration Settings that
affect parameters the user can change (any filter settings, set temperature
default, Celsius vs Fahrenheit, 12-hour vs 24-hour time, reminders
suppression, etc), you must reset Persistent Memory for your DIP Switch or
Software Configuration Settings changes to take effect. You should also reset
Persistent Memory after loading a new file into a board (using the ESM,
purchased seperately).
To reset Persistent Memory:
s Power down.
s Set A12 ON (See illustration below).
s Power up.
s Wait until “ ” or “
” is displayed on your panel.
” appears see section below.
Note: If “
s Set A12 OFF. (This can be done safely with power on if you use a nonconductive tool such as a pencil to push the switch back to the OFF
position. Otherwise, power down before setting A12 OFF)
s Power up again (if you powered down in the previous step).
s For all other power ups, leave A12 OFF.
About Persistent Memory and Time of Day Retention:
This system uses memory that doesn’t require a battery to store a variety
of settings. What we refer to as Persistent Memory stores all the User
Preferences, as well as all the filter settings, the set temperature, and the
heat mode.
Persistent Memory is not used for Time of Day. Time of Day needs to be
“kept running” (not just stored) while the power is off, so a separate Real
Time Clock feature (on all models except the EL1000) keeps track of
Time of Day while the unit is off. Time of Day Retention, and Time of Day
Retention alone, is controlled by the J91 jumper. J91 must be set according
to main system panel used.
Switchbank A
J91
RTC
Enabled
(Not Jumpered)
Switchbank B
J91
RTC
Disabled
(Jumpered)
POWER UP DISPLAY SEQUENCE, SOFTWARE ID
message on power up:
If “
” appears before (and instead of) “ ” or
”, you have not configured DIP Switches and/or
“
Software Configuration Settings in a valid manner. This must be corrected
before you can reset Persistent Memory.
The switch numbers, jumpers, or configuration settings displayed after
“
” are ones with which the system has found a configuration problem.
For example:
s “
” would mean that the combination of how you’ve set
A5 and how you’ve set B2 is not supported on this system.
s “
” would mean that there is a problem with jumper J99
s “
” would mean that the combination of how
you’ve set pump 3 for 1-speed and blower for 1-speed is not supported
on this system.
s “
” would mean that the combination of how you’ve
set DIP switches which have been assigned to pump 3 and blower is not
supported on this system.
Power Up Display Sequence
Upon power up, you should see the following on the display:
s Three numbers in a row, which are the SSID (the System Software
ID). The third display of these numbers is the Software Version, which
should match the version of your system. For example, if these three
, that is a Mach 3 EL8000 at version 26.
numbers are
s If there is a Configuration Error, the
message (see above) will
appear at this point (and none of the messages below will display).
Otherwise what comes next is:
s An indication of either the input voltage detected (EL1000/EL2000), or
the heater wattage range supported (EL8000/GL2000/GL8000).
s Heater wattage display: “ ” means the system supports a heater
” means the system supports a heater
from 1 kW to 3 kW. “
” means the system supports a 3 kW
from 3 kW to 6 kW. “
heater only. (These ranges may be modified slightly in the case of
special heaters, which the next bullet covers.)
s Input voltage display: A system showing “
” supports 3 kW
to 6 kW heaters. A system showing “ ” supports the very same
heaters, although at 120V those heaters will function at only 1/4 of
” or
their 240V rated wattage. (The system shows only either “
” as a general indication of input voltage; it does not show the
“
actual input voltage.)
s If your system is using a special type of heater, a display such as “ ”
may appear next. If your system is using the generic Balboa heater, no
heater type display will appear.
s “ ” or “
” will appear to signal the start of
Priming Mode.
At this point, the power up sequence is complete. Refer to the User Guide
for the ML Series panel on your system for information about how the spa
operates from this point on.
38
VS-GS Persistent Memory with VL Panels
Any time you change a DIP Switch, other than A1, you must reset Persistent
Memory for your new DIP Switch Settings changes to take effect. If you do
not reset Persistent Memory, your system may function improperly.
To reset Persistent Memory:
s Power down by disconnecting power source from spa.
s Put a jumper across J43, covering both pins. (See illustration below)
s Power up by connecting power source to spa.
s Wait until “ ” is displayed on your panel.
s Power down again.
s Remove jumper from J43 (May also move to cover 1 pin only)
s Power up again.
About Persistent Memory and Time of Day Retention:
This system uses memory that doesn’t require a battery to store a variety of
settings. What we refer to as Persistent Memory stores the filter settings,
the set temperature, and the heat mode.
Persistent Memory is not used for Time of Day. Only models with a
Serial Deluxe panel installed (VS5xxDZ and GS5xxDZ) can display the
time. However, during power loss to the spa, the system will lose the
correct time, and reset to 12:00 PM when power is restored.
Power Up Display Sequence
Upon power up, you should see the following on the display:
s Three numbers in a row, which are the SSID (the System Software
ID). The third display of these numbers is the Software Version,
which should match the version of your system. For example, if these
three numbers are
, that is a VS511SZ at version 38.
s Displayed next is: “ ” (indicating the system is configured for
a heater between 3 and 6 kW) or “ ” (indicating the system is
configured for a heater effectively* between 1 and 3 kW).
“ ” should appear for all VS models running at 240VAC.
“ ” should appear for all VS models running at 120VAC, as well
as all GS models. (*A heater which is rated at 4 kW at 240VAC will
function as a 1 kW heater at 120VAC.)
s “ ” will appear to signal the start of Priming Mode.
At this point, the power up sequence is complete. Refer to the Reference
Card for the VS or GS System model of your spa for information about how
the spa operates from this point on, including how to adjust the Time of
Day if using a Serial Deluxe style panel.
J43
TST
C
G
J90
G
C
K4
SWITCHBANK A
K1
J12
C
G
K5
W2
J20
F5, F3A 250V
K5
J50
C
FUSE 3A 250V
G
G
W4
C
C
G
J46
C
W3
J1 J1A
J29
C
K8
OZONE
J23
RST
J6 J43
G
W7
K9
T1
F4 FUSE .3A 250V
F1
C
W1
SWITCHBANK
A
S1 TST
PUMP
J20
G
J6
J29
G
J50
K1
J47
J17/26
J23
E.GND
K6
FUSE 20A 250V
F7
J10
J18
E.GND
J13
S1 TST
SWITCHBANK A
J22
EXT.
T
RLY
L
AUX. F
J7
J8
SEN. A
SEN. B
BALBOA INSTRUMENTS, INC. 2-SPD
J44 VS500Z
EXT RLY
P/N 22972 REV D
MADE IN U.S.A
V
VAC
COPYRIGHT 2005
J43 on VS5xxZ and VS300 Series Main Board Shown.
J43 on GS5xxZ Series is located in approximately the same position.
LINE
BLK AC
F4
K2
J26
F2
J60
J1
K3
J12
J43
J6
U4
WHT AC
J57
TST
RST
J6 J43
S1
J7
J8
SEN. A
SEN. B
J9
J2
J58
Balboa
1
U4
NEUTRAL
VS100
P/N 22964_B MADE IN U.S.A.
© 2006
K3
K2
W1
2 3
J18
F2
J13
T0.25A 250V
J2A
HEATER
A
SWITCHBANK A
J43 on VS100/GS100 Series Main Board Shown.
39
Testing the Circuit Board Output
BALBOA’S QUICK TESTTM TEST KIT
TO USE THE BALBOA QUICK CHECK
If your topside control panel is working properly, but a pump,
blower, or other device does not activate when its panel
button is pressed, further diagnosis is easily accomplished
with the Balboa Quick Check, which is designed to test
output voltage on a variety of Balboa systems. The following
system outputs can be tested using the Balboa Quick Check:
UÊ Turn off the power at the house breaker box.
UÊ Unplug the device in question, and plug the Quick Check
in its place.
UÊ Restore power to the spa and press the appropriate
panel button again. If the Quick Check’s light appears,
the device in question is receiving voltage.
UÊ An ordinary multi-meter can also be used to check for
proper output voltage, except when working with a
variable-speed blower or a dimmable spa light. In these
cases, a component on the circuit board called a “triac”
needs to be under a small load to test output voltage.
NOTE: If a small load is not applied to these systems,
voltage indications of up to 240 volts AC can be seen
when measuring output voltage, even if the component is
not activated.
UÊ Even if the system is not equipped with a blower triac,
the best way to verify voltage output is with the Balboa
Quick Check.
UÊ If the Quick Check light does not appear after pressing
the appropriate panel button, trace the wires from the
corresponding connector in the system box back to the
circuit board.
UÊ Probe these connections at the circuit board after
activating the function with the topside control panel.
UÊ If you do not have correct voltage, double check the
input voltage before you replace the circuit board.
UÊ If you do have correct voltage at the circuit board, turn
off the system power and check for a blown in-line
fuse. Blowing the in-line fuse or the power input fuse is
usually a symptom of a faulty pump, blower, or a short in
the wiring to one of those devices.
UÊ If the fuse is good, then replace the output connector.
UÊ If the high-speed pump comes on when the system calls
for heat or when the system goes into a filter cycle,
the pump is most likely wired backwards. Verify that
the black (low speed) & red (high speed) wires are not
switched in the amp connector or the pump itself.
UÊ Always check to make sure all devices are plugged into
the proper location.
NOTE: If the spa light output is not detected with the Balboa
Quick Check, be sure to check continuity of the light fuse on
the circuit board.
120 VAC or 240 VAC -- 2-speed pump
120 VAC or 240 VAC -- 1-speed pump
120 VAC or 240 VAC -- blower (with or w/o variable speed)
120 VAC or 240 VAC -- ozone generators
12 VAC -- spa light
120 VAC -- spa light (with Spa Light Adapter)
12 VAC -- perimeter light (with Perimeter Light Adapter)
The Balboa Quick Check Test Kit is especially useful for
testing variable speed blowers and dimmable spa lights.
Because these outputs use a device on the circuit board
called a triac, no voltage can be measured unless a load
exists. The Quick Check not only supplies a small load, but
also indicates if voltage is present.
The 4-prong connector is used to test pumps, blowers, ozone
generators, and by using the Spa Light Adapter, 120 VAC
spa light output. The 2-prong connector is used to test the
output for the 12 VAC spa light. Also included in the kit is a
Perimeter Light Adapter, which can be used to test the 12 VAC
perimeter light output.
Balboa QuickCheckTM
Part No. 70002
40
Testing the Sensor Set
1.
Check sensor wires for cracks or damage that may
indicate the presence of a rodent.
2. Inspect the connections of both sensors on the circuit
board. The plugs must be clean.
3.
If the sensors are not totally failing but are showing
excessive (2° F/1.0 °C or more) difference between the
two sensors when not heating (a possible cause of
Sn/SnS/SENSOR SYNC, HL/HFL/HTR FLOW LOW, and
LF/LOW/FLOW/messages), do the following:
UÊ Note which sensor is reading consistently higher
(A vs B or t vs H).
4.
Unplug the two sensors from the circuit board and
exchange their positions (i.e., plug the one that was in
the “Sen. A” jack into the “Sen. B” jack and vice versa).
5. Press a panel button if any "stray" faults appeared
during the process. (Stray faults are normal when
sensors are unplugged then plugged back in while the
system is running.)
6.
Within a minute or so, see if the same or other sensor is
now reading consistently higher:
UÊ If the same sensor (A vs B or t vs H) is reading higher
after the sensor interchange, the problem is on the
circuit board. Replace the circuit board.
UÊ If the opposite sensor is now reading higher, the problem
is with the sensor(s). Replace the sensor set.
*If you wait more than 2 minutes after plugging the
sensors back in, heating may start (even outside a filter
in Economy or Sleep mode) due to a stray Cd/CLd/COLD
WATER condition usually detected when sensors are
being plugged in while the system is running.
7. If there is a message indicating an open or faulty sensor:
UÊ Unplug the sensor set (but leave the original sensors
in the heater) and plug in the test sensor set. Put both
sensors into the same cup of warm water (ideally above
the set temperature, so the spa won't try to heat during
this test, as there is no heater protection during this
test) and verify that they read the same temperature
(within 1°F/0.5°C).
UÊ If the problem is solved, replace the sensor set. If the
problem is not solved, do not replace the sensor set.
UÊ Plug in the original sensor set to verify that there is not a
connection problem.
UÊ If the problem continues after following the above steps,
then replace the circuit board.
41
Changing a System Circuit Board
HOW TO REPLACE A SYSTEM CIRCUIT BOARD
Important!
Be sure to turn the power off before replacing any
component, especially a circuit board.
Important!
DO NOT REMOVE AND REPLACE THE CIRCUIT BOARD
UNLESS THE FAULT HAS POSITIVELY BEEN DETERMINED TO BE THE CIRCUIT BOARD.
HOW TO REMOVE A SYSTEM CIRCUIT BOARD
NOTE: Before you begin, labeling all wires to be removed
may help speed up reinstallation. The wiring diagram should
always be used to ensure proper wire placement.
UÊ Shut OFF line power to the spa at the main circuit
breaker panel. Do not attempt to service a spa without
shutting off the power. Serious injury or damage
may result.
UÊ Disconnect all wires and slip-on connectors as
necessary to remove the board.
UÊ Remove all the screws which mount the board to the
system enclosure.
UÊ Remove the board from the plastic stand-offs by gently
squeezing the locking flange on each stand-off with a
pair of pliers. The board should now be free and can be
removed from the system box.
VS500 Board
42
UÊ Check all jumpers and dip switch positions on the new
board. Make sure they are in the same position as the
old board.
UÊ Make sure the new board snaps in place on the plastic
stand-offs. Use care to be sure the connectors on the
right side of the board clear the enclosure openings as
the board is installed.
Caution: Do Not Overtighten this screw.
UÊ Install all screws which mount the board to the
system enclosure.
UÊ Reconnect all wires and slip-on connectors.
UÊ Restore power to the spa at the main breaker.
UÊ Test to make sure all functions work correctly.
Important
DO NOT REMOVE AND REPLACE THE CIRCUIT BOARD
UNLESS YOU HAVE TESTED ALL OTHER COMPONENTS
AND PROVEN THAT THE CIRCUIT BOARD IS ACTUALLY
CAUSING THE PROBLEM.
Removing the Heater Assembly from a Spa System
Note: Be careful when removing a heater assembly
from a spa plumbing system. Water may splash out
under pressure.
Water under pressure in the plumbing may splash out,
and onto the system’s electronic board. Do not remove the
system door until the water has been drained from the heater
assembly housed in the system.
1.
Turn off the main power.
2. Close off the slice valves (or, ball valves) adjacent to the
heater assembly.
3.
Once the valves are closed, slowly crack the heater
assembly end tubes until water flows out. If the
connectors are on too tight, it may be necessary to
loosen the Phillips screws that hold the connectors
together. Once the water has been drained, continue.
Remove both nuts that secure
the element in place.
4.
Remove the system door cover.
5. Remove the nuts securing the copper straps to the
heater assembly’s terminal connectors. Be sure to
use a supporting end wrench on the lower nut.
Otherwise, excessive torque may be occur on the straps
and put undue stress on the PCB.
6.
Remove the heating assembly sensor wires and replace
if necessary.
7.
Remove both nuts that secure the element in place.
8.
Remove the heater assembly
Keep the lower nut from turning by
supporting it with another end-wrench
43
Panel Message Reference Guide
Message
Meaning / Frequency
5FNQFSBUVSFOPUDVSSFOUJO
&DPOPNZPS4MFFQNPEF
*O&DPOPNZPS4MFFQNPEFUIFQVNQNBZCFPGGGPS
IPVSTPVUTJEFBmMUFSDZDMF*GZPVXJTIUPTFFUIF
DVSSFOUTQBUFNQFSBUVSFFJUIFSTXJUDIUP4UBOEBSE
NPEFPSUVSO+FUTPOGPSNJOVUFT1MFBTFTFF
i%JBHOPTJOH5PQTJEF$POUSPM1BOFMTw1BHF
$POmHVSBUJPOFSSPS4QB
DBOOPUTUBSUVQ
1MFBTFTFFi%JBHOPTJOH5PQTJEF$POUSPM1BOFMTw
1BHF
"TOFFEFE<>
*OTUBMMOFX.JOFSBMDBSUSJEHF
Reminder, Suppress in User Preferences. [2]
&WFSZEBZT<>
5FTUBOEBEKVTUQ)DIFNJDBMMFWFMTQFSNBOVGBDUVSFST
JOTUSVDUJPOTReminder, Suppress in User Preferences.
[2]
&WFSZEBZT<>
5FTUBOEBEKVTUTBOJUJ[FSDIFNJDBMMFWFMTQFS
NBOVGBDUVSFSTJOTUSVDUJPOTReminder, Suppress in User
Preferences. [2]
'JSNXBSFJOTUBMMQSPCMFN
$POUBDU#BMCPBJGNFTTBHFBQQFBSTPONPSFUIBOPOF
QPXFSVQ
&WFSZEBZT<>
$MFBOBOEDPOEJUJPODPWFSQFSNBOVGBDUVSFST
JOTUSVDUJPOTReminder, Suppress in User Preferences.
[2]
&WFSZEBZT<>
3FNPWFDMFBOBOESFJOTUBMMmMUFSQFSNBOVGBDUVSFST
JOTUSVDUJPOTReminder, Suppress in User Preferences.
[2]
4ZTUFNDPOmHVSFEJODPSSFDUMZ
.FOVQBOFMEJTQMBZTFSSPST
$POUBDU#BMCPB1MFBTFTFFi%JBHOPTJOH5PQTJEF
$POUSPM1BOFMTw1BHF
'JSNXBSFJOTUBMMQSPCMFN
$POUBDU#BMCPBJGNFTTBHFBQQFBSTPONPSFUIBOPOF
QPXFSVQ1MFBTFTFFi%JBHOPTJOH5PQTJEF$POUSPM
1BOFMTw1BHF
.-1BOFMT
*OBEFRVBUFXBUFSEFUFDUFE
JOIFBUFS
$IFDLXBUFSMFWFMJOTQB3FmMMJGOFDFTTBSZ*GUIF
XBUFSMFWFMJTPLBZNBLFTVSFUIFQVNQTIBWFCFFO
QSJNFE1SFTTBOZCVUUPOUPSFTFU
7-QBOFMT
1PTTJCMFJOBEFRVBUFXBUFS
QPPSnPXPSBJSCVCCMFTJOEFUFDUFEJOUIFIFBUFS4QBJTTIVU
EPXOGPSNJOVUFT
*GXBUFSMFWFMJTOPSNBMNBLFTVSFBMMQVNQTIBWFCFFO
QSJNFE1SFTTBOZCVUUPOUPSFTFU5IJTNFTTBHFXJMM
SFTFUXJUIJONJOVUFT
&WFSZEBZT<>
%SBJOBOESFmMMTQBQFSNBOVGBDUVSFSTJOTUSVDUJPOT
Reminder, Suppress in User Preferences. [2]
or
[1]
Action Required
On some systems even when spa is shut down, some equipment may occasionally turn on to
continue monitoring temperature or if freeze protection is needed.
[2] Please see the User Manual of the specific panel that the Reminders need to be suppressed.
[3] This is a Reminder Message.
Note: All Messages may not appear on your panel.
44
5IFQVNQJTPOEVSJOH
4UBOECZ.PEFUPBTTJTU
JOESBJOJOHUIFTQB
1SFTTi+FUTwUPUVSOPGGUIFQVNQXIFOXBUFSIBT
ESBJOFEPSQPXFSPGGUIFTQB
*OBEFRVBUFXBUFSEFUFDUFEJO
IFBUFS%JTQMBZTPOUIJSEPDDVSSFODFPGiESwNFTTBHF
4QBJT
TIVUEPXO<>
'PMMPXBDUJPOSFRVJSFEGPS NFTTBHF
4QBXJMMOPUBVUPNBUJDBMMZSFTFU1SFTTBOZCVUUPOUP
SFTFUNBOVBMMZ
5IFTQBJTPQFSBUJOHJO
&DPOPNZ.PEF
i&DOwXJMMBQQFBSTPMJEPOUIFEJTQMBZXIFOUIF
UFNQFSBUVSFJTOPUDVSSFOUi&DOwXJMMBMUFSOBUFXJUI
UIFUFNQFSBUVSFXIFOUIFUFNQFSBUVSFJTDVSSFOU
"TOFFEFE
$POUJOVPVT'JMUSBUJPOJTPO
i*DFw1PUFOUJBMGSFF[F
DPOEJUJPOEFUFDUFE
/PBDUJPOSFRVJSFE5IFQVNQTBOEUIFCMPXFSXJMM
BVUPNBUJDBMMZBDUJWBUFSFHBSEMFTTPGTQBTUBUVT
4QBDPVMEOPUUSJQ('$*
$POUJOVFEPQFSBUJPONBZCFVOTBGF
*OBEFRVBUFXBUFSEFUFDUFE
JOIFBUFS%JTQMBZTPOUIJSE
PDDVSSFODFPGUIFBCPWF
NFTTBHF
4QBJTTIVUEPXO<>
'PMMPXBDUJPOSFRVJSFEGPSUIFBCPWFNFTTBHF
4QBXJMMOPUBVUPNBUJDBMMZSFTFU)JHIMJHIUBOE
QSFTTUPSFTFU
*OBEFRVBUFXBUFSEFUFDUFE
JOIFBUFS
$IFDLXBUFSMFWFMJOTQB3FmMMJGOFDFTTBSZ*GUIFXBUFS
MFWFMJTPLBZNBLFTVSFUIFQVNQTIBWFCFFOQSJNFE
1SFTTBOZCVUUPOUPSFTFU
"TVCTUBOUJBMEJGGFSFODF
CFUXFFOUIFUFNQFSBUVSF
TFOTPSTXBTEFUFDUFE5IJT
DPVMEJOEJDBUFBnPXQSPCMFN
$IFDLXBUFSMFWFMJOTQB3FmMMJGOFDFTTBSZ*GUIFXBUFS
MFWFMJTPLBZNBLFTVSFUIFQVNQTIBWFCFFOQSJNFE
1SFTTBOZCVUUPOUPSFTFU
i0WFSIFBUw5IFTQBIBTTIVU
EPXO<>0OFPGUIFTFOTPST
IBTEFUFDUFE¡'¡$BU
UIFIFBUFS
%0/05&/5&35)&8"5&33FNPWFUIFTQBDPWFS
BOEBMMPXXBUFSUPDPPM0ODFUIFIFBUFSIBTDPPMFE
SFTFUCZQVTIJOHBOZCVUUPO
"QVNQBQQFBSTUPIBWFCFFO
TUVDLPOUIFMBTUUJNFTQBXBT
QPXFSFEEPXO
108&3%08/41"*..&%*"5&-:%0/05
&/5&35)&8"5&3
i0WFSIFBUw5IFTQBIBTTIVU
EPXO<>0OTPNFTZTUFNTBO
BMBSNNBZTPVOE0OFPGUIF
TFOTPSTIBTEFUFDUFE¡'
BQQSPY¡$
BUUIFIFBUFS
%0/05&/5&35)&8"5&33FNPWFUIFTQB
DPWFSBOEBMMPXXBUFSUPDPPM0ODFUIFIFBUFSIBT
DPPMFESFTFUCZQVTIJOHBOZCVUUPO*GTQBEPFTOPU
SFTFUUFTUTFOTPST
Economy
[1]
On some systems even when spa is shut down, some equipment may occasionally turn on to
continue monitoring temperature or if freeze protection is needed.
[2] Please see the User Manual of the specific panel that the Reminders need to be suppressed.
[3] This is a Reminder Message.
Note: All Messages may not appear on your panel.
45
Panel Message Reference Guide (cont.)
i*DFw1PUFOUJBMGSFF[F
DPOEJUJPOEFUFDUFE
/PBDUJPOSFRVJSFE5IFQVNQTBOEUIFCMPXFSXJMM
BVUPNBUJDBMMZBDUJWBUFSFHBSEMFTTPGTQBTUBUVT
1FSTJTUFOUMPXnPXQSPCMFNT
%JTQMBZTPOUIFmGUIPDDVSSFODF
PGUIFi)FBUFS'MPX-PXwNFTTBHFXJUIJOIPVST
)FBUFSJT
TIVUEPXOCVUPUIFSTQBGVODUJPOTDPOUJOVFUPSVOOPSNBMMZ
'PMMPXBDUJPOSFRVJSFEGPSi)'-wPSi)-wNFTTBHF
)FBUJOHDBQBDJUZPGUIFTQBXJMMOPUSFTFUBVUPNBUJDBMMZ
ZPVNBZQSFTTBOZCVUUPOUPSFTFU
&WFSZEBZT<>
*OTUBMMOFXmMUFSReminder, Suppress in User
Preferences. [2]
i0WFSIFBUw5IFTQBIBTTIVU
EPXO<>0OFPGUIFTFOTPST
IBTEFUFDUFEUIBUUIFTQBXBUFS
JT¡'¡$
%0/05&/5&35)&8"5&33FNPWFUIFTQBDPWFS
BOEBMMPXXBUFSUPDPPM"U¡'¡$UIFTQB
TIPVMEBVUPNBUJDBMMZSFTFU*GTQBEPFTOPUSFTFUUFTU
TFOTPST
i0WFSIFBUw5IFTQBIBTTIVU
EPXO0OTPNFTZTUFNTBO
BMBSNNBZTPVOE0OFPGUIF
TFOTPSTIBTEFUFDUFE¡'
BQQSPY¡$
BUUIFIFBUFS
%0/05&/5&35)&8"5&33FNPWFUIFTQBDPWFS
BOEBMMPXXBUFSUPDPPM0ODFUIFIFBUFSIBTDPPMFE
SFTFUCZQVTIJOHBOZCVUUPO5FTUTFOTPST
)BSEXBSFGBJMVSF
$POUBDU#BMCPBJGNFTTBHFBQQFBSTPONPSFUIBOPOF
QPXFSVQ
Q)JTIJHI
"EEQ)SFEVDFSBDDPSEJOHUPNBOVGBDUVSFST
JOTUSVDUJPOT
Q)JTMPX
"EEQ)JODSFBTFSBDDPSEJOHUPNBOVGBDUVSFST
JOTUSVDUJPOT
8IFOZPVSTQBJTmSTUBDUVBUFE
JUXJMMHPJOUP1SJNJOHNPEF
4FFUIF.*OTUBMMBUJPO*OTUSVDUJPO.BOVBMGPS
DPNQMFUFJOTUSVDUJPOTPO1PXFSVQBOE1VNQ
1SJNJOH5IF1SJNJOHNPEFXJMMMBTUGPSVQUPNJOVUFT
BOEUIFOUIFTQBXJMMCFHJOUPIFBUBOENBJOUBJOUIF
XBUFSUFNQFSBUVSFJOUIF4UBOEBSENPEF
)BSEXBSFGBJMVSF
$POUBDU#BMCPBJGNFTTBHFBQQFBSTPONPSFUIBOPOF
QPXFSVQ
"TOFFEFE<>
*OTUBMMOFX.JOFSBMDBSUSJEHFReminder, Suppress in
User Preferences. [2]
&WFSZEBZT<>
*OTUBMMOFXmMUFSReminder, Suppress in User
Preferences. [2]
&WFSZEBZT<>
3FNPWFDMFBOSFJOTUBMMmMUFSQFSNBOVGBDUVSFSTJOTUSVDUJPOTReminder, Suppress in User Preferences. [2]
[1]
On some systems even when spa is shut down, some equipment may occasionally turn on to
continue monitoring temperature or if freeze protection is needed.
[2] Please see the User Manual of the specific panel that the Reminders need to be suppressed.
[3] This is a Reminder Message.
Note: All Messages may not appear on your panel.
46
&WFSZEBZT<>
$MFBODPOEJUJPODPWFSQFSNBOVGBDUVSFSTJOTUSVDUJPOTReminder, Suppress in User Preferences. [2]
&WFSZEBZT<>
%SBJOBOESFmMMTQBQFSNBOVGBDUVSFSTJOTUSVDUJPOT
Reminder, Suppress in User Preferences. [2]
&WFSZEBZT<>
5FTUBOEBEKVTUQ)DIFNJDBMMFWFMTQFSNBOVGJOTUSVDUJPOTReminder, Suppress in User Preferences. [2]
&WFSZEBZT<>
5FTUBOEBEKVTUTBOJUJ[FSDIFNJDBMMFWFMTQFS
NBOVGBDUVSFSTJOTUSVDUJPOTReminder, Suppress in User
Preferences. [2]
)BSEXBSFGBJMVSF
$POUBDU#BMCPB
&WFSZEBZT<>
5FTUSFTFU3$%QFSNBOVGBDUVSFSTJOTUSVDUJPOT<>
&WFSZEBZT<>
$MFBOBOEDPOEJUJPOXPPEQFSNBOVGBDUVSFST
JOTUSVDUJPOT<>
4QBJTTIVUEPXO<>5IFTFOTPSUIBUJTQMVHHFEJOUPUIF
4FOTPSi"wKBDLJTOPUXPSLJOH
*GUIFQSPCMFNQFSTJTUTDPOUBDU#BMCPB.BZBQQFBS
UFNQPSBSJMZJOBOPWFSIFBUDPOEJUJPO
4FFi5FTUJOHUIF
4FOTPS4FUw1BHF
4QBJTTIVUEPXO<>5IFTFOTPSUIBUJTQMVHHFEJOUPUIF
4FOTPSi#wKBDLJTOPUXPSLJOH
*GUIFQSPCMFNQFSTJTUTDPOUBDU#BMCPB.BZBQQFBS
UFNQPSBSJMZJOBOPWFSIFBUDPOEJUJPO
4FFi5FTUJOHUIF
4FOTPS4FUw1BHF
4BOJUJ[FSJTIJHI
3FNPWFTQBDPWFSBOEBMMPXTBOJUJ[FSUPEJTTJQBUF
4BOJUJ[FSJTMPX
"EETBOJUJ[FSBDDPSEJOHUPNBOVGBDUVSFSTJOTUSVDUJPOT
4UBOECZ.PEFIBTCFFO
BDUJWBUFECZQSFTTJOHB
CVUUPODPNCJOBUJPOPO
UIFVTFSQBOFM
1SFTTBOZCVUUPOFYDFQUi+FUTwUPMFBWF4UBOECZ
.PEFBOESFUVSOUPOPSNBMPQFSBUJPO
5IFTQBJTPQFSBUJOHJO
4UBOEBSEJO&DPOPNZ.PEF
0QFSBUFTUIFTBNFBT4UBOEBSENPEFUIFOSFWFSUTUP
&DPOPNZNPEFBGUFSIPVS1SFTTi.PEFwUPTXJUDI
EJSFDUMZUP&DPOPNZNPEF
4QBJTTIVUEPXO<>5IF
TFOTPSUIBUJTQMVHHFEJOUPUIF
4FOTPSi"wKBDLJTOPUXPSLJOH
5FTUTFOTPSBOESFQMBDFJGCBE1MFBTFTFF5FTUJOHUIF
4FOTPS4FU1BHF
[1]
On some systems even when spa is shut down, some equipment may occasionally turn on to
continue monitoring temperature or if freeze protection is needed.
[2] Please see the User Manual of the specific panel that the Reminders need to be suppressed.
[3] This is a Reminder Message.
Note: All Messages may not appear on your panel.
47
Panel Message Reference Guide (cont.)
4QBJTTIVUEPXO<>5IF
TFOTPSUIBUJTQMVHHFEJOUPUIF
4FOTPSi#wKBDLJTOPUXPSLJOH
5FTUTFOTPSBOESFQMBDFJGCBE1MFBTFTFF5FTUJOHUIF
4FOTPS4FU1BHF
4FOTPSTBSFPVUPGCBMBODF
*GUIJTJTBMUFSOBUJOHXJUIUIF
UFNQFSBUVSFJUNBZKVTUCFB
UFNQPSBSZDPOEJUJPO*GUIF
EJTQMBZTIPXTPOMZUIJTNFTTBHF
QFSJPEJDBMMZCMJOLJOH
UIFTQB
JTTIVUEPXO<>
5FTUTFOTPSBOESFQMBDFJGCBE1MFBTFTFF5FTUJOHUIF
4FOTPS4FU1BHF
4MFFQ.PEFIBTCFFO
BDUJWBUFECZQSFTTJOHB
CVUUPODPNCJOBUJPOPO
UIFVTFSQBOFM
i4-1wXJMMBQQFBSTPMJEPOUIFEJTQMBZXIFOUIF
UFNQFSBUVSFJTOPUDVSSFOUi4-1wXJMMBMUFSOBUFXJUI
UIFUFNQFSBUVSFXIFOUIFUFNQFSBUVSFJTDVSSFOU
4QBJTTIVUEPXO5IFTFOTPS
UIBUJTQMVHHFEJOUPUIF4FOTPS
i"wKBDLJTOPUXPSLJOH
5FTUTFOTPSBOESFQMBDFJGCBE1MFBTFTFF5FTUJOHUIF
4FOTPS4FU1BHF
4QBJTTIVUEPXO5IFTFOTPS
UIBUJTQMVHHFEJOUPUIF4FOTPS
i#wKBDLJTOPUXPSLJOH
5FTUTFOTPSBOESFQMBDFJGCBE1MFBTFTFF5FTUJOHUIF
4FOTPS4FU1BHF
i0WFSIFBUw5IFTQBIBTTIVU
EPXO<>0OFPGUIFTFOTPST
IBTEFUFDUFEUIBUUIFTQBXBUFS
JT¡'BQQSPY¡$
%0/05&/5&35)&8"5&33FNPWFUIFTQBDPWFS
BOEBMMPXXBUFSUPDPPM"U¡'BQQSPYJNBUFMZ
¡$
UIFTQBTIPVMEBVUPNBUJDBMMZSFTFU*GTQB
EPFTOPUSFTFUTIVUPGGUIFQPXFSUPUIFTQB
4UBOECZ.PEFIBTCFFO
BDUJWBUFECZQSFTTJOHB
CVUUPODPNCJOBUJPOPO
UIFVTFSQBOFM
1SFTTBOZCVUUPOUPMFBWF4UBOECZ.PEFBOESFUVSO
UPOPSNBMPQFSBUJPO
5IFTQBJTPQFSBUJOHJO
4UBOEBSE.PEF
5FNQFSBUVSFEJTQMBZJTDVSSFOUBGUFSQVNQIBT
CFFOSVOOJOHGPSBUMFBTUNJOVUFT
"QVNQBQQFBSTUPCFTUVDL
PODBVTJOHUIFXBUFS
UFNQFSBUVSFUPDSFFQVQ
QPTTJCMZUPIB[BSEPVTMFWFMT
108&3%08/41"*..&%*"5&-:%0/05
&/5&35)&8"5&3
&WFSZEBZT<>
5FTUSFTFUQFSNBOVGBDUVSFSTJOTUSVDUJPOTReminder,
Suppress in User Preferences. [2]
&WFSZEBZT<>
$MFBOBOEDPOEJUJPOXPPEQFSNBOVGBDUVSFSTJOTUSVD
UJPOTReminder, Suppress in User Preferences. [2]
[1]
On some systems even when spa is shut down, some equipment may occasionally turn on to
continue monitoring temperature or if freeze protection is needed.
[2] Please see the User Manual of the specific panel that the Reminders need to be suppressed.
[3] This is a Reminder Message.
Note: All Messages may not appear on your panel.
Balboa Water Group
Tustin, Ca. 92780 (714) 384-0384
48
40920 Rev A October 31, 2008
©2008 Balboa Water Group. All rights reserved.