1
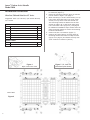
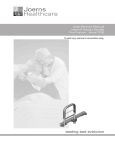
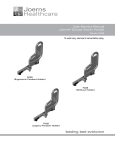
User-Service Manual
Joerns® Deluxe Assist Handle
Model F028
To avoid injury, read user’s manual before using.
F028
(Basic Pendant Holder)
F028
(Ergonomic Pendant Holder)
Model F028
leading bed evolution
WOUND
SAFETY
DESIGN
SOLUTIONS
SOLUTIONS
SOLUTIONS
Joerns® Deluxe Assist Handle
Model F028
Important Precautions
Warning: Risk Of Serious Injury Or Death. This
product is intended for use with the Joerns U770,
U790, U795, UCXT and ECS beds. Use of this product
on any bed for which it was not designed could result
in an unproven or unsafe configuration, potentially
resulting in serious injury or death. For questions
regarding compatibility, contact your Joerns
Healthcare Representative.
Warning: Risk Of Serious Injury Or Death. Use
a properly sized mattress in order to minimize the
gap between the side of the mattress and the assist
device. This gap must be small enough to prevent
a resident from getting his/her head or neck caught
in this location. Make sure that raising or lowering
the bed, or contouring the sleep surface does not
create hazardous gaps. Failure to do so could result
in serious injury or death.
Warning: Risk Of Serious Injury Or Death.
Properly locate the mounting brackets for the assist
device. The gap between the head/foot panel and
the assist device must be large enough to prevent
a resident from getting his/her head or neck caught
in this location (see the installation instructions for
more information). If multiple assist devices are
needed, position them such that the gap between
them is large enough for the trunk and hips to easily
pass through. Make sure that raising or lowering the
bed, or contouring the sleep surface does not create
hazardous gaps. Failure to do so could result in
serious injury or death.
Warning: Risk Of Serious Injury Or Death. Do
not use this assist device if any openings within the
assist device body will allow a resident to get his/her
head or neck lodged within these openings. Failure to
do so could result in serious injury or death.
Warning: Risk Of Serious Injury Or Death. Do
not use this assist device until you have verified that
it is locked in place. Injury to resident or caregiver
may result if this procedure is not followed.
Warning: An optimal bed system assessment
should be conducted on each resident by a
qualified clinician or medical provider to ensure
maximum safety of the resident. The assessment
should be conducted within the context of, and in
compliance with, the state and federal guidelines
related to the use of restraints and bed system
entrapment guidance, including the Clinical
Guidance for the Assessment and Implementation
of Side Rails published by the Hospital Bed
Safety Workgroup of the U.S. Food and Drug
Administration. Further information can be obtained
at the following web address: http://www.fda.gov/
MedicalDevices/ProductsandMedicalProcedures/
GeneralHospitalDevicesandSupplies/HospitalBeds/
default.htm.
Warning: In the event worn or broken part(s) are
identified, remove the device from service until
repairs are made.
Warning: Risk of Serious Injury or Death.
Do not use the device as an assist if the hand grip
area is wet. A wet surface may lead to the resident’s
hand slipping on the assist device and result in injury
or death.
Note: The assist device is intended for use as an aid
in entering or exiting the bed sleep area, as well as
a stable handhold during self-positioning within the
bed sleep area.
This assist device is only one part of your healthcare
bed system. Proper combinations of bed, mattress,
head/foot panels, and assist devices are needed
to minimize the risk of entrapment. For more
information, contact your Joerns representative.
Table of Contents
Important Precautions........................................................................................... 2
Entrapment Information........................................................................................ 3
Assist Handle Installation Instructions..................................................................... 4
Warranty........................................................................................................... 10
2
Joerns® Deluxe Assist Handle
Model F028
Bed System Entrapment Information
Joerns Compliance Solutions
Although essential in the practice of long-term care,
bedside rails, in recent years, have also been a
subject of regulatory review and evolution in design
and use.
Matching the right bed components in order to meet
regulatory guidelines can be complex.
That focus includes not only the challenge of
achieving an appropriate balance between resident
security and unnecessary restraint, but also the
additional safety issue of entrapment.
®
That is why Joerns offers a wide array of compliance
options. We assist customers in selecting compliant
accessories recommended for their specific bed
model.
Creating a Safer Care Environment
The U.S. Food and Drug Administration (FDA),
working with our company and other industry
representatives has addressed the potential danger
of entrapment with new safety guidelines for medical
beds. These guidelines recommend dimensional
limits for critical gaps and spaces between bed
system components.
While the guidelines apply to all healthcare settings,
(hospitals, nursing homes and at home), long-term
care facilities have particular exposure since serious
entrapment events typically involve frail, elderly or
dementia patients.
Entrapment zones involve the relationship of
components often directly assembled by the
healthcare facility rather than the manufacturer.
Therefore, compliance is the responsibility of the
facility.
To learn more about compliance options with Joerns
products, visit our website at www.joerns.com, or
contact our Customer Care reps at 800-826-0270
and ask for free informational publications.
As the leading manufacturer of long-term care beds
and a frontrunner in addressing this critical issue,
Joerns Healthcare can offer you the expertise,
assistance and products to bring your facility into
compliance.
To learn more about entrapment zones, assessment
methods and guidelines concerning entrapment,
contact Joerns Healthcare at 800-826-0270 or
consult the FDA website: http://www.fda.gov/
MedicalDevices/ProductsandMedicalProcedures/
GeneralHospitalDevicesandSupplies/HospitalBeds/
default.htm.
For More Information
3
Joerns® Deluxe Assist Handle
Model F028
Installation Instructions
UltraCare 700 and UltraCare XT Series
Suggested Tools: 1/2" Wrench, 3/8" Socket Wrench,
1/2" Socket
Parts List
Item
Description
Qty
1
Assist Handle PN: F028
1
2
Mounting Channel PN: 31008848AL
1
3
5/16"-18 Bolt PN: 12523166
2
4
Lock Nuts 5/16"-18 Hex PN: 12673107 2
5
Nut Retainers PN: 11013270
2
Service Parts
6
Latch PN: 11012007
2
7
Latch Pin Kit PN: 39000820
1
Figure 1
Nylon insert face down
End of Bed
Figure 2
4
1. Determine where you want the assist handle to
be mounted (Figure 2).
2. Orient the mounting channel (Item 2) with the
bed as shown in Figure 3 on page 5.
3. When mounting to an 80" head section, line up
holes A & E and holes B & G. For a 76" head
section, line up holes A & E and holes B & F.
The mounting bracket is attached to the foot
section on either 76" or 80" beds using holes
C & H and holes I & D (Figure 2). See page 8
for additional installation steps. Please note the
same mounting bracket is used in all mounting
locations listed above.
4. Insert nuts into nut retainers (Figure 1).
5. Insert 5/16" bolts (Item 3) through holes of
mounting channel and holes on sleep surface
(Figure 3 on page 5) and fasten securely with
5/16" locknuts in retainers (Item 4).
Figure 7 - Kit, Latch Pin
(Includes all parts shown)
Joerns® Deluxe Assist Handle
Model F028
Operation Instructions
1. Insert the assist handle into the mounting
bracket (Figure 4). The assist handle must be
perpendicular to the sleep surface.
Note: Insert the bushing completely into the
mounting bracket until the flange is resting upon the
bracket. Failure to ensure proper installation may
lead to damage to the bushing, a reduced product
life, and/or poor function of the assembly.
2. After the assist handle is inserted, it can be
rotated 90 degrees towards the head or foot
section of the bed.
3. Lock the assist handle by engaging the latch pin
into the latch (Item 6) (Figure 5).
4. Verify that the assist handle is locked prior to
leaving any resident unattended.
5. To remove the assist handle: orient the assist
handle perpendicular to the sleep surface
(Figure 4). Pull straight up on the assist handle
to remove.
Remove
Insert
Figure 4
Maintenance/Inspection Information: Visually
inspect the assist handle and mounting bracket,
and check for loose hardware on a monthly basis.
Tighten loose hardware as stated in the installation
instructions.
Warning: In the event worn or broken part(s) are
identified, remove the device from service until
repairs are made.
Figure 5
4
5
Figure 3
5
Joerns® Deluxe Assist Handle
Model F028
EasyCare Series
Suggested Tools: 1/2" Wrench, 3/8" Socket Wrench,
1/2" Socket
Parts List
Item
Description
Qty
1
Assist Handle PN: F028
1
2
Mounting Channel PN: 31008848AL
1
3
5/16"-18 Bolt PN: 12523166
2
4
Lock Nuts 5/16"-18 PN: 12673105
2
5
Bushings PN: 11012033
2
6
Small Washer PN: 12843789
2
7
Large Washer PN: 12843788
2
Service Parts
8
Latch PN: 11012007
2
9
Latch Pin Kit PN: 39000820
1
1. Determine where you want the assist handle to
be mounted (Figure 8).
2. Remove the mattress stop from the sleep surface
on which you will be mounting the assist handle.
3. Orient the mounting channel (Item 2) with the
bed as shown in Figure 9 on page 7.
4. When mounting to an 80" head section, line
up holes A & E and holes B & F. For a 76" head
section, line up holes E & J and holes F & K.
The mounting bracket is attached to the foot
section on either 76" or 80" beds using holes
C & G and holes H & D (Figure 8). See page 8
for additional installation steps. Please note the
same mounting bracket is used in all mounting
locations listed above.
5. Apply small washer (Item 6) to 5/16" Bolt (Item
3). Insert bushings (Item 5) into sleep surface
as identified in Step 3 above. Insert bolt through
holes. Apply the large washer (Item 7) and
secure with lock nut (Item 4).
6. Reinstall mattress stop(s).
Note: For ECS bed frames manufactured before
5/1/2009 (see Serial Number Label located on the
right side of the bed frame below the foot sleep
deck section), contact Joerns Healthcare’s Technical
Service at 800.826.0270 for an updated mattress
stop.
76" Bed
9
Figure 7 - Kit, Latch Pin
(Includes all parts shown)
80" Bed
Head
Side of Bed
Figure 8
6
Foot
Joerns® Deluxe Assist Handle
Model F028
Operation Instructions
1. Insert the assist handle into the mounting
bracket (Figure 10). The assist handle must be
perpendicular to the sleep surface.
Note: Insert the bushing completely into the
mounting bracket until the flange is resting upon the
bracket. Failure to ensure proper installation may
lead to damage to the bushing, a reduced product
life, and/or poor function of the assembly.
2. After the assist handle is inserted, it can be
rotated 90 degrees towards the head or foot
section of the bed.
3. Lock the assist handle by engaging the latch pin
into the latch (Item 6) (Figure 11).
4. Verify that the assist handle is locked prior to
leaving any resident unattended.
5. To remove the assist handle: orient the assist
handle perpendicular to the sleep surface (Figure
10). Pull straight up on the assist handle to
remove.
Remove
Insert
Figure 10
Maintenance/Inspection Information: Visually
inspect the assist handle and mounting bracket,
and check for loose hardware on a monthly basis.
Tighten loose hardware as stated in the installation
instructions.
Warning: In the event worn or broken part(s) are
identified, remove the device from service until
repairs are made.
Figure 11
Figure 9
7
Joerns® Deluxe Assist Handle
Model F028
Foot End Installation Instructions
For use when installing F028 on foot end of
the bed for UltraCare 700, UltraCare XT and
EasyCare Series.
Suggested Tools: 1/2" Socket Wrench
Parts List
Item
Description
Qty
1
Panel Mount Bracket PN: 11012722
1
2
Bolt, 5/16"-18 x .75 PN: 12553104
4
Warning: Risk of Serious Injury. Properly locate
the brackets for the assist device and foot panel
bracket. Failure to do so could result in serious
injury.
1. Raise the bed to a comfortable working height
and raise the Foot Section (Figure 12).
2. Locate the bolts on either side of the bed
(Figure 13). Remove bolts from both sides of
the bed (4 bolts).
3. Locate the battery patch cable (Detail A). Ensure
that there is enough loose cable to allow you to
move the panel mount bracket out approximately
1-inch (Figure 13)
4. Once the panel mount bracket is able to move,
locate the holes shown in Figure 14.
5. Install the 4 bolts that were removed in Step 2.
Detail A
Figure 12
Figure 13
8
Figure 14
Joerns® Deluxe Assist Handle
Model F028
Notes:
9
Joerns Healthcare Warranty Program
for all Joerns Assist Devices and Side Rails
Joerns assist devices and side rails are guaranteed
for a period of 12 months from the date of delivery
against defects in materials and workmanship under
normal use and service.
Joerns Healthcare’s obligation under this warranty is
limited to supplying replacement parts, servicing or
replacing, at its option, any product which is found
by Joerns Healthcare to be defective.
Steel structural components and welds are covered
under warranty for a period of ten years from the
date of delivery.
Warranty replacement parts are covered by the
terms of this warranty until the product’s original
warranty period expires.
This warranty does not apply to damage or defects
caused by misuse, incorrect handling or installation
by a non-authorized installer. Damage caused by use
in unsuitable environmental conditions or failure to
maintain the product in accordance with user and
service instructions is not covered. Any alteration,
modification or repair unless performed by or
authorized in writing by Joerns Healthcare will void
this warranty.
When requested by Joerns Healthcare, parts must be
returned for inspection at the customer’s expense.
Credit will be issued only after inspection.
The product contains various parts that wear from
normal use. These parts, such as plastic bushings,
are not covered under the 12-month warranty, but
are covered for 90 days after purchase of product.
Post Acute, Acute, HomeCare
(P) 800.826.0270
(F) 800.457.8827
VA/Government
(P) 800.966.6662
(F) 800.232.9796
www.joerns.com • email: [email protected]
United Kingdom
+44 (0) 844 811 1156
+44 (0) 844 811 1157
Service
Most service requests can be handled by the facility
Maintenance Department with assistance from the
Joerns Healthcare product Service Department.
Most parts requested can be shipped UPS next day
air at the customer’s expense. Should a technician
be required, at our discretion, one will be provided
by Joerns Healthcare. Only the Joerns Healthcare
Product Service Department can dispatch authorized
technicians. For prompt warranty inspection and
service contact your local authorized representative
or Joerns Healthcare Customer Service at
800.826.0270
Canadian Office
(P) 866.546.1151
(F) 519.451.8662
Netherlands
+31 (0) 30 6363700
+31 (0) 30 6363799
All Other Countries
+44 (0) 844 811 1156
+44 (0) 844 811 1157
© 2012 Joerns Healthcare • 6110072 RevG • 12-2076