1
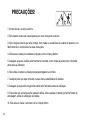
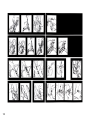
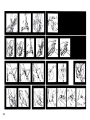
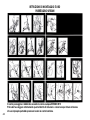
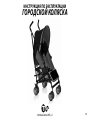
MANUAL DE INSTRUCCIONES
SILLA URBAN
Innovaciones MS, sl
1
INSTRUCCIONES DE MONTAJE Y USO
SILLA DE PASEO URBAN
2
Esta silla cumple con la normativa EN1888:2012
Freno simultáneo
Lea las instrucciones atentamente antes de utilizar la silla de paseo y guárdelas para posibles futuras
consultas. Si no sigue las instrucciones, puede afectar a la seguridad del niño.
3
4
5
6
7
8
GARANTÍA FORMAL
Los contenidos de este documento como se muestra a continuación tendrán efecto desde el momento que
se compra el producto.
Innovaciones M.S. S.L. el distribuidor oficial situado en Pol. Ind. La Cava. Avda. Generalitat Valenciana s/n.
Sector Industrial 5. 46892 MONTAVERNER. Valencia.(Spain) garantiza al consumidor que este es un producto
nuevo y no tiene ningún fallo en cuanto a los materiales, diseño y fabricación y que tiene las características que
ha declarado el fabricante.
Esta garantía formal, es válida para todos los países miembros de la Comunidad Europea sin quedar en ninguno excluido el derecho del consumidor según medidas legales que obligan a la tienda que vende el producto
a ofrecer esta garantía.
Para beneficiarse de esta garantía formal, el Consumidor debe devolver el producto defectuoso a la tienda
donde lo adquirió presentando al comerciante la prueba de compra del producto que debe mostrar detalladamente la dirección de la tienda, la fecha de compra del producto con el sello de la tienda y una firma indicando
de que producto se trata, o , en su defecto, el recibo que no debe ser alterado y que claramente debe mostrar la
misma información que hemos dicho antes.
La garantía formal es válida durante veinticuatro (24) meses des de que se compra el producto.
Durante este periodo INNOVACIONES M.S. S.L. arreglará o cambiará cualquier producto defectuoso bajo su
criterio.
La garantía formal es para el comprador final del producto (Consumidor) y no excluye ni limita los derechos
del Consumidor según marca la ley y/o los derechos que el Consumidor tiene respecto a la tienda que vende el
producto.
LA GARANTÍA NO SERÁ VÁLIDA EN LOS SIGUIENTES CASOS.
La garantía formal queda excluida en el caso de daño causado al producto por las siguientes razones: si el
producto se utiliza de una forma que no cumple con la información de las instrucciones para su uso y montaje,
si le han dado un golpe al producto o se ha caído, si el producto está expuesto a la humedad, o al calor extremo
o a con- diciones ambientales adversas, o a cambios repentinos de tiempo, cuando el producto se corroe , se
9
oxida o se repara o se altera el producto sin autorización previa, si lo repara utilizando piezas de repuesto no
autorizadas , si el uso o mantenimiento del producto no es el correcto, o no hace ningún tipo de mantenimiento
sin hacer lo que se dice en el manual de instrucciones, se monta mal, tiene algún accidente , se estropea a causa
de la comida o la bebida, por cualquier producto químico o causas de fuerza mayor.
En cualquier caso, INNOVACIONES M.S. S.L. ,rechaza toda responsabilidad por daños causada a las personas o a la propiedad , otra que no sea el producto ,si el daño lo causa por no seguir las instrucciones, consejos
o precauciones que hay en el manual de instrucciones por parte del propietario o persona que esté utilizando
el producto. (Sólo como ejemplo, no deje nunca al niño solo o el niño debe de tener siempre el arnés puesto…)
Es más, INNOVACIONES M.S. S.L. , rechaza toda responsabilidad de daño a personas y a la propiedad cuando la rotura del producto se debe a un deterioro de los componentes del producto normal por el uso que se hace
de éste. Todos los componentes de este producto hechos de plástico, se desgastan con el uso.
Importado por INNOVACIONES M.S. S.L.
Pol. Ind. La Cava
C/ Benigànim, 9
46892 MONTAVERNER (Valencia) Spain
Tel. 96 229 76 70 - Fax 96 229 76 76
Sello del establecimiento vendedor para garantía
10
MANUAL DE INSTRUÇÕES
SILLA URBAN
Innovaciones MS, sl
11
INSTRUÇÕES DE MONTAGEM E UTILIZAÇÃO
DA CADEIRA DE PASSEIO URBAN
12
Esta cadeira cumpre a normativa EN 1888: 2012.
Freio simultâneo.
Leia as instruções atentamente antes de utilizar a cadeira de passeio e guarde-as para futuras consultas. Se você não seguir as instruções, pode ter problemas com a segurança da criança.
MONTAGEM E USO:
Leia as instruções atentamente antes de montar a cadeira de passeio, para evitar qualquer problema posterior.
1. ABRA EL CHASSI
Solte o botão de segurança e empurre a asa da cadeira de passeio para cima enquanto aperta
com o pé o botão de segurança; a cadeira se abrirá em seguida (Imagem 1a e 1b).
2. PARA COLOCAR OS TRAVÕES:
Pressione os dois pedais do travão e a cadeira vai ficar estabilizada. Levante os pedais de travão
e, desta forma, solte o travão (Imagem 2).
3. PARA COLOCAR O BLOQUEIO DAS RODAS DA FRENTE:
Coloque a roda da frente no tubo da perna dianteira e empurre para cima, até ouvir um “clikc”
(Imagem 3).
4. PARA COLOCAR A CAPOTA:
Depois de colocar o gancho da capota no seu lugar correspondente, aperte os ganchos da capota
para poder abri-la. Feche os 4 ganchos na parte de trás da cadeira de passeio (Imagem 4ª e 4b).
5. PARA DOBRÁ-LA:
Deite a capota para trás para desapertar o botão de fecho. Suba a rosca para poder colocar a asa
para a frente. Dobre a cadeira de passeio e feche os botões (Imagem 7ª, 7b e 7c).
6. PARA AJUSTAR O ENCOSTO:
Se pode ajustar jogando para cima o encosto para ajustar uma das 4 posições que deseje.
7. PARA AJUSTAR O REPOUSO PARA OS PÉS:
Pressione o botão para ajustar o repouso de pés, para subir ou descer (Imagem 9).
13
8. PARA UTILIZAR A TIRA DE TRANSPORTE:
Antes de a utilizar, se certifique de que está bem encaixada, as rodas da frente ficarão na tira do
ombros enquanto que a asa fica para a frente (Imagem 10).
9. PARA ACONDICIONAR A CRIANÇA:
Você deve introduzir a fivela macho dentro da fêmea e ouvindo o “click”, significa que está fechado. Para abrir a fivela, tem que apertar as partes laterais. Com a fivela de correr de plástico, se
pode regular a longitude do arnês, tornando-o mais comprido ou mais curto (Imagem 11ª., 11b.,
11c.).
10. PARA COLOCAR OU RETIRAR O REPOUSO DE PÉS:
Dobre um pouco o chassi. Alinhe a fronha e coloque-a seguindo a direção da seta do repouso de
pés. Encaixe os ganchos na fronha do repouso de pés e no chassi da cadeira. Faça o mesmo no
lado oposto. O repouso de pés já está instalado. Para retirá-lo, retire a fronha que o segura primeiro. O repouso de pés poderá assim ser retirado (Imagem 12ª., 12b., 12c.).
- As imagens deste manual são meramente ilustrativas, simplesmente para que se tenha
uma ideia do produto. Por isso, a imagem pode ser um pouco diferente do produto que você
tenha comprado.
- Para melhorar a qualidade do produto, podemos trocar a estrutura e a imagem do produto
mesmo sem aviso prévio. Agradecemos a sua compreensão.
14
LIMPEZA:
1. Limpe as manchas do assento, das partes de plástico e de vinil, com água fria e sabão
suave. Deixe secar.
2. Pode lavar a parte de tecido do assento, na máquina de lavar roupa, durante 10-15 minutos. Retire da máquina assim que acabar de torcer. Não passe a ferro nem a coloque na
máquina de secar.
3. As partes de metal e de plástico podem ser limpas com um pano suave e húmido e secar
com outro seco. Não utilize detergentes agressivos ou dissolventes.
CUIDADO E MANTIMENTO:
1. Deve passar um esponja húmida pelo chassi da cadeira de passeio regularmente, não utilize nenhum produto químico para limpar o produto.
2. Deve fazer um mantimento periódico e mudar qualquer parte estragada ou partida imediatamente, tal como as tampas e os eixos das rodas.
15
PRECAUÇÕES!
1. Nunca deixar a criança sozinha.
2. Esta cadeira é para ser usada apenas por uma criança de cada vez.
3. Não coloque mais do que uma criança, nem malas ou acessórios na cadeira de passeio, se o
fabricante não o recomenda nas suas instruções.
4. Não leve a cadeira por escadas ou degraus com a criança dentro.
5. Assegure-se que a cadeira está totalmente montada e com todas as partes bem colocadas,
antes de sua utilização.
6. Não utilize a cadeira se há alguma peça estragada ou em falta.
7. Qualquer peso que seja colocado na asa, afeta a estabilidade da cadeira.
8. Assegure-se que todos os ganchos estão bem fechados antes da utilização.
9. Para evitar que a criança sofra qualquer asfixia, retire qualquer material que tenha ficado da
embalagem, antes da utilização da cadeira.
10. Não suba ou baixe o encosto com a criança dentro.
16
11. Não deixe que a criança se ponha de pé no repouso para pés, já que a cadeira pode virar-se e
causar-lhe ferimentos.
12. Tenha cuidado ao dobrar e abrir a cadeira para que não magoe os dedos.
13. As partes que não sejam recomendadas pelo fabricante, não devem ser utilizadas.
14. Utilize sempre os arnês.
15. Esta cadeira é para crianças com idades compreendidas entre os 6 meses e os 3 anos ou até
pesarem 15Kg.
16. Deve sempre utilizar os dois arneses, o que está entre as pernas e o da cintura.
17. Não deve colocar mais do que 2Kg na cesta.
18. Comprove que o chassi e o assento estão bem acoplados antes de utilizá-los.
19. Não pode utilizar este produto para correr ou para patinar.
20. É perigoso deixar a criança sozinha.
Importado por INNOVACIONES M.S.S.L.
Pol. Ind. La Cava
C/ Benigànim, 9
46892 MONTAVERNER (Valencia) Spain
Tel. 96 229 76 70 - Fax 96 229 76 76
17
18
INSTRUCTION MANUAL
BUGGY URBAN
Innovaciones MS, sl
19
1. SETTING UP THE BUGGY
Open the fastening bucle (a). Unfold the buggy by pulling the handles upwards (b). Press the lever
as shown in the picture to lock the mechanism preventing the stroller from accidental folding (c).
2. FOLDING THE BUGGY
Remove the Bumper Bar, lift the expanding mechanism shown in the picture (a). Holding the buggy
handles, release the locking device by pressing the pedal (b). Fold the buggy, making sure that the
fabric part is folded properly (c). Fasten the safety buckle (d).
3. FOOTREST ADJUSTMENT
Press the buttons on both sides of the footrest and adjust it to the required position.
4. BRAKE
To brake the buggy, press the brake levers on both sides. To release the brake, lift both levers with
your foot.
5. MOUNTING AND DETACHING THE BUGGY HOOD
To mount the hood, insert its mounting devices into the mounting trakcs (a) and fasten the Velcro
fasteners fixing the hood to the stroller handle (b). To remove the hood, unfasten the Velcro fasteners fixing the hood to the buggy handle and then take the mounting devices out of the mounting
trakcs (c).
6. STROLLER BACKREST ADJUSTMENT
20
To lift the backrest, hold it with your hand and shift it upwards. To lower the backrest to the recicling
position, lift the adjusting levers on both sides of the buggy and change the backrest position.
7. ADJUSTING OF HARNESS
Change of straps length in the harness by sliding the regulator to the one side or the other, adapting it to the child’s body.
8. ATTACHING THE FRONT WHEELS
Insert the front swivel wheel over the housing on the front leg. Be sure that the arrow on the swivel
lock is correctly orientated. Repeat for the other wheel (a). To fix the front wheels in the non swivel
position, turn the wheel so that the two notches on both housing line up at the front. Lift up te swivel lock until it locks into place. To unlock, press down the swivel lock to release. (b).
9. ATTACHING THE RAINCOVER
The raincover simply drapes over your puschair with the hood extended. Fasten the press studs on
to the side of the hood and the velcro straps around the front legs to secure.
10. D-RINGS HARNESS ADJUSTMENT
To adjust the shoulder straps to fit your child correctly, use the pull shown in the image. Ensure the
harness is correctly fitted before useThe harness should be correctly adjusted in order to secure
your child at all times (a). To fasten de harness. Insert both fasteners securely into the clasp (b). To
release the harness, squeeze each side of the clip and pull away from the fastener, one at a time (c).
The D-Rings higlighted in red are provided for fitting a separate harness complying with BS 6684 (d).
21
22
Read these instructions carefully before use and keep them for future reference.
Your child’s safety may be affected if you do not follow these instructions.
This stroller is intended to transport one child from birth and up to a maximum weigth of 15 kg.
ATTENTION: Do not use any additional accessories which are not listed by the manufacturer.
WARNING: It may be dangerous to leave your child unattended.
WARNING: Use harness as soon as your child can sit unaided.
WARNING: Always use the crotch strap in combination with the waist belt.
WARNING: Check that folding devices are correctly engaged and locked.
WARNING: Loading of shopping basket shouldn’t pass limit of 3 kg.
WARNING: Any load attached to the handle affects the stability of the pushchair. The admissible
load of the bag on the pram handle is 1.5 kg.
WARNING: This product is not suitable for running or skating.
Keep plastic packaging materials out of reach of children to avoid the danger of asphyxiation.
When parking always use the parking brake. Avoid situations of extreme use that decrease your
control over the child and the stroller.
When using the stroller for your child, your speed should be limited to a walking speed. Running,
jogging or skating are not recommended. Do not use escalators or stairs and be careful when using
the elevators while your child is in the stroller. The stroller may only be used for the transportations
of one child. Use only original accessories and original spare parts. Make sure that the child’s
hands stay out of range of possible pinching areas when the stroller or parts thereof are being folded, unfolded, or otherwise changed.
23
WARNING: Bear in mind that small parts, such as the caps protecting axles in transport, can be
swallowed by your child, and may cause your child to choke.
WARNING: When storing the stroller in a car trunk pay special attention not to exert a pressure on it
by the trunk lid, as this can result in the damage of the stroller.
MAINTENANCE
To prolong the life span of your stroller, dry with a soft cloth after use in rainy weather. Clean the
wheels and the metal parts regularly to keep the stroller functioning smoothly. Use mild detergents
and lukewarm water for cleaning. Do not use aggressive solvents. The seat and the shopping basket should not be washed in the washing machine. For safety reason use original parts only.
24
WRNING: A CHILD’S SFETY IS YOUR RESPONSABILITY
Children should be harnessed in at all times and should never be left unattended.
The child should be clear of moving parts while making adjustments.
This vehicle requires regular maintenance by the user.
Overloading, incorrect folding and the use of non-approved accessories may damage or
break this vehicle.
Read the instructions for use.
Imported by INNOVACIONES M.S, S.L.
Pol. Ind. La Cava
C/ Benigànim, 9
46892 MONTAVERNER (Valencia) Spain
Tel. 96 229 76 70 - Fax 96 229 76 76
25
26
MANUEL D’INSTRUCTION
POUSSETTE URBAN
Innovaciones MS, sl
27
INSTRUCTIONS DE MONTAGE ET UTILISATION
DE LA POUSSETTE URBAN
28
Cette poussette respecte la normative EN:1888:2012
Freins simultanés
Lisez attentivement les instructions avant son utilisation et gardez-les pour une prochaine lecture.
Si vous ne suivez pas les instructions, la sécurité de l’enfant peut être affectée.
MONTAGE ET UTILISATION
Lisez attentivement les instructions avant de monter la poussette pour éviter les pertes.
1.OUVREZ LE CHÂSSIS
Lâchez le bouton de pliage, prenez l’anse de la chaise poussette et tirez vers le haut pendant que
vous appuyez avec le pied sur le bouton de pliage, la chaise poussette s’ouvrira de suite (Dessin
1a, 1b).
2.POUR METTRE LES FREINS.
Appuyez sur les pédales, la poussette restera inmobile. Levez les pédales de freins de cette façon
vous lâcherez le frein. (Dessin2)
3.POUR BLOQUER LES ROUES AVANT
Placez la roue avant dans le tube de la patte avant et poussez vers le haut jusqu’à entendre « click
» (Dessin 3)
4.POUR PLACER LA CAPOTE
Après mettre le crochet de la capote à sa place, appuyez sur les crochets pour pouvoir l’ouvrir.
Accrochez les 4 crochets à la partie arrière de la poussette. (Dessin 4a,4b).
5.POUR LA PLIER
Mettez la capote vers l’arrière pour défaire le bouton de fermeture. Levez l’écrou pour placer l’anse
vers l’avant. Pliez la poussette et fermez les boutons (Dessin 7a, 7b, 7c)
6.POUR AJUSTER LE DOSSIER
Vous pouvez l’ajuster en tirant vers le haut le dossier. Il y a 4 positions.
7.POUR AJUSTER LE REPOSE-PIEDS
Appuyez sur le bouton pour le monter ou le descendre (Dessin9)
29
8.POUR UTILISER LA BANDE DE TRANSPORT
Avant de l’utiliser, vérifiez qu’elle est bien attachée, les roues avant se trouveront sur la bandes des
épaules pendant que l’anse se trouvera derrière (Dessin 10)
9.POUR ASSURER L’ENFANT
La boucle mâle doit être introduite dans la boucle femelle, quand vous entendrez un click c’est-àdire qu’elle est bien fermée. Pour ouvrir la boucle vous devez appuyer sur les côtés. Avec la boucle
coulissante en plastique, vous pouvez régler la longueur de l’harnais, pour le rendre plus ou moins
court (Dessin 11a, 11b, 11c)
10.POUR METTRE OU ENLEVER LE REPOSE-PIEDS
Pliez un peu le châssis. Mettez la housse alignée et placez-la suivant la direction des flèches du
repose-pieds. Attachez les crochets à la housse et au châssis de la poussette. Faites la même chose de l’autre côté. le repose-pieds est alors installé. Pour l’enlever, enlevez la housse. (Dessin 12a,
12b, 12c)
• Les dessins utilisés dans ce manuel sont simplement illustratifs pour se faire une idée de la
structure du produit, c’est pour cela que les dessin peut varier en fonction du produit.
• Pour améliorer la qualité du produit, nous pouvons changer la structure et le design du produit sans préavis. Nous remercions votre compréhension.
30
NETTOYAGE
1.Nettoyez les taches du siège, des parties en plastique ou en vinyle avec de l’eau froide et
du savon doux. Laissez sécher.
2.Vous pouvez mettre la housse du siège dans la machine à laver, lavez séparément et avec
un programme de linge délicat et eau froide. Ne pas utiliser de javel. Centrifugez à basse
température pendant 10-15 minutes. Séchez-la juste après. Ne pas repasser ni mettre dans
le sèche-linge.
3.Les parties en métal et en plastique peuvent être nettoyées avec un chiffon doux et humide
et les sécher avec un autre chiffon sec.
PRÉCAUTION ET ENTRETIEN
1.Passez une éponge humide sur le châssis régulièrement, ne pas utiliser de produit chimique.
2.Faites un entretien régulièrement et chanchez toute partie cassée ou abîmée inmédiatement, comme les bouchons et les axes de roue.
31
PRÉCAUTIONS!
1.Ne jamais laisser l’enfant seul.
2.Cette poussette ne supporte qu’un enfant à la fois.
3.Ne pas mettre plus d’un enfant, ni sacs ni accesssoires dans la poussette si ce n’est pas recommandé par le fabricant dans les instructions.
4.Ne pas descendre avec la poussette les escaliers avec l’enfant à l’intérieur.
5.Vérifiez que la poussette est bien montée et que toutes les pièces sont bien mises avant de
l’utiliser.
6.Ne pas utiliser la poussette s’il manque une pièce ou si elle est cassée.
7.Tout poids placé sur l’anse peut affecté la stabilité de la poussette.
8.Vérifiez que tous les crochets sont bien fermés avant de l’utiliser.
9.Évitez que l’enfant puisse s’asfixier, enlevez tout matériel d’emballage avant d’utiliser le produit.
10.Ne pas monter ni descendre le dossier avec l’enfant dedans.
32
11.Ne pas laisser l’enfant se mettre debout sur le repose-pieds, la poussette pourrait se renverser
et l’enfant se faire mal.
12.Faites attention en pliant ou dépliant la poussette de ne pas coincer les doigts de l’enfant.
13.Les parties qui ne sont pas recommandées par le fabricant ne doivent pas être utilisées.
14.Utilisez toujours le harnais.
15.Cette chaise est destinée aux enfants entre 6 mois et 3ans ou jusqu’à 15kg.
16.Toujours utilisez les deux harnais celui entre les jambes et celui de la ceinture.
17.Ne pas mettre plus de 2kg dans le panier.
18.Vérifiez que le châssis et le siège sont bien emboîtés avant utilisation.
19.Ne pas utiliser ce produit pour courir ou patiner.
20.C’est dangereux de laisser l’enfant seul.
Importé par INNOVACIONES M.S.S.L.
Pol. Ind. La Cava
C/ Benigànim, 9
46892 MONTAVERNER (Valencia) Spain
Tel. 96 229 76 70 - Fax 96 229 76 76
33
34
BETRIEBSANTEILTUNG
KINDERWAGEN URBAN
Innovaciones MS, sl
35
1. KINDERWAGENAUFBAU
Öffnen Sie die Verriegelung (a.). Ziehen Sie die Griffe nach oben um den Kinderwagen aufzuklappen
(b.). Drücken Sie auf den Hebel wie es in der Zeichnung dargestellt wird damit der Mechanismus
ordnungsgemäß gesichert wird und um zu vermeiden dass der Kinderwagen sich unbeabsichtigt
aufklappt (c.).
2. ZUKLAPPEN DES KINDERWAGENS
Heben Sie die in der Abbildung gezeigten Expansionsmechanismus (a.). Während Sie die Griffe des
Kinderwagens festhalten, lösen Sie die Verriegelung durch Betätigung des Fußhebels (b.). Klappen
Sie den Wagen so, dass Sie sicher sind dass der Stoff richtig gefaltet ist (c.). Befestigen Sie den
Haken.
3. EINSTELLUNG DER FUßABLAGE
Drücken Sie den Knopf auf beiden Seiten der Fußablage runter und passen Sie diese in der
gewünschter Position an.
4. BREMSEN
Um den Kinderwagen zu bremsen, drücken Sie die Bremshebel an beiden Seiten runter. Um die
Bremse zu lösen, heben Sie die beiden Hebel mit dem Fuß an.
5. AN UND ABBAU DES KLAPPVERDECKS
So platzieren Sie die capotam geben Sie die entsprechenden Verriegelungen auf Schienen (a.) und
machen Sie die Klettverschlüsse zu um das Klappverdeck an dem Lenkbügel des Kinderwagens zu
befestigen (b.). Um das Klappverdeck zu entfernen, lösen Sie die Kletthaken und Haken auf ihrer
Seite Schienen ziehen (c.)
6. POSITIONSEINSTELLUNG DER RÜCKENLEHNE DES KINDERWAGENS
Um die Rückenlehne anzuheben, ziehen Sie diese mit der Hand nach oben. Um die Rückenlehne
auf ihre Liegeposition zurück zu bringen, klappen Sie die Stellhebel auf beiden Seiten des Kin36
derwagens auf und ändern Sie die Position der Rückenlehne.
7. EINSTELLUNG DES SICHERHEITSGURTES
Ändern Sie die Länge des Gurtschloss Kunststoff Schiebe zu einen oder anderen Seite, die Anpassung an den Körper des Kindes
8. BEFESTIGUNG DER VORDERRÄDER
Drehen Sie das Vorderrad in die entsprechende Vertiefung der Vorderachse rein. Stellen Sie sicher
dass der Rad-Pfeil richtig ausgerichtet ist. Wiederholen Sie das gleiche für das andere Rad (a.). Um
die Vorderräder in der nicht Schwenkposition zu fixieren, drehen Sie das Rad, so dass die beiden
Kerben auf beiden Gehäuse Line-Up an der Front. Heben Sie te Schwenkriegel, bis es einrastet.
Um die Sperre aufzuheben, drücken Sie die Schwenksperre zu lösen. (b).
9. BEFESTIGUNG DES REGENSCHUTZ
Der Regenschutz einfach drapiert über Ihre puschair mit der Haube verlängert. Befestigen Sie
die Druckknöpfe an der Seite der Motorhaube und den Klettverschlüssen um die Vorderbeine zu
sichern.
10. EINSTELLUNG DES SICHERHEITSGURT
Zur Einstellung der Schultergurte, um Ihr Kind richtig passen, verwenden Sie das Pull shwn im Bild.
Achten Sie darauf, den Kabelbaum. Legen boh Verschlüsse fest in den Verschluss (b). , den Kabelbaum zu lösen, drücken jede Seite des Clips und ziehen weg von dem Befestigungselement, eine
zu einem Zeitpunkt (c). die D-Ringe in rot higlighted sind für die Ausrüstung eine separate Kabelbaum Einhaltung BS 6684 (d) vorgesehen ist.
37
38
Lesen Sie gründlich die Anleitung bevor Sie den Kinderwagen benutzen und bewahren Sie diese
für zukünftige Rückfragen auf. Wenn Sie die Anweisungen nicht befolgen, kann die Sicherheit des
Kindes beeinträchtigt werden.
Dieser Kinderwagen ist für Kinder ab 8 Monaten bis zu 15 kg.
WARNUNGEN
-Benutzen Sie kein Zubehör was nicht von dem Hersteller empfolen wurde.
-Lassen Sie das Kind nie unbeaufsichtigt da dies gefährlich seien kann.
-Benutzen Sie immer den Sicherheitsgurt, vor allem wenn das Kind sich alleine hinsetzen
kann.
-Benutzen sie das Band was zwischen den Beinen ist in Kombination mit dem Band von der
Taille.
-Überprüfen Sie dass der Klappmechanismus richtig placiert und gut geschlossen ist.
-Man darf nicht mehr als 3 kg in den Korb legen.
-Dieser Kinderwagen ist nicht für Kinder unter 8 Monaten geeignet.
-Benutzen Sie immer das Rückhaltesystem.
-Alles Gewicht was Sie an den Griff hengen, kann die Stabilität des Kindewagens beeinflussen. Hängen Sie nie ein Tasche an den Griff die mehr als 1,5 kg wiegt.
-Man darf nie mit dem Kinderwagen schlittern oder rennen.
-Bitte halten Sie die Verpackung immer von den Kind fern um Erstickungsgefahren zu vermeiden. Wenn Sie anhalten, ziehen Sie immer die Bremse des Kinderwagens an.
-Vermeiden Sie den Kinderwagen in Extremsituationen zu benutzen damit Sie nicht die
Kontrolle über das Kind oder den Kinderwagen verlieren. Wenn Sie den Kinderwagen mit
dem sitzenden Kind benutzen, dürfen Sie nur gehen. Man darf mit dem Kinderwagen nicht
39
rennen oder schlittern. Sie können nur ein einziges Kind in den Kinderwagen setzen. Man darf
nur Orginalzubehör oder Orginalersatzteile benutzen. Vergewissern Sie sich, dass die Kinderhände nicht an gefährliche Bereiche kommen können, zum Beispiel wo der Kinderwagen aus
oder zusammen geklappt wird.
-Berücksichtigen Sie dass Kleinteile wie zum Beispiel die Schutzstöpsel der Achsen eine
Erstickungsgefahr sind wenn sie von dem Kind verschluckt werden.
-Wenn Sie den Kinderwagen im Kofferraum aufbewaren, passen Sie auf das der Kofferraumdeckel nicht auf den Kinderwagen drückt um diesen nicht zu beschädigen.
-Lassen Sie das Kind nicht mit diesem Produkt spielen.
-Beim rein und rausnehmen des Kindes ziehen Sie immer die Bremse an.
-Das Kind darf nicht mehr als 20 kg wiegen im Fall der Verwendung einer zusätzlichen Hebebühne.
WARTUNG
Damit der Kinderwagen länger hält, machen Sie diesen immer trocken nach einem regnerischen
Spaziergang. Reinigen Sie regelmäßig die Räder und die Metallteile damit der Kinderwagen immer
richtig funktioniert. Benutzen Sie nur mildes Reinigungmittel und Wasser um den Kinderwagen zu
reinigen. Benutzen Sie nie starkes Reinignungmittel. Der Bezug und der Korb können nicht in der
Waschmaschine gereinigt werden. Aus Sicherheitsgründen benutzen Sie immer nur die Originalteile.
40
WICHTIG:DIE SICHERHEIT DES KINDES IST IHRER VERANTWORTUNG
Das Kind muss jeder Zeit den Sicherheitsgurt verwenden und darf nie unbeaufsichtig bleiben.
Halten Sie das Kind immer fern von losen Teilen während Sie Änderungen am Kinderwagen
vornehmen.
Dieser Kinderwagen bedarf regelmäßige Wartung die durch den Benutzer durchgeführt werden muss.
Wenn man zu viel Gewicht in den Kinderwagen legt, den nicht richtig zusammen klappt oder
nicht offizielles Zubehör benutz, könne Sie den Kinderwagen beschädigen.
Lesen Sie die Anleitung bevor Sie den Kinderwagen benutzen.
Dieses Produkt wurde hergestellt und hat die erforderlichen Tests erfüllt zur Einhaltung der
Vorschriften.
Importier von:
INNOVACIONES M.S. S.L.
Pol. Ind. La Cava. calle Beniganim, 9
46892MONTAVEHNER (Valencia) SPAIN
Fax 96 229 76 78
41
42
MANUALE DI INSTRUZIONI
PASSEGGINO URBAN
Innovaciones MS, sl
43
ISTRUZIONI DI MONTAGGIO E USO
PASSEGGINO URBAN
44
Il nostro passeggino è fabbricato secondo la norma europea EN1888: 2012
Prima dell’uso leggere attentamente questo libretto di istruzioni e conservare per future referenze.
Un uso improprio potrebbe provocare lesioni al vostro bambino.
MONTAGGIO E USO
Leggere attentamente la sequenza di montaggio per evitare pericoli nell’utilizzo.
1.APERTURA TELAIO:
Sganciare la leva di chiusura. Impugnare i manici e premendo con il piede sulla leva di apertura/
chiusura sollevare fino a completa apertura del telaio (fig. 1a, 1b)
2.POSIZIONAMENTO FRENI:
Questo passeggino è fornito di freno di stazionamento. Premere i due pedali per attivare il freno di
stazionamento e consentire il bloccaggio del passeggino. Sollevare il pedale per disattivare il freno
di stanziamento (fig. 2)
3.BLOCCO/SBLOCCO RUOTE ANTERIORI:
Inserire il perno di bloccaggio della ruota anteriore nel foro del tubo gamba. Un click indicherà
l’avvenuto aggancio (fig. 3)
4.REGOLAZIONE CAPOTTA:
Per montare la capotta sul passeggino, è necessario che gli adattatori vengano prima correttamente agganciati in sede. Per agganciare gli adattatori, inserire entrambi i ganci nelle sedi posteriori
(fig. 4a, 4b)
5.CHIUSURA TELAIO:
Richiudere la capottina, quindi sganciare la leva di chiusura. Spingere in avanti l’impugnatura sollevando i pulsanti di regolazione su ciascun lato del manico.
Completare la chiusura del passeggino fissando le leve di chiusura (fig. 7a, 7b, 7c)
6.REGOLAZIONE SCHIENALE:
Il passeggino è dotato di schienale reclinabile in 4 posizioni diverse. Sollevare o reclinare lo schienale fino al raggiungimento dell’inclinazione desiderata.
45
7.REGOLAZIONE POGGIAPIEDI:
Per regolare il poggiapiedi nella posizione desiderata, agire su entrambe le leve di regolazione.
8.UTILLIZZO DELLA CINGHIA DI TRASPORTO A SPALLA:
Prima dell’utilizzo, assicurarsi che la cinghia sia allacciata correttamente. Le ruote anteriori devono
essere allineate longitudinalmente alla cinghia delle spalle e l’impugnatura inclinata in avanti (fig.
10)
9.CINTURA DI SICUREZZA:
Il telaio è dotato di cintura regolabile in plastica.
Inserire l’aggancio della cintura superiore nell’estremità della cintura girovita. Un click indicherà
l’avvenuta chiusura.
Per slacciare la cinghia, agire sulle due estremità (fig. 11a, 11b, 11c)
10.REGOLAZIONE POGGIAPIEDI:
Chiudere leggermente il telaio. Allineare la pedana poggiapiedi e premere verso il basso seguendo
la direzione indicata dalla freccia. Fissare il poggiapiedi al telaio, agganciando i lembi attorno alla
struttura. Il poggiapiedi è ora istallato. Per richiuderlo, rimuovere innanzitutto la pedana di sostegno, quindi rimuovere il poggiapiedi (fig.12a, 12b, 12c)
•Le figure utilizzate nel presente manuale hanno scopo esclusivamente illustrativo. Il prodotto acquistato, pertanto, potrebbe variare rispetto alle illustrazioni qui riportate.
•L’azienda si riserva la possibilità di apportare le opportune modifiche per migliorare la qualità del prodotto, senza preavviso agli utenti. Vi ringraziamo per la comprensione.
46
PULIZIA:
1. Pulire il tessuto, le parti in plastica o in metallo con acqua fredda e un detergente delicato.
Lasciare asciugare.
2. Si consiglia di lavare il tessuto in lavatrice separatamente da altri articoli utilizzando un lavaggio delicato a freddo. È possibile effettuare la centrifuga a bassa temperatura per 10-15
minuti. Estrarre subito dopo la centrifuga. Non utilizzare prodotti abrasivi a base di candeggina. Non stirare e non asciugare meccanicamente.
3. Pulire le parti in plastica o in metallo con un panno delicato e umido e asciugare con un
panno asciutto. Non utilizzare solventi o detergenti aggressivi.
MANUTENZIONE
1. Pulire regolarmente il telaio con una spugna umida. Non utilizzare prodotti chimici.
2. Controllare periodicamente lo stato del prodotto. Sostituire immediatamente qualsiasi parte rotta o rovinata. Le ruote sono soggette a usura e devono essere sostituite all’occorrenza.
47
AVVERTENZE!
1.Non lasciare mai incustodito il vostro bambino quando collocato nel passeggino.
2.Il passeggino è progettato per il trasporto di un solo bambino per seduta.
3.Non sovraccaricare il passeggino con altri bambini, merci o accessori.
4.Non salire o scendere scale o gradini con i bambino collocato nel passeggino.
5.Prima dell’utilizzo, assicurarsi che il prodotto sia correttamente montato e che tutti i dispositivi di
bloccaggio e sicurezza siano correttamente inseriti.
6.Non utilizzare il prodotto se tutti i suoi componenti non sono correttamente fissati e regolati.
7.Qualsiasi carico applicato al prodotto ne compromette la stabilità.
8.Prima di utilizzare il prodotto, assicurarsi che tutti i dispositivi di bloccaggio siano correttamente
agganciati.
9.Prima di utilizzare il prodotto, rimuovere tutti gli elementi facenti parte dell’imballaggio per evitare
rischi di soffocamento.
10.Non sollevare o abbassare lo schienale del passeggino con all’interno il bambino.
48
11.Non permettete al bambino di alzarsi in piedi sul poggiapiedi per evitare che il passeggino si
ribalti arrecandogli danni.
12.Fare attenzione a non infilare le dita tra i componenti durante l’apertura e chiusura del passeggino.
13.Non utilizzare il passeggino per uso diverso da quello per il quale è stato progettato.
14.Utilizzare sempre l’imbracatura correttamente allacciata.
15.Questo prodotto è ideato per bambini da 6 mesi a 3 anni con peso massimo di 15 Kg.
16. Utilizzare sempre la cinghia spartigambe in combinazione con quella ventrale.
17.Il cesto inferiore può supportare un carico massimo di 2Kg.
18.Prima di utilizzare il passeggino, assicurarsi che il telaio e il sedile.
19.Questo passeggino non è adatto per correre o pattinare.
20.Non lasciare mai il bambino solo e senza sorveglianza.
Importado da INNOVACIONES M.S.S.L.
Pol. Ind. La Cava
C/ Benigànim, 9
46892 MONTAVERNER (Valencia) Spain
Tel. 96 229 76 70 - Fax 96 229 76 76
49
50
ИНСТРУКЦИЯ ПО ЭКСПЛУАТАЦИИ
ГОРОДСКОЙ КОЛЯСКА
Innovaciones MS, sl
51
52
53
54
55
56
57
IMPORTANTE
Tiene la obligación el establecimiento vendedor del producto de poner la fecha de venta del producto.
En caso de reclamación, deben presentar esta ficha.
Guarde siempre las instrucciones para futuras consultas.
SELLO DEL
ESTABLECIMIENTO:
Importado por:
Innovaciones MS, sl
Tel: 96 229 76 70
Fax: 96 229 76 76
Polígono Industrial La Cava
C/. Beniganim, 9
46892 MONTAVERNER
(VALENCIA) SPAIN
58