1
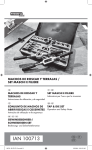
GIBBON
D
Inhalt
1.
1.1
1.2
2.
3.
4.
5.
6.
7.
8.
8.1
8.2
8.3
8.4
8.5
8.6
9.
10.
2
So verstehen Sie diese Gebrauchsanleitung richtig...........................................................................6
Kennzeichnungen am Gerät.....................................................................................................................6
Kennzeichnungen in dieser Gebrauchsanleitung.....................................................................................7
Wichtige Sicherheitsinformation...........................................................................................................7
Gerät auspacken und prüfen.................................................................................................................8
Gerät instand halten...............................................................................................................................8
Technische Daten....................................................................................................................................8
Entsorgung und Umweltschutz.............................................................................................................9
Übersicht über Bestandteile und Bedienelemente..............................................................................9
Gerät für den Einsatz vorbereiten.......................................................................................................10
Akku einlegen..........................................................................................................................................10
Akku laden..............................................................................................................................................10
Montage der Kamera...............................................................................................................................11
Austarieren des Gerätes mit der Kamera vertikal und horizontal............................................................11
Das Gerät auf das Gewicht der Kamera abstimmen..............................................................................13
Montage Handgriff...................................................................................................................................14
Gerät bedienen......................................................................................................................................14
Kalibrieren des Gerätes.......................................................................................................................16
EN
Contents
1.
1.1
1.2
2.
3.
4.
5.
6.
7.
8.
8.1
8.2
8.3
8.4
8.5
8.6
9.
10.
Understanding these instructions for use correctly..........................................................................19
Markings on the device...........................................................................................................................19
Identifications in these instructions for use.............................................................................................20
Important safety information...............................................................................................................20
Unpack and check the device..............................................................................................................21
Maintaining the device..........................................................................................................................21
Technical specifications.......................................................................................................................21
Disposal and environmental protection..............................................................................................22
Overview of components and control elements................................................................................22
Preparing the devices for use..............................................................................................................23
Inserting the powerpack..........................................................................................................................23
Charging the powerpack.........................................................................................................................23
Mounting the camera..............................................................................................................................24
Vertical and horizontal balancing of the device with the camera............................................................24
Adjust the device to the weight of the camera........................................................................................26
Assembling the handle............................................................................................................................27
Operating the device.............................................................................................................................27
Calibrating the device...........................................................................................................................29
3
FR
Contenu
1.
1.1
1.2
2.
3.
4.
5.
6.
7.
8.
8.1
8.2
8.3
8.4
8.5
8.6
9.
10.
4
Pour bien comprendre la notice d’utilisation.....................................................................................32
Symboles sur l’appareil...........................................................................................................................32
Symbole de la notice d’utilisation............................................................................................................33
Informations de sécurité importantes.................................................................................................33
Déballer et vérifier les appareils..........................................................................................................34
Entretenir l’appareil..............................................................................................................................34
Caractéristiques techniques................................................................................................................34
Recyclage et environnement...............................................................................................................35
Aperçu des composants et des éléments de commande.................................................................35
Préparer l‘appareil avant utilisation....................................................................................................36
Introduction de la batterie.......................................................................................................................36
Chargement de la batterie......................................................................................................................36
Montage de la caméra............................................................................................................................37
Équilibrez l‘appareil avec la caméra verticalement et horizontalement..................................................37
Ajuster l‘appareil en fonction du poids de la caméra..............................................................................39
Montage de la poignée...........................................................................................................................40
Utilisation de l‘appareil.........................................................................................................................40
Calibrage de l‘appareil..........................................................................................................................42
PT
Conteúdo
1.
1.1
1.2
2.
3.
4.
5.
6.
7.
8.
8.1
8.2
8.3
8.4
8.5
8.6
9.
10.
Saiba interpretar corretamente o manual de instruções...................................................................45
Identificações no aparelho......................................................................................................................45
Identificações neste manual de instruções.............................................................................................46
Informações de segurança importantes.............................................................................................46
Desempacotar e inspecionar o aparelho............................................................................................47
Conservar o aparelho...........................................................................................................................47
Dados técnicos......................................................................................................................................47
Eliminação e proteção ambiental........................................................................................................48
Resumo dos componentes e elementos de comando......................................................................48
Preparar o aparelho para a utilização.................................................................................................49
Inserir a bateria.......................................................................................................................................49
Carregar a bateria...................................................................................................................................49
Montagem da câmara.............................................................................................................................50
Tarar o aparelho com a câmara em posição vertical e horizontal...........................................................50
Ajuste o aparelho ao peso da câmara....................................................................................................52
Montagem da pega.................................................................................................................................53
Operar o aparelho.................................................................................................................................53
Calibração do aparelho........................................................................................................................55
5
D Gebrauchsanleitung
Wir danken Ihnen für Ihr Vertrauen und wünschen Ihnen viel Freude und Erfolg mit Ihrem
neuen Gerät.
■■ Lesen Sie diese Gebrauchsanleitung
sorgfältig durch, bevor Sie Ihr neues
Gerät das erste Mal benutzen. Sie
enthält alles, was Sie wissen müssen,
damit Sie Personen- und Sachschäden
vermeiden.
■■ Beachten Sie alle Sicherheitshinweise
in dieser Gebrauchsanleitung sorgfältig.
■■ Bewahren Sie diese Gebrauchsanleitung sorgfältig auf. Geben Sie diese Gebrauchsanleitung an den neuen Besitzer
weiter, wenn Sie das Gerät verkaufen
oder anderweitig überlassen.
6
1. So verstehen Sie diese
Gebrauchsanleitung richtig
1.1 Kennzeichnungen am Gerät
Dieses Zeichen bedeutet, dass Ihr Gerät
die Sicherheitsanforderungen aller anwendbaren EU-Richtlinien erfüllt.
Entsorgung und Umweltschutz
Elektrische und elektronische Geräte sowie
Batterien dürfen nicht mit dem Hausmüll
entsorgt werden. Der Verbraucher ist
gesetzlich Verpflichtet, elektrische und
elektronische Geräte sowie Batterien am
Ende Ihrer Lebensdauer an den dafür
eingerichteten, öffentlichen Sammelstellen
oder an die Verkaufsstelle zurückzugeben.
Einzelheiten dazu regelt das jeweilige
Landesrecht. Das Symbol auf dem
Produkt, der Gebrauchsanleitung oder der
Verpackung weist auf diese Bestimmungen
hin. Mit der Wiederverwertung, der stofflichen Verwertung oder anderen Formen
der Verwertung von Altgeräten/Batterien
leisten Sie einen wichtigen Beitrag zum
Schutz unserer Umwelt.
1.2 Kennzeichnungen in dieser
Gebrauchsanleitung
Kennzeichnung
Macht Sie auf die Handhabung und
Auswirkung von Sicherheitsinformationen
aufmerksam.
WARNUNG
Macht Sie auf eine gefährliche Situation
aufmerksam, die eine schwere Verletzung
oder den Tod nach sich ziehen kann, wenn
sie nicht vermieden wird.
VORSICHT
Macht Sie auf eine gefährliche Situation
aufmerksam, die eine leichte bis mittelschwere Verletzung nach sich ziehen
kann, wenn sie nicht vermieden wird.
HINWEIS
Macht Sie auf mögliche Sachschäden und
andere wichtige Informationen in Verbindung mit Ihrem Gerät aufmerksam.
2. Wichtige Sicherheitsinformation
WARNUNG
Bruchgefahr
Achten Sie auf einen sicheren Halt der
angebrachten Geräte und Equipment.
Kontrollieren Sie vor jeder Benutzung alle
Verschlüsse, Schrauben und Befestigungen. Alle montierten Teile müssen fest und
sicher sitzen.
WARNUNG
Stromschlaggefahr und Brandgefahr
durch Kurzschluss oder Fehlfunktion
Ein Kurzschluss kann u. a. durch defekte
Kabel und durch Feuchtigkeit oder Nässe
verursacht werden. Bei einem Kurzschluss
können sich die Leitungsdrähte so stark
erwärmen, dass deren Isolierung schmilzt
oder die Leitungsdrähte sogar durchschmelzen. Dadurch kann es zu einem
Brand kommen.
■■ Betreiben Sie das Gerät nicht mit nassen
Händen oder Füßen.
■■ Reinigen Sie das Gerät nur auf die in
dieser Gebrauchsanleitung angegebene
Weise.
■■ Achten Sie darauf, dass das Gerät nicht
herunterfällt. Lassen Sie ein heruntergefallenes Gerät von einer Elektrofachkraft
prüfen, bevor Sie es wieder einschalten.
■■ Wenn das Gerät einmal beschädigt
oder defekt sein sollte oder wenn Sie
Schmorgeruch feststellen:
Öffnen Sie das Gerät nicht. Reparieren
Sie das Gerät niemals selbst. Lassen
Sie das Gerät ausschließlich von einer
Elektrofachkraft reparieren.
■■ Halten Sie das Gerät stets so instand,
wie diese Gebrauchsanleitung es vorschreibt.
■■ Prüfen Sie die örtliche Stromversorgung
mit den Anschlusswerten des Gerätes
Netzteil (siehe technische Daten).
Sollten die Anschlusswerte nicht übereinstimmen, wenden Sie sich bitte an
[email protected] oder Tel.
+49 84 32 / 9489-0.
7
WARNUNG
Erstickungsgefahr durch Kleinteile
Halten Sie das Gerät und die Verpackung
von Kindern und Haustieren fern.
WARNUNG
Vorsichtsmaßnahmen bei der Verwendung mit dem Akku
Bei unsachgemäßer Handhabung kann der
Akku auslaufen oder explodieren. Beachten Sie folgende Sicherheitshinweise:
■■ Verwenden Sie nur Akkus, die in dieser
Bedienungsanleitung genannt werden.
■■ Legen Sie den Akku nicht in ein Feuer
oder setzen Sie sie direkter Hitze aus.
■■ Sollte Akku-Flüssigkeit mit Haut oder
Kleidung in Kontakt kommen, spülen
Sie diese sofort mit frischem Wasser ab.
■■ Lassen Sie die Akkus nicht unbeaufsichtigt laden, trennen Sie nach
vollständiger Aufladung der Akkus das
Netzteil von der Stromzufuhr, in dem Sie
den Netzstecker ziehen. Der Akku ist
vollständig aufgeladen, wenn die LED
Anzeige am Netzteil grün aufleuchtet.
3. Gerät auspacken und prüfen
1. Packen Sie den Lieferumfang vorsichtig aus.
2. Prüfen Sie, ob der Lieferumfang
vollständig vorhanden ist:
3. Prüfen Sie, ob der Lieferumfang unbeschädigt ist.
HINWEIS
Wenn der Lieferumfang unvollständig oder
beschädigt ist, wenden Sie sich bitte an
[email protected] oder an unsere telefonische Servicehotline unter der Nummer
+49 8432 9489-0.
8
HINWEIS
Im Zuge von Produktverbesserungen
behalten wir uns technische und optische
Veränderungen vor.
4. Gerät instand halten
Bringen Sie das Gerät niemals mit Feuchtigkeit oder Wasser in Berührung.
HINWEIS
Verwenden Sie ausschließlich die in der
nachfolgenden Tabelle angegebenen Reinigungsmittel.
Reinigen
Gerät
Reinigung
Gehäuse Leichte und hartnäckige Verschmutzungen mit trockenem
Microfasertuch beseitigen
5. Technische Daten
Batterie
Stromversorgung
Netzteil
Gewicht
Maße
Lithium Polymer
800mAh 11,1V
Input 100-240V
50/60Hz -0,8A
Output 12,6V 1500mA
ca. 840 g
ca. 28 x 19 x 15 cm
Zulässige
Betriebsbedingung
0 °C bis + 40 °C
Lagerbedingungen
Trocken und staubfrei
bei -20 °C bis +50 °C
6. Entsorgung und Umweltschutz
Entsorgen Sie das Gerät bitte bei einer der
örtlichen Entsorgungsstellen.
Dieser Service ist für Sie kostenlos.
1
4 5
7. Übersicht über Bestandteile und
Bedienelemente
2
1 ¼ Zollgewinde für Zubehörmontage
2 Pfeiltasten hoch/runter
3 Anschlussbuchse Netzteil
4 LED Statusanzeige 1x grün
5 LED Statusanzeige 3x rot
(Gewicht und Akkuanzeige)
3
6Befestigungsschrauben
Schnellwechselplatte und Schlitten
7 Ein-/Ausschalter (blaue LED)
8 ¼ Zollgewinde z.B. für Stativaufnahme
6
7
8
9
8. Gerät für den Einsatz vorbereiten
8.1 Akku einlegen
Batteriefachdeckel
öffnen
Akku mit der Steckverbindung des
Gerätes verbinden
Akku in die Batterieaufnahme einführen
Batteriefachdeckel
verschließen.
HINWEIS
Verwenden Sie nur den speziell mitgelieferten Akku. Verwenden Sie keine anderen Akkus.
Achten Sie beim Einlegen des Akkus dass keine Kabel gequetscht oder beschädigt werden.
8.2 Akku laden
Stecken Sie den
Stecker des Netzteiles in die Buchse
des Gerätes
Verbinden Sie das
Netzteil mit der
Stromversorgung
Rote LED leuchtet –
Gerät lädt
Grüne LED leuchtet –
Gerät ist aufgeladen
Seitliche LED blinkt rot
– laden Sie Ihr Gerät
auf.
LED leuchtet rot –
Gerät ist betriebsbereit
HINWEIS
Verwenden Sie nur das mitgelieferte Netzteil. Schalten Sie das Gerät zum Laden aus.
10
8.3 Montage der Kamera
Setzen Sie Ihre
Kamera auf die
Schnellwechselplatte auf
Befestigen Sie
Ihre Kamera
fest und sicher
mit der Befestigungsschraube
an der schnellwechselplatte
Führen Sie die
Schnellwechselplatte mit Ihrer
Kamera auf die
Halterungsschiene des Gerätes
Befestigen und
sichern Sie die
Schnellwechselplatte mit der
Schraube.
Je nach Bedarf
können Sie die
Kamera auf
der Halterungsschien mit der
Schnellwechselplatte hin und
her bewegen.
HINWEIS
Achten Sie auf einen sicheren Halt Ihrer Kamera.
8.4 Austarieren des Gerätes mit der Kamera vertikal und horizontal
Vertikal:
Stellen Sie das Gerät
wie abgebildet ab.
Handgriff nach rechts
Lösen Sie die seitliche Schraube um
den Schlitte bewegen
zu können
Bewegen Sie je nach
Bedarf den Schlitten
Tarriern Sie den
Schlitten für die
vertikale Position aus
11
Verschließen Sie die
Schrauben für einen
sicheren Halt
Ist der Gimbal in der vertikalen Achse korrekt
balanciert, bleibt die Kamera in unterschiedlichen Winkeln in der entsprechenden Achse.
HINWEIS
Achten Sie auf einen sicheren Halt Ihrer Kamera.
Horizontal:
Zum Verschieben der
Schnellwechselplatte
Öffnen Sie die vordere Schraube (unterhalb vom Objektiv)
leicht
Ist der Gimbal in der horizontalen Achse
korrekt balanciert, bleibt die Kamera in unterschiedlichen Winkeln in der entsprechenden
Achse.
HINWEIS
Achten Sie auf einen sicheren Halt Ihrer Kamera.
12
8.5 Das Gerät auf das Gewicht der Kamera abstimmen
Schalten Sie das
Gerät ein
Drücken sich gleichzeitig die Pfeiltasten
Die Grüne und alle
Sobald sie die Pfeil3 rote LED`s leuchten tasten auslassen,
leuchtet eine rote
LED
Betätigen Sie die
Pfeiltasten nach oben
oder unten um die
Gewichtseinstellung
vorzunehmen:
Zur Bestätigung
des eingestellten
Gewichtes betätigen
Sie beide Pfeiltasten
gleichzeitig
Alle LED`s blinken,
solange sie beide
Pfeiltasten gedrückt
halten
Sobald sie die Pfeiltasten auslassen,
leuchtet eine grüne
und eine rote LED
Rechte rote LED= 300g
Mittlere rote LED= 600g
Linke rote LED= 800g
HINWEIS
Ihr Gerät kann noch nicht selbstständig bei Inbetriebnahme die Balance halten. Führen Sie
hierzu die Schritte „10. Kalibrieren des Gerätes“ durch.
13
8.6 Montage Handgriff
Handgriff,
Gummiring
Stülpen sie den
Gummiring über
das Gewinde
Befestigen Sie den Handgriff an Ihrem Gerät
9. Gerät bedienen
Stellen Sie vor dem
Einschalten des Gimbals
sicher, dass die Kamera
horizontal und der Handgriff
vertikal ausgerichtet sind.
(siehe Foto)
14
Schalten Sie das Gerät mit
dem Ein-/Ausschalter ein.
Blaue LED leuchtet.
Grüne BreitschaftsLED und rote LED leuchten
am Gerät
Bewegen Sie das
Gerät nicht weiter als
30° nach vorne oder
hinten
Mit den Pfeiltasten
können Sie die
Kamera neigen
Verschiedene Verwendungsbeispiele
HINWEIS
Aufgrund der grundsätzlichen Einschränkungen der Gyrotechnik soll der Gimbal nicht um
mehr als 30° geneigt werden, da sich der Motor sonst schüttelt.
15
10.Kalibrieren des Gerätes
Ihr Gerät kann noch
nicht selbstständig
bei Inbetriebnahme
die Balance halten.
Laden Sie das
Entpacken Sie die
Programm “Balancing Datei „BigBalance.rar“
Re-Calibration” von
der Homepage
www.bigbalance.com
herunter.
Installieren Sie den
x86 Treiber für 32-bit
Windows Systeme
Installieren Sie den
x64 Treiber für 64-bit
Windows Systeme
Installieren Sie die
Mac Version für
Macintosh Computer
Klicken Sie auf „weiter“ um den Treiber
zu installieren
16
Stimmen Sie dem
Linzenzvertrag zu
und klicken Sie
„weiter“
Die Installation startet
Fertig
Öffnen sie die Buchse Schalten Sie das
für den Anschluss
Gerät aus! Bringen
des Mini-USB Kabels und lassen Sie Ihr
Gerät während des
Kalibrierens in der
Horizontalen.
Verbinden Sie Ihr
Gerät mit dem USB
Kabel am Computer
LED leuchtet rot
Starten Sie das
Suchen Sie den
Programm „Balancing Richtigen Anschluss
Re-Calibration“
aus z. B. com3 oder
com5
Klicken Sie den
Button „connect“
Alle Buttons
verändern die Farbe
von grau auf weiß
Klicken Sie den
Button „CALIB ACC“
an
Sie erhalten eine
Meldung mit „successfully“. Bestätigen
Sie mit dem Button
„OK“
Klicken Sie anschließend auf den Button
„CALL GYRO“
Die Grüne LED am
Gerät beginnt zu
blinken und leuchtet
anschließen auf.
Klicken Sie anschließend den Button
„WRITE“an
17
Danach den Button
„WRITE“ anklicken
Sie erhalten eine
Meldung mit
„successfully“.
Bestätigen Sie mit
dem Button „OK“
Verschließen Sie die
Mini-USB Buchse
Testen Sie das Gerät
ob dieses nun in der
Balance bleibt. Sollte
dieses nicht sein,
wiederholen Sie die
Kalibrierungsschritte
aus 10.
18
Klicken Sie den
Button „Disconnect“
an
Entfernen Sie das
USB Kabel
EN Instruction Manual
Thank you very much for your confidence.
We wish you much pleasure and success
with your device.
■■ Please read these instructions for use
thoroughly before you use this new
equipment for the first time. It contains
everything you need to know in order to
avoid damage to persons or property.
■■ Strictly follow all notes on safety in
these instructions for use.
■■ Keep these instructions for use in a safe
place. If you sell your equip-ment or
pass it on to someone else, you should
also pass on these instructions for use.
1. Understanding these
instructions for use correctly
1.1 Markings on the device
This symbol indicates, that your device
meets the safety requirements of all
applicable EU-directives.
Waste disposal and protection of the
environment
Electric and electronic appliances as
well as batteries must not be disposed of
together with domestic waste. The user
is legally obliged to return electric and
electronic appliances as well as batteries
to specially set up public collecting points
or the sales outlet once they have reached
the end of their service life. Details are
regulated by national law. The symbol on
the product, the instructions for use or the
packaging refers to these provisions. The
recycling, the material-sensitive recycling
or any other form of recycling of waste
equipment/ batteries is an important
contribution to the protection of our
environment.
19
1.2 Identifications in these instructions
for use
Identification
Draws your attention to the dealing with
and the effect of safety information.
WARNING
Draws you attention to a dangerous situation, which can result in severe or even
fatal injury, if not avoided.
CAUTION
Indicates a hazardous situation, which,
if not avoided, may result in minor or
moderate injury.
NOTE
Draws your attention to possible material
damage and other important information in
connection with your equipment.
2. Important safety information
WARNING
Risk of breakage
Ensure secure hold of the attached devices
and equipment. Before each use check all
locks, screws and fastening elements. All
mounted parts must be tight and securely
fitted.
20
WARNING
Danger of electric shock, fire through
short-circuit
A short-circuit could be caused through
defect cables and through humidity or
moisture. A short-circuit can warm up the
conductors, so that there isolation will melt
or even melt thoroughly. This could lead to
fire.
■■ Don´t operate the device with wet hands
or feet.
■■ Please only follow this instruction
manual for cleaning your device.
■■ Prevent your device for falling-off. In
case of falling-off, please let an electrician check the device before switching
on again.
■■ If your device should be damaged or
defect or if you notice a burning smell:
Don´t open the device. Never repair the
device on your own. The device should
only be repaired by electricians.
■■ Please follow this instruction manual for
maintaining your device.
■■ Check whether the local power supply
corresponds with the connecting values
of the power supply unit (see technical
data). Should the connection values not
match, please contact [email protected]
or phone +49 8432 9489-0.
WARNING
Danger of suffocation caused by small
parts
Keep the device out of the reach of children and pets.
WARNING
Precautions when using with rechargeable battery
These can run out or explode, if inappropriately handled. Please observe the following
safety notes:
■■ Use only rechargeable batteries mentioned in these operating instructions.
■■ Do not lay rechargeable battery into fire
or expose these to direct heat.
■■ If battery fluid has come into contact
with skin or clothes, flush it off immediately with fresh water.
■■ Do not leave the powerpacks unattended when charging, after successful
charging disconnect the powerpacks
from the power supply by simply pulling
out the mains plug. The powerpack is
fully charged when the LED indicator on
the power supply unit lights green.
3. Unpack and check the device
1. Carefully unpack the scope of delivery.
2. Check whether the scope of delivery is
complete:
3. Check whether the scope of delivery is
free of damage.
NOTE
If the scope of delivery is incomplete or
damaged, please contact [email protected]
or call our service hotline under the number
+49 8432 9489-0.
NOTE
Within the scope of product improvements
we reserve the right for technical and
optical changes.
4. Maintaining the device
Do not bring the device into contact with
moisture or water.
NOTE
Do not bring the device into contact with
moisture or water.
Cleaning
Device
Cleaning
Housing
Remove light and intractable
dirt with a dry micro-fibre
cloth
5. Technical specifications
Battery
Power Supply
Weight
Dimensions
Lithium Polymer
800mAh 11,1V
Input 100-240V
50/60Hz -0,8A
Output 12,6V 1500mA
ca. 840 g
ca. 28 x 19 x 15 cm
Permitted Operation
Temperature
0 °C to + 40 °C
Storage Conditions
Dry and dust-free at
-20 °C to +50 °C
21
6. Disposal and environmental
protection
Please dispose of your device at your local
disposal area at no charge.
1
4 5
7. Overview of components and
control elements
2
1 ¼ inch thread for accessory assembly
2 Arrow keys up/down
3 Connecting socket power supply unit
4 LED Status display 1 × green
5 LED Status display 3 × red
(weight and powerpack indicator)
3
6 Fastening screws quick-release plate
and carriage
7 On / Off-switch (blue LED)
8 ¼ inch thread e.g. for tripod receptacle
6
7
8
22
8. Preparing the devices for use
8.1 Inserting the powerpack
Open the battery
compartment lid
Connect the powerpack with the plug
connection of the
device
Insert the powerpack
into the battery
compartment
Close the battery
compartment lid
NOTE
Use only the specially supplied powerpack. Do not use any other powerpacks. When inserting
the power pack make sure that no cable is squashed or damaged.
8.2 Charging the powerpack
Push the plug of the
power supply unit
into the socket of the
device
Connect the power
supply unit with the
electric power supply
Red LED lights –
device is charging
Green LED lights
– device is fully
charged
LED on the side
flashes red – charge
your device
LED lights red –
device ready for
operation
NOTE
Use only the power supply unit that has been delivered with the device. Switch off the device
for charging.
23
8.3 Mounting the camera
Attach the
camera to the
quick-release
plate
Fasten the
camera securely
with the fastening screw to the
quick release
plate
Guide the quick
release plate
with your camera
on the holding
rail of the device
Fasten and
secure the quick
release plate with
the screw.
You can move
the camera
on the holding
rail with the
quick-release
plate to and fro,
if required.
NOTE
Ensure secure fastening of your camera.
8.4 Vertical and horizontal balancing of the device with the camera
Vertically:
Put the device down
as shown. Handle to
the right
24
Loosen the screw on
the side to be able to
move the carriage
Move the carriage as
required
Balance the carriage for the vertical
position
Fasten the screws for
secure hold
If your adjustment of verical balance is
correct, your camera can be held on
differerent angles on the tilt axes.
NOTE
Ensure secure fastening of your camera.
Horizontally:
To displace the
quick-release plate
Slightly loosen the
front screw (below
the lens)
If your adjustment of horizontal balance is
correct, your camera can be held on
differerent angles on the roll axes.
NOTE
Ensure secure fastening of your camera.
25
8.5 Adjust the device to the weight of the camera
Switch on the device
Press the arrow keys
at the same time
The green and all
3 red LEDs light up
When you release
the arrow keys, a red
LED will light up
Press the arrow up or
down button to adjust
the weight:
Press both arrow
keys at the same
time to confirm the
adjusted weight
All LEDs are flashing,
as long as both
arrow keys are held
depressed
As soon as you release the arrow keys, a
green and a red LED
will light
Right red LED= 300g
Middle red LED= 600g
Left red LED= 800g
NOTE
Your device can still not automatically keep the balance when operation is started.
For this purpose perform the steps “10. Calibrating the device”.
26
8.6 Assembling the handle
Handle,
rubber disc
Put the rubber
disc over the
thread
Fasten the handle on your device
9. Operating the device
Before turn on the gimbal,
please ensure the mounting
platform is horizontal and
holding the handle straightly.
(See photo)
Switch on the device (blue
LED lights up)
The green standby-LED and
the red LED on the device
light up
27
Do not move the device further than 30°
to front and rear
You can tilt the
camera with the
arrow keys
Various exampled of use
NOTE
Due to the limitation of gyroscope, do not tilt the gimbal beyond 30 degrees front or back,
otherwise the gimbal will tremble.
28
10.Calibrating the device
Your device can still
not automatically
keep the balance
when operation is
started.
Download the
program
“BigBalance.rar”
from the website
www.bigbalance.com
Unzip the file
(BigBalance.rar)
Install x86 drive
for 32-bit Windows
platform.
Install x64 drive
for 64-bit Windows
platform.
Install Mac Version
for Macintosh
computer
Click Next to install
the driver
At the License
Agreement page of
the Installer, click I
accept this agreement and Next
Installation in
progress
Finish
29
Open the socket to
connect the Mini-USB
cable
Switch off the device!
Adjust and leave your
device in horizontal
position during calibration.
Connect your device
to the computer using
the USB-cable
The LED lights red
Start the program
“Balancing ReCalibration”
Look for the right
connection, e.g.
com3 or com5
Click on the button
“Connect”
All buttons change
their colour from grey
to white
Click on the button
„CALIB ACC“
Subsequently click on You will receive a
the button “WRITE”
messages “successfully”. Press “OK” to
confirm
30
Subsequently click
on the button „CALL
GYRO“
The green LED on
the device starts flashing and will finally
light up.
Click on the button
„WRITE“
You will receive a
messages “successfully”. Press “OK” to
confirm
Close the Mini-USB
socket
Test the device to
see if it now keeps
its balance. If this is
not the case, repeat
the calibration steps
from 10.
Click on the button
„Disconnect“
Remove the USBcable
31
FR Mode d‘emploi
Nous vous remercions de votre confiance et
vous souhaitons beaucoup de plaisir et de
succès avec votre appareil.
■■ Veuillez lire attentivement cette notice
avant d‘utiliser pour la première fois
votre nouvel appareil. Elle contient tout
ce que vous devez savoir afin d‘éviter
tout dommage corporel ou matériel.
■■ Veuillez respecter scrupuleusement toutes les consignes de sécurité évoquées
dans la présente notice d‘utilisation.
■■ Conservez bien cette notice. Remettez-la au nouveau propriétaire en cas de
vente de l‘appareil ou de cession pour
tout autre motif.
32
1. Pour bien comprendre la notice
d’utilisation
1.1 Symboles sur l’appareil
Ce symbole signifie que votre appareil
répond aux exigences de sécurité de toutes les directives UE applicables.
Recyclage et environnement
Les appareils électriques et électroniques
et les piles ne doivent pas être jetés avec
les ordures ménagères. A la fin de leur
durée de vie, l’utilisateur a pour obligation
légale de remettre les appareils électriques
et électroniques ainsi que les piles aux
centres de collecte publics dédiés ou à leur
point de vente. Les cas particuliers sont
soumis à la législation en vigueur dans le
pays concerné. Le symbole sur le produit, la notice d’utilisation ou l’emballage
informe des dispositions applicables. Avec
le recyclage des matériaux ou des anciens
appareils et batteries, vous contribuez de
manière significative à la protection de
notre environnement.
1.2 Symbole de la notice d’utilisation
Signification
Attire votre attention sur la manipulation et
les effets des informations de sécurité.
ATTENTION
Attire votre attention sur une situation dangereuse qui peut entraîner des blessures
graves voire mortelles s’il elle n’est pas
évitée.
PRUDENCE
Attire votre attention sur une situation dangereuse qui peut entraîner des blessures
légères voire assez conséquentes s‘il elle
n‘est pas évitée.
REMARQUE
Attire votre attention sur les éventuels
dommages matériels et les autres informations concernant votre appareil.
2. Informations de sécurité
importantes
ATTENTION
Risque de casse
Vérifiez que les appareils et l‘équipement
monté sont bien fixés. Contrôlez avant
chaque utilisation toutes les fermetures,
vis et fixations. Toutes les pièces montées
doivent être fixées correctement et en toute
sécurité.
ATTENTION
Risque de décharge électrique et de
brûlure en cas de court-circuit
Un court-circuit peut par exemple se produire en présence d‘un câble défectueux,
d‘humidité, ou d‘eau. En cas de court-circuit, les fils d‘alimentation peuvent chauffer
au point de faire fondre leur isolation ou
de fondre eux-mêmes. Et cela peut causer
des brûlures.
■■ N‘utilisez jamais l‘appareil lorsque vous
avez les mains ou les pieds mouillés.
■■ Nettoyez l‘appareil en procédant
uniquement tel qu‘indiqué dans la présente notice d‘utilisation.
■■ Veillez à éviter la chute de l‘appareil. En
cas de chute, demandez à un électricien
spécialisé de contrôler votre appareil
avant de le réutiliser.
■■ En cas d‘endommagement, de défaillance ou d‘odeur de brûlé :
N‘ouvrez pas l‘appareil. Ne réparez jamais l‘appareil vous-même. Confiez sa
réparation uniquement à un électricien
spécialisé.
■■ Entretenez l‘appareil comme indiqué
dans la présente notice d‘utilisation.
■■ Vérifiez que l‘alimentation électrique
locale correspond aux valeurs de raccordement au secteur de l‘appareil (voir
les caractéristiques techniques). Si les
valeurs de raccordement sont différentes, veuillez vous adresser à
[email protected] ou appelez le
+49 84 32/9489-0.
33
ATTENTION
Risque d’étouffement en raison de petits éléments
Conservez l’appareil hors de portée des
enfants et des animaux.
REMARQUE
Afin d’améliorer constamment nos produits,
nous nous réservons le droits de procéder à des modifications techniques ou
visuelles.
ATTENTION
Mesures de précaution concernant l’utilisation de la batterie ou autre
Elles peuvent fuir ou exploser en cas de
mauvaise manipulation. Veuillez respecter
les consignes de sécurité suivantes:
■■ Utilisez uniquement la batterie ou
d’autres batteries mentionnées dans la
présente notice d’utilisation.
■■ Ne jetez pas la batterie ou autre au feu
et ne la mettez pas à proximité directe
d’une source de chaleur.
■■ Si du liquide de la batterie vient à entrer
en contact avec la peau ou des vêtements, rincez immédiatement à l’eau
claire.
■■ Ne laissez pas les batteries sans surveillance, débranchez le bloc d‘alimentation
de l‘alimentation électrique dès que la
batterie est complètement chargée, en
débranchant le connecteur. La batterie
est complètement chargée lorsque la DEL
s‘allume en vert sur le bloc d‘alimentation.
4. Entretenir l’appareil
Évitez tout contact de l’appareil avec l’eau
ou l’humidité.
REMARQUE
Utilisez uniquement les produits d’entretien
mentionnés dans le tableau ci-dessous.
Nettoyage
Appareil
Nettoyage
Boîtier
Éliminer les salissures légères
et tenaces à l’aide d’un chiffon
en microfibre.
5. Caractéristiques techniques
Batterie
3. Déballer et vérifier l’appareil
1. Déballez avec précaution le contenu de la
livraison.
2. Vérifiez le contenu de la livraison
3. Vérifiez l’absence de dommages du contenu de la livraison :
REMARQUE
Si le contenu de la livraison est incomplet ou
endommagé, veuillez vous adresser à
[email protected] ou contacter notre hotline
au +49 84 32 / 9489-0.
34
Alimentation
Poids
Dimensions
Conditions d‘utilisation admises
Conditions de
stockage
Lithium Polymer
800mAh 11,1V
Input 100-240V
50/60Hz -0,8A
Output 12,6V 1500mA
ca. 840 g
ca. 28 x 19 x 15 cm
0 °C à + 40 °C
Au sec et à l‘abri de
la poussière de
-20 °C à +50 °C
6. Recyclage et environnement
Confiez gratuitement le recyclage de l‘appareil à une structure de recyclage locale et
appropriée.
1
4 5
7. Aperçu des composants et des
éléments de commande
2
1 Filetage ¼ pouce pour montage des
accessoires
2 Touches fléchées haut/bas
3 Connecteur bloc d‘alimentation
4 DEL d‘affichage de statut 1x verte
5 DEL d‘affichage de statut 3x rouges
(poids et affichage batterie)
3
6 Vis de fixation de plaque de changement
rapide et coulisses
7 Marche/arrêt (DEL bleue)
8 Filetage ¼ pouce par ex. pour support de
trépied
6
7
8
35
8. Préparer l‘appareil avant utilisation
8.1 Introduction de la batterie
Ouvrir le couvercle du Connecter la batterie
compartiment à pile
à la fiche de raccordement de l‘appareil
Introduire la batterie
dans le logement
prévu à cet effet
Fermer le couvercle
du compartiment à
pile.
REMARQUE
N‘utiliser que la batterie spécialement fournie. N‘utilisez pas d‘autre batterie. Attention en
introduisant la batterie qu‘aucun câble ne soit écrasé ou endommagé.
8.2 Chargement de la batterie
Insérer le connecteur Connectez le bloc
du bloc d‘alimentation d‘alimentation l‘alidans la douille de
mentation électrique
l‘appareil
La DEL rouge s‘allume – L‘appareil est
en charge
La DEL latérale clignote en rouge – Chargez
votre appareil
La DEL s‘allume –
L‘appareil est chargé
La DEL s‘allume en
rouge – L‘appareil est
fonctionnel
REMARQUE
N‘utilisez que le bloc d‘alimentation fourni. Pour charger l‘appareil, éteignez-le.
36
8.3 Montage de la caméra
Placez votre
caméra sur la
plaque de changement rapide
Fixez votre
caméra solidement et en toute
sécurité avec la
vis de fixation
sur la plaque
de changement
rapide
Guidez la plaque
de changement
rapide avec
votre caméra sur
les rails de fixation de l‘appareil
Fixez et sécurisez la plaque de
changement rapide avec la vis.
Au besoin, vous
pouvez déplacer
la caméra sur les
rails de fixation
avec la plaque
de changement
rapide.
REMARQUE
Vérifiez que la caméra est bien fixée.
8.4 Équilibrez l‘appareil avec la caméra verticalement et horizontalement
Verticalement :
Placez l‘appareil
selon l‘illustration.
Poignée à droite
Desserrez la vis
latérale pour pouvoir
déplacer la glissière
Déplacez les glissières comme vous le
souhaitez
Équilibrez les glissières pour la position
verticale
37
Serrez les vis pour
garantir une bonne
fixation
Si l‘appareil est correctement équilibré dans
l‘axe vertical, l‘appareil reste dans des angles
différents sur l‘axe respectif.
REMARQUE
Vérifiez que la caméra est bien fixée.
Horizontalement :
Pour déplacer la plaque de changement
rapide
Desserrez légèrement la vis avant
(sous l‘objectif)
REMARQUE
Vérifiez que la caméra est bien fixée.
38
Si l'appareil est correctement équilibré sur
l'axe horizontal, la caméra reste à des angles
différents dans l'axe correspondant.
8.5 Ajuster l‘appareil en fonction du poids de la caméra
Allumez l‘appareil
Appuyer simultanément sur les touches
fléchées
La DEL verte et les 3
rouges s‘allument
Dès que vous
relâchez les touches
fléchées, une DEL
rouge s‘allume
Actionnez les touches
fléchées vers le haut u
le bas pour modifier le
réglage du poids :
Pour confirmer le
poids réglé, actionnez simultanément
les deux touches
fléchées
Toutes les DEL
clignotent si vous
continuez à appuyer
sur les deux touche
fléchées
Dès que vous
relâchez les touches
fléchées, une DEL
verte et une rouge
s‘allument
DEL rouge droite:
300 g
DEL rouge centrale:
600g
DEL rouge gauche:
800g
REMARQUE
Votre appareil ne maintient pas encore seul son équilibre lors de la mise en service. Pour ce
faire, effectuez les étapes du point « 10. Calibrage de l‘appareil ».
39
8.6 Montage de la poignée
Poignée,
rondelle en
caoutchouc
Montez la bague
en rondelle en
caoutchouc
Fixez la poignée avec appareil
9. Utilisation de l‘appareil
Assurez-vous avant de démarrer le Gimbal que l'appareil photo soit à l'horizontale
et la poignée à la verticale.
(Voir photo)
40
Mettez l‘appareil en marche
(la DEL bleue s‘allume)
La DEL verte de fonctionnalité et la DEL rouge s‘allument
sur l‘appareil
Ne déplacez pas l‘appareil de plus de 30°
en avant ou en
arrière
Vous pouvez incliner
la caméra avec les
touches fléchées
Différents exemples d‘utilisation
REMARQUE
En raison de la limitation de gyroscope, ne inclinez pas le cardan au-delà de 30 degrés avant
ou arrière, sinon le cardan tremblera.
41
10.Calibrage de l‘appareil
Votre appareil ne
maintient pas encore
seul son équilibre lors
de la mise en service.
Téléchargez le programme
« BigBalance.rar »
sur la page d‘accueil
www.bigbalance.com
Décompressez
le fichier
„BigBalance.rar“
Installez le pilote
x86 pour systèmes
Windows 32 bit
Installez le pilote
x64 pour systèmes
Windows 64 bit
Installez la version
Mac pour ordinateur
Macintosh
Cliquez sur „Suivant“
pour installer le pilote
42
Acceptez le contrat
de licence et cliquez
sur „Suivant“
L‘installation démarre
Fini
Ouvrez la douille pour
raccorder le mini-câble USB
Éteignez l‘appareil
! Placez l‘appareil à
l‘horizontale pendant le calibrage et
laissez-le dans cette
position
Raccordez votre appareil au câble USB
sur l‘ordinateur
La LED s‘allume en
rouge
Démarrez le programme « Balancing
Re-Calibration »
Choisissez le bon
raccordement par ex.
com3 ou com5
Cliquez sur le bouton
« Connect »
Tous les boutons
passent de gris à
blanc
Cliquez sur le bouton
„CALIB ACC“
Cliquez ensuite sur le
bouton « WRITE »
Vous recevez le
message «successfully». Validez avec le
bouton « OK »
Cliquez sur le bouton
„CALL GYRO“
La DEL verte commence à clignoter sur
l‘appareil puis elle
reste allumée.
43
Cliquez ensuite sur le
bouton « WRITE »
Vous recevez le
message «successfully». Validez avec le
bouton « OK »
Fermez la mini douille USB
Testez l‘appareil pour
voir s‘il reste en équilibre. Si cela n‘est pas
le cas, répétez les
étapes de calibrage
du point 10.
44
Cliquez sur le bouton
„Disconnect“
Retirez le câble USB
PT Manual de instruções
Agradecemos a sua confiança e desejamoslhe muito sucesso e felicidades com o seu
novo aparelho.
■■ Antes de utilizar o seu novo aparelho
pela primeira vez, leia atentamente este
manual de instruções. Este contém
todas as informações necessárias para
evitar danos pessoais e materiais.
■■ Observe todos os avisos de segurança
deste manual de instruções.
■■ Guarde este manual de instruções. Em
caso de venda ou doação do aparelho
a terceiros, também o manual de instruções deverá ser vendido/dado.
1. Saiba interpretar corretamente o
manual de instruções
1.1 Identificações no aparelho
Este símbolo indica que o seu aparelho
cumpre todos os requisitos de segurança
de todas as Diretivas UE aplicáveis.
Eliminação e proteção ambiental
Os aparelhos elétricos e eletrónicos,
assim como as baterias, não devem ser
eliminados no lixo doméstico. A lei estipula
que, no final da sua vida útil, os aparelhos
elétricos e eletrónicos, assim como as baterias, devem ser entregues em pontos de
recolha públicos e próprios para o efeito,
ou devolvidos no local de venda. Demais
pormenores são regulados pelas respetivas leis nacionais. O símbolo no produto,
manual de instruções ou embalagem alerta
para estas prescrições. Ao reciclar e reutilizar aparelhos antigos e baterias antigas
está a contribuir significativamente para a
proteção do meio ambiente.
45
1.2 Identificações neste manual de
instruções
Identificação
Alerta-o para as informações de segurança, para a necessidade de as implementar e para o efeito das mesmas.
ATENÇÃO
Alerta-o para uma situação perigosa, que
poderá ter como consequência ferimentos
graves ou até mesmo a morte .
CUIDADO
Alerta-o para uma situação perigosa, que
poderá ter como consequência ferimentos
ligeiros a médios .
AVISO
Alerta-o para possíveis danos materiais e
outras informações importantes relativas
ao seu aparelho.
2. Informações de segurança
importantes
ATENÇÃO
Perigo de rutura
Certifique-se de que os aparelhos e equipamento montado possuem um suporte
seguro. Antes de cada utilização, verifique
todas as conexões, parafusos e fixações.
Todas as peças montadas devem estar
fixadas de forma segura.
ATENÇÃO
Perigo de choque elétrico e incêndio
devido a curto-circuito ou anomalias
Na origem de um curto-circuito podem
estar, entre outras coisas, cabos defeituosos e humidade. No caso de um curto-circuito, os fios elétricos podem aquecer
bastante e, consequentemente, o seu
isolamento pode ficar derretido ou os fios
elétricos podem derreter completamente.
Isso pode originar um incêndio.
■■ Não opere o aparelho com as mãos ou
pés molhados.
■■ Limpe o aparelho apenas conforme as
indicações deste manual de instruções.
■■ Preste atenção para que o aparelho
não caia. Um aparelho que tenha caído
deve ser inspecionado por um técnico
eletricista antes de ser novamente
colocado em funcionamento.
■■ Caso o aparelho apresente danos ou
defeitos, ou se sentir cheiro a queimado:
Não abra o aparelho. Nunca efetue reparações por conta própria. O aparelho
deve ser reparado exclusivamente por
um técnico eletricista.
■■ Conserve o aparelho conforme indicado
neste manual de instruções.
■■ Compare a alimentação elétrica local
com a potência de ligação da fonte de
alimentação do aparelho (ver Dados
técnicos). Se as potências de ligação
não coincidirem, entre em contacto
com a Walser, através do endereço de
e-mail [email protected] ou do número de
telefone +49 84 32 / 9489-0.
ATENÇÃO
Perigo de asfixia devido a peças pequenas
Mantenha o aparelho fora do alcance das
crianças e animais domésticos.
46
ATENÇÃO
Medidas preventivas durante a utilização com a bateria
Se a bateria for utilizada de forma inadequada, esta pode vazar ou explodir. Observe os seguintes avisos de segurança:
■■ Utilize apenas as baterias indicadas
neste manual de instruções.
■■ Não coloque a bateria no fogo nem a
exponha a fontes de calor.
■■ Se o líquido da bateria entrar em contacto com a pele ou o vestuário, estes
devem ser imediatamente enxaguados
com água limpa.
■■ Não deixe a bateria carregar sem
supervisão. Após o carregamento,
desconecte a fonte de alimentação da
alimentação de corrente, retirando a
ficha da tomada. Quando a bateria estiver totalmente carregada, a indicação
LED na fonte de alimentação acende a
verde.
3. Desempacotar e inspecionar o
aparelho
1. Desempacote cuidadosamente o volume
de fornecimento.
2. Verifique se o volume de fornecimento
está completo:
3. Verifique se o volume de fornecimento não
apresenta danos.
AVISO
Se o volume de fornecimento não estiver
completo ou apresentar danos, entre em
contacto com a Walser, através do endereço de e-mail [email protected], ou com a
nossa linha telefónica, através do número
de telefone +49 8432 9489-0.
AVISO
No âmbito de melhorias do produto, reservamo-nos o direito de efetuar alterações
técnicas e óticas.
4. Conservar o aparelho
O aparelho nunca deverá entrar em
contacto com humidade ou água.
AVISO
Utilize apenas os produtos de limpeza
indicados na seguinte tabela.
Limpar
Aparelho
Limpeza
Carcaça
Pequenas sujidades e sujidades resistentes devem
ser limpas com um pano de
microfibras seco
5. Dados técnicos
Bateria
Alimentação
elétrica, fonte de
alimentação
Peso
Dimensões
Condições de operação permitidas
Condições de
armazenamento
Lithium Polymer
800mAh 11,1V
Input 100-240V
50/60Hz -0,8A
Output 12,6V 1500mA
ca. 840 g
ca. 28 x 19 x 15 cm
0 °C – + 40 °C
Local seco e sem pó,
entre -20 °C e +50 °C
47
6. Eliminação e proteção ambiental
Elimine o aparelho num dos pontos de
recolha locais. Este serviço é gratuito.
1
7. Resumo dos componentes e
elementos de comando
4 5
1 Rosca de 1 ¼ polegadas para a
montagem de acessórios
2
2 Teclas de seta para acima / para baixo
3 Tomada fêmea de conexão da fonte de
alimentação
4 LED de indicação de estado 1x verde
5 LED de indicação de estado 3x vermelho
(peso e indicação da bateria)
3
6 Parafusos de fixação da placa de
mudança rápida e corrediça
7 Interruptor ON/OFF (LED azul)
8 Rosca de ¼ polegadas p. ex. para
tirar fotografias com tripé
6
7
8
48
8. Preparar o aparelho para a utilização
8.1 Inserir a bateria
Abra a tampa do
compartimento da
bateria
Conecte a bateria
com o conector do
aparelho
Insira a bateria no
compartimento da
bateria
Feche a tampa do
compartimento da
bateria
AVISO
Utilize apenas a bateria fornecida. Não utilize outras baterias. Ao inserir a bateria, preste
atenção para que nenhum cabo fique esmagado ou danificado.
8.2 Carregar a bateria
Insira a tomada
macho da fonte
de alimentação na
tomada fêmea do
aparelho
Conecte a fonte de
alimentação com a
alimentação elétrica
LED vermelho acende – Aparelho está a
carregar
LED lateral pisca a
vermelho – Carregue
o aparelho.
LED verde acende – Aparelho está
carregado
LED acende a vermelho – Aparelho está
operacional
AVISO
Utilize apenas a fonte de alimentação fornecida. Desligue o aparelho para efetuar o
carregamento.
49
8.3 Montagem da câmara
Coloque a sua
câmara em cima
da placa de mudança rápida
Fixe a sua
câmara de forma
segura à placa
de mudança
rápida, utilizando
o parafuso de
fixação
Desloque a placa de mudança
rápida com a
sua câmara
para a barra
de suporte do
aparelho
Fixe a placa de
mudança rápida
de forma segura,
utilizando o parafuso.
Se for necessário, é possível deslocar a
câmara na barra
de suporte para
a frente e para
trás, com a placa
de mudança
rápida.
AVISO
Certifique-se de que o suporte da sua câmara é seguro.
8.4 Tarar o aparelho com a câmara em posição vertical e horizontal
Vertical:
Posicione o aparelho
conforme indicado na
figura. Pega para a
direita
50
Solte o parafuso lateral para poder mover
a corrediça
Mova a corrediça,
conforme necessário
Efetue a tara da corrediça para a posição
vertical
Aperte os parafusos
para garantir um
suporte seguro
Se o dispositivo é correctamente equilibrada
no eixo vertical, a câmara permanece em
ângulos diferentes no respectivo eixo.
AVISO
Certifique-se de que o suporte da sua câmara é seguro.
Horizontal:
Para deslocar a placa Solte ligeiramente
de mudança rápida
o parafuso dianteiro (por baixo da
objetiva)
Se o dispositivo é correctamente equilibrada
no eixo horizontal, a câmara permanece em
ângulos diferentes no eixo correspondente.
AVISO
Certifique-se de que o suporte da sua câmara é seguro.
51
8.5 Ajuste o aparelho ao peso da câmara
Ligue o aparelho
Pressione as teclas
de seta em simultâneo
O LED verde e todos
os 3 LEDs vermelhos
acendem
Assim que soltar as
teclas de seta, acende um LED vermelho
Acione as teclas de
seta para cima ou
para baixo para efetuar o ajuste do peso:
Para confirmar o
peso ajustado acione
ambas as teclas de
seta em simultâneo
Todos os LEDs
piscam enquanto ambas as teclas de seta
estiverem premidas
Assim que as teclas
de seta forem soltas,
acende um LED
verde e um LED
vermelho
LED vermelho direito:
300g
LED vermelho central:
600g
LED vermelho
esquerdo: 800g
AVISO
O seu aparelho ainda não consegue manter o equilíbrio de forma autónoma durante a
colocação em funcionamento. Execute, para isso, os passos indicados no ponto
„10. Calibração do aparelho“.
52
8.6 Montagem da pega
Pega, vedante
de borracha
Coloque o
Fixe a pega ao aparelho
vedante de
borracha sobre a
rosca
9. Operar o aparelho
Antes de ligar a Gimbals
deve certificar-se que a
câmara está alinhada na horizontal e o punho na vertical.
(Ver fotografia)
Ligue o aparelho (o LED azul
acende)
O LED de disponibilidade
verde e o LED vermelho
acendem no aparelho
53
Não desloque o aparelho para a frente
ou para trás em mais
de 30°
É possível inclinar a
câmara através das
teclas de seta
Diversos exemplos de utilização
AVISO
Devido à limitação de giroscópio, não incline o cardan além de 30 graus da frente ou de trás,
caso contrário o cardan vai tremer.
54
10.Calibração do aparelho
O seu aparelho ainda
não consegue manter
o equilíbrio de forma
autónoma durante a
colocação em funcionamento.
Descarregue o
Descompacte o
programa
ficheiro „BigBalance.
„BigBalance.rar“ da
rar“
página de Internet
www.bigbalance.com.
Instale o controlador
x86 para sistemas
Windows de 32 bits
Instale o controlador
x64 para sistemas
Windows de 64 bits
Instale a versão Mac
para computadores
Macintosh
Clique em „Seguinte“
para instalar o controlador
Aceite o contrato de
licença e clique em
„Seguinte“
A instalação inicia
Terminado
55
Abra a tomada fêmea
para proceder à
conexão do cabo
Mini-USB
Desligue o aparelho! Coloque o seu
aparelho em posição
horizontal e deixe-o
ficar assim durante a
calibração.
Ligue o seu aparelho
ao computador, através do cabo USB
O LED acende a
vermelho
Inicie o programa
„Balancing ReCalibration“
Procure a conexão
correta de p. ex.
com3 ou com5
Clique no botão
„connect“
Todos os botões
mudam de cor, de
cinzento para branco
Clique no botão
„CALIB ACC“
De seguida, clique no
botão „WRITE“
É exibida uma
mensagem indicando
„successfully“. Confirme com o botão „OK“
De seguida, clique no
botão „CALL GYRO“
56
O LED verde no
aparelho começa a
piscar e, de seguida,
acende.
Clique no botão
„WRITE“
É exibida uma
mensagem indicando
„successfully“. Confirme com o botão „OK“
Feche a tomada
fêmea Mini-USB
Teste o aparelho
para verificar se este
mantém o equilíbrio.
Se este não for o
caso, repita os passos
de calibração indicados no ponto 10.
Clique no botão
„Disconnect“
Retire o cabo USB
57
58
59
60
61
Distributed by
WALSER GmbH & Co. KG
Gewerbering 26
86666 Burgheim
Tel: +49 8432 9489-0
Fax: +49 8432 9489-8333
Germany
www.big-balance.info
EN Made
in China
ES Fabricado
en China
Fabbricato in China
03.2015
IT