1
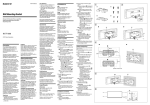
3-452-958-21(1) (1) Wall Mounting Bracket Operating Instructions (For the control unit) Betjeningsvejledning (til styreenheden) Käyttöohje (ohjausyksikkö) Instruções de funcionamento (Para o aparelho de controlo) Varotoimet Precauções Tämä tuote on tarkoitettu vain DAVF200-laitteelle. Tuotteen käyttäminen muiden tuotteiden kanssa tai muuhun kuin tässä mainittuun tarkoitukseen saattaa aiheuttaa vaurion tai henkilövamman. Este produto destina-se apenas ao modelo DAV-F200. Uma utilização com outros produtos ou outras finalidades que não as especificadas poderá causar danos ou ferimentos. Asiakkaille É necessária uma formação técnica adequada para instalar este produto. Certifique-se de que a instalação é efectuada por pessoal técnico qualificado ou técnicos qualificados e tenha em atenção a segurança durante a instalação. Ammattitaitoisen henkilön on asennettava tämä tuote. Anna valtuutetun huoltohenkilön asentaa tuote. Kiinnitä huomiota turvallisuuteen asennuksen aikana. Huoltohenkilöstölle Ammattitaitoisen henkilön on asennettava tämä tuote. Varmista työturvallisuus lukemalla tämä käyttöohje huolellisesti. Emme vastaa virheellisen käsittelyn tai asennuksen aiheuttamista vahingoista tai vammoista. Anna tämä asennusohje asiakkaalle asennuksen jälkeen. Turvallisuus WS-F100 ©2008 Sony Corporation Printed in China Precautions Sikkerhedsforskrifter This product is for DAV-F200 only. Use with other products or for other purposes than those specified may cause damage or injury. Dette produkt er kun til DAV-F200. Anvendelse sammen med andre produkter eller til andre formål end de angivne kan forårsage ting- eller personskade. To customers Sufficient expertise is required for installing this product. Be sure to subcontract the installation to qualified service personnel and pay adequate attention to safety during the installation. For qualified service personnel Sufficient expertise is required for installing this product. Be sure to read this instruction manual thoroughly to do the installation work safely. We are not liable for any damage or injury caused by mishandling or improper installation. After installation, please hand this installation manual to the customers. On safety Be sure to attach the control unit to a wall that is sufficiently thick and strong. Do not lean or hang on the control unit, as the control unit may fall down. On cleaning Clean the plate and the bracket with a soft cloth slightly moistened with a mild detergent solution. Do not use any type of abrasive pad, scouring powder or solvent such as thinner, benzine or alcohol. If you have any questions or problems concerning your system, please consult your nearest Sony dealer. Til kunder Der kræves tilstrækkelig ekspertise for at installere dette produkt. Sørg for at give installationen videre til faglært servicepersonale og vær tilstrækkeligt opmærksom på sikkerhed under installationen. Til faglært servicepersonale Kiinnitä ohjausyksikkö seinään, joka on riittävän paksu ja vahva. Älä nojaa ohjausyksikköön äläkä roiku siinä, sillä se voi pudota. Puhdistaminen Puhdista levy ja kiinnitin mietoon pesuaineliuokseen kostutetulla pehmeällä liinalla. Älä käytä hankaustyynyjä, hankausjauhetta äläkä liuottimia, kuten tinneriä, bensiiniä tai alkoholia. Jos sinulla on laitteeseen liittyviä kysymyksiä tai ongelmia, ota yhteys lähimpään Sony-jälleenmyyjään. Para os clientes Para o pessoal técnico qualificado É necessária uma formação técnica adequada para instalar este produto. Leia atentamente este manual de instruções para efectuar a instalação com segurança. Não nos responsabilizamos por quaisquer danos ou ferimentos causados pela utilização indevida ou instalação incorrecta. Após a instalação, entregue este manual de instalação aos clientes. Segurança Certifique-se de que monta o aparelho de controlo numa parede suficientemente grossa e resistente. Não se apoie nem se pendure no aparelho de controlo, pois o aparelho de controlo pode cair. Limpeza Limpe a placa e o suporte com um pano macio e ligeiramente humedecido numa solução de detergente suave. Não utilize nenhum tipo de esfregões ou pó de limpeza abrasivos, nem dissolventes como diluente, benzina ou álcool. Se tiver dúvidas ou problemas relacionados com o sistema, consulte o agente Sony da sua zona. Specifications Dimensions Bracket (for control unit) (): 238 × 168 × 35 mm Bracket (for wall) (): 266 × 164 × 20 mm Mass Bracket (for control unit) (): 0.7 kg Bracket (for wall) (): 0.7 kg Design and specifications are subject to change without notice. Specifikationer Mål Beslag (til styreenheden) (): 238 × 168 × 35 mm Beslag (til væg) (): 266 × 164 × 20 mm Vægt Beslag (til styreenheden) (): 0,7 kg Beslag (til væg) (): 0,7 kg Der tages forbehold for ændring af design og specifikationer uden forudgående varsel. Tekniset tiedot Mitat Kiinnike (ohjausyksikkö) (): 238 × 168 × 35 mm Kiinnike (seinä) (): 266 × 164 × 20 mm Paino Kiinnike (ohjausyksikkö) (): 0,7 kg Kiinnike (seinä) (): 0,7 kg Rakennetta ja teknisiä ominaisuuksia voidaan muuttaa ilman ennakkoilmoitusta. Especificações Der kræves tilstrækkelig ekspertise for at installere dette produkt. Sørg for at læse brugsanvisningen grundigt, så installationen kan udføres sikkert. Vi er ikke ansvarlige for nogen ting- eller personskade, som forårsages af forkert håndtering eller fejlagtig installation. Efter installationen skal brugsanvisningen overgives til kunderne. Dimensões Om sikkerhed Design e especificações sujeitos a alterações sem aviso prévio. Sørg for at fastgøre styreenheden til en væg, som er tilstrækkeligt tyk og stærk. Man må ikke læne sig opad eller støtte sig til styreenheden, da den kan falde ned. Om rengøring Rengør plade og konsol med en blød klud, som fugtes let med en mild rengøringsmiddelopløsning. Brug aldrig nogen form for skuresvamp, skurepulver eller opløsningsmiddel, såsom fortynder, renset benzin eller alkohol. Hvis du har spørgsmål eller problemer I forbindelse med systemet, skal du kontakte den nærmeste Sony forhandler. Suporte (para o aparelho de controlo) (): 238 × 168 × 35 mm Suporte (para parede) (): 266 × 164 × 20 mm Peso Suporte (para o aparelho de controlo) (): 0,7 kg Suporte (para parede) (): 0,7 kg A A A A B C C C 150 mm 400 mm 150 mm D 72.5 mm Control unit / Styreenhed / Ohjausyksikkö / Unidade de controlo / / F F E G D.C.S. FUNCTION VOL DVD HOME THEATRE SYSTEM DAV-F500 Katso kokoamisen aikana mallia vasemmalla näkyvistä kuvista. Varmista, että kaikki luettelossa mainitut osat on toimitettu. Peel the 4 seals () off the screw positions on the rear of the control unit. Attach the bracket (for control unit) () to the control unit. Poista 4 ruuvipaikan suojaa () ohjausyksikön takaa. Draw the system cable through opening () of the bracket (for control unit) (). Attach the 3 hooks () of the bracket (for control unit) () to the control unit. Secure the bracket (for control unit) () with the 4 supplied screws (large) (). Attach the bracket (for wall) () to the wall. Before attaching, make sure that the wall is sufficiently strong. Decide the installation location for the bracket (for wall) (). Allow sufficient space around screw hole (): 150 mm above, 150 mm below, 250 mm to the left, and 400 mm to the right (disc slot side). Screw hole () will be the center of the control unit’s width. The location 72.5 mm above from the screw hole () will be the top of the control unit. Secure the bracket (for wall) () to the wall with 12 commercially-available screws. Hook the control unit onto the bracket (for wall) () on the wall. If you install the cords inside the wall, draw the cords through opening () of the bracket (for wall) () (cut a hole in the wall at that point). If you do not install the cords inside the wall, draw them through areas ( or ) of the bracket (for wall) (). Secure the bracket (for control unit) () with the 4 supplied screws (small) (). Asenna kiinnike (ohjausyksikkö) () ohjausyksikköön. Pujota järjestelmäkaapeli kiinnikkeen (ohjausyksikkö) () aukosta (). Asenna kiinnikkeen (ohjausyksikkö) () 3 koukkua () ohjausyksikköön. Kiinnitä kiinnike (ohjausyksikkö) () mukana toimitetuilla 4 ruuvilla (suuret) (). Asenna kiinnike (seinä) () seinään. Varmista ennen asentamista, että seinä on riittävän vahva. Valitse kiinnikkeen (seinä) () asennuspaikka. Jätä riittävästi tilaa ruuvinreiän () ympärille: 150 mm ylle, 150 mm alle sekä 250 mm vasemmalle ja 400 mm oikealle puolelle (levyaukon puolelle). Ruuvinreikä () on ohjausyksikön keskipiste leveyssuunnassa. Ohjausyksikön yläreuna tulee olemaan 72,5 mm ruuvinreiästä () ylöspäin. Asenna kiinnike (seinä) () seinään käyttämällä 12:ta yleisesti saatavilla olevaa ruuvia. Nosta ohjausyksikkö seinällä olevaan kiinnikkeeseen (seinä) (). Jos asennat kaapelit seinän sisään, pujota ne kiinnikkeen (seinä) () aukosta () (tee seinään tällöin reikä). Jos et asenna kaapeleita seinän sisään, pujota ne kiinnikkeen (seinä) () kohtien ( tai ) kautta. Kiinnitä kiinnike (ohjausyksikkö) () mukana toimitetuilla 4 ruuvilla (pienet) (). Huomautus Note Älä löysää kiinnityslevyn ruuveja tai ruuvia, joka pitää ohjausyksikön kiinni kiinnikkeessä asennuksen aikana. Ohjausyksikkö voi tällöin pudota ja aiheuttaa onnettomuuden. Installation af styreenheden Instalar o aparelho de controlo Se illustrationerne til venstre under samlingen. Sørg for, at alle de angivne komponenter medfølger. Consulte as ilustrações da esquerda durante o processo de montagem. Certifique-se de que são fornecidos todos os itens indicados. Retire os 4 vedantes () das posições dos parafusos na parte de trás do aparelho de controlo. Prenda o suporte (para o aparelho de controlo) () ao aparelho de controlo. Puxe o cabo do sistema através da abertura () do suporte (para o aparelho de controlo) (). Prenda os 3 ganchos () do suporte (para o aparelho de controlo) () ao aparelho de controlo. Fixe o suporte (para o aparelho de controlo) () com os 4 parafusos (grandes) fornecidos (). Prenda o suporte (para parede) () à parede. Antes de prender, certifique-se de que a parede é suficientemente resistente. Decida o local de instalação para o suporte (para parede) (). Deixe espaço suficiente à volta do orifício do parafuso (): 150 mm acima, 150 mm abaixo, 250 mm para a esquerda e 400 mm para a direita (lado da ranhura do disco). O orifício do parafuso () será o centro da largura do aparelho de controlo. O local 72,5 mm acima do orifício do parafuso () será a parte superior do aparelho de controlo. Fixe o suporte (para parede) () à parede com 12 parafusos à venda no mercado. Engate o aparelho de controlo no suporte (para parede) () na parede. Se instalar os cabos no interior da parede, puxe os cabos através da abertura () do suporte (para parede) () (abra um orifício na parede nesse ponto). Se não instalar os cabos no interior da parede, puxe-os através das áreas ( ou ) do suporte (para parede) (). Fixe o suporte (para o aparelho de controlo) () com os 4 parafusos (pequenos) fornecidos (). Tag de 4 forseglinger () af skruepositionerne på bagsiden af styreenheden af. Monter beslaget (til styreenheden) () på styreenheden. A.F.D. STD Ohjausyksikön asentaminen Refer to the illustrations on the left during the assembly process. Make sure all of listed items are supplied. Do not loosen the screws of the mounting plate or the screw to secure the control unit to the mounting bracket during the assembly process, as the control unit may drop, causing an accident. D 250 mm Installing the control unit Træk systemkablet gennem åbningen () i beslaget (til styreenheden) (). Monter de 3 kroge () til beslaget (til styreenheden) () på styreenheden. Fastgør beslaget (til styreenheden) () med de 4 medfølgende skruer (store) (). Monter beslaget (til væggen) () på væggen. Kontroller, at væggen har tilstrækkelig styrke før monteringen. Bestem placeringen af beslaget (til væggen) (). Sørg for tilstrækkelig plads omkring skruehullet (): 150 mm over, 150 mm under, 250 mm til venstre og 400 mm til højre (disc-åbningens side). Skruehullet () skal være midt på styreenhedens bredde. Placeringen 72,5 mm over skruehullet () vil være toppen af styreenheden. Fastgør beslaget (til væggen) () på væggen med 12 almindelige skruer. Sæt styreenheden på beslaget (til væggen) () på væggen. Hvis du installerer ledningerne inden i væggen, skal du trække ledningerne gennem åbningen () i beslaget (til væggen) () (skær et hul i væggen på dette sted). Hvis du ikke installerer ledningerne inden i væggen, skal du trække dem gennem områderne ( eller ) i beslaget (til væggen) (). Fastgør beslaget (til styreenheden) () med de 4 medfølgende skruer (små) (). Bemærk! Undgå at løsne skruerne i monteringspladen eller den skrue, der fastgør styreenheden til monteringspladen, under samlingen, da styreenheden kan falde ned og forsage en ulykke. Nota Não solte os parafusos da placa de fixação ou o parafuso de fixação do aparelho de controlo ao suporte de fixação durante o processo de montagem, já que o aparelho de controlo pode cair, causando um acidente.