1
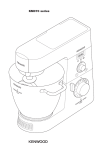
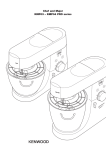
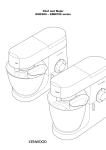
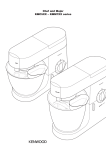
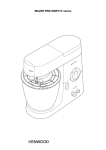
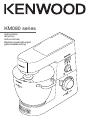
KM080 series
instructions
istruzioni
instrucciones
Bedienungsanleitungen
gebruiksaanwijzing
English
●
●
before using your Kenwood appliance
Read these instructions carefully and retain for future reference.
Remove all packaging and any labels.
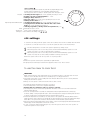
know your Kenwood Cooking Chef Kitchen Machine
safety
●
●
●
●
●
●
●
●
●
●
●
●
●
●
●
●
●
●
●
●
●
●
●
●
●
●
●
●
important note - electronic medical implants
Like all induction heating products, this appliance generates short-range magnetic fields. If any user or person in
close proximity has a pacemaker or other active implants, please consult a doctor before use, concerning any
possible incompatibility to prevent any risk to health.
Switch off and unplug the appliance before fitting or removing tools/attachments, after use and before cleaning.
Keep body parts, jewellery and loose clothing away from moving parts and fitted attachments.
Never put your fingers etc., into the hinge mechanism.
Never leave the appliance on unattended.
Never use a damaged appliance. Get it checked or repaired: see ‘service and customer care’, page 16.
Never use an unauthorised attachment or more than one attachment at once.
Never exceed the maximum capacities on page 13 and when using the induction heater never exceed the 3 litre
maximum fill level marked on the inside of the bowl.
When using an attachment, read the safety and usage instructions that come with it.
Take care when lifting this appliance as it is heavy. Ensure the head is locked and that the bowl, tools, outlet covers
and cord are secure before lifting.
Never let the cord hang down where a child could grab it.
Never let the power unit, cord or plug get wet.
Be careful when handling or touching any part of the appliance when being used in the cook mode or after
cooking, IN PARTICULAR THE BOWL, SPLASHGUARD AND TOOLS as they will remain HOT long after the
appliance has been switched off. Use the handles to remove and carry the bowl. Use oven gloves when handling
the hot bowl and hot mixing tools.
The underside of the bowl will remain hot long after the heating has stopped. Use caution when handling and use
the work surface protection mat when placing the bowl on heat sensitive surfaces.
Be careful of steam escaping from the mixer bowl particularly when opening the lid in the splashguard or when
raising the mixer head.
If transferring hot food from the mixer to the liquidiser, always allow the ingredients to cool to room temperature
before placing in the liquidiser.
Only use the bowl and tools supplied with this appliance. Never use the bowl with any other heat source.
Never operate the appliance in the cook mode with the bowl empty.
Never insert anything through the air vents.
When using this appliance ensure it is positioned on a level surface away from the edge. Make sure it is at least
10 cm from walls and ensure that the vents are not blocked. Do not position below overhanging cupboards.
For the correct and safe operation of the induction cooker ensure that the bowl base and temperature sensors
are clean and dry before cooking.
As with all induction cooking appliances do not place credit cards, magnetic media or sensitive electronic
equipment near to the appliance when in use.
Do not use the appliance for deep frying foods.
Always ensure food is thoroughly cooked before eating.
Food should be eaten shortly after cooking or allowed to cool quickly and then refrigerated as soon as possible.
This appliance is not intended for use by persons (including children) with reduced physical, sensory or mental
capabilities, or lack of experience and knowledge, unless they have been given supervision or instruction
concerning use of the appliance by a person responsible for their safety.
Children should be supervised to ensure that they do not play with the appliance.
Only use the appliance for its intended domestic use. Kenwood will not accept any liability if the appliance is
subject to improper use, or failure to comply with these instructions.
3
●
●
before plugging in
Make sure your electricity supply is the same as the one shown on the underside of your machine.
This appliance conforms to EC directive 2004/108/EC on Electromagnetic Compatibility and EC regulation no.
1935/2004 of 27/10/2004 on materials intended for contact with food.
before using for the first time
Wash the parts: see ‘care and cleaning’ page 16.
introduction
Thank you for buying this Kenwood Cooking Chef Kitchen Machine, we hope you will enjoy many years use.
Kenwood has nearly 60 years of experience and expertise in developing our Kitchen Machines and their wide
variety of attachments. Kenwood Chef Kitchen Machines are renowned for being more than just a food mixer.
In the development of Cooking Chef we have taken the well-known versatility of the Chef a step further by
introducing integrated Induction Cooking directly beneath the mixing bowl. You can now enjoy all of the benefits
of everyday ‘cold bowl’ planetary mixing when preparing your favourite cakes, pastries and dough, plus the
added advantage of heating and cooking directly in the bowl combined with planetary mixing. The opportunities
are endless.
The Kenwood Cooking Chef with its range of optional attachments truly is the complete food preparation system.
Strong, Reliable, Versatile, Kenwood.
What is Induction Cooking and how does it work?
Induction cooking is an advanced cooking method that employs the principles of electromagnetic induction.
When an electric current is passed through a copper coil in the induction cooking area it creates an electromagnetic field. When the Cooking Chef bowl is locked into position the circuit is completed by a special layer of
stainless steel in the bowl base. In turn this creates a large amount of thermal energy that passes through to the
contents of the bowl, thus heating the food.
Induction cooking is extremely energy efficient because it only produces heat in the base of the bowl. Other
heating methods such as gas hobs waste almost 50% of the heat energy around the sides of the pan. Indeed
the Induction cooking area on your Cooking Chef only feels hot during and immediately after cooking because of
the heat transferred back from the contents of the bowl. All of this means that Induction cooking is very efficient,
very safe and very clean.
The cooking functionality of your Kenwood Cooking Chef is similar to using a saucepan on your cooker hob. The
added advantage is that the Chef will automatically stir your food and regulate the cooking temperature to your
precise requirements, leaving you free to confidently perform other tasks in your kitchen.
The Cooking Chef uses induction heating technology which is extremely efficient. When compared to cooking on
a gas or electric hob, you may find that cooking times are reduced or that you need to cook on a lower
temperature.This should be considered when using your appliance for the first time or when experimenting with a
new recipe. Make sure that if you start cooking at a high temperature, you keep watching and reduce the heat
when necessary to stop food burning and sticking to the bowl, just as you would with your saucepan. Generally
the Cooking Chef will automatically heat the food to your desired temperature in the quickest possible time. It is
therefore not necessary to set the temperature higher than you require in order to reduce cooking times. At this
stage you should also pay attention to the frequency of the stir settings. When cooking at higher temperatures
you may find it necessary to stir constantly using stir setting
. Stir settings
and
are useful in
maintaining the consistency of your food during longer cooking periods on a low simmer.
4
Selection of the correct bowl tool is also important at this stage. Further on in this book we have suggested the
most appropriate uses for each tool and with experience you will quickly understand which is best for each task.
When cooking you will find that the high temperature flexible beater is best used to obtain a very smooth
consistency for sauces and creams, whereas the stirring tool is better when cooking foods that need to maintain
a more solid consistency, such as stews, casseroles, ragouts etc. Our recipe book recommends the best tools
for each recipe, and you may also find that changing the tool for different processes during your meal preparation
gives better results.
During cooking and immediately afterwards, the bowl, splashguard and bowl tool will be hot – just as your
saucepan would be. Please take care when touching any of these. It is important to also remember that the
cooking process will generate steam and condensation so take care when looking into the bowl, lifting the food
chute lid or the Cooking Chef/machine head to view or access the bowl. You should also warn others when the
machine is cooking or hot so they will also be careful. When touching or removing hot parts it is advised to use
oven gloves and only carry the bowl using the handles provided. You may also find the work surface protection
mat useful to protect heat sensitive surfaces.
When heating liquids or food with a high water content, the accuracy of the temperature reading is usually within
+/- 5°C. The accuracy of the temperature display and control will vary depending upon the consistency of your
bowl contents, the volume of your bowl contents, the frequency of stirring and the bowl tool that is used. Again
this is similar to cooking on a hob, for example, where a large quantity of food in a large saucepan is heated but
not stirred thoroughly. The food will be hot at the base of the saucepan, or even burnt, whereas the food near the
top will be much cooler.
In addition to the temperature display the machine has a small blue LED. This will flash until the machine has
reached the selected temperature. Once the required temperature is reached the light will stop flashing. However,
you should note that when you add further ingredients to the bowl the blue LED will begin to flash again as the
temperature of the bowl contents will be reduced by cold ingredients. You may also notice the static light begin
to flash if the mixing frequency is increased.
You will quickly find that your Kenwood Cooking Chef is simple to use and will help make your everyday food
preparation easy.
5
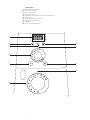
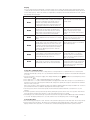
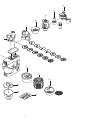
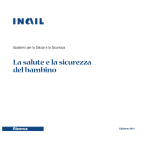
know your Kenwood Cooking Chef
attachment outlets ! high speed outlet
" medium speed outlet
# slow speed outlet
$ tool socket
the mixer % medium/high speed outlet cover
& mixer head
' slow speed outlet cover
( slow speed outlet lever
) cooking chef bowl
* head - lift lever
+ speed control
, air vents
- bowl pedestal/induction area
. drain hole
/ temperature sensors
0 stainless steel K beater
1 high temperature flexible beater
2 whisk
3 dough hook
4 stirring tool
high temperature spatula
heat shield
rubber seal
splashguard
feed chute lid
work surface protection mat
spanner
0
!
"
%
#
&
'
1
2
(
3
4
) $
*
+
,
.
,
6
/
5
6
7
8
%
&
'
(
)
*
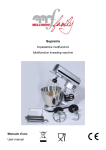
control panel
timer/temperature display
timer decrease button
timer increase button
temperature control
pulse button/high speed, high temperature whisk button
speed control
timer/temperature selector button
temperature indicator light
fold button
speed control indicator light
5
6
7
'
(
8
%
)
*
&
7
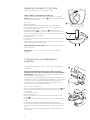
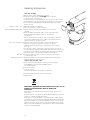
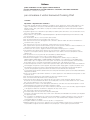
adjusting the height of the tools
Please refer to page 9 on how to assemble the mixer.
whisk, stainless steel K beater, stirring tool
For best performance the whisk, K beater and stirring tool should be
almost touching the bottom of the bowl !. If necessary adjust the height
using the spanner provided.
Here’s how:
1 Unplug the appliance.
2 Raise the mixer head and insert the whisk, beater or stirring tool.
3 Lower the mixer head. If the clearance needs to be adjusted, raise the
mixer head and remove the tool.
4 Using the spanner provided loosen the nut " sufficiently to allow
adjustment of the shaft #. To lower the tool closer to the bottom of the
bowl, turn the shaft anti-clockwise. To raise the tool away from the bottom
of the bowl turn the shaft clockwise.
5 Re-tighten the nut.
6 Fit the tool to the mixer and lower the mixer head. (Check its position see
points above).
7 Repeat the above steps as necessary until the tool is set correctly. Once
this is acheived tighten the nut securely.
!
#
"
high temperature flexible beater - this tool should just touch the
bottom of the bowl.
dough hook - this tool is set at the factory and should require no
adjustment.
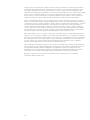
to fit and use your splashguard
assembly
The splashguard assembly consists of 2 pieces: the heat shield and the
splashguard.
!
The heat shield must be fitted during cooking operations
otherwise the mixer will not operate and error code E:03 will
be displayed. The heat shield is to protect the mixer head from steam
produced during the cooking process.
If necessary both the heat shield and the splashguard can be fitted to retain
ingredients in the bowl e.g. when mixing light ingredients such as flour and
icing sugar, or when cooking ingredients where moisture needs to be
retained in the bowl. The splashguard should not be fitted to the bowl
unless used in conjunction with the heat shield.
1 Raise the mixer head until it locks.
2 Push the heat shield upwards onto the underside of the mixer head ! until
fully located. The heat shield must never be used without the rubber seal
correctly fitted.
3 Fit the bowl onto the base.
4 Lower the mixer head.
5 Rest the splashguard on the bowl rim and then slide forward until fully
located ".
● During mixing, ingredients can be added directly to the bowl via the feed
chute.
6 To remove the splashguard simply slide it away from the appliance.
7 To remove the heat shield, raise the mixer head until it locks. Remove the
tool, then pull the heat shield downwards from the underside of the mixer
head.
Note: Only fit or remove the splashguard when the mixer head is in the
locked position.
8
"
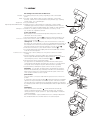
the mixer
K-beater
●
whisk
●
dough hook
high temperature flexible beater
stirring tool
●
●
●
1
to fit a tool 2
3
4
to remove a tool
●
5
6
7
the mixing tools and some of their uses
For making cakes, biscuits, pastry, icing, fillings, éclairs and mashed
potato.
For eggs, cream, batters, fatless sponges, meringues, cheesecakes,
mousses, soufflés. Don’t use the whisk for heavy mixtures (e.g. creaming
fat and sugar) - you could damage it.
For yeast mixtures only.
Suitable for many cooking operations in particular cooking custards,
!
scrambled eggs and sauces. Ideal for scraping mixes both hot and cold
from the sides of the bowl during mixing. Also suitable to sauté vegetables.
Suitable to use during cooking to maintain the consistency of food
e.g. chicken, fish, vegetables and fruit.
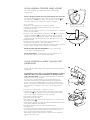
to use your mixer
Before using the mixer ensure the temperature and speed controls are
switched to the off ‘O’ positions.
Turn the head-lift lever clockwise ! and raise the mixer head until it locks.
Place the tool in the socket, locating the shaft pin in the groove and then
turn to lock into position ".
stirring tool - to fit the stirring tool, insert the shaft into the socket, then
line up the slot on the extension so that it is located beneath the metal pin on
the underside of the mixer head. Hold the paddle and turn so that the shaft
pin is below the groove then push up and turn to lock into position #.
Fit the bowl onto the base - press down and turn clockwise $.
To lower the mixer head, raise it slightly, then turn the head lift lever clockwise.
Lower into the locked position.
Reverse step 2 above. (Always use oven gloves to remove tools after
cooking).
Connect the mixer to the power supply. The speed and temperature
indicator lights will illuminate briefly. The display will show
and then
clear leaving the power on indicator illuminated
.
Turn the speed control to the desired setting
(see page 10 for recommendations), the mixer will start and the speed
control indicator light will flash. The timer will count up in 1 second intervals.
The speed can be changed at any time whilst the mixer is operating.
Stop the mixer by returning the speed control to the off ‘O’ position.
"
Important - If at any time, the mixer head is raised during an operation,
the mixer will automatically stop and beep and it will not re-start when the
mixer head is lowered. To re-start the mixer turn the speed control to the
off ‘O’ position and then re-select a speed.
pulse button
The pulse button can only be used when the speed control is in the off ‘O’
position.
To select pulse, press the pulse button P and the mixer will run at maximum
speed for as long as the button is held in this position. If the bowl contents
are above 60°C, the speed will increase gradually. This will be accompanied
by a beeping sound and the speed and temperature indicator lights will flash
quickly.
#
fold button
Press and release the fold button
and the mixer will automatically
operate on minimum speed for 2 revolutions and then stop. The button
can be pressed for a longer operation or pressed repeatedly as needed to
combine ingredients.
Note: If the fold button is pressed whilst the motor is running it will perform
the standard fold function and then return to the selected speed.
$
9
speed control 9
The following speeds are a guide only and will vary depending upon the
quantity and the temperature of the ingredients being mixed etc.
Turn the speed control clockwise to obtain speeds ‘min’ through to ‘max’.
K-beater
●
●
●
●
●
high temperature flexible beater
●
●
●
whisk
dough hook
stirring tool
●
●
●
creaming fat and sugar start on min, gradually increasing to ‘max’.
beating eggs into creamed mixtures 4 - ‘max’.
folding in flour, fruit etc min - 1
all in one cakes start on min speed, gradually increase to max.
rubbing fat into flour min - 2.
creaming fat and sugar start on min, gradually increasing to 3.
scraping mixes both hot and cold from the sides of the
bowl start on min gradually increasing to 3.
sauteing vegetables, stirring risotto and polenta etc., use
Gradually increase to ‘max’.
Start on ‘min’, gradually increasing to 1.
, .
Use with the stir settings only ,
9
.
stir settings
To select the stir settings turn the speed control anti-clockwise These are most suitable when the mixer
is used in the cook mode. Please note, to use the stir speeds all outlet covers must be fitted.
– Use this setting when a constant slow speed is required e.g. stirring sauces.
– When the speed control is set to this position, the mixer will intermittently operate on a slow
speed once every 5 seconds for approximately 2 revolutions.
– When the speed control is set to this position, the mixer will intermittently operate on a slow
speed once every 30 seconds, making it suitable for stirring casseroles etc.
Return the speed control to the off ‘O’ position to stop the operation.
●
●
Note:
Whenever a speed is selected, the speed indicator light will flash.
A high pitched sound may be heard from the appliance when in use. This is normal.
to use the mixer to cook food
●
●
●
IMPORTANT
Make sure the induction area, temperature sensors and external surface of the bowl base are clean.
Failure to do this will affect the heat sensor, resulting in poor cooking performance.
Check that all the outlet covers including the heat shield are fitted. If they are not correctly fitted the
heating function will not operate.
Always use oven gloves to remove the bowl and tools after cooking.
1 Assemble the mixer following the instructions on page 9.
2 Turn the temperature control to the required temperature.
● Heating will not commence unless a speed is selected.
3 Turn the speed control to the desired speed which will switch on the motor and the heater. Both
indicator lights will flash.
4 Once the set temperature is reached, the temperature indicator light will illuminate continuously.
However, during cooking the light will start to flash if the temperature changes indicating that the mixer
is trying to maintain the set temperature (please read introduction page 4).
● If the bowl temperature exceeds 60°C, for safety reasons the speed is automatically limited even if a
higher speed has been selected. The speed will not automatically increase when the temperature drops
below 60°C. The speed control must be switched off first and the desired speed reselected.
● Note: Each time the timer/temperature selector button is pressed, the display will alternate between the
timer display and the temperature of the bowl contents.
5 To stop or pause the mixing and heating process, return the speed control to the off ‘O’ position. To
resume the operation select a speed.
10
●
●
●
●
●
●
●
●
●
●
●
hints
Some recipes, in particular those with a high water content, will not be able to reach a
cooking temperature above 100°C (as this is the boiling point of water).
When adding ingredients to the bowl during cooking, turn the speed down and add the ingredients slowly and
evenly.
To heat sauces quickly use a continuous stir setting
.
You may find changing the tool for different processes during your meal preparation gives better results e.g. use
the high temperature flexible beater to fry vegetables and then the stirring tool whilst cooking pieces of meat or
poultry.
If using the splashguard during cooking, always remove it before lifting the mixer head. Be aware of condensation
formed on the splashguard and heat shield.
When lifting the mixer head lift it slowly to allow any liquid on the underside of the heat shield to flow back into
the bowl.
Three stir functions are available which enable you to select the appropriate amount of stirring for individual
recipes. Some recipes will require constant stirring to stop ingredients from sticking to the bottom of the bowl,
whereas others will benefit from intermittent stirring to maintain the consistency of the food.
For optimum performance adjust the tool heights see page 8.
The maximum cooking time is 3 hours after which time the mixer will automatically switch off.
It is possible to heat food without a tool in position, however a speed must be selected. This may be
advantageous when melting foods e.g. butter, chocolate.
Each time the timer/temperature selector button is pressed the display will alternate between displaying the
cooking time and the temperature reached at that point.
High speed, high temperature whisk control
To whisk at high speed at temperatures above 60°C, turn the speed control to the desired whisking speed and
then press and hold the pulse button. This will be accompanied by a beeping sound and the speed and
temperature indicator lights will flash quickly. The whisking speed will slowly increase to the selected speed.
Repeat the procedure to increase the speed further. You can reduce the whisking speed or turn off the mixer as
normal.
This function MUST only be used with the whisk. You should not exceed the maximum
cooking capacity of 3 litres and you must ensure the splashguard is fitted. The machine
must not be left unattended.
●
●
after cooking
Be careful when handling or touching any part of the mixer when being used in the cook mode or after cooking,
IN PARTICULAR THE BOWL, SPLASHGUARD AND TOOLS as they will remain HOT long after the appliance has
been switched off. Use the handles to remove and carry the bowl. Use oven gloves when handling the hot bowl
and hot mixing tools.
The underside of the bowl will remain hot long after the heating has stopped. Use caution when handling and
use the work surface protection mat provided to protect heat sensitive surfaces.
11
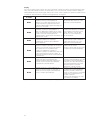
display
For your safety the mixer is fitted with 5 separate safety sensors which will operate when using the mixer in the
cooking mode. If the mixer is switched on and a safety sensor activated, the timer/temperature display will show
an error message e.g. ‘E:01’. This will be accompanied by a beeping sound and the mixer will not work. Check
the following error messages:Error Message
Description
Solution
E:01
The head of the machine is in the raised position. Close the head. Turn the speed control
When the head is lifted, a safety sensor disables to the ‘O’ position and then select the
desired speed.
the motor and heater. If the speed control is
turned to any setting other than the Off ‘O’
position when the head is raised, this message
is displayed and the motor will not switch on.
E:02
The Cooking Chef Bowl is not fitted. The heating
function will only work if the Cooking bowl is
being used. This bowl must also be correctly
fitted. Safety sensors will detect an incorrect
bowl or the correct bowl incorrectly fitted.
E:03
The heat shield is not fitted. The heating function Ensure the heat shield is fitted
will be disabled if the heat shield is not correctly correctly. Turn the speed control to ‘O’
fitted.
and then select desired speed.
E:04
The slow speed outlet and high speed/medium
speed outlet covers are not fitted. These covers
are fitted with safety sensors. If the covers are
not fitted correctly the heating will switch off and
if stir functions are selected, the motor will run
continuously. Mixing speeds min to max will
run continuously.
Ensure that all covers are fitted correctly.
Turn the speed control to ‘O’ and then
select desired speed.
Temperature sensor problem. If the heater
control detects a bowl temperature higher than
expected during normal use, the motor and
heater will automatically switch off.
Turn the speed control to ‘O’, unplug the
machine and allow to cool. Check
that the bowl base and temperature
sensors are clean. Replace plug and
switch on as normal.
Motor speed or overheat problem. If the motor
stalls or gets too hot, the control system will
automatically switch off the motor and heater.
Turn the speed control to ‘O’ and unplug
the machine. Remove any obstructions
causing the motor to stall. Ensure all
the air vents are clear of obstructions.
Plug in and switch on.
E:09
E:10
Ensure that the Cooking Chef bowl is
being used. Check that the bowl
is fitted correctly. Turn the speed
control to “0” and then select desired
speed.
If these or any other error codes continue to appear on the display contact Kenwood Customer Care.
1
2
3
4
●
5
to use the countdown timer
The timer can be used in both the cooking and non cooking modes. If a countdown time is not selected, the
timer will automatically count up in 1 second intervals whilst the mixer is in operation. The maximum running time
is 3 hours.
Connect the mixer to the power supply. The display will briefly show
and then clear leaving the power on
indicator visible
.
Press either the + or – button and 0:00 will appear in the display.
Press either the + or – button until the desired time is displayed. The timer will count up in 5 second intervals. If
the button is pressed continuously the numbers will change more quickly the longer it is held down. A maximum
time of 3 hours can be set.
Note: If the + button is pressed when the timer is at 3:00 the displayed time will change to 0:00. If the – button is
pressed when the timer is at 0:00 the displayed time will change to 3:00.
Turn the speed control to the desired speed, the mixer will start and the timer will count down in 1 second
intervals.
The mixer operation can be paused at any time by turning the speed control to the off ‘O’ position. This will also
pause the timer. The timer will continue to count down when the mixer is re-started.
The mixing process will automatically stop when the total time has elapsed and audible beeps will be emitted for
3 seconds. The display will flash for 5 seconds and then clear showing the power on indicator
.
to reset the timer
1 Zero the timer by pressing the + and – buttons at the same time (the speed control must be in the off ‘O’ position).
● If the machine has been idle for 10 minutes, the LCD display and backlight will enter ‘sleep mode’ and all the
displays will turn off. If any button or control knob is activated, the display will resume its previous format.
12
shortcrust pastry
stiff yeast dough
●
●
●
soft yeast dough
●
●
fruit cake mix
egg whites
cooking mode
general hints
●
●
●
●
●
●
●
important
●
●
●
maximum capacities
Flour weight:
910g - 2lb
Flour weight:
1.5kg - 3lb 5oz
2.4kg - 5lb 5oz
Total weight:
2.6kg - 5lb 12oz
Flour weight:
Total weight:
5kg - 11lb
Total weight:
4.55kg - 10lb
16
3 litres
Stop mixing and scrape down the bowl with the spatula frequently.
Eggs at room temperature are best for whisking.
Before whisking egg whites, make sure there’s no grease or egg yolk on the whisk or bowl.
Use cold ingredients for pastry unless your recipe says otherwise.
points for bread making
Never exceed the maximum capacities stated - you’ll overload the machine.
If you hear the machine labouring, switch off, remove half the dough and do each half separately.
The ingredients mix best if you put the liquid in first.
trouble shooting guide when cooking
Problem
Cause
The mixer will not operate in the heat mode
and displays an error message and gives a
warning beep.
One of the safety sensors has been activated.
A temperature has been selected but the
bowl contents do not heat (the temperature
indicator light is not illuminated).
A speed has not been selected.
Select a speed.
The mixer changes speed during cooking.
The speed is automatically limited when the
bowl contents reach 60°C.
This is a safety feature.
Food burning on the base of the bowl.
•
•
•
•
1 The temperature setting selected may be
too high.
2 Incorrect tool being used.
3 The stir function is too slow.
4 The tool may not be low enough in
the bowl.
5 The timer has been set for too long.
6 The sensor and/or the underside of bowl
may not be clean.
Consistency of food not maintained.
1 Temperature selected too high.
2 Stir function too fast.
3 Ingredients cooked for too long.
4 Incorrect tool being used.
Inconsistent mixing speed.
Solution
1 Ingredients too large, hard or too firm.
See the table referring to error messages page 12.
Ensure the head is lowered and locked.
Ensure all outlet covers are correctly fitted.
Ensure the heat shield is correctly fitted.
Ensure the cooking chef bowl is corrected fitted.
1 Reduce the temperature on the dial or cook at
a lower temperature.
2 Check the most suitable tool is being used.
3 Increase the frequency of the stir function or
increase to a continuous operation.
4 Adjust the tool.
5 Cook for a shorter length of time (ensure food is
thoroughly cooked).
6 Ensure that these areas are kept clean and dry.
1 Reduce temperature.
2 Reduce stir speed.
3 Reduce the cooking time (ensure food is
thoroughly cooked).
4 Check the most suitable tool is being used.
1 Cut food into smaller pieces, remove stones
from fruit, slowly melt ingredients without a tool
in position (but ensure a speed has been
selected).
2 Add ingredients after the head is lowered.
3 Check the most suitable tool is being used.
Cold ingredients have been added to a
hot mixture but the temperature display
does not respond quickly.
If the bowl contents are not thoroughly
stirred then there will be varying food
temperatures throughout the bowl.
Difficult to shut mixer head with food in bowl.
Firm ingredients such as chocolate in the
bottom of the bowl prevent the mixer head
from locking down.
Add ingredients after the mixer head is lowered.
Mixer runs continuously when stir
stir
are selected.
Outlet covers are incorrectly fitted.
Ensure the outlet covers are correctly fitted.
Hot bowl fitted.
Remove the bowl, or cool the bowl to below
60°C.
or
Motor speed is limited when using
attachments
13
1 Allow time for the ingredients to be thoroughly
mixed.
2 Increase the stir speed.
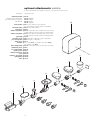
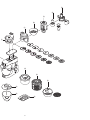
optional attachments available
To buy an attachment not included in your pack, see service and customer care.
attachment
attachment code
flat pasta maker 5 AT970A
additional pasta attachments
AT971A tagliatelle
(not shown) used in conjunction
AT972A tagliolini
with AT970A
AT973A trenette
AT974A spaghetti
pasta maker 6 AT910 comes with maccheroni rigati die
(12 optional dies plus biscuit maker can be fitted)
roto food cutter 7 AT643 comes with 5 drums
fruit press 8 AT644
multi food grinder % AT950A comes with a fine, medium and coarse screen,
a small and large sausage nozzle and a kebbe maker
multi food grinder & AT955 comes with a fine, medium and coarse screen,
a small and large sausage nozzle and a kebbe maker
grain mill ' AT941A
food processor ( AT647 includes 6 cutting discs and a knife blade
pro slicer/grater ) AT340 includes 7 cutting discs
citrus press * AT312
blender + 1.5 l acrylic AT337, 1.6 l thermo resist glass AT358,
1.5 l stainless steel AT339
mini chopper/mill , AT320A comes with 4 glass jars and 4 lids for storage
continuous juicer - AT641
ice-cream maker . AT957A
potato peeler / AT445
colander and sieve 0 AT930A
scale 1 AT850B
stainless steel bowl 2 36386A
splashguard 3 34445A
cover 4 606397
4
'
&
%
8
7
6
1
2
3
4
5
5
14
,
+
*
)
(
.
/
0
3
2
1
15
cleaning and service
●
●
●
●
appliance, outlet covers
●
●
high temperature flexible beater
●
●
bowl, tools, splashguard
●
●
●
●
drain hole
●
temperature sensors
●
●
●
●
●
●
care and cleaning
Always switch off and unplug before cleaning.
A little grease may appear at outlet " when you first use
it. This is normal - just wipe it off.
The metal surfaces of the temperature sensors may show signs of wear
during normal use. this does not affect the performance of the product.
Do not leave the high temperature flexible beater fitted to the mixer
when not in use.
Wipe with a damp cloth, then dry.
Never use abrasives or immerse in water.
Always remove the flexible wiper blade from the tool before
cleaning.
Wash the flexible wiper blade and tool in hot soapy water, then
dry thoroughly. Alternatively the parts can be washed in
a dishwasher.
Note: Please inspect the condition of the tool body before and after
use and also regularly inspect the condition of the wiper blade and
replace it if there are any signs of wear.
Wash by hand, then dry thoroughly or wash in the dishwasher.
Never use a wire brush, steel wool or bleach to clean your
stainless steel bowl. Use vinegar or a suitable descaler to remove
limescale.
If food sticks or burns on the inside of the bowl, remove as much as
possible using the spatula provided. Fill the bowl with warm soapy water
and allow to soak. Remove any stubborn deposits using a nylon brush.
Any discolouration of the bowl will not affect its performance.
Ensure this area is free from food. If necessary use a pipe cleaner
or cotton bud to clean.
Wipe with a damp cloth then dry thoroughly. Never use abrasives or
sharp instruments to clean the sensors.
service and customer care
If the cord is damaged it must, for safety reasons, be replaced
by KENWOOD or an authorised KENWOOD repairer.
If you need help with:
using your machine
servicing or repairs
Contact the shop where you bought your machine.
Designed and engineered by Kenwood in the UK.
Made in China.
IMPORTANT INFORMATION FOR CORRECT DISPOSAL OF THE
PRODUCT IN ACCORDANCE WITH EC DIRECTIVE
2002/96/EC.
At the end of its working life, the product must not be disposed of as
urban waste.
It must be taken to a special local authority differentiated waste collection
centre or to a dealer providing this service.
Disposing of a household appliance separately avoids possible negative
consequences for the environment and health deriving from inappropriate
disposal and enables the constituent materials to be recovered to obtain
significant savings in energy and resources. As a reminder of the need to
dispose of household appliances separately, the product is marked with a
crossed-out wheeled dustbin.
16
"
recipes
See important points for bread making on page 13.
ingredients
●
●
●
●
●
method 1
2
3
4
5
6
7
8
●
●
●
●
●
●
●
●
method 1
2
3
4
5
6
7
8
●
17
white bread stiff yeast dough
1.36kg (3lb) strong plain flour
15ml (3tsp) salt
25g (1oz) fresh yeast; or 15g/20ml (1⁄2oz) dried yeast + 5ml (1tsp) sugar
750ml (11⁄4pts) warm water: 43˚C (110˚F). Use a thermometer or add 250ml
(9fl oz) boiling water to 500ml (18fl oz) cold water
25g (1oz) lard
dried yeast (the type that needs reconstituting): pour the warm water into
the bowl. Then add the yeast and the sugar and leave to stand for about 10
minutes until frothy.
fresh yeast: crumble into the flour.
other types of yeast: follow the manufacturer’s instructions.
Pour the liquid into the bowl. Then add the flour (with fresh yeast if used),
salt and lard.
Knead at minimum speed for 45 - 60 seconds. Then increase to speed 1,
adding more flour if necessary, until a dough has formed.
Knead for 3 - 4 more minutes at speed 1 until the dough is smooth, elastic
and leaves the sides of the bowl clean.
Put the dough into a greased polythene bag or a bowl covered with a tea
towel. Then leave somewhere warm until doubled in size.
Re-knead for 2 minutes at speed 1.
Half fill four 450g (1lb) greased tins with the dough, or shape it into rolls.
Then cover with a tea towel and leave somewhere warm until doubled in
size.
Bake at 230˚C/450˚F/Gas Mark 8 for 30 - 35 minutes for loaves or 10 - 15
minutes for rolls.
When ready, the bread should sound hollow when tapped on the base.
white bread soft yeast dough
2.6kg (5lb 12oz) ordinary plain flour
1.3 litre (21⁄4pts) milk
300g (10oz) sugar
450g (1lb) margarine
100g (4oz) fresh yeast or 50g (2oz) dried yeast
6 eggs, beaten
5 pinches salt
Melt the margarine in the milk and bring to 43˚C (110˚F).
dried yeast (the type that needs reconstituting): add the yeast and sugar
to the milk and leave to stand for about 10 minutes until frothy.
fresh yeast: crumble into the flour and add the sugar.
other types of yeast: follow the manufacturer’s instructions.
Pour the milk into the bowl. Add the beaten eggs and 2kg (4lb 6oz) flour.
Mix at minimum speed for 1 minute, then at speed 1 for a further minute.
Scrape down.
Add the remaining flour and mix at minimum speed for 1 minute, then at
speed 1 for 2 - 3 minutes until smooth and evenly mixed.
Half fill some 450g (1lb) greased tins with the dough, or shape it into rolls.
Then cover with a tea towel and leave somewhere warm until doubled in
size.
Bake at 200˚C/400˚F/Gas Mark 6 for 20 - 25 minutes for loaves or 15
minutes for rolls.
When ready, the bread should sound hollow when tapped on the base.
Makes about 10 loaves.
recipes continued
ingredients: sponge
●
●
●
filling and decoration
●
●
●
●
method 1
2
3
4
5
6
7
8
9
10
11
strawberry and apricot gâteau
3 eggs
75g (3oz) caster sugar
75g (3oz) plain flour
150ml (1⁄4pt) double cream
Sugar to taste
225g (8oz) strawberries
225g (8oz) apricots
Halve the apricots and remove the stones. Cook gently in very little water, adding
sugar to taste, until soft.
Wash and halve the strawberries.
To make the sponge, whisk the eggs and sugar at maximum speed until very pale
and thick.
Remove the bowl and the whisk. Fold in the flour by hand using a large metal spoon do this carefully to keep the sponge light.
Put the mixture into two 18cm (7”) greased and lined sandwich tins.
Bake at 180˚C/350˚F/Gas Mark 4 for about 20 minutes until the cake springs back
when lightly touched.
Turn out onto a wire rack.
Whisk the cream at maximum speed until stiff. Add sugar to taste.
Roughly chop the apricots and a third of the strawberries. Fold them into half the
cream.
Spread this over one of the sponges, then put the other sponge on top.
Spread the remaining cream on top and decorate with the remaining strawberries.
meringues
4 egg whites
ingredients ● 250g (9oz) icing sugar, sieved
● Line your baking tray with non-stick baking parchment.
method 1 Whisk the egg whites and sugar at maximum speed for about 10 minutes until it
stands in peaks.
2 Spoon the mixture onto the baking tray (or use a piping bag with a 2.5cm (1”) star
nozzle).
3 Bake at 110˚C/225˚F/Gas Mark 1⁄4 for about 4 - 5 hours until firm and crisp. If they start
to brown, leave the oven door slightly ajar.
● Store meringues in an airtight tin.
●
ingredients
●
●
●
hint ●
method 1
2
3
4
Ingredients
●
●
●
●
method 1
2
3
4
18
shortcrust pastry
450g (1lb) flour, sieved with the salt
5ml (1tsp) salt
225g (8oz) fat (mix lard and margarine straight from the fridge)
About 80ml (4tbsp) water
Don’t overmix
Put the flour into the bowl. Chop the fat up roughly and add to the flour.
Using the stainless steel K beater mix at speed 1 until it resembles breadcrumbs.
Stop before it looks greasy.
Add the water and mix at minimum speed. Stop as soon as the water is
incorporated.
Cook at around 200˚C/400˚F/Gas Mark 6, depending on the filling.
chilli marinade
200g (7oz) cold clear honey (refrigerated overnight)
1 green chilli (whole)
5ml (1 tsp) crunchy peanut butter
seasoning
Place all the ingredients into the mini chopper/mill.
Fit the attachment to the mixer and allow the ingredients to settle around the blade.
Switch to pulse for 10 seconds.
Use as required.
Notes
19
Italiano
●
●
prima di utilizzare la vostra apparecchiatura Kenwood
Leggere attentamente le presenti istruzioni e conservarle come futuro riferimento.
Rimuovere la confezione e le etichette.
per conoscere il vostro Kenwood Cooking Chef
sicurezza
●
●
●
●
●
●
●
●
●
●
●
●
●
●
●
●
●
●
●
●
●
●
●
●
●
●
●
●
Importante – impianti medici elettronici
Come tutti i prodotti generanti riscaldamento a induzione, questo apparecchio genera campi magnetici a corto
raggio. Se l’utilizzatore o una persona nelle immediate vicinanze dell’apparecchio ha un pacemaker o altro
impianto medico attivo, prima dell’uso si prega di consultare il medico per escludere eventuali incompatibilità e
rischi per la salute.
Spegnere l’apparecchio e disinserire la spina dalla presa elettrica prima di montare o staccare utensili/accessori,
dopo l’uso e prima della pulizia.
Tenere lontano il corpo, gli articoli di gioielleria/bigiotteria e gli indumenti larghi dalle parti in movimento e dagli
accessori installati.
Non inserire mai le dita ecc. nel meccanismo della cerniera.
Non lasciare mai l’apparecchio incustodito dopo averlo acceso.
Non usare mai un accessorio danneggiato. Farlo controllare o riparare: vedere alla sezione ‘manutenzione e
assistenza tecnica’, pag. 88.
Non usare mai un accessorio non approvato, oppure più di un accessorio alla volta.
Non superare mai le capacità massime indicate a pag. 84. Inoltre, quando si utilizza la cottura ad induzione, non
superare mai il livello massimo di 3 litri indicato all’interno del recipiente.
Se viene usato un accessorio, leggere le istruzioni di sicurezza e di impiego che lo corredano.
Fare attenzione nel sollevare questo apparecchio, per via del peso. Verificare che la testa sia bloccata in
posizione e che recipiente, utensili, coperchi degli attacchi e cavo elettrico siano ben saldi prima di sollevare
l'apparecchio.
Non lasciare mai che il cavo penzoli da dove un bambino potrebbe afferrarlo.
Non lasciare mai che corpo motore, il filo o la spina elettrica si bagnino.
Attenzione nel maneggiare o toccare qualsiasi parte dell’apparecchio durante o dopo la cottura, IN
PARTICOLARE IL RECIPIENTE, IL PARASPRUZZI E GLI UTENSILI, che continueranno a SCOTTARE anche
diverso tempo dopo che l'apparecchio è stato spento. Per estrarre e spostare il recipiente, servirsi dei manici.
Usare guanti da forno al momento di maneggiare il recipiente caldo e gli utensili per miscelare.
La base del recipiente continua a scottare anche parecchio tempo dopo il termine della cottura. Fare attenzione
nel maneggiare il recipiente e usare il tappetino di protezione prima di appoggiarlo a superfici sensibili al calore.
Fare attenzione al vapore che fuoriesce dal recipiente di Kenwood Cooking Chef, in particolare nell’aprire il
coperchio del paraspruzzi, oppure al momento di sollevare la testa di Kenwood Cooking Chef.
Se si desidera versare alimenti caldi da Kenwood Cooking Chef nel frullatore, prima lasciarli sempre raffreddare a
temperatura ambiente.
Usare solo il recipiente e gli utensili in dotazione con questo apparecchio. Non utilizzare mai il recipiente con altre
sorgenti di calore.
Non azionare mai l’apparecchio nella modalità di cottura se il recipiente è vuoto.
Non cercare di inserire nulla attraverso le bocchette per l'aria.
Prima di usare questo apparecchio, verificare di collocarlo in piano, lontano dal bordo del piano di lavoro.
Assicurarsi che vi sia una distanza di almeno 10 cm dalle pareti, e che le bocchette dell’aria non siano ostruite.
Non collocare l’apparecchio sotto a una credenza.
A garanzia dell’uso corretto e sicuro della piastra ad induzione, controllare che la base del recipiente e i sensori
della temperatura siano puliti ed asciutti prima di avviare la cottura.
Come per qualunque apparecchio per cottura a induzione, evitare di collocare carte di credito, supporti magnetici
o altri apparecchi elettronici sensibili vicino all’apparecchio dopo averlo acceso.
Non usare questo apparecchio per friggere i cibi.
Controllare sempre che i cibi siano ben cotti prima di mangiarli.
Consumare i cibi entro breve tempo dopo averli cotti; in alternativa, farli raffreddare velocemente e poi refrigerarli
non appena possibile.
Non consentire l’uso dell’apparecchio a persone (anche bambini) con ridotte capacità psico-fisico-sensoriali, o
con esperienza e conoscenze insufficienti, a meno che non siano attentamente sorvegliate e istruite da un
responsabile della loro incolumità.
Sorvegliare i bambini, assicurandosi che non giochino con l’apparecchio.
Utilizzare l'apparecchio solo per l'uso domestico per cui è stato realizzato. Kenwood non si assumerà alcuna
responsabilità se l'apparecchio viene utilizzato in modo improprio o senza seguire le presenti istruzioni.
74
●
●
prima di collegare l’apparecchio alla rete elettrica
Accertarsi che la tensione della vostra rete sia la stessa di quella indicata sulla base dell’apparecchio.
Questo apparecchio è conforme alla direttiva 2004/108/CE sulla Compatibilità Elettromagnetica, ed al
regolamento (EC) No. 1935/2004 del 27/10/2004 sui materiali in contatto con alimenti.
prima dell’uso
Lavare i componenti: vedere la sezione ‘cura e pulizia’, pag. 88.
introduzione
Grazie per aver acquistato Kenwood Cooking Chef, che speriamo userete per molti anni con un rendimento
ottimale.
Kenwood vanta quasi 60 anni di esperienza e competenza nello sviluppo dei propri prodotti e del loro ampio
assortimento di accessori. Kenwood Chef è molto più di un semplice impastatore.
Nel realizzare il nuovo Kenwood Chef per cottura, abbiamo abbinato la sua tradizionale a un nuovo
perfezionamento: la possibilità di cuocere a induzione gli alimenti direttamente nel recipiente di Kenwood Cooking
Chef. Ora potrete avere tutti i vantaggi della consueta miscelazione con movimento planetario ‘nel recipiente a
freddo’ per preparare le torte, pastafrolle e gli impasti che preferite, ma in più riscaldarli e cuocerli direttamente nel
recipiente dell’apparecchio. Le possibilità sono davvero infinite.
Kenwood Cooking Chef, con la sua gamma di opzionali, è veramente il sistema più completo per la preparazione
degli alimenti.
Robusto, Affidabile, Versatile, Kenwood.
Che cos’è la cottura a induzione e come funziona?
La cottura a induzione è un metodo avanzato per cuocere gli alimenti, che si avvale dei principi dell'induzione
elettromagnetica. Con il passaggio della corrente elettrica attraverso una serpentina in rame, all’interno dell’area
destinata alla cottura a induzione, si viene a creare un campo elettromagnetico. Inserendo e fermando in
posizione il recipiente di Kenwood Cooking Chef, il circuito viene completato da uno speciale strato di acciaio
inox all'interno della base per il recipiente. A sua volta, questo genera molta energia termica che si trasmette al
contenuto del recipiente, che viene così riscaldato.
La cottura a induzione usa energia in modo molto efficiente, in quanto genera calore solo nella base del
recipiente. Altri metodi di cottura, come i fornelli a gas, sprecano invece quasi il 50% dell’energia termica attorno
ai lati della pentola. Anzi, l’area del vostro Kenwood Cooking Chef destinata alla cottura ad induzione scotta solo
durante e immediatamente la cottura, per via del calore che si ritrasferisce dal contenuto del recipiente. Tutto
questo significa che la cottura ad induzione è molto efficiente, sicura e pulita.
La funzione di cottura di Kenwood Cooking Chef è simile all'uso di una pentola su un normale fornello. Tuttavia, il
vantaggio supplementare consiste nel fatto che Kenwood Cooking Chef mescolerà automaticamente i cibi e
regolerà la temperatura di cottura in base alle vostre esatte preferenze, lasciandovi liberi di occuparvi di altro in
cucina.
Kenwood Cooking Chef usa la tecnologia di riscaldamento ad induzione, che è estremamente efficiente. Rispetto
alla cottura su un fornello a gas o elettrico, può darsi che richiederà meno tempo, o che sarà possibile cuocere a
una temperatura più bassa. Considerare questi fattori al momento di usare l’apparecchio per la prima volta, o di
provare una nuova ricetta. Se iniziate la cottura a una temperatura elevata, controllate regolarmente e, se
necessario, abbassatela per evitare che i cibi si brucino e aderiscano al recipiente – proprio come fareste con una
normale pentola. In generale, Kenwood Cooking Chef riscalda in modo automatico gli ingredienti alla vostra
temperatura desiderata, nel minor tempo possibile. Di conseguenza, non è necessario impostare una
temperatura più alta del necessario solo per ridurre i tempi di cottura. A questo punto, occorre prestare
attenzione anche alla frequenza della miscelazione. Cuocendo ad alta temperatura, è possibile che i cibi debbano
essere mescolati di continuo, usando l’impostazione
. Le impostazioni
e
sono utili per mantenere la
consistenza dei cibi in caso di tempi lunghi di cottura a bassa temperatura.
75
A questo stadio è anche importante scegliere l’utensile corretto per il recipiente. Più avanti in queste istruzioni
presenteremo dei suggerimenti per l'uso ottimale di ciascun utensile, e con l’esperienza capirete presto quale
sarà l'utensile migliore per ciascuna procedura. Durante la cottura scoprirete che la frusta flessibile per alta
temperatura dà risultati migliori se desiderate una consistenza molto uniforme per salse e creme, mentre l’utensile
per mescolare è preferibile per alimenti la cui consistenza deve rimanere più solida, ad esempio spezzatini,
pasticci, ragù, ecc. Il nostro ricettario elenca gli utensili consigliati per ciascuna ricetta, e forse scoprirete che
cambiando utensili per le varie procedure durante la preparazione è possibile ottenere risultati migliori.
Durante e immediatamente dopo la cottura, il recipiente, il paraschizzi e l'utensile per il recipiente scotteranno,
proprio come una normale pentola. Fare quindi attenzione nel toccarli. È anche importante tenere presente che la
cottura produce vapore e condensa. Attenzione, quindi, a quando controllate l’interno del recipiente, o sollevate il
coperchio dal tubo introduttore degli alimenti o la testa Kenwood Cooking Chef macchina per esaminare o
accedere al recipiente. Avvertite anche le altre persone dei pericoli durante la cottura, o quando l'apparecchio
scotta, in modo che facciano attenzione. Al momento di toccare o di estrarre componenti caldi, è consigliabile
usare guanti da forno e spostare il recipiente servendosi esclusivamente degli appositi manici. Potreste trovare
utile anche il tappetino di protezione, per evitare di danneggiare le superfici sensibili al calore.
Nel riscaldare liquidi, o cibi che contengono molta acqua, normalmente la precisione della temperatura indicata
rientra in +/- 5ºC. La precisione del display e del controllo della temperatura varia a seconda della consistenza e
del volume dei cibi nel recipiente, della frequenza con cui vengono mescolati e dell'utensile usato per il recipiente.
Anche tutti questi fattori sono simili alla cottura su fornello; ad esempio, riscaldando ma non mescolando bene
una grossa pentola che contiene un'elevata quantità di ingredienti il cibo risulta molto caldo, o addirittura
bruciato, sul fondo della pentola, ma molto meno caldo nella parte superiore.
Oltre al display per la temperatura, l’apparecchio ha una piccola spia luminosa blu. Questa spia lampeggia fino a
quando l’apparecchio non raggiunge la temperatura selezionata. Una volta ottenuta la temperatura richiesta, la
spia smette di lampeggiare. Tuttavia, aggiungendo nuovi ingredienti al recipiente la spia blu ricomincia a
lampeggiare, visto che la temperatura si riduce per via dell’introduzione di ingredienti freddi. Inoltre, potreste
anche notare che la spia inizia a lampeggiare quando la frequenza di miscelazione viene aumentata.
Ben presto, capirete che il vostro Kenwood Cooking Chef è molto semplice da usare e vi faciliterà la
preparazione dei piatti di tutti i giorni.
76
per conoscere il vostro Kenwood Cooking Chef
attacchi per gli accessori ! attacco ad alta velocità
" attacco a media velocità
# attacco a bassa velocità
$ attacco per utensili
Kenwood Cooking Chef % coperchio dell'attacco a media/alta velocità
& testa della macchina
' coperchio dell’attacco a bassa velocità
( leva dell’attacco a bassa velocità
) ciotola di Kenwood Cooking Chef
* levetta alza-testa
+ selettore della velocità
, bocchette per l’aria
- piedistallo del recipiente/area ad induzione
. foro di scarico
/ sensori della temperatura
0 frusta K in acciaio inox
1 frusta flessibile per alta temperatura
2 frusta a fili grossi
3 gancio impastatore
4 utensile per mescolare
spatola per alta temperatura
protezione termica
tenuta di gomma
paraschizzi
&
coperchio dell’introduttore per alimenti
tappetino di protezione per piano
di lavoro
0
chiave
!
"
%
#
'
1
2
(
3
4
) $
*
+
,
.
,
77
/
5
6
7
8
%
&
'
(
)
*
pannello di controllo
display per timer/temperatura
tasto timer tasto timer +
controllo della temperatura
tasto Funzione Pulse , per montare ad alta velocità
controllo della velocità
selettore per timer/temperatura
spia di controllo della temperatura
tasto per amalgamare
spia di controllo della velocità
5
6
7
'
(
8
%
)
*
&
78
come regolare l’altezza degli utensili
Per le istruzioni relative al montaggio di Kenwood Cooking Chef ,
vedere pag. 80.
frusta a fili grossi, frusta in acciaio inox, utensile per mescolare
Per ottenere i migliori risultati, il frusta a fili grossi, la frusta e l’utensile per
mescolare devono quasi fare contatto con il fondo del recipiente !. Se
necessario, regolare la loro altezza con la chiave in dotazione.
!
1
2
3
4
5
6
7
Ecco come farlo:
Disinserire la spina dell’apparecchio dalla presa elettrica.
Sollevare la testa della macchina e inserire la frusta a fili, la frusta o
l’utensile per mescolare.
Abbassare la testa della macchina. Se occorre regolare il gioco, sollevare la
testa e staccare l’utensile.
#
Usando la chiave fornita, allentare a sufficienza il dado " per consentire la
regolazione dell’alberino #. Per abbassare l’utensile verso il fondo del
recipiente, ruotare in senso antiorario l'alberino. Per sollevare l’utensile
allontanandolo dal fondo del recipiente, ruotare l’alberino in senso orario.
"
Ristringere il dado.
Montare l’utensile sul mixer e abbassare la testa dell’apparecchio.
(Controllare la sua posizione – vedi i punti suddetti).
Se necessario, ripetere questa procedura fino a quando l’utensile è regolato
in modo corretto. A questo punto, ristringere a fondo il dado.
frusta flessibile per alta temperatura – questo utensile deve
toccare appena il fondo del recipiente.
gancio impastatore – questo utensile è regolato in fabbrica e non
dovrebbe essere necessario modificarne l’impostazione.
come montare e usare il gruppo del
paraschizzi
Il gruppo del paraschizzi comprende 2 componenti: la protezione termica e
il paraschizzi.
!
La protezione termica deve essere installata durante la cottura,
altrimenti il mixer non entra in funzione e il display mostra il
codice di errore E:03. La protezione termica protegge la testa del mixer
dal vapore generato in fase di cottura.
Se necessario, è possibile installare sia la protezione termica che il
paraschizzi, per mantenere gli ingredienti all’interno del recipiente (es.
quando si miscelano ingredienti leggeri, come farina e zucchero a velo,
dove occorre mantenere l’umidità all’interno del recipiente). Il paraschizzi
non va installato sul recipiente se non è usato insieme alla protezione
termica.
1 Sollevare la testa del mixer fino a quando non si blocca.
2 Spingere verso l'alto la protezione termica, sulla parte sottostante della
testa del mixer !, fino a inserirla a fondo. Non usare mai la protezione
termica senza inserire correttamente la tenuta di gomma.
3 Ora inserire il recipiente sulla base.
4 Abbassare la testa del mixer.
5 Appoggiare il paraschizzi sul bordo del recipiente e poi spostarlo in avanti
fino a inserirlo bene ".
• Durante la miscelazione è possibile aggiungere gli ingredienti direttamente
nel recipiente, utilizzando l’introduttore.
6 Per estrarre il paraschizzi basta semplicemente allontanarlo
dall’apparecchio.
7 Per togliere la protezione termica, sollevare la testa del mixer finché non si
blocca. Estrarre l’utensile, quindi spingere la protezione termica verso il
basso per staccarla dalla base della testa del mixer.
NB: Installare od estrarre il paraschizzi solo quando la testa del mixer si
trova in posizione bloccata.
79
"
il mixer
frusta a K
●
frusta a fili grossi
●
gancio impastatore
frusta flessibile per
alta temperatura
utensile per mescolare
●
●
●
1
come installare un utensile 2
3
4
come estrarre un utensile
●
5
6
7
utensili per miscelare e possibili usi
Per preparare torte, biscotti, pastafrolla, glassa, farciture, bignè e purè di
patate.
Per uova, panna, pastelle, pan di Spagna senza grassi, meringhe, torte
alla ricotta, mousse, soufflé. Non usare la frusta a fili grossi per miscele
dense (es. per amalgamare burro/margarina e zucchero), altrimenti si rischia
di danneggiarlo.
Solo per miscele a lievitazione.
!
Idonea per molte operazioni di cottura, in particolare per cuocere crema
pasticciera, uova strapazzate e salse. Ideale per staccare miscele calde e
fredde dalle pareti del recipiente, durante la miscelazione. Adatta anche per
le verdure saltate.
Idoneo in fase di cottura, per mantenere la consistenza dei cibi es.pollo,
pesce, verdure e frutta.
come usare il mixer
Prima di utilizzare il mixer, verificare che i controlli per temperatura e velocità
siano in posizione spenta ‘O’.
Ruotare la leva alza-testa in senso orario ! e sollevare la testa del mixer fino
a bloccarla in posizione.
Inserire l’utensile nell’attacco, con il perno dell’alberino all’interno della
scanalatura, poi ruotare per bloccarlo in posizione ".
utensile per mescolare – per montare l’utensile per mescolare, inserire il
suo alberino nell’attacco, allineare la fessura sull’estensione, affinché venga a
trovarsi sotto il perno metallico sul lato sottostante della testa del mixer.
Tenere la paletta e ruotare fino a quando il perno dell’alberino risulta sotto la
scanalatura, quindi spingere verso l’alto e ruotare per bloccare in posizione
#.
Collocare il recipiente sulla base, premerlo verso il basso e ruotare in senso
orario $.
Per abbassare la testa del mixer, sollevarla leggermente e poi ruotare in
senso orario la leva alza-testa. Abbassare nella posizione bloccata.
Invertire lo stadio 2 suddetto. (Usare sempre dei guanti da forno per estrarre
gli utensili dopo la cottura).
Collegare il mixer all’alimentazione elettrica. Ora le spie indicatrici di velocità e
temperatura si accendono per qualche istante. Nel display appare
e
poi scompare, lasciando acceso l'indicatore di alimentazione
.
Impostare il controllo della velocità sulla posizione desiderata (vedere pag. 81
per i consigli). Ora il mixer entra in funzione e la spia indicatrice del controllo
della velocità lampeggia. Il timer parte, contando a intervalli di 1 secondi. La
velocità può essere variata in qualunque momento durante l'uso del mixer.
Fermare il mixer riportando il controllo della velocità sulla posizione
spenta ‘O’.
Importante – Se la testa del mixer viene sollevata in qualsiasi momento
durante l’uso, l’apparecchio si ferma automaticamente e non riparte quando
la testa viene riabbassata. Per fare ripartire il mixer, spostare il controllo della
velocità sulla posizione spenta ‘O’ e poi selezionare nuovamente una
velocità.
"
#
Funzione Pulse
La funzione Pulse è utilizzabile solo con il controllo della velocità in posizione
spenta ‘O’.
Per selezionare la funzione Pulse, premere il tasto Pulse P . Ora il mixer
funziona a velocità massima fino a quando si continua a tenere premuto il
tasto in questa posizione. Se i cibi nel recipiente hanno una temperatura di
oltre 60ºC, la velocità aumenta in modo graduale. Questo è accompagnato
da un segnale acustico e dalle spie indicatrici di velocità e temperatura che
lampeggiano in modo rapido.
tasto per mescolare a bassissima velocità
Premendo e rilasciando il tasto per amalgamare
, il mixer funziona
automaticamente a velocità minima per 2 giri e poi si ferma. Questo tasto
può essere tenuto premuto più a lungo, oppure premuto ripetutamente,
come necessario per amalgamare gli ingredienti.
NB: Se il tasto per amalgamare viene premuto mentre il motore gira,
l'apparecchio amalgama gli ingredienti in modo consueto e poi si ripristina
sulla velocità selezionata.
80
$
controllo della velocità 9
Le velocità seguenti sono a semplice titolo di guida e variano a seconda della
quantità e della temperatura degli ingredienti miscelati, ecc.
Ruotare in senso orario il controllo della velocità per avere velocità da 'min'
fino a 'max'.
frusta
●
●
●
●
●
frusta flessibile per
alta temperatura
●
●
●
frusta a fili grossi
gancio impastatore
utensile per mescolare
●
●
●
per amalgamare burro/margarina e zucchero iniziare al min. e
passare gradualmente a ‘max’.
per sbattere le uova 4 - ‘max’.
9
per incorporare farina, frutta ecc. min - 1
miscele per torte iniziare a velocità min. e passare gradualmente a max.
per incorporare burro/margarina nella farina min - 2.
per amalgamare burro/margarina e zucchero iniziare al min. e
passare gradualmente a 3.
per staccare miscele calde e fredde dalle pareti del recipiente
iniziare al min. e passare gradualmente a 3.
per saltare verdure, mescolare risotti e polenta, ecc. usare
.
Aumentare gradualmente fino a ‘max’.
Iniziare al ‘min’ e passare gradualmente a 1.
Usare solo con le impostazioni per mescolare ,
e .
impostazioni per mescolare
Per scegliere le impostazioni per mescolare, ruotare in senso antiorario il controllo della velocità. Queste
impostazioni sono più idonee quando il mixer è usato nella modalità di cottura. Si ricorda che per usare
le impostazioni per mescolare, tutti i coperchi degli attacchi devono essere installati.
– Usare questa impostazione se si richiede una bassa velocità costante, es. per mescolare le salse.
– Impostando il controllo della velocità in questa posizione, il mixer funziona a intermittenza a bassa
velocità ogni 5 secondi, per 2 giri circa.
– Impostando il controllo della velocità in questa posizione, il mixer funziona a intermittenza a bassa
velocità ogni 30 secondi, per mescolare pasticci, ecc.
Per fermare la procedura, rispostare il controllo della temperatura sulla posizione spenta ‘O’.
●
●
NB:
Ogni volta che si seleziona una velocità, la spia indicatrice della velocità lampeggia.
Durante l’uso è possibile che l’apparecchio produca un segnale acustico penetrante. Questo è normale.
come usare il mixer per cucinare
●
●
●
IMPORTANTE
Controllare che l’area ad induzione, i sensori della temperatura e l'esterno della base del recipiente
siano puliti. In caso contrario, il sensore termico viene compromesso e si avrà una cottura scadente.
Verificare che tutti i coperchi degli attacchi, compresa la protezione termica, siano installati. Se non
sono stati montati correttamente, la funzione di riscaldamento non si attiva.
Usare sempre dei guanti da forno per estrarre gli utensili dopo la cottura.
1 Montare il mixer come spiegato a pag. 80.
2 Ruotare il controllo della temperatura fino all’impostazione desiderata.
● L’apparecchio non inizia a riscaldare se prima non viene selezionata una velocità.
3 Ruotare il controllo della velocità fino alla velocità desiderata: ora il motore e il riscaldatore si accendono.
Entrambe le spie indicatrici iniziano a lampeggiare.
4 Una volta raggiunta la temperatura impostata, la spia indicatrice della temperatura rimane accesa.
Tuttavia, nel corso della cottura inizia a lampeggiare se la temperatura cambia, per indicare che il mixer
sta cercando di mantenere la temperatura selezionata (si prega di leggere l'introduzione a pag. 75).
● Se la temperatura nel recipiente supera 60ºC, per ragioni di sicurezza la velocità viene automaticamente
limitata, anche se l'utilizzatore imposta una velocità superiore. La velocità non aumenta in modo
automatico quando la temperatura scende a meno di 60ºC. Prima, infatti, occorre spegnere il controllo
della velocità e riselezionare la velocità desiderata.
● NB: Ogni volta che si preme il selettore per timer/temperatura, il display alterna fra la visualizzazione del
timer e quella della temperatura del contenuto del recipiente.
5 Per fermare o mettere in pausa la procedura di miscelazione e riscaldamento, riportare il controllo delle
velocità alla posizione spenta ‘O’. Per proseguire, selezionare una velocità.
81
●
●
●
●
●
●
●
●
●
●
●
consigli
Per alcune ricette, in particolare quelle ad alto contenuto di acqua, non sarà possibile
raggiungere temperature di cottura oltre 100ºC (ossia il punto di ebollizione dell’acqua).
Quando si desidera aggiungere ingredienti nel recipiente in fase di cottura, ridurre la velocità e versarli in modo
lento e continuo.
Per riscaldare velocemente le salse, mescolarle in modo continuo
.
Cambiando l’accessorio per svolgere diversi trattamenti nella preparazione dei vostri piatti potreste ottenere
risultati migliori, per esempio usando la frusta flessibile per alta temperatura per friggere verdure e poi l’utensile
per mescolare per la cottura di carne rossa o pollame.
Se durante la cottura viene utilizzato il paraschizzi, toglierlo sempre prima di sollevare la testa del mixer.
Attenzione alla condensa che si forma sul paraschizzi e sulla protezione termica.
Sollevare la testa del mixer lentamente, per consentire all’eventuale liquido presente sulla parte sottostante della
protezione termica di rifluire nel recipiente.
Sono disponibili tre diverse impostazioni per mescolare, consentendovi di scegliere la funzione più idonea per
ciascuna ricetta. Infatti, per alcune ricette occorre mescolare di continuo gli ingredienti, per evitare che si
attacchino sul fondo del recipiente, mentre per altre basta mescolare in modo intermittente, per meglio
mantenere la consistenza dei cibi.
Per un rendimento ottimale, regolare l’altezza degli utensili – vedere pag. 79.
Il tempo massimo di cottura è 3 ore. In seguito, il mixer si spegne in modo automatico.
È possibile riscaldare i cibi senza installare alcun utensile, ma occorre sempre selezionare una velocità. Questo
può risultare utile nel fondere alimenti come burro o cioccolato.
Ogni volta che si preme il selettore per timer/temperatura, il display alterna fra la visualizzazione del tempo di
cottura e quella della temperatura raggiunta in quel momento.
funzione per montare ad alta velocità e ad alta temperatura
Per frullare ad alta velocità a temperature oltre 60ºC, ruotare il controllo della velocità fino all’impostazione
desiderata, poi premere e tenere premuto il tasto Pulse. Questo è accompagnato da un segnale acustico e dalle
spie indicatrici di velocità e temperatura che lampeggiano in modo rapido. La velocità della lavorazione degli
ingredienti aumenta lentamente, fino alla velocità selezionata.
Ripetere la procedura per aumentare ulteriormente la velocità. È possibile ridurre la velocità o spegnere il mixer
nel modo consueto.
Questa funzione DEVE essere usata solo con la frusta a fili grossi. Non superare la massima
capacità di cottura di 3 litri e controllare che il paraschizzi sia installato. Non lasciare
incustodito l’apparecchio.
●
●
dopo la cottura
Attenzione nel maneggiare o toccare qualsiasi parte del mixer, quando viene usato nella modalità di cottura o
dopo la cottura, IN PARTICOLARE IL RECIPIENTE, IL PARASCHIZZI E GLI UTENSILI, che continueranno a
SCOTTARE anche diverso tempo dopo che l'apparecchio è stato spento. Per estrarre e spostare il recipiente,
servirsi dei manici. Usare guanti da forno al momento di maneggiare il recipiente caldo e gli utensili per miscelare.
La base del recipiente continua a scottare anche parecchio tempo dopo il termine della cottura. Fare attenzione
nel maneggiare il recipiente e usare il tappetino di protezione prima di appoggiarlo a superfici sensibili al calore.
82
display
Per vostra sicurezza, il mixer è dotato di 5 sensori separati di sicurezza, che entrano in funzione quando il mixer
viene usato nella modalità di cottura. Se il mixer viene acceso e un sensore di sicurezza si attiva, il display per
timer/temperatura mostra un messaggio di errore, ad es. ‘E:01’. Inoltre, l’apparecchio genera un segnale acustico
e il mixer non entra in funzione. Controllare i messaggi di errore che seguono:
Messaggio
di errore
E:01
E:02
E:03
E:04
E:09
E:10
Descrizione
Soluzione
Con la testa sollevata, un sensore di sicurezza
impedisce al motore e al riscaldatore di
attivarsi. Se il controllo della velocità non è in
posizione spenta ('O’) quando la testa viene
sollevata, il display indica questo messaggio e il
motore non si accende.
Il recipiente di Kenwood Cooking Chef non
è installato. La funzione di riscaldamento si
attiva solo utilizzando il recipiente per la cottura.
Inoltre, il recipiente deve essere inserito in modo
corretto. Sensori di sicurezza rilevano un
recipiente diverso, oppure l’errato inserimento del
recipiente per cottura.
La protezione termica non è stata installata. Se
la protezione termica non è installata
correttamente, la funzione di riscaldamento
rimane disattivata.
Non vi sono coperchi sull'attacco a bassa
velocità e su quello a alta/media velocità. Questi
coperchi sono provvisti di sensori di sicurezza.
Se i coperchi non sono installati in modo
corretto, il riscaldamento si spegne; se
l’utilizzatore seleziona una funzione per mescolare
i cibi, il motore funziona in modo continuo. Le
velocità di miscelazione da min a max funzionano
continuamente.
Problema con un sensore della temperatura.
il termostato rileva una temperatura del
recipiente maggiore del previsto durante l’uso
normale, motore e sistema di riscaldamento
si spegneranno automaticamente.
Abbassare la testa. Ruotare il controllo
della velocità alla posizione ‘O’ e poi
selezionare la velocità desiderata.
Problema di velocità o surriscaldamento del
motore. Se il motore stalla o si surriscalda, il
sistema di controllo spegne automaticamente
motore e sistema di riscaldamento.
Verificare che venga utilizzato il recipiente
di Kenwood Cooking Chef. Controllare
che il recipiente sia montato in modo
corretto. Ruotare il controllo della
velocità su ‘O’ e poi selezionare la
velocità desiderata.
Verificare che la protezione termica sia
montata in modo corretto. Ruotare il
controllo della velocità su ‘O’ e poi
selezionare la velocità desiderata.
Verificare che tutti i coperchi siano
installati in modo corretto.
Ruotare il controllo della velocità su ‘O’ e
poi selezionare la velocità desiderata.
Ruotare il controllo della velocità su ‘O’,
disinserire la spina dell’apparecchio dalla
presa elettrica e lasciarlo raffreddare.
Controllare che la base del recipiente e i
sensori della temperatura siano puliti.
Reinserire la spina e accendere
l’apparecchio come di consueto.
Ruotare il controllo della velocità su ‘O’ e
poi selezionare la velocità desiderata.
Eliminare le eventuali ostruzioni che
causano lo stallo del motore. Controllare
che tutte le bocchette dell’aria non
presentino ostruzioni.
Inserire la spina dell’apparecchio nella
presa elettrica e accenderlo.
Se questi o altri codici di errore continuano ad apparire nel display, contattare l’Assistenza tecnica Kenwood.
83
1
2
3
4
●
5
per usare il conto alla rovescia con timer
Il timer può essere usato sia in modalità di cottura che senza la cottura. Se l’utilizzatore non seleziona un tempo
per il conto alla rovescia, il timer conta automaticamente in intervalli di 1 secondo durante il funzionamento del
mixer. Il tempo massimo è 3 ore.
Collegare il mixer all’alimentazione elettrica. Nel display appare brevemente
e poi scompare, lasciando
visibile l'indicatore di alimentazione
.
Premere il tasto + o -: ora nel display appare 0:00.
Premere i tasti + e – fino a visualizzare il tempo desiderato. Il timer parte, contando a intervalli di 5 secondi. Se il
tasto viene premuto continuamente, più a lungo lo si preme e più velocemente i numeri cambiano. È possibile
impostare un tempo massimo di 3 ore.
NB: Premendo il tasto + quando il timer indica 3:00, il tempo sul display passa a 0:00. Premendo il tasto –
quando il timer indica 0:00, il tempo il display passa a 3:00.
Ruotare il controllo della velocità fino all'impostazione desiderata; ora il mixer entra in funzione e il timer avvia il
conto alla rovescia in intervalli di 1 secondo.
Il mixer può essere messo in pausa in qualunque momento, ruotando il controllo della velocità in posizione
spenta (‘O’). In tal modo, anche il timer entra in pausa. Il timer prosegue il conto alla rovescia quando il mixer
viene riacceso.
Il sistema di miscelazione si ferma automaticamente allo scadere del tempo totale e l’apparecchio emette segnali
acustici per 3 secondi. Il display lampeggia per 5 secondi e poi visualizza l'indicatore di alimentazione
.
come azzerare il timer
1 Azzerare il timer premendo simultaneamente i tasti + e – (il controllo della velocità deve trovarsi in posizione
spenta, ossia ‘O’).
● Se l’apparecchio non viene usato per 10 minuti, il display a LCD e la retroilluminazione entrano nel modo
‘stand by’ e tutti i display si spengono. Azionando un tasto o una manopola, il display torna al formato
precedente.
pastafrolla
impasto lievitato duro
●
●
●
impasto lievitato soffice
●
●
miscela per torta di frutta
albumi
modalità di cottura
consigli generali
●
●
●
●
●
●
●
importante
●
●
●
capacità massime
Peso totale impasto:
Peso totale impasto:
Peso totale:
Peso totale impasto:
Peso totale:
Peso totale:
16
3 litri
910g
1,5kg
2,4kg
2,6kg
5kg
4,55kg
Fermare frequentemente l’apparecchio e staccare con la spatola gli ingredienti aderiti al recipiente.
Per frullare è preferibile usare uova a temperatura ambiente.
Prima di montare gli albumi, controllare che sulla frusta a fili o nel recipiente non vi siano residui di grasso o di
tuorlo d’uovo.
Per la pastafrolla usare ingredienti dal frigorifero, salvo indicato diversamente nella ricetta.
promemoria per fare il pane
Non superare mai le capacità massime indicate, altrimenti l’apparecchio verrà sovraccaricato.
Se l’apparecchio impasta a fatica spegnerlo, togliere metà dell’impasto e impastare in due volte.
Gli ingredienti si impastano meglio aggiungendo per primi i liquidi.
84
guida alla localizzazione dei problemi in fase di cottura
Problema
Il mixer non funziona nella modalità di
riscaldamento; visualizza un messaggio di
errore e genera un tono di avvertimento.
Causa
Uno dei sensori di sicurezza si è attivato.
•
•
•
•
È stata selezionata una temperatura, ma il
contenuto del recipiente non si riscalda (la
spia indicatrice della temperatura non
è accesa).
Il mixer cambia velocità durante la cottura.
I cibi si bruciano sul fondo del recipiente.
La consistenza dei cibi non viene mantenuta.
La velocità di miscelazione non è uniforme.
Sono stati aggiunti ingredienti freddi a una
miscela calda, ma il display della temperatura
non risponde in modo rapido.
È difficile abbassare la testa del mixer con
i cibi all’interno del recipiente.
Il mixer funziona in modo continuo
selezionando la funzione
o
per mescolare.
L’uso degli accessori limita la velocità
del motore.
85
Non è stata selezionata una velocità.
Soluzione
Vedere la tabella dei messaggi di errore, a pag. 83.
Controllare che la testa sia abbassata e
bloccata.
Verificare che tutti i coperchi degli attacchi siano
correttamente inseriti.
Verificare che la protezione termica sia montata
in modo corretto.
Controllare che il recipiente di Kenwood Cooking
Chef sia ben inserito.
Selezionare una velocità.
La velocità viene limitata in modo automatico Questo è un accorgimento di sicurezza.
quando il contenuto del recipiente giunge
a 60ºC.
1 La temperatura impostata potrebbe essere 1 Ridurre la temperatura sulla manopola, oppure
eccessiva.
cucinare a una temperatura inferiore.
2 Viene usato l’utensile sbagliato.
2 Verificare che l’utensile usato sia quello più
adatto.
3 La funzione di miscelazione è troppo lenta. 3 Alzare la frequenza di miscelazione, oppure
mescolare in modo continuo.
4 L’utensile potrebbe non raggiungere la parte 4 Regolare l’utensile.
bassa del recipiente.
5 Il tempo impostato per il timer è troppo
5 Cuocere per meno tempo (ma verificare che
lungo.
i cibi non siano crudi).
6 Il sensore e/o la base del recipiente
6 Controllare che queste aree vengano tenute
possono non essere puliti.
pulire e asciutte.
1 La temperatura selezionata è eccessiva.
1 Ridurre la temperatura.
2 La funzione di miscelazione è troppo veloce. 2 Ridurre la velocità di miscelazione.
3 Gli ingredienti sono stati cotti per
3 Ridurre il tempo di cottura (controllando che i
troppo tempo.
cibi non siano crudi).
4 Viene usato l’utensile sbagliato.
4 Verificare che l’utensile usato sia quello
più adatto.
1 Ingredienti troppo grossi, troppo duri o
1 Tagliare gli ingredienti a pezzetti più piccoli,
troppo solidi.
asportare i noccioli dalla frutta, fondere
lentamente gli ingredienti senza usare alcun
utensile (ma verificare di aver selezionato una
velocità).
2 Aggiungere gli ingredienti dopo aver abbassato
la testa.
3 Verificare che l’utensile usato sia quello più
adatto.
Se i cibi all’interno del recipiente non
1 Lasciare tempo per la miscelazione completa
vengono mescolati bene, la loro
degli ingredienti.
temperatura potrebbe variare.
2 Aumentare la velocità di miscelazione.
Ingredienti duri, come il cioccolato, sul fondo
Aggiungere gli ingredienti dopo aver abbassato
del recipiente possono impedire alla testa del la testa.
mixer di bloccarsi in posizione abbassata.
I coperchi sono montati in modo non corretto
Verificare che tutti i coperchi degli attacchi siano
sugli attacchi.
correttamente inseriti.
È stato inserito un recipiente caldo.
Estrarre il recipiente, oppure lasciarlo raffreddare
fino a 60°C.
accessori opzionali disponibili
Per acquistare un accessorio non in dotazione, vedere la sezione ‘manutenzione e assistenza tecnica’.
accessorio
codice
sfogliatrice 5 AT970A
torchio per la pasta
AT971A tagliatelle
(non illustrati) usato insieme a
AT972A tagliolini
AT970A
AT973A trenette
AT974A spaghetti
accessorio per pasta 6 AT910 provvisto di trafila per maccheroni rigati
(è possibile installare 12 trafile facoltative più un accessorio per fare i biscotti)
grattugia a rulli 7 AT643 con 5 tamburi
pressa per frutta 8 AT644
tritacarne % AT950A dotato di un mascherina fine, media e grossa, un ugello
per salsiccia piccolo e uno grande e un accessorio per kebbe
tritacarne & AT955 dotato di un mascherina fine, media e grossa, un ugello
per salsiccia piccolo e uno grande e un accessorio per kebbe
macinagranaglie ' AT941A
robot ( AT647 comprende 6 dischi di taglio e una lama
tagliaverdure a dischi ) AT340 comprende 7 dischi di taglio
spremiagrumi * AT312
frullatore + 1,5l acrilico AT337, 1,6 l vetro termoresistente AT358
1,5l acciaio inox AT339
mini tritatutto/macinatutto , AT320A con 4 vasetti in vetro e 4 coperchi
spremitore continuo - AT641
macchina per gelato . AT957A
pelapatate / AT445
passapomodoro 0 AT930A
bilancia 1 AT850B
recipiente in acciaio inox 2 36386A
paraspruzzi 3 34445A
coperchio 4 606397
4
'
&
%
8
7
6
1
2
3
4
5
5
86
,
+
*
)
(
.
/
0
3
2
1
87
pulizia e assistenza tecnica
●
●
●
●
Apparecchio e copriprese
●
●
frusta flessibile ad
alta temperatura
recipiente, utensili, paraschizzi
●
●
●
●
●
●
foro di scarico
●
sensori della temperatura
●
●
●
●
●
●
cura e pulizia
Spegnere sempre l’apparecchio e togliere la spina dalla presa elettrica prima di pulirlo.
Con il primo uso, dall’attacco " potrebbe essere visibile un poco di grasso.
Questo è normale – asportare i residui.
Le superfici metalliche dei sensori della temperatura possono mostrare segni
di usura durante l’uso normale. Tuttavia, questo non
compromette il rendimento del prodotto.
"
Non lasciare la frusta flessibile ad alta temperatura montata
sull’apparecchio quando non viene utilizzata.
Passarli con un panno umido e poi asciugare.
Non usare mai prodotti abrasivi né immergere in acqua questi
componenti.
Rimuovere sempre la lama dell’aletta flessibile prima di pulire.
Lavare la lama dell’aletta flessibile e l’accessorio con acqua calda e
detergente, poi asciugare bene, oppure le parti possono essere lavate
in lavastoviglie.
NB: Si prega di verificare le condizioni del corpo dell’accessorio prima
e dopo l’uso e di verificare regolarmente le condizioni della lama dell’aletta
flessibile e di sostituirla nel caso siano evidenti segni di usura.
Lavarli a mano e asciugarli a fondo, oppure lavarli in lavastoviglie
Non usare spazzole metalliche, pagliette o candeggina per pulire il recipiente in
acciaio inox. Per asportare il calcare, utilizzare aceto o un prodotto idoneo.
Se i cibi aderiscono o si bruciano nel recipiente, asportarli per quanto possibile usando la
spatola in dotazione. Riempire il recipiente di acqua calda saponata e lasciare a bagno.
Asportare i residui più ostinati con una spazzola in nylon.
L’eventuale scolorimento del recipiente non ne compromette il rendimento.
Controllare che non vi siano residui di alimenti. Se necessario, pulire con uno spazzolino
per tubature o con un bastoncino di cotone idrofilo.
Passarli con un panno umido e poi asciugare. Non usare mai prodotti abrasivi o utensili
appuntiti per pulire i sensori.
manutenzione e assistenza tecnica
In caso il cavo sia danneggiato, per ragioni di sicurezza deve esser sostituito solo dal
fabbricante oppure da un Centro Assistenza KENWOOD autorizzato alle riparazioni.
Se si ha bisogno di assistenza riguardo:
uso dell’apparecchio o
manutenzione o riparazioni
Contattare il negozio dove si è acquistato l’apparecchio.
Disegnato e progettato da Kenwood nel Regno Unito.
Prodotto in Cina.
IMPORTANTI AVVERTENZE PER IL CORRETTO SMALTIMENTO DEL PRODOTTO
AI SENSI DELLA DIRETTIVA EUROPEA 2002/96/EC.
Alla fine della sua vita utile il prodotto non deve essere smaltito insieme ai rifiuti urbani.
Deve essere consegnato presso gli appositi centri di raccolta differenziata predisposti dalle
amministrazioni comunali, oppure presso i rivenditori che offrono questo servizio.
Smaltire separatamente un elettrodomestico consente di evitare possibili conseguenze
negative per l’ambiente e per la salute derivanti da un suo smaltimento inadeguato e
permette di recuperare i materiali di cui è composto al fine di ottenere notevoli risparmi in
termini di energia e di risorse.
Per rimarcare l’obbligo di smaltire separatamente gli elettrodomestici, sul prodotto è
riportato il simbolo del bidone a rotelle barrato.
88
ricette
Vedere il promemoria per fare il pane, a pag. 84.
ingredienti
●
●
●
●
●
metodo 1
2
3
4
5
6
7
8
●
ingredienti
pane bianco impasto duro con lievito
1,36kg di farina per pane
15ml (3 cucchiaini) di sale
25g di lievito di birra fresco, oppure 15g/20ml di lievito di birra in polvere + 5ml (1 cucchiaino) di zucchero
750ml di acqua tiepida: 43ºC. Usare un termometro oppure aggiungere 250ml di acqua bollente a 500ml di
acqua fredda.
25g di strutto
lievito di birra in polvere (il tipo che occorre ricostituire): versare l'acqua tiepida nel recipiente. Ora
aggiungere lievito e zucchero e lasciare agire per circa 10 minuti, fino a quando non fa schiuma.
lievito di birra fresco: sbriciolarlo nella farina.
lievito di altro tipo: seguire le istruzioni del produttore.
Versare il liquido nel recipiente. Ora aggiungere la farina (con il lievito fresco, se usato), il sale e lo strutto.
Impastare a velocità minima per 45 – 60 secondi. Ora portare la velocità a 1, se necessario aggiungendo altra
farina sino a formare un impasto.
Lavorare per altri 3 – 4 minuti a velocità 1, fino a quando l’impasto risulta morbido, elastico e non aderisce ai lati
del recipiente.
Mettere l’impasto in un sacchetto di plastica leggermente imburrato o in una pirofila coperta da uno strofinaccio.
Lasciare lievitare al caldo, fino a quando l’impasto raddoppia in dimensioni.
Impastare nuovamente per 2 minuti a velocità 1.
Riempire a metà quattro teglie imburrate da 450g con l’impasto, oppure fare dei panini.
Coprire con uno strofinaccio e lasciare lievitare al caldo fino a quando l’impasto raddoppia in dimensioni.
Infornare a 230ºC per 30 – 35 minuti per le pagnotte, o per 10 - 15 minuti per i panini.
Quando è pronto, il pane deve dare un suono cavo se picchiettato sul fondo.
7
8
pane bianco impasto morbido con lievito
2,6kg di normale farina
1,3 litri di latte
300g di zucchero
450g di margarina
100g di lievito di birra fresco o 50g di lievito di birra in polvere
6 uova sbattute
5 pizzichi di sale
Sciogliere la margarina nel latte e portare a 43ºC.
lievito di birra in polvere (il tipo che occorre ricostituire): aggiungere lievito e zucchero al latte e lasciare agire
per 10 minuti circa, fino a quando non si vede schiuma.
lievito di birra fresco: sbriciolare nella farina e aggiungere lo zucchero.
lievito di altro tipo: seguire le istruzioni del produttore.
Versare il latte nel recipiente. Aggiungere le uova sbattute e 2kg di farina.
Lavorare a velocità minima per 1 minuto, poi a velocità 1 per un altro minuto.
Staccare l’impasto dalle pareti del recipiente.
Aggiungere la restante farina e lavorare a velocità minima per 1 minuto, quindi a velocità 1 per 2-3 minuti, fino ad
avere un impasto uniforme e ben amalgamato.
Riempire a metà quattro teglie imburrate da 450g con l’impasto, oppure fare dei panini.
Coprire con uno strofinaccio e lasciare lievitare al caldo fino a quando l’impasto raddoppia in dimensioni.
Infornare a 200ºC per 20 – 25 minuti per le pagnotte, o per 10 – 15 minuti per i panini.
Quando è pronto, il pane deve dare un suono cavo se picchiettato sul fondo.
●
Per 10 pagnotte circa.
●
●
●
●
●
●
●
metodo 1
2
3
4
5
6
89
ricette continuaz.
torta di fragole e albicocche
3 uova
● 75g di zucchero semolato
● 75g di farina
farcitura e decorazione ● 150ml di panna da cucina
● Zucchero, secondo i gusti
● 225g di fragole
● 225g di albicocche
metodo 1 Dimezzare le albicocche e privarle dei noccioli. Cuocere a bassa temperatura in pochissima acqua, aggiungendo
zucchero secondo le preferenze, fino a quando le albicocche non sono ben morbide.
2 Lavare e dimezzare le fragole.
3 Per fare il pan di Spagna, montare uova e zucchero a velocità massima, fino ad avere una miscela molto chiara e
densa.
4 Togliere il recipiente e il frullino dall'apparecchio. Incorporare la farina a mano, usando un grosso cucchiaio di
metallo (procedere con attenzione, per avere un pan di Spagna leggero).
5 Versare la miscela in due teglie quadrate, imburrate e rivestite di carta da forno, misuranti 18cm.
6 Infornare a 180ºC per circa 20 minuti, fino a quando la torta non risulta elastica premendola leggermente.
7 Capovolgere e raffreddare su una griglia.
8 Montare la panna a velocità massima, fino a quando non si indurisce. Aggiungere zucchero secondo le
preferenze.
9 Spezzettare grossolanamente le albicocche e un terzo delle fragole. Incorporarle in metà della panna.
10 Distribuire su una metà della torta, poi sovrapporre l'altra metà.
11 Spalmare la panna rimasta sulla torta e decorare con le restanti fragole.
Ingredienti: pan di Spagna
●
meringhe
4 albumi
● 250g di zucchero a velo, setacciato
● Rivestire una teglia con carta da forno antiaderente.
metodo 1 Frullare gli albumi con lo zucchero a velocità massima per circa 10 minuti, fino a quando non formano picchi.
2 Con un cucchiaio, distribuire la miscela sulla teglia (oppure usare una sacca da pasticceria con beccuccio da
2,5cm).
3 Infornare a 110ºC per circa 4 – 5 ore, fino ad avere meringhe consistenti e croccanti. Se iniziano a dorarsi,
lasciare leggermente accostato lo sportello del forno.
● Conservare le meringhe in un contenitore ermetico.
ingredienti
●
ingredienti
●
●
●
●
consiglio ●
metodo 1
2
3
4
ingredienti
●
●
●
●
metodo 1
2
3
4
pastafrolla
450g di farina, setacciata insieme al sale
5ml (1 cucchiaino) di sale
225g di grasso (miscelare strutto e margarina direttamente dal frigorifero)
Circa 80ml (4 cucchiai) di acqua
Non lavorare eccessivamente gli ingredienti
Versare la farina nel recipiente. Tagliare grossolanamente strutto e margarina a pezzetti e aggiungerli alla farina.
Usare la frusta a K in acciaio inox e miscelare a velocità 1, fino ad avere la consistenza di briciole di pane.
Fermarsi prima che l’impasto assuma un aspetto unto.
Aggiungere l’acqua e miscelare a velocità minima. Fermarsi non appena l'acqua è stata incorporata.
Cuocere a circa 200ºC, a seconda del ripieno.
marinata al peperoncino
200g di miele freddo (lasciato in frigorifero tutta la notte prima)
1 peperoncino verde (intero)
5ml (1c) di burro d’arachidi con pezzetti
condimento
Mettere tutti gli ingredienti nel minisminuzzatore/macinino
Montare l’accessorio dell’apparecchio e lasciare adagiare gli ingredienti lungo la lama.
Premere il tasto a impulso per 10 secondi.
Usare a piacimento.
90
GARANZIA KENWOOD
22-04-2002
15:44
Pagina 1
ASSISTENZA
CGARANZIA
E R T I F I CEASERVIZI
T O D IDIG
ARANZIA
PER L’ITALIA
1. KENWOOD garantisce ai propri clienti l’applicazione di tutti i diritti contenuti nella Direttiva
Europea 1999/44/CE sulla vendita dei beni di consumo, nonché dei diritti previsti dalle
norme nazionali in materia.
In particolare sono coperti da garanzia tutti i possibili difetti di conformità e di fabbricazione
presenti nel prodotto al momento della vendita che si manifestino nei primi 2 anni dalla data
di acquisto.
2. Per il primo anno il cliente KENWOOD goderà pienamente dei diritti sopra indicati senza
dover dimostrare l’esistenza del difetto di conformità o di fabbricazione al momento della
vendita.
3. La conformità del prodotto verrà ripristinata dalla KENWOOD senza alcun onere per il cliente per manodopera e materiale nonché per le spese di intervento del tecnico a domicilio, limitatamente ai prodotti per i quali tale servizio sia previsto.
4. Per esercitare i diritti di cui sopra il cliente dovrà rivolgersi alla rete dei Centri Assistenza
Autorizzati KENWOOD (contattare il numero verde sottoindicato) ed esibire unitamente al
presente “certificato” un documento valido ai fini fiscali e rilasciato dal rivenditore e comprovante la data di acquisto del prodotto.
5. I diritti di cui ai punti 1, 2, 3 non si applicano ai seguenti casi :
➤ Difetti causati da utilizzi non previsti nel libretto di istruzione che costituisce parte integrante del contratto di vendita.
➤ Difetti causati da rotture accidentali, incuria, manomissione da parte di terzi non autorizzati,
utilizzo di ricambi non originali.
6. Non sono da intendersi come prestazioni in garanzia gli interventi inerenti l’installazione, l’allacciamento agli impianti di alimentazione e le manutenzioni citate nel libretto delle istruzioni. Altresì viene escluso dalla garanzia il ricambio dei materiali di consumo ( es. filtri, spazzole ecc.).
7. La KENWOOD declina ogni responsabilità per eventuali danni che possono, direttamente o
indirettamente derivare a persone, cose ed animali domestici in conseguenza della mancata osservanza di tutte le prescrizioni indicate nell’apposito libretto di istruzioni e concernenti specialmente le avvertenze in tema di installazione, uso e manutenzione dell’apparecchio.
CONTACT
SERVICE ITALIA
Numero Verde
91
KENWOOD
800-202323
800-201052
Via Lodovico Seitz, 47
Dal lunedì al Venerdì
09.00 - 18.30
Sabato 09.00 - 12.00
31100 Treviso - Italia
HEAD OFFICE: Kenwood Limited, 1-3 Kenwood Business Park, New Lane, Havant, Hampshire PO9 2NH
KW00800145/2