1
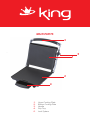
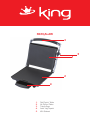
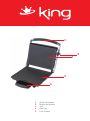
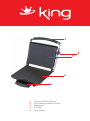
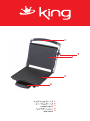
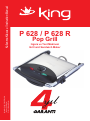
Model No: P 628 / P 628 R Pop Grill
Izgara ve Tost Makinesi
Grill and Sandwich Maker
Kullanma Kılavuzu / Instruction Manual
P 628 / P 628 R
Izgara ve Tost Makinesi
Grill and Sandwich Maker
Pop Grill
MAIN PARTS
3
1
2
4
1.
2.
3.
4.
5.
Upper Cooking Plate
Bottom Cooking Plate
Handle
Drip Tray
Lock System
5
READ AND SAVE THESE INSTRUCTIONS
BEFORE FIRST USE
Read and follow all the instructions in this “Use And Care” even if you feel you are
familiar with the product, and find a place to keep it handy for future reference.
Your attention is drawn particularly to the sections concerning “IMPORTANT
SAFEGUARDS”, “FOR YOUR SAFETY”, and the “SERVICE” statements.
For your convenience record the complete model number (located on the product
identification plate) and the date you received the product, together with your
purchase receipt and attach to the warranty and service information. Retain in the
event that warranty service is required.
NOTE: The rating of this product (as marked on the product identification plate) is
based on specific loading tests. Normal use or the use of other recommended
attachments may draw significantly less power.
IMPORTANT SAFEGUARDS
When using any electrically powered product, basic safety precautions should
always be followed, including the following:
PLEASE READ ALL INSTRUCTIONS CAREFULLY BEFORE USING THE
PRODUCT.
WARNING - to reduce the risk of fire, electrical shock or injury to persons or
property:
■ Always operate the product from a power source of the same voltage, frequency
and rating as indicated on the product identification plate.
■ Close supervision is necessary when the product is used by or near children or
infirm persons. Do not allow children to use it as a toy.
■ Do not operate any product with a damaged cord or plug, or after the product
malfunctions, or is dropped or appears damaged in any way. Return the complete
product to the place of purchase for inspection, repair or replacement.
■ To reduce the risk of electric shock, do not immerse or expose the product or
flexible cord to rain, moisture or any liquid other than those necessary for correct
operation of the product.
■ This product should not be used in the immediate vicinity of water, such as
bathtub, washbowls, swimming pool etc. where the likelihood of immersion or
splashing could occur.
■ Ensure the power cord is kept away from the cooking plates of the Sandwich
Press when in use.
■ Do not leave the appliance unattended when switched on.
■ Switch off and unplug from outlet when not in use, before assembling or disassembling parts and before cleaning. Remove by grasping the plug - do not pull on the
cord.
■ Do not use the appliance for other than its intended use.
■ Do not let the cord hang over the edge of a table or bench or touch any hot
surfaces.
■ Do not operate or place any part of this product on or near any hot surface (such
as gas or electric burner or hot plate or in a heated oven).
■ Avoid touching hot surfaces, use handles and knobs.
■ When using the Sandwich Press, ensure that there is sufficient air space above
and all sides for air circulation.
■ The use of attachments or accessories not recommended or sold by the product
distributor may cause personal or property hazards or injuries.
■ This product is intended for normal domestic/household use only.
READ AND SAVE THESE INSTRUCTIONS
An introduction to your Sandwich Press
Congratulations on the purchase of your Tiffany Sandwich Press.
With very little imagination, you can make a fantastic variety of snacks, meals and
entertaining. All type of toasted and melted snacks can be made, quickly and easily.
There is no need to restrict yourself to the plain old type toasted Sandwich.
Before using your Sandwich Press for the first time.
Note: When using the Sandwich Press for the first time, the unit will emit a fine
smoke. This is caused by the heating of the elements and new components and can
be disregarded.
■ Remove all packaging from the Sandwich Press before use.
■ Check that the cooking plates are free of dust. Wipe the surface of the plates with
a damp cloth and dry with cloth, kitchen towel etc.
Place the Sandwich Press on a flat level surface. Unlock the Storage clip, and
unscrew the Adjustable Height knob, this will allow the top and bottom to open and
close.
■ Cooking plates must be in the closed position for pre-heating.
■ Before using your Sandwich Press for the first time, the non-stick plates must be
seasoned during the preheating time (until the green light comes on) to protect the
non-stick surface.
Note: For the first use ONLY, season the plates by applying a thin coat of cooking
oil, butter or margarine to the cooking surfaces and rub in with a paper towel.
Exercise care, as the cooking plates will be hot.
■ Plug the power cord into a 230V power outlet and turn the power ON. The Heating
up (Red) light will illuminate, indicating that there is power to the unit. The Ready
(Green) light will also illuminate, indicating pre-heating operation.
■ Preheat the plates for 2-4 minutes (or until the green light goes ON). Season the
plates accordingly if using the sandwich press for the first time. Maximum temperature of the plates is obtained after 5 seconds of the GREEN light turning OFF.
■ During the preheating time (Both Red and Green light ON)– Prepare your
sandwich and when ready, open the Sandwich Press and place the sandwich on the
Bottom Cooking Plate. Always place Sandwiches towards the rear of the cooking
plate.
■ Close the Top Cooking Plate and it will automatically adjust to the thickness of the
sandwich because of the floating hinge. This will ensure an even toasting. Use the
Adjustable Height knob if you do not want the top plate touching the sandwich.
■ Toasting should take approximately 5-8 minutes. However, exact toasting times
will depend on types and thickness of breads and different fillings used.
■ Open the lid when the sandwich is cooked. Always remove the sandwich by using
plastic or wooden spatula. Never use metal utensils as this may damage the
Non-Stick Coating.
■ Close the lid to preserve the heat until ready to toast the next sandwiches.
■ After use, remove the plug from the wall socket.
Hints for Best Results
Bread:
■ The Sandwich Press can be used to toast most types of Bread: White, Wholemeal,
Multigrain, Rye, Raisin Loaf, etc. Focaccia, Turkish Bread, Baguettes as well as
Bread Rolls are also ideal to toast in the Sandwich Press.
■ Sweet breads, such as Raisin Bread and Brioche, that contain a high sugar
content will tend to brown quicker.
■ For soft or liquid sandwich fillings, use medium sliced bread, white or brown. If
small amount of filling, use toasting bread.
■ The Sandwich Press is ideal for toasting plain breads or Turkish breads with no
fillings or toppings. Try toasting Turkish breads with jams for a great alternative to
standard bread at breakfast.
Fillings:
■ CAUTION! Always take care when biting into sandwiches containing fillings such
as cheese, tomato and jam, as they retain heat and you can burn your mouth if
eaten too quickly.
Fat Free Snacks:
■ It is NOT necessary to use any butter or margarine on the outside of the toasted
snack because the sandwich press has a Non-Stick Flat Plate Design.
Care of your product
■ After use and before cleaning, remove plug, wait for sandwich press to cool.
■ Wipe the inside and edges of the heating plate with absorbent paper towel or a soft
cloth.
■ Should any filling be difficult to remove, pour a little cooking oil onto the heating
plate and re-heat for 1-2 minutes. Turn the power off and wipe off after 5 minutes
when the filling has softened. Wipe the outside with a slightly moistened cloth
ensuring that no moisture, oil or grease enter the appliance.
■ Do not clean the inside or outside with any abrasive scouring pad or steel wool as
this will damage and scratch the Non-Stick Plates.
■ This unit is NOT Dishwasher SAFE.
■ Do not use spray-on cleaners, as this will affect the performance of the Non-Stick
surface on the cooking plates.
DO NOT IMMERSE IN WATER OR ANY LIQUID
For Your Safety
■ Always operate the product in accordance with the product use and care
instructions.
■ Ensure the power cord is kept away from the cooking plates of the Sandwich
Press when in use.
Service
■ CAUTION To reduce the risk of electric shock, do not remove the cover (or back).
No user serviceable parts inside. Refer servicing to an authorized service facility.
■ Do not operate the product with a damaged cord or plug, or after the product
malfunctions, or appears damaged in any way. Return the complete product to the
place of purchase for inspection, repair or replacement.
■ In some products, the replacement by the user of the flexible cord is not intended.
Special tools may be required to disassemble the product or replace the cord.
Return the complete product to the place of purchase for inspection, repair or
replacement.
PARÇALARI
3
1
2
4
1.
2.
3.
4.
5.
Üst Pişirici Tabla
Alt Pişirici Tabla
Tutma Sapı
Artık Yağ Tepsisi
Kilit Sistemi
5
BU TALİMATLARI OKUYUNUZ VE SAKLAYINIZ
İLK KULLANIMDAN ÖNCE
İlk kullanımdan önce cihazı kullanmayı biliyor bile olsanız öncelikle kullanma
kılavuzunu okuyunuz ve ileride kullanmak için saklayınız.
Dikkatinizi özellikle “ÖNEMLİ GÜVENLİK TALİMATLARI”, “GÜVENLİĞİNİZ İÇİN”,
VE “ SERVİS” bölümlerine veriniz.
Size kolaylık sağlaması için model numarasını(üründeki plaka üzerinde bulunan)
ürünü satın aldığınız tarihi, garanti belgenizi ve faturanızı saklayınız. Garanti
servisinin gerekli olduğu durumlar için saklayınız.
NOT: Bu ürünün derecelendirmesi (ürünün üstündeki plakada gösterildiği gibi)
spesifik yükleme testlerine göredir. Cihazın normal kullanımı veya önerilen diğer
eklerin kullanımı daha az elektrik kullanımına sebep olacaktır.
ÖNEMLİ GÜVENLİK TALİMATLARI
Herhangi bir elektrikli alet kullanırken, aşağıdaki temel güvenlik talimatlarına
uyulmalıdır:
CİHAZI KULLANMADAN ÖNCE LÜTFEN BÜTÜN GÜVENLİK TALİMATLARINI
DİKKATLİCE OKUYUNUZ.
UYARI – Kişilere ve mülke zarar gelmesini, elektrik çarpmasını veya yangın riskini
azaltmak için:
■ Her zaman cihazınızı, cihazın plakasının üstünde yazan voltaj ile aynı voltaja
sahip prize takarak çalıştırınız.
■ Cihaz çocuklar tarafından veya çocukların yanında kullanılırken yakın gözetim
gerekmektedir. Çocukların cihazla oyuncak olarak oynamasına izin vermeyiniz.
■ Cihazı arızalı kordon veya prizle veya cihaz arızalandıktan sonra veya cihaz
düşürüldüğü yada herhangi bir hasar gözüktüğünde kullanmayınız. Cihazın tamiri
veya değişimi için cihazı yetkili KING servislerine götürünüz.
■ Elektrik çarpma riskini azaltmak için, cihazı herhangi bir sıvıya veya suya
batırmayınız, cihazı veya kordonu veya diğer gerekli ekleri nemli veya yağmurlu
ortamda bırakmayınız.
■ Bu ürün küvet, lavabo veya suyun sıçrama olasılığı olduğu yüzme havuzlarının
yanında kullanılmamalıdır.
■ Cihazın kullanımı sırasında kordonun tost yapma makinesinin pişirme
plakasından uzak olduğundan emin olunuz.
■ Cihazı çalışır durumda iken yalnız bırakmayınız.
■ Cihaz kullanımda değilken, parçalar söküp takılırken ve temizlemeden önce cihazı
kapatınız ve cihazın fişini prizden çekiniz. Cihazın fişini, fişten tutarak çekiniz
kordondan tutarak çekmeyiniz.
■ Cihazı kullanım amacından başka bir amaç için kullanmayınız.
■ Cihazın kordonunun masa ve tezgah kenarlarından sarkmasına veya sıcak
yüzeylere değmesine izin vermeyiniz.
■ Cihazı herhangi sıcak bir yüzeyin yanında veya üstünde kullanmayınız.(sıcak fırın,
gazlı ve elktrikli ısıtıcı veya sıcak levha vb)
■ Cihazın sıcak yüzeylerine ve düğmelerine dokunmayınız.
■ Tost yapma makinesini kullanırken hava dolaşımı için cihazın yanlarında yeteri
kadar boşluk olduğundan emin olunuz.
■ Yetkili servis tarafından satılmayan ve önerilmeyen aksesuar ve eklerin kullanımı
hasar ve yaralanmalara sebep olabilir.
■ Bu ürün sadece normal ev içi kullanımı içindir.
Tost Yapma Makinenizin Tanıtımı
KING Tost Yapma Makenisini satın aldığınız için teşekkür ederiz.
Çok küçük bir hayal gücü ile fantastik ve eğlenceli yemekler ve aperatifler yapabilirsiniz. Tüm erimiş ve tost tipi aperatifleri kolayca ve hızlı bir şekilde yapabilirsiniz.
Tost Yapma Makinenizin İlk Kullanımından Önce
Not: Cihazı ilk defa kullanırken, cihazdan duman çıkabilir. Bu gayet normaldir ve
elementlerin ve yeni bileşenlerin ısınmasından dolayı olmaktadır ve gözardı
edilebilir.
■ Kullanmadan önce Tost Yapma Makinenizin bütün ambalaj malzemelerini
çıkartınız.
■ Pişirme plakasının tozsuz olduğunu kontrol ediniz. Nemli bir bezle plakaların
yüzeylerini temizleyiniz ve daha sonra kuru bir bezle kurulayınız.
Tost yapma makinenizi düz bir yüzeye koyunuz. Saklama kilidini açınız ve yükseklik
ayarlama düğmesini çözünüz bu size alt ve üst açma kapamasına izin verecektir.
■ Ön ısınma için pişirme plakaları kapalı durumda olmalıdır.
■ Tost yapma makinenizin ilk kullanımından önce, yapışmaz plakaların
yapışmazlığını koruması için yapışmaz plakalar ön ısınma süresi boyunca
kullanılmamalıdır(yeşil ışık yanana kadar).
Not: Sadece ilk kullanım için, pişirme plakasına azıcık yağ, tereyağ veya margarin
sürünüz ve kağıt havlu ile yayınız. Pişirme plakası sıcak olacaktır dikkatli olunuz.
■ Cihazın fişini prize takınız ve cihazı çalıştırınız. Kırmızı ışık (ısınma) cihazda güç
olduğunu göstermektedir. Yeşil ışık (hazır) ön ısınma sürecini göstermektedir.
■ Pişirme plakalarını 2-4 dakika arası ön ısıtma yapınız(veya yeşil ışık yanana
kadar). Tost yapma makinenizi ilk defa kullanıyorsanız plakaları ona göre alıştırınız.
Plakalar maksimum dereceye yeşil ışık yandıktan 5 saniye sonra ulaşılacaktır.
■ Ön ısınma süresinde(kırmızı ve yeşil ışık yandığı zaman) tostunuzu hazırlayınız
ve hazır olduğunda tost yapma makinenizi açınız ve tostunuzu alt plakaya koyunuz.
Tostunuzu her zaman pişirme plakasının arka tarafına doğru koyunuz.
■ Üst pişirme plakasını kapatınız ve kayan menteşe otomatik olarak tostunuzun
kalınlığına göre ayarlanacaktır. Bu tostunuzun daha iyi kızarmasını sağlayacaktır.
■ Tostunuzun kızarması yaklaşık 5-8 dakika arası sürecektir. Ancak, mükemmel
kızarma süresi kullandığınız ekmeğin kalınlığına ve cinsine bağlıdır.
■ Tostunuz kızardığı zaman kapağı açınız. Tostunuzu çıkartmak için herzaman
plastik veya tahta spatula kullanınız. Asla metal malzeme kullanmayınız bu
yapışmaz plakaya zarar verecektir.
■ Sıcaklığı korumak için kapağı diğer tostunuzu haırlayana kadar kapalı tutunuz.
■ Kullandıktan sonra fişi prizden çekiniz.
En İyi Sonuçlar İçin İpuçları
Ekmek:
■ Tost kızartma makineniz bir çok ekmeği kızartmak için kullanılabilir.(beyaz ekmek,
tahıllı, kepekli, baget vb)
■ Tatlı ekmekler (üzümlü ekmek vb) yüksek şeker içerdiğinden daha çabuk
kızaracaktır.
■ Yumuşak veya sıvı sandviç malzemeleri için beyaz veya kahverengi orta
büyüklükte ekmekleri kullanınız. Az miktarda malzeme kullanacasanız tost ekmeği
kullanınız.
İçindeki malzemeler:
■ DİKKAT! Tostunuzu ısırırken her zaman içindeki malzemelere dikkat ediniz. Çok
sıcak olabilirler.
Yağsız Atıştırmalıklar:
■ Herhangi bir yağ veya margarin kullanmanıza gerek yoktur çünkü cihazın
yapışmaz yüzeyi bulunmaktadır.
Cihazınızın Bakımı
■ Cihazı kullandıktan sonra veya temizlemeden önce fişi prizden çıkartınız ve
cihazın soğumasını bekleyeniz.
■ Yumuşak bir bezle ve emici bir havlu ile pişirme plakalarının içini ve kenarlarını
siliniz.
■ Eğer herhangi bir kalıntıyı çıkartmak zor ise pişirme plakalarının üstüne az
miktarda yemeklik yağ koyunuz ve 1-2 dakika daha ısıtınız. Daha sonra cihazı
kapatınız ve 5 dakika sonra kalıntılar yumuşadıktan sonra siliniz. Cihazın dış tarafını
nemli bir bezle siliniz. Cihazın içine nem girmediğinden emin olunuz.
■ Yapışmaz plakalara zarar vereceğinden dolayı cihazın içini ve dışını aşındırıcı
bulaşık süngeri veya çelik yünü ile silmeyiniz.
■ Cihazı bulaşık makinesine koymayınız.
■ Temizleyici sprey kullanmayınız çünkü bu yapışmaz plakaların yüzeyinin
performansını etkilemektedir.
CİHAZI SUYA VEYA HERHANGİ BİR SIVININ İÇİNE BATIRMAYINIZ.
Güvenliğiniz İçin
■ Cihazı herzaman talimatlara uygun çalıştırınız.
■ Kordonun cihazı kullanırken pişirme plakalarından uzak olduğundan emin olunuz.
Servis
■ UYARI: Elektrik çarpma riskine karşı kapağı yerinden çıkartmayınız.
Hiç bir parçayı kendiniz tamir etmeyiniz. Hehrangi bir yetkili KING servisine
götürünüz.
■ Cihazı arızalı kordon veya prizle veya cihaz arızalandıktan sonra veya cihaz
düşürüldüğü yada herhangi bir hasar gözüktüğünde kullanmayınız. Cihazın tamiri
veya değişimi için cihazı yetkili KING servislerine götürünüz.
■ Bazı ürünlerin esnek kablosu kullanıcı tarafından değiştirme amaçlı değildir. Özel
araçlar kordonun sökümünde veya değişiminde gerekli olabilir. Muayene, tamir
veya değiştirme için satın aldığınız yere ürünü tam bir şekilde götürünüz.
3
1
2
4
1.
2.
3.
4.
5.
Obere Kochplatte
Bottom Kochplatte
Griff
Drip Tray
Lock System
5
LESEN UND DIESE ANLEITUNG
VOR DEM ERSTEN GEBRAUCH
Lesen und befolgen Sie alle Anweisungen in dieser " Verwendung und Pflege " ,
auch wenn Sie sich mit dem Produkt vertraut , und finden einen Platz , damit es für
späteres Nachschlagen fühlen.
Ihre Aufmerksamkeit gilt vor allem in den Abschnitten über " Wichtige Sicherheitshinweise ", " FÜR IHRE SICHERHEIT " und "Service" Aussagen gezogen .
Für Ihre Bequemlichkeit notieren Sie die vollständige Modellnummer (befindet sich
auf der Produkt- Typenschild ) und das Datum , das Sie das Produkt zusammen mit
dem Kaufbeleg und heften sich an die Garantie-und Service-Informationen .
Bewahren Sie in dem Fall, dass Garantie-Service erforderlich ist.
HINWEIS: Die Bewertung dieses Produktes ( wie auf dem Produkt Typenschild
markiert ) auf spezifische Belastung Tests. Normaler Gebrauch oder die Verwendung von anderen empfohlenen Anlagen schöpfen können deutlich weniger Strom .
WICHTIGE SICHERHEITSHINWEISE
Bei der Verwendung eines elektrisch betriebenen Produkt sollten grundlegende
Vorsichtsmaßnahmen zu halten , einschließlich der folgenden :
Lesen Sie alle Anweisungen , BEVOR SIE DAS PRODUKT .
WARNUNG - Um die Gefahr von Feuer , Stromschlag oder Verletzungen an
Personen oder Sachen zu reduzieren :
■ Betreiben Sie das Produkt von einer Stromquelle mit der gleichen Spannung ,
Frequenz und Leistung auf dem Produkt Typenschild zu entnehmen .
■ Sorgfältige Aufsicht ist notwendig , wenn das Produkt oder in der Nähe von
Kindern oder gebrechlichen Personen verwendet wird. Lassen Sie Kinder nicht , um
es als Spielzeug verwenden .
■ Betreiben Sie kein Produkt mit einem beschädigten Kabel oder Stecker, oder
nachdem das Produkt nicht richtig funktioniert oder heruntergefallen ist oder
beschädigt zu sein scheint in keiner Weise. Bringen Sie den vollständigen Artikel in
den Ort des Kaufs für Inspektion, Reparatur oder Ersatz.
■ Um die Gefahr eines Stromschlags zu verringern, nicht tauchen oder Setzen Sie
das Produkt oder flexible Schnur regen , Feuchtigkeit oder jede andere Flüssigkeit
als diejenigen, die für den korrekten Betrieb des Produkts.
■ Dieses Produkt sollte nicht in unmittelbarer Nähe von Wasser , z. B. Badewanne,
Waschschüssel , Schwimmbad etc., wo die Wahrscheinlichkeit einer Tauch-oder
Spritzwasser auftreten könnten verwendet werden.
■ Stellen Sie sicher, dass das Netzkabel entfernt ist von den Platten der Sandwich
Presse gehalten , wenn im Einsatz .
■ Lassen Sie das Gerät nicht unbeaufsichtigt , wenn eingeschaltet.
■ Schalten Sie aus und ziehen aus der Steckdose , wenn es nicht in Gebrauch, vor
Montage oder Demontage Teile und vor der Reinigung . Entfernen Sie immer am
Stecker - nicht am Kabel ziehen .
■ Lassen Sie das Gerät nicht für andere als die vorgesehenen Zwecke .
■ Lassen Sie das Kabel nicht über die Kante eines Tisches oder einer Bank hängen
und berühren Sie keine heißen Oberflächen .
■ Betreiben Sie oder legen einen Teil davon auf oder in der Nähe einer heißen
Oberfläche (z. B. Gas-oder Elektro -Brenner oder Heizplatte oder in einem Ofen ) .
■ Berühren heißer Oberflächen verwenden Griffe und Knöpfe .
■ Bei Verwendung der Sandwich Press, sicherzustellen , dass genügend Luftraum
über und alle Seiten für die Luftzirkulation .
■ Die Verwendung von Anbauteilen oder Zubehör nicht empfohlen oder vertrieben
durch das Produkt Händler kann Personenschäden oder Sachschäden Gefahren
oder Verletzungen.
■ Dieses Produkt ist für den normalen Hausgebrauch / Haushalt Gebrauch
bestimmt.
LESEN UND DIESE ANLEITUNG
Eine Einführung in Ihr Sandwich Press
Herzlichen Glückwunsch zum Kauf Ihres Tiffany Sandwich Press.
Mit sehr wenig Phantasie , können Sie eine fantastische Auswahl an Snacks,
Mahlzeiten und unterhaltsam. Alle Arten von gerösteten und geschmolzen Snacks
gemacht , schnell und einfach .
Es besteht keine Notwendigkeit , sich auf die gute alte Art geröstetes Sandwich zu
beschränken.
Bevor Sie Ihr Sandwich Press für die erste Zeit.
Hinweis: Bei der Verwendung des Sandwich Presse zum ersten Mal , wird das Gerät
einen feinen Rauch entwickelt . Dies wird durch die Erwärmung der Elemente und
neue Komponenten verursacht und kann vernachlässigt werden.
■ Entfernen Sie alle Verpackungsmaterialien aus dem Sandwich Presse vor dem
Gebrauch.
■ Überprüfen Sie , dass die Platten frei von Staub sind. Wischen Sie die Oberfläche
der Platten mit einem feuchten Tuch und trocknen Sie mit einem Tuch , Küchenpapier usw.
Legen Sie das Sandwich Press auf einer ebenen Oberfläche . Schalte den Storage
■ Clip, und schrauben Sie den Knopf Einstellbare Höhe , wird diese ermöglichen es
oben und unten zu öffnen und zu schließen.
■ Kochplatten muss in der geschlossenen Position zum Vorwärmen sein .
■ Bevor Sie Ihr Sandwich Presse zum ersten Mal , müssen die Antihaft- Platten
während der Vorheizzeit (bis das grüne Licht aufleuchtet ), um die AntihaftOberfläche schützen gewürzt.
Hinweis: Bei der ersten Verwendung NUR Saison die Platten durch Aufbringen einer
dünnen Schicht Speiseöl, Butter oder Margarine zu den Kochfeldern und reiben Sie
mit einem Papiertuch. Seien Sie vorsichtig , da die Platten wird heiß .
■ Stecken Sie den Netzstecker in eine 230V Steckdose und schalten Sie das Gerät.
Die Aufheizzeit (rot) leuchtet auf , was darauf hinweist , dass die Steckdose am
Gerät an. Die Ready ( grün) Licht wird auch beleuchten , was Vorheizbetrieb .
■ Heizen Sie die Platten für 2-4 Minuten (oder bis das grüne Licht geht an ) . Saison
die Platten entsprechend, wenn mit der Sandwich- Presse für die erste Zeit.
Maximale Temperatur der Platten wird nach 5 Sekunden das grüne Licht
Ausschalten erhalten.
■ Während der Vorheizzeit ( Rote und grüne LED leuchtet) - Planen Sie Ihre
Sandwich und wenn Sie bereit sind , öffnen Sie das Sandwich Press und legen Sie
das Sandwich auf dem Bottom Kochstelle. Legen Sie immer Sandwiches in
Richtung der Rückseite der Kochplatte .
■ Schließen Sie die obere Kochplatte und es wird automatisch auf die Dicke des
Sandwich wegen der schwimmenden Scharnier einstellen . Dadurch wird sichergestellt, eine gleichmäßige Röstung . Verwenden Sie die höhenverstellbar Knopf,
wenn Sie nicht wollen, dass die obere Platte berühren das Sandwich .
■ Rösten dauert etwa 5-8 Minuten . Allerdings wird genau Toasten mal auf Typen
und Dicke von Brot und verschiedenen Füllungen abhängen.
■ Öffnen Sie den Deckel , wenn das Sandwich zubereitet wird. Ziehen Sie immer
den Sandwich mit Kunststoff-oder Holzspatel . Benutzen Sie niemals Metallgegenstände , da dies die Antihaft-Beschichtung beschädigt werden kann.
■ Schließen Sie den Deckel , um die Wärme bis bereit, die nächsten Sandwiches
Toast zu bewahren.
■ Nach dem Gebrauch den Netzstecker aus der Steckdose.
Hinweise für beste Ergebnisse
Bread:
■ Die Sandwich Presse verwendet werden, um die meisten Arten von Brot Toast
werden : Weiß , Vollkornbrot , Mehrkornbrot , Roggen, Rosinen Loaf usw. Focaccia,
türkische Brot, Baguettes sind sowie Brötchen auch ideal, um in der Presse
Sandwich Toast .
■ Sweet Brot, wie Rosinenbrot und Brioche , die einen hohen Zuckergehalt
enthalten wird schneller braun neigen.
■ Für weiche oder flüssige Sandwichfüllungen , nutzen Medium geschnittenem Brot,
weiß oder braun . Wenn kleine Menge der Füllung , verwenden Toastbrot .
■ The Sandwich Press ist ideal zum Toasten Ebene Brot oder türkischen Brot ohne
Füllung oder Auflage . Versuchen Toasten türkische Brot mit Marmelade für eine
tolle Alternative zu Standard- Brot zum Frühstück.
Füllungen:
■ VORSICHT! Achten Sie immer darauf , wenn beisst in Sandwiches mit Füllungen
wie Käse, Tomaten und Marmelade, wie sie Wärme zu halten , und Sie können den
Mund verbrennen, wenn zu schnell gegessen .
Fat Free Snacks:
■ Es ist nicht notwendig, Butter oder Margarine auf der Außenseite des gerösteten
Snack zu verwenden, weil das Sandwich Presse hat eine Non-Stick Flat Plate
Entwurf.
Pflege für Ihr Produkt
■ Nach dem Gebrauch und vor der Reinigung den Stecker , warten Sandwich
drücken , um abzukühlen.
■ Wischen Sie das Innere und die Kanten der Heizplatte mit einem saugfähigen
Papiertuch oder einem weichen Tuch.
■ Sollte eine Füllung schwierig zu entfernen , gießen Sie ein wenig Speiseöl auf die
Heizplatte und Re- Hitze 1-2 Minuten. Schalten Sie das Gerät aus und wischen Sie
nach 5 Minuten, wenn die Füllung weich geworden . Wischen Sie die Außenseite mit
einem leicht angefeuchteten Tuch um sicherzustellen, dass keine Feuchtigkeit , Öl
oder Fett das Gerät eingeben .
■ Reinigen Sie das innerhalb oder außerhalb mit einem Scheuer- Pad oder
Stahlwolle , da diese beschädigt werden und zerkratzen die Antihaft- Platten .
■ Dieses Gerät ist nicht spülmaschinenfest .
■ Verwenden Sie keine Sprühreiniger , da dies die Leistung des Non-Stick
Oberfläche auf den Platten beeinflussen.
NICHT in Wasser oder sonstige Flüssigkeiten tauchen
Für Ihre Sicherheit
■ Betreiben Sie das Produkt in Übereinstimmung mit der Verwendung des
Produktes und Pflegehinweise.
■ Stellen Sie sicher, dass das Netzkabel entfernt ist von den Platten der Sandwich
Presse gehalten , wenn im Einsatz .
Dienst
■ VORSICHT . Um das Risiko eines Stromschlags zu vermeiden , entfernen Sie
nicht die Abdeckung (oder die Rückseite ) . Keine zu wartenden Teile im Inneren.
Überlassen Sie die Wartung zu einem autorisierten Service-Einrichtung .
■ Betreiben Sie das Produkt mit einem beschädigten Kabel oder Stecker, oder nach
den Produkt Fehlfunktionen oder erscheint in irgendeiner Weise beschädigt .
Bringen Sie den vollständigen Artikel in den Ort des Kaufs für Inspektion, Reparatur
oder Ersatz.
■ In einigen Produkten ist der Ersatz durch den Benutzer das flexible Kabel nicht
vorgesehen. Spezialwerkzeuge erforderlich sein, um das Produkt zu zerlegen oder
ersetzen Sie das Kabel sein . Bringen Sie den vollständigen Artikel in den Ort des
Kaufs für Inspektion, Reparatur oder Ersatz.
3
1
2
4
1.
2.
3.
4.
5.
Plaque supérieure de cuisson
Plaque inférieure de cuisson
Poignée
Plateau d'égouttement
Lock System
5
LIRE ET CONSERVER CES INSTRUCTIONS
AVANT LA PREMIÈRE UTILISATION
Lisez et suivez toutes les instructions de cette " utilisation et d'entretien », même si
vous sentez que vous êtes familiarisé avec le produit, et de trouver un endroit pour
garder à portée de main pour référence future.
Votre attention est particulièrement attirée sur les sections relatives aux « GARANTIES important», « Pour votre sécurité» , et les déclarations de «service» .
Pour votre commodité enregistrer le numéro de modèle (situé sur la plaque
d'identification du produit ) et la date que vous avez reçu le produit, avec la preuve
d'achat et le joindre à la garantie et informations de service. Conserver dans le cas
où le service de garantie est nécessaire.
NOTE : La cote de ce produit ( tel qu'indiqué sur la plaque d'identification du produit
) est basée sur des essais de chargement spécifiques. Utilisation normale ou
l'utilisation d'autres accessoires recommandés peuvent tirer beaucoup moins
d'énergie .
MESURES DE SÉCURITÉ IMPORTANTES
Lors de l'utilisation de tout produit fonctionnant à l'électricité , les précautions de
sécurité de base doivent toujours être suivies, y compris ce qui suit:
S'IL VOUS PLAÎT LIRE TOUTES LES INSTRUCTIONS AVANT D'UTILISER LE
PRODUIT.
AVERTISSEMENT - Pour réduire les risques d'incendie , de choc électrique ou des
blessures aux personnes ou aux biens :
■ Toujours utiliser le produit d'une source d'alimentation de la même tension , la
fréquence et note , comme indiqué sur la plaque d'identification du produit .
■ Une surveillance étroite est nécessaire lorsque le produit est utilisé par ou près
des enfants ou des personnes handicapées . Ne laissez pas les enfants l'utilisent
comme un jouet.
■ Ne pas utiliser n'importe quel produit avec un cordon ou une fiche endommagé ou
après un dysfonctionnement du produit, s'il est tombé ou semble endommagé de
quelque façon. Retourner le produit complet pour le lieu d'achat pour inspection,
réparation ou remplacement.
■ Pour réduire le risque de choc électrique , ne pas immerger ou exposer le cordon
de produit ou flexible à la pluie , à l'humidité ou de tout liquide autre que celles qui
sont nécessaires pour le bon fonctionnement du produit.
■ Ce produit ne doit pas être utilisé à proximité immédiate de l'eau , comme une
baignoire, lavabos , piscine etc, où la probabilité d' immersion ou éclaboussures
pourrait se produire.
■ S'assurer que le cordon d'alimentation est maintenu à l'écart des plaques de
cuisson du sandwich presse lors de son utilisation .
■ Ne pas laisser l'appareil sans surveillance lorsqu'il est allumé .
■ Mettez hors tension et débranchez la prise de courant lorsqu'il n'est pas utilisé ,
avant de monter ou de démonter des pièces et avant de le nettoyer . Retirez par la
prise - ne tirez pas sur le cordon.
■ Ne pas utiliser l' appareil que pour son utilisation prévue.
■ Ne laissez pas le cordon pendre sur le bord d'une table ou un banc ou en contact
avec des surfaces chaudes.
■ Ne pas utiliser ou placer une partie quelconque de ce produit sur une surface
chaude ou près (comme brûleur à gaz ou électrique ou plaque chauffante ou dans
un four chauffé ) .
■ Évitez de toucher les surfaces chaudes , utilisez les poignées .
■ Lorsque vous utilisez le Sandwich Press, s'assurer qu'il ya un espace aérien
suffisant au-dessus et tous les côtés pour la circulation de l' air.
■ L'utilisation de pièces ou accessoires non recommandés ou vendus par le distributeur de produit peut provoquer des dangers ou des dommages corporels ou
matériels.
■ Ce produit est destiné à un usage domestique / ménage normal.
LIRE ET CONSERVER CES INSTRUCTIONS
Une introduction à votre Sandwich Press
Félicitations pour l'achat de votre Tiffany Sandwich Press.
Avec très peu d' imagination , vous pouvez faire une fantastique variété de
collations, de repas et de divertissement. Tout type de collations grillées et fondu
peut être faite, rapidement et facilement.
Il n'est pas nécessaire de vous limiter à l'ancien type plaine grillé Sandwich.
Avant d'utiliser votre sandwich presse pour la première fois .
Remarque: Lorsque vous utilisez le Sandwich Press pour la première fois , l'
appareil émet une fumée fine . Cela est dû à l'échauffement des éléments et de
nouveaux composants et peut être négligé .
■ Retirez tous les emballages du Sandwich presse avant utilisation.
■ Vérifier que les plaques soient exempts de poussière . Essuyez la surface des
plaques avec un chiffon humide et séchez avec un chiffon , serviette de cuisine , etc
Placez le sandwich de presse sur une surface plane. Déverrouiller le clip de
stockage , et dévisser le bouton réglable en hauteur , ce qui permettra haut et en
bas pour ouvrir et fermer.
■ Plaques de cuisson doit être en position fermée pour le pré- chauffage.
■ Avant d'utiliser votre sandwich presse pour la première fois , les plaques
anti-adhésives doivent être assaisonné pendant le temps de préchauffage ( jusqu'à
ce que le voyant vert s'allume ) pour protéger la surface antiadhésive .
Note: Pour la première utilisation uniquement , saison des plaques en appliquant
une fine couche d'huile de cuisson , de beurre ou de margarine pour les surfaces de
cuisson et frottez avec une serviette en papier . Soyez prudent , car les plaques de
cuisson sera chaud .
■ Branchez le cordon d'alimentation à une prise de courant 230V et mettez l'appareil
sous tension . Le haut lumineux de chauffage (rouge) s'allume , indiquant que
l'alimentation à l'unité . Le voyant Prêt (vert) s'allume également , indiquant
opération de pré- chauffage.
■ Préchauffer les plaques pendant 2-4 minutes ( ou jusqu'à ce que la lumière verte
s'allume ) . Saison les plaques en conséquence en cas d'utilisation de la presse de
type sandwich pour la première fois . On obtient la température maximale des
plaques bout de 5 secondes du feu vert de s'éteindre.
■ Pendant la durée de préchauffage ( le rouge et le vert clair ) - Préparez votre
sandwich et lorsque vous êtes prêt , ouvrez le Sandwich presse et placer le
sandwich sur le fond plat de cuisson . Toujours placer Sandwiches vers l'arrière de
la plaque de cuisson .
■ Fermez la plaque supérieure et il ajustera automatiquement à l'épaisseur du
sandwich en raison de la charnière flottante . Cela permettra d'assurer une grillant
même . Utilisez le bouton réglable en hauteur si vous ne voulez pas toucher la
plaque supérieure du sandwich.
■ Grillage devrait prendre environ 5-8 minutes. Cependant, les temps de grillage
exacts dépendront types et épaisseurs de pains et de garnitures différentes
utilisées.
■ Ouvrez le couvercle lorsque le sandwich est cuit . Toujours enlever le sandwich en
utilisant une spatule en plastique ou en bois. Ne jamais utiliser d'ustensiles
métalliques car cela pourrait endommager le revêtement antiadhésif .
■ Fermez le couvercle pour préserver la chaleur avant d'être prêt à griller les
prochaines sandwiches.
■ Après utilisation, retirez la fiche de la prise murale.
Conseils pour de meilleurs résultats
Pain :
■ Le Sandwich presse peut être utilisé pour griller la plupart des types de pain blanc,
complet , multigrains , de seigle , pain aux raisins , etc Focaccia , pain turc,
Baguettes ainsi que les petits pains sont également idéales pour porter un toast
dans le Sandwich Press.
■ Pains sucrés, comme le pain aux raisins et Brioche , qui contiennent une forte
teneur en sucre ont tendance à brunir rapidement.
■ Pour les garnitures de sandwich molles ou liquides , utiliser le pain en tranches
moyennes , blanc ou brun . Si petite quantité de remplissage, utiliser griller le pain .
■ Le Sandwich Press est idéal pour griller les pains ordinaires ou des pains turcs
sans plombages ou garnitures. Essayez griller les pains turcs avec des confitures
pour une excellente alternative au pain norme au petit déjeuner.
Remplissages :
■ ATTENTION ! Il faut toujours prendre soin lors de mordre dans sandwiches
contenant des remplissages comme le fromage , la tomate et de la confiture , car ils
retiennent la chaleur et vous pouvez brûler votre bouche si mangé trop vite.
Fat Snacks gratuits:
■ Il n'est pas nécessaire d'utiliser du beurre ou de la margarine à l'extérieur du snack
grillé parce que la presse en sandwich présente une plaque design plat antiadhésif.
Entretien de votre produit
■ Après utilisation et avant le nettoyage, retirer la fiche , attendez presse sandwich
refroidir.
■ Nettoyez l'intérieur et les bords de la plaque chauffante avec une serviette de
papier absorbant ou un chiffon doux.
■ En cas de remplissage être difficiles à enlever , versez un peu d'huile de cuisson
sur la plaque chauffante et réchauffer pendant 1-2 minutes. Eteignez l'appareil et
essuyez après 5 minutes lorsque le remplissage a adouci . Essuyez l'extérieur avec
un chiffon légèrement imbibé veillant à ce qu'aucune humidité, l'huile ou de la
graisse pénètrent dans l'appareil.
■ Ne pas nettoyer l'intérieur ou à l'extérieur avec un tampon à récurer abrasif ou
laine d'acier car cela pourrait endommager et rayer les plaques antiadhésives .
■ Cet appareil n'est pas au lave-vaisselle .
■ Ne pas utiliser de jet-sur nettoyeurs , car cela aura une incidence sur la
performance de la surface anti-adhésive sur les plaques de cuisson .
NE PAS immerger dans l'eau ou tout autre liquide
Pour votre sécurité
■ Toujours utiliser le produit conformément à l' utilisation du produit et les
instructions d'entretien .
■ S'assurer que le cordon d'alimentation est maintenu à l'écart des plaques de
cuisson du sandwich presse lors de son utilisation .
Service
■ ATTENTION . Pour réduire le risque de choc électrique , ne pas retirer le
couvercle ( ou l'arrière) . Pas réparable par l'utilisateur . Confiez l'entretien à un
centre de service agréé.
■ Ne pas utiliser le produit avec un cordon ou une fiche endommagé ou après un
dysfonctionnement du produit, ou apparaît endommagé . Retourner le produit
complet pour le lieu d'achat pour inspection, réparation ou remplacement.
■ Dans certains produits , le remplacement par l'utilisateur de la corde flexible est
pas destiné . Outils spécifiques peuvent être nécessaires pour démonter le produit
ou de remplacer le cordon. Retourner le produit complet pour le lieu d'achat pour
inspection, réparation ou remplacement.
3
1
2
4
1.
2.
3.
4.
5.
Cucinare Piastra superiore
Parte inferiore piastra di cottura
Maneggiare
Drip Tray
Lock System
5
LEGGERE E CONSERVARE QUESTE ISTRUZIONI
PRIMA DEL PRIMO UTILIZZO
Leggere e seguire tutte le istruzioni di questo " Uso e manutenzione ", anche se si
sente si ha familiarità con il prodotto, e di trovare un posto per tenere a portata di
mano per riferimenti futuri .
Si richiama l'attenzione in particolare alle sezioni relative alle " NORME DI
SICUREZZA ", "Sicurezza ", e le dichiarazioni "ASSISTENZA" .
Per vostra comodità di registrare il numero di modello completo (che si trova sulla
targhetta di identificazione del prodotto) e la data di ricevimento del prodotto ,
insieme con la ricevuta di acquisto e di allegare alla garanzia e informazioni di
servizio . Conservare nel caso in cui il servizio di garanzia è richiesto .
NOTA : Il rating di questo prodotto ( come indicato sulla targhetta di identificazione
del prodotto ) si basa su prove di carico specifiche . Uso normale o l'uso di altri
accessori consigliati potrebbero trarre molta meno energia .
IMPORTANTI MISURE
Quando si utilizza un prodotto ad alimentazione elettrica , dovrebbero essere
sempre seguite le precauzioni di sicurezza di base , incluse le seguenti :
SI PREGA DI LEGGERE ATTENTAMENTE LE ISTRUZIONI PRIMA DI
UTILIZZARE IL PRODOTTO .
AVVERTENZA - Per ridurre il rischio di incendi , scosse elettriche o danni a persone
o cose :
■ Utilizzare sempre il prodotto da una fonte di alimentazione della stessa tensione ,
frequenza e portata indicati sulla targhetta di identificazione del prodotto.
■ è necessaria un'attenta supervisione quando il prodotto viene utilizzato in
presenza di bambini o persone inferme . Non permettere che i bambini usino come
un giocattolo .
■ Non utilizzare alcun prodotto con un cavo o spina danneggiati , o dopo di malfunzionamento del prodotto , o cade o appare danneggiato in alcun modo. Restituire il
prodotto completo al luogo di acquisto per l'ispezione , la riparazione o la sostituzione .
■ Per ridurre il rischio di scosse elettriche , non immergere o esporre il cavo di
prodotto o flessibili a pioggia, umidità o liquidi diversi da quelli necessari per il
corretto funzionamento del prodotto.
■ Questo prodotto non deve essere utilizzato in prossimità di acqua , come vasca da
bagno , lavandini , piscina, ecc , dove potrebbe verificarsi il rischio di immersione o
spruzzatura.
■ Assicurarsi che il cavo di alimentazione sia tenuto lontano dalle piastre del panino
stampa quando è in uso .
■ Non lasciare l'apparecchio incustodito quando è acceso .
■ Spegnere e staccare la spina dalla presa di corrente quando non è in uso, prima
di montare o smontare le parti e prima di pulirlo . Togliere afferrando la spina - non
tirare il cavo .
■ Non utilizzare l' apparecchio per scopi diversi rispetto al suo uso previsto .
■ Non lasciare che il cavo penda dal bordo di un tavolo o banco o toccare le superfici
calde .
■ Non utilizzare o collocare qualsiasi parte di questo prodotto sopra o vicino a una
superficie calda ( come il gas o bruciatore elettrico o piastra calda o in un forno
riscaldato ) .
■ Evitare di toccare le superfici calde , usare maniglie e pomoli .
■ Quando si utilizza l' Sandwich stampa, assicurarsi che ci sia sufficiente spazio
d'aria sopra e tutti i lati per la circolazione dell'aria .
■ L' uso di accessori o accessori non raccomandati o venduti dal distributore del
prodotto può causare pericoli o danni a persone o proprietà .
■ Questo prodotto è destinato esclusivamente all'uso domestico / famiglia normale.
LEGGERE E CONSERVARE QUESTE ISTRUZIONI
Un'introduzione alla tua Sandwich Press
Congratulazioni per l'acquisto del vostro Tiffany Sandwich Press.
Con poca fantasia , si può fare una fantastica varietà di spuntini, pasti e divertente.
Tutti i tipi di snack tostati e sciolto può essere fatto , in modo rapido e semplice.
Non vi è alcuna necessità di limitare se stessi per il vecchio tipo di pianura tostato
Sandwich .
Prima di utilizzare il vostro panino stampa per la prima volta .
Nota : Quando si utilizza il Sandwich stampa per la prima volta , l'apparecchio
emette un sottile fumo . Questo è causato dal riscaldamento degli elementi e di
nuovi componenti e può essere ignorato.
■ Rimuovere tutti gli imballaggi dal panino stampa prima dell'uso .
■ Verificare che le piastre siano privi di polvere . Pulire la superficie delle piastre con
un panno umido e asciugare con un panno , carta da cucina , ecc
Posizionare il Sandwich Stampa su una superficie piana . Sblocca la clip bagagli, e
svitare la manopola regolabile in altezza, questo permetterà alto e in basso per
aprire e chiudere .
■ Piastre di cottura deve essere in posizione chiusa per il pre- riscaldamento .
■ Prima di utilizzare il vostro panino stampa per la prima volta , le piastre
antiaderenti deve essere stagionato durante il tempo di preriscaldamento ( fino a
quando la luce verde si accende) per proteggere la superficie antiaderente .
Nota: Per il primo utilizzo SOLO , stagione i piatti applicando un sottile strato di olio
da cucina , burro o margarina per le superfici di cottura e strofinare con un tovagliolo
di carta . Fare attenzione , come le piastre di cottura sarà caldo .
■ Collegare il cavo di alimentazione in una presa di corrente 230V e accendere
l'alimentazione . L' up leggero riscaldamento ( rosso) si accende , indica che vi è
alimentazione all'unità . La spia di attività ( verde ) si illuminerà , indicando
operazione di pre - riscaldamento .
■ Preriscaldare le piastre per 2-4 minuti (o fino a quando la luce verde si accende ).
Stagione delle piastre di conseguenza se si utilizza la stampa a sandwich per la
prima volta . Temperatura massima delle piastre si ottiene dopo 5 secondi la luce
verde spegnersi.
■ Durante il tempo di preriscaldamento ( sia rosso che verde accesa) - Preparare il
panino e quando è pronto , aprire il panino stampa e posizionare il panino sulla
piastra di cottura inferiore . Inserire sempre Panini verso la parte posteriore della
piastra di cottura.
■ Chiudere la piastra di cottura superiore e regola automaticamente allo spessore
del sandwich a causa della cerniera flottante . Ciò garantirà anche uno tostatura .
Utilizzare la manopola di altezza regolabile , se non si desidera che la piastra
superiore di toccare il panino .
■ Tostatura dovrebbe durare circa 5-8 minuti . Tuttavia, i tempi di tostatura esatti
dipendono tipo e spessore di pane e ripieni diversi utilizzati .
■ Aprire il coperchio quando il panino è cotto . Rimuovere sempre il panino
utilizzando spatola di plastica o di legno . Non utilizzare mai utensili in metallo per
evitare di danneggiare il rivestimento antiaderente .
Chiudere il coperchio per conservare il caldo fino al momento di brindare prossimi
panini .
■ Dopo l'uso , rimuovere la spina dalla presa a muro .
Suggerimenti per ottenere migliori risultati
Pane :
■ The Sandwich Press può essere usato per brindare maggior parte dei tipi di pane:
bianco , integrale , multicereali , di segale , Uvetta Pan , ecc Focaccia , pane turco ,
Baguettes così come panini sono ideali anche per brindare in Sandwich Press.
■ Pani dolci , come Raisin Pane e brioche , che contengono un alto contenuto di
zuccheri tendono al marrone più veloce.
■ Per i ripieni panino morbida o liquido , utilizzare il pane a fette medie , bianco o
marrone . Se piccola quantità di ripieno , usare il pane tostato.
■ The Sandwich Press è l'ideale per tostare pane pianura o pani turchi senza
otturazioni o condimenti . Prova tostare pane turco con marmellate per una grande
alternativa al pane normale a colazione .
Imbottiture:
■ ATTENZIONE ! Prestare sempre attenzione quando addentando panini
contenenti otturazioni come il formaggio, pomodoro e marmellate , in quanto
trattengono il calore e si può bruciare la bocca se mangiato troppo in fretta .
Fat snack gratuiti :
■ Non è necessario utilizzare alcun burro o margarina sulla parte esterna della
merenda tostato perché la stampa panino ha un Non- Stick Piastra design piatto .
Cura del prodotto
■ Dopo l'uso e prima della pulizia , staccare la spina , attendere panino stampa a
raffreddare .
■ Pulire l'interno e bordi della piastra di riscaldamento con il tovagliolo di carta
assorbente o un panno morbido.
■ Qualora un riempimento essere difficile da rimuovere , versare un po 'di olio di
cottura sulla piastra di riscaldamento e ri- calore per 1-2 minuti . Spegnere
l'alimentazione e pulire dopo 5 minuti, quando il ripieno è ammorbidita. Pulire
l'esterno con un panno leggermente inumidito assicurando che nessuna umidità ,
olio o grasso all'interno dell'apparecchio .
■ Non pulire l'interno o l' esterno con qualsiasi panni abrasivi o lana d'acciaio per
non danneggiare e graffiare le piastre antiaderenti.
■ Questa unità non è lavabile in lavastoviglie .
■ Non utilizzare spray detergenti , come questo influirà sul rendimento della
superficie antiaderente sulle piastre di cottura .
Non immergere in acqua o altri liquidi
Per la vostra sicurezza
■ Utilizzare sempre il prodotto in conformità con l'uso del prodotto e le istruzioni per
la cura .
■ Assicurarsi che il cavo di alimentazione sia tenuto lontano dalle piastre del panino
stampa quando è in uso.
Servizio
■ ATTENZIONE . Per ridurre il rischio di scosse elettriche , non rimuovere il
coperchio ( o il retro) . Non ci sono parti riparabili dall'utente. Rivolgersi a un centro
di assistenza autorizzato .
■ Non utilizzare il prodotto con un cavo o spina danneggiati , o dopo di malfunzionamento del prodotto , o appare danneggiato in alcun modo. Restituire il prodotto
completo al luogo di acquisto per l'ispezione , la riparazione o la sostituzione .
■ In alcuni prodotti , la sostituzione da parte dell'utente del cavo flessibile, non è
destinato . Attrezzi speciali possono essere richiesti per smontare il prodotto o
sostituire il cavo . Restituire il prodotto completo al luogo di acquisto per l'ispezione,
la riparazione o la sostituzione .
3
1
2
4
1.
2.
3.
4.
5.
5
.
"
"
"
" "
"
.
(
)
.
(
)
.
.
.
:
:
.
:
■
.
.
■
.
■
.
.
■
.
■
.
.
■
.
■
)
.
.
.
-
■
.
■
■
■
(
.
■
■
.
.
■
.
/
■
.
KING
.
.
.
.
.
.
.
■
(
)
.
)
■
.
.
.
(
:
■
.
.
.
.
.
230V
■
:
■
■
(
(ON
.
)
.
.
.
.OFF
(ON-
)
42
■
5
)
■
.
.
.
.
.
5-8
.
■
.
.
■
.
■
.
■
.
■
:
:
:
■
.
■
.
.
■
.
.
■
.
:
.
:
!
.
:
.
.
.
■
■
.
5
.
.
■
21
■
.
■
■
.
:
.
.
■
(
.
■
.
)
.
.
.
.
.
■
■
■
.
SATIŞ SONRASI SERVİS
Cihazda bir arıza olması halinde King Yetkili Servisi’ne başvurmadan önce
aşağıdaki kontrolleri yapınız.
1- Fiş prize doğru olarak takılmış mı?
2- Evin elektrik tesisatında bir problem var mı?
3- Kullanım talimatları doğru olarak uygulanmış mı?
Eğer arıza halen giderilmediyse size en yakın King Yetkili Servisi’ne müracaat ediniz.
Bu cihazla ilgili tüm yedek parçalar kılavuz kitapçığında sunulan King Yetkili
Servisi’nden temin edilebilir. Bir sorun ile karşılaştığınızda lütfen bizi arayınız.
DİKKAT: Cihazı yere düşürmemeye dikkat ediniz. Kullanım esnasında cihazı
düşürürseniz ilk olarak fişini prizden çekiniz. Düşme esnasında cihazın parçaları
kırılabilir ve cihaz hasar görebilir. Bu durumda cihazı kullanmadan önce King
Yetkili Servisi’ne tetkik ettiriniz.
TAŞIMA VE NAKLİYE
Cihazın naklini kendi orjinal kutusu ve bölmeleri ile veya cihazın etrafını koruyacak
yumuşak bir bezle sararak yapmak gerekir. Yanlış ambalajlama esnasında plastik
parçalar kırılabilir, elektrik aksamı zarar görebilir.
NOT: ÜRÜNÜN MÜŞTERİYE İNTİKALİNDEN SONRA YÜKLEME, BOŞALTMA VE TAŞIMA
SIRASINDA OLUŞAN ARIZALAR VE HASARLAR GARANTİ KAPSAMINA GİRMEZ.
UYARI: Bu cihazla ilgili her türlü tamir ve onarım yalnız King Yetkili Servisleri tarafından yapılır.
Yetkili Servislerimiz dışındaki kişilerce yapılan herhangi bir tamir ve onarımı girişimi tüketici
haklarının tamamen ortadan kalkmasına neden olacaktır. Bu cihazla ilgili tüm yedek parçalar
yalnız bu kılavuz kitapçığında sunulan King Yetkili Servisleri’nden temin edilmek zorundadır.
King Servislerinden temin edilmemiş King harici yedek parçalar ile yapılan tamiratlardan
şirketimiz sorumlu değildir. Bir sorun ile karşılaştığınızda lütfen bizi arayınız.
Çevre: Cihazınızı kullanmak istemediğiniz
zaman veya ömrü tükendiğinde diğer çöplerle
birlikte atmayınız. Tekrar dönüşüm için
cihazları toplayanlara veriniz. Böylece çevreye
saygı göstermiş olursunuz.