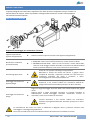
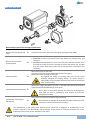
1
Servomotori brushless a magneti permanenti serie NGB - TOP Permanent magnet brushless servomotors NGB – TOP series Manuale d’uso e manutenzione Operation and maintenance manual Versione italiana pag. 2÷20 English version pag. 21÷40 SOMMARIO PERSONALE QUALIFICAT O 3 SICUREZZA 3 NORMATIVE DI RIFERIMENTO 4 RICEZIONE / CONSERVAZIONE 5 ETICHETTATURA MOTORI 5 PIAZZAMENTO / ACCOPP IAMENTO 5 FUNZIONAMENTO 5 PROTEZIONE TERMI CA 6 FRENO D’EMERGENZA (O PZIONE) 7 TRASDUTTORI DI POSIZ IONE 8 COLLEGAMENTO 9 MANUTENZIONE 15 CUSCINETTI 17 INERZIA SUPPLEMENT ARE (OPZIONE) 19 ANOMALIE DI FUNZIONA MENTO E SOLUZIONI 19 Il presente manuale si riferisce solamente ai prodotti standard riportati nel catalogo. MAGNETIC non si riterrà responsabile di mal funzionamenti o incidenti dovuti alla mancata applicazione delle indicazioni contenute nel presente manuale. A seguito sono riportati i punti principali per il corretto utilizzo dei servomotori brushless, serie NGB e TOP. 2 SOMMARIO | Manual NGB / TOP IT PERSONALE QUALIFICAT O Questo manuale è rivolto al PERSONALE QUALIFICATO che deve conoscere e osservare le disposizioni antinfortunistiche nazionali e le normative vigenti in ambito delle installazioni in bassa tensione. Sono necessarie le seguenti qualifiche: Trasporto Montaggio meccanico Collegamento elettrico Setup del motore solo a persone con nozioni di movimentazione solo meccanici qualificati solo elettricisti specializzati solo tecnici qualificati con nozioni approfondite in meccanica, elettrotecnica e tecnologia di azionamenti SICUREZZA I motori possiedono parti in tensione e parti in movimento per cui è necessario seguire alcune regole per non incorrere in situazioni di pericolo. La movimentazione, la messa in servizio, l’utilizzo e l’eventuale riparazione devono essere eseguite da PERSONALE QUALIFICATO e solamente dopo avere seguito le seguenti disposizioni. Il personale qualificato deve conoscere le procedure per l’istallazione, la manutenzione e l’utilizzo del motore e aver letto il presente manuale d’uso e manutenzione. Il personale qualificato deve conoscere tutti i dati tecnici, le specifiche, i collegamenti Elettrici relativi al motore da montare. Tutte le lavorazioni devono essere vietate ad operatori non qualificati. Al fine di ridurre azioni che potrebbero penalizzare la macchina, l’operatore e/o le persone o le cose vicine al motore, è necessario osservare le seguenti avvertenze. Prestare particolare cura durante il posizionamento della macchina per non incorrere in accidentali cadute. L’albero motore è libero di ruotare e quindi non lo si deve utilizzare per la movimentazione. Sollevare e/o spostare i motori utilizzando solamente i golfari montati sul motore o ancoraggi idonei. Non avvicinarsi a parti in rotazione (es. albero motore). Utilizzare adeguati dispositivi di protezione individuale durante le lavorazioni in prossimità dell’estremità d’asse (presenza di spigoli taglienti nella sede linguetta). Prestare attenzione che dadi, rondelle o altro tipo di corpi estranei entrino in contatto con l’avvolgimento con parti in rotazione. Prima di eseguire il collaudo della macchina prevedere adeguate protezioni attorno alle parti in rotazioni (giunti, etc.). Verificare anche le viti per il fissaggio del motore alla macchina. Verificare l’assenza di tensione nell’impianto prima di procedere al collegamento elettrico del motore. Verificare che i cavi elettrici non siano stati danneggiati durante il montaggio, che siano disposti lontano da parti in movimento e che non siano sottoposti a sforzi meccanici. Prima di procedere all’alimentazione del motore controllare il fissaggio delle viti o dadi delle morsettiere elettriche e chiudere il coperchio della scatola morsettiera (ove presente). Non scollegare alcun connettore durante il funzionamento o comunque con quadro in tensione. IT Manual NGB / TOP | PERSONALE QUALIFICATO 3 La superficie dei motori potrebbe raggiungere o superare i 100°C, quindi non posizionare vicino al motore parti che si potrebbero deteriorare o incendiare. Attendere il raffreddamento del motore fino ad una temperatura inferiore a 40°C prima di toccarlo. È pericolosa la permanenza in un’area di 2 metri intorno al rotore magnetico per le persone con pacemaker (stimolatore cardiaco). Il rotore dei motori brushless è costituito da materiale magnetico in terre rare che genera un intenso campo magnetico: durante le fasi di manutenzione (motore aperto) fare quindi attenzione agli oggetti ferro-magnetici, soggetti ad attrazione, presenti nell’area di lavoro. L’attrazione e l’urto di oggetti sulle parti che costituiscono il rotore, possono pregiudicarne la funzionalità e procurare danni fisici alle persone (schiacciamento arti e/o ferimento con oggetti magneticamente attratti dal rotore). Non utilizzare il motore come base d’appoggio per persone o per parti della macchina. Non assestare colpi violenti sull’albero motore o sui meccanismi ad esso collegato per non danneggiare i cuscinetti motore NORMATIVE DI RIFERIM ENTO I servomotori brushless serie NGB e serie TOP, sono realizzati nel rispetto delle normative internazionali IEC60034 relative alle macchine elettriche rotanti. Norme italiane principali applicate (*): CEI EN 60034-1 Caratteristiche nominali e di funzionamento CEI EN 60034-5 Grado di protezione degli involucri delle macchine rotanti (codice IP) - classificazione CEI EN 60034-6 Metodi di raffreddamento codice IC CEI EN 60034-7 Classificazione delle forme costruttive e dei tipi di installazione CEI EN 60034-8 Marcatura dei terminali e senso di rotazione CEI EN 60034-11 Protezione termica: specifica i requisiti relativi all'utilizzo di sensori termici di protezione inseriti negli avvolgimenti di statore CEI EN 60034-14 Vibrazioni meccaniche di macchine con altezza d’asse uguale o superiore a 56mm-Misura, valutazione e limiti dell’intensità di vibrazione CEI EN 60034-18-1 e 21 Valutazione funzionale dei sistemi di isolamento - Principi direttivi generali e procedure di prova per avvolgimenti a filo – Valutazione termica e classificazione CEI CLC/TS EN 60034-25 Guida per la progettazione e le prestazioni dei motori in corrente alternata specificamente progettati per l'alimentazione da Convertitori (*) La numerazione della classificazione normativa italiana CEI riportata, corrisponde alla numerazione europea EU CENELEC e internazionale IEC. I prodotti contenuti nel presente manuale sono realizzati nel rispetto delle direttive comunitarie della bassa tensione (2006/95/CE) I motori devono essere installati in conformità alle istruzioni fornite dal costruttore: la messa in servizio può essere effettuata solo dopo aver verificato che la macchina, dove verrà applicato il motore, sia conforme alle direttive di riferimento. 4 NORMATIVE DI RIFERIMENTO | Manual NGB / TOP IT RICEZIONE / CONSERVA ZIONE Tutti i motori vengono accuratamente collaudati e controllati prima della spedizione. Ogni motore è fornito di un bollettino di collaudo dove sono riportate tutte le caratteristiche del motore e dei relativi accessori. All'arrivo è opportuno verificare che i motori non abbiano subito danni durante il trasporto; ogni eventuale inconveniente va subito segnalato. Se i motori non vengono subito installati vanno conservati in un ambiente asciutto e pulito privo di vibrazioni che potrebbero danneggiare i cuscinetti e devono essere protetti contro le brusche variazioni di temperatura generalmente causa di condensa. Verificare l'estremità d'asse e, se necessario, ripristinare lo strato di vernice protettiva con opportuni prodotti anticorrosivi. Se i motori prima dell'installazione sono stati per lungo tempo in un ambiente a bassa temperatura, vanno lasciati per alcuni giorni a temperatura ambiente per eliminare l'eventuale condensa. ETICHETTATURA MOTORI Descrizione delle sigle e dei dati presenti nella targa motore: N0 = Numero di matricola Type = Tipo di motore Nn = Velocità nominale BEMF = f.c.e.m fase-fase @ 1000 RPM IP = Grado di protezione Tn0 = Coppia @ 0 RPM In0 = Corrente @ 0 RPM IC = Metodo di raffreddamento Tp = Coppia di picco Ip = Corrente di picco 2p = Numero di poli motore Transd. = Tipo di trasduttore Brake = Tipo di freno (opzionale) PIAZZAMENTO / ACCOPP IAMENTO Tutti i servomotori possono essere montati in qualsiasi posizione avendo uno dei due cuscinetti bloccato. Essendo l’accoppiamento un’operazione molto delicata va eseguita con la massima cura per assicurare un buon funzionamento del motore. L'organo di trasmissione va montato a caldo (80-100°C) o a freddo utilizzando il foro filettato in testa all'asse motore, con apposito attrezzo. N.B. Nel montaggio sono assolutamente da evitare colpi che potrebbero danneggiare i cuscinetti. N.B. I rotori dei servomotori sono bilanciati con mezza linguetta, asse pieno (grado R secondo ISO 2373). Vanno quindi montati organi di trasmissione (ingranaggi, semi-giunti, pulegge) bilanciati anch’essi con mezza chiavetta, foro non strozzato. L'accoppiamento deve essere eseguito in modo da ottenere un buon allineamento; in caso contrario possono manifestarsi: forti vibrazioni, irregolarità di moto e spinte assiali. Nel caso di accoppiamento con puleggia è necessario verificare che il carico radiale non sia eccessivo (vedasi paragrafo 9). Nel caso di accoppiamento diretto in bagno d'olio assicurassi che sia montato l'anello paraolio, fornito solo su richiesta. Tale anello non va assolutamente montato quando l'accoppiamento è a secco. FUNZIONAMENTO Verificare che il funzionamento sia concorde alla targa motore e ai dati dichiarati nel catalogo. Si ricorda che la massima temperatura ambiente prevista è di 40°C: per temperature superiori occorre contattare il nostro ufficio commerciale per la necessaria verifica. IT Manual NGB / TOP | RICEZIONE / CONSERVAZIONE 5 PROTEZIONE TERMICA La protezione termica dei motori è realizzata con sensori tipo: Sonda klixon a contatto normalmente chiuso: (SOLUZIONE STD) Temperature di commutazione nominali (NST) 150°C con tolleranza (Standard): ± 5K Campo di temperatura di reinserzione: -35K ± 15K Tensione d’esercizio max AC / DC: 500 V Corrente di misurazione AC cos φ = 1,0 (carico ohmico) / cicli di commutazione: 2,5 A / 10.000 6,3 A / 3.000 7,5 A / 300 In alternativa alla protezione tipo klixon i motori posso essere richiesti anche con termoresistenze e termistori di tipo KTY 84/130 e PTC: Termo resistenza KTY84/130 (con coefficiente di resistenza positivo): Temperatura di lavoro: -40°C + 300°C Resistenza a 100°C: 970÷1030 Ω Corrente di misurazione @ 25/300°C: 10/2 mA A seguire riportiamo la tabella specifica del valore di resistenza ai capi del sensore in funzione della temperatura misurata: T ambiente °C 0 10 20 30 40 50 60 70 80 90 100 110 120 130 140 150 160 6 R minima Ω 474 514 555 599 645 694 744 797 852 910 970 1029 1089 1152 1216 1282 1350 R tipica Ω 498 538 581 626 672 722 773 826 882 940 1000 1062 1127 1194 1262 1334 1407 PROTEZIONE TERMICA | Manual NGB / TOP R massima Ω 522 563 607 652 700 750 801 855 912 970 1030 1096 1164 1235 1309 1385 1463 IT Termistore PTC (con coefficiente di resistenza positivo): Temperatura di reazione nominale: 70 °C - 180 °C Campo di tensione d’esercizio: 2,5 VDC - 30 VDC Tensione sensore max. consigliata: 2,5 VDC - 7,5 VDC FRENO D’EMERGENZA (OPZIONE) Sono freni di stazionamento del tipo a caduta di tensione, possono essere usati solamente a motore fermo, e non per frenate dinamiche, salvo casi di emergenza. Nelle normali condizioni d’impiego non richiedono manutenzioni. Tutti i freni sono alimentati a 24 Vdc. Una errata alimentazione (Vcc > 25 V o Vcc < 21,5 V) potrebbe causare strisciamenti anomali, cigolii fastidiosi ed in qualche caso freno che non si sblocca. È quindi importante verificare il valore della tensione di alimentazione. Nel collegamento è indispensabile rispettare la polarità (la connessione del freno è alloggiata all’interno del connettore di potenza nei contatti 4,5 – vedi schema connessioni). La coppia frenante indicata in tabella vale per i freni funzionanti a secco e con le superfici di attrito assolutamente prive di grasso. Essa viene raggiunta dopo un periodo di rodaggio la cui durata varia in funzione del lavoro. Tutti i motori provvisti di freno vengono consegnati rodati e verificati su banco di collaudo con chiave dinamometrica per garantire la coppia di frenatura dichiarata. AVVERTENZA: Quando viene interrotta l’alimentazione del freno, ai suoi capi, si crea una sovratensione autoindotta di valore elevato che potrebbe danneggiare l’alimentazione. Prevedere quindi una adeguata protezione ai capi dell’alimentatore (ad esempio un diodo di ricircolo posto in parallelo alla bobina del freno). IT Manual NGB / TOP | FRENO D’EMERGENZA (opzione) 7 NGB85 – TOP40 NGB108 – TOP50 NGB145 Brake model Kendrion Binder 86621 06H Kendrion Binder 86621 07H KEB combiperm 08.P1 Breaking torque 3.2 Nm 11 Nm 36 Nm Rated voltage 24 Vdc (±10%) 24 Vdc (±10%) 24 Vdc (-6+10%) Rated power 12 W 16 W 26 W Nominal current 0.50 Adc Additional inertia 0.38 kgcm 0.64 Adc 2 1.06 kgcm 1.08 Adc 2 0.38 kgcm2 Insertion response time 19 ms 20 ms 22 ms Release response time 29 ms 29 ms 90 ms Additional weight 0.3 kg 0.6 kg 1.6 kg Max switching work/hour 350 (under 3000 RPM) 400 (under 3000 RPM) 720 (under 3000 RPM) TRASDUTTORI DI POSIZ IONE I motori possono essere equipaggiati nella soluzione standard da resolver o da encoder alloggiati nello scudo posteriore per la protezione contro gli urti accidentali. Nel dettaglio sono disponibili i seguenti tipi: Resolver 2 poli (SOLUZIONE STD) . Rapporto di trasformazione = 0.5 ± 10% Tensione alimentazione = 10Vrms – 4.5Khz Impedenza ingresso = 200 Ohm @ 4.5kHz Impedenza uscita = 370 Ohm Velocità massima = 10000 RPM Encoder TTL + S. HALL modello EF36 (segnali incrementali + fasi di commutazione + impulso di zero) Risoluzione impulsi incrementali/giro = vedere valore in targa motore o bollettino di collaudo – max 2048 imp/giro Tensione aliment. = 5Vdc ± 5% (15mA nom.) Frequenza massima = 300 kHz Velocità massima = 6000 RPM Elettronica d’uscita = Line Driver Encoder sinusoidale modello S21 (segnali incrementali + assoluti seno coseno + impulso di zero) Risoluzione impulsi incrementali = 2048 imp/giro Tensione aliment. = 5Vdc ± 10% (40mA nom.) Offset Vdc dei segnali d’uscita = 2.5Vdc ± 20% Tensione uscite incrementali 1 Vpp Tensione uscite assolute =1Vpp Tensione impulso di zero R(+) R(-) ≥ 0.4V Frequenza massima = 500 kHz Velocità massima = 12000 RPM 8 TRASDUTTORI DI POSIZIONE | Manual NGB / TOP IT Encoder digitale assoluto multigiro AD36 Risoluzione impulsi incrementali = 2048 imp/giro Tensione aliment. = 5Vdc -5+10% (100mA nom.) Risoluzione posiz.assoluta monogiro = 19 bit Risoluzione posiz.assoluta multigiro = 12 bit Tensione uscite incrementali 1 Vpp Frequenza massima = 500 kHz Velocità massima = 10000 RPM (continuativa) (interfaccia Biss) COLLEGAMENTO Tutti i motori sono equipaggiati con connettori industriali maschi cilindrici M23 con fissaggio a filetto predisposti per attacco Speedtec (Intercontac). I connettori montati sono realizzati in conformità alle normative di riferimento: DIN 40050, DIN EN 60352-2, DIN EN ISO 60512 e quindi compatibili per connessioni con connettori volanti di altre case costruttrici rispondenti a queste norme. Su richiesta forniamo la parte volante dei connettori potenza e di segnale in versione Speedtec da cablare su cavo (a cura del cliente). Tutti i connettori sono garantiti con grado di protezione IP67 (rif. IEC 60529) realizzati per essere protetti contro polveri, umidità, solventi per la pulizia, oli industriali, eccetera. Sia il connettore di potenza che quello di segnale sono predisposti per il cablaggio di cavi schermati di cui consigliamo l’impiego (per le connessioni fare riferimento agli schemi riportati nel manuale; in particolare suggeriamo l’utilizzo di cavi multipolari con doppini intrecciati e schermati a coppie con schermatura aggiuntiva esterna del cavo. Le versioni disponibili (per la parte connettore fisso) sono: uscita connettori diritta (versione B) uscita connettori 90° rotabile (versione D) – angolo di rotazione > 180° meccanici cavi liberi (solo per motore TOP 20: configurazione standard) Versione B Versione D Rotabili Range temperatura funzionamento -20 +130°C Tensione massima 630V ac/dc (Potenza) 125V ac/dc (Segnale) Grado di protezione IP67 Sezione filo max. 4 mm2 (Potenza 6 pins) 1 mm2 (Segnale 17 pins) Corrente massima 28A (Potenza 6 pins) 10A (Segnale 17 pins) Superficie metallica nichelata Frutto portacontatti in PA 6.6 IT Manual NGB / TOP | COLLEGAMENTO 9 Posizione connettori (*) NGB 108 – 145 NGB 108 – 145 con opzione freno o con inerzia aggiuntiva Connettore di segnale Connettore di segnale Connettore di potenza + freno Connettore di potenza NGB 85 TOP 40-50 versione con e senza freno TOP 20 disponibile anche in versione con connettori Cavo di segnale Connettore di segnale Connettore di potenza + freno Cavo di potenza * Le immagini riportate sono esemplificative sia per la versione B che per la versione D Connessione di potenza + freno (opzionale) a 6 contatti: Pin 1 Fase U Pin 2 Fase V Massa 10 Pin 4 + 24Vdc freno (opzionale) Pin 5 0 Vdc freno (opzionale) Pin 6 Fase W COLLEGAMENTO | Manual NGB / TOP Vista frontale connettore pannello (fisso su motore) IT Connessioni trasduttori velocità/posizione Riferimento metallico tra pins 1 e pins 11 ENCODER HENGSTLER S 21 SIN-COS INCREMENTALE E ASSOLUTO N° 1 2 3 4 5 6 7 8 9 10 11 12 13 14 15 16 17 SIGNAL A+ AR+ (Z) D- (ref. COS) C+ (ref. SIN) C- (ref. SIN) 0V KLIXON / KTY (+) KLIXON / KTY (-) Up +5V (Vdc) B+ BR- (Z) D+ (ref. COS) 0V sensor +5V sensor SHIELD ENCODER HENGSTLER AD36 ASSOLUTO MULTIGIRO – INTERFACCIA BiSS N° 1 2 3 4 5 6 7 8 9 10 11 12 13 14 15 16 17 COLOR WHITE-GREEN BROWN-GREEN PINK FREE YELLOW FREE BROWN WHITE / RED WHITE / BLACK WHITE RED/BLUE GRAY/PINK GRAY GREEN BLACK VIOLET SHIELD SIGNAL A+ A+ DATA + CLOCK 0V KLIXON / KTY (+) KLIXON / KTY (-) Up +5V (Vdc) B+ B- DATA - CLOCK 0V sensor +5V sensor SHIELD ENCODER ELTRA EF 36 TTL LINE DRIVER INCREMENTALE + FASI HALL RESOLVER TAMAGAWA T2PD N° 1 2 3 4 5 6 7 8 9 10 11 12 13 14 15 16 17 N° 1 2 3 4 5 6 7 8 9 10 11 12 13 14 15 16 17 COLOR GREEN BROWN BLUE GRAY VIOLET WHITE-GREEN BLACK WHITE / RED WHITE / BLACK RED YELLOW PINK OR ORANGE WHITE RED-BLUE BROWN-GREEN GRAY-PINK SHIELD IT SIGNAL A+ AZ U V V0V KLIXON / KTY (+) KLIXON / KTY (-) + Vdc B+ BZUWW SHIELD COLOR YELLOW BLUE RED - WHITE FREE FREE FREE FREE WHITE / RED WHITE / BLACK FREE RED BLACK YELLOW-WHITE FREE FREE FREE SHIELD 2 POLI SIGNAL SEN + SEN V REF + KLIXON / KTY (+) KLIXON / KTY (-) COS + COS V REF - CASE Manual NGB / TOP | COLLEGAMENTO 11 Per la connessione del motore attenersi allo schema riportato. Utilizzare i seguenti tipi di cavi: Per i segnali: il cavo di collegamento deve essere del tipo a 4 doppini intrecciati e schermati più schermo esterno. Gli schermi devono essere accomunati solo dal lato convertitore. Montaggio connettore potenza volante Codice Magnetic 000075056F (pressacavo per cavo Ø 9.5 ÷ 14.5 mm) Codice Intercontec BSTA 085 FR23 42 0100 000 (pressacavo per cavo Ø 9.5 ÷ 14.5 mm) ① Infilare sul cavo la sezione ghiera ferma cavo ② Sguainare il cavo ③ Riportare la calza metallica sulla sezione ferma cavo ④ Spellare i cavi potenza e segnale ⑤ Crimpare o saldare i cavi ai relativi pins (per il crimpaggio utilizzare apposita pinza di crimpaggio Intercontec) ⑥ Bloccare il riporto di calza metallica nell’apposita sede del ferma cavo ⑦÷⑩ ⑪⑫ ⑬ 12 Inserire i pins crimpati o saldati nel frutto porta contatti Bloccare il frutto porta contatti con il modulo guida isolante e inserirlo all’interno del corpo metallica Avvitare il serra cavo per ottenerne il bloccaggio con una coppia torcente di circa 17Nm. COLLEGAMENTO | Manual NGB / TOP IT Montaggio connettore segnale volante Codice Magnetic 000075054F (pressacavo per cavo Ø 6 ÷ 10 mm) Codice Intercontec ASTA 035 FR11 41 0100 000 (pressacavo per cavo Ø 6 ÷ 10 mm) ① Infilare sul cavo la sezione ghiera ferma cavo ② Sguainare il cavo ③ Riportare la calza metallica sulla sezione ferma cavo ④ Spellare i cavi potenza e segnale ⑤⑥ Crimpare o saldare i cavi ai relativi pins (per il crimpaggio utilizzare apposita pinza di crimpaggio Intercontec) ⑦⑧ Bloccare il riporto di calza metallica nell’apposita sede del ferma cavo ⑨⑩ Sbloccare il frutto porta contatti aprendolo come da figura ⑪⑫ Inserire i pins sul frutto porta contatti e chiudere il frutto per bloccarli in posizione corretta ⑬⑭ Inserire il particolare isolante e inserire il gruppo connettore all’interno del corpo metallico ⑮ Avvitare il serra cavo per ottenerne il bloccaggio con una coppia torcente di circa 7 Nm. Smontaggio connettori parte fissa: IT Manual NGB / TOP | COLLEGAMENTO 13 Svitare le 4 viti di fissaggio connettore allo scudo lato opposto flangia Sganciare il frutto porta-contatti dal corpo metallico del connettore e sfilare i fili di potenza cablati sui pins POTENZA 6 PINS Svitare la vite di chiusura del connettore come in figura Aprire il connettore e sganciare il frutto porta-contatti dal corpo metallico del connettore e sfilare i fili di potenza cablati sui pins Per smontare il connettore di segnale è necessario utilizzare l’apposita attrezzatura Intercontec Svitare le 4 viti di fissaggio connettore allo scudo lato opposto flangia Inserire l’attrezzatura nel connettore e spingere verso il motore il frutto porta-contatti per sganciarlo dal corpo metallico Aprire di 2 mm il frutto porta-contatti (come in figura) per poter sfilare i pins (esercitare sui pins una piccola pressione per lo sgancio dal frutto) SEGNALE 17 PINS Per smontare il connettore di segnale è necessario utilizzare l’apposita attrezzatura Intercontec Aprire il corpo metallico del connettore come descritto per il connettore di potenza Aprire di 2 mm il frutto porta-contatti (come in figura) per poter sfilare i pins (esercitare sui pins una piccola pressione per lo sgancio dal frutto) 14 COLLEGAMENTO | Manual NGB / TOP IT MANUTENZIONE In questo paragrafo sono descritte le operazioni ed i codici di alcuni componenti utili per ricambi e la manutenzione del motore: prima di procedere scollegare elettricamente il motore e disaccoppiarlo meccanicamente dall’impianto. TOP 40, TOP 50, NGB 85 Sequenza di smontaggio per sostituzione cuscinetti: Togliere coperchio lato opposto accoppiamento Rimuovere il trasduttore posizione/velocità Svitare le 4 viti del coperchio chiusura lato opposto accoppiamento Bloccando l’albero dal lato accoppiamento: RESOLVER: svitare la vite centrale che blocca il rotore resolver e sfilarlo ENCODER EF36-S21-AD36: svitare la vite che blocca il rotore dell’encoder, svitare le viti di fissaggio encoder allo scudo e rimuovere l’encoder dall’albero motore prestando attenzione a non tirare i fili connessi al connettore. Estrazione gruppo rotore Svitare le 4 viti presenti sulla flangia accoppiamento. Bloccando lo statore del motore ed estrarre il gruppo rotore completo di cuscinetti; l’operazione richiede una certa forza per l’attrazione magnetica che tende a contenere il rotore sull’avvolgimento: rischio schiacciamento arti. Smontaggio cuscinetto lato opposto flangia Utilizzare un estrattore per togliere il cuscinetto: prestare attenzione a non rovinare l’albero con l’estrattore evitando di spingere direttamente sull’albero (interporre un disco d’ottone) Smontaggio cuscinetto lato flangia Togliere il seeger bloccaggio cuscinetto dallo scudo e disaccoppiarlo dal gruppo rotore Togliere quindi il seeger bloccaggio cuscinetto se presente sull’abero (o eventualmente l’anello bloccaggio cuscinetto estraendolo assieme al cuscinetto): estrarre il cuscinetto con estrattore prestare attenzione a non rovinare l’albero con l’estrattore evitando di spingere direttamente sull’albero (interporre un disco d’ottone) La manutenzione dei motori con freno va effettuata in Magnetic data la precisione richiesta nello smontaggio e rimontaggio del gruppo freno. Una errata procedura può portare a malfunzionamenti del sistema freno installato sul motore IT Manual NGB / TOP | MANUTENZIONE 15 NGB 108, NGB 145 Sequenza di smontaggio per sostituzione cuscinetti: Togliere coperchio lato opposto accoppiamento Rimuovere il trasduttore posizione/velocità Estrazione statore Svitare le 4 viti del coperchio chiusura lato opposto accoppiamento Bloccando l’albero dal lato accoppiamento: RESOLVER: svitare la vite centrale che blocca il rotore resolver e sfilarlo ENCODER EF36-S21-AD36: svitare la vite che blocca il rotore dell’encoder, svitare le viti di fissaggio encoder allo scudo e rimuovere l’encoder dall’albero motore prestando attenzione a non tirare i fili connessi al connettore. Togliere la linguetta dall’albero Svitare le 4 viti presenti sullo scudo lato opposto flangia Smontare il connettore di potenza e di segnale Bloccando lo scudo lato opposto flangia separare il gruppo statore completo di flangia accoppiamento; l’operazione richiede una certa forza per l’attrazione magnetica che tende a contenere il rotore sull’avvolgimento. Togliere il seeger che blocca il cuscinetto posteriore sulla sede dello scudo Togliere il seeger che blocca il cuscinetto posteriore sull’albero Smontaggio cuscinetto lato opposto flangia Utilizzare un estrattore per rimuovere il cuscinetto prestare attenzione a non rovinare l’albero con l’estrattore evitando di spingere direttamente sull’albero (interporre un disco d’ottone) Rimuovere assieme l’anello di bloccaggio e il cuscinetto con estrattore Smontaggio cuscinetto lato flangia prestare attenzione a non rovinare l’albero con l’estrattore evitando di spingere direttamente sull’albero (interporre un disco d’ottone) La manutenzione dei motori con freno va effettuata in Magnetic data la precisione richiesta nello smontaggio e rimontaggio del gruppo freno. Una errata procedura può portare a malfunzionamenti del sistema freno installato sul motore 16 MANUTENZIONE | Manual NGB / TOP IT Codici componenti per ricambistica: Motore Cuscinetto Cuscinetto L.A. L.O. Anello Angus Anello Guarnizione (opzione) compensazione per scudi TOP 20 6200-2RS1 61900-ZZ - LMKAS 22 000057095 000057094 TOP 40 6204-2RS 6003-ZZ-WT A 20357 LMKAS 35B OR 3281 OR 3300 TOP 50 6205-2RS 6203-ZZ-WT A 32527 LMKAS 40B OR 3350 OR 3350 NGB 85 6204-2RS 6003-ZZ-WT A 20357 LMKAS 35B OR 3281 OR 3300 6204 ZZC3WT A 25427 LMKAS 52A OR 3350 OR 3350 NGB 145 6207-2RS1 6206ZZ CMDEA3 A 42567 LMKAS 72D OR 3500 000057137 NGB 108 6205-2RS Guarnizione coperchio L.O. Materiale non di commercio (contattare ufficio commerciale Magnetic) CUSCINETTI Tutti i motori montano cuscinetti a sfere con doppio schermo, pre lubrificati a vita, che non richiedono quindi manutenzione. Ogni 2000 ore di funzionamento è comunque consigliabile misurarne la temperatura e le vibrazioni. I valori riportati nelle seguenti tabelle si riferiscono a soli carichi radiali agenti sui cuscinetti: in presenza di carichi assiali particolarmente gravosi occorre verificare con Magnetic la possibilità di adottare accorgimenti speciali per il corretto funzionamento dei motori. La formula per il calcolo del carico radiale agente sui cuscinetti è: dove: Fr = carico radiale N C = coppia del motore in Nm D = diametro della puleggia in mm k = fattore di tensione fornito dal costruttore della puleggia e valutabile mediamente in: k = 1.0 per cinghie dentellate k = 2.3 per cinghie trapezoidali k = 3.8 per cinghie piane Qualora il valore dello sforzo radiale così calcolato risulti maggiore di quello riportato sulle tabelle relative ai cuscinetti, si deve passare ad una soluzione speciale oppure aumentare il diametro della puleggia. TOP 20 RPM X mm 0 5 10 20 IT Fr [N] 200 600 1000 1500 2000 2500 3000 3500 4000 5000 6000 8000 690 670 640 600 540 520 510 470 460 450 430 400 440 420 410 380 400 380 370 340 340 330 320 300 310 300 290 270 289 270 269 250 270 260 252 230 240 230 226 210 220 210 209 190 210 200 196 180 Manual NGB / TOP | CUSCINETTI 17 TOP 40 NGB 85 RPM X mm 0 10 20 25 30 Fr [N] 200 600 1000 1500 2000 2500 3000 3500 4000 5000 6000 740 686 639 618 598 740 686 639 618 598 740 686 639 618 598 740 686 639 618 598 740 686 639 618 598 687 637 594 574 559 646 599 558 540 522 598 555 517 500 484 577 535 498 482 466 541 502 467 452 438 510 472 440 426 412 200 600 1000 1500 2000 Fr [N] 2500 3000 3500 4000 5000 6000 1780 1660 1450 1290 1220 1130 990 880 1020 950 830 740 890 820 720 640 800 750 650 580 740 690 600 530 690 640 560 500 660 610 530 470 620 580 510 450 570 530 470 410 540 500 440 390 200 600 1000 1500 2000 2500 3000 3500 4000 5000 6000 1788 1647 1520 1412 1318 1235 1200 1105 1020 947 884 829 992 914 843 783 731 685 850 783 723 671 626 587 761 700 647 600 560 525 697 642 592 550 513 481 648 597 551 512 477 448 609 561 518 481 449 421 577 531 490 455 425 398 526 485 447 415 388 363 200 600 1000 1500 2000 2500 3000 3500 4000 5000 3513 3301 2946 2726 2660 2537 2373 2230 1990 1841 1797 1714 1969 1850 1651 1528 1491 1422 1694 1592 1421 1315 1283 1223 1520 1429 1275 1180 1151 1098 1397 1313 1171 1084 1058 1009 1302 1224 1092 1011 986 940 TOP 50 RPM X mm 0 10 30 50 NGB108 RPM X mm 0 10 20 30 40 50 – – – – – 8000 – – – – Fr [N] NGB145 RPM X mm 0 10 20 30 40 50 8000 - 8000 - Fr [N] - - - 6000 - 8000 - Per NGB108 e NGB145 con estremità d’asse opzionale rispettivamente di Ø 19x40 mm e Ø 24x50 mm occorre considerare i limiti delineati dalle curve tratteggiate indicate nei seguenti grafici: 18 CUSCINETTI | Manual NGB / TOP IT INERZIA SUPPLEMENTAR E (OPZIONE) Nei casi dove è richiesto, l’accessorio opzionale “inerzia aggiuntiva“ viene montato sul motore nella zona freno: non è quindi possibile fornire motori con freno + inerzia aggiuntiva. Inerzia totale NGB 85 Inerzia motore (catalogo) + 4.0 kgcm2 NGB 108 Inerzia motore (catalogo) + 5.7 kgcm2 NGB 145 Inerzia motore (catalogo) + 42.1 kgcm2 ANOMALIE DI FUNZIONA MENTO E SOLUZIONI Albero motore bloccato Il motore viene alimentato ma non gira Freno (opzionale) difettoso Avvolgimento in corto circuito Cuscinetto/i danneggiato/i ❷ Verifica del freno Errato settaggio del sistema di controllo - azionamento Cablaggio motore/azionamento difettoso Freno (opzionale) alimentato Il motore non fornisce la coppia di targa Motore surriscaldato in modo anomalo (Il motore funzionante a pieno regime termico può arrivare ad una temperatura zona statore fino a 110°C) IT non ❶ Verifica dell’avvolgimento ❸ Smontaggio motore Verifica presenza consensi del controllo e il corretto settaggio dell’ azionamento Verificare le connessioni tra il trasduttore ed il motore se conformi allo schema di collegamento. Codice riportato nel bollettino di collaudo ❷ Verifica del freno Verifica della resistenza fase-fase dell’avvolgimento Avvolgimento guasto ❶ Rotore smagnetizzato Trasduttore di velocità e posizione sfasato Cuscinetto/i danneggiato/i Parametrizzazione errata del azionamento ❹ Verifica B.E.M.F. Verificare la fasatura del trasduttore ❺ montato sul motore ❸ Smontaggio motore Verificare impostazioni limiti di coppia e corrente sull’azionamento Temperatura ambiente di lavoro Trasduttore di velocità e posizione sfasato Carico eccessivo all’asse Cortocircuito parziale Protettore termico guasto Temperatura ambiente > 40°C (occorre declassare il motore) Verificare la fasatura del trasduttore ❺ montato sul motore Verificare il corretto dimensionamento del motore in funzione del carico e del servizio da soddisfare: verificare la corrente quadratica media del ciclo di lavoro Verificare la corrente assorbita in rapporto a quella indicata sulla targa del motore Verificare il protettore termico e ❶ verificare che il ciclo di lavoro sia conforme alla taglia del motore. Manual NGB / TOP | ANOMALIE DI FUNZIONAMENTO E SOLUZIONI 19 Guadagni dei regolatori di velocità e corrente elevati Il motore vibra Parametri motore correttamente settati non Squilibrio rotore dovuto a guasto meccanico Carico radiale su cuscinetto L.A. eccessivo Motore rumoroso Guadagni dei regolatori di velocità e corrente elevati Cuscinetto/i danneggiato/i Variare i valori dei guadagni dei regolatori di velocità e corrente (vedere manuale del drive) Eseguire procedura di auto-tuning del motore per modellizzare correttamente il motore in funzione del drive utilizzato I rotori sono equilibrati con pasta equilibratrice: smontare ed aprire il ❸ motore per verificarne l’eventuale distacco dal rotore. Verificare che il carico radiale sui cuscinetti sia conforme ai valori indicati in questo manuale a pag. 17-18 Variare i valori dei guadagni dei regolatori di velocità e corrente (vedere manuale del azionamento) ❸ Smontaggio motore ❶ VERIFICHE SULL’AVVOLGIMENTO Tutte queste verifiche devono essere eseguite con motore elettricamente scollegato dal drive sia per la parte di potenza che per la parte di segnale. Verificare che l’isolamento dell’avvolgimento verso massa e verso il termoprotettore sia superiore a 2 MΩ utilizzando uno strumento MEGGER con tensione di prova 1000 Vcc. Verificare con un tester il sensore di protezione termica: fare riferimento ai paragrafi specifici di questo manuale. Verificare la resistenza fase-fase dell’avvolgimento: le 3 combinazioni U-V; V-W; U-W devono essere tutte conformi al valore riportato sul bollettino di collaudo (tolleranza ± 8%). ❷ VERIFICA DEL FRENO Verificare la funzionalità del freno stazionamento (se presente): controllare che la tensione applicata al freno sia pari a 24Vdc (±10%) e la polarità dell’alimentazione sia corretta come da schema di connessione pagina 11; accertarsi quindi che l’alimentatore del freno supporti l’assorbimento indicato in tabella di pagina 9 ❸ SMONTAGGIO MOTORE Per procedere allo smontaggio del motore per la verifica/sostituzione dei cuscinetti fare riferimento a pag.15 e pag.16. ❹ VERIFICA B.E.M.F. Verificare che le tre combinazioni di tensione fase-fase (Bemf) del motore trascinato alla velocità di 1000RPM siano uguali al valore riportato sul bollettino di collaudo: occorre trascinare il motore lato albero a 1000RPM (quindi disaccoppiato dal carico) e leggere con un tester TrueRMS la tensione indotta sui terminali U V W (tolleranza ± 8%). Nel caso la velocità di trascinamento fosse diversa da 1000RPM ricalcolare il valore rilevato sulla velocità di 1000RPM in modo proporzionale: es. con 50Vrms rilevati a 850RPM BEMF = 50 ÷ 850 x 1000 (kRPM) ❺ AUTO-FASATURA TRASDUTTORE DEL MOTORE Attraverso l’azionamento che pilota il motore (il motore deve essere scollegato dal carico) effettuare la procedura di auto fasatura motore/trasduttore come descritto nei manuali del costruttore: in questo modo è possibile rilevare il settaggio dell’angolo di fasatura ed è anche possibile controllare i cablaggi di potenza e segnale se conformi allo schema di collegamento del motore e dell’azionamento. 20 ANOMALIE DI FUNZIONAMENTO E SOLUZIONI | Manual NGB / TOP IT INDEX AUTHORIZED STAFF 22 SAFETY 22 NORMATIVE REFERENCES 23 RECEPTION / STORAGE 24 MOTOR LABELLING 24 POSITIONING / COUPLING 24 OPERATION 24 THERMAL PROTECTION 25 EMERGENCY BRAKE (OPTION) 26 POSITIONING TRANSDUCERS 27 CONNECTION 28 MAINTENANCE 34 BEARINGS 36 ADDITIONAL INERTIA ( OPTION) 38 MALFUNTIONS AND SOLU TIONS 38 This manual only refers to standard products listed in our catalog. MAGNETIC will not be responsible for problems or accidents due to no application of the instructions indicated in the present manual. The main points concerning the correct use of brushless servomotors, NGB and TOP series, are listed hereby. EN Manual NGB / TOP | INDEX 21 AUTHORIZED STAFF This manual is for staff authorized that must know and respect all the national safety norms and the existing policies concerning the low voltage installations. The following skills are required: Transport Mechanical assembly Electrical connection Motor Set up only staff with notions about materials handling only qualified mechanics only specialized electricians only qualified technicians with in-depth notions of mechanics, electrical engineering and drive technology SAFETY The motors has parts under voltage and moving parts. It is therefore necessary to follow some norms in order to avoid dangerous situations. The handling, the starting up, the use and the eventual repair must be carried out by staff authorized and always in accordance with the following instructions. The authorized staff must know the norms about installation, use and maintenance of the motor and must have read all this use and maintenance manual carefully. The staff authorized must know all the technical details, specifications and electrical connections concerning the motor to be installed. All operations are not allowed to unqualified operators. To reduce any action, which could damage the motor or the operators or the things nearby, must be observed the following remarks: The motor shaft is free to run so it must not be used for the handling. Lift and/or move the motors only using the eyehooks assembled on the motor (or others appropriate). Not approach to the rotating parts (for example: motor shaft). Use protective clothing during the mounting of mechanical components on the shaft end (presence of sharp edges next to the keyway). Pay attention to nuts, washers or any other foreign body: they do not have to be in touch with the winding or rotating parts. Before testing the machine ensure to have the right protections around the rotating parts (joints, etc.). Check also the screws for fixing the motor to the machine. Check the absence of any tension on the system before proceeding with the electrical connection of the motor. Check that the cables are not damaged because of the mounting, that they are far from any rotating part and that they have not to support any mechanical effort. Before proceeding with the motor supply, check the fixing of the screws or nuts of the electrical terminal boxes and close the cover of the terminal box (where present). Do not disconnect any connector during the operation or in any case with the digital-drive under voltage. 22 AUTHORIZED STAFF | Manual NGB / TOP EN The temperature of the motors surface could reach or exceed 100° C. Therefore keep far from motor the objects or people because could be damaged or burned. Wait that the motor temperature be lower than 40°C before touching it. For people that use peacemaker device the area of 2 meters around the motor is very dangerous! Pay attention! The rotor of the brushless motor contains rare-earth magnetic material that generate a strong magnetic field: during motor maintenance (in case of open motor) the ferromagnetic materials could be attracted on the rotor and cause any damage to the rotor or cause injure to people (crushing limbs or other injury). Do not use the motor as a supporting base for people or parts of the equipment. Do not hit with vim the motor shaft or the connected parts in order not to damage the motor bearings. NORMATIVE REFERENCES The brushless servomotors NGB and TOP series are manufactured in accordance with IEC60034 international norms concerning electrical rotating machines. Main Italian norms applied (*): CEI EN 60034-1 Nominal and operation characteristics CEI EN 60034-5 Degrees of protection provided by the integral design of rotating electrical machines (IP code) CEI EN 60034-6 Methods of cooling (IC CODE) CEI EN60034-7 Classification of types of construction, mounting arrangements and terminal box position (IM Code) CEI EN 60034-8 Terminal markings and direction of rotation CEI EN 60034-11 Thermal protection: requirements for the use of protection thermal sensors in the stator windings CEI EN 60034-14 Mechanical vibration of certain machines with shaft heights 56 mm and higher - Measurement, evaluation and limits of vibration severity CEI EN 60034-18-1 e 21 Functional evaluation of the insulation systems – General directive basics and testing procedures for thread windings – Thermal evaluation and classification CEI CLC/TS EN 60034-25 Guide for the planning and the performance of a.c. motors specifically designed for power supply from drives (*) CEI Italian norms numbers correspond to European numeration EU CENELEC and international IEC The products indicated in the present manual are manufactured in compliance with EU directives about low voltage (2006/95/EC) The motors must be installed in accordance with the instructions supplied by the manufacturer: before proceeding with the starting up, it in necessary to check that the machine, where the motor will be installed, is compliant with the reference norms. EN Manual NGB / TOP | NORMATIVE REFERENCES 23 RECEPTION / STORAGE All motors are subject to an accurate test and check before shipment. Each motor is supplied with a test certificate where all the specifications of the motor and the relative accessories are listed. On arrival, it is advisable to check that the motors have not been damaged during transport; any defect must be immediately notified to Magnetic. If the motors are not installed immediately, they must be stocked in a clean and dry room, without vibrations which may damage the bearings and they must be protected against sudden temperature changes which might cause condensate. The shaft end shall be checked and, if necessary, the protective varnish should be touched up with suitable anticorrosive products. If the motors have been stored for a long time at low temperature, keep them at room temperature for a few days to eliminate any condensate. MOTOR LABELLING Description of abbreviations and data on the motor plate: N0 = Serial number Type = Motor type Nn = Nominal speed BEMF = V/kRPM IP = Protection degree Tn0 = Torque @ 0 RPM In0 = Current @ 0 RPM IC = Cooling type Tp = Peak torque Ip = Peak current 2p = Poles number Transd. = Transducer type Brake = Brake type (option) POSITIONING / COUPLI NG All servomotors have one of bearings motor locked so they can be installed in any position. To ensure a good operation of the motor must you should be sure that the operations are done correctly mechanical coupling. The mechanical components for transmission must be preheated for mounting (80-100°C) or mounted using the threaded hole on the motor shaft end, with a special tool. Note: any hit or shock that might harm the bearings must be avoided. Note: the rotors of servomotor are balanced with half-key, full shaft. (R grade into CEI EN 60034-14). Therefore also the transmission devices (gears, half-joints, pulleys) must be balanced with half-key, before mounting. The coupling must be done in a way ensuring a good alignment, otherwise strong vibrations, irregular motion and axial thrusts might result. In case of pulley coupling it is necessary to make sure that the radial load is not excessive (see bearings paragraph). In case of direct coupling in oil bath you must request the sealing ring option, supplied on request. This sealing ring must not be mounted with dry coupling. OPERATION Make sure that operation is concordant motor rating plate and the data reported in the catalog. Please note that the maximum ambient temperature allowed is 40°C: for higher values please contact our sales office. 24 RECEPTION / STORAGE | Manual NGB / TOP EN THERMAL PROTECTION The thermal protection of the motors is made through the following sensors: Thermal sensor Klixon contact normally closed (STANDARD SOLUTION): • Nominal switching temperature (NST) 150 ° C with tolerance (Standard): ± 5K • Temperature range of re-activation: -35K ± 15K • Maximum operating voltage AC / DC: 500 V • Current measurement AC cos φ = 1.0 (ohmic load) / switching cycles: 2.5 A / 10,000 6.3 A / 3,000 7.5 A / 300 How alternative model to Klixon sensor, the motors can be supplied with thermoresistors and thermistors type KTY 84/130 and PTC: Thermo resistance KTY84/130 (with positive temperature coefficient): Operating temperature: -40°C + 300°C Value of resistance at 100°C: 970÷1030 Ω Measurement current at 25/300°C: 10/2 mA The following table shows the resistance to the ends of the sensor in accordance with the measured temperature: T ambient °C 0 10 20 30 40 50 60 70 80 90 100 110 120 130 140 150 160 EN R minimum Ω 474 514 555 599 645 694 744 797 852 910 970 1029 1089 1152 1216 1282 1350 R typical Ω 498 538 581 626 672 722 773 826 882 940 1000 1062 1127 1194 1262 1334 1407 Manual NGB / TOP | THERMAL PROTECTION R maximum Ω 522 563 607 652 700 750 801 855 912 970 1030 1096 1164 1235 1309 1385 1463 25 Thermistor PTC sensor (with positive temperature coefficient) : • Nominal reaction temperature: 70 ° C - 180 ° C • Range of operating voltage: 2.5 VDC - 30 VDC • Max. sensor voltage recommended: 2.5 VDC - 7.5 VDC EMERGENCY BRAKE (OPT ION) They are stationing brakes, voltage droop type. They can be used only with motor not running, not for dynamic braking, except on emergency. In normal conditions they do not require any service. All brakes are supply 24 V dc. A wrong supply (Vdc > 25 V or Vdc < 21,5 V) could cause anomalous sliding and squeaking sound and sometimes it may happen that the brake do not release. It is very important therefore to check the supply voltage. In the electric connection is important to respect the polarity of terminals (the brake is connected inside to the power connector: contacts 4,5 - please see connection diagram) The braking torque specified in the table refers to dry operating brakes, without any grease on the friction surfaces. It is reached after a run-in time varying in function of the type of work. All motors with brake are delivered after their checking using a torque wrench to ensure the braking torque declared. WARNING: When the brake supply is disconnected, the over voltage self-induced could damage the supply. An adequate protection on the power supply must be provided (for example a recirculation diode connected in parallel to the winding of the brake). 26 EMERGENCY BRAKE (OPTION) | Manual NGB / TOP EN NGB85 – TOP40 NGB108 – TOP50 NGB145 Brake model Kendrion Binder 86621 06H Kendrion Binder 86621 07H KEB combiperm 08.P1 Breaking torque 3.2 Nm 11 Nm 36 Nm Rated voltage 24 Vdc (±10%) 24 Vdc (±10%) 24 Vdc (-6+10%) Rated power 12 W 16 W 26 W Nominal current 0.50 Adc Additional inertia 0.38 kgcm 0.64 Adc 2 1.06 kgcm 1.08 Adc 2 0.38 kgcm2 Insertion response time 19 ms 20 ms 22 ms Release response time 29 ms 29 ms 90 ms Additional weight 0.3 kg 0.6 kg 1.6 kg Max switching work/hour 350 (under 3000 RPM) 400 (under 3000 RPM) 720 (under 3000 RPM) POSITIONING TRANSDUC ERS The motors can be equipped, in their standard version, with resolver or encoder fitted in the back shield for the protection against accidental hits. The following types are available: 2 poles Resolver (STANDARD SOLUTION) . Transformation ratio = 0.5 ± 10% Supply voltage = 10Vrms – 4.5Khz Input impedance = 200 Ohm at 4.5kHz Output impedance = 370 Ohm Max. speed = 10000 RPM Encoder TTL + S. HALL model EF36 (incremental signals + commutation phases + zero channel ) Resolution incremental pulses/revolution = please see value on the motor plate or on the test certificate – max 2048 ppr Voltage supply = 5Vdc ± 5% (15mA nom.) Max. frequency = 300 kHz Max. speed = 6000 RPM Output electronics = Line Driver Synusoidal encoder model S21 (incremental signals + absolute sine&cosine + zero channel) Resolution incremental pulses = 2048 ppr Voltage supply = 5Vdc ± 10% (40mA nom.) Offset Vdc output signals = 2.5Vdc ± 20% Incremental output voltage= 1 Vpp Absolute output voltage =1Vpp Zero channel voltage R(+) R(-) ≥ 0.4V Max frequency = 500 kHz Max. speed = 12000 RPM EN Manual NGB / TOP | POSITIONING TRANSDUCERS 27 Multiturn absolute digital encoder AD36 Incremental pulses resolution = 2048 ppr Supply voltage = 5Vdc -5+10% (100mA nom.) Singleturn absolute position resolution = 19 bit Multiturn absolute position resolution = 12 bit Incremental output voltage = 1 Vpp Max. frequency = 500 kHz Max. speed = 10000 RPM (continuous) (interface BiSS) CONNECTION All motors are equipped with cylindrical male M23 industrial connectors with thread mounting prepared for Speedtec (Intercontec) connection. The assembled connectors are manufactured in compliance with reference norms: DIN 40050, DIN EN 60352-2, DIN EN ISO 60512 and are therefore compatible with connectors produced by other manufacturers that meets these standards. On request we supply the female power and signal connectors version Speedtec to be wired on cable (by the customer). All connectors are guaranteed with IP67 degree of protection (ref. IEC 60529) designed to be protected against dust, humidity, cleaning solvents, industrial oils, etc. Both power and signal connectors are prepared for the wiring of shielded cables that we recommend (for the connections please refer to the diagrams in the manual). In particular we suggest the use of multi-polar cables with couple shielded and twisted pairs with additional external shielding of the cable. The available versions (for the fix connector part) are: Straight connector output (version B) 90° angular connector output (version D) – rotation angle over 180 mechanical degrees free cables (only for motor TOP 20: standard arrangement) Version B Version D rotable Operation temperature range -20 +130°C Max. voltage 630V ac/dc (Power) 125V ac/dc (Signal) Degree of protection IP67 Max. thread section 4 mm2 (Power 6 pins) 1 mm2 (Signal 17 pins) Max. current 28A (Power 6 pins) 10A (Signal 17 pins) Nickel-plated metallic surface Contact socket in PA 6.6 28 CONNECTION | Manual NGB / TOP EN Connectors position (*) NGB 108 – 145 NGB 108 – 145 Signal connector Signal connector Power connector + brake Power connector connectorConnettore di potenza NGB 85 TOP 40-50 with brake option or additional inertia TOP 20 version with or withour brake available even with connectors (option) Signal cable Signal connector Power connector + brake Power cable * The above images illustrate both version B and version D Power connection + brake (option) 6 contacts: Pin 1 Phase U Pin 2 Phase V Ground EN Pin 4 + 24Vdc brake (option) Pin 5 0 Vdc brake (option) Pin 6 Phase W Manual NGB / TOP | CONNECTION Front view connector panel (fix on the motor) 29 Connections tranducers speed/position Metallic reference between pins 1 and pins 11 ENCODER HENGSTLER S 21 SIN-COS INCREMENTAL AND ABSOLUTE N° 1 2 3 4 5 6 7 8 9 10 11 12 13 14 15 16 17 SIGNAL A+ AR+ (Z) D- (ref. COS) C+ (ref. SIN) C- (ref. SIN) 0V KLIXON / KTY (+) KLIXON / KTY (-) Up +5V (Vdc) B+ BR- (Z) D+ (ref. COS) 0V sensor +5V sensor SHIELD ENCODER HENGSTLER AD36 MULTITURN ABSOLUTE – INTERFACE BiSS N° 1 2 3 4 5 6 7 8 9 10 11 12 13 14 15 16 17 COLOR WHITE-GREEN BROWN-GREEN PINK FREE YELLOW FREE BROWN WHITE / RED WHITE / BLACK WHITE RED/BLUE GRAY/PINK GRAY GREEN BLACK VIOLET SHIELD SIGNAL A+ A+ DATA + CLOCK 0V KLIXON / KTY (+) KLIXON / KTY (-) Up +5V (Vdc) B+ B- DATA - CLOCK 0V sensor +5V sensor SHIELD ENCODER ELTRA EF 36 TTL LINE DRIVER INCREMENTAL + HALL PHASES TAMAGAWA RESOLVER T2PD N° 1 2 3 4 5 6 7 8 9 10 11 12 13 14 15 16 17 N° 1 2 3 4 5 6 7 8 9 10 11 12 13 14 15 16 17 COLOR GREEN BROWN BLUE GRAY VIOLET WHITE-GREEN BLACK WHITE / RED WHITE / BLACK RED YELLOW PINK OR ORANGE WHITE RED-BLUE BROWN-GREEN GRAY-PINK SHIELD 30 SIGNAL A+ AZ U V V0V KLIXON / KTY (+) KLIXON / KTY (-) + Vdc B+ BZUWW SHIELD CONNECTION | Manual NGB / TOP COLOR YELLOW BLUE RED - WHITE FREE FREE FREE FREE WHITE / RED WHITE / BLACK FREE RED BLACK YELLOW-WHITE FREE FREE FREE SHIELD 2 POLES SIGNAL SEN + SEN V REF + KLIXON / KTY (+) KLIXON / KTY (-) COS + COS V REF - CASE EN For the connection of the motor please follow the connection diagram. Use the following cable types: For signals: the connection cable must be 4 twisted pair cables and shielded plus external shield. The shield must be connected together only on inverter side. Female power connector assembly Magnetic code 000075056F (cable clamping range Ø 9.5 ÷ 14.5 mm) Intercontec code BSTA 085 FR23 42 0100 000 (cable clamping range Ø 9.5 ÷ 14.5) ① Insert on the cable the cable clamps section ② Remove cable housing ③ Move the shield cable on the cable clamps section ④ Strip the power and signal cables ⑤ Crimp or solder the cables to the appropriate pins (using crimp Intercontec tool) ⑥ Block the crown clamp in the clamps section ⑦÷⑩ ⑪⑫ Insert the crimped pins Lock the insulation insert with the insulating form guide and insert it into the metal body ⑬ Screw the clamp with a torque of about 17Nm EN Manual NGB / TOP | CONNECTION 31 Female signal connector assembly Magnetic code 000075054F (cable clamping range Ø 6 ÷ 10 mm) Intercontec code ASTA 035 FR11 41 0100 000 (cable clamping range Ø 6 ÷ 10 mm) ① Insert on the cable the cable clamps section ② Remove cable housing ③ Move the shield cable on the cable clamps section ④ Strip the power and signal cables ⑤⑥ Crimping or solder the cables to the appropriate pins (using crimping Intercontec tool) ⑦⑧ Block the crown clamp in the clamps section ⑨⑩ Open the insulation insert how you see in fig.9 ⑪⑫ Insert the pins on insulation receptacle and close it for to lock them in correct position ⑬⑭ Insert the insulation receptacle with the pins into the metal body ⑮ 32 Screw the clamp with a torque of about 7 Nm CONNECTION | Manual NGB / TOP EN Male connector disassembly: Unscrew the 4 connector fixing screws to the shield, opposite flange side Release the contact socket from the metal body of the connector and remove the power wires wired on the pins POWER 6 PINS Unscrew the locking screw of the connector as shown in the figure Open the connector and release the contact socket from the metal body of the connector and remove the power wires wired on the pins To disassemble the signal connector please use the specific Intercontec tool C4.016.00 Unscrew the 4 connector fixing screws to the shield, opposite flange side Insert the tool in the connector and push the contact socket towards the motor to release it from the metal body Open the contact socket of 2 mm (as shown) to remove the pins (put a little pressure on the pins for the release from the socket) SIGNAL 17 PINS To disassemble the signal connector please use the specific Intercontec tool Open the metal body of the connector as described for power connector Open of 2 mm the contact socket (as shown) to remove the pins (put a little pressure on the pins for the release from the socket) EN Manual NGB / TOP | CONNECTION 33 MAINTENANCE This section describes the operations and the codes of some useful components for spare parts and motor’s maintenance: before proceeding please disconnect electrically the motor and uncouple it mechanically from the system. TOP 40, TOP 50, NGB 85 Disassembly sequence for bearings replacement: Remove cover non driving-end side Remove the transducer position/speed Unscrew the 4 screws of the cover non driving-end side (n.d.e) By blocking the shaft from the driving-end side: RESOLVER: unscrew the central screw that blocks the resolver rotor and remove it ENCODER EF36-S21-AD36: unscrew the screw that locks the encoder rotor, unscrew the screws that fixes the encoder to the sealing and remove the encoder from the motor shaft taking care not to pull the wires connected to the connector. Rotor extraction Remove the 4 screws on the flange coupling. Blocking the stator of the motor remove the rotor group complete of bearings; an certain energy is required due to the magnetic attraction that tends to restrain the rotor on the winding: risk of limbs crushing. Disassembly of bearing n.d.e side Use a puller to remove the bearing: be careful not to damage the shaft with the extractor by avoiding to push directly on the shaft (interject a shim disc) Disassembly bearing and flange on driving-end side Remove the seeger ring (that blocks the bearing) from the shield and uncouple it from the rotor assembly Then remove the seeger ring if present on the shaft (or eventually remove it together with the bearing): pull out the bearing by using a puller Be careful not to damage the shaft with the puller avoiding to push it directly on the shaft (interject a brass disc) The maintenance of the motors with brake must be carried out in Magnetic in consideration of the precision required in the disassembly and reassembly of the brake. An incorrect procedure can cause malfunction of the brake system installed on the motor. 34 MAINTENANCE | Manual NGB / TOP EN NGB 108, NGB 145 Disassembly sequence for bearings replacement: Remove non driving-end side cover Remove the transducer position/speed Stator extraction Unscrew the 4 screws of the cover closing non driving-end side (NDE) By blocking the shaft from the driving-end side: RESOLVER: unscrew the central screw that blocks the resolver rotor and remove it ENCODER EF36-S21-AD36: unscrew the screw that holds the encoder rotor, unscrew the screws that fix the encoder to motor and remove the encoder from the motor shaft being careful not to pull the wires connected to the connector. Remove the key from the shaft Unscrew the 4 screws on the flange opposite side of coupling Remove the power and signal connector By blocking the flange of coupling side, pull out the stator assembly complete of coupling flange: an certain energy is required due to the magnetic attraction that tends to restrain the rotor on the winding. Remove the seeger that blocks the rotor on the NDE side shield and remove the seeger that blocks the NDE bearing to the shaft Disassembly NDE side bearing Use a puller to remove the bearing: be careful not to damage the shaft with the tool by avoiding to push directly on the shaft (interject a shim disc) Use a puller to remove the shoulder ring and bearing Disassembly of driving-end side bearing Be careful not to damage the shaft with the puller avoiding to push it directly on the shaft (interject a shim disc) The maintenance of the motors with brake must be carried out in Magnetic in consideration of the precision required in the disassembly and reassembly of the brake. An incorrect procedure can cause malfunction of the brake system installed on the motor. EN Manual NGB / TOP | MAINTENANCE 35 Spare parts codes: Motor DE Bearing NDE Bearing Angus ring Compensation (option) ring Gasket for shields Gasket NDE cover TOP 20 6200-2RS1 61900-ZZ - LMKAS 22 000057095 000057094 TOP 40 6204-2RS 6003-ZZ-WT A 20357 LMKAS 35B OR 3281 OR 3300 TOP 50 6205-2RS 6203-ZZ-WT A 32527 LMKAS 40B OR 3350 OR 3350 NGB 85 6204-2RS 6003-ZZ-WT A 20357 LMKAS 35B OR 3281 OR 3300 6204 ZZC3WT A 25427 LMKAS 52A OR 3350 OR 3350 A 42567 LMKAS 72D OR 3500 000057137 NGB 108 6205-2RS NGB 145 6207-2RS1 6206ZZ CMDEA3 Special components (please contact Magnetic sales office) BEARINGS All motors are made with ball bearings double-shield type, pre-lubricated for their all life and then maintenance-free. Check anyway their temperature and vibrations every 2000 operation hours. The values in the following tables refer only to radial loads acting on the bearings: in case of axial loads particularly heavy please contact Magnetic about the possibility of special arrangements for the correct motor operation. This formula is used for calculating the radial load on the bearings: where: Fr = radial load (N) C = motor torque (Nm) D = pulley diameter (mm) k = voltage factor specified by the pulley manufacturer that corresponds generally to: k = 1.0 for toothed belts k = 2.3 for trapezoidal belts k = 3.8 for flat belts If the calculated radial force is higher than how is indicated on the bearings tables, you have to adopt a special solution or increase the diameter of the pulley. TOP 20 RPM X mm 0 5 10 20 36 Fr [N] 200 600 1000 1500 2000 2500 3000 3500 4000 5000 6000 8000 690 670 640 600 540 520 510 470 460 450 430 400 440 420 410 380 400 380 370 340 340 330 320 300 310 300 290 270 289 270 269 250 270 260 252 230 240 230 226 210 220 210 209 190 210 200 196 180 BEARINGS | Manual NGB / TOP EN TOP 40 NGB 85 RPM X mm 0 10 20 25 30 Fr [N] 200 600 1000 1500 2000 2500 3000 3500 4000 5000 6000 740 686 639 618 598 740 686 639 618 598 740 686 639 618 598 740 686 639 618 598 740 686 639 618 598 687 637 594 574 559 646 599 558 540 522 598 555 517 500 484 577 535 498 482 466 541 502 467 452 438 510 472 440 426 412 200 600 1000 1500 2000 Fr [N] 2500 3000 3500 4000 5000 6000 1780 1660 1450 1290 1220 1130 990 880 1020 950 830 740 890 820 720 640 800 750 650 580 740 690 600 530 690 640 560 500 660 610 530 470 620 580 510 450 570 530 470 410 540 500 440 390 200 600 1000 1500 2000 2500 3000 3500 4000 5000 6000 1788 1647 1520 1412 1318 1235 1200 1105 1020 947 884 829 992 914 843 783 731 685 850 783 723 671 626 587 761 700 647 600 560 525 697 642 592 550 513 481 648 597 551 512 477 448 609 561 518 481 449 421 577 531 490 455 425 398 526 485 447 415 388 363 200 600 1000 1500 2000 2500 3000 3500 4000 5000 3513 3301 2946 2726 2660 2537 2373 2230 1990 1841 1797 1714 1969 1850 1651 1528 1491 1422 1694 1592 1421 1315 1283 1223 1520 1429 1275 1180 1151 1098 1397 1313 1171 1084 1058 1009 1302 1224 1092 1011 986 940 TOP 50 RPM X mm 0 10 30 50 NGB108 RPM X mm 0 10 20 30 40 50 – – – – – 8000 – – – – Fr [N] NGB145 RPM X mm 0 10 20 30 40 50 8000 - 8000 - Fr [N] - - - 6000 - 8000 - For NGB108 and NGB145 with special dimension of shaft ends, respectively Ø 19x40 mm and Ø 24x50 mm, please consider the limits outlined by the dashed curves shown in the following graphs: EN Manual NGB / TOP | BEARINGS 37 ADDITIONAL INERTIA (OPTION) When "additional inertia" option is required : we will mount it on the motor in the brake area, so it is not possible make motors with brake + additional inertia. Total inertia NGB 85 Motor inertia (catalog) + 4.0 kgcm2 NGB 108 Motor inertia (catalog) + 5.7 kgcm2 NGB 145 Motor inertia (catalog) + 42.1 kgcm2 MALFUNCTIONS AND SOLUTIONS Motor blocked shaft The motor is supplied but not operating Defective (optional) brake Short circuit winding Damaged bearing(s) ❷ Check the brake ❶ Check the winding ❸ Motor disassembly Wrong setting of the digital driving system Wrong connection motordigital drive Brake not supplied Damaged winding Demagnetized rotor The motor does not provide the nominal torque Abnormally overheated motor (the motor running at full operating temperature can reach a temperature in the stator area up to 110°C) 38 Wrong start phase angle Damaged bearing(s) Incorrect parameterization of the drive Check the I/O digital control and the correct setting of the drive Check if the connection between motor connector and digital drive connector is an accordance with the connection diagram. See the drawing code in the test certificate (for motor connector) ❷ Check the brake Check the phase-phase resistance of the ❶ winding ❹ Check B.E.M.F. Check the start phase angle of the motor ❺ transducer system ❸ Motor disassembly Check setting torque and current limits on the drive Working ambient temperature Wrong start phase angle Excessive axis load Partial short winding circuit Thermal protector damaged Ambient temperature > 40 ° C (the motor must be downgraded) Check the start phase angle of the motor❺ transducer system Check the correct choice of the motor according to the load and the required service: check the mean square current of the operating cycle Check the motor current compared to the value indicated on the motor plate Check the thermal protector and verify ❶ that the operating duty is accordant to the motor performance MALFUNCTIONS AND SOLUTIONS | Manual NGB / TOP EN Vibrating motor Too high gains of the speed and current regulators on drive Motor parameters not correctly set Rotor imbalance due to mechanical failure Excessive radial load on DE bearing Noisy motor High gains of the speed and current regulators Damaged bearing(s) Change the gain values of the current and speed regulators (see the drive manual) Set the motor in accordance with the drive by the self-tuning procedure The rotors are balanced through balancing pasta: disassembly and open the motor to ❸ check the possible separation of the pasta from the rotor Verify that the radial load on the bearings is in accordance with the values indicated in this manual (pages 36-37) Change the gain values of the speed and current regulators (see the drive manual) ❸ Motor disassembly ❶ CHECKS OF THE WINDING All these checks must be performed with the motor electrically disconnected from the drive both the part of the power and for the part of the signal. Ensure that the winding is insulated from ground and the resistance between thermal protector and ground is higher than 2 MΩ by using a MEGGER tool with test voltage of 1000 Vdc. Check using tester the thermal protection sensor: refer to the specific sections of this manual. Check the phase-phase resistance of the winding: the 3 combinations U-V, V-W, U-W must all be in accordance with the data reported on the test certificate (tolerance ± 8%). ❷ CHECK OF THE BRAKE Ensure that the brake (if present) operates correctly: check that the voltage applied to the brake is equal to 24 Vdc (± 10%) and that the polarity of the supply is correct as per connection diagram on page 30; make sure that the current absorption of the brake is how shown in the table on page 28 ❸ MOTOR DISASSEMBLY When disassembling the motor for the check / replacement of the bearings please refer to page 34 and page 35. ❹ B.E.M.F. CHECK Verify that the three combinations of phase-phase voltage (Bemf) of the motor at 1000RPM are equal to the value reported in the test certificate: (the motor shaft must be uncoupled from the load) the voltage induced on the terminals U V W (tolerance ± 8%) must be read through a tester TrueRMS. In case that the speed test rotation is different from 1000RPM recalculate the value measured on the speed 1000RPM in a proportional way: for example with 50Vrms measured at 850RPM BEMF = 50 ÷ 850 x 1000 (kRPM) ❺ START PHASE ANGLE OF THE MOTOR TRANSDUCER Through the drive that controls the motor (the motor must be disconnected from the load), run the start phase angle procedure as described in the manufacturers' manuals: in this way it is possible to measure the setting of the phasing angle and you can also check if the wirings for power and signal are in compliance with the connection diagram of motor drive. EN Manual NGB / TOP | MALFUNCTIONS AND SOLUTIONS 39 MAGNETIC S.p.A. si riserva facoltà di modificare senza preavviso i dati contenuti nel presente manuale. MAGNETIC S.p.A. reserves the right to change any data contained in this manual, without previous notice. MAGNETIC s.r.l. via del Lavoro, 7 I-36054 Montebello Vicentino (VI) tel. +39 0444 649399 fax +39 0444 440495 www.magnetic.it [email protected] I00209 – 06/2013