1
391352
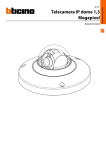
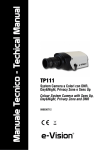
Telecamera box 700 TVL 12V/230VCA
Manuale Di Istruziono. User Manual
-
LE 05701AA-01CB-12W40
391348
Telecamera box 700 TVL 12V/230VCA
IT
ITALIANO............................................................................................................................................ 4
EN
ENGLISH ............................................................................................................................................. 12
IT
Sicurezza del prodotto
Questo prodotto deve essere installato in conformità con le regole d’installazione e di preferenza da un elettricista qualificato. L’eventuale installazione e utilizzo improprio dello stesso possono comportare
rischi di shock elettrico o incendio.
Prima di procedere all’installazione, leggere attentamente le istruzioni associate e individuare un luogo di montaggio idoneo in funzione del prodotto.
Non aprire, smontare, alterare o modificare l’apparecchio eccetto speciale menzione indicata nel manuale. Tutti i prodotti Bticino devono essere esclusivamente aperti e riparati da personale adeguatamente
formato e autorizzato da Bticino. Qualsivoglia apertura o riparazione non autorizzata comporta l’esclusione di eventuali responsabilità, diritti alla sostituzione e garanzie.
Utilizarre esclusivamente accessori di marca Bticino.
Safety Instructions
GB
IE
This product should be installed in line with installation rules, preferably by a qualified electrician. Incorrect installation and use can lead to risk of electric shock or fire.
Before carrying out the installation, read the instructions and take account of the product’s specific mounting location.
Do not open up, dismantle, alter or modify the device except where specifically required to do so by the instructions. All Bticino products must be opened and repaired exclusively by personnel trained and
approved by Bticino. Any unauthorised opening or repair completely cancels all liabilities and the rights to replacement and guarantees.
Use only Bticino brand accessories.
2
Telecamera box 700 TVL 12V/230VCA
Indice
1
Contenuto ............................................................................................................................................................................................................................4
2
Dimensioni e descrizione ............................................................................................................................................................................................4
Installazione dell'obiettivo auto-iris: ............................................................................................................................................................6
2.2
Procedura di utilizzo:...........................................................................................................................................................................................6
Menu OSD: .........................................................................................................................................................................................................................6
3.1
Funzioni......................................................................................................................................................................................................................8
3.2
Gestione della luminosità: in funzione dell'ambiente interno, esterno o in notturna. .......................................................8
3.2.1
Manuale Di Istruziono
3
2.1
Regolazione dell'immagine:.......................................................................................................................................................................8
3.2.2 Ausilio di visualizzazione delle immagini scure o in notturna: "AGC (Auto Gain Control)", "NR (Noise
reduction)", "HLC (High Light Compensation)". ...............................................................................................................................................8
3.2.3 Gestione del controluce: "ATR (Adaptive Tone Reproduction)", "BLC (Back Light Compensation)"
e "WB (White Balance)"................................................................................................................................................................................................9
3.3
4
Altre funzioni principali .................................................................................................................................................................................... 10
Specifiche ......................................................................................................................................................................................................................... 10
4.1
Caratteristiche principali della funzione OSD nei modelli EFFIO E........................................................................................ 10
4.2
Spécifications de la caméra ......................................................................................................................................................................... 10
3
1 Contenuto
IT
Blocco di montaggio
Chiave a brugola
Viti
Verificare la presenza di tutti gli elementi elencati sotto.
Se uno di questi elementi risulta mancante, contattare il rivenditore.
2 Dimensioni e descrizione
4
391348
Manuale Di Istruziono
Telecamera box 700 TVL 12V/230VCA
391352
N°
Nome
Funzioni
1
Attacco CS
Corrisponde ad un obiettivo CS.
2
Back Focus
Messa a fuoco della telecamera con la chiave a brugola svitando le due viti di fermo
dell'anello dell'obiettivo CS.
3
Coperchio protettivo
Protegge il sensore.
4
Attacco C/CS
Possibilità di adattare un anello per un obiettivo C (non fornito insieme al prodotto).
5
Zoccolo di montaggio
Consente di fissare la telecamera su un supporto.
6
Uscita video
Invia il segnale video sull'ingresso di un monitor.
7
Ingresso di alimentazione
12 V CC o 110-240 V CA a seconda della telecamera.
8
Non utilizzato
NA.
9
Spia di alimentazione
La spia è rossa quando la telecamera viene alimentata.
10
Pulsante del menu OSD
Vedere più sotto la descrizione della funzione OSD.
11
Controllo dell'iris
(DC driver)
Funziona con un obiettivo auto-iris (diaframma automatico).
5
2.1
Installazione dell'obiettivo auto-iris:
PIN auto-iris
Pin
2.2
DC DRIVER
(Direct DRIVE)
1
DAMP-
2
DAMP+
3
DRIVE+
4
DRIVE-
Procedura di utilizzo:
1- Fissare la telecamera al supporto di montaggio con l'ausilio degli accessori in dotazione.
2- Collegare l'uscita video allo schermo o ad un registratore tramite un cavo coassiale da 75 ohm.
3- Alimentare la telecamera a seconda del modello.
3 Menu OSD:
N.
6
Funzione
1
() Sposta in alto la selezione.
2
() Sposta in basso la selezione.
3
(►) Sposta a destra la selezione e riduce il valore del parametro.
4
(◄) Sposta a sinistra la selezione e aumenta il valore del
parametro.
5
Visualizza il menu sullo schermo e convalida la selezione.
Telecamera box 700 TVL 12V/230VCA
Manuale Di Istruziono
Descrizione Sony EFFIO E
7
3.1
Funzioni
Per l'installazione di una telecamera è importante regolare i parametri secondo le abituali condizioni di utilizzo (interno, esterno
e/o notturno). Il miglior risultato si otterrà combinando vari parametri.
I modelli più avanzati (EFFIO P) permettono una gestione migliore delle condizioni di luminosità difficili come il controluce.
Si tratta in questo caso di parametri tipici che influenzano la qualità dell'immagine e che vengono elaborati e raggruppati in
funzione delle condizioni dell'ambiente circostante.
3.2
Gestione della luminosità: in funzione dell'ambiente interno, esterno o in notturna.
3.2.1
Regolazione dell'immagine:
-
"PICT ADJUST" "Brightness" = Luminosità, "Contrast" = Contrasto, "Sharpness" = Nitidezza, "Hue" = Tinta,
"Gain" = Guadagno.
-
"SHUTTER/ AGC" combinano:
o
"SHUTTER": velocità di otturazione
o
"IRIS": apertura del diaframma dell'obiettivo
La regolazione di Shutter e Iris definisce la quantità di luce che arriva al sensore in un lasso di tempo dato.
-
o "AGC" (Auto Gain Control): il "GUADAGNO" è l'amplificazione del segnale
"WHITE BALANCE" (bilanciamento dei bianchi): consente di tarare il sensore e di correggere la dominante di colore in
funzione dell'illuminazione ambiente. Ogni tipo di luce contiene una dominante colorata specifica: più arancione per le
luci interne (al tungsteno), bluastra per la luce del giorno, biancastra con un cielo nuvoloso o verdastra sotto una luce al
neon. Si parla di temperatura di colore: se l'occhio umano non si lascia ingannare dalle differenze di temperatura di
colore, una telecamera deve essere "tarata" per ottenere una colorimetria corretta del video. È possibile regolare
manualmente il bilanciamento dei bianchi "MANUAL WB" oppure utilizzare regolazioni automatiche quali:
o
"ATW" (Auto Tracing White Balance): la telecamera regola automaticamente il bilanciamento dei bianchi
in funzione delle variazioni di luce. Il parametro "ATW FRAME" stabilisce la frequenza di regolazione.
È possibile utilizzare comandi supplementari presenti in questo menu ("SPEED", "DELAY CONT", "ATW FRAME") in
ambienti con tipi diversi di illuminazione combinati tra loro, quali tubi fluorescenti, luce solare o luce incandescente.
3.2.2
o
"ANTI-CR (Anti Color Rolling)": se installata in un locale illuminato da una sorgente di luce fluorescente,
la telecamera può essere influenzata dalla frequenza di lampeggiamento della sorgente, il che induce il
bilanciamento dei bianchi a variare ciclicamente i colori. Questo effetto è detto "Color Rolling". La funzione
"Anti CR" elimina questo effetto indesiderato.
o
"INDOOR", "OUTDOOR": su tutte le telecamere è possibile stabilire preventivamente la modalità di
bilanciamento dei bianchi in funzione di un ambiente predefinito.
Ausilio di visualizzazione delle immagini scure o in notturna: "AGC (Auto Gain Control)", "NR (Noise reduction)",
"HLC (High Light Compensation)".
Il circuito elettronico misura in tempo reale il livello di luce rilevato dalla telecamera. Se la luce è al di sotto del limite di
funzionamento in modalità a colori, la telecamera di sorveglianza passa automaticamente alla modalità bianco e nero. Il livello
minimo di luce necessario è di soli 0,1 lux a colori e 0,01 lux in bianco e nero.
-
"AGC" (Auto Gain Control): misura in tempo reale il livello del segnale video e lo amplifica quindi se è troppo basso
(immagine troppo scura). Questa funzione permette di schiarire automaticamente le immagini quando la telecamera di
sorveglianza è installata in un ambiente con un'illuminazione insufficiente. Un guadagno eccessivo può creare rumore
nell'immagine.
Menu "SHUTTER/AGC"
-
8
"DAY/NIGHT": permette di stabilire i livelli di alternanza giorno/notte e notte/giorno in modalità "AUTO", di impostare la
telecamera in bianco e nero o a colori.
Telecamera box 700 TVL 12V/230VCA
-
"NR" (Noise reduction): utilizza un procedimento digitale per ridurre il rumore dell'immagine. Il rumore dell'immagine
si manifesta con sgranature visibili quando la telecamera di sorveglianza viene utilizzata in un ambiente molto scuro.
2D DNR riduce questo difetto e migliora la qualità dell'immagine.
-
3.2.3
Manuale Di Istruziono
NR:
"HLC" (High Light Compensation): compensazione di luminosità elevata che consente di identificare e compensare
le aree esposte ad una luce forte proveniente da una sorgente posta proprio davanti alla telecamera. Questa funzione
scurisce le aree esposte a luce forte e migliora la visualizzazione dei dettagli nelle aree sottoesposte.
Gestione del controluce: "ATR (Adaptive Tone Reproduction)", "BLC (Back Light Compensation)" e "WB (White
Balance)".
-
"ATR" (Adaptive Tone Reproduction): migliora la capacità di riproduzione dei dettagli quando l'immagine contiene
aree molto luminose e altre molto scure. Nell'esempio riportato sotto, l'area sovraesposta e l'area sottoesposta vengono
corrette automaticamente con la funzione ATR.
-
"BLC" (BackLight Compensation): compensazione automatica del controluce. Funziona selezionando l'area dell'immagine
che deve essere sottoposta al controllo automatico del diaframma. In questo modo è possibile riprodurre le aree desiderate
con una buona esposizione. In caso di controluce la telecamera regola il diaframma in funzione dell'area selezionata e
ignora la forte luminosità dello sfondo. La funzione BLC è estremamente efficace ma è importante ricordare che la parte
luminosa della scena può essere sovraesposta. Questa funzione è disponibile solamente nelle telecamere EFFIO E.
9
3.3
Altre funzioni principali
Mascheramento ("Masking" o "Privacy mask") è la funzione di mascheramento delle aree private o delle aree in cui sono
vietate le riprese. Sull'immagine le aree mascherate saranno coperte da riquadri di colore nero o da un mosaico.
"Camera Reset": questa funzione ripristina i parametri originali, si trova nel menu "OTHER" sulle telecamere EFFIO P e all'ultima
voce del menu principale nelle telecamere EFFIO E.
4 Specifiche
4.1
4.2
Caratteristiche principali della funzione OSD nei modelli EFFIO E
Funzioni principali
"EFFIO-E"
Risoluzione orizzontale
da 500 a 700 TVL (a seconda dei modelli)
Wide dynamic range
No
ATR
Sì
Noise reduction
2D-NR
Day & Night e Controllo dell'esposizione dei
sensori IR
Sì
Privacy mask
8 maschere
E-zoom
No
Slow shutter (Sens-up)
No
Digital Image Stabilizer
No
HLC
Sì
Rilevamento di movimento
Sì
Spécifications de la caméra
Caratteristiche tecniche
Sensore
Numero di righe
Tipo di scansione
Giorno/Notte
Illuminazione minima (Color/BW/IR on)
ICR (IR Cut Filter)
Distanza di illuminazione infrarossi (IR)
Angolo di illuminazione infrarossi (IR)
OSD (On-Screen Display)
WDR (Wide Dynamic Range)
Mascheramento
Obiettivo/Attacco
Grado di protezione IP
Alimentazione
Consumo
Temperatura di esercizio
Dimensioni del prodotto
Peso del prodotto
10
391348
391352
1/3" Sony EXview HAD CCD II
PAL:700 TVL
Interlacciata
Sì
a colori 0,03 lux a F1,2, bianco e nero 0,01 lux a F1,2
Sì
Sì
No
Sì
CS
IP30
12 V CC (+ -) 10%,
110 – 230 V~
12 V = 90 mA,
230 V ~ = 30 mA
-10°C -> 55°C
130,6 mm x 66 mm x 52 mm
350 g
380 g
Camera box 700TVL 12v/230Vac
Index
1
Contents ............................................................................................................................................................................................................................. 12
2
Dimensions and Description ...................................................................................................................................................................................... 12
Fitting the Auto Iris Lens: .................................................................................................................................................................................. 14
2.2
Instructions for Use:............................................................................................................................................................................................. 14
OSD Menu:......................................................................................................................................................................................................................... 14
3.1
Functions................................................................................................................................................................................................................. 16
3.2
Luminosity Management: matching the environment (indoor, outdoor or night-time). ....................................................... 16
3.2.1
User Manual
3
2.1
Picture Adjustment: ....................................................................................................................................................................................... 16
3.2.2
Enhanced Visualisation of Dark/Night-time Images: "AGC (Auto Gain Control)", "NR (Noise Reduction)",
"HLC (High Light Compensation)"............................................................................................................................................................................. 16
3.2.3
Back Light Management: "ATR (Adaptive Tone Reproduction)", "BLC (Back Light Compensation)" and
"WB (White Balance)"...................................................................................................................................................................................................... 17
3.3
4
Other Main Functions......................................................................................................................................................................................... 18
Specifications.................................................................................................................................................................................................................... 18
4.1
Main Characteristics of the EFFIO E............................................................................................................................................................... 18
4.2
Specifications......................................................................................................................................................................................................... 18
11
1 Contents
EN
Mounting plate
Allen key
Screws
Check that you have all the parts shown above.
If any of them is missing, please contact your dealer.
2 Dimensions and Description
12
User Manual
Camera box 700TVL 12v/230Vac
391348
391352
No.
Name
Functions
1
CS Lens Mount
Designed to take a CS lens.
2
Back Focus
The camera can be focused by using the Allen key to loosen the two screws which
hold the CS lens ring in place.
3
Protective Cover
Protects the sensor.
4
C/CS Lens Mount
It is possible to adapt a ring for use with a C lens (not supplied with this product).
5
Mounting Base
For attaching the camera to a bracket.
6
Video Output
Sends the video signal to the monitor input.
7
Power Input
12VDC or 110-230VAC, depending on the type of camera.
8
Not Used
N/A.
9
Power Indicator Light
The light shows red when the camera is supplied with power.
10
OSD Menu Buttons
See OSD description below.
11
Iris Control (DC Driver)
Works with an auto iris lens.
13
2.1
Fitting the Auto Iris Lens:
Pins
2.2
DC DRIVER
(Direct DRIVE)
1
DAMP-
2
DAMP+
3
DRIVE+
4
DRIVE-
Instructions for Use:
4- Attach the camera to the mounting bracket using the accessories supplied.
5- Connect the video output either to the screen or to a recorder with a 75 ohm coaxial cable.
6- Use the power supply recommended for the type of camera.
3 OSD Menu:
No.
14
Function
1
() Moves the selection upwards.
2
() Moves the selection downwards.
3
(►) Moves the selection to the right and lowers the value of the
setting.
4
(◄) Moves the selection to the left and raises the value of the setting.
5
Displays the menu and confirms selection on the screen.
Camera box 700TVL 12v/230Vac
User Manual
Sony EFFIO E Description
15
3.1
Functions
When installing a camera, it is important to adjust the settings to match normal operating conditions (indoor, outdoor and/or
night-time). Results can be improved by adjusting several settings at once.
With more sophisticated models (EFFIO P) difficult light conditions, such as backlight, can be managed more effectively.
The following settings typically have an impact on picture quality. They have been discussed and grouped on the basis of the
conditions affecting the camera's surroundings.
3.2
Luminosity Management: matching the environment (indoor, outdoor or night-time).
3.2.1
Picture Adjustment:
-
"PICT ADJUST" "Brightness", "Contrast", "Sharpness", "Hue", "Gain".
-
"SHUTTER/AGC" combines:
o
"SHUTTER": shutter speed
o
"IRIS": opening the lens diaphragm
Adjusting both the shutter and the iris determines how much light reaches the sensor over a given time period.
-
o "AGC" (Auto Gain Control): the "GAIN" is the signal amplification
"WHITE BALANCE": facilitates sensor calibration and correction of colour cast to suit the ambient lighting. Different
types of light contain specific colour casts: for indoor lighting (tungsten) this is more orange-coloured, while for daylight
it tends to be blue; under cloudy skies it is whitish, and under neon lights it is greenish. This is referred to as colour
temperature. The human eye is not confused by colour temperature differences, but cameras need to be "calibrated" in
order for their video colorimetry to be accurate. The white balance can be adjusted manually using "MANUAL WB" or,
alternatively, automatic adjustment options can be used, e.g.:
o
"ATW" (Auto Tracing White Balance): the camera automatically adjusts the white balance in response to
changes in light. The "ATW FRAME" setting determines how often readjustments are made.
Further controls found in this menu ("SPEED", "DELAY CONT", "ATW FRAME") can be used in environments where
different kinds of lighting, such as fluorescent tubes, sunlight and incandescent light, occur in combination.
3.2.2
o
"ANTI-CR (Anti Colour Rolling)": if the camera is installed in a location lit by a fluorescent light source, it can be
affected by the flicker rate of the light source, causing the white balance to alter the colours on a cyclical basis.
This undesirable effect is known as "Colour Rolling" and "Anti CR" is the function designed to eradicate it.
o
"INDOOR", "OUTDOOR": All cameras can have their white balance mode pre-set to suit a predefined
environment.
Enhanced Visualisation of Dark/Night-time Images: "AGC (Auto Gain Control)", "NR (Noise Reduction)",
"HLC (High Light Compensation)".
The electronic circuit takes real-time measurements of the light levels being picked up by the camera. If they fall below the
operating threshold for colour mode, the surveillance camera automatically switches to black and white mode. The minimum
light level required is only 0.1 Lux for colour and 0.01 Lux for black and white.
-
"AGC" (Auto Gain Control): measures the strength of the video signal in real time, then, if the signal is too weak (the
picture is too dark), amplifies it. This function means that pictures can automatically be brightened when the surveillance
camera is located in an environment with insufficient lighting. Excessive gain generates image noise.
menu "SHUTTER/AGC"
-
16
"DAY/NIGHT": pre-sets the levels at which the camera switches from day to night/night to day in "AUTO" mode, or sets
the camera permanently to black & white or colour.
Camera box 700TVL 12v/230Vac
-
"NR" (Noise Reduction): reduces image noise using a digital process. Image noise shows up in the form of grains which
can be seen when surveillance cameras are used in very dark environments. 2D DNR helps to rectify this flaw and
improve picture quality.
-
3.2.3
User Manual
NR:
"HLC" (High Light Compensation): compensation for strong light, i.e. identification of and compensation for any areas
exposed to a strong light source directly facing the camera. This function darkens any areas exposed to strong light in
order to enhance the detail displayed in under-exposed areas.
Back Light Management: "ATR (Adaptive Tone Reproduction)", "BLC (Back Light Compensation)" and
"WB (White Balance)".
-
"ATR" (Adaptive Tone Reproduction): improves the reproduction of detail when images contain a mixture of very light
and very dark areas. In the example below, the ATR function has automatically corrected both the over-exposed and the
under-exposed areas.
-
"BLC" (Back Light Compensation): automatic backlight compensation. This works by selecting the area of the image
which requires automatic diaphragm control, and ensuring that the area chosen is reproduced using the correct
exposure. When backlight is present, the camera adjusts the diaphragm to suit the area selected and ignores high levels
of luminosity in the background. The BLC function is highly efficient. However, it is important to remember that it can
result in the brightly-lit part of the scene being over-exposed. This function is only available on EFFIO E cameras.
17
3.3
Other Main Functions
"Masking" is the function used to mask any areas which are private or which it is forbidden to film. In the picture, these areas are
shown covered by a black square or by a mosaic.
"Camera Reset": this function restores the camera's original settings, and can be found in the "OTHER" menu on EFFIO P cameras
and at the very bottom of the main menu on EFFIO E cameras.
4 Specifications
4.1
4.2
Main Characteristics of the EFFIO E
Main Functions
"EFFIO E"
Horizontal resolution
500 to 700 TVL (depending on the model)
Wide dynamic range
No
ATR
ATR
Noise reduction
2D-NR
Day/Night and IR exposure control
Yes
Privacy mask
8 masks
E-zoom
No
Slow shutter (Sens-up)
No
Digital Image Stabiliser
No
HLC
Yes
Motion detection
Yes
Specifications
Technical Characteristics
Sensor
Number of lines
Type of scanning
Day/Night
Minimum lighting (Colour/BW/IR on)
ICR (IR Cut Filter)
Infrared (IR) light distance
Infrared (IR) light angle
OSD (On Screen Display)
WDR (Wide Dynamic Range)
Masking
Lens/Lens Mount
IP Protection index
Power supply voltage
Power consumption
Operating temperature
Product dimensions
Product weight
18
391348
391352
1/3" Sony EXview HAD CCD II
PAL:700 TVL
entrelaced
Yes
Color [email protected] / BW [email protected]
Yes
Yes
No
Yes
CS
IP30
12 VDC (+ -)10%,
110 – 230 V~
12 V = 90 mA,
230 V ~ 30 mA
From -10 °C to 55°C
Length 130.6 mm, Width 66 mm, Height 52 mm
350 g
380 g
User Manual
Camera box 700TVL 12v/230Vac
19
20