1
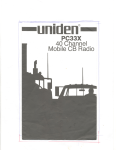
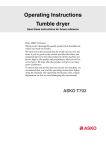
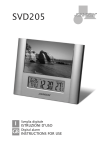
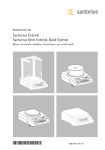
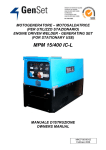
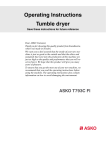
Roma
I
GB
Macchina per caffè espresso e cappuccino
ISTRUZIONI D’USO
Espresso coffee and cappuccino machine
INSTRUCTIONS FOR USE
2
3
15
4
5
6
10
20
8
7
11
9
12
21
1
14
15
13
21
14
2
17 19 18
16
19
18
8
9
16
17
A
B
C
10
3
220-240V~ 50Hz Rated Power: 1050W
Heater Power: 1000W Pump Power: 50W
Pressure: 15BAR
5
· Tazze e caffè NON sono compresi nella confezione · Cup and coffee are not included in the box
3
I
AVVERTENZE GENERALI
Conservate con cura il presente
manuale e leggetene attentamente le avvertenze; esse forniscono importanti indicazioni riguardanti la
sicurezza, l’uso immediato e futuro dell’apparecchio.
Questo apparecchio, adatto per il solo uso
domestico, dovrà essere destinato solo
alla funzione per il quale è stato espressamente concepito.
Ogni altro uso è da considerarsi improprio
e pericoloso.
Il costruttore non può essere considerato
responsabile per eventuali danni derivanti
da usi impropri, errati ed irragionevoli.
L’installazione dovrà essere effettuata secondo le prescrizioni del costruttore. Una
errata installazione può causare danni a
persone, animali, cose, il costruttore non
può esserne ritenuto responsabile. La sicurezza delle apparecchiature elettriche è
garantita solo se queste sono collegate ad
un impianto elettrico provvisto di idonea
messa a terra secondo quanto stabilito
dagli attuali standard vigenti in materia di
sicurezza elettrica.
Gli elementi dell’imballaggio (sacchetti in
plastica, chiodi, polistirolo espanso, ecc.)
non devono essere lasciati alla portata di
bambini o incapaci in quanto rappresentano potenziali fonti di pericolo.
Prima di collegare l’apparecchio accertarsi
che i dati di targa siano rispondenti a
quelli della rete di distribuzione elettrica.
In caso di incompatibilità tra la presa e la
spina rivolgersi a personale qualificato per
le necessarie operazioni di adeguamento.
Non utilizzare adattatori, prese multiple
e/o prolunghe.
Qualora il loro uso si rendesse indispensabile utilizzare esclusivamente materiale
conforme alle vigenti norme di sicurezza
ed aventi requisiti di compatibilità con apparecchio e rete di distribuzione elettrica.
Utilizzando l’apparecchio per la prima
volta, assicurarsi di aver tolto ogni etichetta o foglio di protezione.
4
Se l’apparecchio è dotato di prese d’aria,
assicurarsi che non vengano mai occluse
nemmeno parzialmente.
L’uso di qualsiasi apparecchio elettrico
comporta l’osservanza di alcune regole
fondamentali ed in particolare:
Non immergere o bagnare l’apparecchio;
non usarlo vicino ad acqua, in vasca, nel
lavello o in prossimità di altro recipiente
con liquidi. Nel caso l’apparecchio dovesse
cadere accidentalmente in acqua NON cercare di recuperarlo ma innanzitutto togliere immediatamente la spina dalla presa
di corrente.
Successivamente portarlo in un centro assistenza qualificato per i necessari controlli.
Durante l’uso, l’apparecchio deve essere
lontano da qualsiasi oggetto o sostanza
infiammabile od esplosiva.
Non toccare l’apparecchio con mani bagnate o umide.
Non usare l’apparecchio a piedi nudi.
Non tirare l’apparecchio o il cavo per staccare la spina dalla presa.
Non lasciare l’apparecchio esposto ad
agenti atmosferici (pioggia, sole).
Si raccomanda di tenere l’apparecchio
fuori dalla portata di bambini od incapaci
e di non permetterne loro l’utilizzo.
Scollegare la spina dalla presa di corrente
quando l’apparecchio non viene utilizzato
e prima di effettuare qualsiasi operazione
di pulizia o manutenzione.
Il cavo di alimentazione deve essere srotolato per tutta la sua lunghezza al fine di
evitarne il surriscaldamento.
Il cavo di alimentazione non deve essere
avvicinato a fonti di calore e/o superfici
taglienti.
In caso di cavo di alimentazione danneggiato, provvedere alla sostituzione che
deve essere effettuata da personale qualificato.
In caso di guasto e/o cattivo funzionamento spegnere l’apparecchio e rivolgersi
a personale qualificato.
mamente sporco o incrostato o presentasse depositi di cibo, depositi calcarei,
depositi di polvere o altro; esternamente
o internamente: per motivi igenico-sanitari, il centro assistenza respingerà l’apparecchio stesso senza visionarlo.
Eventuali manomissioni o interventi effettuati da personale non qualificato fanno
decadere i diritti di garanzia.
Per pulire l’apparecchio usare solo un
panno morbido e non abrasivo.
Quando l’apparecchio, risulta inutilizzabile e si desidera eliminarlo, asportarne i
cavi e smaltirlo presso un ente qualificato
al fine di non contaminare l’ambiente.
Il simbolo
sul prodotto o sulla confezione indica che il prodotto non deve
• Se nel prodotto vi sono parti in vetro, essere considerato come un normale rifiuto domestico, ma deve essere portato
queste non sono coperte da garanzia.
nel punto di raccolta appropriato per il
riciclaggio di apparecchiature elettriche
ATTENZIONE:
Le parti in plastica del prodotto non sono ed elettroniche.
Provvedendo a smaltire questo prodotto
coperte da garanzia.
in modo appropriato, si contribuisce a
evitare potenziali conseguenze negative
ATTENZIONE:
per l’ambiente e per la salute, che poI danni del cavo di alimentazione, deritrebbero derivare da uno smaltimento
vanti dall’usura non sono coperti da gainadeguato del prodotto. Per informaranzia; l’eventuale riparazione sarà
zioni più dettagliate sul riciclaggio di
pertanto a carico del proprietario
questo prodotto, contattare l’ufficio comunale, il servizio locale di smaltimento
ATTENZIONE:
rifiuti o il negozio in cui è stato acquiSe si rendesse necessario portare o spestato il prodotto.
dire l’apparecchio al centro assistenza
autorizzato, si raccomanda di pulirlo accuratamente in tutte le sue parti.
Se l’apparecchio risultasse anche mini-
5
AVVERTENZE PARTICOLARI
- Posizionare sempre l'apparecchio su
una superficie piana.
- Non lasciare mai incustodito l'apparecchio in uso.
- Non utilizzare l'apparecchio con una
prolunga di corrente.
- Questo prodotto è destinato al normale
uso esclusivamente domestico/familiare.
PRIMA DEL PRIMO UTILIZZO
Leggere e seguire le istruzioni contenute
in questo manuale "Uso e Manutenzione",
anche se si ha già familiarità con il prodotto, e tenerle a portata di mano per consultazioni future.
Si richiama l'attenzione in particolare per
- Attenzione! la caraffa per il riempimento
le sezioni riguardanti: "AVVERTENZE
deve essere sempre utilizzata quando si
IMPORTANTI", "PER LA VOSTRA SICUversa acqua nell'unità.
REZZA", "GARANZIA" e "SERVICE".
Non riempire mai l'unità oltre la quantità
AVVERTENZE IMPORTANTI
indicata dal livello 1250 ml segnato sul
Quando si utilizza un prodotto elettrico, serbatoio dell'acqua.
vanno rispettate precauzioni di sicurezza Il serbatoio è progettato per l'uso escludi base, tra cui le seguenti:
sivo con questo apparecchio, non utiliz- SI PREGA DI LEGGERE ATTENTAMENTE zare mai in altro modo.
TUTTE LE ISTRUZIONI PRIMA DI UTILIZ- - Non lasciare incustodita la macchina
ZARE IL PRODOTTO.
per il caffè quando si usa in presenza di
- Attenzione! per ridurre il rischio di in- bambini.
cendi, scosse elettriche o lesioni a persone - Assicurarsi che il pulsante ON/OFF è in
posizione "OFF" prima di collegare o scolo cose:
- Spegnere e staccare la spina dalla presa legare la spina dalla presa di corrente.
di corrente quando non in uso, prima di - Tenere il pulsante ON/OFF in posizione
montare o smontare le parti e prima della "OFF" quando l'unità non viene utilizzata.
- Assicurarsi che le mani siano asciutte
pulizia.
durante
il collegamento e scollegamento
Estrarre la spina afferrando la spina, NON
dell'apparecchio.
tirando il cavo.
- Lasciare raffreddare prima di inserire o - Non toccare parti calde della macchina
rimuovere pezzi e prima di pulire l'appa- da caffè, usare le maniglie e interruttori.
- Non lasciare l'apparecchio vicino a fonti
recchio.
di
calore, e assicurarsi che il cavo non
- Pulire l'ugello vapore SOLO quando
l'apparecchio è stato spento e lasciato raf- possa toccare una superficie calda (supporto del filtro e ugello vapore).
freddare.
- Non posizionare sopra a qualsiasi altro - Non immergere l'apparecchio in acqua
o altri liquidi.
apparecchio.
- Non posizionare l'apparecchio vicino a
gas, fonti di calore, fornelli o forno.
1.
2.
- Attenzione! non mettere in funzione
l'apparecchio senza acqua nel serbatoio; 3.
la pompa non funzionerebbe in modo 4.
5.
corretto.
6.
In questo caso, spegnere e lasciare che la
7.
macchina si raffreddi completamente.
Aprire la manopola vapore per rilasciare 8.
9.
qualsiasi pressione residua.
La macchina può ora essere utilizzata 10.
11.
nuovamente.
6
Descrizione
Pulsante ON/OFF
Spia luminosa ON/OFF
Pulsante erogazione
Spia luminosa temperatura
Pulsante vapore
Spia luminosa vapore
Testa sagomata del cestello porta filtri
Blocco del cestello porta filtri
Cestello porta filtri
Manopola erogazione vapore
Tubo vaporizzatore
tura, il blocco del cestello porta filtri (8).
Inserire o la cialda o la polvere nel filtro.
Nel caso di utilizzo della polvere di caffè,
attenersi ai consigli sopra citati per il
grado di macinatura.
Nel mettere il caffè in polvere nel filtro,
non eccedere con la quantità.
Utilizzando il misurino (16) 1 volta o due,
versare la polvere nel filtro poi premere
delicatamente la polvere all’interno dello
stesso con il pressatore (17).
Prima del primo utilizzo
Pulire eventuali eccessi di polvere deposiPrima di utilizzare la macchina per il caffè
tati sul bordo del filtro.
per la prima volta, pulire il serbatoio con
ATTENZIONE: terminata l’erogazione del
acqua una o due volte.
Assicurarsi di aver eliminato tutte le pla- caffè, aspettare che il filtro si sia raffredstiche adesive di protezione dell’apparec- dato e pulirlo subito dal caffè utilizzato.
Questa operazione di pulizia dei filtri (18
chio.
e 19) è da eseguire dopo ogni utilizzo.
Caffè espresso
Eliminare anche i residui di polvere di caffè
Corretta macinatura del caffè.
che rimangono sul filtro esterno della
- Per ottenere risultati ottimali, il caffè
macchina dentro alla ghiera porta cestello
deve avere una macinatura media, do(20).
vrebbe avere aspetto consistente come
Portando verso sinistra l’impugnatura del
sabbia o sale fino.
- Se la macinatura è troppo fine, l'acqua cestello porta filtri (9), far scorrere verso il
non fluisce attraverso il caffè, anche sotto retro della stessa, il blocco del cestello
porta filtri (8).
pressione.
- Se la macinatura è troppo grossa, l'ac- Inserire quindi il portafiltro (con il filtro e
qua scorre troppo velocemente e il caffè il caffè) centrando la testa sagomata del
non cederà completamente il suo aroma. cestello porta filtri (7) nella ghiera porta
Estrarre il serbatoio (13) e riempirlo con cestello (20).
Lasciare il blocco del cestello porta filtri e
acqua.
Reinserire nella sua sede il serbatoio riem- ruotare l’impugnatura verso destra serpito assicurandosi che il tubo in gomma randola.
sia immerso in acqua e che peschi sul
Nota: non serrare eccessivamente.
fondo del serbatoio.
Inserire la spina in una presa di corrente
Attenzione, se l’apparecchio non venisse
idonea a riceverla e premere il tasto (1)
utilizzato per lunghi periodi, non lasciare
ON/OFF, si illuminerà la spia luminosa (2).
acqua nel serbatoio avendo cura di svuoCon l’accensione della macchina, comincerà
tarlo ed asciugarlo.
il riscaldamento della stessa e raggiunta la
Svuotare anche il residuo di acqua pretemperatura di utilizzo si accenderà anche
sente nel circuito facendo funzionare la
la spia luminosa caffè (4).
pompa per qualche secondo fino al comIl vassoio superiore (15) si scalda con la
pleto esaurimento.
macchina e può essere utilizzato come
Scegliere il filtro porta caffè (18 o 19) per scalda tazze.
1 o 2 tazze di caffè e inserirlo nella sua Depositare le tazze prima dell’uso sul vassede, nel cestello porta filtri (9) facendo soio avendo cura di non scottarsi.
prima scorrere verso il retro dell’impugna12.
13.
14.
15.
16.
17.
18.
19.
20.
21.
Terminale vaporizzatore
Serbatoio acqua
Griglia
Vassoio caldo
Misurino
Pressatore
Filtro porta caffe (x 2 tazze)
Filtro porta caffe (x 1 tazza)
Ghiera porta cestello
Bacinella asportabile
7
4. Prima di inserire il terminale vaporizzatore (12) nel latte, ruotare la manopola vapore (10) in senso antiorario per attivare
la funzione vapore in modo da eliminare
tutta l'acqua condensata.
Durante questa operazione tenere un bicchiere vuoto sotto il terminale vaporizzatore (12).
Posizionare 1 o 2 tazze sulla griglia (14) in
corrispondenza degli ugelli di uscita caffè
posti sotto al cestello portafiltri.
Premere il tasto erogazione (3) e raggiunta
la quantità di caffè desiderata, premerlo
nuovamente per interrompere l’erogazione.
Per non bagnare il piano dove è posizionata la macchina del caffè, durante
l’erogazione del caffè, posizionare un
recipiente anche sotto il terminale vaporizzatore (12) in quanto possono fuoriuscire delle gocce d’acqua.
Sbloccare il cestello portafiltri (9) ruotandolo verso sinistra e una volta raffreddato
pulirlo come indicato prima.
5. Eliminata l’acqua di condensa, quando
il terminale vaporizzatore eroga solo vapore inserirlo con attenzione nel bricco in
acciaio contenete il latte freddo appena
sotto la superficie del latte.
Importante: Non lasciare che il terminale
vaporizzatore tocchi il fondo della brocca,
perché questo potrebbe ostruire il passaggio del vapore.
Eseguire dei piccoli movimenti circolari
con il bricco in modo che il latte contenuto
si muova anch’esso.
Come il vapore riscalda il latte, questo comincerà a salire.
Seguire il livello del latte abbassando la
brocca e tenendo sempre la punta del terminale vaporizzatore appena sotto la superficie.
Ottenuta la quantità di schiuma desiderata, interrompere l’erogazione vapore
ruotando la manopola erogazione vapore
(10) in senso orario e premere il pulsante
vapore (5).
Attenzione, non lasciare mai il cestello
portafiltri serrato alla ghiera porta filtro.
Se l’indicatore luminoso temperatura (4)
spegne, attendere la sua riaccensione
prima di preparare il caffè successivo.
Attenzione, non premere mai il tasto erogazione (3) quando la spia temperatura (4)
è spenta.
Cappuccino
Cappuccino è un caffè espresso con latte
caldo e schiuma di latte.
(1/3 caffè espresso, 1/3 latte e 1/3 latte
montato con il vapore).
Nota: Si consiglia di fare prima l'espresso
e successivamente lavorare il latte con il
vapore.
Nota: Non fate bollire il latte.
1. Seguire le indicazioni sopra riportate Versare il latte nel caffè espresso e fare
per fare il caffè espresso.
una miscela con spuma cremosa.
Cospargere con cannella o cioccolato in
2. Premere il tasto vapore (5).
All’accensione della spia luminosa vapore polvere e decorare con un bastoncino di
significa che la macchina è pronta ad ero- cannella.
Terminato l’uso del terminale vaporizzagare vapore.
tore, erogare ancora del vapore per elimi3. Versare circa 100 ml di latte freddo in nare eventuali residui di schiuma di latte,
un bricco in acciaio inox.
lasciare, tubo vaporizzatore (11) e termiNota: Per ottenere i migliori risultati si nale vaporizzatore (12) sempre puliti.
consiglia di utilizzare il latte freddo a temperatura di frigorifero e la brocca in acciaio inox ben raffreddata.
8
Decalcificazione Espresso/Cappuccino
Manutenzione e pulizia
macchina
È necessario pulire l'ugello vapore e svitare
il terminale vaporizzatore immediata- 1. Posizionare il serbatoio dell’acqua con
1/2 litro di acqua e 2 cucchiaini di acido
mente dopo ogni utilizzo.
citrico.
Basta pulire il tubo vaporizzatore in ac2. Posizionare un contenitore di grandi diciaio inox con un panno umido e svitato il
mensioni sotto la ghiera porta cestello e
terminale vaporizzatore, metterlo sotto
un altro recipiente sotto l'ugello vapore.
acqua corrente tiepida per rimuovere il
3. Accendere la macchina premendo il
latte in eccesso.
pulsante ON/OFF (1).
Attenzione: sono parti che possono esAttendere l’accensione della spia luminosa
sere molto calde quindi attenzione al petemperatura (4) e poi premere il pulsante
ricolo di scottature
erogazione (3) per far passare 1/3 del liEffettuare comunque frequentemente la
quido.
pulizia di tutta la della macchina e delle
Interrompere l’erogazione ripremendo il
sue componenti.
pulsante erogazione (3).
Con colpi di vapore ripulire il terminale vaSuccessivamente premere il tasto vapore
porizzatore, il cestello portafiltri, l'ugello
(5) e all’accensione della spia luminosa vadi uscita vapore, i filtri e le componenti
pore (6), ruotare la manopola vapore in
mobili. (Se i fori dei filtri risultassero intasenso antiorario per rilasciare vapore.
sati con granelli di caffè usare un pennello
Lasciare fluire la soluzione attraverso
per rimuoverli).
l'ugello vapore per 1-2 minuti.
Mantenere la macchina pulita dopo aver
fatto ogni caffè, e alla fine di ogni sessione 6. Dopo 2 minuti, ruotare la manopola vapore in senso orario e premere il tasto vadi lavoro.
pore (5).
Importante: Non lavare mai gli accessori
Spegnere la macchina premendo il pulmacchina espresso in lavastoviglie.
sante ON/OFF (1).
Rimuovere anche griglia (14) e bacinella
raccogli gocce (21) per pulirle con acqua 7. Non utilizzare la macchina per 10-15
minuti in modo di consentire al disincrocorrente.
stante di avere effetto.
Nota: nei periodi di inutilizzo, non lasciare
montato alla ghiera porta cestello, il ce- 8. Trascorsi i 10-15 minuti premere il
tasto "ON/OFF" per ri accendere la macstello pota filtri.
Le superfici esterne della macchina sono china e ripetere, per la seconda volta, la
da pulire con un panno morbido e inumi- procedura di disincrostazione.
dito solo quando la macchina è fredda e Togliere e svotare i contenitori posti sotto
la ghiera porta cestello e sotto l’ugello vascollegata dalla rete elettrica.
pore.
Dopo un uso continuato nella macchina si
Svuotare e pulire accuratamente il serbahanno accumuli di depositi minerali che
toio acqua, poi riempirlo nuovamente con
richiedono interventi di "decalcificazione"
acqua pulita.
Si consiglia di decalcificare la macchina
Eseguire altri 3 cicli di pulizia con acqua
ogni 2-3 mesi o dopo che la macchina ha
pulita facendola passare sia dalla ghiera
fatto 200 tazze di caffè espresso, anche se
porta filtro sia dall’ugello vapore.
questo periodo dipende dalla durezza dell'acqua e frequenza d'uso della macchina. Nota: verificare che l’acqua che scorrere
attraverso la macchina fuoriesca pulita e
chiara.
9
GB
GENERAL SAFETY REQUIREMENTS
Carefully read the requirements
in this manual and keep in a safe
place. It contains important instructions on the safety, use and future of
your appliance.
This appliance is only for domestic use
and must only to be used for the purpose
it was specifically designed.
Any other use is considered improper and
dangerous.
The manufacturer cannot be held responsible for any damages caused by improper, incorrect and negligent use. The
installation must be carried out according
to the manufacturer’s instructions. The
manufacturer shall not be held responsible
for any damages to people, animals or objects caused by incorrect installation. The
safety of the electrical equipment is only
guaranteed if it is connected to an electrical installation equipped with a suitable
earthing system in compliance with the
current standards on electrical safety.
Do not leave parts of packaging (plastic
bags, foam polystyrene, nails, etc) within
reach of children or incapacitated people
since they are potential sources of danger.
Before connecting the appliance, check
that the technical data on the rating label
corresponds to those of the main electricity network.
In case of incompatibility between the outlet and the plug, contact a qualified electrician for the necessary adjustments.
Do not use adaptors, multiple plugs and
extension leads.
However, if absolutely necessary only use
materials that conform to the current safety standards and that are compatible
with the appliance and the main electricity
network.
On using the appliance for the first time,
remove any labels or protective sheets.
If the appliance is equipped with air inlets,
make sure they are never blocked not even
partially.
The use of any electrical appliance involves the observance of some fundamental
rules. In particular:
Do not immerge the appliance in water
and do not wet; do not use it near water,
in the tub, washbasin or near other recipients with liquids. If the appliance
should accidentally fall in water, DO NOT
try to touch it but immediately disconnect
the plug from the mains power.
Then bring it to an authorised service
centre for the necessary controls.
During use, the appliance must be kept
away from any inflammable objects or
substances or explosives.
Do not touch the appliance with wet
hands or feet.
Do not use the appliance with bare feet.
Do not pull on the power cord or on the
appliance itself to disconnect the plug
from the power outlet.
Do not leave the appliance exposed to atmospheric agents (sun, rain…)
Keep the appliance out of reach of children or incapacitated people and do not
let them use it.
Disconnect the plug from the power outlet when the appliance is not being used
and before carrying out any cleaning or
maintenance.
The power cord must be completely unwound to prevent it from overheating.
The power cord must be kept away from
heat sources and/or sharp edges.
If power cord is damaged, have it replaced by qualified personnel.
Switch off and contact a qualified technician if the appliance should breakdown
and/or not function properly.
Any tampering or interventions executed
by unqualified people will cancel the guarantee.
Use a soft and non-abrasive cloth to
clean the appliance.
When the appliance is unserviceable and
must be eliminated, remove its cords and
dispose of it at an authorised disposal
centre in order to protect the environment.
10
• Warranty does not cover any glass parts
of the product.
ATTENTION:
The damages of the power supply cord,
originate by the wear aren’t covered by
guarantee; the repair will be in charge to
the owner.
ATTENTION:
Warranty does not cover any plastic parts
of the product
ATTENTION:
If the need should arise to take or send the
appliance to an authorised service centre,
make sure to clean all its parts thoroughly.
For hygienic purposes, the service centre
shall reject appliances that are not perfectly clean on the outside or inside without
making any controls or repairs.
The symbol
on the product or on its
packaging indicates that this product may
not be treated as household waste. Instead
it shall be handed over to the applicable
collection point for the recycling of electrical and electronic equipment.
By ensuring this product is disposed of
correctly, you will help prevent potential
negative consequences for the environment and human health, which could
otherwise be caused by inappropriate
waste handling of this product.
For more detailed information about recycling of this product, please contact your
local city office, your household waste disposal service or the shop where you purchased the product.
11
SPECIAL WARNINGS
BEFORE FIRST USE
Read and follow the instructions in this
manual "Use and Maintenance", even if
you already know to use the product, and
keep them handy for future references.
Pay attention mainly to the sections on:
“IMPORTANT WARNINGS”, “FOR YOUR
SAFETY”, “WARRANTY” and “SERVICE”.
IMPORTANT WARNINGS
When using electric products, should be
respected basic security precautions, including the following:
- PLEASE READ ALL INSTRUCTIONS CAREFULLY BEFORE USING THE PRODUCT.
- Warning! to reduce the risk of fire,
electric shock or injury to persons or property:
- Turn off and unplug from the power
point when not in use, before assembling
or disassembling the parts and before
cleaning.
Pull out the plug by grasping the plug,
NOT pulling on the cord.
- Allow to cool before putting on or taking off parts and before cleaning the appliance.
- Clean the steam nozzle ONLY when the
appliance was switched off and cooled.
- Do not place above any other appliance
- Do not place near any gas, source of
heat, stove or oven.
- Warning! The pitcher to filling should
always be used when water is poured into
the appliance.
Never fill the appliance over the amount
indicated by 1250 ml level marked on the
water tank.
The tank is designed for the exclusive use
with this appliance, never use otherwise.
- Do not leave the coffee maker unattended if it is used when children are present.
- Make sure the ON/OFF switch is in
“OFF” before connecting or disconnecting
the plug from the power point.
- Hold the ON/OFF button in “OFF” when
the appliance is not used.
- Make sure your hands are dry when
plugging and unplugging the appliance.
- Do not touch the heat parts of the coffee maker, use the handles and switches.
- Do not leave the appliance near heat
sources, and make sure that the cable can
not touch a hot surface (filter holder and
steam nozzle).
- Do not immerse the appliance in water
or others liquids.
1.
2.
3.
4.
5.
6.
7.
8.
9.
10.
11.
12.
13.
14.
15.
16.
17.
18.
19.
20.
21.
- Warning! Do not operate the appliance
without water in the tank; the pump will
not work properly. In this case, turn off the
appliance and let it cool completely.
Open the steam knob to release any residual pressure.
The appliance can now be used again.
- Put the appliance always on a flat surface.
- Never leave the appliance running unattended.
- Do not use the appliance with a extension cord.
- This product is intended only for use
domestic/family.
12
Description
ON/OFF Button
ON/OFF Indicator light
Supply button
Temperature indicator light
Steam button
Steam indicator light
Head of the filter basket
Locking of the filter basket
Filters basket
Steam supply knob
Vaporizer tube
Steamer
Water tank
Grid
Hot tray
Measure
Presser
Coffee filter (x 2 cups)
Coffee filter (x 1 cup)
Basket ring
Removable drip tray
Before first use
Before using the coffee maker the first
time, clean the tank wit water once or
twice.
Make sure to eliminate all protective adhesive plastic of the appliance.
Espresso coffee
Correct grinding of coffee
- For best results, the coffee should have
a medium grinding, with a consistent look
as sand or salt.
- If the grind is too fine, the water does
not flow through the coffee, also under
pressure.
- If the grinding is too coarse, the water
flows too fast and the coffee will not gives
its flavour completely.
Remove the tank (13) and fill it with water.
Replace the tank filled into place making
sure that the rubber tube is immersed in
water and fish on the bottom of the tank.
This cleaning of the filters (18 e 19) must
to be made after each use.
Remove all the residual powdered coffee
remaining on the outside filter of the appliance inside the basket ring (20).
Taking the handle to the left of the filter
basket (9), sliding toward the back of it,
the locking of the filter basket (8).
Then insert the filter holder (with the filter
and the coffee), centring the head of filter
basket (7) into the basket ring (20).
Leave the locking of the filter basket and
rotate the knob to the right tightening it.
Note: do not over tightening.
Insert the plug into a compatible power
outlet and press the ON/OFF button (1),
will light the indicator light (2).
When the machine is ON, it will start heating and reached the operating temperature will also turn on the coffee indicator
light (4).
The upper tray (15) warms up with the
machine and can be used as a cup warmer.
Before the use place the cups on the tray
taking care do not burn.
Pay attention, if the appliance is not used
for a long time, do not leave water in the
tank taking care to empty it and dry.
Drain remaining water into the circuit by
running the pump a few seconds until
Place 1 or 2 cups on the grid (14) in corcomplete exhaustion.
respondence to the coffee outlet nozzles
Choose the coffee filter (18 or 19) to 1 or placed under the filters basket.
2 cups of coffee and put it into place, in Press the supply button (3) and reached
the filter basket (9), by first sliding toward the desired coffee quantity, press it again
the back of the handle, the locking of the to stop the supply.
In order to not wet the surface where the
filter basket (8).
Insert into the filter the coffee pods or coffee machine is placed, during the cofpowdered coffee. In case of use of pow- fee supply, place a container also under
dered coffee, follow the advices above for the evaporator terminal (12) because can
leak drops or water.
the fineness of grind.
By putting the powdered coffee into the Unlock the filter basket (9) by turning to
the left and clean it after cooled like
filter, do not exceed the quantity.
Using the scoop (16) once or twice, pour above.
the powdered coffee into the filter, then
Warning, never leave the filter basket
gently press the powdered coffee inside it
tightened to the filter ring.
with the presser (17).
If turn off the temperature indicator light
Wipe any excess of powdered coffee de(4), wait the restart before preparing the
posited on the edge of the filter.
next coffee.
WARNING: At the end of the supply of
Warning, never press the supply button
coffee, wait the filter is cooled and clean
(3) if the temperature light (4) is off.
immediately the coffee used.
13
Cappuccino
Cappuccino is a espresso with warm milk
and milk froth.
(1/3 espresso, 1/3 milk and 1/3 frothed
milk with steam).
Pour the milk into espresso coffee and
make a mix with creamy froth.
Sprinkle with cinnamon or cocoa powder
and garnish with a cinnamon stick.
After using the steamer, still supply the
steam to remove any remaining milk froth,
Note: It is recommended to do before the
let always clean the steamer tube (11) and
espresso then work the milk with the
steamer (12).
steam.
Maintenance and cleaning
1. Follow the instructions above to do the
The steam nozzle must be cleaned and
espresso coffee.
unscrew the steamer immediately after
2. Press the steam button (5).
each use.
When lights the steam indicator of means Clean the stainless steel steamer tube with
the machine is ready to supply steam.
a damp cloth, and unscrew the steamer
terminal,
put it under warm running water
3. Pour about 100 ml of cold milk into a
to
remove
the excess of milk.
stainless steel jug.
Note: For best results it is recommended Warning: they are parts that can be very
to use cold milk at refrigerator tempera- hot then pay attention do not burn.
Make frequently the cleaning of the whole
ture and the stainless steel jug cooled.
machine and its components.
4. Before inserting the steamer (12) in the Clean the steamer terminal, the filters
milk, turn the steam knob (10) counter basket, the steam outlet nozzle, the filters
clockwise to activate the steam function to and moving parts with shots of steam.
remove all the condensed water. During (Is the filters holes are clogged with coffee
this operation place an empty glass under granules use a brush to remove them).
the steamer (12).
Keep the machine cleaned after each coffee
and at the end of each work.
5. After discharged the condensate water,
when the steamer supplies only steam insert it carefully into the steel jug containing the cold milk just below the milk
surface.
Important: Do not let the steamer touches
the bottom of the jug, because this could
obstruct the passage of steam.
Make small circular movements with the
jug do that the milk contained moves too.
As the steam heats the milk, this will begin
to rise.
Follow the level of the milk bringing down
the jug and always keeping the tip of the
steamer just under the surface.
Stop the steam supply when reached the
desired foam, by turning clockwise the
steam knob (10) and press the steam button (5).
Note: The milk should not boiling.
Important: Never wash the espresso machine accessories in the dishwasher.
Also remove the grid (14) and drip tray
(21) to clean with running water.
Note: when not in use, remove the filter
basket to the basket ring.
The external surfaces of the machine
should be clean with a dampen soft cloth
only when the machine is cooled and disconnected from the electricity network.
After continued use in the machine are accumulations of mineral deposits that require a “decalcification”.
It is recommended to decalcify the machine every 2-3 months or after the machine has made 200 cups of espresso
coffee, although this period depends on
water hardness and frequency of use of
the machine.
14
Espresso Decalcification/Cappuccino
machine
1. Place the water tank with ½ litre of water
and 2 teaspoons of citric acid.
2. Place a large container under the basket
ring and another container under the
steam nozzle.
3. Turn on the machine by pressing
ON/OFF (1).
Wait until the temperature indicator light
(4) turn on and then press the supply button (3) to pass 1/3 of the liquid.
Stop the supply by pressing the supply
button (3).
Afterwards press the steam button (5) and
when the steam light indicator (6) turn on,
rotate the steam knob anticlockwise to release steam.
Allow the solution to flow through the
steam nozzle for 1-2 minutes.
6. After 2 minutes, turn the steam knob
clockwise and press the steam button (5).
Turn off the machine by pressing the button ON/OFF (1).
7. Do not use the machine for 10-15 minutes in order to allow the descaler to
have effect.
8. After 10-15 minutes press the button
"ON/OFF" to turn on the machine and repeat for the second time, the scaling procedure.
Remove and discharge the containers placed under the basket ring and under the
steam nozzle.
Empty and clean carefully the water tank,
then fill it again with clean water.
Make other 3 cleaning cycles with clean
water by passing both the filter ring and
the steam nozzle.
Note: Make sure that the water that flows
through the machine comes out clean and
clear.
15
GARANZIA
La durata della garanzia decorre dalla data di acquisto dell’apparecchio, comprovata dal timbro del rivenditore e cessa dopo il periodo
prescritto anche se l’apparecchio non é stato usato. Rientrano nella garanzia tutte le sostituzioni o riparazioni che si rendessero necessarie per difetti di materiale o di fabbricazione. La garanzia decade qualora l’apparecchio venga manomesso o quando il difetto
sia dovuto ad uso improprio. Le sostituzioni o le riparazioni contemplate nella garanzia vengono effettuate gratuitamente per merce
resa franco nostri centri assistenza. Sono a carico dell’utente le sole spese di trasporto. Le parti o gli apparecchi sostituiti diventano
di nostra proprietà.
GUARANTEE
The validity of the guarantee starts from the purchasing date certified by the seller’s stamp and expires at the end of the indicated
period, even when the device has not been used. The guarantee covers all substitutions or repairs due to material or manufacturing
defects. The guarantee has no validity in case of device tampering or when the defect is due to incorrect or improper use of the
same. Substitutions and repair covered by the guarantee are made free of any charge for goods delivered free our service company
representative. Only the freight will be at buyer’s expense. All replaced parts or devices will become our property.
GARANTIE
La validité de la garantie commence à partir de la date d’achat de l’appareil, attestée par la timbre du revendeur et termine après la
période prescrit, même si l’appareil n’a pas été utilisé. Rentrent dans la garantie: toutes les substitutions ou réparations qui seraient
nécessaires par défauts de matériel ou de fabrication. La garantie n’est pas valable si l’appareil a été manumis ou si le défaut est dû
à usage impropre. Les substitutions ou les réparations couvertes par la garantie sont faites gratuitement pour marchandise rendue
franco nos centres d’assistance. Sont à la charge de l’acheteur simplement les frais de transport. Les pièces et les appareils substitués
deviennent de notre propriété.
GARANTIE
Die Garantiedauer läuft vom Einkaufsdatum der Gerätes an das durch den Stempel des Verkäufres nachgewiesen ist, und verfällt
nach der vorgeschriebenen Zeit, auch wenn das Gerät nicht gebraucht worden ist. Die Garantie schliesst alle Ersetzungen oder Reparaturen ein, die wegen schadhaften Materials oder fehlerhafter Herstellung erfordert würden. Die Garantie verfällt, wenn das Gerät
zerbrochen wird oder der Fehler auf ungeeigneten Gebrauch zurückzuführen ist. Die von der Garantie vorgesehenen Ersetzungen
oder Reparaturen werden für ab unserren Kundenzentren gelieferte Ware kostenlos ausgeführt. Nur die Frachtkosten gehen zu Lasten
des Verbrauchers. Die Ersetzen Teile oder Geräte werden unser Eigentum.
GARANTIA
El período de garantia inicia en la fecha de compra del aparato comprobada por el sello del vendedor y termina después del período
prescrito aunque el aparato no sea usado. Entran en la garantia todas las sustituciones o reparaciones que sean necesarias por defectos de materiales o de fabricación. La garantia se pierde cuando el aparato sea reparado en un centro de asistencia no autorizado
o cuando el defecto es causado por un uso inapropiado. Las sustituciones o las reparaciones contempladas en la garantia vienen
efectuadas gratuitamente. Solamente son a cargo del usuario los gastos de transporte. Las partes o los aparatos sustituidos permanecen en nuestro poder.
GARANTIA
A validade da garantia começa a partir da data da compra do aparelho, comprovada pelo carimbo do vendedor e termina após o periodo indicado, mesmo se o aparelho não tiver sido utilizado. A garantia cobre todas as substituições ou reparações que sejam necessárias, devido a defeitos do material ou de fabrico. A garantia perde a validade se o aparelho fôr indevidamente utilizado ou se o
defeito fôr devido a utilizaçao imprópria do mesmo. As substituições ou reparações cobertas pela garantia sâo efectuadas gratuitamente, sendo a mercadoria entregue sem despesas nos nossos centros de assistència. Apenas fiçarao a cargo do comprador as despesas de transporte. As peças ou os aparelhos substituidos serâo de nossa propriedade.
ΕΓΓΥΗΣΗ
Η διάρκεια της εγγύησης τίθεται σε ισχύ από την ημερομηνία αγοράς της συσκευής, με βάση την σφραγίδα του καταστηματάρχη
και έως ότου παρέλθει η προβλεπόμενη περίοδος ακόμα και στην περίπτωση που η συσκευή δεν έχει χρησιμοποιηθεί. Η εγγύηση
καλύπτει όλες τις αντικαταστάσεις ή/και επισκευές που αποδεικνύονται αναγκαίες για ελαττώματα υλικών ή κατασκευής. Η
εγγύηση παύει να ισχύει εάν στην συσκευή γίνουν αυθαίρετες παρεμβάσεις ή όταν η δυσλειτουργία προκληθεί από ακατάλληλη
χρήση. Οι προβλεπόμενες από την εγγύηση αντικαταστάσεις και οι επισκευές γίνονται δωρεάν για προϊόντα που στέλνονται
ελεύθερης παράδοσης στα κέντρα εξυπηρέτησης πελατών μας. Ο χρήστης αναλαμβάνει μόνο τα έξοδα μεταφοράς. Τα εξαρτήματα ή οι συσκευές που αντικαθιστώνται παραμένουν στην δική μας ιδιοκτησία.
ГАРАНТИЯ
Гарантийный срок начинается с даты приобретения устройства, засведетельствованый печатями магазина, и прекращается
после установленного срока, даже если устройство не используется. Покрытые гарантии с любой замены или ремонта
могут оказаться необходимыми в связи с дефектами материалов или изготовления. Гарантия истекает, если устройство изменено или когда дефект связан с неправильным использованием. Замена или ремонт согласно данной гарантии
осуществляется бесплатно для товаров в наших сервисных центрах. Расходы представляет только транспортировка. Части
замененного оборудования становятся нашей собственностью.
2
GARANZIA GUARANTEE GARANTIE GARANTIE GARANTIA GARANTIA ΕΓΓΥΗΣΗ ГАрАНТиЯ
ANNI YEARS ANS JAHRE AñOS ANOS χρόνια роки ГоДА
internet: www.johnson.it
MOD. Roma
Compilare all’atto dell’acquisto
Check before purchasing
DATA ACQUISTO
PURCHASE DATE
Allegare scontrino fiscale con timbro del rivenditore
Seller’s stamp
La presente garanzia non é valida se incompleta
This certificate of guarantee has to be dulyfilled
in to be valid
e-mail: [email protected]
MOD. Roma
DATA ACQUISTO
PURCHASE DATE
DATA RIPARAZIONE
REPARE DATE
TIMBRO CENTRO ASSISTENZA
AFTER SALES SERVICE CENTER STAMP