1
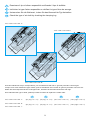
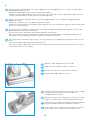
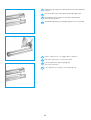
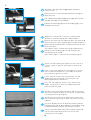
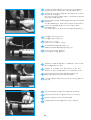
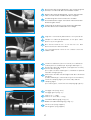
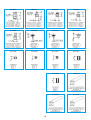
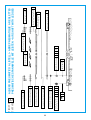
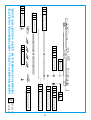
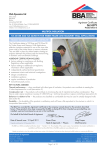
ALBERO PNEUMATICO A LISTELLI
ARBRE PNEUMATIQUE A REGLETTES
PNEUMATISCHE SPANNWELLE MIT LEISTEN
AIR SHAFT WITH LEDGES
ISTRUZIONI PER LA MANUTENZIONE
NOTICE D’ENTRETIEN
REPARATUR-ANWEISUNG UND ERSATZTEILLISTE
REPAIR INSTRUCTIONS AND SPARE PARTS LIST
SVECOM
SVECOM
SVECOM
SVECOM PE
I
1- PRESENTAZIONE
Questo manuale riporta le istruzioni per quanto ritenuto necessario per la conoscenza, il buon uso e la normale
manutenzione dell’Albero espansibile prodotto dalla ditta SVECOM P.E. s.r.l. Montecchio Maggiore (VI) - Italia.
L’Albero è un rotante a funzionamento pneumatico, atto ad avvolgere o svolgere bobine di materiali vari secondo la portata
e lo schema di carico che ne hanno caratterizzato il progetto.
L’Albero, costruito come componente di una macchina, deve essere utilizzato esclusivamente per le operazioni sopra
descritte.
Il presente manuale è parte integrante del prodotto e va custodito e conservato in modo adeguato per permettere l’integrità
e la consultazione durante tutto l’arco di vita dell’Albero espansibile.
Dal rispetto e dall’osservanza delle istruzioni descritte in questo manuale dipende il regolare funzionamento e la durata
dell’Albero espansibile.
È obbligatorio attenersi a quanto descritto nel presente manuale.
La ditta SVECOM P.E. declina qualsiasi responsabilità per danni arrecati a persone, animali o cose, dovuti alla
negligenza o alla mancata osservanza di tali istruzioni.
2- GARANZIA
La SVECOM P.E. garantisce l’Albero espansibile per un periodo di mesi 12 più 4 dalla data di acquisto. Tale garanzia si
esplica nella riparazione o sostituzione gratuita di quelle parti che, dopo un attento esame eseguito dal Servizio Tecnico del
Costruttore, risultino difettose. La garanzia è limitata ai soli difetti di materiale e cessa di avere effetto qualora le parti rese
risultino manomesse o comunque smontate da personale non autorizzato allo scopo.
Sono escluse dalla garanzia le responsabilità per danni diretti e indiretti arrecati a persone, animali o cose a causa del
guasto o del malfunzionamento dell’Albero. Le spese di trasporto, gli eventuali tributi doganali, l’IVA e quant’altro non scritto
nel contratto di fornitura sono in ogni caso a carico dell’acquirente.
Le sostituzioni o le riparazioni dei materiali in garanzia non prolungano in ogni caso i termini della garanzia stessa.
L’acquirente potrà comunque far valere i suoi diritti sulla garanzia solo se avrà rispettato le condizioni concernenti la
prestazione della garanzia, riportate nel contratto di fornitura.
Qualora risultasse che le parti non intendono sottoporre a giudizio arbitrale le controversie nascenti del contratto di fornitura
o in ogni caso in cui sia richiesta la pronuncia da parte di un organo del Foro ordinario, sarà territorialmente competente solo
il Foro di Vicenza.
2.1- ESCLUSIONI DALLA GARANZIA
Alla consegna è necessar io ver ificare che l’ Albero non abbia subito danni durante il traspor to.
Eventuali reclami dovranno essere presentati entro 8 giorni dalla consegna dell’Albero.
Oltre ai casi previsti nel contratto di fornitura la garanzia decade:
• Qualora si dovesse verificare un errore di manovra imputabile all’operatore.
• Qualora il danno sia imputabile ad insufficiente manutenzione.
• Qualora venga oltrepassata la portata massima ammessa dall’Albero e la velocità di lavoro.
• Qualora, in seguito ad interventi di riparazione eseguiti dall’utilizzatore senza il consenso della SVECOM - P.E. o a causa
del montaggio di pezzi di ricambio non originali, l’Albero abbia subito cambiamenti ed il danno sia causato da tali
cambiamenti.
• Qualora non vengano rispettate le istruzioni descritte nel presente manuale.
3- IDENTIFICAZIONE
Ogni Albero espansibile è dotato di una scritta
punzonata identificativa (Figura 1), che riporta i seguenti dati:
• Nome del Costruttore;
• Mese di costruzione XX;
• Anno di costruzione YY;
• Numero della commessa SVECOM ZZZZ.
Fig. 1
SVECOM xx/yy
I dati riportati vanno sempre indicati nelle richieste di interventi
di assistenza c/o di fornitura di parti di ricambio.
Gli alberi espansibili riparati dalla SVECOM - P.E.
riportano una scritta punzonata (Figura 2) con i seguenti dati:
• Lettera R;
• Mese della riparazione AA;
• Anno della riparazione BB.
1
zzzz
Fig. 2
SVECOM xx/yy
R
AA/BB
zzzz
4- LIVELLI DI PERICOLO
Si consiglia di leggere molto attentamente questo manuale ed in particolare questa sezione, che riguarda le norme di
sicurezza, evitando comportamenti inopportuni o in contrasto con le istruzioni contenute nel presente manuale.
Fare attenzione al segnale di pericolo, dove riportato, in questo manuale ed attenersi alle disposizioni di
sicurezza.
I segnali di pericolo qui impiegati sono di due livelli:
!
AVVERTENZA
PERICOLO
Questo simbolo avverte che se le operazioni descritte
non sono correttamente eseguite, si possono causare
danni all’Albero o ai materiali avvolti. Questo segnale
vale per tutte le operazioni descritte di seguito anche
se non riportato per ognuna di esse.
Questo segnale avverte che se le operazioni descritte
non sono correttamente eseguite, possono causare
gravi lesioni, morte o rischi a lungo termine per la
salute.
La SVECOM - P.E. declina ogni responsabilità per danni diretti o indiretti causati dalla mancata osservanza delle
norme di sicurezza e di prevenzione infortuni di seguito descritte.
La SVECOM - P.E. declina inoltre ogni responsabilità per danni causati da un uso improprio dell’Albero e/o a
seguito di modifiche eseguite senza autorizzazione del costruttore.
5- USO IN SICUREZZA
• È assolutamente vietato usare o fare usare l’Albero a chiunque non abbia letto completamente, compreso ed assimilato
perfettamente quanto riportato nel presente manuale, e nel manuale d’uso e manutenzione della macchina di cui l’Albero
è un componente.
• È assolutamente vietato toccare o appoggiarsi all’albero durante la rotazione.
• L’Albero è costruito esclusivamente per l’avvolgimento e lo svolgimento di materiale in bobina.
• È obbligatorio posizionare la/le bobine di materiale avvolto sull’Albero secondo lo schema di carico di progetto,
comunicato alla SVECOM - P.E. con documento scritto e da questa avvallato.
6- MANUTENZIONE IN SICUREZZA
Per garantire la manutenzione in sicurezza dell’Albero è indispensabile rispettare le seguenti prescrizioni:
• La manutenzione dell’Albero deve essere effettuata solamente da personale qualificato e specializzato, seguendo le
istruzioni riportate nel presente manuale.
• La manutenzione va eseguita scrupolosamente, seguendo le istruzioni contenute nel presente manuale e facendo
sostituire le parti danneggiate o usurate.
• Eventuali operazioni di sollevamento dell’Albero vanno eseguite manualmente se la massa dell’Albero è inferiore al limite
stabilito, o con imbracature idonee e conformi alle Leggi del Paese dove avvengono le suddette operazioni.
• Non effettuare saldature, tagli alla fiamma o con utensile o fori sulla struttura dell’Albero.
• Usare sempre negli interventi di riparazione e manutenzione ricambi originali.
• Per le operazioni di avvitamento di grani e viti fare uso della chiave dinamometrica tarata ai valori richiamati nel testo.
• Memorizzare e conservare per tutta la durata di vita dell’Albero il presente Manuale istruzioni d’uso.
2
F
1- PRESENTATION
Ce manuel fournit les instructions nécessaires à la connaissance, à l’utilisation correcte et à la maintenance ordinaire de
l’Arbre Pneumatique produit par la firme SVECOM P.E. s.r.l. Montecchio Maggiore (VI) - Italie. L’Arbre Pneumatique est un
dispositif tournant à fonctionnement pneumatique, apte à enrouler ou à dérouler des bobines de matériaux divers suivant la
charge et le schéma de chargement qui en ont caractérisé le projet.
L’Arbre, construit comme composant d’une machine, doit être utilisé exclusivement pour les susdites opérations.
Le présent manuel fait partie intégrante du produit. Il doit être gardé et conservé d’une façon adéquate, afin de pouvoir être
consulté pendant toute la durée de vie de l’Arbre Pneumatique.
Le fonctionnement régulier et la durée de l’Arbre Pneumatique dépend du respect et de l’observation des instructions
décrites dans ce manuel.
Il est obligatoire de se tenir aux instructions du présent manuel.
La firme SVECOM P.E. décline toute responsabilité pour les dommages causés aux personnes, aux animaux ou aux
choses par négligence ou inobservation de ces instructions.
2- GARANTIE
La firme SVECOM P.E. garantit l’Arbre Pneumatique pendant une période de 12 mois plus 4 à compter de la date d’achat. Cette
garantie s’exerce dans le dépannage ou le remplacement gratuit des pièces qui, après examen attentif effectué par le Service
Technique du Constructeur, s’avèrent défectueuses. La garantie ne couvre que les défauts du matériau et sa validité cesse si les
pièces rendues sont altérées ou bien démontées par un personnel non autorisé.
La garantie exclut les responsabilités pour les dommages directs et indirects causés aux personnes, aux animaux ou aux choses
en raison de pannes ou d’un mauvais fonctionnement de l’Arbre. Les frais de transport, les droits de douane éventuels, la TVA et
tout ce qui n’est pas écrit dans le contrat de fourniture sont, dans tous les cas, à la charge de l’acheteur.
Les remplacements ou les dépannages des matériaux sous garantie ne prolongent absolument pas les délais de la garantie.
L’acheteur ne pourra se prévaloir de ses droits sur la garantie que s’il a respecté les conditions concernant la prestation de
la garantie, indiquées sur le contrat de fourniture.
Au cas où les parties n’entendraient pas soumettre au jugement arbitral les litiges découlant du contrat de fourniture et dans
tous les cas où l’on demanderait le prononcé de la part d’un organe du Tribunal ordinaire, la compétence territoriale
n’appartiendra qu’au Tribunal de Vicence.
2.1- EXCLUSIONS DE LA GARANTIE
Lors de la livraison, il est nécessaire de contrôler que l’Arbre n’a subi aucun dommage pendant le transport.
Toute réclamation éventuelle devra être présentée dans les 8 jours après la livraison de l’Arbre.
Outre les cas visés par le contrat de fourniture, la garantie exclut:
• le cas d’une erreur de manoeuvre imputable à l’opérateur;
• si le dommage est imputable à une maintenance insuffisante;
• si la charge maximale admise par l’Arbre et la vitesse de travail sont dépassées;
• si, par suite d’interventions de dépannage exécutées par l’utilisateur sans le consentement de SVECOM - P.E. ou bien du
montage de pièces détachées non originales, l’Arbre a subi des changements et que le dommage est causé par ces
changements;
• si les instructions décrites dans le présent manuel ne sont pas respectées.
3- IDENTIFICATION
Tout Arbre Pneumatique est muni d’une inscription
poinçonnée d’identification (Figure 1) portant les données suivantes:
• Nom du Constructeur;
• Mois de fabrication XX;
• Année de fabrication YY;
• Numéro de la commande SVECOM ZZZZ.
Les données mentionnées doivent toujours être indiquées
sur les demandes d’interventions d’assistance et/ou
de livraison de pièces détachées.
Les Arbres Pneumatiques réparés par SVECOM-P.E.
portent une inscription poinçonnée (Figure 2) avec les données suivantes:
• Lettre R;
• Mois de la réparation AA;
• Année de la réparation BB.
3
Fig. 1
SVECOM xx/yy
zzzz
Fig. 2
SVECOM xx/yy
R
AA/BB
zzzz
4- NIVEAUX DE DANGER
On conseille de lire très attentivement ce manuel et en particulier cette section concernant les normes de sécurité, afin
d’éviter des conduites inadéquates ou en contraste avec les instructions contenues dans le présent manuel.
Faire attention au signal de danger, là où il apparaît dans ce manuel, et se tenir aux dispositions de sécurité.
Les signaux de danger ici utilisés sont de deux niveaux:
!
AVERTISSEMENT
DANGER
Ce symbole signale que si les opérations décrites ne
sont pas correctement exécutées, elles risquent
d’endommager l’Arbre ou les matériaux enroulés. Ce
signal est valable pour toutes les opérations décrites
ci-après, même s’il n’est pas indiqué pour chacune
d’entre elles.
Ce signal indique que si les opérations décrites ne
sont pas correctement exécutées, elles risquent de
causer de graves lésions, la mort ou des risques à
long terme pour la santé.
La firme SVECOM - P.E. décline toute responsabilité pour les dommages directs ou indirects causés par
l’inobser vation de normes de sécurité et de prévention des accidents décrites ci-après.
5- UTILISATION SURE
• Il est absolument interdit d’utiliser ou de faire utiliser l’Arbre à quiconque n’aurait pas complètement lu, compris et
assimilé parfaitement les instructions du présent manuel et du manuel d’emploi et de maintenance de la machine dont
l’Arbre est un composant.
• Il est absolument interdit de toucher ou de s’appuyer sur l’arbre pendant la rotation.
• L’Arbre est construit exclusivement pour l’enroulement et le déroulement de matériau en bobine.
• Il est obligatoire de positionner la/les bobines de matériau enroulé sur l’Arbre suivant le schéma de chargement de
projet, communiqué à SVECOM - P.E. par document écrit et avalisé par celle-ci.
6- MAINTENANCE SURE
Pour garantir la maintenance sûre de l’Arbre, il est indispensable d’observer les prescriptions suivantes:
• La maintenance de l’Arbre ne doit être effectuée que par le personnel qualifié et spécialisé, suivant les instructions
fournies dans le présent manuel.
• La maintenance doit être scrupuleusement exécutée, conformément aux instructions contenues dans le présent manuel,
et en faisant remplacer les pièces endommagées ou usées.
• Toutes les opérations de levage de l’Arbre doivent être exécutées manuellement si la masse de l’Arbre est inférieure à la
limite établie ou à l’aide d’élingues adéquates et conformes aux Lois du Pays où les susdites opérations sont exécutées.
• Ne pas effectuer de soudures, ni de découpages au chalumeau ou avec un outil, ni de trous sur la structure de l’Arbre.
* Utiliser toujours des pièces détachées originales en cas d’interventions de dépannage et de maintenance.
• Pour les opérations de vissage de goujons et de vis, se servir de la clé dynamométrique étalonnée sur les valeurs
indiquées dans le texte.
• Mémoriser et conser ver, pendant toute la durée de vie de l’Arbre, le présent manuel d’emploi.
4
D
1- EINFÜHRUNG
Dieses Handbuch enthält die erforderlichen Anweisungen für die Kenntnis, den richtigen Gebrauch und die normale Instandhaltung der
Spannwelle, die von der Firma SVECOM P.E. s.r.l. - Montecchio Maggiore (VI) - Italien hergestellt wird. Die Spannwelle ist ein
pneumatisch rotierendes Gerät und ist dazu geeignet, Spulen mit verschiedenen Materialien auf- und abzuwickeln, nach dem Leistungsund Belastungsschema, die das Projekt gekennzeichnet haben.
Die Welle, die als Bestandteil einer Maschine konstruiert wurde, darf ausschließlich für die oben beschriebenen Arbeitsvorgänge
verwendet werden.
Das vorliegende Handbuch ist ein wesentlicher Bestandteil des Produktes und muß in geeigneter Weise aufbewahrt und erhalten
werden, damit seine Vollständigkeit gewährleistet wird und somit das Nachschlagen während der ganzen Lebensdauer der Spannwelle
möglich ist.
Das reguläre Funktionieren und die Lebensdauer der Spannwelle hängt von der Befolgung und Beachtung der Anweisungen ab, die in
diesem Handbuch beschrieben werden.
Es ist Pflicht, sich an die Anweisungen des vorliegenden Handbuches zu halten.
Die Firma SVECOM P.E. s.r.l. weist jede Verantwortung für Schäden, die aufgrund einer nachlässigen Beachtung oder
Mißachtung dieser Anweisungen, Personen, Tieren oder Sachen zugefügt werden, zurück.
2- GARANTIEN
Die Firma SVECOM P.E. s.r.l. leistet auf die Spannwelle eine Garantie von 12 Monaten plus 4 Monaten ab Kaufdatum. Diese Garantie
beinhaltet die kostenlose Reparatur oder Ersetzung der Teile, die nach einer aufmerksamen Prüfung durch den Technischen Dienst
des Herstellers als fehlerhaft befunden werden. Die Garantie gilt nur für Materialfehler und hat keine Wirkung mehr, wenn die
beschädigten Teile von unbefugten Personen erbrochen oder jedenfalls abmontiert wurden.
Von der Garantie ausgenommen ist die Verantwortung für direkte und indirekte Schäden, die aufgrund eines Defekts oder eines
schlechten Betriebs der Welle, Personen, Tieren oder Sachen zugefügt werden. Die Transportkosten, die eventuellen Zollgebühren, die
Mehrwertsteuer und alles andere, das im Lieferungsvertrag nicht enthalten ist, gehen in jedem Fall zu Lasten des Käufers.
Die Ersetzungen oder Reparaturen der Materialien unter Garantie verlängern auf keinen Fall die Dauer der Garantie selbst. Auf jeden
Fall kann der Käufer sein Recht auf Garantie erst geltend machen, wenn er die im Lieferungsvertrag angeführten Bedingungen
betreffend die Garantieleistungen beachtet hat.
Sollten die Parteien ihre Meinungsverschiedenheiten, die durch den Liefervertrag entstehen, nicht einem Schiedsspruch unterwerfen
wollen oder in jedem Fall, in dem eine Entscheidung von einem Organ des ordentlichen Gerichts beantragt wird, hat nur das Gericht
von Vicenza Gebietszuständigkeit.
2.1 AUSNAHMEN VON DER GARANTIE
Bei der Übergabe muß überprüft werden, ob die Welle nicht durch den Transport beschädigt wurde.
Eventuelle Reklamationen müssen innerhalb von 8 Tagen nach der Lieferung der Welle mitgeteilt werden.
Außer bei den im Liefervertrag vorgesehenen Fällen verfällt die Garantie:
* Wenn ein Bedienungsfehler, der dem Bedienungsmann zuzuschreiben ist, festgestellt wird.
* Wenn der Schaden einer ungenügenden Instandhaltung zuzuschreiben ist.
* Wenn die maximale von der Welle zugelassene Tragkraft und Arbeitsgeschwindigkeit überschritten werden.
* Wenn, in der Folge von Eingriffen für Reparaturen, die vom Benützer ohne die Zustimmung der SVECOM - P.E. ausgeführt worden
sind, oder aufgrund der Montage von nicht originalen Ersatzteilen, die Welle Veränderungen erfahren hat und der Schaden von diesen
Veränderungen herrührt.
* Wenn die Anweisungen, die im vor liegenden Handbuch beschr ieben werden, nicht beachtet werden.
3- IDENTIFIZIERUNG
Jede Spannwelle ist mit einer gestempelten
Id.-Schrift versehen (Abbildung 1), die folgende Daten anführt:
• Name des Herstellers
• Herstellungsmonat XX;
• Herstellungsjahr YY;
• Auftragsnummer SVECOM ZZZZ.
Abb. 1
SVECOM xx/yy
Die angeführten Daten müssen bei Anfragen für Kundendienst und/oder
für Lieferungen von Ersatzteilen immer angegeben werden.
Die Spannwelle, die von der Firma SVECOM - P.E.
repariert wurden, sind mit einer gestempelten Schrift (Abbildung 2)
versehen, die folgende Daten anführt:
• Buchstabe R;
• Monat der Reparatur AA;
• Jahr der Reparatur BB.
5
zzzz
Abb. 2
SVECOM xx/yy
R
AA/BB
zzzz
4- GEFAHRSTUFEN
Es wird empfohlen, dieses Handbuch und insbesondere den Abschnitt, der die Sicherheitsvorschriften betrifft, aufmerksam zu lesen um
so ein unangebrachtes oder nicht den Anweisungen, die im vorliegenden Handbuch enthalten sind, entsprechendes Verhalten zu
vermeiden.
Beachten Sie das Gefahrenzeichen, wo es in diesem Handbuch aufscheint und halten Sie sich an die
Sicherheitsvorschriften.
Hier werden zwei Stufen von Gefahrenzeichen verwendet:
!
VORSICHT
GEFAHR
Dieses Zeichen warnt davor, daß eine unkorrekte
Ausführung der beschriebenen Tätigkeiten die Welle
oder das umwickelte Material beschädigen werden kann.
Dieses Zeichen gilt auch für alle in der Folge
beschriebenen Tätigkeiten, auch wenn es nicht jedesmal
wiedergegeben wird.
Dieses Zeichen warnt davor, daß eine unkorrekte
Ausführung der beschriebenen Tätigkeit schwere
Verletzungen, Tod oder eine lang anhaltende Gefahren
für die Gesundheit zur Folge haben kann.
Die Firma SVECOM - P.E. weist jede Verantwortung für direkte oder indirekte Schäden zurück, die durch Nichtbeachtung
der in der Folge angegebenen Sicherheitsvorschriften sowie der Vorschriften zur Vorbeugung von Unfällen entstehen.
Die Firma SVECOM - P.E. weist außerdem jede Verantwortung für Schäden zurück, die durch einen nicht sachgerechten
Gebrauch der Welle und/oder in der Folge von Veränderungen, die ohne die Bewilligung des Herstellers ausgeführt
wurden, entstehen.
5- ANWENDUNG IN SICHERHEIT
• Es ist strengstens verboten, die Welle zu betätigen oder betätigen zu lassen, wenn das vorliegende Handbuch sowie die
Gebrauchsanweisungen und Instandhaltungsvorschriften der Maschine, von der die Welle ein Bestandteil ist, vorher nicht ausführlich
gelesen und der Inhalt völlig verstanden und aufgenommen wurde.
• Es ist strengstens verboten, während der Rotation die Welle zu berühren oder sich auf sie zu stützen.
• Die Welle wurde ausschließlich für das Auf- und Abwickeln von Materialien auf Spulen konstruiert.
• Es ist Pflicht, die mit Material umwickelte/n Spule/n nach dem Belastungsschema des Plans zu positionieren, der der Firma SVECOM
- P.E. mit einem schriftlichen Dokument mitgeteilt und von ihr bestätigt wird.
6- WARTUNG IN SICHERHEIT
Um eine sichere Wellenwar tung zu garantieren, ist es unerläßlich, die folgenden Vorschriften zu beachten:
• Die Welle darf nur von qualifiziertem und Fachpersonal gewartet werden, wobei die Anweisungen, die im vorliegenden Handbuch
stehen, befolgt werden müssen.
• Die Wartung der Welle muß gewissenhaft ausgeführt werden, wobei die im vorliegenden Handbuch stehenden Anweisungen befolgt
sowie die beschädigten oder abgenutzten Teile ersetzt werden müssen.
• Das eventuelle Aufheben der Welle muß manuell erfolgen, wenn das Gewicht der Welle unter der festgesetzten Grenze liegt oder mit
Schlingen, die geeignet sind und den Gesetzen des Landes entsprechen, in dem die obengenannten Tätigkeiten durchgeführt werden.
• Auf der Struktur der Welle nicht schweißen, brennschneiden, mit Werkzeug schneiden oder Löcher bohren.
• Bei den Reparatur- und Wartungsarbeiten immer originale Ersatzteile verwenden.
• Beim Einschrauben von Dübeln und Schrauben muß ein Drehmomentenschlüssel verwendet werden, der auf die im Handbuch
angegebenen Werte eingestellt ist.
• Das vorliegende Handbuch mit den Gebrauchsanweisungen für die ganze Lebensdauer der Welle aufbewahren und den Inhalt im
Gedächtnis festhalten.
6
GB
1- PRESENTATION
This manual gives instructions necessary for understanding, properly using and for normal maintenance on the Expanding
Shaft produced by SVECOM P.E. s.r.l. in Montecchio Maggiore (VI) - Italy.
The Expanding Shaft is a pneumatically operated rotating device designed to reel and unreel reels of sundry materials
depending on the loads and loading schemas that characterize the project.
The Shaft, manufactured as a machine component, must only be used for the above-indicated operations.
The present manual is an integral part of the product and must be suitably preserved and stored to protect it and permit
consultation during the entire life span of the Expanding Shaft.
Proper operation and the durability of the Expanding Shaft depend on compliance with and respect for the
instructions given in this manual.
It is mandatory to comply with the contents of this manual.
The SVECOM P.E. declines all responsibility for damage to persons, animals or property caused by negligence or
failure to comply with these instructions.
2- GUARANTEE
SVECOM P.E. guarantees the Expanding Shaft for a period of 12 months plus 4 from the date of purchase. This guarantee
consists in free repair or replacement of those parts which, after careful examination by the Manufacturer's Engineering
Department, are found to be defective. The guarantee covers only material defects and ceases to be effective whenever the
parts returned are found to have been tampered with or in any case dismantled by persons not authorized to do so.
Guarantee coverage excludes responsibility for direct and indirect damage caused to persons, animals or property caused
by Shaft breakdowns or malfunctions. Shipping costs, any customs fees, VAT and anything else not specified in the delivery
contract are always understood to be paid for by the purchaser.
Repair or replacement of guarantee covered materials does not extend the terms of the guarantee coverage itself. The
purchaser can take advantage of his guarantee rights only if he has complied with the guarantee service conditions indicated
in the delivery contract.
Whenever the parties do not intend to submit disputes arising from the delivery contract to arbitration or in any case
whenever judgement by an ordinary Court of Law is required then the Court of Vicenza shall have sole jurisdiction.
2.1- EXCLUSIONS FROM GUARANTEE COVERAGE
It is necessar y to check, when receiving the Shaft, that it has not been damaged during shipment.
All claims must be presented within 8 days of delivery of the Shaft.
Guarantee coverage ceases, in addition to the cases stipulated in the deliver y contract, whenever :
• there has been an operator’s mistake when using the Shaft.
• whenever damage is due to insufficient maintenance;
• whenever the maximum load capacity or working speed of the Shaft has been exceeded;
• whenever, following repair performed by the user without the consent of SVECOM - P.E. or because of installation of
non-genuine spare par ts, the Shaft has been changed and damage is caused by these changes.
• whenever the instructions described in this instruction manual are not complied with.
3- IDENTIFICATION
Every Expanding Shaft is identified through a punched inscription
(Figure 1) that gives the following data:
• Name of the Manufacturer
• Month of manufacture XX;
• Year of manufacture YY;
• SVECOM order number ZZZZ.
These data must always be indicated when
requesting service and/or delivery of spare parts.
Expanding Shafts repaired by SVECOM - P.E.
are identified (Figure 2) with the following data:
• Letter R
• Month of repair AA;
• Year of repair BB.
Fig. 1
SVECOM xx/yy
zzzz
Fig. 2
SVECOM xx/yy
R
7
AA/BB
zzzz
4- LEVELS OF DANGER
We recommend giving your full attention to this manual and to this section on safety standards in particular. This will help
to avoid actions that are undesirable or are in contrast with the instructions contained in this manual.
Pay attention to the danger signal when it is illustrated in this manual. Comply with safety regulations.
Danger signals used in this manual have two different meanings:
!
WARNING
DANGER
This symbol warns that if the operations described
are not correctly performed this can cause damage to
the Shaft or to the materials being reeled. This signal
is applicable for all the procedures described below
even if it is not specifically indicated for each of them.
This signal warns that the operations that are
described, if they are not correctly performed, can
cause severe harm, death or long term health risks.
SVECOM - P.E. declines all responsibility for direct or indirect damage caused by failure to comply with the safety
and accident prevention regulations described in the following paragraphs.
SVECOM - P.E. also declines all responsibility for damage caused by improper use of the Shaft and/or following
modifications to it that were not authorized by the manufacturer.
5- SAFE USE OF THE SHAFT
• It is prohibited to use or have the Shaft used by anyone who has not fully read, understood and perfectly assimilated the
contents of this manual and of the operating and maintenance manual for the machine where the Shaft is fitted.
• It is absolutely prohibited to touch or rest against the Shaft during rotation.
• The Shaft is built exclusively for reeling and unreeling materials in reels.
• It is mandatory to position the reel(s) of material wrapped on the Shaft according to the project loading schema
communicated to SVECOM - P.E. in a wr itten document and approved by this latter company.
6- SAFE MAINTENANCE
It is necessary to comply with the following regulations in order to guarantee safe maintenance of the Shaft:
• Maintenance on the Shaft must only be done by qualified and specialized personnel according to the instructions given
in this manual.
• Maintenance must be done with care, following the instructions contained in this manual and replacing damaged or worn
components.
• Any Shaft hoisting procedure must be done by hand if the mass of the Shaft is below the preset limit, or by suitable slings
that conform to the Laws of the Country where hoisting takes place.
• Never make weldings, flame or tool cuts or holes in or on the Shaft structure.
• Always use genuine spare parts when performing maintenance and repair.
• Use a torque wrench and the torque values indicated in the text when tightening dowels and screws.
• Memorize the contents of this Instruction Manual and preserve it for the entire working life of the Shaft.
8
I
Esaminare il tipo di albero espansibile verificando il tipo di staffetta.
F
Individuer le type d’arbre expansible en vérifiant le type d’étau de serrage.
D
Untersuchen Sie die Wellenart, indem Sie das Klemmstück-Typ feststellen.
GB
Check the type of air shaft by checking the clamping lug.
TIPO-TYPE-TYP-TYPE A
TIPO-TYPE-TYP-TYPE C
TIPO-TYPE-TYP-TYPE B
Una volta identificato il tipo corrispondente, per la sostituzione del tubo in gomma procedere come segue:
Lorsque vous avez individué le type d’arbre, pour la substitution de la vessie en gomme procédez comme il suit:
Haben Sie die entsprechende Art herausgefunden, ersetzen Sie das Gummischlauch wie folgt:
Once identified the type of shaft, please proceed as follows to replace the rubber tube:
TIPO-TYPE-TYP-TYPE A
I
F
D
GB
(da pag. 10 a 13)
(de pag. 10 à 13)
(von Seite 10 bis 13)
(from page 10 to 13)
(da pag. 14 a 17)
(de pag. 14 à 17)
(von Seite 14 bis 17)
(from page 14 to 17)
TIPO-TYPE-TYP-TYPE B
TIPO-TYPE-TYP-TYPE C
9
A
I
Togliere le due staffette di chiusura con l’apposita chiave a brugola da mm. 5 e sfilare il listello dalla
parte opposta della valvola.
Togliere il tubo di gomma ed estrarre il nottolino di ottone.
Prendere il nuovo tubo di gomma (almeno 150 mm. più lungo) ed inserire il nottolino di ottone nel suo
interno, con particolare cura ad ugual misura dell’originale.
F
Enlever les deux étaux d’étanchéité avec la clef exagonale de 5 mm, et défiler la réglette du côté
opposé à la valve.
Enlever la chambre à air et récupérer le gicleur en laiton.
Prendre un morceau de tuyau en gomme (plus long de 150 mm), et replacer le gicleur de la même façon
que sur le tuyau substitué.
D
Die zwei Verschlussklemmen mittels einem 5 mm lang Hexsagonstecker abnehmen und die Leiste von der
Gegenseite des Luftventiles herausziehen.
Den Gummischlauch abnehmen und die Messingklinke herausziehen.
Den neuen Gummischlauch als Ersatzteil (mindenst 150 mm laenger) bringen und die Messingklinke, mit
besonderer Sorge für die gleiche Abmessung wie das Original, einsetzen.
GB Take away the two clamping lungs using a 5 mm key and take out the ledge from the opposite side of the air
valve.
Take out the rubber tube and extract the brass pawl.
Take the new spare rubber tube (almost 150 mm longer) and insert the brass pawl with particular care for the
same measurement as the original.
I
Mettere il tubo di gomma nella sua sede.
F
Mettre le tuyau en gomme dans la rainure.
D
Den Gummischlauch in seinen Sitz einsetzen.
GB Position the rubber tube in its seat.
I
Inserire in sequenza, guarnizione oring, bussola e la parte
sporgente del nottolino di ottone nel forellino di
collegamento della valvola.
F
Placer en premíer, le joint torique, puis l’axe foré et la tige
du gicleur en laiton dans l’orifice de distribution de l’air.
D
O-ring, Bruchse und den Vorsprungsteil der Messingklinke
in der Anschlußbohrung des Luftventiles einsetzen.
GB Insert o-ring, sleeve and the protruding piece of the brass
pawl into the small connection hole of the air valve.
10
I
Infilare il centino di protezione.
F
Enfiler le ruban de protection.
D
Die Schutzlamelle hineinstecken.
GB Insert the protection lamel.
I
Vista prima dell’inserimento della staffa.
F
Vue avant le placement de l’étau d’étanchéité.
D
GB
Bevor der Einführung der Verschlussklemme
gesehen.
View before the introduction of the clamping lug.
I
Inserimento delle staffette e vite di fissaggio.
F
Mise en position de l’étau d’étanchéité et vis de
fixation.
D
Einführung der Verschlussklemme und
Befestigungsschraube.
GB Introduction of the clamping lug and fixing screw.
I
Fissaggio delle staffette (pari a 2 Kg. circa di forza
sulla chiave a T.).
F
Fixation de l’étau (2 Kg. sur la clef à T).
D
Befestigung der Verschlussklemme (2 Kg ca.
Anpressung auf T Stecker).
GB Fixing of the clamping lug (2 Kg approx. of force on
the T key).
11
I
Tagliare il tubo di gomma in modo che sfiori il foro di
fissaggio della staffa.
F
Couper la chambre à air de façon à ce qu’elle éffleure le
trou taraudé pour la fixation de l’étau.
D
Der Gummischlauch gerade beim Loch von Befestigung
der Klemme abschneiden.
GB Cut the rubber tube exactly near the fixing hole of the lug.
I
Inserimento del listello con molle di richiamo.
F
Enchâssement de la réglette avec les ressor ts.
D
Einfuhrung der Leiste mit Rückfeder.
GB Introduction of the ledge with retur n spring.
I
Distensione del centino di plastica, per eventuali grinze
formatesi al momento dell’iserimento del listello.
F
Détente du ruban de protection à cause d’éventuelles
rides au moment de l’introduction de la réglette.
D
Ausdehnung des Gummischlauches und der
Kunststofflamelle wegen eventuellen Fältchen bei der
Einfuhrung der Leiste.
GB Stretching of the plastic lamel to eliminate possible
wrinkles due to the introduction of the ledge.
I
Tagliare il centino di protezione 3 mm più cor to.
F
Couper le ruban de protection, 3 mm plus cour t
que le tuyau en gomme.
D
Die Schutzlamelle um 3 mm kürzer als den
Gummischlauch abschneiden.
GB Cut the protection lamel 3 mm shor ter than the
rubber tube
12
I
Vista prima di mettere le staffette di chiusura dal lato della
valvola.
F
Vue avant de mettre l’étau d’étanchéité du côté valve.
D
Bevor die Verschlussklemme von der Luftventilseite
einzusetzen gesehen.
GB View before placing the clamping lug on the air valve side.
I
Ultima operazione: fissaggio della staffetta.
F
Der niére opération: fixation de l’étau.
D
Letzte Operation: Befestigung der
Verschlussklemme.
GB Last Operation: fixing of the clamping lug.
13
C
I
Allentare i due grani di fissaggio delle staffette e
svitare la vite.
F
Dévisser les 2 vis sans tête des étaux de serrage et
dévisser la vis.
D
Die 2 Klemmstuck-Befestigugsschrauben los-machen
und die Schraube ausschrauben.
Loosen the two fixing grains of the claping lugs and
GB untighten the screw
I
Togliere le staffette D e sfilare le staffette E,B.
(Sfilare la staffetta tipo G per l’albero tipo C)
F
Enlever les étaux de serrage D et puis les étaux E,B.
(Faire coulisser l’étau type G pour le type d’arbre C)
D
Klemmstücke D abnehmen und Klemmstücke E und
B herausziehen.
(Für Wellen Typ C, Klemmstück Typ G abnehmen)
GB Remove the clamping lugs D and slide out the
clamping lugs E and B.
(For shafts type C, take out the clamping lug G)
I
Sfilare il listello dalla parte opposta al lato valvola, il
centino, il tubo in gomma ed estrarre il nottolino di
ottone.
F
Faire coulisser la réglette du côté opposé à la valve
puis le ruban de protection, la chambre à air plate
puis enlever le gicleur en laiton.
D
Leiste, Gummischauch und Schtzlamelle von der
Gegenseite des Luftventiles herausziehen und
Messing-Mündstück abnehmen.
GB From the side opposite to the valve, slide out the
ledge, the protection lamel, the rubber tube and
remove the brass pawl.
I
Prendere il nuovo tubo di gomma (almeno 150 mm più lungo)
ed inserire il nottolino di ottone nel suo interno, con particolare
cura ad ugual misura dell’originale.
F
Prendre un morceau de tuyau en gomme (plus long de 150
mm), et replacer le gicleur de la même façon que sur le tuyau
substitué.
D
Den neuen Gummischlauch als Ersatzteil (mindenst 150 mm
laenger) bringen und die Messingklinke, mit besonderer Sorge
für die gleiche Abmessung wie das Original, einsetzen.
GB Take the new spare rubber tube (almost 150 mm longer) and
insert the brass pawl with particular care for the same
measurement as the original.
14
I
Mettere il tubo di gomma nella sua sede.
F
Mettre le tuyau en gomme dans la rainure.
D
Den Gummischlauch in seinen Sitz einsetzen.
GB Position the rubber tube in its seat.
I
Inserire in sequenza, guarnizione oring, bussola e la parte
sporgente del nottolino di ottone nel forellino di
collegamento della valvola.
F
Placer en premíer, le joint torique, puis l’axe foré et la tige
du gicleur en laiton dans l’orifice de distribution de l’air.
D
O-ring, Bruchse und den Vorsprungsteil der Messingklinke
in der Anschlußbohrung des Luftventiles einsetzen.
GB Insert o-ring, sleeve and the protruding piece of the brass
pawl into the small connection hole of the air valve.
I
Infilare il centino di protezione.
F
Enfiler le ruban de protection.
D
Die Schutzlamelle hineinstecken.
GB Insert the protection lamel.
I
Vista prima dell’inserimento della staffa.
F
Vue avant le placement de l’étau d’étanchéité.
D
GB
Bevor der Einführung der Verschlussk lemme
gesehen.
View before the introduction of the clamping lug.
15
I
Inserire la staffetta B (lato non valvola) e la staffetta D.
(Infilare prima la staffetta tipo G per gli alberi tipo C)
F
Positionner l’étau de serrage B (côté opposé à la valve)
et l’étau de serrage D.
(En ce qui concerne l’arbre type C, introduire en premier
l’étau de serrage type G)
D
Klemmstück B und D auf der Gegenseite des Luftventiles
einsetzen.
(Für das Wellentyp C, Klemmstück Typ G vormontieren.)
GB Insert the clamping lug B (non-valve side) and the
clamping lug D.
(For shafts type C, insert first the clamping lug type G.)
I
Fissaggio vite (2 Kg. circa)
Fissaggio grani (2 Kg. ca.)
F
Fixer la vis (~ 2 Kg.)
Fixer le vis sans tête (~ 2 Kg.)
D
Schrauben-Befestigung (2 Kg. ca.)
Madenschrauben-Befestigung (2 Kg. ca.)
GB Fix the scew (2 Kgs. approx.)
Fix the grains (2 Kg. approx.)
I
Tagliare il tubo di gomma in modo che sfiori il foro
di fissaggio della staffa.
F
Couper la chambre à air de façon à ce qu’ elle
éffleure le trou taraudé pour la fixation de l’étau.
D
Den Gummischlauch gerade beim Loch von
Befestigung der Klemme abschneiden.
GB Cut the rubber tube exactly near the fixing hole of
the lug.
I
Inserimento del listello con molle di richiamo.
F
Enchâssement de la réglette avec les ressorts.
D
Einfuhrung der Leiste mit Rückfeder.
GB Introduction of the ledge with return spring.
16
I
Distensione del centino di plastica, per eventuali grinze
formatesi al momento dell’iserimento del listello.
F
Détente du ruban de protection à cause d’éventuelles
rides au moment de l’introduction de la réglette.
D
Ausdehnung des Gummischlauches und der
Kunststofflamelle wegen eventuellen Fältchen bei der
Einfuhrung der Leiste.
GB Stretching of the plastic lamel to eliminate possible
wrinkles due to the introduction of the ledge.
I
Tagliare il centino di protezione 3 mm più cor to.
F
Couper le ruban de protection, 3 mm plus cour t
que le tuyau en gomme.
D
Die Schutzlamelle um 3 mm kürzer als den
Gummischlauch abschneiden.
GB Cut the protection lamel 3 mm shor ter than the
rubber tube
I
Inserire la staffetta E (lato non valvola) e la staffetta D.
(Infilare prima la staffetta tipo G per gli alberi tipo C)
F
Positionner l’étau de serrage E (côté opposé à la valve)
et l’étau de serrage D.
(En ce qui concerne l’arbre type C, introduire en premier
l’étau de serrage type G)
D
Klemmstück E und D auf der Gegenseite des Luftventiles
einsetzen.
(Für das Wellentyp C, Klemmstück Typ G vormontieren.)
GB Insert the clamping lug E (non-valve side) and the
clamping lug D.
(For shafts type C, insert first the clamping lug type G.)
I
Fissaggio vite (2 Kg. circa)
Fissaggio grani (2 Kg. ca.)
F
Fixer la vis (~ 2 Kg.)
Fixer le vis sans tête (~ 2 Kg.)
D
Schrauben-Befestigung (2 Kg. ca.)
Madenschrauben-Befestigung (2 Kg. ca.)
GB Fix the scew (2 Kgs. approx.)
Fix the grains (2 Kg. approx.)
17
PARTICOLARI DI ASSEMBLAGGIO • PIECES NECESSAIRES POUR LE MONTAGE • ERSATZTEILE • SPARE PARTS
RPLA01507
RPLA01510
RPLA01509C
15H7
15H10
15H9continuo
RPLA01509
RPLH00010
centino da 10
RPLH00015
RPLF01500
RPLM00015
RPLA02009
RPLF02000
RPLH00020
RPLM00020
RPLA02509
RPLF02500
RPLH00025
RPLM00025
RPLQ15045
RPLQ20045
RPLQ25050
RPLQ14045
RPLQ15028
RPLQ15029
RPLQ15033
18
RPLV00029
RPLV00145
RPLV00014
RPLV00017
RPLV00235
RPLN07025
RPLN07008
RPLN12000
RPLP10008
RPLP10010
RPLP10012
RPLP10015
RPLP10020
RPLF01501
RPLF02001
RPLF02501
19
PARTICOLARI DI ASSEMBLAGGIO • PIECES NECESSAIRES POUR LE MONTAGE • ERSATZTEILE • SPARE PARTS
RPABO6018Z
RPAA06014Z
RPAA06016Z
Vite tipo A
Vis type A
Schraube Typ A
Screw type A
Vite tipo B
Vis type B
Schraube Typ B
Screw type B
Vite tipo C
Vis type C
Schraube Typ C
Screw type C
RPAFO6006Z
RPAFO6008Z
Grano tipo A
Vis sans tête type A
Madenschraube Typ A
Grain type A
Grano tipo B
Vis sans tête type B
Madenschraube Typ B
Grain type B
20
RPABO6010Z
Vite tipo D
Vis type D
Schraube Typ D
Screw type D
21
C
A B C D E
OR A C
Valvola tipo / Valve type
Luftventil Typ / Air valve type
A
Nottolino tipo / Gicleur en laiton type
Messingklinke Typ / Brass pawl type
E
Staffetta tipo / Etau de serrage type
Klemmstück typ / Clamping lug type
A
G
Staffetta tipo / Etau de serrage type
Klemmstück typ / Clamping lug type
Centino tipo / Ruban de protection type
Schutzlamelle Typ / Protection lamel type
D
Staffetta tipo / Etau de serrage type
Klemmstück typ / Clamping lug type
A
OR tipo / OR type
OR typ / OR type
A
Bussola tipo / Axe foré type
Buchese Typ / Sleeve type
A
A B C D E
Molla tipo / Ressort type
Feder typ / Spring type
Grano tipo / Vis sans tête type
Madenschraube Typ / Grain type
B
A
Tubo gomma / Chambre à air plate
Gummischlauch / Flat rubber tube
Listello tipo / Réglette type
Leiste typ / Ledge type
A
Staffetta tipo / Etau de serrage type
Klemmstück typ / Clamping lug type
Vite tipo / Vis type
Schraube Typ / Screw type
B
D
ALBERO PNEUMATICO A LISTELLI • ABRE PNEUMATIQUE A REGLETTES
PNEUMATISCHE SPANNWELLE MIT LEISTEN • AIR SHAFT WITH LEDGES
Grano tipo / Vis sans tête type
Madenschraube Typ / Grain type
TIPO-TYPE
TYP-TYPE
22
B
A
Centino tipo / Ruban de protection type
Schutzlamelle Typ / Protection lamel type
A B C D E
OR A C
Valvola tipo / Valve type
Luftventil Typ / Air valve type
A B
E
Staffetta tipo / Etau de serrage type
Klemmstück typ / Clamping lug type
Nottolino tipo / Gicleur en laiton type
Messingklinke Typ / Brass pawl type
D
Staffetta tipo / Etau de serrage type
Klemmstück typ / Clamping lug type
A
OR tipo / OR type
OR typ / OR type
A
Bussola tipo / Axe foré type
Buchese Typ / Sleeve type
A
A B C D E
Molla tipo / Ressort type
Feder typ / Spring type
Grano tipo / Vis sans tête type
Madenschraube Typ / Grain type
B
D
Tubo gomma / Chambre à air plate
Gummischlauch / Flat rubber tube
Listello tipo / Réglette type
Leiste typ / Ledge type
A
A
Staffetta tipo / Etau de serrage type
Klemmstück typ / Clamping lug type
Vite tipo / Vis type
Schraube Typ / Screw type
ALBERO PNEUMATICO A LISTELLI • ABRE PNEUMATIQUE A REGLETTES
PNEUMATISCHE SPANNWELLE MIT LEISTEN • AIR SHAFT WITH LEDGES
Grano tipo / Vis sans tête type
Madenschraube Typ / Grain type
TIPO-TYPE
TYP-TYPE
B
23
A
A B
A B C
A B C D E
OR A C
Valvola tipo / Valve type
Luftventil Typ / Air valve type
Nottolino tipo / Gicleur en laiton type
Messingklinke Typ / Brass pawl type
Centino tipo / Ruban de protection type
Schutzlamelle Typ / Protection lamel type
A B C
OR tipo / OR type
OR typ / OR type
A
Bussola tipo / Axe foré type
Buchese Typ / Sleeve type
A B C
A B C D E
Molla tipo / Ressort type
Feder typ / Spring type
A B C
Tubo gomma / Chambre à air plate
Gummischlauch / Flat rubber tube
Listello tipo / Réglette type
Leiste typ / Ledge type
Vite tipo / Vis type
Schraube Typ / Screw type
A B C
A B C
ALBERO PNEUMATICO A LISTELLI • ABRE PNEUMATIQUE A REGLETTES
PNEUMATISCHE SPANNWELLE MIT LEISTEN • AIR SHAFT WITH LEDGES
Staffetta tipo / Etau de serrage type
Klemmstück typ / Clamping lug type
TIPO-TYPE
TYP-TYPE
AGENTS & DISTRIBUTORS
I TA L Y
Great Britain
NORTHERN AMERICA
Turkey
LOMBARDIA/PIEMONTE/LIGURIA
JARSHIRE LIMITED
Levels House Way, Stoke Gardens
Slough SL13Q3
Tel. +44 1753 825122
Fax +44 1753 694653
E-mail: [email protected]
Website: www.jarshire.co.uk
U.S.A
FATIH HIDROLIK PNÖMATIK OTOMASYON
SANAYII TICARET EYUP EKINCI CO
1 Emintas San. Sit. No: 195-196-197
Bayrampasa Istanbul - Turkey
Tel. +90 212 544 7028
Fax + 90 212 5447031
E-mail: [email protected]
CARELLI VALTER
Via Luigi Einaudi,10
20013 Magenta - MILANO
Tel +39 02 97297379
Fax +39 02 97950328
E-mail: [email protected]
VENETO/FRIULI/VENEZIA GIULIA
Nor thern Germany
ING. RUBEN MAZZAROL
Via Tartini, 24
36060 S. Giacomo di Rom. d’Ezzelino VI
Tel. e Fax +39 0424 30175
E-mail: [email protected]
ENGEL GmbH
Gaußstr. 5
D - 31787 Hameln
Tel. +49 5151 67453
Fax +49 5151 67463
E-mail: [email protected]
Website: www.engel-hameln.de
EMILIA ROMAGNA
Southern Germany
MAURIZIO NERI
Via Parmeggiani 2/2
40131 BOLOGNA (BO)
Tel. e Fax +39 051 522282
E-mail: [email protected]
HAMANN INDUSTRIETECHNIK SÜD
Alleenstr. 64
D - 73230 Kirchheim/Teck
Tel. +49 7021 3085
Fax +49 7021 71393
E-mail: [email protected]
TRENTINO ALTO ADIGE
TRIVENETO/EMILIA ROMAGNA
ELISABETTA CIANI
Via Salerno, 7
33100 UDINE (UD)
Tel. +39 0432 234046
Fax +39 0432 205784
E-mail: [email protected]
CENTRAL ITALY
B.F.G. RAPP. INDUSTRIALI srl
Via Pesciatina, 599
55010 Lappato - LUCCA
Tel. +39 0583 975878
Fax +39 0583 975698
E-mail: [email protected]
SOUTHERN ITALY
Belgium
CRE CUTTING &
ROLLING EQUIPMENT
AV JF Debecker, 69
1200 Brussels, Belgique
Tel. +32 2 7704316
Fax +32 2 7700038
E-mail: [email protected]
Spain
HERREKOR S.L.L.
Zamoka Lantegialdea
Oialume Bidea 25
20115 Astigarraga - Gipuzkoa
Tel. +34 943 556450
Fax +34 943 552809
E-mail [email protected]
MARIO TOMMASO TANI
Via Mimose ,2
00019 Tivoli
ROMA
Tel. e Fax +39 0774 330391
E-mail: [email protected]
Greece
EUROPE
Switzerland
Finland
GRAAFINEN KONE OY
Läkkisepäntie 20 b
SF - 00620 Helsinki
Tel. +358 9 7771900
Fax +358 9 77719070
E-mail: [email protected]
Sweden
MGB TEKNIK AB
Mellangarden 5
SE 194 51 Upplands Väsby
Tel. +46 8 59094440
Fax +46 8 59094485
E-mail: [email protected]
EVANGELOS G.DAFNIS
2, Parnassou Street
Gr -105 61 Athens - Greece
Tel. +30 210 322 9760 - 323 0287
Fax +30 210 324 9275
PERRET HANDLING AG
Bernstraße, 3
CH - 2560 Nidau Schweiz
Tel. +41 32 3665030
Fax +41 32 3665039
E-mail: [email protected]
Website: www.perrethandling.ch
France
LAFORET DELAYE IND.
145 Chemin du Lavoir
F - 38260 St Hilaire de la Cote
Tel. +33 4 74547100
Fax +33 4 74547101
E-mail: [email protected]
AUSTRALIA
Denmark
Australia
SCANTECO ApS
Tibbevangen 88
DK 3500 VÆRLØSE
Tel. +45 44 985155
Fax +45 44 985156
E-mail: [email protected]
Website: www.scanteco.dk
WEB DYNAMICS PTY LTD
4/30 Lilian Fowler Place
Marrickville NSW 2204
Tel. +61 2 95165533
Fax +61 2 95165328
E-mail: [email protected]
Website: www.webdynamics.com.au
GOLDENROD CORPORATION
P.O. BOX 95
Pines Bridge Commerce Park
25 Lancaster Drive - 06403
Beacon Falls, CT
Tel. +1 203 7234400
Fax +1 203 7238230
E-mail [email protected]
Website: www.goldrod.com
SOUTHERN AMERICA
Venezuela
GENERAL DRIVES DE VENEZUELA, S.A.
Centro Comercial Bello Monte,
Piso 2, Ofic. 2-K Caracas 1050
Tel. +58 212 7527208 - 7511579
Fax +58 212 7511579
Telex 28176 GEDRI VC
E-mail: [email protected]
Brazil
MACCO ACABAMENTO E
CONVERSÃO
INDUSTRIA E COMERCIO LTDA
Rua Fragaria Rosea, 28
02945 - 000 - SÃO PAULO
Tel. +55 11 39748222
Fax +55 11 36733936
E-mail: [email protected]
MTT MAQUINAS E TECNOLOGIAS PARA
TERMOPLASTICOS LTDA
Av. Rouxinol, 84 CJ 58 MOENA
CEP 04516-000 SÃO PAULO BRAZIL
Tel. e Fax +11 5021 3843
E-mail: [email protected]
Argentina
DUCANPACK
Salta 593 (1824)
Lanús Lste Buenos Aires,
Tel. +54 11 12255172
Fax +54 11 47490690
E-mail: [email protected]
NEXEM
Av. Maipù 1472
Piso 11D
1638 Vicente Lopez
Buenos Aires, Argentina
Tel. +54 11 47911696
Fax +54 11 47180459
E-mail: [email protected]
Mexico
INTERPACK SOLUTION
Plazuala Del Monte Alegra 132
Col. Lomas de la Harradura - Huixquilucan,
Edo de Mexico C.P. 52785 Mexico
Tel. +52 (55) 5290 7644 - 5291 2562
Fax +52 (55) 5251 1400
E-mail: [email protected]
EQUIPOS INTERPULP
Col. Chapultepoc Polanco
11560 Mexico, D.F.
Tel. +52 (55) 5279 0540
Fax +52 (55) 5281 0689
E-mail: [email protected]
24
Colombia
CORFLEX
Cra. 10 No. 65-35 Of. 704
P.O. Box 86698 Bogotà - Colombia S.A.
Tel. +571 - 3456360 / 3456247
Fax +571 - 3461175
E-mail: [email protected]
ASIA
Taiwan
SWITCH MEANS INDUSTRIAL CO.
7F-6, NO. 80, SEC.1, SHIN TAI WU
RD. HSICHIH CITY TAIPEI HSEIN
Tel. +886 22 6984558
Fax +886 22 6984556
E-mail: [email protected]
E-mail: [email protected]
AFRICA
South Africa
PRINTING PRODUCTS PTY LIMITED
P.O Box 15351 Vlaeberg 8018
Tel. +27 21 9480820
Fax +27 21 9480830
E-mail: [email protected]
RUSSIA
GRAFIKO
197376, Russia - St Petersburg
Inctrymentaanar, Ed. 3
6/z Kantemnpobcknn, 225
Tel. +7 (812) 3350644
Tel. +7 (812) 9736544
Fax +7 (812) 3806588
E-mail: [email protected]
Website: www.grafiko.spb.ru
MIDDLE EAST
Israel
P.B.A. WIESNER LTD.
17 ZVI Bergman St.
Ind. Zone Sgula Petach - Tikva 49277
Tel. +972 3 9052111
Fax +972 3 9052110
E-mail: [email protected]
T
SVECOM P.E.
Messieurs,
Spett. Cliente,
Vi ricordiamo che il nostro servizio include
notre implantation mondiale est composée de
una rete mondiale di tecnici ed agenti che
sociétés, d’agents et de techniciens pour vous
fornisce pezzi di ricambio e manutenzione.
aider et vous conseiller.
Per un più accurato e veloce servizio contattate
il vostro Punto assistenza più vicino.
Dear Customer,
Lieber Kunde,
We would like to remind you that our service includes
hiermit möchten wir Sie daran erinner, daß
a world wide network of agents and technicians which
unsere weltweite Verkaufsorganisation immer für
provide spare parts and maintenance.
Ersatzteilservice, Reparatur - und Wartungsservice
In order to give you a more accurate and fast
zur Verfügung steht. Bitte wenden Sie sich an die
assistance, contact your nearest service.
nähste Service-Stelle in Ihrem Land.
•
•
•
•
Pezzi di ricambio
des pièces de rechange
Spare par ts
Ersatzteilser vice
•
•
•
•
Manutenzione
Maintenance
de la manutention
Reparatur - und
War tungsser vice
U.S.A.
+ PRODUCTION
EUROPE
SVECOM P.E.
SOUTH
AMERICA
SVECOM P.E.
CONSOCIATA
Rappresentanti e rivenditori nel mondo. Per tutte le informazioni telefonare alla Sede.
I - 36075 Montecchio Maggiore VICENZA - ITALY - Via della Tecnica - tel. 0444/499344 r.a. Telex 481567 SVECOM - Fax 0444/499338
web site: www.svecom.com
Represented all over the world. For information please contact us.
GOLDENROD CORPORATION - 100 Union City Road - Prospect. CT 06712 - (203) 758.3331 - fax (203) 758.0074