1
FAVORIT 60760
User manual
Istruzioni per l’uso
Downloaded from DishWasher-Manual.com Manuals
Dishwasher
Lavastoviglie
2
Contents
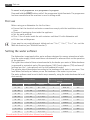
Thank you for choosing one of our high-quality products.
To ensure optimal and regular performance of your appliance please read this
instruction manual carefully. It will enable you to navigate all processes perfectly
and most efficiently. To refer to this manual any time you need to, we recommend
you to keep it in a safe place. And please pass it to any future owner of the appliance.
We wish you much joy with your new appliance.
Contents
Operating instructions
3
Safety information
Correct use
General safety
Child safety
Installation
Product description
Internal light
Control panel
The digital display
Function buttons
Setting mode
First use
3
3
3
3
4
5
5
6
7
7
7
8
Setting the water softener
8
Setting manually
9
Setting electronically
9
Use of dishwasher salt
9
Use of rinse aid
10
Adjusting the dosage of rinse aid
11
Daily use
11
Loading cutlery and dishes
12
The lower basket
13
The cutlery basket
13
The upper basket
15
Adjusting the height of the upper basket
16
Use of detergent
16
Fill with detergent
17
Multitab function
18
Activation/deactivation of the Multitab
function
18
Washing programmes
19
Select and start a washing programme
20
Unloading the dishwasher
Care and cleaning
Cleaning the filters
Cleaning the spray arms
External cleaning
Internal cleaning
Prolonged periods of non-operation
Frost precautions
Moving the machine
What to do if…
21
22
22
23
23
23
23
23
24
24
Technical data
Installation instructions
26
26
Installation
26
Fitting under a counter (kitchen worktop or
sink)
26
Levelling
27
Water connection
27
Water supply connections
27
Water inlet hose with safety valve
28
Water outlet hose connection
28
Electrical connection
29
Environment concerns
30
Packaging material
30
Subject to change without notice
Downloaded from DishWasher-Manual.com Manuals
Safety information
3
Operating instructions
Safety information
In the interest of your safety and to ensure the correct use, before installing and first using
the appliance, read this user manual carefully, including its hints and warnings. To avoid
unnecessary mistakes and accidents, it is important to ensure that all people using the
appliance are thoroughly familiar with its operation and safety features. Save these instructions and make sure that they remain with the appliance if it is moved or sold, so that
everyone using it through its life will be properly informed on appliance use and safety.
Correct use
• This dishwasher is only intended for washing household utensils suitable for machine
washing.
• Do not put any solvents in the dishwasher. This could cause an explosion.
• Knives and other items with sharp points must be loaded in the cutlery basket with their
points down or placed in a horizontal position in the upper basket.
• Only use products (detergent, salt and rinse aid) suitable for dishwashers.
• Avoid opening the door whilst the appliance is in operation, hot steam may escape.
• Do not take any dishes out of the dishwasher before the end of the dishwashing cycle.
• After use, isolate the appliance from the power supply and turn off the water supply.
• This product should be serviced only by an authorised service engineer, and only genuine
spare parts should be used.
• Under no circumstances should you attempt to repair the machine yourself. Repairs
carried out by inexperienced persons will cause injury or serious malfunctioning. Contact
your local Service Force Centre. Always insist on genuine spare parts.
General safety
• Persons (including children) with reduced physical sensory, mental capabilities or lack
of experience and knowledge must not use the appliance. They must have supervision
or instruction for the operation of the appliance by a person responsible for their safety.
• Dishwasher detergents can cause chemical burns to eyes, mouth and throat. Could endanger life! Comply with the safety instructions of the dishwasher detergent manufacturer.
• Water in the dishwasher is not for drinking purposes. Detergent residue may still be
present in your machine.
• Ensure that the door of the dishwasher is always closed when it is not being loaded or
unloaded. In this way you will avoid anybody tripping over the open door and hurting
themselves.
• Do not sit or stand on the open door.
Child safety
• This appliance is designed to be operated by adults. Don’t allow children to use the
dishwasher unsupervised.
• Keep all packaging well away from children. There is risk of suffocation.
• Keep all detergents in a safe place out of children’s reach.
Downloaded from DishWasher-Manual.com Manuals
4
Safety information
• Keep children well away from the dishwasher when the door is open.
Installation
• Check your dishwasher for any transport damage. Never connect a damaged machine.
If your dishwasher is damaged contact your supplier.
• All packaging must be removed before use.
• Any electrical and plumbing work required to install this appliance must be carried out
by a qualified and competent person.
• For safety reasons it is dangerous to alter the specifications or attempt to modify this
product in any way.
• Never use the dishwasher if the electrical supply cable and water hoses are damaged; or
if the control panel, work top or plinth area are damaged such that the inside of the
appliance is freely accessible. Contact your local Service Force centre, in order to avoid
hazard.
• All sides of the dishwasher must never be drilled to prevent damage to hydraulic and
electric components.
WARNING!
For electrical and water connection carefully follow the instructions given in specific paragraphs.
Downloaded from DishWasher-Manual.com Manuals
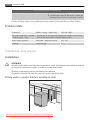
Product description
5
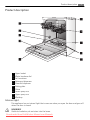
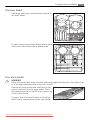
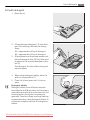
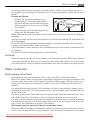
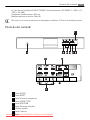
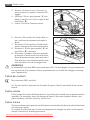
Product description
1
2
3
4
5
6
7
8
9
10
Upper basket
Water hardness dial
Salt container
Detergent dispenser
Rinse aid dispenser
Rating plate
Filters
Lower spray arm
Upper spray arm
Worktop
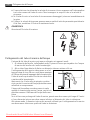
Internal light
This appliance has an internal light that comes on when you open the door and goes off
when the door is closed.
WARNING!
Visible led radiation, do not stare into the beam.
Downloaded from DishWasher-Manual.com Manuals
6
Control panel
Internal light equipped with LED lamp CLASS 2 in accordance with IEC 60825-1: 1993 +
A1: 1997 + A2: 2001.
Emission wave length: 450 nm
Maximum emitted power: 548 μW
If it is necessary to replace the light, contact your local Service Force Centre.
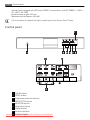
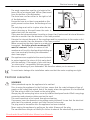
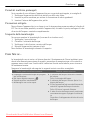
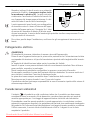
Control panel
7
10
8
1 On/Off button
2 RESET button
3 Programme selection buttons
4 NIGHT CYCLE button
5 MULTITAB button
6 Delay start button
7 Digital display
8 Function buttons
9 Indicator
lights
Downloaded
from DishWasher-Manual.com
Manuals
9
Control panel
7
10 Programme lights
Indicator lights
MULTITAB
Indicates the activation/deactivation of the MULTITAB function (see
MULTITAB function)
Salt
Illuminates when the special salt has run out. 1)
Rinse aid
Illuminates when the rinse aid has run out. 1)
1) The salt and rinse aid indicator lights are never illuminated while a washing programme is running even if filling
with salt and/or rinse aid is necessary.
The digital display
The digital display indicates:
• the level of hardness to which the water softener is set,
• the approximate remaining time of the running programme,
• activation/deactivation of the rinse aid dispenser (ONLY with Multitab function active),
• the end of a washing programme (a zero will appear in the digital display),
• the countdown of the delay start,
• fault codes concerning malfunction of the dishwasher.
NIGHT CYCLE button
Night Cycle is a silent washing programme that will not disturb you, even when you sleep.
It can be set at night or in times with a more economical power rate.
During the Night Cycle the pump runs at a very low speed to reach a noise level reduction
of 25% compared to the declaration programme. As a consequence, it has a very long
running time.
Function buttons
The following functions can be set with the help of these buttons:
• setting of the water softener,
• activation/deactivation of the rinse aid dispenser when Multitab function is active.
Setting mode
The appliance is in setting mode when ALL programme lights are illuminated.
Always remember that when performing the following operations:
– selecting a washing programme,
– setting the water softener,
– activating/deactivating the rinse aid,
the appliance MUST be in setting mode.
If a programme light is illuminated, the last performed or selected programme is still set.
In this case, to return to setting mode, the programme has to be cancelled.
Downloaded from DishWasher-Manual.com Manuals
8
First use
To cancel a set programme or a programme in progress
Press and hold the RESET button until all the programme lights illuminate. The programme
has been cancelled and the machine is now in setting mode.
First use
Before using your dishwasher for the first time:
• Ensure that the electrical and water connections comply with the installation instructions
• Remove all packaging from inside the appliance
• Set the water softener
• Pour 1 litre of water inside the salt container and then fill with dishwasher salt
• Fill the rinse aid dispenser
If you want to use combi detergent tablets such as: "3 in 1", "4 in 1", "5 in 1" etc... set the
Multitab function (see "Multitab function").
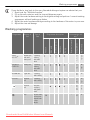
Setting the water softener
The dishwasher is equipped with a water softener designed to remove minerals and salts
from the water supply, which would have a detrimental or adverse effect on the operation
of the appliance.
The higher the content of these minerals and salts, the harder your water is. Water hardness
is measured in equivalent scales, German degrees (°dH), French degrees (°TH) and mmol/l
(millimol per litre - international unit for the hardness of water).
The softener should be adjusted according to the hardness of the water in your area. Your
local Water Authority can advise you on the hardness of the water in your area.
The water softener must be set in both ways: manually, using the water hardness dial and
electronically.
Water hardness
Adjusting the water hardness
setting
Use of salt
°dH
°TH
mmol/l
manually
electronically
51 - 70
91 - 125
9,1 - 12,5
2
level 10
yes
43 - 50
76 - 90
7,6 - 8,9
2
level 9
yes
37 - 42
65 - 75
6,5 - 7,5
2
level 8
yes
29 - 36
51 - 64
5,1 - 6,4
2
level 7
yes
23 - 28
40 - 50
4,0 - 5,0
2
level 6
yes
19 - 22
33 - 39
3,3 - 3,9
2
level 5
yes
15 - 18
26 - 32
2,6 - 3,2
1
level 4
yes
11 - 14
19 - 25
1,9 - 2,5
1
level 3
yes
4 - 10
7 - 18
0,7 - 1,8
1
level 2
yes
Downloaded from DishWasher-Manual.com Manuals
Use of dishwasher salt
Water hardness
Adjusting the water hardness
setting
°dH
°TH
mmol/l
manually
electronically
<4
<7
< 0,7
1
level 1
9
Use of salt
no
Setting manually
The dishwasher is factory set at position 2.
1. Open the dishwasher door.
2. Remove the lower basket from the dishwasher.
3. Turn the water hardness dial to position 1
or 2 (see table).
4. Replace the lower basket.
Setting electronically
The dishwasher is factory set at level 5.
1. Press the On/Off button. The dishwasher must be in setting mode.
2. Press simultaneously and keep pressed buttons B and C , until the lights of buttons A ,
B and C start flashing.
3. Press button A , the lights of buttons B and C turn off while the light of button A goes
on flashing. In the digital display is visible the current level.
Examples:
displayed = level 5
displayed = level 10
4. To change the level, press button A . Each time the button is pressed the level changes
(for the selection of the new level see the chart).
Examples: if the current level is 5, by pressing button A once, level 6 is selected. if the
current level is 10, by pressing button A once, level 1 is selected.
5. To memorise the operation, switch off the dishwasher by pressing the On/Off button.
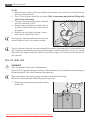
Use of dishwasher salt
WARNING!
Only use salt specifically designed for use in dishwashers. All other types of salt not specifically designed for use in a dishwasher, especially table salt, will damage the water softener. Only fill with salt just before starting one of the complete washing programmes. This
will prevent any grains of salt or salty water, which may have been spilt, remaining on the
bottom of the machine for any period of time, which may cause corrosion.
Downloaded from DishWasher-Manual.com Manuals
10
Use of rinse aid
To fill:
1. Open the door, remove the lower basket and unscrew the cap of the salt container by
turning it anticlockwise.
2. Pour 1 litre of water inside the container (this is necessary only before filling with
salt for the first time) .
3. Using the funnel provided, pour in the salt
until the container is full.
4. Replace the cap making sure that there is
no trace of salt on the screw thread or on
the gasket.
5. Replace the cap tightly turning it clockwise until it stops with a click.
Do not worry if water overflows from the unit
when filling with salt, this is quite normal.
The salt indicator light on the control panel can remain illuminated for 2-6 hours after the
salt has been replenished, assuming the dishwasher remains switched on. If you are using
salts that take longer to dissolve then this can take longer. The function of the machine is
not affected.
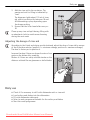
Use of rinse aid
WARNING!
Only use branded rinse aid for dishwashers.
Never fill the rinse aid dispenser with any other substances (e.g. dishwasher cleaning agent,
liquid detergent). This would damage the appliance.
Rinse aid ensures thorough rinsing, and spot and streak free drying.
Rinse aid is automatically added during the last rinse.
1. Open the container by pressing the release
button (A).
Downloaded from DishWasher-Manual.com Manuals
Daily use
11
2. Add the rinse aid in the container. The
maximum level for filling is indicated by
"max".
The dispenser holds about 110 ml of rinse
aid, which is sufficient for between 16 and
40 dishwashing cycles, depending upon
the dosage setting.
3. Ensure that the lid is closed after every refill.
Clean up any rinse aid spilt during filling with
an absorbent cloth to avoid excess foaming
during the next wash.
Adjusting the dosage of rinse aid
According to the finish and drying results obtained, adjust the dose of rinse aid by means
of the 6 position selector (position 1= minimum dosage, position 6= maximum dosage).
The dose is factory set in position 4.
Increase the dose if there are drops of water or lime
spots on the dishes after washing.
Reduce it if there are sticky whitish streaks on the
dishes or a bluish film on glassware or knife blades.
Daily use
•
•
•
•
•
Check if it's necessary to refill with dishwasher salt or rinse aid.
Load cutlery and dishes into the dishwasher.
Fill with dishwasher detergent.
Select a wash programme suitable for the cutlery and dishes.
Start the wash programme.
Downloaded from DishWasher-Manual.com Manuals
12
Loading cutlery and dishes
Loading cutlery and dishes
Sponges, household cloths and any object that can absorb water may not be washed in the
dishwasher.
• Before loading the dishes, you should:
– Remove all left over food and debris.
– Soften remnants of burnt food in pans
• When loading the dishes and cutlery, please note:
– Dishes and cutlery must not impede the rotation of the spray arms.
– Load hollow items such as cups, glasses, pans, etc. with the opening downwards so
that water cannot collect in the container or a deep base.
– Dishes and items of cutlery must not lie inside one another, or cover each other.
– To avoid damage to glasses, they must not touch.
– Lay small objects in the cutlery basket.
• Plastic items and pans with non stick coatings have a tendency to retain water drops;
these items will not dry as well as porcelain and steel items.
• Light items (plastic bowls etc.) must be loaded in the upper basket and arranged so they
do not move.
For washing in the dishwasher the following cutlery and dishes
are not suitable:
are of limited suitability:
• Cutlery with wooden, horn, china or mother- • Only wash stoneware in the dishwasher if it
of-pearls handles.
is specially marked as being dishwasher-safe
• Plastic items that are not heat resistant.
by the manufacturer.
• Older cutlery with glued parts that are not
• Glazed patterns may fade if machine washed
temperature resistant.
frequently.
• Bonded cutlery items or dishes.
• Silver and aluminium parts have a tendency
• Pewter or copper items.
to discolour during washing: Residues, e.g.
• Lead crystal glass.
egg white, egg yolk and mustard often cause
• Steel items prone to rusting.
discolouring and staining on silver. Therefore
• Wooden platters.
always clean left-overs from silver immedi• Items made from synthetics fibres.
ately, if it is not to be washed straight after
use.
Open the door and slide out the baskets to load the dishes.
Downloaded from DishWasher-Manual.com Manuals
Loading cutlery and dishes
13
The lower basket
Load larger and heavily soiled dishes and pans in
the lower basket.
To make it easier to load larger dishes, all rear plate
racks in the lower basket can be folded down.
The cutlery basket
WARNING!
Sharp knives and other items of cutlery with sharp edges must be laid in the cutlery tray
or in the upper basket because of the risk of injury.
Place knives, small spoons and small forks in the
cutlery tray which is in the upper basket. Place
forks and spoons that do not fit in the cutlery tray
in the cutlery basket.
To ensure that all items of cutlery in the cutlery
basket can be reached by the water, you should:
Downloaded from DishWasher-Manual.com Manuals
14
Loading cutlery and dishes
1. Place the grid insert on the cutlery basket.
2. Place forks and spoon in the cutlery basket
with their handles pointing downwards.
For larger utensils, such as whisks, leave off
one half of the cutlery grid.
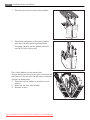
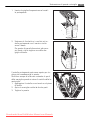
The cutlery basket can be opened out.
Always make sure that you put your hand around
both parts of the two-part handle when removing
it from the dishwasher.
1. Place the cutlery basket on a table or work
surface.
2. Open out the two-part handle.
3. Remove cutlery.
Downloaded from DishWasher-Manual.com Manuals
Loading cutlery and dishes
The upper basket
Load smaller, fragile crockery and long, sharp cutlery in the upper basket.
• Arrange items of crockery on and under the
folding cup racks so that they are offset from
each other and water can reach all items.
• The cup racks can be folded up out of the way
for tall crockery items.
• Lay or hang wine and brandy glasses in the
slots in the cup racks.
• For glasses with long stems, fold the glass
rack to the right, otherwise fold it away to
the left.
Downloaded from DishWasher-Manual.com Manuals
15
16
Use of detergent
• The row of spikes on the left of the upper
basket is also in two parts and can be folded
away.
Spikes not folded away: place glasses, mugs
etc. in the upper basket.
Spikes folded away: more room for serving
dishes.
Adjusting the height of the upper basket
Maximum height of the dishes in:
the upper basket
the lower basket
With upper basket raised
22 cm
30 cm
With upper basket lowered
24 cm
29 cm
The height of the upper basket can also be adjusted when it is loaded.
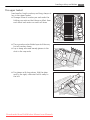
Raising / lowering the upper basket:
1. Pull out the upper basket completely.
2. Holding the upper basket by the handle,
raise it as far as it will go and then lower
it vertically.
The upper basket will latch into the lower
or the upper position.
WARNING!
After loading your machine always close the
door, as an open door can be a hazard.
Before closing the door, ensure that the spray
arms can rotate freely.
Use of detergent
Only use detergents specifically designed for use in dishwashers.
Please observe the manufacturer's dosing and storage recommendations as stated on the
detergent packaging.
Using no more than the correct amount of detergent contributes to reducing pollution.
Downloaded from DishWasher-Manual.com Manuals
Use of detergent
Fill with detergent
1. Open the lid.
2. Fill the detergent dispenser (1) with detergent. The marking indicates the dosing
levels:
20 = approximately 20 g of detergent
30 = approximately 30 g of detergent.
3. All programmes with prewash need an additional detergent dose (5/10 g) that must
be placed in the prewash detergent chamber (2).
This detergent will take effect during the
prewash phase.
4. When using detergent tablets, place the
tablet in compartment (1)
5. Close the lid and press until it locks in
place.
Detergent tablets
Detergent tablets from different manufactures dissolve at different rates. For this reason,
some detergent tablets do not attain their full
cleaning power during short washing programmes. Therefore, please use long washing
programmes when using detergent tablets, to
ensure the complete removal of detergent residuals.
Downloaded from DishWasher-Manual.com Manuals
17
18
Multitab function
Multitab function
This appliance is equipped with the "Multitab function", that allows the use of the "Multitab"
combi detergent tablets.
These products are detergents with a combined cleaning, rinsing and salt functions. They
can also contain other different agents depending on which kind of tablets you choose ("3
in 1", "4 in 1", "5 in 1" etc...).
Check whether these detergents are suitable for your water hardness. See the manufacturers instructions.
This function can be selected with all washing programmes. With the selection of this
function the inflow of rinse aid and salt from each respective supply container is automatically deactivated and also the indicator lights for salt and rinse aid are deactivated.
Select the "Multitab function " before the start of a washing programme.
Once this function is selected (indicator light illuminated) it will remain active also for the
following washing programmes.
With the use of the "Multitab function", the cycle durations may change. In this case, in
the digital display, the indication of the running time of the programme is automatically
updated.
Once the programme is running, the "Multitab function " can NO longer be changed. If you
want to exclude the "Multitab function " you have to cancel the programme setting and
then deactivate the "Multitab function ".
In this case you have to set a washing programme (and desired options) again.
Activation/deactivation of the Multitab function
Press the Multitab button: the corresponding indicator light illuminates. This means that
the function is active.
To deactivate the function press the Multitab button again: the indicator light turns off.
If the drying results are not satisfactory we suggest that you:
1. Fill up the rinse aid dispenser with rinse aid.
2. Activate the rinse aid dispenser.
3. Set the rinse aid dosage to position 2.
• The activation/deactivation of the rinse aid dispenser can only be possible with the
"Multitab function" active.
Activation/deactivation of the rinse aid dispenser
1. Press the On/Off button. The dishwasher must be in setting mode.
2. Press simultaneously buttons B and C , until the lights of buttons A , B , and C start
flashing.
3. Press button B , the lights of buttons A and C turn off while the light of button B goes
on flashing. The digital display indicates the current setting:
= Rinse aid dispenser deactivated.
= Rinse aid dispenser activated.
4. To change the setting, press button B again, the digital display indicates the new setting.
5. To memorise the operation, switch off the dishwasher by pressing the On/Off button.
Downloaded from DishWasher-Manual.com Manuals
Washing programmes
19
If you decide to turn back to the use of standard detergent system we advise that you:
1. Deactivate the "Multitab function".
2. Fill up the salt container and the rinse aid dispenser again.
3. Adjust the water hardness setting to the highest setting and perform 1 normal washing
programme without loading any dishes.
4. Adjust the water hardness setting according to the hardness of the water in your area.
5. Adjust the rinse aid dosage.
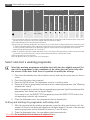
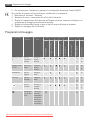
Washing programmes
Delicate
crockery
and glassware
-
Any
Partial load
(to be completed later
in the
day)6)
Downloaded from DishWasher-Manual.com Manuals
-
12 - 23 Water (litres)
Normal
soil
16 - 18
Crockery
and cutlery
9
Normal
soil
12 - 13
ECO 50°5)
14 - 15
Crockery
and cutlery
4
Light soil
1,1 - 1,7 Energy (kWh)
30 MIN 60°4)
1,5 -1,7
Crockery,
cutlery,
pots and
pans
0,9
Heavy soil
0,8 -0,9 1,0 - 1,1
INTENSIV
CARE 70°
0,1
Mixed nor- Crockery,
mal and
cutlery,
heavy soil pots and
pans
-
AUTO
45-70°3)
-
- Duration (minutes)2)
Consumption values 1)
Drying
Final rinse
Programme description
1/2x Intermediate rinse
Type of
load
Main wash
Degree of
soil
Prewash
Programme
Select and start a washing programme
13 - 14 Water (litres)
Crockery
and cutlery
1.2 - 1.3 Energy (kWh)
Normal
soil
- Duration (minutes)2)
NIGHT CYCLE
Consumption values 1)
Drying
Programme description
Final rinse
Type of
load
Intermediate rinse
Degree of
soil
Prewash
Programme
Main wash
20
1) The consumption values are intended as a guide and depends on the pressure and the temperature of the water
and also by the variations of the power supply and the amount of dishes.
2) The digital display shows the programme duration.
3) During the Auto washing programme the amount of soil on the dishes is determined by how cloudy the water
is. The programme duration, water and energy consumption levels can vary; this depends upon if the appliance
is fully or partially loaded and if the dishes are lightly or heavily soiled. The temperature of the water is
automatically adjusted between 45° C and 70° C.
4) Ideal for washing a partially loaded dishwasher. This is the perfect daily programme, made to meet the needs
of a family of 4 persons who only wish to load breakfast and dinner crockery and cutlery.
5) Test programme for test institutes.
6) This programme does not require the use of detergent
Select and start a washing programme
Select the washing programme and delay start with the door slightly opened. The
start of the programme or the countdown of the delay start will occur only after
the closure of the door. Until then it is possible to modify the settings.
1. Check that the baskets have been loaded correctly and that the spray arms are free to
rotate.
2. Check that the water tap is opened.
3. Press the On/Off button. The dishwasher must be in setting mode.
4. Press one of the two programme buttons to select a washing programme. (see "Washing
programmes" chart).
When a programme is selected the corresponding programme light illuminates and the
programme time flashes on the digital display.
If you want to set the NIGHT CYCLE programme, press the NIGHT CYCLE button, the
corresponding indicator light comes on.
5. Close the dishwasher door, the programme starts automatically.
Setting and starting the programme with delay start
1. After having selected the washing programme, press the delay start button until the
number of hours for the delay start appear in the digital display. The start of the selected
washing programme can be delayed for between 1 and 19 hours.
2. Close the dishwasher door, the countdown starts automatically.
3. The from
countdown
will decrease with steps
of 1 hour.
Downloaded
DishWasher-Manual.com
Manuals
Unloading the dishwasher
21
4. The opening of the door will interrupt the countdown. Close the door; the countdown
will continue from the point at which it was interrupted.
5. Once the delay start has elapsed the programme will start automatically.
The selection of the washing programme and delay start can also occur with the door closed.
Keep in mind that in this way, once a washing programme button is pressed you have
ONLY 3 seconds in which you can choose another programme or select a delay start, after
which the selected programme will start automatically.
WARNING!
Interrupt or cancel a washing programme in progress ONLY if it’s absolutely necessary. Attention! Hot steam may escape when the door is opened. Open the door
carefully.
Cancelling a delay start or a washing programme in progress
• Press the RESET button until all the programme lights will illuminate.
• Cancelling a delay start involves also the cancelling of the washing programme set. In
this case you have to set the washing programme again.
• If a new washing programme is to be selected, check that there is detergent in the
detergent dispenser.
Interrupt a washing programme in progress
• Open the dishwasher door; the programme will stop. Close the door; the programme will
start from the point at which it was interrupted.
• Press the On/Off button, all lights will turn off. Press the On/Off button again; the programme will start from the point at which it was interrupted.
End of the washing programme
• The dishwasher will automatically stop and an audible signal informs you of the end of
the washing programme.
• The light of the programme just ended will remain on.
• In the digital display appears a zero.
1. Switch off the dishwasher by pressing the On/Off button.
It is recommended to switch off the appliance once the washing programme has ended. If
this is not done, automatically after about 3 minutes from the end of the programme, all
indicator lights will go off. The digital display shows 1 horizontal bar.
This will help to reduce the consumption of energy when you forget or for any reason
cannot switch the appliance off once the programme has ended.
Press any button (except On/Off) and the control panel will show the same situation (indicator lights and digital display) as when the programme ended.
2. Open the dishwasher's door, leave it ajar and wait a few minutes before removing the
dishes; in this way they will be cooler and the drying will be improved.
Unloading the dishwasher
• Hot dishes are sensitive to knocks.
The dishes
therefore be allowed to
cool down before removing from the appliance.
Downloaded
from should
DishWasher-Manual.com
Manuals
22
Care and cleaning
• Empty the lower basket first and then the upper one; this will avoid water dripping from
the upper basket onto the dishes in the lower one.
• Water may appear on the sides and the door of the dishwasher as the stainless steel will
eventually become cooler than the dishes.
CAUTION!
When the washing programme has finished, it is recommended that the dishwasher is
unplugged and the water tap turned off.
Care and cleaning
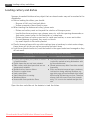
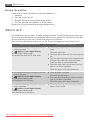
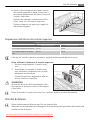
Cleaning the filters
The filters must be checked and cleaned from time to time. Dirty filters will degrade the
washing result.
WARNING!
Before cleaning the filters ensure that the machine is switched off.
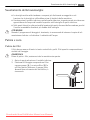
1. Open the door, remove the lower basket.
2. The dishwasher filter system comprises a
coarse filter ( A ), a microfilter ( B ) and a
flat filter. Unlock the filter system using
the handle on the microfilter, and remove
the filter system.
3. Turn the handle about 1/4 a turn anticlockwise and remove the filter system.
4. Take hold of the coarse filter ( A ) by the
handle with the hole and remove from the
microfilter ( B ).
5. Clean all filters thoroughly under running
water.
Downloaded from DishWasher-Manual.com Manuals
Care and cleaning
23
6. Remove the flat filter from the base of the
washing compartment and clean both
faces thoroughly.
7. Put the flat filter back in the base of the
washing compartment and ensure that it
fits perfectly.
8. Place the coarse filter ( A ) in the microfilter ( B ) and press together.
9. Put the filter combination in place and
lock by turning the handle clockwise to the
stop. During this process ensure that the
flat filter does not protrude above the base
of the washing compartment.
WARNING!
NEVER use the dishwasher without filters. Incorrect repositioning and fitting of the filters
will produce poor washing results and may result in damage to the appliance.
Cleaning the spray arms
NEVER try to remove the spray arms.
If residues of soil have clogged the holes in the spray arms, remove them with a cocktail
stick.
External cleaning
Clean the external surfaces of the machine and control panel with a damp soft cloth. If
necessary use only neutral detergents. Never use abrasive products, scouring pads or solvent
(acetone, trichloroethylene etc....).
Internal cleaning
Ensure that the seals around the door, the detergent and rinse aid dispensers are cleaned
regularly with a damp cloth.
We recommend every 3 months to run the wash programme for heavy soiled dishes using
detergent but without dishes.
Prolonged periods of non-operation
If you are not using the machine for any prolonged period of time you are advised to:
1. Unplug the appliance and then turn off the water.
2. Leave the door ajar to prevent the formation of any unpleasant smells.
3. Leave the inside of the machine clean.
Frost precautions
Avoid placing the machine in a location where the temperature is below 0°C. If this is
unavoidable, empty the machine, close the appliance door, disconnect the water inlet pipe
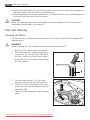
and empty it.
Downloaded from DishWasher-Manual.com Manuals
24
What to do if…
Moving the machine
If you have to move the machine (moving house etc....):
1. Unplug it.
2. Turn the water tap off.
3. Remove the water inlet and discharge hoses.
4. Pull the machine out together with the hoses.
Avoid over tilting the machine during transportation.
What to do if…
The dishwasher will not start or stops during operation. Certain problems are due to the
lack of simple maintenance or oversights, which can be solved with the help of the indications described in the chart, without calling out an engineer.
Switch off the dishwasher and carry out the following suggested corrective actions.
Fault code and malfunction
Possible cause and solution
• continuous flashing of the light of the running programme
•
appears in the digital display.
• intermitted audible signal
The dishwasher does not fill with water.
• The water tap is blocked or furred with limescale.
Clean the water tap.
• The water tap is turned off. Turn the water tap
on.
• The filter (where present) in the threaded hose
fitting at the water inlet valve is blocked.
Clean the filter in the threaded hose.
• The water inlet hose has not been correctly
laid or it is bent or squashed.
Check the water inlet hose connection.
• continuous flashing of the light of the running programme
•
appears in the digital display.
• intermitted audible signal
The dishwasher will not drain.
• The sink spigot is blocked.
Clean out the sink spigot.
• The water drain hose has not been correctly
laid or it is bent or squashed.
Check the water drain hose connection.
• continuous flashing of the light of the running programme
•
appears in the digital display.
• intermitted audible signal
Anti-flood device is activated.
• Close the water tap and contact your local
Service Force Centre.
Downloaded from DishWasher-Manual.com Manuals
What to do if…
Fault code and malfunction
The programme does not start.
25
Possible cause and solution
• The dishwasher’s door has not been properly
closed. Close the door.
• The main plug is not plugged in. Insert the
main plug.
• The fuse has blown out in the household fuse
box.
Replace the fuse.
• Delay start has been set.
If dishes are to be washed immediately, cancel
the delay start.
Once these checks have been carried out, switch on the appliance: the programme will
continue from the point at which it was interrupted.
If the malfunction or fault code reappears contact the Service Force Centre.
For other fault codes not described in the above chart, please contact your local Service
Force Centre, quoting the model (Mod.), product number (PNC) and serial number (S.N.).
This information can be found on the rating plate located on the side of the dishwasher
door.
So that you always have these numbers at hand, we recommend you to make a note of
them here:
Mod. : . . . . . . . . . . . . . . . . . . . . . . .
PNC :. . . . . . . . . . . . . . . . . . . . . . . .
S.N. : . . . . . . . . . . . . . . . . . . . . . . . .
The wash results are not satisfactory
The dishes are not clean
• The wrong washing programme has been selected.
• The dishes are arranged in such a way as to
stop water reaching all parts of the surface.
The baskets must not be overloaded.
• The spray arms do not rotate freely due to
incorrect arrangement of the load.
• The filters in the base of the washing compartment are dirty or incorrectly positioned.
• Too little or no detergent has been used.
• Where there are limescales deposits on the
dishes; the salt container is empty or the incorrect level of the water softener has been
set.
• The drain hose connection is not correct.
• The salt container cap is not properly closed.
The dishes are wet and dull
• Rinse aid was not used.
• The rinse aid dispenser is empty.
There are streaks, milky spots or a bluish coating • Decrease rinse aid dosing.
on glasses and dishes
Downloaded from DishWasher-Manual.com Manuals
26
Technical data
The wash results are not satisfactory
Water drops have dried onto glasses and dishes • Increase rinse aid dosing.
• The detergent may be the cause. Contact the
detergent manufacturer’s consumer care line.
If after all these checks, the problem persists, contact your local Service Force Centre.
Technical data
Dimension
Width - height - depth (cm)
59,6 x 85 x 62,5
Electrical connection - Voltage Information on the electrical connection is given on the rating
- Overall power - Fuse
plate on the inner edge of the dishwasher's door
Water supply pressure
Minimum - Maximum (MPa)
0,05 - 0,8
Capacity
Place settings
12
Installation instructions
Installation
WARNING!
Any electrical and/or plumbing work required to install this appliance should be carried out
by a qualified electrician and/or plumber or competent person.
Remove all packaging before positioning the machine.
If possible, position the machine next to a water tap and a drain.
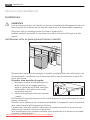
Fitting under a counter (kitchen worktop or sink)
Downloaded from DishWasher-Manual.com Manuals
Water connection
27
By removing the machine's worktop, you can install it under a close fitting sink unit or a
pre-existing top, providing the dimensions of the recess correspond to those shown in the
picture.
Proceed as follows:
1. Remove the machine's worktop by unscrewing the two rear retaining screws,
pull the worktop from the back of the machine and slide out the front slots, lifting
the worktop.
2. Insert the machine after adjusting the levelling with the adjustable feet.
When inserting the machine, ensure that the water inlet and drain hoses are not kinked or
squashed.
During all operations that involve accessibility to internal components the dishwasher has
to be unplugged.
Be sure that once the appliance has been installed, it is easily accessible for the service
engineer in the event that a repair is required.
If the dishwasher is later used as a free-standing appliance, the original worktop must be
re-mounted.
The plinth on free-standing appliances is not adjustable.
Levelling
Good levelling is essential for correct closure and sealing of the door. When the appliance
is correctly levelled, the door will not catch on either side of the cabinet. If the door does
not close correctly, loosen or tighten the adjustable feet until the machine is perfectly level.
Water connection
Water supply connections
This appliance can be connected to either a hot (max. 60°) or cold water supply.
With a hot water supply you can have a significant reduction of energy consumption. This
however, depends on how the hot water is produced. (We suggest alternative sources of
energy that are more environmentally friendly as e.g. solar or photovoltaic panels and
aeolian).
For making the connection itself, the coupling nut fitted to the machine's supply hose is
designed to screw onto a 3/4" thread spout or to a purpose made quick-coupling tap such
as the Press-block.
The water pressure must be within the limits given in the "Technical specifications". Your
local Water Authority will advise you on the average mains pressure in your area.
The water inlet hose must not be kinked, crushed, or entangled when it is being connected.
The dishwasher features fill and drain hoses which can be turned either to the left or the
right to suit the installation by means of the locknut.
The locknut must be correctly fitted to avoid water leaks.
(Attention! NOT all models of dishwashers have fill and drain hoses provided with locknut.
In this case, this kind of facility is not possible). If the machine is connected to new pipes
Downloaded from DishWasher-Manual.com Manuals
28
Water connection
or pipes which have not been used for a long time, you should run the water for a few
minutes before connecting the inlet hose.
DO NOT use connection hoses which have previously been used for an old appliance.
This appliance has been fitted with safety features which will prevent the water used in
the appliance from returning back into the drinking water system. This appliance complies
with the applicable plumbing regulations.
Water inlet hose with safety valve
After connecting the double-walled water inlet hose, the safety valve is next to the tap.
Therefore the water inlet hose is only under pressure while the water is running. If the
water inlet hose starts to leak during this operation, the safety valve cuts off the running
water.
Please take care when installing the water inlet hose:
• The electrical cable for the safety valve is in the double-walled water inlet hose. Do not
immerse the water inlet hose or the safety valve in water.
• If water inlet hose or the safety valve is damaged, remove the mains plug immediately.
• A water inlet hose with safety valve must only be replaced by a specialist or by the Service
Force Centre.
WARNING!
Warning! Dangerous voltage.
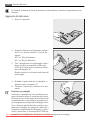
Water outlet hose connection
The end of the drain hose can be connected in the following ways:
1. To the sink outlet spigot, securing it to the underside of the work surface. This will
prevent waste water from the sink running into the machine.
2. To a stand pipe provided with vent-hole, minimum internal diameter 4 cm.
Downloaded from DishWasher-Manual.com Manuals
Electrical connection
29
The waste connection must be at a height of between 30 cm (minimum) and 100 cm (maximum)
from the bottom of the dishwasher.
The drain hose can face either to the right or left
of the dishwasher.
Ensure the hose is not bent or squashed as this
could prevent or slow down the discharge of water.
The sink plug must not be in place when the machine is draining as this could cause the water to
syphon back into the machine.
If you use a drain hose extension it must be no longer than 2 metres and its internal diameter
must be no smaller than the diameter of the hose provided.
Likewise the internal diameter of the couplings used for connections to the waste outlet
must be no smaller than the diameter of the hose provided.
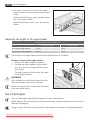
When connecting the drain hose to an under sink
trap spigot, the entire plastic membrane (A)
must be removed . Failure to remove all the
membrane will result in food particles building up
over time eventually blocking the dishwasher
drain hose spigot.
Our appliances are supplied with a security device
to protect against the return of dirty water back
into the machine. If the spigot of your sink has a
"no return valve" incorporated this can prevent
the correct draining of your dishwasher. We therefore advise you to remove it.
To avoid water leakage after installation make sure that the water couplings are tight.
Electrical connection
WARNING!
Safety standards require the appliance to be earthed.
Prior to using the appliance for the first time, ensure that the rated voltage and type of
supply on the rating plate match that of the supply where the appliance is to be installed.
The fuse rating is also to be found on the rating plate.
Always plug the mains plug into a correctly installed shockproof socket. Multi-way plugs,
connectors and extension cables must not be used.
This could constitute a fire hazard through overheating.
If necessary, have the domestic wiring system socket replaced. In case that the electrical
cable has to be replaced, contact your local Service Force centre.
The plug must be accessible after the appliance has been installed.
Never unplug the appliance by pulling on the cable. Always pull the plug.
The manufacturer accepts no liability for failure to observe the above safety precautions.
Downloaded from DishWasher-Manual.com Manuals
30
Environment concerns
Environment concerns
The symbol
on the product or on its packaging indicates that this product may not be
treated as household waste. Instead it should be taken to the appropriate collection point
for the recycling of electrical and electronic equipment. By ensuring this product is disposed
of correctly, you will help prevent potential negative consequences for the environment
and human health, which could otherwise be caused by inappropriate waste handling of
this product. For more detailed information about recycling of this product, please contact
your local council, your household waste disposal service or the shop where you purchased
the product.
Packaging material
The packaging materials are environmentally friendly and can be recycled. The plastic components are identified by markings, e.g. >PE<, >PS<, etc. Please dispose of the packaging
materials in the appropriate container at the community waste disposal facilities.
WARNING!
When a unit is no longer being used:
• Pull the plug out of the socket.
• Cut off the cable and plug and dispose of them.
• Dispose of the door catch. This prevents children from trapping themselves inside and
endangering their lives.
Downloaded from DishWasher-Manual.com Manuals
Indice
31
Grazie per aver scelto uno dei nostri prodotti di qualità.
Per garantire il funzionamento ottimale e regolare dell'apparecchio, la preghiamo
di leggere attentamente questo manuale d'istruzioni. In tal modo potrà eseguire
ogni operazione alla perfezione e con la massima efficienza. Le consigliamo inoltre
di conservare il manuale in un luogo sicuro, affinché possa consultarlo ogni volta
che ne avrà bisogno. Infine, qualora l'apparecchio cambiasse proprietario, non
dimentichi di consegnargli il presente manuale.
Le auguriamo di trarre la massima soddisfazione dal suo nuovo acquisto.
Indice
Istruzioni d'uso
Informazioni per la sicurezza
Uso corretto
Sicurezza generale
Per la sicurezza dei bambini
Installazione
Descrizione del prodotto
Luce interna
Pannello dei comandi
Visore digitale
Tasti funzione
Modalità impostazione
Primo utilizzo
Regolazione del decalcificatore dell’acqua
117955060-00-012009
Impostazione manuale
Impostazione elettronica
Uso del sale per lavastoviglie
32
32
32
32
33
33
34
34
35
36
36
36
37
37
38
38
39
Uso del brillantante
39
Regolazione del dosaggio del brillantante
40
Utilizzo quotidiano
41
Sistemazione di posate e stoviglie
41
Il cestello inferiore
42
Cestello portaposate
42
Cestello superiore
44
Regolazione dell'altezza del cestello
superiore
45
Uso del detersivo
45
Aggiunta del detersivo
46
Uso di pastiglie combinate
47
Attivazione/disattivazione della funzione
Multitab
47
Programmi di lavaggio
48
Selezione e avvio di un programma di
lavaggio
49
Svuotamento della lavastoviglie
51
Pulizia e cura
Pulizia dei filtri
Pulizia dei mulinelli
Pulizia esterna
Pulizia interna
Periodi di inutilizzo prolungati
Precauzioni antigelo
Trasporto della lavastoviglie
Cosa fare se…
51
51
52
52
52
53
53
53
53
Dati tecnici
55
Istruzioni di installazione
56
Installazione
56
Installazione sotto un piano (piano di lavoro
o lavello)
56
Livellamento
57
Collegamento dell’acqua
57
Allacciamento idrico
57
Tubo di carico dell'acqua con valvola di
sicurezza "AquaControl"
57
Collegamento del tubo di scarico dell'acqua
58
Collegamento elettrico
59
Considerazioni ambientali
59
Materiale di imballaggio
60
Downloaded from DishWasher-Manual.com Manuals
Con riserva di modifiche
32
Informazioni per la sicurezza
Istruzioni d'uso
Informazioni per la sicurezza
Per garantire un impiego corretto e sicuro dell'apparecchio, prima dell'installazione e del
primo utilizzo, leggere con attenzione il libretto istruzioni, inclusi i suggerimenti e le avvertenze. Per evitare errori e incidenti, è importante garantire che tutte le persone che
utilizzano l'apparecchio ne conoscano il funzionamento e le caratteristiche di sicurezza.
Conservare queste istruzioni e allegarle all'apparecchio in caso di trasporto o di vendita, in
modo che chiunque lo utilizzi sia correttamente informato sul suo utilizzo e sulle precauzioni di sicurezza.
Uso corretto
• Questa lavastoviglie è destinata al lavaggio degli utensili da cucina idonei al lavaggio a
macchina.
• Non introdurre solventi nella lavastoviglie. Queste sostanze potrebbero causare un'esplosione.
• Coltelli e altri oggetti appuntiti devono essere collocati nel cestello per posate con le
punte rivolte verso il basso oppure appoggiati in posizione orizzontale sul cestello superiore.
• Usare solo prodotti (detersivi, sale e brillantante) idonei per lavastoviglie.
• Non aprire la porta con l'apparecchio in funzione; potrebbe fuoriuscire vapore molto
caldo.
• Non togliere gli utensili dalla lavastoviglie prima della fine del ciclo completo.
• Dopo l'uso, scollegare l'apparecchio dalla rete elettrica e chiudere il collegamento alla
rete idrica.
• Gli interventi di assistenza sul prodotto devono essere eseguiti esclusivamente da tecnici
autorizzati e utilizzando solo componenti di ricambio originali.
• In nessun caso l'utente deve cercare di riparare la lavastoviglie personalmente. Una riparazione effettuata da persone non competenti può causare danni o compromettere
seriamente il funzionamento dell'apparecchio. Contattare il centro di assistenza locale.
Richiedere sempre pezzi di ricambio originali.
Sicurezza generale
• Questo apparecchio non deve essere utilizzato da bambini o da persone con ridotte
capacità fisiche, sensoriali o mentali, oppure prive di conoscenza ed esperienza, a meno
che tale utilizzo non avvenga sotto la supervisione o la guida di una persona responsabile
della loro sicurezza.
• I detersivi per lavastoviglie possono causare irritazioni a occhi, bocca e gola. Le conseguenze possono essere fatali! Osservare le misure di sicurezza indicate dal produttore
del detersivo.
• L'acqua contenuta nella lavastoviglie non è potabile. Potrebbe contenere residui di detersivo.
• Aprire la porta della lavastoviglie solo quando occorre caricarla o scaricarla. Tenendo la
porta chiusa, si eviteranno rischi di inciampo e di conseguenti lesioni.
•
Non sedersi
o salire sulla porta aperta. Manuals
Downloaded
from DishWasher-Manual.com
Informazioni per la sicurezza
33
Per la sicurezza dei bambini
• L'apparecchio è progettato per essere utilizzato da persone adulte. Non lasciare che i
bambini utilizzino da soli la lavastoviglie.
• Tenere i materiali di imballaggio al di fuori della portata dei bambini. Alcuni materiali
possono creare rischi di soffocamento.
• Conservare i detersivi in un luogo sicuro al di fuori della portata dei bambini.
• Tenere i bambini lontano dalla lavastoviglie quando la porta è aperta.
Installazione
• Controllare che la lavastoviglie non presenti danni dovuti al trasporto. Se l'apparecchio
è danneggiato, non collegarlo. In caso di danno alla lavastoviglie, rivolgersi al fornitore.
• Prima dell'uso, rimuovere tutti i materiali di imballaggio.
• Tutti gli interventi elettrici e idraulici richiesti per l'installazione dell'apparecchio devono
essere eseguiti da un tecnico qualificato e competente.
• Per ragioni di sicurezza, è pericoloso cambiare le specifiche o cercare di modificare il
prodotto in qualunque modo.
• Non usare la lavastoviglie se il cavo elettrico o i tubi idraulici sono danneggiati; oppure
se il pannello dei comandi, il piano di lavoro o il basamento presentano danni tali da
consentire l'accesso a parti interne dell'apparecchio. Per evitare rischi, contattare il servizio di assistenza locale.
• Non forare le pareti laterali della lavastoviglie, per evitare di danneggiare i componenti
idraulici ed elettrici.
AVVERTENZA
Per i collegamenti elettrici e idraulici, seguire attentamente le istruzioni dei paragrafi corrispondenti.
Downloaded from DishWasher-Manual.com Manuals
34
Descrizione del prodotto
Descrizione del prodotto
1
2
3
4
5
6
7
8
9
10
Cestello superiore
Manopola durezza dell'acqua
Contenitore del sale
Erogatore detersivo
Erogatore brillantante
Targhetta
Filtri
Mulinello inferiore
Mulinello superiore
Piano di lavoro
Luce interna
Questo apparecchio dispone di una luce interna che si accende e si spegne, rispettivamente,
quando si apre e si chiude la porta.
AVVERTENZA
Radiazioni LED visibili: non fissare lo sguardo sul fascio luminoso.
Downloaded from DishWasher-Manual.com Manuals
Pannello dei comandi
35
La luce interna è dotata di LED di CLASSE 2 conformemente a IEC 60825-1: 1993 + A1:
1997 + A2: 2001.
Lunghezza d'onda emessa: 450 nm
Massima potenza di uscita: 548 μW
Nel caso in cui occorra sostituire la lampadina, contattare il Centro di assistenza locale.
Pannello dei comandi
7
10
8
1 Tasto On/Off
2 Tasto RESET
3 Tasti Selezione programmi
4 Tasto NIGHT CYCLE
5 Tasto MULTITAB
6 Tasto Partenza ritardata
7 Display digitale
8 Tasti funzione
9 Spiefrom DishWasher-Manual.com Manuals
Downloaded
9
36
Pannello dei comandi
10 Spie dei programmi
Spie
MULTITAB
Indica l'attivazione/disattivazione della funzione MULTITAB(vedere
funzione MULTITAB )
Sale
Si accende quando è esaurito il sale speciale. 1)
Brillantante
Si accende quando è esaurito il brillantante. 1)
1) Le spie del sale e del brillantante non sono mai accese quando è in corso il programma di lavaggio anche se è
richiesto il riempimento.
Visore digitale
Il visore digitale indica:
• il livello di durezza sul quale è impostato il decalcificatore dell'acqua,
• il tempo approssimativo residuo del programma in corso,
• l'attivazione/disattivazione dell'erogazione del brillantante (SOLO con la funzione Multitab attiva),
• la fine del programma di lavaggio (nel visore digitale compare uno zero),
• il conto alla rovescia della partenza ritardata,
• i codici di errore relativi a malfunzionamenti della lavastoviglie.
Tasto NIGHT CYCLE
Night Cycle è un programma di lavaggio silenzioso che non disturba nemmeno quando si
dorme. Questo programma può essere attivato di notte o negli orari in cui l'energia costa
meno.
Quando è in funzione il ciclo Night Cycle, la pompa gira a bassissima velocità abbattendo
il rumore del 25% rispetto al funzionamento normale, ma allungando notevolmente la
durata del programma.
Tasti funzione
Questi tasti abilitano le seguenti funzioni:
• impostazione del decalcificatore dell'acqua,
• attivazione/disattivazione dell'erogazione del brillantante quando la funzione Multitab
è attiva.
Modalità impostazione
L'apparecchio si trova in modalità impostazione quando TUTTE le spie dei programmi sono
accese.
Tenere sempre presente che, quando si eseguono operazioni quali:
– selezione di un programma di lavaggio,
– impostazione del decalcificatore dell'acqua,
– attivazione /disattivazione dell'erogazione del brillantante,
l'apparecchio DEVE trovarsi in modalità impostazione.
Downloaded from DishWasher-Manual.com Manuals
37
Primo utilizzo
Se la spia di un programma è accesa, è ancora impostato l'ultimo programma eseguito o
selezionato. In questo caso, per ritornare alla modalità impostazione è necessario cancellare
il programma.
Per cancellare un programma impostato o un programma in corso
Tenere premuto il tasto RESET fino a quando le spie di tutti i programmi si accendono. Il
programma è stato cancellato e l'apparecchio è ora in modalità impostazione.
Primo utilizzo
Prima di utilizzare la lavastoviglie per la prima volta:
• Assicurarsi che i collegamenti elettrici e idraulici siano conformi alle istruzioni di installazione
• Rimuovere tutto il materiale di imballaggio dall'interno dell'apparecchio
• Impostare il decalcificatore
• Versare 1 litro di acqua all'interno del contenitore del sale, quindi riempire con il sale per
lavastoviglie
• Riempire il contenitore del brillantante
Se si desidera utilizzare detersivi in pastiglie multifunzione del tipo: "3 in 1", "4 in 1", "5 in
1" ecc., impostare la funzione Multitab (vedere "funzione Multitab ").
Regolazione del decalcificatore dell’acqua
La lavastoviglie è dotata di un decalcificatore dell'acqua studiato per rimuovere dalla rete
idrica sali minerali che possono compromettere il buon funzionamento dell'apparecchio.
La durezza dell'acqua dipende dal contenuto di questi sali. La durezza dell'acqua è misurata
in scale equivalenti, gradi tedeschi °dH, gradi francesi °TH e mmol/l (millimol per litro, unità
internazionale di durezza dell'acqua).
Il decalcificatore deve essere regolato in base alla durezza dell'acqua del proprio impianto.
Per informazioni sulla durezza dell'acqua nella propria zona, è possibile rivolgersi all'ente
erogatore locale.
Il decalcificatore dell'acqua deve essere impostato in due modi: manualmente, tramite il
selettore di durezza dell'acqua, ed elettronicamente.
Durezza dell'acqua
Regolazione dell'impostazione
della durezza dell'acqua
Uso del sale
°dH
°TH
mmol/l
manuale
elettronica
51 - 70
91 - 125
9,1 - 12,5
2
livello 10
Sì
43 - 50
76 - 90
7,6 - 8,9
2
livello 9
Sì
37 - 42
65 - 75
6,5 - 7,5
2
livello 8
Sì
29 - 36
51 - 64
5,1 - 6,4
2
livello 7
Sì
23 - 28
40 - 50
4,0 - 5,0
2
livello 6
Sì
19 - 22
33 - 39
3,3 - 3,9
2
livello 5
Sì
Downloaded from DishWasher-Manual.com Manuals
38
Regolazione del decalcificatore dell’acqua
Durezza dell'acqua
Regolazione dell'impostazione
della durezza dell'acqua
Uso del sale
°dH
°TH
mmol/l
manuale
elettronica
15 - 18
26 - 32
2,6 - 3,2
1
livello 4
Sì
11 - 14
19 - 25
1,9 - 2,5
1
livello 3
Sì
4 - 10
7 - 18
0,7 - 1,8
1
livello 2
Sì
<4
<7
< 0,7
1
livello 1
No
Impostazione manuale
L'impostazione di fabbrica è la posizione 2.
1. Aprire la porta della lavastoviglie.
2. Rimuovere il cestello inferiore dalla lavastoviglie.
3. Ruotare il selettore di durezza dell'acqua
nella posizione 1 o 2 (vedere tabella).
4. Riposizionare il cestello inferiore.
Impostazione elettronica
L'impostazione di fabbrica è la posizione 5.
1. Premere il tasto On/Off. La lavastoviglie deve trovarsi in modalità impostazione.
2. Tenere contemporaneamente premuti i tasti B e C fino a quando le spie dei tasti A ,
B e C iniziano a lampeggiare.
3. Premere il tasto A : le spie dei tasti B e C si spengono, mentre la spia del tasto A continua
a lampeggiare. Il visore digitale mostra il livello corrente.
Esempi:
sul visore = livello 5
sul visore = livello 10
4. Per cambiare il livello, premere il tasto A . Ad ogni pressione del tasto, il livello cambia
(per la selezione del nuovo livello, vedere la tabella).
Esempi: se il livello corrente è 5, premendo il tasto A una volta si seleziona il livello 6.
se il livello corrente è 10, premendo il tasto A una volta si seleziona il livello 1.
5. Per memorizzare l'operazione, spegnere la lavastoviglie premendo il tasto On/Off.
Downloaded from DishWasher-Manual.com Manuals
Uso del sale per lavastoviglie
39
Uso del sale per lavastoviglie
AVVERTENZA
Usare soltanto sale specifico per lavastoviglie. Tutti gli altri tipi di sale non specifici per l'uso
in lavastoviglie, in particolare il sale da cucina, possono danneggiare il decalcificatore. Aggiungere il sale poco prima di iniziare uno dei programmi completi di lavaggio. In questo
modo si impedisce che gli eventuali versamenti di sale o di acqua salata sul fondo della
lavastoviglie possano danneggiare e causare corrosione.
Per riempire:
1. Aprire la porta, togliere il cestello inferiore e svitare il tappo del contenitore girandolo
in senso antiorario.
2. Versare 1 litro di acqua all'interno del contenitore (necessario solo prima di introdurre il sale per la prima volta) .
3. Utilizzando l'imbuto in dotazione, versare
il sale fino a riempire il contenitore.
4. Richiudere con il tappo e accertarsi che
non vi siano residui di sale sulla filettatura
o sulla guarnizione.
5. Riapplicare il tappo avvitandolo in senso
orario fino allo scatto.
La fuoriuscita dell'acqua durante il riempimento del contenitore con il sale è normale e
non provoca alcun danno.
La spia del sale sul pannello comandi può restare accesa per un periodo di 2-6 ore dal
riempimento, se la lavastoviglie resta accesa. Se il sale utilizzato si dissolve lentamente, è
possibile che la spia resti accesa più a lungo. La funzionalità della macchina non è compromessa.
Uso del brillantante
AVVERTENZA
Utilizzare solo prodotti brillantanti specifici per lavastoviglie.
Non introdurre altre sostanze nel contenitore del brillantante (es. detergenti per lavastoviglie, detersivi liquidi). Si rischierebbe di danneggiare l'apparecchio.
Il brillantante assicura un risciacquo accurato e un'asciugatura senza macchie o segni.
Il brillantante è aggiunto automaticamente dal programma durante l'ultimo risciacquo.
Downloaded from DishWasher-Manual.com Manuals
40
Uso del brillantante
1. Aprire il contenitore premendo il pulsante
di rilascio (A).
2. Introdurre il brillantante nel contenitore. Il
livello massimo di riempimento è indicato
dal segno "max".
L'erogatore contiene circa 110 ml di liquido sufficiente per circa 16 - 40 cicli di lavaggio, a seconda del dosaggio impostato.
3. Assicurarsi che il coperchio sia chiuso dopo
l'operazione di riempimento.
Eliminare le eventuali fuoriuscite di liquido con
un panno assorbente per evitare la formazione
di schiuma al successivo lavaggio.
Regolazione del dosaggio del brillantante
In base ai risultati ottenuti, regolare la quantità di brillantante agendo sul selettore a 6
posizioni (posizione 1 = dosaggio minimo, posizione 6 = dosaggio massimo).
Il dosaggio è preimpostato dalla fabbrica al livello 4.
Se dopo il lavaggio si osservano gocce d'acqua o
tracce di calcare sulle stoviglie, aumentare la dose.
Ridurre la quantità se sulle stoviglie si notano strisce biancastre e appiccicose o un leggero velo
bluastro su coltelli e bicchieri.
Downloaded from DishWasher-Manual.com Manuals
Utilizzo quotidiano
41
Utilizzo quotidiano
•
•
•
•
•
Controllare il livello del sale o del brillantante.
Sistemare stoviglie e posate nella lavastoviglie.
Aggiungere il detersivo.
Selezionare un programma di lavaggio idoneo per posate e stoviglie.
Avviare il programma di lavaggio.
Sistemazione di posate e stoviglie
Non lavare in lavastoviglie spugne, strofinacci da cucina e altri oggetti che potrebbero
assorbire acqua.
• Prima di sistemare le stoviglie, occorre:
– Rimuovere i residui di cibo e altri materiali.
– Ammorbidire i residui di bruciato nei tegami
• Quando si sistemano stoviglie e posate, osservare quanto segue:
– Stoviglie e posate non devono impedire ai mulinelli di girare liberamente.
– Disporre i recipienti cavi (tazze, bicchieri, padelle ecc.) con la parte concava rivolta
verso il basso, in modo da evitare che l'acqua rimanga all'interno dei contenitori o
nella loro base.
– Stoviglie e posate non devono essere poste le une dentro le altre né coprirsi a vicenda.
– Onde evitare di danneggiare il vetro, i bicchieri non devono toccarsi.
– Disporre gli oggetti piccoli nel cestello portaposate.
• Le stoviglie in plastica e i tegami in materiale antiaderente tendono a trattenere maggiormente le gocce d'acqua; il loro grado di asciugatura risulterà perciò inferiore a quello
degli oggetti in ceramica e acciaio.
• Gli oggetti leggeri (come i recipienti in plastica) devono essere caricati nel cestello superiore e disposti in modo da non potersi muovere.
Per il lavaggio in lavastoviglie, le seguenti posate e stoviglie sono da considerarsi
non idonee:
limitatamente idonee:
• Posate con manici in legno, osso, porcellana • Lavare in lavastoviglie porcellane e ceramiche
o madreperla.
solo se il produttore ne indica espressamente
• Oggetti in plastica non resistenti al calore.
l'idoneità al lavaggio in lavastoviglie.
• Posate antiche o vecchie con collante non re- • Dopo lavaggi ripetuti in lavastoviglie, le desistente alle alte temperature.
corazioni non smaltate potrebbero sbiadire.
• Posate o piatti con parti incollate.
• Con il lavaggio in lavastoviglie, le parti in ar• Oggetti in peltro o rame.
gento e alluminio tendono a cambiare colore:
• Oggetti in cristallo piombato.
I residui di cibo, ad esempio albume, tuorlo
• Oggetti in acciaio non inossidabile.
d'uovo, senape ecc. causano spesso scolori• Taglieri di legno.
ture o macchie, in particolare sull'argento.
• Oggetti in fibre sintetiche. Oggetti in ferro o
Pertanto, se l'argento non è lavato subito doghisa.
po l'uso, occorre togliere immediatamente i
residui di cibo.
Aprire la porta ed estrarre i cesti per sistemare le stoviglie.
Downloaded from DishWasher-Manual.com Manuals
42
Sistemazione di posate e stoviglie
Il cestello inferiore
Sistemare nel cestello inferiore le stoviglie più
grandi e con sporco ostinato.
Per facilitare la sistemazione delle stoviglie più ingombranti, è possibile abbassare i supporti per i
piatti.
Cestello portaposate
AVVERTENZA
Le posate lunghe, affilate o taglienti non devono essere sistemate in posizione verticale
perché sono potenzialmente pericolose. Coltelli, posate e altri oggetti lunghi o appuntiti
vanno collocati nell'apposito vassoio scorrevole del cestello superiore oppure appoggiati
orizzontalmente sul cestello superiore.
Cucchiaini e forchettine vanno sistemati nell'apposito vassoio del cestello superiore. Forchette e
cucchiai vanno sistemati nell'apposito cestello
portaposate del cestello inferiore.
Per fare in modo che tutte le posate disposte nel
cestello siano raggiunte dal getto d'acqua, sarebbe
opportuno:
Downloaded from DishWasher-Manual.com Manuals
Sistemazione di posate e stoviglie
1. Inserire la griglia di separazione nel cestello portaposate.
2. Sistemare le forchette e i cucchiai nel cestello portaposate con il manico rivolto
verso il basso.
Per posate di grandi dimensioni, ad esempio fruste, si può togliere una delle due
griglie divisorie.
Il cestello portaposate può essere aperto per togliere più comodamente le posate.
Verificare sempre di afferrare entrambe le parti
della maniglia quando si estrae il cestello dalla lavastoviglie.
1. Appoggiare il cestello su un tavolo o sul piano
di lavoro.
2. Aprire la maniglia costituita da due parti.
3. Togliere le posate.
Downloaded from DishWasher-Manual.com Manuals
43
44
Sistemazione di posate e stoviglie
Cestello superiore
Sistemare nel cestello superiore le stoviglie fragili
e di dimensioni più piccole e le posate lunghe e
appuntite.
• Disporre le stoviglie sopra e sotto i ripiani delle
tazze in modo l'acqua possa raggiungere tutte
le superfici.
• I ripiani per le tazze possono essere sollevati
per fare posto a stoviglie più grandi.
• Appoggiare o appendere i calici ai bordi sagomati dei ripiani delle tazze.
• I calici a stelo lungo possono essere appoggiati all'apposito supporto ondulato spostabile a destra o a sinistra del cesto superiore.
Downloaded from DishWasher-Manual.com Manuals
Uso del detersivo
45
• Anche la fila di supporti nella parte sinistra
del cestello superiore è divisa in due parti e
può essere abbassata per facilitare il carico di
ciotole e insalatiere.
Ripiano non ripiegato: sistemazione di bicchieri, tazze ecc. nel cestello superiore.
Ripiano ripiegato: più spazio per oggetti di
dimensioni maggiori.
Regolazione dell'altezza del cestello superiore
Altezza massima delle stoviglie nel:
Cestello superiore
Cestello inferiore
Con cestello superiore sollevato 22 cm
30 cm
Con cestello superiore abbassato
29 cm
24 cm
L'altezza del cestello superiore può essere regolata anche quando questo è carico.
Come sollevare / abbassare il cestello superiore:
1. Estrarre completamente il cestello superiore.
2. Tenendo per la maniglia il cestello superiore, sollevarlo completamente e quindi
abbassarlo verticalmente.
Il cestello superiore è agganciato nella posizione inferiore o superiore.
AVVERTENZA
Al termine del carico della lavastoviglie, chiudere sempre la porta per evitare di inciampare
e farsi male.
Prima di chiudere la porta, accertarsi che i mulinelli possano ruotare liberamente.
Uso del detersivo
Usare esclusivamente detersivi specifici per lavastoviglie.
Osservare le raccomandazioni di dosaggio e di conservazione del produttore dichiarate sulla
confezione del detersivo.
Downloaded from DishWasher-Manual.com Manuals
46
Uso del detersivo
Evitando di eccedere nell'uso di detersivo si contribuisce a limitare l'inquinamento ambientale.
Aggiunta del detersivo
1. Aprire il coperchio.
2. Versare il detersivo nell'apposito contenitore (1). Le tacche indicano i livelli di dosaggio:
20 = ca. 20 g di detersivo
30 = ca. 30 g di detersivo.
3. Tutti i programmi con prelavaggio richiedono una piccola quantità di detersivo
(5/10 g) da versare nel contenitore detersivo prelavaggio (2).
Questo detersivo è utilizzato nella fase del
prelavaggio.
4. Quando si usano detersivi in pastiglie, sistemarle nello scomparto (1)
5. Chiudere il coperchio e premere fino allo
scatto.
Detersivo in pastiglie
I detersivi in pastiglie dei vari produttori possono richiedere tempi di scioglimento diversi.
Pertanto, alcuni di essi possono non dissolversi
completamente e non svolgere la propria azione detergente nei programmi di lavaggio brevi.
Se si utilizzano questi detersivi, scegliere programmi di lavaggio più lunghi per garantire il
completo scioglimento del detersivo. In alternativa, selezionare la funzione MULTITAB che
garantisce
lo scioglimento
del detersivo inManuals
tutti i programmi di lavaggio.
Downloaded
from
DishWasher-Manual.com
Uso di pastiglie combinate
47
Uso di pastiglie combinate
Questo apparecchio prevede la funzione " Multitab" che consente di utilizzare detersivi in
pastiglie multifunzione" Multitab ".
Questi prodotti esercitano una funzione combinata di detersivo, brillantante e sale. A seconda dei tipi ("3 in 1", "4 in 1", "5 in 1" ecc.), le pastiglie possono inoltre contenere altri
agenti.
Verificare che questi detersivi siano adatti alla durezza dell'acqua del proprio impianto.
Vedere le istruzioni del produttore riportate sulla confezione.
Questa funzione può essere selezionata con tutti i programmi di lavaggio. Con la selezione
di questa funzione, l'erogazione del brillantante e del sale e le relative spie sono automaticamente disattivate.
Selezionare la funzione " Multitab " prima di avviare il programma di lavaggio.
Una volta selezionata (la spia è accesa), questa funzione rimane attiva anche per i successivi
programmi di lavaggio.
Utilizzando la funzione " Multitab", le durate del ciclo possono cambiare. In questo caso,
l'indicazione del tempo residuo del programma è automaticamente aggiornata nel visore
digitale.
Quando è in corso un programma, la funzione " " MultitabNON può più essere modificata.
Se si desidera escludere la funzione " Multitab", è necessario prima cancellare l'impostazione
del programma e poi disattivare la funzione " Multitab ".
In questo caso, è necessario impostare di nuovo il programma di lavaggio e l'opzione desiderata.
Attivazione/disattivazione della funzione Multitab
Premere il tasto Multitab: la spia corrispondente si accende. Questo indica che la funzione
è attiva.
Per disattivare la funzione, premere nuovamente il tasto Multitab: la spia corrispondente
si spegne.
Se i risultati dell'asciugatura non sono soddisfacenti, si consiglia di:
1. Riempire il contenitore del brillantante.
2. Attivare l'erogazione del brillantante.
3. Impostare il dosaggio del brillantante in posizione 2.
• L'attivazione/disattivazione dell'erogazione del brillantante è possibile solo con la funzione " Multitab"attiva.
Attivazione/disattivazione dell'erogazione del brillantante
1. Premere il tasto On/Off. La lavastoviglie deve trovarsi in modalità impostazione.
2. Premere contemporaneamente i tasti B e C fino a quando le spie dei tasti A , B e C
iniziano a lampeggiare.
3. Premere il tasto B : le spie dei tasti A e C si spengono, mentre la spia del tasto B continua
a lampeggiare. Il visore digitale indica l'impostazione corrente:
= Erogazione del brillantante disattivata.
= Erogazione del brillantante attivata.
4. Per cambiare l'impostazione, premere nuovamente il tasto B : il visore indica la nuova
impostazione.
Downloaded
from DishWasher-Manual.com Manuals
48
Programmi di lavaggio
5. Per memorizzare l'operazione, spegnere la lavastoviglie premendo il tasto On/Off.
Se si decide di ritornare all'uso di detersivi tradizionali, si consiglia di:
1. Disattivare la funzione " Multitab".
2. Riempire di nuovo i contenitori del sale e del brillantante.
3. Regolare l'impostazione della durezza dell'acqua sul valore massimo ed eseguire un
programma di lavaggio normale senza stoviglie.
4. Regolare la durezza dell'acqua in base al tipo di acqua del proprio impianto.
5. Regolare il dosaggio del brillantante.
Programmi di lavaggio
Qualunque Carico partipo di sto- ziale (da
viglia
completare
successivamente nel
corso della
giornata) 6)
Downloaded from DishWasher-Manual.com Manuals
Asciugatura
12 - 23 Acqua (litri)
16 - 18
9
12 - 13
14 - 15
Bicchieri e
stoviglie
delicate
4
Sporco
normale
0,9 1,5 -1,7 1,1 - 1,7 Energia (kWh)
Stoviglie
miste
0,1 0,8 -0,9 1,0 - 1,1
Sporco
normale
ECO 50°5)
- Durata (minuti) 2)
Stoviglie
miste
-
30 MIN 60 ° 4) Sporco
leggero
-
Stoviglie
miste e
pentole
-
INTENSIV CA- Sporco inRE 70°
tenso
-
Stoviglie
miste e
pentole
Valori di consumo 1)
-
AUTO 45-70 ° Sporco
3)
normale e
intenso
Risciacquo finale
Descrizione del programma
1/2x Risciacquo intermedio
Tipo di carico
Lavaggio principale
Grado di
sporco
Prelavaggio
Programma
Selezione e avvio di un programma di lavaggio
13 - 14 Acqua (litri)
Asciugatura
Stoviglie
miste
1,2 - 1,3 Energia (kWh)
Sporco
normale
Valori di consumo 1)
- Durata (minuti) 2)
NIGHT CYCLE
Risciacquo finale
Descrizione del programma
Risciacquo intermedio
Tipo di carico
Lavaggio principale
Grado di
sporco
Prelavaggio
Programma
49
1) I valori di consumo sono da intendersi come misure indicative e dipendono dalla pressione e dalla temperatura
dell'acqua, dalle variazioni dell'alimentazione elettrica e dalla quantità di stoviglie.
2) La durata del programma compare nel display digitale.
3) Durante il programma di lavaggio "Automatico" il grado di sporco sulle stoviglie è indicato dalla densità
dell'acqua. La durata del programma e i consumi di acqua ed energia possono variare, poiché dipendono dal
livello di carico della lavastoviglie e dal grado di sporco delle stoviglie. La temperatura dell'acqua è regolata
automaticamente fra 45 °C e 70 °C.
4) Ideale per il lavaggio di un carico parziale. Ideale come programma quotidiano in risposta alle esigenze di una
famiglia di 4 persone che desidera inserire solo stoviglie e posate della colazione e della cena.
5) Programma di prova a fini normativi.
6) Questo programma non richiede l'uso di detersivi
Selezione e avvio di un programma di lavaggio
Selezionare il programma di lavaggio e la partenza ritardata con la porta leggermente aperta. Il programma o il conto alla rovescia si avvia solo dopo la chiusura
della porta. Fino a quel momento, è possibile modificare le impostazioni.
1. Controllare che i cestelli siano caricati correttamente e che i mulinelli siano liberi di
ruotare.
2. Controllare che il rubinetto dell'acqua sia aperto.
3. Premere il tasto On/Off. La lavastoviglie deve trovarsi in modalità impostazione.
4. Premere uno dei tasti Selezione programmi per selezionare un programma di lavaggio.
(vedere la "Tabella programmi di lavaggio").
Quando è selezionato un programma, la spia corrispondente si accende e la durata del
programma lampeggia sul display digitale.
Per impostare il programma NIGHT CYCLE, premere il tasto NIGHT CYCLE: la spia corrispondente si accende.
5. Quando si chiude la porta della lavastoviglie, il programma si avvia automaticamente.
Impostazione e avvio del programma con "partenza ritardata"
1. Dopo aver scelto il programma di lavaggio, premere il tasto di partenza ritardata fino
a quando compare il numero di ore desiderato per l'avvio ritardato. L'inizio del programma di lavaggio può essere posticipato fino a un massimo di 19 ore.
2. Dopo avere chiuso lo sportello della lavastoviglie, il conto alla rovescia parte automaticamente.
Downloaded from DishWasher-Manual.com Manuals
50
Selezione e avvio di un programma di lavaggio
3. Il conto alla rovescia si basa su decrementi di 1 ora.
4. L'apertura della porta interrompe il conto alla rovescia. Chiudere la porta; il conto alla
rovescia riprende da dove era stato interrotto.
5. Appena è trascorso il tempo di ritardo impostato, il programma si avvia automaticamente.
La selezione del programma di lavaggio e della partenza ritardata è possibile anche se la
porta è chiusa. Si tenga presente che, una volta premuto il tasto di un programma, si hanno
SOLO 3 secondi per selezionare un altro programma o la partenza ritardata, dopodiché il
programma selezionato si avvia automaticamente.
AVVERTENZA
Interrompere o annullare un programma di lavaggio in corso SOLO se assolutamente
necessario. Attenzione! Nell'aprire la porta, potrebbe fuoriuscire vapore molto caldo. Aprire la porta con cautela.
Come cancellare una partenza ritardata o un programma di lavaggio in corso
• Premere il tasto RESET fino a quando tutte le spie dei programmi si accendono.
• Se si annulla la partenza posticipata, si annulla anche il programma di lavaggio impostato. In questo caso, è necessario impostare di nuovo il programma di lavaggio.
• Se occorre selezionare un nuovo programma di lavaggio, verificare che sia presente il
detersivo nell'apposito contenitore.
Interruzione di un programma di lavaggio in corso
• Aprire la porta della lavastoviglie; il programma si arresta. Chiudere la porta; il programma ricomincia dal punto in cui è stato interrotto.
• Premere il tasto On/Off; tutte le luci si spengono. Premere di nuovo il tasto On/Off; il
programma ricomincia dal punto in cui è stato interrotto.
Fine del programma di lavaggio
• La lavastoviglie si arresta automaticamente e un segnale acustico comunica il termine
del programma di lavaggio.
• La spia del programma appena terminato rimane accesa.
• Nel display compare uno zero.
1. Spegnere la lavastoviglie premendo il tasto On/Off.
Si raccomanda di spegnere l'apparecchio quando il programma di lavaggio è terminato. In
caso contrario, tutte le spie si spengono automaticamente dopo 3 minuti dal termine del
programma. Nel display digitale compare 1 trattino.
Questo contribuisce a ridurre il consumo di energia se si dimentica per qualunque motivo
di spegnere l'apparecchio al termine del programma.
Premendo qualunque tasto (tranne On/Off), il pannello comandi appare nella stessa condizione (spie e display digitale) di quando il programma è terminato.
2. Aprire la porta della lavastoviglie, lasciarla socchiusa e attendere alcuni minuti prima
di estrarre le stoviglie; in questo modo le stoviglie avranno tempo di raffreddarsi e i
risultati dell'asciugatura saranno migliori.
Downloaded from DishWasher-Manual.com Manuals
Svuotamento della lavastoviglie
51
Svuotamento della lavastoviglie
• Le stoviglie molto calde tendono a rompersi più facilmente se soggette a urti.
Lasciare che le stoviglie si raffreddino prima di toglierle dalla macchina.
• Vuotare prima il cestello inferiore e quindi quello superiore; in questo modo, si eviteranno
sgocciolamenti d'acqua dal cestello superiore sulle stoviglie di quello inferiore.
• Sulle pareti laterali e sulla porta della lavastoviglie potrà formarsi della condensa, perché
l'acciaio inossidabile diventerà più freddo delle stoviglie.
ATTENZIONE
Quando il programma di lavaggio è terminato, si raccomanda di staccare la spina di alimentazione elettrica e di chiudere il rubinetto dell'acqua.
Pulizia e cura
Pulizia dei filtri
I filtri devono essere di tanto in tanto controllati e puliti. Filtri sporchi compromettono i
risultati del lavaggio.
AVVERTENZA
Prima di pulire i filtri, assicurarsi che la macchina sia spenta.
1. Aprire la porta ed estrarre il cestello inferiore.
2. Il sistema di filtraggio comprende un filtro
a grana grossa ( A ), un microfiltro ( B ) e
un filtro piatto. Sbloccare il gruppo filtro,
facendo leva sul manico del microfiltro, e
rimuoverlo.
Downloaded from DishWasher-Manual.com Manuals
52
Pulizia e cura
3. Ruotare il manico di circa 1/4 di giro in
senso antiorario e togliere il sistema di filtraggio.
4. Afferrare il filtro a grana grossa ( A ) mediante il manico con il foro e toglierlo dal
microfiltro ( B ).
5. Lavare i filtri sotto l'acqua corrente.
6. Estrarre il filtro piatto dal fondo della vasca e pulire accuratamente entrambe le
facce.
7. Ricollocare il filtro piatto sul fondo della
vasca e assicurarsi che sia ben posizionato.
8. Reinserire il filtro a grana grossa ( A ) nel
microfiltro ( B ) e premere.
9. Rimontare il gruppo e bloccare ruotando
la maniglia in senso orario fino all'arresto.
Durante questo processo, assicurarsi che il
filtro piatto sia correttamente posizionato
sulla sua sede e che sia ben agganciato.
AVVERTENZA
La lavastoviglie non deve MAI essere usata senza filtri. Un montaggio o un posizionamento
non corretto dei filtri possono influire negativamente sui risultati del lavaggio e danneggiare l'apparecchio.
Pulizia dei mulinelli
Non rimuovere MAI i mulinelli.
Se i fori dei mulinelli sono ostruiti da residui di sporco, liberarli servendosi di uno stuzzicadenti.
Pulizia esterna
Pulire le superfici esterne dell'apparecchio e il pannello dei comandi con un panno morbido
inumidito. Se necessario, usare un detergente neutro. Non usare prodotti abrasivi, spugnette abrasive o solventi (acetone, trielina ecc.).
Pulizia interna
Pulire periodicamente le guarnizioni della porta e le vaschette del detersivo e del brillantante
con un panno umido.
Si consiglia di effettuare ogni 3 mesi un programma di lavaggio per piatti molto sporchi,
usando il detersivo a lavastoviglie scarica.
Downloaded from DishWasher-Manual.com Manuals
Cosa fare se…
53
Periodi di inutilizzo prolungati
Se si prevede di non utilizzare l'apparecchio per un periodo prolungato, si consiglia di:
1. Scollegare l'apparecchio dalla rete elettrica e dalla rete idrica.
2. Lasciare la porta socchiusa per evitare la formazione di odori sgradevoli.
3. Lasciare l'interno dell'apparecchio pulito.
Precauzioni antigelo
Non collocare l'apparecchio in un luogo in cui la temperatura possa scendere al di sotto di
0°C. Se ciò non fosse possibile, svuotare l'apparecchio, chiudere la porta, scollegare il tubo
di carico dell'acqua e vuotarlo completamente.
Trasporto della lavastoviglie
Se occorre spostare la lavastoviglie (a causa di un trasloco ecc.):
1. Scollegare il cavo elettrico.
2. Chiudere il rubinetto dell'acqua.
3. Scollegare i tubi di carico e scarico dell'acqua.
4. Estrarre l'apparecchio insieme ai tubi.
Non ribaltare la lavastoviglie durante il trasporto.
Cosa fare se…
La lavastoviglie non si avvia o si blocca durante il funzionamento. Alcuni problemi sono
dovuti alla mancata esecuzione di semplici procedure di manutenzione o di controllo e
possono essere risolti con l'ausilio delle indicazioni fornite nella tabella, senza ricorrere
all'assistenza tecnica.
Spegnere la lavastoviglie ed eseguire le seguenti azioni correttive consigliate.
Codice guasto e malfunzionamento
Possibile causa e soluzione
• Lampeggio continuo della spia del programma in esecuzione
• Nel visore digitale compare
.
• Segnale acustico intermittente
La lavastoviglie non carica acqua.
• Il rubinetto dell'acqua è bloccato o intasato
dal calcare.
Pulire il rubinetto dell'acqua.
• Il rubinetto dell'acqua è chiuso. Aprire il rubinetto dell'acqua.
• Il filtro (se presente) nel raccordo filettato alla
valvola di ingresso dell'acqua è ostruito.
Pulire il filtro nel raccordo filettato.
• Il tubo di carico dell'acqua non è posizionato
correttamente oppure è piegato o schiacciato.
Controllare il collegamento del tubo di carico
dell'acqua.
Downloaded from DishWasher-Manual.com Manuals
54
Cosa fare se…
Codice guasto e malfunzionamento
Possibile causa e soluzione
• Lampeggio continuo della spia del programma in esecuzione
• Nel visore digitale compare
.
• Segnale acustico intermittente
La lavastoviglie non scarica l'acqua.
• Lo scarico è ostruito.
Pulire lo scarico.
• Il tubo di scarico dell'acqua non è posizionato
correttamente oppure è piegato o schiacciato.
Controllare il collegamento del tubo di scarico
dell'acqua.
• Lampeggio continuo della spia del programma in esecuzione
• Nel visore digitale compare
.
• Segnale acustico intermittente
Dispositivo antiallagamento attivato.
• Chiudere il rubinetto dell'acqua e contattare
il Centro di assistenza locale.
Il programma non si avvia.
• La porta della lavastoviglie non è stata chiusa
correttamente. Chiudere la porta.
• La spina di alimentazione non è inserita nella
presa di corrente. Inserire la spina di alimentazione elettrica.
• Un fusibile domestico è bruciato.
Sostituire il fusibile.
• È stata impostata la partenza ritardata.
Se le stoviglie devono essere lavate immediatamente, cancellare la partenza ritardata.
Dopo avere effettuato questi controlli, accendere l'apparecchio: Il programma riprenderà
dal punto in cui era stato interrotto.
In caso di ricomparsa del codice di allarme o dell'anomalia, contattare il Centro di assistenza
locale.
Per altri codici di guasti non descritti nella tabella, contattare il Centro di assistenza locale,
indicando il nome del modello (Mod.), il codice prodotto (PNC) e il numero seriale (N.S.).
Le informazioni tecniche sono riportate nella targhetta posta sul lato della porta.
Per avere sempre i dati dell'apparecchio a portata di mano, si consiglia di annotarli qui di
seguito:
Mod. : . . . . . . . . . . . . . . . . . . . . . . .
PNC:. . . . . . . . . . . . . . . . . . . . . . . .
N.S. : . . . . . . . . . . . . . . . . . . . . . . . .
Downloaded from DishWasher-Manual.com Manuals
Dati tecnici
55
I risultati del lavaggio non sono soddisfacenti
Le stoviglie non sono pulite
• È stato selezionato un programma di lavaggio
non adatto.
• Le stoviglie sono disposte in modo che l'acqua
non raggiunga tutte le parti della superficie.
I cestelli non devono essere sovraccarichi.
• I mulinelli non ruotano liberamente a causa
della sistemazione non corretta delle stoviglie.
• I filtri sul fondo vasca sono sporchi o non correttamente installati.
• È stata utilizzata una dose insufficiente di detersivo.
• Se si osservano depositi di calcare sulle stoviglie; il contenitore del sale è vuoto o è stato
impostato un valore non corretto del decalcificatore.
• Il tubo di scarico non è collegato correttamente.
• Il tappo del contenitore del sale non è chiuso
correttamente.
Le stoviglie sono bagnate e opache
• Non è stato utilizzato il brillantante.
• Il contenitore del brillantante è vuoto.
Bicchieri e stoviglie presentano striature, macchie biancastre o una patina bluastra
• Ridurre il dosaggio del brillantante.
Bicchieri e stoviglie presentano macchie dovute • Aumentare il dosaggio del brillantante.
all'asciugatura di gocce d'acqua
• La causa potrebbe essere il detersivo. Contattare il servizio clienti del produttore del detersivo.
Se il problema persiste anche dopo questi controlli, contattare il Centro di assistenza locale.
Dati tecnici
Dimensioni
Larghezza - altezza - profondi- 59,6 x 85 x 62,5
tà (cm)
Collegamento elettrico - Tensione - Potenza generale - Fusibile
Le informazioni sul collegamento elettrico sono fornite sulla targhetta dei dati applicata sul lato interno della porta della lavastoviglie
Pressione di carico dell'acqua
Minimo - massimo (MPa)
0,05 - 0,8
Capacità
Coperti
12
Downloaded from DishWasher-Manual.com Manuals
56
Installazione
Istruzioni di installazione
Installazione
AVVERTENZA
Tutti gli interventi elettrici e/o idraulici richiesti per l'installazione dell'apparecchio devono
essere eseguiti da un elettricista e/o idraulico qualificato o da una persona competente.
Rimuovere tutti gli imballaggi prima di collocare l'apparecchio.
Laddove possibile, posizionare la macchina vicino ad un rubinetto dell'acqua e ad uno
scarico.
Installazione sotto un piano (piano di lavoro o lavello)
Rimuovendo il piano della lavastoviglie, è possibile installarla sotto una unità lavello o un
top preesistente, a condizione che le dimensioni dell'incasso corrispondano a quelle illustrate nella figura.
Procedere come descritto di seguito:
1. Rimuovere il piano della lavastoviglie svitando le due viti di fissaggio posteriori;
estrarre il piano dal retro della macchina,
sollevandolo e facendolo scorrere nelle
scanalature anteriori.
2. Inserire la lavastoviglie, dopo aver regolato
i piedini.
Nell'incassare la macchina, assicurarsi che i tubi di ingresso e di scarico dell'acqua non siano
piegati o schiacciati.
Durante tutte le operazioni che richiedono accessibilità ai componenti interni la macchina
deve essere staccata dall'alimentazione elettrica.
L'apparecchio, una volta installato, deve essere facilmente accessibile al tecnico di assistenza per gli eventuali interventi di riparazione.
Se la lavastoviglie viene in seguito utilizzata come apparecchio a sè stante non incassato,
rimontare il piano originale.
Downloaded from DishWasher-Manual.com Manuals
Collegamento dell’acqua
57
La zoccolatura degli apparecchi auto supportati non è regolabile.
Livellamento
Un buon livellamento è essenziale per la corretta chiusura e tenuta della porta. Se l'apparecchio è livellato correttamente, la porta si chiude perfettamente senza attriti laterali. Se
la porta non dovesse chiudersi correttamente, allentare o serrare i piedini regolabili fino a
quando la macchina non è perfettamente a livello.
Collegamento dell’acqua
Allacciamento idrico
Questo apparecchio può essere collegato all'alimentazione di acqua calda (max 60°) o acqua
fredda.
Alimentando l'apparecchio con acqua calda, è possibile ridurre significativamente il consumo energetico. Il vantaggio ottenibile, tuttavia, dipende da come è prodotta l'acqua calda.
(È consigliabile utilizzare fonti di energia alternative, come pannelli solari, fotovoltaici o
eolici, che sono più compatibili ecologicamente).
Per eseguire il collegamento, il dado montato sul tubo di alimentazione della macchina si
avvita ad un tubo di uscita da 3/4" o ad un rubinetto ad innesto rapido come un Pressblock.
La pressione dell'acqua deve essere compresa nei limiti forniti in "Specifiche tecniche".
L'ente di erogazione idrica locale è in grado di indicare la pressione della rete idrica della
vostra area.
Il tubo di ingresso dell'acqua non deve essere attorcigliato, schiacciato o intasato al momento del collegamento.
La lavastoviglie è dotata di tubi di ingresso e di scarico che possono essere installati mediante dadi di bloccaggio a sinistra o a destra, a seconda della collocazione.
Il dado autobloccante deve essere posizionato correttamente per evitare perdite
d'acqua.
(Attenzione! NON tutti i modelli di lavastoviglie sono forniti con tubi di carico e scarico e
dadi di bloccaggio. In tal caso, questo tipo di installazione non è possibile). Se l'apparecchio
è collegato a tubazioni nuove o rimaste inutilizzate per molto tempo, si consiglia di lasciar
scorrere l'acqua per alcuni minuti prima di collegare il tubo di carico.
NON utilizzare tubi di collegamento già utilizzati per altri apparecchi.
Questo apparecchio è dotato di caratteristiche di sicurezza che impediscono che l'acqua
utilizzata nella lavastoviglie ritorni alla tubazione dell'acqua corrente. Questo apparecchio
è conforme alle relative norme in vigore.
Tubo di carico dell'acqua con valvola di sicurezza "AquaControl"
Dopo aver collegato il tubo di carico dell'acqua a doppia camera, la valvola di sicurezza si
trova vicino al rubinetto. Il tubo di carico dell'acqua si trova sotto pressione solo quando
la lavastoviglie carica l'acqua. Se durante l'afflusso di acqua il tubo di carico inizia a perdere,
la valvola di sicurezza interrompe il flusso di acqua.
Nell'installare il tubo di carico dell'acqua, considerare che:
Downloaded from DishWasher-Manual.com Manuals
58
Collegamento dell’acqua
• Il cavo elettrico che alimenta la valvola di sicurezza si trova a passare nell'intercapedine
tra le due camere del tubo di carico. Non immergere in acqua il tubo o la valvola di
sicurezza.
• Se il tubo di carico o la valvola di sicurezza sono danneggiati, staccare immediatamente
la spina.
• Il tubo e la valvola di sicurezza possono essere sostituiti solo da personale specializzato.
A tal fine, contattare il Centro di assistenza locale.
AVVERTENZA
Avvertenza! Pericolo di tensione.
Collegamento del tubo di scarico dell'acqua
L'estremità del tubo di scarico può essere collegato nei seguenti modi:
1. Al rubinetto del lavello, installandolo sotto il piano di lavoro per impedire che l'acqua
di scarico dal lavello entri nella lavastoviglie.
2. Ad un tubo fisso dotato di sfiato con diametro interno minimo di 4 cm.
Il collegamento dello scarico deve essere a un'altezza minima di circa 30 cm e un'altezza massima
di 100 cm dal piano di appoggio della lavastoviglie.
Il tubo di scarico può essere rivolto sia a destra sia
a sinistra della lavastoviglie.
Assicurarsi che il tubo non sia piegato o schiacciato, perché lo scarico dell'acqua potrebbe essere
rallentato o compromesso.
Il tappo del lavandino non deve essere in sede
quando la lavastoviglie scarica l'acqua, perché ciò
potrebbe causare il deflusso dell'acqua nella macchina.
Se si utilizza una prolunga del tubo di scarico, questa non deve essere più lunga di 2 metri
e il suo diametro interno non deve essere inferiore al diametro del tubo in dotazione.
Allo stesso modo, il diametro interno dei raccordi utilizzati per il collegamento allo scarico
non deve essere inferiore a quello del tubo in dotazione.
Downloaded from DishWasher-Manual.com Manuals
Collegamento elettrico
59
Quando si collega il tubo di scarico a un rubinetto
posto sotto il lavello, è necessario togliere tutta
la membrana in plastica (A) . In caso contrario,
si determina l'accumulo di residui di alimenti che
con il passare del tempo possono bloccare il rubinetto del tubo di scarico della lavastoviglie.
I nostri apparecchi sono forniti con un dispositivo
di sicurezza contro il ritorno all'interno dell'apparecchio dell'acqua usata per il lavaggio. Se il tubo
di scarico del lavandino è dotato di valvola senza
ritorno incorporata, lo scarico della lavastoviglie potrebbe risultare compromesso. Si consiglia pertanto di rimuoverlo.
Per evitare perdite dopo l'installazione, verificare che gli accoppiamenti siano serrati a
fondo.
Collegamento elettrico
AVVERTENZA
Gli standard di sicurezza richiedono la messa a terra dell'apparecchio.
Prima di usare l'apparecchiatura per la prima volta, assicurarsi che l'alimentazione elettrica
corrisponda alla tensione e al tipo di alimentazione riportate nella targhetta della lavastoviglie.
La targhetta di identificazione indica anche la portata del fusibile.
Inserire la spina in una presa antishock elettrico correttamente installata. Non utilizzare
prese multiple, connettori e prolunghe.
Questi componenti potrebbero surriscaldarsi e generare un pericolo d'incendio.
Se necessario, sostituire le prese dell'impianto elettrico domestico. Se occorre sostituire il
cavo elettrico, contattare il servizio di assistenza locale.
La spina deve essere sempre accessibile dopo l'installazione della macchina.
Non staccare mai la spina tirando il cavo. Tirare solo la spina.
Il produttore declina qualunque responsabilità in caso di mancato rispetto delle misure di
sicurezza sopra descritte.
Considerazioni ambientali
Il simbolo
sul prodotto o sulla confezione indica che il prodotto non deve essere
considerato come un normale rifiuto domestico, ma deve essere portato nel punto di
raccolta appropriato per il riciclaggio di apparecchiature elettriche ed elettroniche.
Provvedendo a smaltire questo prodotto in modo appropriato, si contribuisce a evitare
potenziali conseguenze negative, che potrebbero derivare da uno smaltimento inadeguato
del prodotto. Per informazioni più dettagliate sul riciclaggio di questo prodotto, contattare
l’ufficio comunale, il servizio locale di smaltimento rifiuti o il negozio in cui è stato
acquistato il prodotto.
Downloaded from DishWasher-Manual.com Manuals
60
Dove portare gli apparecchi fuori uso?
In qualsiasi negozio che vende apparecchi nuovi oppure si restituiscono ai centri di
raccolta ufficiali della SENS oppure ai riciclatori ufficiali della SENS.
La lista dei centri di raccolta ufficiali della SENS è visibile nel sito www.sens.ch.
Materiale di imballaggio
I materiali di imballaggio sono riciclabili. I componenti in plastica sono identificati mediante
marchi quali >PE <, >PS< ecc. Si prega di smaltire questi materiali di imballaggio conformemente alle norme locali in vigore.
AVVERTENZA
Se l'apparecchio non è più utilizzato:
• Togliere la spina dalla presa.
• Tagliare il cavo di alimentazione, rimuovere la spina ed eliminare entrambi.
• Eliminare i dispositivi di chiusura. Queste azioni sono intese a impedire che i bambini
possano restare chiusi accidentalmente all'interno o trovarsi in analoghe situazioni di
pericolo.
Downloaded from DishWasher-Manual.com Manuals
61
Downloaded from DishWasher-Manual.com Manuals
62
Downloaded from DishWasher-Manual.com Manuals
63
Downloaded from DishWasher-Manual.com Manuals
www.electrolux.com
117955060-00-012009
Per gli accessori e i pezzi di ricambio vogliate visitare il nostro Web Shop:
www.aeg.ch
Downloaded from DishWasher-Manual.com Manuals