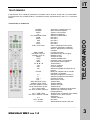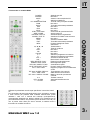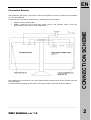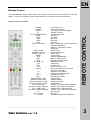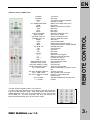
1
MANUALE UTENTE
USER MANUAL
IT
Le informazioni contenute nella presente guida sono intese a fornire un ulteriore supporto per
l’Utente nell’utilizzo del prodotto Hantarex con Windows Media Center integrato.
Le informazioni contenute nel presente documento rappresentano la visione attuale del prodotto con la
versione software disponibile al momento della pubblicazione.
A causa di possibili aggiornamenti da parte di Microsoft, le informazioni potrebbero non descrivere o
riflettere accuratamente il prodotto software pubblicato. La presente guida viene fornita a solo scopo
informativo e non si offrono garanzie, esplicite o implicite, relativamente alla guida o alle informazioni
in essa contenute.
Microsoft, Windows, il logo Windows, il logo Microsoft Internet Explorer, Xbox 360, MSN, il logo MSN, Windows Media, il logo
Start di Windows, Xbox e Xbox Live sono marchi o marchi registrati di Microsoft Corp. negli Stati
Uniti e/o in altri Paesi.
I nomi di società o prodotti esistenti citati nel presente documento potrebbero essere marchi dei rispettivi proprietari.
___________________________________________________________________________
MANUALE WMC rev 1.0
IT
INDICE
Introduzione e panoramica ......................................................................................... 1
Schema di collegamento............................................................................................. 2
Telecomando .............................................................................................................. 3
Windows XP Media Center Edition 2005 Sistema operativo....................................... 4
Windows XP Media Center Edition 2005 Cumulative update2 ................................... 5
Windows XP Media Center Edition 2005 Funzioni...................................................... 6
Operazioni preliminari: configurazione di Media Center...................................... 6.3
Televisione.......................................................................................................... 6.5
Musica .............................................................................................................. 6.13
Immagini ........................................................................................................... 6.17
Video................................................................................................................. 6.21
Riproduzione DVD ............................................................................................ 6.23
Radio ................................................................................................................ 6.25
Online Spotlight ................................................................................................ 6.26
Altri Programmi ................................................................................................. 6.27
Impostazioni...................................................................................................... 6.29
Ulteriori informazioni ................................................................................................... 7
Tecnologia Windows Media Center Extender ........................................................... 8
Suggerimenti e avvertenze ......................................................................................... 9
___________________________________________________________________________
MANUALE WMC rev 1.0
IT
Microsoft e alcuni partner costruttori hanno introdotto una nuova classe di PC dotati di Microsoft
Windows XP Media Center Edition 2005. Media Center offre differenti opportunità d’intrattenimento e
un’esperienza unica, con una completa libertà d’accesso ai suoi contenuti da qualsiasi parte della
stanza e con un singolo telecomando.
I Media Center sono PC desktop completi, equipaggiati con una dotazione hardware e software di tipo
avanzato, allo scopo di offrire contemporaneamente esperienze home entertainment e informatiche
avanzate. I Media Center includono processori di livello medio-alto, e una dotazione di memoria
adeguata per un utilizzo sia tecnico che d’intrattenimento; hard-disk ad alta capienza, lettori Cd-ROM
e DVD. Il sistema presenta, inoltre, capacità audio e video avanzate, unite alle possibilità di
connessione network.
Media Center offre:
• Un telecomando dedicato che controlla tutte le funzioni disponibili con agilità. Al telecomando
possono essere affiancati mouse e tastiera, con la stessa funzionalità da qualsiasi punto della stanza.
• Un sensore ad infrarossi che permette al telecomando di comunicare con Media Center.
• Un sistema grafico avanzato che visualizza la migliore qualità televisiva possibile su monitor.
• Una card di sintonizzazione televisiva che supporta segnali televisivi via cavo, satellite o antenna.
• Un codificatore hardware e software che permette all’utente di registrare programmi televisivi via
cavo, satellite o antenna su hard-disk.
• Un’uscita televisiva che permette di visionare i contenuti di Media Center su una TV connessa ad un
PC.
• Uscite audio (analogiche e digitali) per connessioni agli altoparlanti del PC o ad un sistema di home
entertainment per opzioni di playback esteso.
HANTAREX WMC inside presenta un ulteriore passo di integrazione tra il mondo TV e le nuove
funzionalità di un PC Media Center:
PC alloggiato internamente al Flat TV in modo ergonomico
Telecomando unico per attivare tutte le funzioni del PC WMC e del Flat TV Hantarex
Integrazione del sensore infrarosso per il telecomando WMC
Drastica riduzione dei cavi di collegamento
Modularità del sistema, e’ possibile utilizzare il PC WMC e il Flat TV anche separatamente ed
in modo indipendente
INTRODUZIONE E PANORAMICA
Introduzione e panoramica
___________________________________________________________________________
MANUALE WMC rev 1.0
1
IT
Schema di collegamento
•
•
VIDEO: collegamento con cavo DVI
AUDIO: collegare l’uscita LINE OUT del PC (fare riferimento alla scheda tecnica presente
nella documentazione dello stesso) all’ingresso PC AUDIO del Flat TV
Dopo aver effettuato tutti i collegamenti accendere il sistema mediante l’interruttore generale, e
successivamente premere il tasto di avvio del PC.
Per una corretta visualizzazione dell’immagine, fare riferimento al Manuale Utente LCD TV nella
sezione relativa al collegamento PC.
SCHEMA DI COLLEGAMENTO
Dopo aver posizionato l’apparecchio, procedere ai collegamenti dei vari segnali d’ingresso al Flat TV
facendo riferimento allo specifico Manuale Utente LCD TV.
Collegare l’unità PC al Flat TV come indicato nel seguente schema di collegamento:
___________________________________________________________________________
MANUALE WMC rev 1.0
2
IT
TELECOMANDO
Il telecomando unico Hantarex permette di controllare tutte le funzioni sia del Flat TV che del WMC.
Per passare da una modalità all’altra, è necessario premere rispettivamente i tasti “TV” e “PC/Green
Button”.
POWER
SOURCE
MUTE
TV
PC / GREEN BUTTON
MON
BACK
APP
EPG
DTVm
CTRL / DVD menu
SIZE / GUIDE
PICTURE / REC TV
SOUND / LIVE TV
MENU
TEXT
EXIT
INFO
▲, ▼, ►, ◄
OK
STILL
PIP
FOCUS
P+
PVOL +
VOL RED / DELETE / PLAY
GREEN / SKIP / REW
YELLOW / INSERT / FWD
BLUE / REPLACE / STOP
TXT ? / MTS / REC
TXT stop / SLEEP / REPLAY
TXT i / TIME / SKIP
TXT zoom / PREPG / PAUSE
0..9
DTV / ALPHA
-/-- / CLEAR
Accensione / spegnimento TV
Menù selezione ingressi
Azzera il volume audio
Abilita la modalità TV
Abilita la modalità WMC
Non attivo
Non attivo
Non attivo
Non attivo
Non attivo
Video - Regolazione luminosità,
contrasto, saturazione, nitidezza
Grafica - Regolazione luminosità,
contrasto
Formato immagine
Impostazione tipo di immagine
Modalità sonora
Accesso al menù
Teletext (ON/MIX/OFF)
Uscita da menù o da sottomenù
Informazione sulla sorgente
Tasti direzione
Tasto di conferma
Fermo immagine
Seleziona modalità di PIP (Picture in
Picture)
Modo PIP: seleziona focus e audio
principale o secondario
Seleziona programma successivo
Seleziona programma precedente
Aumenta il volume
Diminuisce il volume
Teletext RED
Teletext GREEN
Teletext YELLOW
Teletext BLUE
Teletext info / Selezione canale audio
Teletext stop / Selezione tempo
autospegnimento
Teletext index / Visualizza orario attuale
Teletext zoom / Ultimo canale
selezionato
Tastiera numerica
Non attivo
Abilita selezione canali a due cifre
TELECOMANDO
Telecomando in modalità TV
___________________________________________________________________________
MANUALE WMC rev 1.0
3
IT
POWER
SOURCE
MUTE
TV
PC / GREEN BUTTON
MON
BACK
APP
EPG
DTVm
CTRL / DVD menu
SIZE / GUIDE
PICTURE / REC TV
SOUND / LIVE TV
MENU
TEXT
EXIT
INFO
▲, ▼, ►, ◄
OK
STILL
PIP
FOCUS
P+
PVOL +
VOL RED / DELETE / PLAY
GREEN / SKIP / REW
YELLOW / INSERT / FWD
BLUE / REPLACE / STOP
TXT ? / MTS / REC
TXT stop / SLEEP / REPLAY
TXT i / TIME / SKIP
TXT zoom / PREPG / PAUSE
0..9
DTV / ALPHA
-/-- / CLEAR
Spegnimento PC
Non attivo
Azzera il volume audio del PC
Abilita la modalità TV
Torna al menù principale di WMC
Non attivo
Torna alla schermata precedente
Non attivo
Non attivo
Non attivo
Avvia menù di riproduzione DVD
Apre la guida TV
Visualizza elenco registrazioni
Visualizza TV WMC a tutto schermo
Non attivo
Visualizza Teletext WMC
Torna alla schermata precedente
Fornisce dettagli sul media
selezionato
Tasti direzione
Tasto di conferma
Non attivo
Non attivo
Non attivo
Seleziona programma successivo
Seleziona programma precedente
Aumenta il volume del PC
Diminuisce il volume del PC
Esegue il media selezionato
Riavvolgimento rapido
Avanzamento rapido
Ferma il media in esecuzione
Registra il programma TV selezionato
su HD
Torna indietro di una traccia
Salta alla traccia successiva
Mette in pausa la riproduzione
corrente
Tastiera numerica
Attiva tastiera alfanumerica
CLEAR
TELECOMANDO
Telecomando in modalità WMC
Utilizzare la pulsantiera numerica per specificare i numeri dei canali
TV.
Per l’immissione di testo nelle applicazioni che lo richiedono, premere
il tasto ALPHA per passare nella modalita’ alfanumerica, quindi
utilizzare i tasti con il metodo del multi-tap (multi-pressione),
comunemente adoperato sui telefoni cellulari (una pressione per la
prima lettera del bottone, due pressioni per la seconda e così via). Se
non si preme alcun tasto per alcuni secondi, la tastiera torna a
funzionare in modalita’ numerica.
___________________________________________________________________________
MANUALE WMC rev 1.0
3.1
IT
Sistema operativo Microsoft Windows XP Media Center Edition 2005
Windows XP Media Center Edition 2005 disponibile preinstallato sui Media Center PC, presenta
avanzate capacità di calcolo, oltre ad un pratico sistema d’intrattenimento digitale integrato – TV in
tempo reale e registrata, film, musica, foto e radio – che puoi goderti come e dove vuoi. Tutti i media
digitali sono raggruppati in un unico apparecchio, e sono accessibili sia sui monitor PC sia su TV,
utilizzando un singolo telecomando.
Con Media Center puoi mettere in pausa, e addirittura riavvolgere, TV e radio in tempo reale,
registrare un’intera serie TV, guardare DVD e video, organizzare e ascoltare la vostra collezione
musicale, mostrare foto digitali, ascoltare radio dal vivo.
Windows XP Media Center Edition presenta un avanzato sistema di computer e d’intrattenimento, in
un unico apparecchio ed è costruito intorno a Windows XP Professional, potenziato dalle avanzate
capacità d’intrattenimento digitale, unicamente sviluppate per le piattaforme Media Center PC.
Rivoluziona il tuo PC di casa trasformandolo nel centro dell’home-entertainment sintonizzato su di te!
Performance e affidabilità
Basato sul sistema operativo Windows XP Professional
Connettività e comunicazione
Procedure guidate e strumenti per la rete domestica.
- Procedure guidate di connessione in rete
- Firewall per la connessione Internet, per la sicurezza del tuo PC
- Condivisione della connessione Internet: consente di condividere una connessione Internet
tra più computer
Microsoft Internet Explorer 6
Windows Messenger
Giochi in Internet
Strumenti per contenuti digitali
Windows Movie Maker (disponibile attraverso download)
Windows Media Player 9 Series
Strumenti di Windows XP per il ritocco delle fotografie
Caratteristiche principali di Media Center
Schermate di menu di facile navigazione
o Navigazione tramite telecomando, mouse o tastiera
o Prompt audio personalizzabili
o Effetti di transizione e sfondi animati
o Finestra di esecuzione: visualizza i contenuti correnti mentre si sfogliano i menu
Impostazioni per il controllo "Parental"
Notifica delle telefonate: notifica su schermo le chiamate in arrivo e visualizza il numero di
telefono (non compatibile con tutti i servizi dial-up)
Procedure guidate d’installazione di Media Center: aiuta a configurare i segnali TV, i decoder
e le connessioni Internet
SISTEMA OPERATIVO
Microsoft® Windows® XP Media Center Edition 2005 offre in modo semplice funzionalità integrate
d’intrattenimento digitale e di computing avanzato, da usare come e quando vuoi. Il divertimento è a
portata di mano attraverso un'unica, semplice interfaccia ed è accessibile utilizzando il tasto verde di
un solo telecomando. Puoi mettere in pausa e riavvolgere TV e radio mentre ne fruisci. Registrare
secondo la tua programmazione e guardare i tuoi programmi televisivi e film preferiti quando vuoi.
Trovare e ascoltare la musica trasformando il Media Center nel tuo DJ. Guardare in sequenza le
fotografie digitali e i filmati amatoriali. Entra in un mondo d’intrattenimento disponibile "on demand".
È facile: basta prendere il telecomando Media Center, rilassarsi davanti alla tua televisione, al tuo
schermo piatto o al monitor del tuo PC e... divertirsi.
___________________________________________________________________________
MANUALE WMC rev 1.0
4
TV e registrazioni video
TV
o Visualizzazione widescreen o a finestra
o Sottotitoli con disattivazione automatica audio
o Pausa di un programma TV fino a 29 minuti
o Riavvolgimento o avanzamento veloce TV
o Avanzamento in avanti o indietro di 29 o 7 secondi
o Avanzamento per fotogramma
Guida ai programmi
o Tabella degli orari dei programmi TV su schermo (fino a 14 giorni)
o Dettagli dei programmi: descrizione, elenco attori, giudizi e altre informazioni
o Visualizzazione di titolo, parola chiave o ricerca per categoria
o Elenchi filtrati per genere
o Aggiornamento automatico della Guida
o Le registrazioni di show o di programmi a puntate sono impostate facilmente mentre si
sfoglia l'elenco
Registrazioni di video per uso personale (PVR, Personal Video Recording)
o Registrazione: registra il programma in corso premendo un tasto
o Registrazione per parola chiave: imposta automaticamente l'orario di registrazione per
categoria, titolo, attore, o regista
Registrazione manuale: impostazioni tipo VCR per la registrazione dei programmi
Riattivazione per registrazione: dalla modalità stand-by il PC si riattiva per
registrare i programmi all'orario impostato
o Gestione conflitti: assicura la registrazione dei programmi anche se cambia l'orario di
trasmissione
o Gestione archiviazione: permette di scegliere il livello di qualità e la dimensione del
file del programma registrato
Film e video
Riproduzione DVD completa di tutte le funzionalità
o Accesso alle funzionalità DVD: capitoli, sinopsi, tracce audio alternative, inquadrature
telecamera multiple e altro ancora.
o Controlli "Parental"
Catalogo video digitale
o Riproduzione video da Video o direttamente dai dispositivi collegati
o
o
Musica
Visualizzazione di album, artisti o genere musicale: ricerca e classificazione di brani musicali
in base ad album, artista o genere.
Visualizzazione widescreen: effetti cool che si muovono al ritmo della musica.
Informazioni sul brano in esecuzione: titolo, durata, artista, titolo album, copertina album.
Elenchi personalizzati: creazione di una compilation in base alla scelta personale.
Elenchi automatici: Media Center crea compilation automatiche basate sui gusti musicali.
Acquisti musica: per trovare nuovi brani musicali basta premere un tasto.
Immagini
Modalità automatica di presentazione di diapositive con effetti di transizione opzionali e
musica in sottofondo.
Comandi Ruota, Zoom, Pan, Modifica e Stampa
Accesso diretto alle fotografie dall'archivio contenuti.
SISTEMA OPERATIVO
IT
Radio
Radio FM e Internet
Preselezione e ricerca delle stazioni radio.
Pausa e riavvolgimento trasmissioni radiofoniche
Replay immediato: torna indietro di 7 secondi.
___________________________________________________________________________
MANUALE WMC rev 1.0
4.1
IT
Online Spotlight
Siti web per guardare o comprare i più recenti brani musicali, trailer dei film, notizie dal mondo
dell'entertainment e altro ancora.
Windows Media 9 Series è integrato in Media Center e fornisce tutta una molteplicità di benefici per la
riproduzione di media audio e video:
Prestazioni migliorate: completamente ridisegnata, la serie Windows Media 9 Media Library
produce risposte più veloci per l’ascolto e la riproduzione dei media digitali, particolarmente
nel caso di librerie di media di grandi dimensioni. Esecuzione e avvio del media sono stati
migliorati.
Supporto per Windows Media Audio e la serie Video 9: i più recenti aggiornamenti nelle
tecnologie di compressione di Windows Media producono audio e video d’alta qualità ai bit
rate esistenti, qualità superiore nel rate del dial-up, e un’esperienza di qualità home-theater
per le connessioni a banda larga, o per il download e play.
Rifiniture Video: per media a basso contenuto di bit-rate, la rifinitura video può ridurre la
“scattosità” nella riproduzione video, aggiungendo i frame mancanti del video.
Auto Crossfading: questa caratteristica mixa automaticamente i livelli audio esistenti tra la fine
di una canzone e l’inizio della successiva. E’ possibile configurare la lunghezza del crossfade.
Auto-monitoraggio di files e cartelle: se sono presenti file musicali su drivers o PC diversi, o
file musicali scaricati dalla rete in cartelle differenti, è possibile aggiungerli alla propria lista,
così da ritrovarli automaticamente nella propria libreria dei media.
Auto info: dall’interno di Media Player è possibile aggiungere o sistemare dettagli degli album
musicali come autore, anno, genere e copertina dell’album per la vostra collezione già
presente di WMA e MP3.
SISTEMA OPERATIVO
Audio e video
La tecnologia di Windows Media 9 Series offre un'eccezionale qualità audio e video, un supporto
software per il sound surround 5.1 completo, un display widescreen 16:9 compatibile, oltre ad una
procedura guidata di calibrazione del display per configurare la risoluzione migliore per la
visualizzazione e per configurare il televisore e l'ingresso segnale.
___________________________________________________________________________
MANUALE WMC rev 1.0
4.2
IT
Novità dell’aggiornamento cumulativo 2 per Windows XP Media
Center Edition 2005
L’aggiornamento cumulativo 2 per Windows XP Media Center Edition 2005, disponibile
gratuitamente dal 14 Ottobre 2005 nelle aree di download del sito Microsoft, include una serie
considerevole di miglioramenti alle prestazioni e alcune nuove funzionalità concepite per ottimizzare
l’utilizzo di Media Center.
Stabilità e affidabilità superiori
-
Ottimizzato per prestazioni stabili e maggiore velocità. L’aggiornamento cumulativo 2
consente prestazioni superiori, da un'esplorazione più fluida a una migliore qualità di TV, video e
audio.
-
Supporto di Xbox 360. Xbox 360™, il sistema di intrattenimento e video game di prossima
generazione il cui rilascio è previsto per l'America del nord nella seconda metà del 2005, sarà
dotato di funzionalità Media Center Extender incorporata, predisposta per l'utilizzo immediato. Tale
funzionalità, in combinazione con il più recente aggiornamento software, l’aggiornamento
cumulativo 2 per Windows XP Media Center Edition 2005, offrirà accesso senza problemi a
musica digitale, video, foto, film e programmi televisivi standard e ad alta definizione nei PC basati
su Media Center Edition 2005, mediante qualsiasi console di gioco Xbox 360 disponibile in casa.
Nuove funzionalità di Media Center
-
Modalità di assenza. Si tratta di una nuova funzionalità che apporta a Media Center PC le
caratteristiche
di
comodità,
prestazioni,
utilizzo
indisturbato
e
capacità
di
accensione/spegnimento istantanei tipiche dei dispositivi elettronici per gli utenti finali. La modalità di
assenza rappresenta un’evoluzione degli attuali sistemi di risparmio energetico per PC. Il sistema
sembra spento, ma in effetti si trova in modalità a basso consumo ed esegue attività automatiche,quali
la registrazione di programmi televisivi e la trasmissione di contenuto in streaming ad un Media
Center Extender (la modalità di assenza è disponibile solo su alcuni nuovi Media Center PC).
-
Miglioramenti alla masterizzazione di DVD. Grazie agli aggiornamenti per il modulo di
masterizzazione di Sonic DVD, le prestazioni e le funzionalità di masterizzazione DVD in Media
Center risultano ulteriormente migliorate. Ora gli utenti possono masterizzare su DVD contenuti da
altre postazioni in rete, ad esempio da un dispositivo Media Center Extender.
-
Zoom avanzato. Un’ulteriore impostazione di zoom consente di ottimizzare le trasmissioni televisive
per gli schermi TV widescreen.
-
Supporto DVB-T. Ora gli utenti possono ricevere trasmissioni video digitale terrestri (DVB-T,
Digital Video Broadcast), nei Paesi dove questi sono disponibili.
-
Attività di ottimizzazione automatiche. Per garantire la corretta esecuzione di Media Center PC, le
attività di ottimizzazione vengono eseguite automaticamente alle ore specificate dall’utente.
AGGIORNAMENTI
Aggiornamenti di Windows® Media Center Extender
___________________________________________________________________________
MANUALE WMC rev 1.0
5
IT
Funzionalità di Windows XP Media Center Edition 2005
MEDIA CENTER: IL MEGLIO DELL’INTRATTENIMENTO DIGITALE DA UN’UNICA
POSTAZIONE
Progettato per l’interazione con un telecomando, Media Center è un valido strumento per divertirsi
con l’home entertainment. Dotato di un design elegante, Media Center è caratterizzato da transizioni
animate e menu di facile utilizzo.
FUNZIONI
L’utente può mettersi comodo in qualsiasi punto della stanza e riprodurre un DVD, ascoltare musica o
la radio, oltre che guardare, sospendere e registrare programmi televisivi in diretta. È possibile
utilizzare la visualizzazione a schermo intero di Media Center o la finestra di anteprima per godersi i
contenuti multimediali mentre si svolgono altre attività. Se poi ci si dimentica il telecomando sul
divano o si è seduti alla scrivania, è sufficiente toccare il mouse per visualizzare i comandi sul
desktop e controllare la sessione di intrattenimento utilizzando mouse e tastiera.
Schermata di avvio di Media Center. I collegamenti consentono di accedere
rapidamente alle funzionalità utilizzate più spesso.
Funzionalità di Media Center
•
•
•
Visualizzazione a schermo intero. La schermata iniziale di Media Center integra tutti i
contenuti multimediali ed è concepita per la visualizzazione e l’interazione tramite
telecomando.
Modalità con finestra. Consente di guardare la TV in una finestra ridimensionabile mentre si
utilizza il PC.
Finestra di anteprima. Il contenuto multimediale riprodotto al momento viene visualizzato in
una finestra di anteprima durante l’esplorazione di Media Center. Le informazioni multimediali,
quali nome e durata dei brani, identificano la selezione corrente.
___________________________________________________________________________
MANUALE WMC rev 1.0
6
•
•
•
•
•
•
•
•
•
•
•
Menu ciclico. Il menu di Media Center è ciclico per consentire un accesso rapido al tipo di
intrattenimento desiderato.
Comandi sul desktop. Allo spostamento del mouse, vengono visualizzate la barra degli
strumenti di riproduzione e la barra degli strumenti dei collegamenti di Media Center, che
garantiscono un pieno controllo delle attività multimediali in corso mentre si è seduti davanti a
Media Center PC.
Controllo volume su schermo. Una visualizzazione su schermo mostra il livello del volume e
indica quando l’audio è disattivato.
Aspetto e funzionalità coerenti. Le schermate dei menu di facile utilizzo offrono avvisi audio
personalizzabili, transizioni animate e sfondi. Caratteri, layout e transizioni rimangono coerenti per
qualsiasi tipo di intrattenimento e in Windows XP.
Supporto avanzato del formato 16:9. Media Center consente di utilizzare al meglio gli schermi
widescreen, fornendo un maggior numero di elementi in alcuni menu, comprese anteprime di
foto e video ed elementi della Guida TV. Mentre si riproduce un DVD o si assiste a un
programma televisivo è possibile estendere le proporzioni dell’immagine, ridurla o ingrandirla o
visualizzarla nel formato originale.
Opzioni Impostazioni. Il menu Impostazioni consente di attivare o disattivare effetti sonori,
nonché animazioni di sfondo e di transizione.
Notifica di chiamate telefoniche. Un avviso sullo schermo notifica istantaneamente la
ricezione delle chiamate telefoniche, visualizzando il numero di telefono (* funzionalità disponibile
solo in alcuni Paesi, è inoltre necessario un modem in grado di identificare il chiamante e un
servizio telefonico che consenta tale identificazione).
Design migliorato per un controllo più facile e veloce. Le voci di menu presentano un nuovo
tipo di carattere che ne facilita la lettura a distanza.
Più scelte di menu. Nella schermata di avvio di Media Center quando l’utente evidenzia una
selezione di menu può scegliere tra le voci utilizzate di recente..
Windows Messenger per Media Center. Ora Windows Messenger è integrato in Media
Center, quindi è possibile sapere quando gli amici sono in linea e inviare messaggi
immediati a qualsiasi nominativo dell’elenco contatti. L’utente può partecipare a chat con gli amici
per commentare il programma visualizzato, fissare un orario per incontrarsi o semplicemente
contattare i familiari ovunque si trovino.
Masterizzazione di contenuti multimediali su CD o DVD. Utilizzando il telecomando è possibile
creare su CD o DVD una compilation personalizzata comprendente i programmi televisivi registrati,
musica, immagini e filmati memorizzati in Media Center (la funzionalità di masterizzazione DVD è
disponibile come opzione OEM).
FUNZIONI
IT
Esercizio pratico
•
•
Utilizzare i tasti di spostamento (frecce/puntatori) e il pulsante OK sul
telecomando per passare da un tipo di intrattenimento a un altro. È inoltre
possibile spostarsi in Media Center con la tastiera (utilizzando i tasti freccia e
INVIO) e il mouse.
Se Media Center PC è collegato a uno schermo widescreen (formato 16:9), è
possibile controllare la visualizzazione del contenuto video. Mentre si guarda
un DVD, un filmato o un programma televisivo, premere Ulteriori
informazioni/Dettagli per alternare tra le modalità di zoom. Si può scegliere
di estendere le proporzioni dell’immagine, ridurla o ingrandirla o visualizzare
il contenuto nel formato originale.
___________________________________________________________________________
MANUALE WMC rev 1.0
6.1
IT
Opzioni utente e di alimentazione
Windows Media Center Edition 2005 offre varie opzioni utente e di risparmio energia accessibili dal
menu di avvio di Media Center.
Le opzioni comprendono:
NOVITÀ Modalità di assenza. Introdotta nell’aggiornamento cumulativo 2, la modalità di assenza
consente un funzionamento analogo a quello dei dispositivi elettronici di fascia consumer,
purché l’hardware sia supportato (la modalità è disponibile solo su alcuni PC nuovi). In questa
modalità il sistema può eseguire attività automatiche, mentre sembra spento. Grazie alla
modalità di assenza, gli utenti possono spegnere e accendere Media Center come se fosse un set-top
box, un lettore CD/DVD o un masterizzatore DVR.
Media Center PC in modalità di assenza è pronto per l’utilizzo in pochi secondi, quando si preme il
tasto di accensione o il pulsante verde di Media Center sul telecomando. Altre periferiche a
infrarossi, ad esempio da una tastiera senza fili o da altri pulsanti sul telecomando, non
consentono di disattivare la modalità di assenza: in questo modo non è possibile tornare
involontariamente a Media Center da questa modalità.
Ad esempio, durante la visione o registrazione di programmi televisivi, l’ascolto di musica o
l’esecuzione di una presentazione, è possibile premere il pulsante di spegnimento sul telecomando
o sul PC. Il sistema sembrerà spento, le immagini scompaiono dallo schermo e gli altoparlanti
vengono disattivati, mentre la registrazione del programma televisivo continua in background. Le
presentazioni e/o la riproduzione di musica si arrestano fino
al ritorno dell’utente. Quando il PC è in modalità di assenza, è sufficiente inserire un CD o DVD
nella relativa unità per riattivare il sistema, gli altoparlanti e lo schermo e riprodurre immediatamente il
contenuto.
FUNZIONI
Chiudi Media Center. Consente di chiudere l’interfaccia Media Center e di visualizzare il desktop.
Disconnetti. Consente di chiudere l’account utente senza arrestare il computer e di disconnettersi
o passare quindi a un altro utente tramite il telecomando.
Arresta il sistema. Consente di spegnere il computer (se abilitato, quando si seleziona Arresta il
sistema Media Center PC entra in modalità di assenza – vedere più avanti).
Riavvia. Consente di riavviare il computer.
Standby. Consente di porre il computer in uno stato a basso consumo (i monitor e i dischi rigidi si
spengono), lasciando aperti applicazioni e file sul desktop.
___________________________________________________________________________
MANUALE WMC rev 1.0
6.2
IT
OPERAZIONI PRELIMINARI: CONFIGURAZIONE DI MEDIA CENTER
Windows XP Media Center Edition 2005 consente di configurare Media Center in base al tipo
specifico di schermo, agli altoparlanti installati, al tipo di segnale TV e ad altre impostazioni. In pochi
semplici passaggi, Media Center viene ottimizzato per garantire la migliore qualità in base
all’hardware disponibile e alla configurazione della stanza.
Per configurare Media Center è necessario completare due sezioni:
Configurazione obbligatoria. Media Center verifica componenti quali la rete, la connessione Internet
e il telecomando.
Configurazione facoltativa. È possibile configurare funzionalità e impostazioni avanzate per
soddisfare le proprie esigenze:
Configurare sintonizzatori, segnale TV e Guida TV
Ottimizzare l’aspetto di Media Center sullo schermo
Configurare altoparlanti stereo e surround
Utilizzare il telecomando o la tastiera e il mouse per spostarsi nelle schermate di configurazione e operare
le selezioni desiderate. Tenere a portata di mano le informazioni relative al CAP o all’indicativo del
Paese e al fornitore di servizi TV. Tali informazioni saranno necessarie per configurare la Televisione
e la relativa Guida TV.
Per utilizzare la Guida TV e programmare le registrazioni, è necessario connettere Media Center PC a
Internet. Una connessione Internet attiva è necessaria anche per scaricare le informazioni su
CD/DVD, ad esempio le immagini di anteprima delle copertine degli album e i titoli dei brani.
OPERAZIONI PRELIMINARI
Configurazione guidata di Media Center
___________________________________________________________________________
MANUALE WMC rev 1.0
6.3
IT
Taratura guidata dello schermo
Una serie di test di taratura dello schermo consente di ottimizzarne le impostazioni:
Centratura e ridimensionamento su schermo. Centra l’immagine e assicura le proporzioni
corrette a seconda del tipo di schermo.
Proporzioni (forma). Assicura che le forme, ad esempio cerchi e linee rette, vengano
rappresentate con precisione sullo schermo.
Luminosità. Regola la visibilità dei colori scuri e delle ombre.
Contrasto. Regola il livello e la chiarezza del colore bianco.
Colore. Regola l’accuratezza dei colori sullo schermo.
Nitidezza (risalto bordi). Influisce sulla rappresentazione degli angoli sullo schermo.
Per avviare la Taratura guidata dello schermo, selezionare Impostazioni > TV > Generale > Regola
impostazioni schermo).
I test di taratura dello schermo consentono di ottimizzare le
immagini visualizzate.
Suggerimenti
• Se si desidera eseguire l’intera Configurazione su un computer già configurato, passare a
Impostazioni nel menu di avvio di Media Center e scegliere Generale. Selezionare
Configura Media Center, quindi scegliere Esegui nuovamente configurazione Media Center.
• Per verificare una parte della configurazione guidata, aprire Impostazioni nel menu di avvio
di Media Center e scegliere Generale. Da tale posizione, provare
a eseguire le procedure guidate in Configurazione telecomando e Configurazione
connessione Internet.
OPERAZIONI PRELIMINARI
La Taratura guidata dello schermo è uno strumento sofisticato che aiuta a ottenere la migliore qualità
di riproduzione video possibile per il tipo specifico di schermo in uso. La procedura guidata pone una serie
di semplici domande per stabilire il tipo di schermo utilizzato, quindi genera una guida personalizzata che
configura lo schermo per fornire un’immagine video luminosa, nitida e a colori vivaci.
___________________________________________________________________________
MANUALE WMC rev 1.0
6.4
IT
TELEVISIONE
Scenario utente
Il supporto di due sintonizzatori consente di guardare e registrare contemporaneamente due spettacoli
diversi, assicurando maggiore flessibilità nella visione e registrazione dei programmi televisivi.
Giorgio sfoglia l’elenco dei telefilm gialli, seleziona quello desiderato e preme il pulsante Rec (Registra) sul
telecomando. Passa alla sitcom e si gode un episodio veramente divertente. Mezz’ora dopo, Giorgio
decide di guardare un film e di
conservare il telefilm giallo per
il fine settimana. Seleziona
Film dal menu principale di
Televisione. Utilizzando i
pulsanti sfoglia gli elenchi
alfabetici per individuare i film
attualmente in
programmazione. Seleziona un
elenco evidenziato per
visualizzare il riepilogo degli
attori del cast
e leggere una recensione.
Certo di aver trovato il film più
adatto
a lui in quel momento, si mette
comodo. Durante la scena
iniziale, squilla però il telefono.
Giorgio preme allora il
I programmi TV registrati sono organizzati in un elenco
pulsante Pausa sul telecomando
facile da consultare.
per interrompere la diretta,
risponde al telefono, ringrazia l’amico per la bella serata e pochi minuti dopo si siede di nuovo in
poltrona. Per la terza volta questa sera non ha perso un secondo dei suoi programmi, preme Play
(Riproduci) e la proiezione del film si riavvia esattamente da dove si era interrotta.
TELEVISIONE
Giorgio torna a casa da una cena con gli amici appena in tempo per godersi i programmi TV di prima
serata. Si mette comodo, prende il telecomando di Media Center e avvia la Guida TV di Media Center.
Prima di immergersi in uno dei suoi programmi preferiti deve decidere quale guardare: la sitcom inizia
tra pochi minuti... ma contemporaneamente viene trasmessa anche l’ultima puntata del suo telefilm giallo
preferito.Ha voglia di ridere, quindi la decisione è facile.
Televisione - in sintesi
Il controllo completo della visione televisiva: il menu Televisione offre un’ampia gamma di funzionalità che
consentono di guardare i programmi preferiti esattamente quando lo si desidera.
Grazie alla videoregistrazione digitale è semplicissimo pianificare le registrazioni degli spettacoli e delle
serie preferite e assumere il pieno controllo di quando e come guardare la TV. Una griglia di 14
giorni di programmazione televisiva sullo schermo rappresenta una comoda posizione per trovare i
programmi desiderati. È persino possibile pianificare le registrazioni mentre si sfoglia la Guida TV;
è sufficiente evidenziare un elenco di programmi, premere Rec (Registra) e il programma sarà
pronto per la visione dal menu Registrazioni quando desiderato.
___________________________________________________________________________
MANUALE WMC rev 1.0
6.5
IT
Televisione consente di controllare anche i programmi televisivi in diretta. Mentre si guarda la TV,
premere il pulsante di Pausa sul telecomando per sospendere il programma fino a 30 minuti.
Quando si è pronti è sufficiente premere Play per riprendere la visione, è anche possibile premere
Skip (Ignora) per saltare 29 secondi, oppure riavvolgere e avanzare rapidamente nel programma
registrato come si preferisce con i tasti avanzamento o riavvolgimento veloci (FWD e REW). Grazie
a Windows Media Center non si rischia di perdere nemmeno un secondo dei programmi preferiti.
Il supporto di due sintonizzatori in Windows XP Media Center Edition 2005 consente di guardare
uno spettacolo mentre se ne registra un altro o registrare due programmi diversi
contemporaneamente.
Il menu Televisione comprende quattro aree principali: Guida TV, TV, Registrazioni e Ricerca.
Guida TV
Finestra di anteprima. Mentre si sfoglia la Guida TV, in una finestra viene visualizzato il
contenuto multimediale riprodotto attualmente.
Channel Guide. Selezionare l’icona di un canale nella griglia della Guida TV per visualizzare
l’elenco dei programmi previsti per tale canale.
Possibilità di impostare le registrazioni dall’interno della Guida TV. Sfogliare la Guida TV
per individuare un programma o una serie da registrare, evidenziare l’elenco dei programmi,
quindi premere il pulsnate Rec (Registra).
Il Controllo genitori consente di bloccare la programmazione TV in base alle scelte dei
genitori. È possibile bloccare tutti i film, bloccare i film senza classificazione e/o impostare la
classificazione massima consentita per i film e i programmi televisivi.
Aggiornamenti automatici della Guida. Media Center può aggiornare automaticamente
gli elenchi dei programmi TV da Internet una o due volte al giorno; in alternativa, è possibile
aggiornare manualmente la Guida TV in qualsiasi momento.
Supporto del formato 16:9. Negli schermi widescreen, la griglia della Guida TV presenta
30 minuti aggiuntivi di elenchi di programmi TV.
Demo introduttiva
Avvio della Guida TV
Premere il pulsante Guide (Guida TV) sul telecomando per accedere rapidamente alla Guida TV.
Vengono visualizzati il titolo del programma, il canale e la fascia oraria. Quando si seleziona il titolo di
un programma durante la sua riproduzione, la finestra di visualizzazione viene ingrandita
automaticamente a schermo intero.
TELEVISIONE
Se disponibile, la Guida TV è una comoda posizione per individuare i programmi che si desidera
guardare e registrare. Aggiornata con le informazioni dei provider di servizi TV, la Guida TV offre
una visualizzazione a griglia per un massimo di 14 giorni di programmazione. È gratuita per gli utenti di
Windows XP Media Center Edition 2005: è sufficiente una connessione Internet per ricevere gli elenchi
aggiornati dei programmi. Le funzionalità comprendono:
Ricerca nella Guida TV
Utilizzare le frecce dei canali/pagine (+ o -) per esaminare sette selezioni per volta. Le frecce in alto, in
basso e laterali consentono di ottenere informazioni aggiuntive. Premere il pulsante Skip (Ignora) o
Replay (Ripeti) per saltare avanti/indietro di 12 ore e premere il pulsante FWD (Avanzamento rapido)
o REW (Riavvolgi) per saltare avanti/indietro di 3 ore
___________________________________________________________________________
MANUALE WMC rev 1.0
6.6
IT
Filtro elenchi programmi della Guida TV
Mentre si sfoglia la Guida TV, selezionare i filtri dei generi per visualizzare solo programmi di
contenuto specifico, ad esempio sport, film, notizie, speciali o programmi per bambini. All’interno della
Guida TV, premere il pulsante Guide (Guida) per accedere all’opzione filtro corrispondente. I filtri della
Guida TV mostrano solo gli elenchi di programmi di un genere specifico, consentendo di individuare
rapidamente gli spettacoli da guardare e registrare.
Visualizzazione delle informazioni sui programmi
Negli elenchi di programmi della Guida TV, selezionare il titolo di un programma per visualizzarne i dettagli, ad
esempio la durata totale e la categoria. Dalla visualizzazione Informazioni programma, è possibile impostare
la registrazione di un singolo episodio o di un’intera serie e trovare altri orari di trasmissione dello
stesso programma.
Selezionare Categorie per scegliere in base ai generi dei programmi, ad esempio filmo sport.
Utilizzare i pulsanti freccia per scorrere i risultati di ricerca. Selezionare Titolo per utilizzare i pulsanti
numerici sul telecomando al fine di immettere una parola del titolo di un programma. Premere OK per
confermare la selezione. Selezionare Parola chiave per utilizzare i pulsanti numerici al fine di immettere
una parola del titolo o della descrizione di un programma. Utilizzare i pulsanti freccia per scorrere i risultati
di ricerca.
Personalizzazione dell’elenco canali della Guida TV
È possibile personalizzare i canali visualizzati nella Guida TV rimuovendo i canali che non si desidera
visualizzare. È possibile eseguire questa operazione nelle impostazioni TV.
Dal menu principale di Media Center, selezionare Impostazioni, TV, quindi Guida TV. Selezionare Modifica
canali. Rimuovere i segni di spunta dai canali che si desidera eliminare dalla Guida TV e
premere OK. Allo stesso modo è possibile reinserire i canali nell’elenco o passare direttamente al
canale desiderato, in qualsiasi momento, utilizzando il tastierino numerico sul telecomando.
Se necessario, è inoltre possibile modificare i numeri dei canali.
TV
È possibile guardare i programmi televisivi preferiti in modalità a schermo intero o in una finestra. Le
funzionalità comprendono:
TV in modalità a schermo intero o con finestra. È possibile guardare la TV in una finestra
utilizzando Media Center PC oppure in modalità a schermo intero a maggiore distanza.
Supporto avanzato del formato 16:9. È possibile alternare le modalità normale, zoom ed
estesa per ottimizzare gli schermi widescreen.
Ottima qualità video. Il segnale video non interlacciato garantisce l’alta risoluzione e la
visualizzazione in scala migliora la qualità offrendo immagini televisive nitide e uniformi sul
monitor del PC.
Sottotitoli automatici. Riportano i dialoghi in formato testo scorrevole nella parte inferiore
dello schermo, in una finestra ticker. Le impostazioni audio consentono di attivare e disattivare
i sottotitoli automatici o attivarli quando l’audio è disattivato.
TELEVISIONE
Ricerca di programmi da guardare e registrare
Effettuare una ricerca nella Guida TV per trovare un programma televisivo immettendo un titolo o
una parola chiave e selezionando una categoria. Per iniziare, premere il pulsante Start sul
telecomando, selezionare Televisione, quindi scegliere Cerca.
___________________________________________________________________________
MANUALE WMC rev 1.0
6.7
IT
Demo introduttiva
Avvio TV a schermo intero
Premere il pulsante Live TV (TV in diretta) sul telecomando per avviare la visualizzazione TV a
schermo intero in qualsiasi attività di Media Center. In alternativa, premere il pulsante Start di Media
Center per attivare il menu di avvio e quindi selezionare Televisione. Se si esegue l’avvio dal menu
Televisione, la riproduzione inizia dell’ultimo canale selezionato.
Cambio canale
Selezionare un canale utilizzando i pulsanti dei canali/pagine (+ o -) oppure i pulsanti numerici sul
telecomando.
Durante il controllo delle registrazioni TV viene
visualizzata una barra di stato, per facilitare lo
spostamento all’interno di un programma.
Comandi intuitivi come quelli di pausa,
riavvolgimento, ripetizione automatica (che
torna indietro di sette secondi), avanzamento
rapido, salto in avanti di 29 secondi e
avanzamento fotogramma per fotogramma,
assicurano il controllo completo della visione.
Visualizzazione delle informazioni sui programmi
Premere Ulteriori informazioni/Dettagli per accedere alle selezioni della finestra sovrapposta in cui
vengono visualizzate le informazioni aggiuntive. Selezionare Ulteriori Informazioni per visualizzare i
dettagli del programma, quali titolo, durata e riassunto. Dalla schermata è inoltre possibile accedere a
opzioni di registrazione, avviare Messenger, regolare impostazioni, visualizzare la Guida in linea e
scegliere altre opzioni.
TELEVISIONE
Pausa e riavvolgimento dei programmi TV in diretta
Nel caso si venga interrotti mentre si guarda un programma, è sufficiente premere il pulsante pausa
sul telecomando per “bloccare” la trasmissione televisiva in diretta finché non si è pronti per
riprendere dallo stesso punto. Poiché il buffer della TV in diretta acquisisce automaticamente gli ultimi
30 minuti di trasmissione, è possibile riavvolgere in qualsiasi momento durante la visione del
programma. Quando si avvia la registrazione durante uno spettacolo, viene incluso anche il
contenuto del buffer, quindi si può guardare il programma dall’inizio.
Visione della TV in una finestra
Per godersi l’intrattenimento di Media Center e contemporaneamente svolgere altre attività, è possibile
attivare Media Center in una finestra ridimensionabile e posizionarla dove desiderato sul desktop.
Spostare il mouse per accedere ai comandi sul desktop. Fare clic sul pulsante Ripristina, quindi utilizzare il
mouse per muovere e ridimensionare la finestra della televisione sul desktop.
Per tornare alla modalità a schermo intero utilizzando il telecomando, premere due volte il
pulsante verde Start.
___________________________________________________________________________
MANUALE WMC rev 1.0
6.8
IT
Visualizzazione delle opzioni di registrazione
Evidenziare il titolo/l’anteprima di un film e premere OK. Dalla visualizzazione Informazioni programma,
è possibile ottenere maggiori informazioni sul film, pianificare una registrazione, impostare opzioni di
registrazione e trovare altri orari di programmazione del film selezionato.
Visualizzazione di dettagli e recensioni sui film
Le informazioni dettagliate sui film sono sempre a portata di mano. È possibile visualizzare i nomi di
regista e protagonisti e trovare altri film diretti dallo stesso regista o con gli stessi attori. Inoltre sono
disponibili recensioni e si possono trovare film simili, altrettanto piacevoli.
Grazie a Windows XP Media Center Edition 2005 risulta particolarmente semplice registrare
programmi televisivi. Il videoregistratore digitale consente di registrare e riprodurre comodamente programmi
televisivi o pianificare la registrazione di spettacoli futuri. L’ampia gamma di opzioni di registrazione
consente di registrare un singolo programma o un’intera serie ed eliminare persino le repliche. È inoltre
possibile guardare contemporaneamente un programma registrato mentre se ne sta registrando un
altro in diretta; in particolare, il supporto del doppio sintonizzatore consente di assistere a uno
spettacolo durante la registrazione di un altro oppure di registrarne due allo stesso tempo. Le
funzionalità comprendono:
Aggiornamenti automatici nella pianificazione delle registrazioni. Se cambia la data o
l’orario di trasmissione di una registrazione pianificata, Media Center aggiorna automaticamente
la registrazione in base al nuovo orario.
Gestione avanzata dei conflitti. Questa funzionalità consente di verificare
automaticamente le più recenti informazioni di programmazione nella Guida TV, garantendo
la registrazione dei programmi anche in caso di modifiche alla programmazione. Se una
registrazione è impostata per un orario pianificato in precedenza, un avviso facilita la scelta
del programma da registrare.
Videoregistrazione da Standby. Questa funzione attiva automaticamente Media Center PC
dalla modalità di risparmio energetico per iniziare le registrazioni pianificate.
Avvio anticipato/Arresto ritardato. Si può scegliere di avviare una registrazione in anticipo o
farla terminare più tardi, in modo da non perdere nemmeno un attimo dei programmi registrati.
Demo introduttiva
Registrazione di programmi televisivi in diretta con un singolo tocco
Premere il pulsante Rec (Registra) sul telecomando per registrare il programma televisivo attualmente
trasmesso. La registrazione termina automaticamente all’ora di fine pianificata per il programma.
TELEVISIONE
Registrazioni di programmi televisivi
Pianificazione di una registrazione quando si sfoglia la Guida TV
Mentre si sfoglia la Guida TV, è possibile evidenziare un programma nell’elenco e premere Rec
(Registra) una volta per registrare il programma singolo o premerlo una seconda volta per registrare
l’intera serie. È inoltre possibile impostare le registrazioni dalla visualizzazione Informazioni
programma.
Registrazione automatica di programmi di probabile interesse
Questa funzionalità permette di registrare automaticamente una selezione personalizzata di programmi
televisivi senza dover sfogliare gli elenchi della Guida TV o impostare manualmente una registrazione. La
registrazione per parola chiave trova e registra gli spettacoli futuri che soddisfano i criteri specificati.
Selezionare Registrazioni dal menu principale di Televisione, scegliere Programmazioni, quindi Aggiungi
registrazione e infine Parola chiave. Impostare una registrazione per parola chiave utilizzando il nome
dell’attore o del regista, il titolo del film o del programma o una parola chiave generica.
___________________________________________________________________________
MANUALE WMC rev 1.0
6.9
IT
Impostazione manuale di una registrazione
Per impostare una registrazione personalizzata utilizzando parametri noti, impostati
manualmente (come nel caso dei videoregistratori), selezionare Registrazioni dal menu principale
Televisione, scegliere Programmazioni, quindi Aggiungi registrazione. Selezionare canale e orario.
Specificare una data, l’ora di inizio/fine, il canale e la durata della registrazione. Se desiderato, si può
assegnare un nome alla registrazione e sceglierne la frequenza, ad esempio ogni giorno, ogni
giorno feriale oppure ogni domenica.
Ricerca di programmi registrati
Per cercare programmi registrati, selezionare Televisione, quindi Registrazioni. Utilizzare le frecce
di spostamento sul telecomando per scorrere l’elenco, quindi selezionare un programma registrato per
visualizzare le relative informazioni, incluse descrizione, rete e data di trasmissione originale.
Per organizzare l’elenco, scegliere “Ordina per data” oppure “Ordina per categoria”. I programmi di una
serie vengono raggruppati come voci secondarie, facilitando l’organizzazione dell’elenco per una ricerca
più rapida.
Gestione di un programma registrato
Selezionare un programma registrato nell’elenco, quindi scegliere:
Riproduci per guardare il programma selezionato.
Elimina per rimuovere una registrazione dal disco rigido.
Mantieni fino al per indicare quando eliminare una registrazione.
Registra serie per registrare tutti gli episodi futuri di una serie.
Altri episodi per trovare orari di trasmissione alternativi.
Gestione delle registrazioni pianificate
Selezionare Programmazioni per visualizzare un elenco dei programmi futuri pianificati per la
registrazione.
Scorrere l’elenco utilizzando i pulsanti freccia. È possibile ordinare l’elenco per data o per titolo. Per
visualizzare o modificare una registrazione pianificata, evidenziare un programma, quindi premere OK.
Dal menu Informazioni programma, è possibile modificare le impostazioni di registrazione, indicare
una data massima per il mantenimento di un programma registrato, rimuovere una registrazione
pianificata selezionando Non registrare, visualizzare informazioni su una serie o trovare altri episodi.
TELEVISIONE
Visione e gestione delle registrazioni (Registrazioni)
Registrazioni, disponibile nel menu principale di Televisione, rappresenta la guida personale ai programmi
registrati e a quelli pianificati per la registrazione. La registrazione televisiva viene eseguita in
background e non interferisce con altre applicazioni o attività di Media Center. I programmi possono
essere registrati durante l’utilizzo del PC per altre attività o anche in caso di accesso al computer da
parte di un altro utente. Il PC è inoltre in grado di registrare programmi in modalità di assenza (per
ulteriori informazioni vedere il punto Modalità di assenza nella sezione Nuove funzionalità di Media
Center).
Esercizio pratico
Oltre ad annullare una registrazione in Registrazioni programmate, è possibile annullare una
registrazione pianificata dalla Guida TV o da Cerca utilizzando il pulsante rosso Registra. Premere il
pulsante Registra una volta per registrare un singolo programma o due volte per una serie e una terza
volta per annullare la registrazione della serie.
___________________________________________________________________________
MANUALE WMC rev 1.0
6.10
IT
Visualizzazione dello stato dei programmi registrati (Cronologia)
In Cronologia viene visualizzato un elenco di programmi che non sono stati registrati e viene indicato il
tipo di errore, ad esempio un’operazione annullata dall’utente, problemi con il segnale TV o Media Center
PC o altre cause tecniche specifiche. È possibile utilizzare Ordina per data, Ordina per stato, Ordina
per titolo o Cancella cronologia per rimuovere i titoli elencati. Evidenziare un programma e
selezionare OK per visualizzare dettagli sugli errori.
Impostazione delle priorità di registrazione (gestione conflitti)
Media Center gestisce le registrazioni e avverte in merito ai conflitti di programmazione. Media Center
fornisce una gestione avanzata dei conflitti di registrazione in modo che i programmi futuri vengano
registrati anche se cambiano gli orari di trasmissione stabiliti, gestisce inoltre automaticamente i
conflitti eliminando le repliche e cercando date di trasmissione alternative in caso di variazioni o
sovrapposizioni.
Se si pianificano due registrazioni per lo stesso orario, un messaggio invita a risolvere il conflitto.
Media Center cerca sulla Guida TV orari alternativi per la trasmissione dei programmi e, se
esistono per uno o entrambi gli spettacoli, offre la possibilità di scegliere quello desiderato. La
schermata Priorità registrazione consente di assegnare priorità alle registrazioni TV per essere sicuri che
i programmi importanti vengano registrati. Se si verifica un conflitto fra due programmi, viene registrato
quello contrassegnato come prioritario.
Gestione delle impostazioni di archiviazione registrazioni
Per gestire lo spazio di archiviazione per le registrazioni televisive e regolare la qualità dei programmi
registrati.
-
Dal menu principale di Televisione, selezionare Impostazioni, quindi Impostazioni per
l’archiviazione. Lo spazio disponibile per i programmi televisivi da registrare dipende dalle
dimensioni del disco rigido, dalla percentuale di spazio nel disco rigido destinata ai programmi registrati e
dalla qualità di registrazione selezionata.
-
Scegliere il livello di qualità e le dimensioni file delle registrazioni per ottimizzare lo spazio del disco
rigido. Media Center facilita la gestione dei programmi registrati, consentendo di mantenere una
registrazione finché non la si elimina manualmente, non viene guardata una volta o non è necessario
spazio sul disco rigido per registrare altri programmi.
-
La durata di registrazione disponibile è rappresentata visivamente da una barra di stato, che
mostra con chiarezza la quantità di spazio registrabile e quella utilizzata attualmente dai
programmi registrati e da altro contenuto.
-
Per la migliore qualità di riproduzione, selezionare Massima. Per la durata di registrazione
massima, selezionare Discreta.
TELEVISIONE
Configurazione della modalità di acquisizione delle registrazioni
Il videoregistratore digitale consente di automatizzare gli aspetti complessi della registrazione offrendo la
libertà di configurare la modalità dell'acquisizione.
Dal menu principale di Media Center, selezionare Impostazioni, TV, Videoregistratore quindi Impostazioni
per la registrazione. È possibile scegliere la qualità video, specificare quando le registrazioni
memorizzate devono essere eliminate o sovrascritte, avviare e arrestare le registrazioni vari minuti
prima e/o dopo l’orario pianificato e modificare le opzioni di registrazione per le serie.
___________________________________________________________________________
MANUALE WMC rev 1.0
6.11
IT
La tabella seguente riporta le dimensioni approssimative dei file. Le dimensioni dei file effettive variano
in base al contenuto audio e video dei programmi TV registrati.
Qualità di registrazione
Dimensione file approssimative (velocità di
codifica)
Massima
Ottima
Buona
Discreta
3 GB/ora (6,8 MB/secondo)
2,5 GB/ora (5,8 MB/secondo)
2 GB/ora (4,6 MB/secondo)
1 GB/ora (2,4 MB/secondo)
Come utilizzare al meglio i contenuti ad alta definizione
Windows Media High Definition Video (WMV HD) consente di guardare film straordinari ad alta
definizione. È sufficiente collegare il PC a uno schermo ad alta definizione, ad esempio un televisore
al plasma e a un sistema audio surround per assistere in casa a un’esperienza incredibile, come al
cinema. Inserire un DVD WMV HD nel PC o scaricare un breve WMV HD dal Web.
Per ulteriori informazioni su DVD WMV HD o su film scaricabili, visitare il sito Web all'indirizzo
http://www.wmvhd.com
TELEVISIONE
Suggerimento
Per una maggiore capacità di archiviazione, è possibile aggiungere un disco rigido interno con
partizione in formato NTFS, se lo spazio lo consente, oppure si può connettere un’unità
multimediale esterna NTFS tramite IEEE 1394 o USB 2.0.
Ad esempio, un’unità USB 2.0 esterna di 300 GB dedicata ai programmi televisivi può archiviare
da 100 a oltre 300 ore di programmazione.
___________________________________________________________________________
MANUALE WMC rev 1.0
6.12
IT
Musica
Scenario utente
Musica consente di archiviare tutta la musica in un’unica posizione, creare elenchi di riproduzione
personalizzati e ascoltare brani ovunque ci si trovi.
È venerdì sera. Elena e Davide domattina andranno al mare per un fine settimana di vacanza. Mentre
Elena prepara le valige, Davide pulisce la casa. Per creare l’atmosfera giusta per il fine settimana,
Davide decide di ascoltare l’ultimo album del loro gruppo preferito. Prende il telecomando di Media
Center, preme Start per avviare Media Center e seleziona Musica, cerca l’album desiderato e preme
Play (Riproduci).
Elena fa una pausa: vuole sorprendere Davide con un suo elenco di brani da ascoltare. Il giorno
prima Elena ha creato un elenco di riproduzione personalizzato che riunisce le loro canzoni preferite.
Afferra il telecomando, seleziona Elenchi di riproduzione dal menu Musica, trova il titolo dell’elenco
personalizzato, “Le nostre canzoni”, e preme Play (Riproduci).
Musica - in sintesi
Windows XP Media Center Edition 2005 consente di organizzare e riprodurre in modo
estremamente semplice la musica digitale sul computer da qualsiasi punto della stanza.
La funzionalità Musica di Media Center, basata sulla piattaforma Windows Media, offre la libertà di
godersi la musica da qualsiasi posizione della stanza. È possibile cercare file audio Windows Media
Audio (WMA), MP3 e WAV scorrendo la copertina dell’album o visualizzare elenchi organizzati per
genere o artista. Inoltre, poiché sullo schermo vengono visualizzati brano, album e informazioni
sull’artista, si sa sempre esattamente cosa si sta ascoltando.
È semplice trarre vantaggio dalla funzionalità di ricerca, comoda e intuitiva, per trovare
rapidamente album, artisti, brani o elenchi di riproduzione. Si può inserire un elenco di
riproduzione personalizzato per qualsiasi occasione ed è sufficiente premere un pulsante per
riprodurre in ordine o casualmente elenchi di riproduzione, musica per artista o genere o l’intero
archivio musicale. È persino possibile masterizzare i brani in un elenco di riproduzione su CD.
MUSICA
A Davide piace la compilation musicale e decide di portarla con loro in viaggio, come colonna sonora del
fine settimana. Inserisce un CD-R vuoto nell’unità CD di Media Center PC, seleziona Crea CD dal menu
Attività e cerca l’elenco di riproduzione “Le nostre canzoni”. In pochi minuti, il nuovo CD dal titolo “Le
canzoni del nostro viaggio” è nel porta-CD, pronto per il viaggio.
___________________________________________________________________________
MANUALE WMC rev 1.0
6.13
IT
Panoramica su Musica
Selezionare Musica dalla schermata di avvio di Media Center per individuare, ascoltare e gestire
brani musicali. Nella schermata principale Musica viene visualizzata Musica recente, che fornisce rapido
accesso a CD, album, artisti ed elenchi di riproduzione selezionati nelle sessioni di ascolto recenti. È
possibile utilizzare le opzioni del menu per effettuare una ricerca per album, artista, elenco di
riproduzione, brano o genere.
Album. Consente di visualizzare gli album nel Catalogo multimediale come elenco alfabetico
(Visualizza per elenco) o per copertina (Visualizza per copertina). È possibile riprodurre tutti gli
album della raccolta selezionando Play (Riproduci), se non è evidenziato un album specifico
e Riproduzione casuale per riprodurre casualmente i brani degli album.
Artisti. Consente di cercare selezioni musicali scorrendo un elenco alfabetico di artisti. Poiché un
album può comprendere vari artisti, probabilmente vengono visualizzati nomi che l’utente non
conosce e che possono stimolare il suo interesse.
Brani. Consente di selezionare un brano specifico da un elenco alfabetico di brani della
raccolta.
Generi. Quando viene archiviata musica sul disco rigido, Windows Media Player suddivide
automaticamente i brani in categorie, per genere o stile musicale. Selezionare un genere, ad
esempio Folk, Rock, Country o Blues è un modo rapido per trovare tutti gli album della
raccolta adatti per un particolare stato d’animo.
Elenchi di riproduzione. Consente di visualizzare elenchi di riproduzione automatici ed elenchi di
riproduzione creati dall’utente tramite Windows Media Player. Gli elenchi di riproduzione sono
raccolte personalizzate di brani adatti a diverse occasioni (ad esempio una festa) o
atmosfere (ad esempio melodie dolci).
MUSICA
Demo introduttiva
La funzionalità Musica è concepita per la facile selezione dei brani. Se si desidera creare
un’atmosfera particolare, ascoltare un artista specifico o godersi un gruppo di brani casuali, è semplice
utilizzare il telecomando per selezionare e controllare le proprie scelte.
___________________________________________________________________________
MANUALE WMC rev 1.0
6.14
IT
Gli elenchi di riproduzione automatici facilitano la creazione e la modifica di compilation di
brani tramite elenchi di riproduzione dinamici che si aggiornano automaticamente per riflettere
nuove aggiunte o modifiche a un catalogo multimediale. La dotazione di Windows Media Player
include oltre 20 elenchi di riproduzione automatici, per qualsiasi tipo di utilizzo: dalla musica
preferita per il fine settimana alle compilation casuali di brani da masterizzare in un CD da
portare in viaggio.
Esercizio pratico
Riprodurre tutti i brani della raccolta musicale digitale, dalla A alla Z. Scorrere fino
a Visualizza brani, quindi selezionare Riproduci. Per riprodurre casualmente i brani
dall’intera raccolta selezionare Riproduzione casuale; per riprodurre indefinitamente
i brani selezionare Ripeti.
Esercizio
pratico
Cercare il nome di un artista o il titolo di un brano immettendo le prime lettere del cognome dell’artista o
una parola chiave del titolo, ad esempio “Bea” per “The Beatles” o “Sun” per “Good Day Sunshine”.
La funzione di ricerca restringe le scelte durante l’immissione; non è necessario fornire informazioni
complete.
Riproduzione di un CD audio
Inserire un CD nell’unità CD. Se Media Center è in esecuzione, un avviso chiede se si desidera riprodurre il
CD. Se Media Center non è attivo, viene richiesto di scegliere il lettore multimediale da utilizzare; fra quelli
disponibili è compreso Media Center. I metadati, inclusi copertina dell’album, nomi dei brani, nome
dell’artista e titolo dell’album vengono recuperati automaticamente da Internet e visualizzati in
pochi secondi.
Suggerimento
Un CD può non avviarsi automaticamente oppure è possibile che non venga richiesto
di scegliere un lettore se sono state modificate le impostazioni AutoPlay in Windows.
Per modificare le impostazioni AutoPlay, ridurre a icona o chiudere Media Center, selezionare
Start sulla barra delle applicazioni di Windows, quindi Risorse del computer. Fare clic con il pulsante
destro del mouse sull’unità utilizzata per riprodurre i CD, quindi selezionare Proprietà. Selezionare la
scheda AutoPlay e verificare le impostazioni per il dispositivo musicale.
MUSICA
Ricerca di brani
Utilizzare la tastiera o il telecomando per individuare un brano, un album o un artista.
Sul telecomando utilizzare i tasti numerici per immettere la prima lettera del brano,
del nome dell’album o dell’artista; premere due volte un tasto per ottenere la seconda lettera
corrispondente e tre volte per la terza lettera. Utilizzare il tasto PGSU/PGGIÙ per utilizzare i
caratteri meno comuni, come le vocali accentate, (é e ü) e i simboli (@ e $).
A ogni nuova lettera immessa l'elenco dei risultati della ricerca viene ulteriormente limitato.
Creazione di un juke-box musicale digitale
È possibile copiare musica dalla raccolta di CD alla cartella Musica per creare una raccolta musicale
digitale su Media Center PC. Con tutti i brani musicali in un’unica posizione, è possibile ascoltare
la raccolta in un modo completamente nuovo: riprodurre casualmente brani in un album o in una
selezione, creare elenchi di riproduzione personalizzati, cercare brani e persino utilizzare
visualizzazioni che interagiscono con la musica.
Durante l’ascolto di un CD, selezionare Copia CD per archiviare brani sul disco rigido nei formati
WMA o MP3. Media Center scarica la copertina dell’album, i dati sull'artista, i titoli dei brani e altri
metadati da Internet, così la musica è organizzata e accessibile in un’unica posizione.
___________________________________________________________________________
MANUALE WMC rev 1.0
6.15
IT
Se si utilizza Windows Media Player, è possibile scegliere le impostazioni per il tipo di file audio che verrà
archiviato nella raccolta Musica. Le impostazioni Copia musica determinano la qualità e le
dimensioni del file audio. Per modificare le impostazioni correnti, aprire Windows Media Player, quindi
selezionare Strumenti, Opzioni, Copia musica per scegliere un nuovo formato.
Riproduzione della musica nella raccolta
Quando si riproducono brani inclusi nell’archivio musicale o su un CD, viene aperta la visualizzazione
Informazioni di esecuzione. Da questa posizione è possibile selezionare diverse opzioni di
riproduzione:
Visualizza copertina. Consente di visualizzare la copertina dell’album, il titolo e il brano
corrente.
Visualizza Coda. Consente di visualizzare l’elenco di tutti i brani sul CD. Scorrere l’elenco
utilizzando i tasti freccia, evidenziare un brano e premere OK per iniziare a riprodurlo.
Riproduzione casuale. Se si amano le sorprese, scegliere l’opzione Riproduzione casuale
per riprodurre casualmente tutti i brani in un album, in un elenco di riproduzione o in un
intero archivio musicale, senza ripetizioni, fino a esaurimento brani.
Ripeti. Per riprodurre in modo continuo l’album o l’elenco di riproduzione preferito,
selezionare Ripeti dal menu sul lato destro della schermata. Un segno di spunta indica la
selezione effettuata. Annullare la selezione per tornare alla modalità di riproduzione senza
ripetizioni.
Acquista musica. È sufficiente premere un pulsante per trovare altri brani degli artisti nella
raccolta musicale. Acquista musica consente di connettersi direttamente a un catalogo di
novità musicali in vendita per gli artisti che si stanno ascoltando. È possibile acquistare musica e
trovare altre novità direttamente dal browser Web.
Effetti grafici. Visualizzazioni di alta qualità a schermo intero rendono viva la musica con effetti e
stili sorprendenti. Premere i pulsanti freccia o CH+/CH- per cambiare visualizzazione.
Modifica coda. Consente di modificare l’elenco della sequenza musicale nella coda di brani
riprodotta attualmente. È possibile aggiungere o eliminare brani, cambiarne l’ordine o salvare
la coda come elenco di riproduzione personalizzato (accessibile nella visualizzazione Elenchi
di riproduzione).
MUSICA
Sono disponibili tre formati Windows Media Audio, nonché MP3 a elevato bit rate:
Windows Media Audio (WMA). I brani vengono copiati utilizzando un bit rate costante.La qualità e le
dimensioni dei file possono essere modificate come desiderato. I bit rate variano da 48 Kbps
(Kilobit al secondo; circa 22 MB per CD) a 192 Kbps (circa 86 MB per CD). Un bit rate inferiore
consente di risparmiare spazio di archiviazione sul disco rigido; un bit rate più elevato consente di
migliorare la qualità della riproduzione audio.
Modalità bit rate variabile WMA. I brani vengono copiati utilizzando una gamma di bit rate per
ottenere la compressione desiderata. Il risultato è un file di dimensioni minori, che mantiene una
qualità di riproduzione eccellente.
Modalità WMA senza perdita di informazioni. I brani mantengono la qualità audio del CD
originale. Gli appassionati di musica possono utilizzare questa modalità per archiviare CD in
modo efficiente e godere della migliore qualità di riproduzione.
MP3 a bit rate elevato. Scegliere di copiare un CD in formato WMA ad alta qualità o MP3. I
valori di bit rate disponibili includono 128 Kbps, 192 Kbps, 256 Kbps e 320 Kbps.
Suggerimento
Se non è possibile riprodurre un file audio, assicurarsi di non aver premuto i pulsanti Mute (Disattiva
audio) o Pause (Pausa) sul telecomando o che il volume non sia impostato su zero. Poiché tutte
queste funzionalità sono rappresentate graficamente sullo schermo, è sufficiente osservarle per
controllarne lo stato.
___________________________________________________________________________
MANUALE WMC rev 1.0
6.16
IT
Riproduzione di musica in un’ampia gamma di formati file supportati
I tipi seguenti di file audio digitali sono compatibili con Media Center. Media Center è inoltre in grado di
riprodurre musica in qualsiasi formato, se il relativo provider rende disponibile un plug-in. Per ulteriori
informazioni sui formati file musicali, fare riferimento alla Guida in linea di Media Player.
Tipo di file (formato)
CD audio
File audio Windows Media
File audio Windows
MP3
Estensione del nome file
.CDA
.ASF, .ASX, .WAX, .WM, .WMA, .WMD
.WMP, .WMX, .WVX, .WAV
.MP3, .M3U
Utilizzo delle scelte rapide da tastiera
Se lo si preferisce, è possibile utilizzare la tastiera del computer anziché il telecomando. Molte
tastiere multimediali fornite con Media Center PC includono speciali tasti di scelta rapida che
facilitano l’utilizzo delle funzionalità di Media Center. Inoltre i tasti freccia sulla tastiera operano come
quelli sul telecomando e il tasto INVIO esegue la stessa funzione del tasto OK sul telecomando.
IMMAGINI
Il Menu Immagini offre tutti gli strumenti necessari per importare, modificare, visualizzare e trasferire
fotografie digitali: è come avere a disposizione un vero e proprio laboratorio fotografico digitale.
Luisa e le sue migliori amiche sono tornate da una vacanza ai Caraibi con bellissimi ricordi, tutti
catturati dalla fotocamera digitale di Luisa. Desiderosa di condividere le fotografie con le compagne di
viaggio, invita le amiche a trascorrere una serata a casa sua.
Prima che arrivino, Luisa connette il cavo USB della fotocamera alla porta USB nella parte anteriore di
Media Center PC. Media Center riconosce la fotocamera e importa le fotografie nella raccolta
Immagini. Utilizzando il telecomando, Luisa seleziona la cartella Viaggio ai Caraibi, evidenzia
l’anteprima della prima immagine e preme OK per visualizzarla a schermo intero. Preme Forward
(Avanzamento) per visualizzare l'anteprima di ogni immagine.
Mentre sfoglia le immagini, scopre che molte presentano difetti di qualità abbastanza comuni.
Un’immagine delle quattro amiche sulla spiaggia al tramonto mostra l’effetto degli “occhi rossi” tipico
delle fotografie scattate con il flash. Luisa seleziona Ritocca nella visualizzazione Dettagli immagine,
quindi seleziona Correzione occhi rossi. In pochi secondi Media Center analizza e corregge la
fotografia. Un’altra immagine del gruppo durante un’escursione a piedi sarebbe stata perfetta da
incorniciare... se un turista non fosse passato davanti a loro proprio nel momento in cui veniva
scattata la fotografia. Luisa seleziona Ritaglia nel menu Ritocca e utilizza le frecce sul telecomando
per regolare i bordi della fotografia, eliminando l’intruso dal ritratto che appenderà nell’ingresso.
IMMAGINI
Scenario utente
Le sue amiche arrivano e si accomodano sul divano. Per creare una festosa atmosfera caraibica,
Luisa ha scelto un album reggae dalla raccolta Musica. Seleziona Presentazione foto nel menu
Immagini e la visualizzazione ha inizio.
Le sue amiche sono entusiaste delle fotografie. Non vedono l’ora di mostrarle ai loro familiari e amici.
Luisa sfoglia il menu Attività, seleziona Crea CD e aggiunge le immagini all’elenco. Alcuni minuti dopo
regala a ogni amica un CD con tutta l’atmosfera e i ricordi dei Caraibi.
Immagini - in sintesi
È possibile utilizzare il telecomando di Media Center (oppure tastiera e mouse) e i menu sullo schermo
per ordinare e trovare fotografie e immagini nelle cartelle Immagini e Immagini condivise. Lo
strumento Ritocca consente di ritagliare una fotografia, regolare il contrasto ed eliminare l’effetto
occhi rossi dai soggetti.
___________________________________________________________________________
MANUALE WMC rev 1.0
6.17
IT
Demo introduttiva
Media Center PC offre un modo nuovo e divertente di ammirare e condividere le fotografie digitali.
Tramite il telecomando è possibile visualizzare fotografie e grafica, riprodurre una presentazione,
ritoccare fotografie e masterizzarle su CD.
Panoramica di Immagini
Selezionare Immagini dalla schermata di avvio di Media Center o premere il pulsante Immagini sul
telecomando per un rapido accesso. Le anteprime degli album e delle fotografie nella raccolta sono
visualizzate nella schermata principale. Per spostarsi fra il menu e le anteprime o le cartelle,
utilizzare i tasti freccia di spostamento sul telecomando.
IMMAGINI
È possibile visualizzare le fotografie digitali una per volta oppure creare presentazioni
automatizzate. Si può persino aggiungere musica di sottofondo alle presentazioni per creare
l’atmosfera giusta e regolare il volume o saltare brani durante una presentazione: tutto senza perdere
un secondo. Si possono condividere le fotografie con familiari e amici creando e masterizzando una
raccolta di immagini personalizzata su CD.
Visualizzazione della raccolta di foto
Dalla schermata principale di Media Center, selezionare Immagini. All’interno di Immagini utilizzare i
pulsanti freccia sul telecomando per scorrere le immagini della raccolta. Un bordo verde evidenzia
l’immagine attualmente selezionata. Le fotografie archiviate nelle cartelle Immagini e Immagini
condivise possono essere ordinate. Selezionare Ordina per nome per ordinare le immagini in base al
nome, in ordine crescente. Selezionare Ordina per data per ordinare le immagini in base alla data
dell’ultima modifica.
Per visualizzare fotografie non archiviate nella cartella Immagini, premere il pulsante Ulteriori
informazioni/Dettagli sul telecomando (o fare clic con il pulsante destro del mouse) e selezionare
l’opzione Aggiungi immagini. Si avvia una procedura guidata che consente di aggiungere (o rimuovere)
visualizzazioni di cartelle di immagini situate in altre posizioni del PC o della rete domestica.
___________________________________________________________________________
MANUALE WMC rev 1.0
6.18
IT
Suggerimenti
•
Quando vengono salvate immagini dalla fotocamera digitale* o dallo scanner nel computer,
Windows XP le archivia in genere nella cartella Immagini inclusa in Documenti. Dall’interno
della cartella Immagini è possibile aggiungere, eliminare, spostare e rinominare file. Qualsiasi
aggiunta o modifica viene riportata immediatamente nella visualizzazione Immagini all’interno di
Media Center.
• Anche se si scattano fotografie con una fotocamera tradizionale, è possibile creare
presentazioni e condividere le immagini utilizzando Media Center. La maggior parte dei servizi
di sviluppo fotografico è in grado di masterizzare le stampe su CD oppure è possibile ricorrere a
società sul Web che rendono disponibili le fotografie su Internet per consentire di scaricarle su un
PC.
*Nota:Windows XP Media Center Edition 2005 supporta una vasta gamma di interfacce per la
connessione di fotocamere digitali, ad esempio Fire Wire (IEEE 1394) e USB, nonché le più
diffuse schede di memoria per fotocamere.
-
Avvio di una presentazione automatizzata. Nel menu di avvio, selezionare Immagini, quindi
scegliere la cartella da visualizzare utilizzando le frecce sul telecomando. Selezionare Presentazione
foto.
Se è necessario sospendere temporaneamente la presentazione, premere Pause (Pausa). Un
indicatore viene visualizzato sullo schermo per cinque secondi, quindi scompare. Premere Play
(Riproduci) o Pause (Pausa) per continuare oppure utilizzare il pulsante freccia per passare
all’immagine successiva o precedente.
-
Aggiunta di musica di sottofondo a una presentazione. Media Center consente di ascoltare
musica e guardare immagini contemporaneamente. È persino possibile creare un elenco di
riproduzione per caratterizzare l’atmosfera di una determinata presentazione. Nel menu di avvio di
Media Center, selezionare Musica, individuare la musica desiderata e premere Riproduzione.
Premere il pulsante Start per tornare al menu principale, quindi selezionare Immagini. Le
informazioni sulla musica che si sta ascoltando rimangono visibili nella finestra di anteprima.
Quando si avvia la presentazione, la visualizzazione passa alla modalità schermo intero e la
musica continua in sottofondo.
-
Modifica impostazioni delle presentazioni. In Immagini, selezionare Impostazioni per cambiare
la modalità in cui viene visualizzata una presentazione. Qui è possibile impostare il tempo di
transizione tra le immagini scegliendo un valore compreso tra due e 60 secondi
(l’impostazione predefinita è cinque secondi). Inoltre si può selezionare la modalità di
riproduzione delle presentazioni, ovvero in ordine o casuale, e se includere o meno le
sottocartelle.
IMMAGINI
Riproduzione di una presentazione
Le presentazioni automatiche possono essere utilizzate come sfondi straordinari per le feste e
rappresentano il modo ideale per condividere le foto preferite con familiari e amici.
Suggerimento
È possibile scegliere la durata di visualizzazione delle immagini di una presentazione,
impostando un valore compreso tra 2 e 60 secondi. Selezionare Impostazioni nella
schermata principale Immagini, quindi alternare o immettere il numero di secondi per la
visualizzazione delle immagini.
___________________________________________________________________________
MANUALE WMC rev 1.0
6.19
IT
Visualizzazione di un’immagine in modalità schermo intero
Per la visualizzazione a schermo intero, selezionare un’immagine e premere OK. Per visualizzare
l’immagine successiva nella cartella, utilizzare i tasti FWD (Avanzamento), Skip (Ignora) o il tasto
di spostamento destro. Utilizzare REW (Riavvolgi), Replay (Ripeti) o il tasto di spostamento
sinistro per tornare indietro. Per tornare a Immagini, premere Back (Indietro) sul telecomando. In
qualsiasi momento durante la visualizzazione di immagini a schermo intero, premere Play
(Riproduci) per alternare il comando manuale e quello automatico.
Zoom e panoramica di un’immagine
È possibile eseguire lo zoom e la panoramica di un’immagine tramite il telecomando. Premere il pulsante
OK per ingrandire una foto e utilizzare i pulsanti freccia per eseguire una panoramica. Per
ruotare un’immagine, selezionarla quindi premere il pulsante Ulteriori informazioni/Dettagli.
Selezionare Dettagli immagine dalla finestra sovrapposta. Scegliere Ruota per ruotare l’immagine in
senso orario a incrementi di 90 gradi.
Correzione di un’immagine
Nella visualizzazione Dettagli immagine, selezionare Ritocca per correggere le imperfezioni delle foto e
cambiare modalità di visualizzazione. Media Center è in grado di regolare il contrasto dell’immagine e
rimuovere l’effetto occhi rossi, un problema comune nella fotografia con il flash in interni. Per applicare
la correzione, contrassegnare le voci Correzione occhi rossi e/o Contrasto: Media Center
analizza l’immagine e la regola automaticamente per la visualizzazione ottimale.
Per correggere l’orientamento della foto, selezionare Ritaglio. Utilizzare i comandi a icona per
incorniciare l’immagine orizzontalmente o verticalmente, ingrandirla o ridurla e modificare l’orientamento
della foto (orizzontale/verticale).
Selezionare Anteprima per ricontrollare i risultati, quindi Salva per memorizzare l’immagine rielaborata.
Modifica della visualizzazione di immagini e presentazioni
Selezionare Impostazioni per regolare le opzioni di visualizzazione delle immagini. Da questa
posizione è possibile scegliere di visualizzare le immagini in ordine casuale, renderle visibili nelle
sottocartelle, regolare il Tempo transizione fra le immagini di una presentazione, modificare il Colore sfondo,
regolare gli Effetti di transizione e trovare immagini archiviate nel computer.
IMMAGINI
Stampa di un’immagine
Durante la visualizzazione di un’immagine, premere Ulteriori informazioni/Dettagli, quindi
selezionare Stampa dal menu. È inoltre possibile selezionare STAMP dalla tastiera per inviare
l’immagine alla stampante.
Utilizzo delle scelte rapide da tastiera e del mouse in Immagini
Se lo si preferisce, per visualizzare le immagini è possibile utilizzare la tastiera del computer o un
mouse anziché il telecomando. I tasti freccia sulla tastiera funzionano in modo analogo a quelli sul
telecomando. Alcune tastiere multimediali includono pulsanti di scelta rapida e ogni volta che si fa clic con
il mouse vengono visualizzati messaggi popup.
Visualizzazione di immagini da una gamma di tipi di file di immagine supportatiImmagini
supporta i tipi di file di immagine più comuni, riportati nella tabella seguente.
Tipo di file (formato)
Joint Photographic Experts Group
Tagged Image File Format
Graphics Interchange Format
Bitmap
Windows MetaFile
Portable Network Graphics
Estensione del nome file
.JPG e .JPEG
.TIF e .TIFF
.GIF*I file .GIF animati vengono
visualizzati come immagini statiche
.BMP
.WMF e .EMF
.PNG
___________________________________________________________________________
MANUALE WMC rev 1.0
6.20
IT
Suggerimento
Se un’immagine non viene visualizzata correttamente, è probabile che il suo tipo di file
non sia supportato. I tipi di file non supportati vengono ignorati durante le presentazioni.
In questi casi può essere necessario modificare l’immagine utilizzando un editor fotografico, quindi salvarla
nuovamente in un formato file supportato.
VIDEO
Scenario utente
Con Windows Movie Maker 2.1 e Media Center PC, è possibile creare, modificare, visualizzare
e condividere tutte i ricordi immortalati su video con amici e familiari.
Il giorno dopo, Maurizio collega la videocamera alla porta USB di Media Center PC e trasferisce il filmato
sul disco rigido. Utilizzando Windows Movie Maker 2.1, combina clip della cerimonia e filmati di
famiglia, aggiungendo transizioni, effetti e musica per dare un tocco professionale. Memorizza il filmato
nella cartella Video e utilizza le funzionalità di masterizzazione DVD di Movie Maker 2.1 per trasferirlo
su DVD.
Durante il fine settimana invita i genitori alla proiezione del filmato. Dopo averli fatti accomodare sul
divano, Maurizio preme Start sul telecomando per avviare Media Center. Sceglie Video dal menu
di Media Center, quindi utilizza le frecce di spostamento sul telecomando per selezionare il
video dell'anniversario. Preme Play (Riproduci) e la proiezione del video ha inizio. Maurizio regola
il volume tramite il pulsante VOL +/- sul telecomando. Preme Pause (Pausa) per impostare la
scena successiva, quindi preme Play (Riproduci) per continuare. Seleziona Rewind (Riavvolgi) per
riascoltare il brindisi di Guido, quindi Skip (Ignora) per passare alla scena successiva.
VIDEO
Per il loro 25° anniversario di matrimonio, Guido e Raffaella hanno voluto ripetere la cerimonia e rinnovare
i voti. Il figlio Maurizio ha registrato il rito e la cena delle nozze d’argento con la sua videocamera
digitale.
Maurizio e i genitori si godono la serata rivivendo le nozze d'argento e il video diventa una preziosa
testimonianza di un evento memorabile. Al termine, quando i genitori si preparano per andarsene,
Maurizio regala loro il DVD, in modo che possano condividere i momenti più belli con gli amici.
Video – in sintesi
Non è più necessario cercare videocassette accumulate nell’armadio o individuare i cavi appropriati
per collegare la videocamera. Video consente di archiviare e organizzare i file video in una libreria
multimediale centralizzata, facilitando la riproduzione di filmati amatoriali o di file video scaricati da
Internet.
Utilizzare il telecomando o il mouse e la tastiera per selezionare Video da Media Center. La
visualizzazione Video consente di ordinare, scegliere e riprodurre video per il divertimento di tutti i presenti.
È possibile invitare gli amici ad assistere ai filmati delle vacanze o godersi clip musicali dalla poltrona o
dal divano preferiti: Windows Media Video 9 assicura una qualità video a schermo intero senza
precedenti.
Windows XP Media Center Edition 2005 comprende il nuovo Windows Movie Maker 2.1 per
Windows XP. Windows Movie Maker 2, completamente rinnovato, porta la creazione semplice e
rapida di video a un livello mai raggiunto prima: oggi, per creare, modificare e condividere filmati sul
computer è sufficiente qualche semplice operazione di trascinamento e selezione.
___________________________________________________________________________
MANUALE WMC rev 1.0
6.21
IT
Approfondimento
Ulteriori informazioni su Windows Movie Maker 2 sono disponibili in Windows Media Player and Digital
Media Experience in Windows XP Reviewer's Guide.
Demo introduttiva
Video consente di organizzare i filmati in un archivio multimediale digitale e di gestire e riprodurre file
video dal desktop o in remoto, tramite il telecomando.
Esplorazione dei video
In Video è possibile utilizzare il telecomando o il mouse e la tastiera per esplorare i video della propria
raccolta. Sul lato destro dello schermo vengono visualizzate anteprime del fotogramma iniziale e
icone delle cartelle (se i video sono stati organizzati in cartelle). Per spostarsi fra il menu e le
anteprime o le cartelle, utilizzare i tasti freccia di spostamento sul telecomando.
Suggerimenti
• Per passare alla modalità a schermo intero dalla finestra di anteprima, selezionare
quest’ultima utilizzando le frecce di spostamento sul telecomando, quindi premere OK. Per
tornare alla schermata precedente, utilizzare il pulsante Back (Indietro) sul telecomando.
• Adottare un sistema di denominazione dei video coerente in modo da sapere sempre cosa si
sta cercando. Ad esempio, “2005_Festa vacanze” è un nome più facile da identificare rispetto
a “Festa”.
Ricerca dei video
In Media Center PC è possibile individuare video e aggiungerli a cartelle condivise da un altro computer.
Se in Media Center PC sono configurati più utenti, è possibile avvalersi della funzionalità Video
condivisi per offrire un facile accesso ai file video che si desidera condividere con altri.
Spostare questi video (o un collegamento) nella cartella Video condivisi. Per trovare questa
cartella, selezionare il menu Start di Windows sul desktop, quindi Risorse del computer e aprire la
cartella Documenti condivisi.
VIDEO
Ordinamento dei video
Nel menu di avvio di Media Center, selezionare Video, quindi Ordina per nome o Ordina per data per
individuare rapidamente un video specifico. L’ordinamento per data consente di organizzare
l’elenco in base all’indicatore data/ora sul file video. Alcune videocamere digitali includono
automaticamente queste informazioni nel file video.
Per visualizzare video non archiviati nella cartella Video, premere il pulsante Ulteriori informazioni
o Dettagli sul telecomando (o fare clic con il pulsante destro del mouse) e selezionare l’opzione
Aggiungi video. Si avvia una procedura guidata che consente di aggiungere (o rimuovere)
visualizzazioni di cartelle situate in altre posizioni del PC o della rete domestica.
Creazione di CD/DVD
È possibile trasferire i video dalla propria raccolta su un CD o un DVD registrabile (per ulteriori dettagli,
vedere le informazioni sulla masterizzazione di CD e DVD nella sezione Altri programmi, più avanti in questa
guida).
Riproduzione di un video
Evidenziare un video e premere OK. È possibile guardare video in modalità a schermo intero o in una
finestra. Premere Ulteriori informazioni/Dettagli sul telecomando per visualizzare informazioni del
programma, come la data di creazione o modifica del file e le dimensioni, relative a un particolare
video selezionato. È inoltre possibile riprodurre il video direttamente da tale schermata.
Per visualizzare il contatore della durata, premere Play (Riproduci) sul telecomando durante la
riproduzione del video.
___________________________________________________________________________
MANUALE WMC rev 1.0
6.22
IT
Riproduzione di video in diversi formati di file
Tipo di file (formato)
Windows Media Video ed elenchi di
riproduzione
File video AVI*
File video MPEG
Estensione del nome file
.WMV, .ASF, .ASX, e .WPL
.AVI
.MPEG, .MPG, .MPE, .M1V, .MP2, .MPV2
e .MPA
File video Indeo
.IVF
*È possibile riprodurre ulteriori formati utilizzando Windows Media Player 9 Series per
installare i codec appropriati.
Scenario utente
Media Center offre una serie completa di funzionalità per la riproduzione di DVD: interruzione, pausa,
avanzamento rapido e riavvolgimento del contenuto dei DVD, nonché accesso a ulteriori
informazioni e contenuti, compresi capitoli, riassunti, varie angolazioni e copertina.
Eva avvia Windows Media Center, inserisce un film di fantascienza su DVD e si accomoda sul letto
sorseggiando una tazza di tè. La riproduzione del DVD si avvia automaticamente.
Prima di riprodurre il film, Eva esamina i contenuti speciali del DVD. Guarda un’intervista con il
regista e la troupe e rimane affascinata dal resoconto di come la truccatrice sia riuscita a
trasformare un attore in un alieno. Eva seleziona DVD Menu sul telecomando e preme Play per
avviare la funzionalità principale. Durante il segmento con l’alieno “trasformato”, Eva preme il
pulsante Replay (Ripeti) per tornare all’inizio del capitolo e riguarda il segmento per scoprire gli
effetti speciali. Durante il film, preme spesso Pausa e Rewind (Riavvolgi) per esaminare il film
fotogramma per fotogramma e vedere se riesce a identificare le controfigure utilizzate nelle scene
d’azione. Squilla il telefono ed Eva preme Stop. Quando è pronta per immergersi nuovamente nell’azione,
preme Play e il DVD riprende dal punto a cui era arrivato.
DVD - in sintesi
È possibile utilizzare il telecomando di Media Center per interrompere, sospendere, far avanzare
rapidamente e riavvolgere i DVD, nonché accedere a ulteriori informazioni e contenuti, inclusi capitoli,
riassunti, varie angolazioni e copertina. Semplici menu in Impostazioni agevolano la modifica delle
impostazioni predefinite relative all’audio e alla lingua dei DVD. Il controllo genitori utilizza le
classificazioni MPAA per bloccare alcuni o tutti i contenuti dei DVD e controllare ciò che possono
vedere i bambini.
RIPRODUZIONE DVD
RIPRODUZIONE DVD
___________________________________________________________________________
MANUALE WMC rev 1.0
6.23
IT
AutoPlay. Quando il DVD viene caricato nell’unità, la riproduzione si avvia automaticamente.
Riproduzione DVD a schermo intero o in una finestra. Il contenuto del DVD viene
visualizzato nella modalità a schermo intero ad alta qualità per la visione a distanza o in una
finestra mentre si esplora Media Center.
Informazioni dettagliate sul DVD. Premendo il pulsante Ulteriori informazioni/Dettagli vengono
visualizzati titolo, titolo del capitolo, genere, classificazione (MPAA) per il controllo genitori,
lunghezza e posizione corrente del DVD.
Controllo genitori. I genitori possono bloccare il contenuto dei DVD secondo le loro
esigenze specifiche ed esclusive. È possibile bloccare tutti i film, bloccare i film non classificati
e/o impostare la classificazione massima consentita per i film.
Deinterlacciamento adattivo e proporzioni video. Il deinterlacciamento video con
accelerazione hardware elimina le righe visibili della scansione e lo sfarfallio. La regolazione
delle proporzioni video con accelerazione hardware garantisce un’immagine più uniforme e
nitida sugli schermi a scansione progressiva ad alta risoluzione.
Demo introduttiva
Riproduzione di un DVD
Inserire un DVD nell’unità appropriata, quindi richiuderla. Se la funzionalità AutoPlay è abilitata, il DVD si
avvia automaticamente. È inoltre possibile riprodurre un DVD già all’interno dell’unità selezionando
Riproduci DVD dalla schermata principale di Media Center.
Visualizzazione di informazioni sul DVD
Premere il pulsante Ulteriori informazioni/Dettagli sul telecomando per visualizzare titolo, titolo del
capitolo, genere, classificazione (MPAA) per il controllo genitori, lunghezza e posizione corrente del DVD.
Accesso ai contenuti speciali
Utilizzando il pulsante DVD Menu (Menu DVD) sul telecomando si accede al menu corrispondente. Nella
maggior parte dei dischi, questo menu fornisce l’accesso a singoli capitoli e ad altri contenuti
speciali. Utilizzare le frecce di spostamento sul telecomando per effettuare selezioni nel menu
principale.
Personalizzazione di comandi DVD
È possibile personalizzare i comandi DVD in Impostazioni > DVD > pulsanti di programmazione DVD del
telecomando.
Esercizio pratico
Durante la visione di un DVD, utilizzare i pulsanti CH +/- (Canale +/-) sul telecomando per saltare da un
capitolo all’altro del DVD. Se durante questa operazione si è connessi a Internet, è possibile vedere anche
i titoli e i numeri dei capitoli.
RIPRODUZIONE DVD
Le funzionalità video comprendono:
___________________________________________________________________________
MANUALE WMC rev 1.0
6.24
IT
RADIO
Scenario utente
Media Center PC con scheda di sintonizzazione radio offre una serie completa di funzionalità per la
radio FM, tra le quali la sospensione delle trasmissioni in diretta, la preselezione delle stazioni e la
ricerca. È inoltre possibile scegliere tra centinaia di stazioni radio su Internet.
Ezio torna a casa dopo una giornata in ufficio, afferra il telecomando Media Center sul tavolino e avvia
Windows Media Center. Per rilassarsi al termine di una giornata impegnativa, seleziona Radio dal
menu e utilizza i tasti freccia per cercare la frequenza della stazione radio locale che trasmette musica
classica.
Mentre prepara la cena, si ricorda che uno dei suoi autori preferiti è ospite al talk show radiofonico di cui non
perde mai una puntata. Utilizzando i tasti freccia evidenzia la preselezione per NPR, quindi preme Ok
per sintonizzarsi immediatamente sulla stazione. Si sintonizza proprio nel momento in cui il conduttore
sta presentando l’autore. Il conduttore cita il sito Web dell’autore ma Ezio non riesce a sentirlo.
Preme Replay (Ripeti) sul telecomando per tornare indietro di sette secondi nella trasmissione — questa
volta l’indirizzo Web non gli sfugge.
Radio - in sintesi
In Media Center Edition 2005, Radio offre un sintonizzatore radio multifunzione direttamente sul desktop,
garantendo il pieno controllo dell’esperienza di ascolto. Le preselezioni consentono di accedere
immediatamente alle stazioni preferite premendo un solo pulsante, mentre le funzionalità di ricerca
permettono di trovare in pochi secondi la larghezza di banda delle frequenze per le stazioni.
Ora è possibile controllare la radio utilizzando le funzionalità di registrazione personale di Media
Center. Mentre si ascolta, premere Pausa sul telecomando per sospendere e ripetere fino a 30 minuti
di contenuto radio. Replay (Ripeti) consente di tornare indietro di sette secondi, in modo da non
perdere dettagli importanti mentre si ascolta una trasmissione radio. Le funzionalità comprendono:
-
RADIO
Appena inizia l’intervista, Ezio si accorge di aver dimenticato di restituire un DVD noleggiato. Preme
Pausa sul telecomando e si precipita fuori casa. Qualche minuto dopo rientra e preme Play. Ezio si
rilassa sul divano e ascolta il resto dell’intervista, che riprende dal punto in cui l’aveva interrotta.
Supporto Radio DVB-T. Ora gli utenti possono ricevere la radio digitale tramite segnali di
trasmissione video digitale (DVB-T, Digital Video Broadcast), nei Paesi dove questi sono
disponibili, come Australia, Inghilterra, Francia e Germania.
Suggerimento
La funzionalità Radio è attiva solo se Media Center PC è configurato con un ingresso FM
sulla scheda di sintonizzazione TV. Se Media Center PC non comprende un sintonizzatore FM, il
menu Radio non è disponibile per la selezione.
Demo introduttiva
Dalla schermata principale di Media Center, selezionare Radio per avviare il sintonizzatore.
Ricerca di una stazione radio
Dalla schermata principale Radio, utilizzare i tasti freccia sul telecomando per scorrere le opzioni di
interfaccia del sintonizzatore:
-
Immettere la frequenza di una stazione. Utilizzare il tastierino numerico per immettere la
frequenza di una stazione. Premere Ok per confermare la selezione.
___________________________________________________________________________
MANUALE WMC rev 1.0
6.25
IT
Ricercare una stazione. Utilizzare i tasti freccia per selezionare Ricerca automatica. Premere i
pulsanti – o + per trovare la stazione successiva sulla larghezza della banda delle frequenze.
Per accedere a una stazione preimpostata, utilizzare i tasti freccia per raggiungere le preselezioni, quindi
scorrere fino alla stazione desiderata oppure immettere il numero della preselezione utilizzando il
tastierino numerico.
È possibile ordinare le preselezioni selezionando Impostazioni dal menu Radio. Utilizzare i tasti freccia
sul telecomando per spostarsi tra le stazioni preimpostate, quindi premere i tasti Su (▲) e Giù (▼)
per assegnare la stazione a un altro numero di preselezione. Per rimuovere una stazione
preimpostata, utilizzare il pulsante Elimina (X) oppure il tasto CANC sulla tastiera.
Controllo della radio
Ora è possibile sospendere e ripetere il contenuto dei programmi radiofonici, con un controllo
completo sulla modalità di ascolto della radio.
-
Sospensione dei programmi radiofonici. Per sospendere una trasmissione radio, premere il
pulsante Pausa sul telecomando. Premere Play o Pausa per riprendere ad ascoltare il programma
dal punto in cui è stato sospeso.Il buffer di sospensione memorizza fino a 30 minuti di contenuto
radiofonico.
-
Ripetizione. È sfuggito il numero da chiamare per il concorso radiofonico del secolo? Premendo
Replay (Ripeti) sul telecomando si torna indietro di sette secondi nella trasmissione radio.
ONLINE SPOTLIGHT
Online Spotlight offre agli utenti di Media Center PC un modo semplice per trovare servizi e software
direttamente nella schermata principale di Media Center. Attraverso Online Spotlight, è possibile
trovare un mondo di servizi in continua espansione grazie al significativo contributo di terze parti. Il
portale è integrato in Media Center in modo da poter visualizzare ed esplorare i contenuti
comodamente a distanza e utilizzando il telecomando.
Le funzionalità di Online Spotlight comprendono numerosi servizi come, ad esempio, la possibilità di
avere informazioni sulle ultime uscite cinematografiche, acquistare film e programmi TV, ascoltare
stazioni radio su Internet ed esplorare siti Web progettati appositamente per gli utenti di Media Center,
ma anche vedere le ultime notizie, fare acquisti online e controllare il proprio conto corrente.
ALTRI PROGRAMMI
L’area Altri programmi offre un’ampia gamma di strumenti e metodi per gestire i contenuti multimediali.
È possibile masterizzare CD o DVD, avviare Messenger su Media Center, trasferire contenuti multimediali
su un dispositivo portatile o un supporto rimovibile e altro ancora.
ONLINE SPOTLIGHT
Creazione di una preselezione
Per accedere rapidamente alle stazioni radio preferite, è possibile definire fino a nove stazioni
preimpostate. Per impostare una preselezione, sintonizzarsi sulla stazione e selezionare Salva. Media
Center assegna automaticamente la stazione a una preselezione.
Masterizzazione di CD e DVD
Ora in Media Center è possibile creare facilmente compilation di CD o DVD con i contenuti
multimediali preferiti. Si possono archiviare su DVD i programmi televisivi registrati o creare una
compilation con foto e file musicali. La masterizzazione di CD/DVD si basa sulla tecnologia Sonic™ ed è
completamente integrata nell’interfaccia di Windows Media Center, per assicurare funzionalità intuitive
ma potenti.
___________________________________________________________________________
MANUALE WMC rev 1.0
6.26
IT
Grazie agli aggiornamenti al modulo di masterizzazione di Sonic DVD, le prestazioni e le
funzionalità di masterizzazione DVD in Media Center risultano ulteriormente migliorate. Ora è possibile
masterizzare su DVD programmi televisivi ad alta definizione e da altre posizioni nella rete, ad
esempio da un dispositivo Media Center Extender.
Masterizzazione dei contenuti multimediali su CD o DVD
Con le funzionalità di masterizzazione CD e DVD integrate in Media Center, è possibile trasferire e
archiviare qualsiasi contenuto multimediale:
Creare un DVD video con i file video o i programmi televisivi registrati (compatibile con
qualsiasi lettore DVD).
Creare un CD audio con la propria musica preferita (compatibile con qualsiasi lettore
CD).
Creare un CD o un DVD con informazioni contenute in Media Center PC, per archiviarle o
trasferirle su un altro PC.
Alla funzionalità Crea CD si accede tramite il menu Altri Programmi o dall’interno di Registrazioni
(Televisione), Musica, Video o Immagini.
Inserire un CD o DVD scrivibile nella relativa unità (vedere la documentazione del produttore dell’unità
CD/DVD per i formati supportati). Crea CD chiede innanzitutto di assegnare un nome al CD.
Immettere un nome utilizzando la tastiera o il telecomando. Selezionare i contenuti multimediali
archiviati in Registrazioni, Musica, Immagini o Video. Lo spazio di archiviazione rimanente viene
indicato nella parte inferiore della schermata.
Selezionare Visualizza CD per un’anteprima dell’elenco delle tracce. È possibile aggiungere o
rimuovere tracce dall’elenco. Selezionare Masterizza CD per creare il CD/DVD.
È inoltre possibile utilizzare Windows XP Movie Maker 2.1 per creare DVD con i propri filmati.
Invio di messaggi immediati
Grazie a Windows Messenger, integrato in Windows Media Center, è possibile sapere quando gli
amici sono in linea e inviare messaggi istantanei a qualsiasi nominativo dell’elenco contatti. L’utente può
conversare con gli amici per commentare il programma visualizzato, fissare un orario per incontrarsi o
contattare i familiari ovunque si trovino.
Da qualsiasi posizione in Media Center, premere il pulsante Ulteriori informazioni/Dettagli sul
telecomando e selezionare Messenger nella finestra sovrapposta. Per accedere e inviare messaggi è
necessario un account Messenger.
Sincronizzazione con un dispositivo portatile
Ora Media Center offre un metodo molto comodo per trasferire immagini, video, programmi televisivi
registrati e musica su dispositivi di archiviazione rimovibili, come memory stick e dischi rigidi esterni.
Nelle cartelle appropriate, scegliere il contenuto multimediale da trasferire e fare clic su Chiudi.
Selezionare Start per trasferire quanto selezionato sul dispositivo rimovibile.
ALTRI PROGRAMMI
Windows XP Media Center 2005 supporta la masterizzazione a doppio strato, permettendo di copiare
il doppio dei file musicali, video, immagine e dati su un DVD. La masterizzazione a doppio strato scrive
due strati di informazioni sullo stesso lato del DVD, raddoppiando la capacità di archiviazione.
Trasferimento di contenuto su Portable Media Center
Portable Media Center integra le funzionalità di Windows XP per gestire, archiviare e riprodurre
contenuti multimediali in un dispositivo elettronico di fascia consumer di facile utilizzo e dalle
dimensioni di un palmare. Portable Media Center si connette senza problemi a Media Center PC con
Windows XP, consentendo il semplice trasferimento di musica, film, foto e programmi televisivi
registrati, per potere godere di tali contenuti ovunque.
___________________________________________________________________________
MANUALE WMC rev 1.0
6.27
IT
Una volta convertito il formato di compressione, una nuova funzionalità denominata Sincronizzazione
automatica, introdotta in Windows Media Player 10, facilita al massimo il trasferimento del contenuto
multimediale in Portable Media Center. È sufficiente collegare Portable Media Center a Media Center
PC con Windows XP; il software riconosce automaticamente il dispositivo e consente di trasferire
subito il contenuto multimediale digitale codificato nel formato di Portable Media Center, senza dover
scaricare driver o utilizzare applicazioni multimediali di terze parti.
Sono disponibili ben tre diversi metodi per aggiungere musica, video e immagini a Portable Media Center
dal computer, utilizzando la tecnologia di sincronizzazione automatica di Windows Media Player
10:automatico, manuale e personalizzato.
Trasferimento automatico di contenuti dal computer a Portable Media Center.
Selezionando questo metodo, il contenuto viene caricato automaticamente nel dispositivo
dal catalogo di Windows Media Player. Windows Media Player seleziona il contenuto e ne
carica la quantità adeguata sul dispositivo. Il trasferimento automatico del contenuto è il
metodo predefinito sul dispositivo.
Trasferimento manuale di contenuti dal computer a Portable Media Center. Selezionando
questo metodo è possibile scegliere il contenuto da caricare in Portable Media Center. Se il
trasferimento automatico carica solo la quantità di contenuto adeguata per il dispositivo, con il
trasferimento manuale è l'utente a decidere la musica, i video e le foto che desidera portare
con sé.
Creazione di elenchi di riproduzione personalizzati, per trasferire contenuto dal computer
a Portable Media Center. Selezionando il trasferimento manuale o automatico, quindi
scegliendo Personalizza elenchi di riproduzione è possibile caricare in Portable Media Center
gli elenchi di riproduzione creati utilizzando Media Center o Windows Media Player.
Inoltre la sincronizzazione automatica prevede l'ordinamento dei contenuti nel dispositivo,
assicurandosi che solo quello specificato venga caricato e non vengano cancellate accidentalmente
informazioni. Se un dispositivo non è dotato di sufficiente spazio di archiviazione per l’intero catalogo,
la sincronizzazione automatica, a seconda del dispositivo in uso, per impostazione predefinita
trasferisce prima gli elenchi di riproduzione più importanti, ad esempio il contenuto contrassegnato da
quattro o cinque stelle, i nuovi brani musicali e le foto acquisite nell'ultimo mese. L’utente può modificare
questo metodo nella sezione di impostazione della sincronizzazione del lettore utilizzato.
Poiché Windows Media Player 10 fornisce il supporto di video e immagini più evoluto del settore per la
sincronizzazione dei dispositivi, è possibile trasferire facilmente in Portable Media Center qualsiasi tipo di
contenuto multimediale, dai film in digitale alle foto e ai programmi televisivi. Portable Media Center inoltre
supporta la più recente piattaforma Digital Rights Management di Windows, permettendo agli utenti di
portare con loro il contenuto delle sottoscrizioni in linea. Ad esempio, in un servizio come Napster un
sottoscrittore può accedere a centinaia di migliaia di brani, scaricarli nel dispositivo e portarli con
sé: il tutto per una minima tariffa mensile.
ALTRI PROGRMMI
Ad esempio, si può registrare la sitcom preferita su Media Center PC, quindi salvare lo spettacolo in
un formato adatto alla riproduzione su Portable Media Center. È possibile impostare Media Center PC
in modo che esegua automaticamente, in background, la conversione da un formato di compressione
all’altro, al termine della registrazione dei programmi televisivi. Il processo di conversione richiede
circa 1,2 volte la durata dello spettacolo in un PC con processore da 2 GHz.
Sincronizzazione con Portable Media Center: procedura dettagliata
La sincronizzazione di Portable Media Center con Media Center praticamente non richiede alcuna
configurazione. Nella descrizione seguente viene illustrata la procedura per trasferire in pochi minuti un
programma televisivo registrato da Media Center su Portable Media Center.
Collegare Portable Media Center al PC utilizzando il cavo di sincronizzazione USB, quindi avviare
Media Center premendo il pulsante verde sul telecomando. Selezionare Altri programmi dall’elenco dei
programmi disponibili. Evidenziare il collegamento Sincronizza con dispositivo selezionandolo con il
___________________________________________________________________________
MANUALE WMC rev 1.0
6.28
IT
pulsante freccia a destra del telecomando e premendo OK. Scegliere Aggiungi elementi e premere il
pulsante OK.
Selezionare Registrazioni dall’elenco delle opzioni di sincronizzazione Aggiungi elementi.
Selezionare l’opzione TV desiderata per la sincronizzazione con il dispositivo. In questo caso viene
eseguita la sincronizzazione di tutti i programmi disponibili. Selezionare Salva e premere OK.
È il momento di avviare il processo di sincronizzazione. Questo passaggio richiede qualche minuto,
poiché Media Center ottimizza i file dei programmi televisivi registrati per Portable Media Center man
mano che trasferisce il contenuto. Selezionare Avvia sincronizzazione e premere OK sul
telecomando.
Dopo il caricamento del contenuto in Portable Media Center, gli spettacoli sono pronti per la
visualizzazione. È sufficiente utilizzare le frecce di scorrimento per selezionare Televisione dall'elenco
di menu disponibili e premere OK. Lo spostamento nei menu di Portable Media Center è analogo
quello in Media Center su un televisore.
IMPOSTAZIONI
Le impostazioni, accessibili nel menu di avvio di Media Center e dal menu principale per ogni tipo di
intrattenimento, consentono di regolare il volume dei suoni e modificare l’aspetto di Media Center,
assicurarsi che il telecomando funzioni correttamente e configurare la connessione a Internet. È inoltre
possibile accedere alle impostazioni relative a TV/DVD, Immagini, Musica e Preselezioni radio.
Impostazioni generali
Impostazioni avvio e finestre. Le opzioni comprendono:
Selezione per mantenere la finestra di Media Center sempre in primo piano.
Visualizzazione della finestra di dialogo “Non progettato per Media Center”
Avvia Media Center quando Windows attiva l’esecuzione automatica. Consente di
avviare Media Center quando si avvia Windows o di passare direttamente al desktop.
NOVITÀ Attività di ottimizzazione automatiche. Per assicurare la corretta esecuzione di
Media Center PC, le attività di ottimizzazione vengono effettuate automaticamente al
momento specificato dall’utente.
IMPOSTAZIONI
Facendo clic su OK durante il processo Sincronizza con dispositivo, Media Center esegue il
trasferimento dei programmi televisivi sullo sfondo, consentendo di guardare un programma TV, ascoltare
musica, riprodurre un DVD, masterizzare un CD o effettuare qualsiasi altra operazione disponibile
in Media Center. Lasciare collegato Portable Media Center finché la sincronizzazione non è completa.
Effetti visivi e sonori. Le opzioni comprendono:
Attivazione/disattivazione delle animazioni di transizione fra schermate.
Riproduci suoni durante l’utilizzo di Media Center
Selezione del colore di sfondo
Opzioni Altri programmi. Le opzioni comprendono:
Impostazioni: scegliere se le applicazioni possono controllare Media Center, rilevare lo
stato corrente di Media Center e visualizzare metadati di Media Center. Per
impostazione predefinita, le opzioni sono attive.
NOVITÀ Applicazioni esterne. È possibile configurare la modalità di funzionamento
delle applicazioni di terze parti in Media Center.
Configurazione guidata Media Center. Le opzioni comprendono:
Configura connessione Internet. Consente di aprire la Configurazione connessione
Internet per impostare una propria connessione.
___________________________________________________________________________
MANUALE WMC rev 1.0
6.29
IT
Opzioni download automatici. È possibile scegliere se acquistare automaticamente licenze
per riprodurre tipi di file multimediali e consentire a Media Center di raccogliere informazioni su
CD/DVD.
Informazioni su Media Center. Informazioni sulla licenza e la versione del prodotto.
Privacy. Consente di configurare l’invio di informazioni a Microsoft allo scopo di migliorare
l’utilizzo di Media Center. Da questa posizione è possibile decidere se inviare a Microsoft
dati relativi all'utilizzo, ovvero informazioni non personali relative unicamente al sistema e alla
configurazione dell’hardware. Queste informazioni vengono raccolte per stabilire perché si
verificano alcuni problemi e come ottimizzare gli aggiornamenti e le versioni future di Windows
XP Media Center Edition 2005.
Impostazioni Televisione
Videoregistratore. Consente di visualizzare lo stato di registrazione dei programmi già
registrati, regolare le opzioni di archiviazione delle registrazioni e modificare le impostazioni
predefinite.
Guida TV. Consente di personalizzare l’elenco dei canali per ogni utente e selezionare Modifica
elenco per configurare la Guida TV, Richiama dati Guida TV per aggiornare le informazioni
della Guida TV e Informazioni su Guida TV per ricevere comunicazioni dal fornitore dei servizi
televisivi.
Configurazione segnale TV. Questa procedura guidata consente di configurare il segnale
TV.
Impostazioni di regolazione dello schermo. Consentono di configurare lo schermo sul quale
utilizzare Media Center.
Audio. Opzioni di regolazione audio e sottotitoli codificati.
IMPOSTAZIONI
Configurazione TV o monitor. Utilizzare questa procedura guidata per modificare
le impostazioni che influiscono sull‘aspetto di Media Center sullo schermo. Selezionare
il tipo di schermo in uso, quindi regolare le impostazioni desiderate per visualizzare
Media Center in modo ottimale.
Impostazioni Windows Update. Consente di attivare/disattivare il download e
l’installazione automatici di aggiornamenti per Windows nel computer.
Impostazioni Desktop remoto. Consente di impostare Media Center PC per
l’accesso in remoto. Desktop remoto permette di accedere a una sessione di
Windows in esecuzione sul computer quando ci si trova su un altro computer. Ad
esempio, è possibile utilizzare Desktop remoto per connettersi da casa al computer di
lavoro e accedere a tutte le applicazioni, i file e le risorse di rete, come se ci si
trovasse in ufficio.
Configurazione altoparlanti. Consente di regolare le impostazioni degli altoparlanti.
Ripristino delle impostazioni di fabbrica. Consente di ripristinare le impostazioni
predefinite di Media Center PC.
Nota:quando sono impostati vari account utente su un Media Center PC condiviso, alcune
impostazioni sono accessibili solo da parte dell’amministratore. Ogni utente può
personalizzare le impostazioni dell’elenco dei canali e dell’audio TV nella Guida TV. Tuttavia
le impostazioni relative al Controllo genitori, a Registrazioni e ad altre funzionalità della Guida
TV riguardano l’intero sistema e possono essere modificate solo dall’amministratore designato
per il computer.
Impostazioni Immagini
È possibile regolare le impostazioni delle presentazioni nei modi seguenti:
Scegliere di visualizzare immagini in ordine casuale, mostrare le immagini nelle
sottocartelle o visualizzare i sottotitoli.
Scegliere di visualizzare le informazioni sui brani durante una presentazione.
___________________________________________________________________________
MANUALE WMC rev 1.0
6.30
IT
Ulteriori informazioni
Scegliere transizioni animate o a dissolvenza incrociata oppure disattivare le transizioni.
Utilizzare i tasti -/+ per definire la durata della visualizzazione di ogni immagine sullo
schermo.
Scegliere il colore di sfondo della presentazione. Se alcune foto presentano dimensioni
insolite, l’area vuota dello schermo viene riempita con il colore selezionato.
Effetti grafici. Selezionare l’effetto di visualizzazione da riprodurre sullo schermo quando si
sceglie Effetti grafici nel menu Informazioni di esecuzione.
Opzioni effetti grafici. Selezionare per avviare sempre gli effetti grafici quando si
riproducono brani musicali e scegliere se mostrare le informazioni sui brani durante gli effetti
grafici.
Aggiungi musica. Consente di aggiungere o rimuovere cartelle per la ricerca di Media Center
in Musica
DVD
Lingua. Consente di regolare le opzioni della lingua per i sottotitoli, i brani audio e i menu
DVD.
Audio. Consente di regolare le impostazioni audio.
Telecomando. Consente di programmare i pulsanti Skip (Ignora) e Replay (Ripeti) sul
telecomando; scegliere se utilizzando questi pulsanti vengono ignorati capitoli o si salta avanti
e indietro.
Comunicazioni
Notifiche. Consente di attivare/disattivare i messaggi immediati dall’interno di Media Center e
configurare le notifiche tramite chiamata telefonica.
Radio
Consente di ordinare e gestire le stazioni radio preselezionate.
ULTERIORI INFORMAZIONI
Impostazioni Musica
___________________________________________________________________________
MANUALE WMC rev 1.0
7
IT
Configurazione dell’hardware del PC
Collegamento di un’antenna FM al PC
Per utilizzare un sintonizzatore FM sulla scheda PC è necessaria un’antenna FM. Le antenne FM
sono disponibili in varie forme e misure. Due esempi vengono illustrati di seguito:
Individuare la presa FM sulla scheda di sintonizzazione TV del PC e collegarvi l'antenna montata.
Come in tutti i casi di ricezione FM, può essere necessario regolare la posizione dell’antenna per
migliorare la qualità del segnale.
ULTERIORI INFORMAZIONI
La configurazione standard di Media Center PC è analoga a quella di un PC tradizionale; gli unici
passaggi aggiuntivi sono il collegamento del segnale TV e del sensore. Attenersi alle linee guida del
produttore per configurare l’hardware del PC. La sezione seguente illustra solo i collegamenti
aggiuntivi di Media Center PC, specificamente quello del segnale TV (da coassiale o S-Video),
quello del sensore (se esterno, quindi via USB) e quello del cavo di controllo IR (mini-presa da 3,175
mm, 1/8”). Il produttore del PC potrebbe fornire in dotazione con il PC istruzioni aggiuntive e più
precise per la configurazione dell’hardware.
___________________________________________________________________________
MANUALE WMC rev 1.0
7.1
IT
La tecnologia Windows Media Center Extender offre il modo più comodo per divertirsi con i programmi
televisivi, la musica, i film, le foto e i video preferiti in ogni ambiente della casa, trasmettendo senza
problemi e contemporaneamente il contenuto multimediale da Media Center PC a qualsiasi televisore.
Grazie al telecomando in dotazione, gli utenti possono ascoltare i brani nella raccolta di musica digitale,
assistere a programmi televisivi in diretta e registrati, visualizzare foto di famiglia e filmati: il tutto
dall’interfaccia familiare di Media Center.
TECNOLOGIE
MEDIA
CENTER
EXTENDER
INCORPORATE IN XBOX
360
Xbox 360 consente di utilizzare
Windows XP Media Center
Edition 2005 in remoto su
televisori e monitor di casa.
Xbox 360 è il sistema di
intrattenimento e per videogiochi
di prossima generazione che
garantisce un coinvolgimento
senza confronti. Xbox 360 da
inizio a una nuova epoca nel
campo
dell'intrattenimento
digitale: sempre connesso,
sempre
personalizzato
e
sempre ad alta definizione.
Da un singolo Media Center PC è possibile accedere
a foto dalla scrivania (1), musica dalla camera da letto (2),
programmi televisivi in diretta e registrati dal soggiorno (3) e foto
e filmati dal salotto (4): tutto
allo stesso tempo, utilizzando l’interfaccia familiare
e coerente di Media Center.
Le tecnologie Media Center Extender sono integrate nei sistemi di gioco Xbox 360™ e forniscono
accesso ai contenuti multimediali digitali da qualsiasi posizione della casa. Ogni Xbox 360 è dotato della
funzionalità Media Center Extender incorporata, predisposta per l’utilizzo immediato. Tale funzionalità,
in combinazione con il più recente aggiornamento software, l’aggiornamento cumulativo 2 per
Windows XP Media Center Edition 2005, offre accesso senza problemi a musica digitale, video, foto,
film e programmi televisivi standard e ad alta definizione nei PC basati su Media Center Edition
2005, mediante qualsiasi console di gioco Xbox 360 disponibile in casa.
Alcune funzionalità e vantaggi chiave delle tecnologie Media Center Extender sono:
•
•
•
TECNOLOGIA EXTENDER
Tecnologie di Windows Media Center Extender
Facile accesso ai contenuti multimediali digitali. Media Center PC è l’hub per
l’intrattenimento digitale che garantisce accesso immediato a un’unica, coerente libreria di contenuti
multimediali digitali da qualsiasi dispositivo Windows Media Center Extender presente in casa.
Grande compatibilità. Media Center Extender può essere collegato a quasi tutti i televisori o
sistemi home theater.
___________________________________________________________________________
MANUALE WMC rev 1.0
8
•
•
•
•
•
•
•
•
Connessione alle reti cablate o senza fili. Grazie a Media Center PC, sono supportate le
connessioni alle reti domestiche cablate o senza fili a elevata velocità.
Video ad alta definizione e audio home theater. Xbox 360 garantisce una qualità audio e video
eccellente, paragonabile a quella dei sistemi home theater, con suono surround digitale a 5.1
canali discreti, audio a 24 bit e supporto di video ad alta definizione a schermo intero (WMV ad
alta definizione).
Esperienza Media Center coerente. Grazie a Xbox 360 è semplice divertirsi con musica digitale,
foto, programmi televisivi e video utilizzando lo stesso telecomando e la stessa interfaccia Media
Center, ormai familiari.
Un solo telecomando. È possibile accedere e controllare il contenuto multimediale di Media
Center utilizzando un unico telecomando progettato per tutti i dispositivi di Media Center,
inclusi Extender e Media Center PC.
Supporto di funzionalità multisessione. Si possono utilizzare fino a cinque diversi dispositivi
Media Center Extender contemporaneamente. Con un Xbox 360 nel salotto di casa, un utente può
guardare un programma televisivo registrato mentre un altro sfoglia la raccolta musicale di
famiglia sul Media Center PC in salotto.
Supporto di aggiornamenti Media Center. I dispositivi Windows Media Center Extender offrono
sempre le funzionalità Media Center più aggiornate, incluse quelle nuove disponibili in Windows
XP Media Center Edition 2005: supporto di un doppio sintonizzatore TV, la Guida TV migliorata e
una selezione ampliata di applicazioni e servizi Media Center aggiuntivi.
Supporto di servizi e applicazioni di terze parti. Le applicazioni e i servizi di terze parti
aumentano ulteriormente i contenuti multimediali digitali fruibili in casa, come la musica in streaming
e film su richiesta. Online Spotlight consente di accedere a musica e film su richiesta, giochi,
servizi di informazione e altro ancora. Premendo un solo pulsante gli utenti possono accedere alla
Guida Xbox, un vero e proprio gateway per l'intrattenimento, e avvantaggiarsi immediatamente delle
funzionalità di Xbox 360 per divertirsi nel modo desiderato: con i giochi, gli amici, la musica.
Possibilità di connettersi ad amici e familiari. Messenger per Media Center consente di
conversare con gli amici mentre si utilizza Media Center in altri modi. È possibile avvalersi della
videocamera Xbox 360 per partecipare a videochiamate o inviare messaggi video ad amici in
tutto il mondo tramite Xbox Live™.
TECNOLOGIA EXTENDER
IT
___________________________________________________________________________
MANUALE WMC rev 1.0
8.1
IT
Il telecomando unico Hantarex e il relativo ricevitore infrarosso per Windows Media Center
utilizzano un protocollo di comunicazione proprietario. Nel caso in cui si vogliano utilizzare
telecomandi e tastiere wireless sviluppate per WMC, sarà necessario collegarne il ricevitore
infrarosso alla porta USB del PC.
Durante la procedura iniziale di registrazione del sistema operativo, può necessario collegare
una tastiera o un mouse alla porta USB.
Si faccia attenzione che, se il PC è acceso e si utilizza il telecomando in modalità WMC (vedi
paragrafo relativo al Telecomando), i comandi trasmessi dal telecomando vengono in ogni
caso eseguiti dal PC anche nel caso in cui la sorgente video visualizzata dal Flat TV è diversa
da quella PC/DVI.
L’interruttore generale di alimentazione è comune sia alla parte Flat TV che alla parte PC.
Assicurarsi quindi di aver spento correttamente il PC prima di togliere l’alimentazione.
Poiché complessivamente nel sistema sono presenti due tuner TV (uno relativo al Flat TV e
uno al PC WMC), è possibile vedere contemporaneamente due programmi televisivi
utilizzando la funzione di Picture in Picture (vedere Manuale Utente LCD TV per dettagli).
Anche se e’ possibile collegare la parte PC Media Center al Flat TV mediante diversi tipi di
connessioni video, è consigliabile utilizzare sempre la connessione DVI per una migliore
visualizzazione.
Per poter visualizzare, all’interno di Windows Media Center, la televisione a pieno schermo nel
modo migliore, scegliere l’opzione di visualizzazione ZOOM3 (premere il tasto INFO mentre si
visualizza un canale televisivo).
Per problemi od ulteriori informazioni relativi alla parte Hardware del PC, fare riferimento alla
documentazione tecnica delle case costruttrici allegate.
Per aggiornamenti od ulteriori informazioni relativi al sistema operativo Windows Media
Center, fare riferimento al sito internet: www.microsoft.it
Le informazioni contenute nella presente guida sono intese a fornire un ulteriore supporto per
l’Utente nell’utilizzo del prodotto Hantarex con Windows Media Center integrato.
Le informazioni contenute nel presente documento rappresentano la visione attuale del prodotto con la
versione software disponibile al momento della pubblicazione.
A causa di possibili aggiornamenti da parte di Microsoft, le informazioni potrebbero non descrivere o
riflettere accuratamente il prodotto software pubblicato. La presente guida viene fornita a solo scopo
informativo e non si offrono garanzie, esplicite o implicite, relativamente alla guida o alle informazioni
in essa contenute.
Si prega di non aprire per nessun motivo l’apparecchio e di rivolgersi soltanto a Centri d’Assistenza
autorizzati. La rottura dei sigilli presenti sulla parte PC o sulla parte TV, fa decadere immediatamente
la garanzia.
Microsoft, Windows, il logo Windows, il logo Microsoft Internet Explorer, Xbox 360, MSN, il logo MSN, Windows Media, il logo
Start di Windows, Xbox e Xbox Live sono marchi o marchi registrati di Microsoft Corp. negli Stati Uniti e/o in altri Paesi.
I nomi di società o prodotti esistenti citati nel presente documento potrebbero essere marchi dei rispettivi proprietari.
___________________________________________________________________________
MANUALE WMC rev 1.0
SUGGERIMENTI E AVVERTENZE
SUGGERIMENTI E AVVERTENZE
9
EN
The information contained in this guide is intended to supply additional support to the end user of
Hantarex products with Windows Media Center integrated.
The information contained in this document is indented for the current product with the software
version available at the moment of publication.
Due to the possibility of upgrades by Microsoft, the information could not describe or represent the software
accurately. This guide should be used only for information and does not construe a guarantee, explicitly or
implied, relative to the guide or the information contained herein.
Microsoft, Windows, the Windows logo, the Microsoft Internet Explorer logo, Xbox 360, MSN, the MSN, Windows Media logo,
the Windows Start It Up logo, Xbox and Xbox Live are trademarks or registered brands of Microsoft Corp. in the United States
and or other countries
The names of companies or products cited in this document could be brands or the respective owners.
___________________________________________________________________________
WMC MANUAL rev 1.0
INDEX
Introduction and overview ........................................................................................... 1
Connection scheme .................................................................................................... 2
Remote control ........................................................................................................... 3
Windows XP Media Center Edition 2005 Operating system ....................................... 4
Windows XP Media Center Edition 2005 Cumulative Update2................................... 5
Windows XP Media Center Edition 2005 Functions.................................................... 6
Preliminary operations: Media Center configuration ........................................... 6.3
My TV ................................................................................................................. 6.5
My Music........................................................................................................... 6.13
My Pictures ....................................................................................................... 6.17
My Video........................................................................................................... 6.21
Play DVD .......................................................................................................... 6.23
Radio ................................................................................................................ 6.25
Online Spotlight ................................................................................................ 6.26
More Programs ................................................................................................. 6.27
Settings............................................................................................................. 6.29
Additional Details ........................................................................................................ 7
Windows Media Center Extender Tecnology .............................................................. 8
Tips and warnings....................................................................................................... 9
___________________________________________________________________________
WMC MANUAL rev 1.0
EN
Introduction and overview
Microsoft and some partner manufacturers introduced a new class of PC with Microsoft Windows XP
Media Center Edition 2005. Media Center offers many entertainment opportunities and is a unique
experience with complete freedom to access your contents from anywhere in your home with a single
remote control.
Media Centers are desktop PCs in all effects and have the latest generation hardware and software in
order to give home entertainment and information from a single source. Media Centers include
medium-high level processors, adequate memory for technical applications and entertainment, high
capacity hard disk and CD-ROM and DVD drives. The present system also has state of the art audio
and video along with the possibility to connect to the Internet.
• A remote control to control all the available functions easily. Along with the remote control, a mouse
and keyboard can be connected with the same functions from anywhere in the room.
• An infrared sensor allows the remote control to communicate with the Media Center.
• A state of the art graphic system gives the best television quality on the monitor.
• A card television card that supports cable television, satellite or antenna signals.
• Encoding hardware and software allows the user to record television programs coming from cable
satellite or antenna signals to the hard disk.
• A television out put jack allows Media Center content to be seen on a TV connected to a PC.
• Analog or digital audio out put to connect to the PC’s speakers or a home entertainment system for
better playback options.
HANTAREX WMC inside presents a further step towards the integration of television and the new
capabilities of a Media Center PC.
A PC within our Flat TV
Single remote control to activate all the WMC PC and the Hantarex Flat TV
Integrated infrared sensors for the WMC remote control
Drastic reduction of connecting cables
Modular system where it is possible to use the WMC PC and the Flat TV separately and
independently
INTRODUCTION
Media Center offers:
___________________________________________________________________________
WMC MANUAL rev 1.0
1
EN
Connection Scheme
After positioning the screen, connect the various input signals to the Flat TV referring to the relative
LCD TV User’s Manual.
Connect the PC to the Flat TV as shown in the following connection scheme.
VIDEO: connect the DVI cable
AUDIO: connect the PC’s LINE OUT output (refer to the technical cards in the PC’s
documentation) to the Flat TV’s PC AUDIO input.
After making all the connections, turn on the system with the general power switch and then push the
PC power button.
To see the images correctly, refer to the PC connection section in the LCD TV User’s Manual.
CONNECTION SCHEME
•
•
___________________________________________________________________________
WMC MANUAL rev 1.0
2
EN
Remote Control
The single Hantarex remote control allows you to control all the functions of both the Flat TV and the
WMC. To go from one mode to another, press either the TV button or the “PC/Green Button”
POWER
SOURCE
MUTE
TV
PC / GREEN BUTTON
MON
BACK
APP
EPG
DTVm
CTRL / DVD menu
SIZE / GUIDE
PICTURE / REC TV
SOUND / LIVE TV
MENU
TEXT
EXIT
INFO
▲, ▼, ►, ◄
OK
STILL
PIP
FOCUS
P+
PVOL +
VOL RED / DELETE / PLAY
GREEN / SKIP / REW
YELLOW / INSERT / FWD
BLUE / REPLACE / STOP
TXT ? / MTS / REC
TXT stop / SLEEP / REPLAY
TXT i / TIME / SKIP
TXT zoom / PREPG / PAUSE
0..9
DTV / ALPHA
-/-- / CLEAR
Turn on/off the TV
Input selection menu
Turn off the volume completely
Activate TV mode
Activate WMC mode
Not active
Not active
Not active
Not active
Not active
Video – brightness, contrast, saturation,
sharpness adjustment
Graphics - brightness, contrast
adjustment
Image format
Image type selection
Sound mode
Access menu
Teletext (ON/MIX/OFF)
Menu or submenu exit
Signal source information
Navigation arrows
Confirm key
Freeze frame
Picture in Picture mode
PIP mode: select focus and audio
principal or secondary
Select the next program
Select the previous program
Increase the volume
Decrease the volume
Teletext RED
Teletext GREEN
Teletext YELLOW
Teletext BLUE
Teletext info / Audio channel selection
Teletext stop / Sleep time selection
Teletext index / Display the time
Teletext zoom / Last channel selected /
Numeric keys
Not active
Activate two digit channel selection
REMOTE CONTROL
Remote control in TV mode
___________________________________________________________________________
WMC MANUAL rev 1.0
3
EN
POWER
SOURCE
MUTE
TV
PC / GREEN BUTTON
MON
BACK
APP
EPG
DTVm
CTRL / DVD menu
SIZE / GUIDE
PICTURE / REC TV
SOUND / LIVE TV
MENU
TEXT
EXIT
INFO
▲, ▼, ►, ◄
OK
STILL
PIP
FOCUS
P+
PVOL +
VOL RED / DELETE / PLAY
GREEN / SKIP / REW
YELLOW / INSERT / FWD
BLUE / REPLACE / STOP
TXT ? / MTS / REC
TXT stop / SLEEP / REPLAY
TXT i / TIME / SKIP
TXT zoom / PREPG / PAUSE
0..9
DTV / ALPHA
-/-- / CLEAR
Turn off PC
Not active
Turn off the volume completely
Activate TV mode
Return to the WMC main menu
Not active
Return to the previous screen
Not active
Not active
Not active
Start DVD recording menu
Open the TV Guide
View the recorded TV list
View TV WMC full screen
Not active
View Teletext WMC
Return to the previous screen
View details about the media selected
Navigation arrows
Confirm button
Not active
Not active
Not active
Select the next program
Select the previous program
Increase the volume
Decrease the volume
Run the selected media
Rapid rewind
Fast Forward
Stop the running media
Record a selected TV program on the
HD
Go back one track
Skip forward to the next track
Pause the current playback
Numeric keys
Activate the alphanumeric keyboard
CLEAR
REMOTE CONTROL
Remote control in WMC mode
Use the numeric keypad to select a TV channel.
To input a text in an application that requires it, press the ALPHA key
to go to the alphanumeric mode. Then, multi-tap the keys like with a
cellular telephone, push once for the first letter of a key, twice for the
second letter, etc. If you do not press a key for a few seconds, the
keypad will automatically return to the numeric mode.
___________________________________________________________________________
WMC MANUAL rev 1.0
3.1
EN
Microsoft Windows XP Media Center Edition 2005 Operating System
Windows XP Media Center Edition 2005 is available preinstalled on your Media Center PC. It has the
latest calculation capabilities, besides a practical integrated digital entertainment system including TV
recorded in real time, films music, photos and radio, that you can enjoy as and where you want. All
the digital multimedia content is gathered in a single device and is accessible on both you PC monitor
and TV using a single remote control.
With Media Center, you can pause and even rewind live TV and live radio programs in real time,
record an entire TV series, watch a DVD and home videos, organize and listen to your music
collection, show your digital photos and listen to live radio.
Windows XP Media Center Edition presents an advanced computer and entertainment system in a
single device that have been developed around Windows XP Professional, enhanced by the latest
digital entertainment technology developed solely for Media Center PC platforms.
Revolutionize your home PC making it the center of home entertainment tuned to you!
Performance and reliability
Based on Windows XP Professional operating system
Connectivity and communication
Wizard guides and tools for the home network.
- Wizard guide to connect to the Internet
- Firewall to connect to the Internet, to protect your PC
- Shared Internet connection: allows the Internet connection to be shared by more than one
computer
Microsoft Internet Explorer 6
Windows Messenger
Play on the Internet
Tools for digital content
Windows Movie Maker (available through download)
Windows Media Player 9 Series
Windows XP tools to touch up your photographs
Media Center’s main characteristics
User friendly menus
o Remote control or with mouse and keyboard
o Personalized audio prompt
o Animated Transition effects and backgrounds
o Windows: view the current contents while browsing the menus
Settings for "Parental" control
Call waiting: a notice appears on the screen to inform you that someone is trying to telephone
and displays the number on the screen (not compatible with all dial-up services).
Media Center wizard guide insulation procedures helps configure the TV signals, decoders
and Internet connection
OPERATING SYSTEM
Microsoft® Windows® XP Media Center Edition 2005 offers easy to use integrated entertainment
capabilities that you can use as you wish. Entertainment is at your fingertips through a single and
easy interface and is accessible using the green button on a single remote control. You can pause
and rewind TV and radio programs while you watch or listen to them. Record your favorite TV
programs and watch them when you want. Find and listen to music making the Media Center your DJ.
Watch slideshows of your digital photographs and home videos. Enter into a world of “on demand”
entertainment.
It is easy; just grab the Media Center remote control, relax in front of your television, your flat screen or
your PC monitor and HAVE FUN!.
___________________________________________________________________________
WMC MANUAL rev 1.0
4
TV and video recording
TV
o View widescreen or in a window
o Subtitles with automatic audio turn off
o Pause a TV program for up to 29 minutes
o Review and fast forward TV
o Fast forward or rewind for 29 or 7 seconds
o Frame step
TV Guide
o List of the times for TV programs on the screen for up to 14 days
o Program details: description, actors, synopsis and other information
o Title display, keyword or search by category
o Playlists filtered by genre
o Automatic TV Guide update
o Recording shows or series is easily scheduled while you brows the list
Video recording for personal use (PVR, Personal Video Recording)
o Recording: record the program in progress by pushing a button
o Record by keyword : automatically sets the recording time by category, title, actor or
director
o Manual recording: set the type of VCR to record the program
o Power on for recording: from the stand-by mode, the PC powers on to record the
program at the set time
o Conflict management: insures that programs are recorded even if the broadcast times
change
o File storage management: allows you to choose the quality level and the file size of
the recorded programs
Film and home video
Watch DVD with all the capabilities
o Access the DVD’s capabilities: chapters, synopsis, supplementary audio tracks,
multiple camera frames and others.
o "Parental" control
Digital Video Catalog
o Watch video from Video or directly from the connected devices
Music
Display albums, artist or music: search and classify music tracks based on albums, artist or
genre.
Widescreen: cool effects that move to the rhythm of the music.
Track information: title, length, artist, album title, album cover .
Personalized playlists: create a compilation of your favorite songs.
Automatic playlists: Media Center creates an automatic compilation based on music tastes.
Get music: to find new songs, just push a button.
Imagines
Automatic slideshow mode with optional transition effects and background music.
Rotate command, Zoom, Pan, Modify and print
Direct access to the filed photographs.
OPERATING SYSTEM
EN
Radio
FM Radio and Internet
Presentation and search for radio stations.
Radio broadcast pause and rewind
Immediate replay: go back 7 seconds
___________________________________________________________________________
WMC MANUAL rev 1.0
4.1
EN
Online Spotlight
Web sites to watch film trailers, buy the latest songs or listen to the latest news from the
entertainment world and even more.
Windows Media 9 Series is integrated in Media Center and supplies many benefits to listen to audio
and watch video content.
Improved performance: completely redesigned, Windows Media 9 Media Library series
responds faster to enjoy digital content, particularly in the case of large content libraries.
Running and starting up content has also improved.
Windows Media Audio support and Video 9 series: the most recent updates in Windows Media
compression technology produce high quality audio and video at the existing bit rates,
superior quality for the dial-up rate, and quality home-theater for wide bandwidth connections
or to download and play
Clear Video: for low bit rate media, the video refinishing can reduce “flicker” while playing
video content adding the missing video frames.
Auto Crossfading: this characteristic automatically mixes the existing audio levels from the end
of one song to the start of the next. It is possible to configure the length of the crossfade.
Auto monitoring of files and folders: it is possible to add them to your list in order to find them
automatically in your library.
Auto info: from within Media Player, it is possible to add or organize the details of your music
albums like the composer, year, genre and album cover for the WMA and MP3 collections
you already have.
OPERATING SYSTEM
Audio and video
Windows Media 9 Series technology offers exceptional video and audio support software for complete
surround sound 5.1, a 16:9 compatible widescreen display, besides a display calibration wizard to
configure the best viewing resolution and to configure the television and input signal.
___________________________________________________________________________
WMC MANUAL rev 1.0
4.2
EN
Cumulative 2 update for Windows XP Media Center Edition 2005 has been available for free
since October 2005 in the download area of Microsoft’s site. It includes a series of considerable
improvements in the performance and some new capabilities conceived to optimize Media
Center.
Stability and superior reliability
-
Optimized for stable performance and improved speed. The Cumulative 2 update gives
superior performance, it gives a more fluid and improved TV, video and audio quality.
Windows® Media Center Extender update
-
Xbox 360 Support. Xbox 360™, the latest generation entertainment and video game
system, which was launched in the second half of 2005 in North America, will have Media
Center Extender incorporated and ready to use. This function, in combination with the most
recent software updates, Cumulative 2 for Windows XP Media Center Edition 2005, offers
access to digital music, video, photos films and standard television programs and at high
resolution in PCs based on Media Center Edition 2005 through any Xbox 360 game console
available at home.
New Media Center Capabilities
-
Standby mode. This is a new functionality that brings the characteristics of ease, performance,
undisturbed use and ability to turn on/off instantly to Media Center PC typical to electric
appliances. The standby mode is an evolution to other PC power saving systems. The
systems seems to be turned off, but, in effect, it is in a power saving mode and runs programs
automatically like recording television programs and streaming broadcasts to a Media Center
Extender; the standby mode is available only on some new Media Center PCs.
-
Improved DVD burning. Thanks to the updates for Sonic DVD burning module, the burning
performance and capabilities in Media Center are even better than before. Now, the user can
burn content from other clients on the network, for example, a Media Center Extender device.
-
Improved Zoom. Improved zoom allows television broadcasts to be optimized for widescreen TVs.
-
DVB-T Support. Now, users can receive digital terrestrial broadcasts, DVB-T, Digital Video
Broadcast, in countries where they are available.
-
Automatic optimization activation. To guarantee that Media Center PC works properly, the
optimization is run automatically at a time set by the user.
WINDOWS MEDIA CENTER UPDATE
Cumulative Update 2 for
Windows XP Media Center Edition 2005
___________________________________________________________________________
WMC MANUAL rev 1.0
5
EN
Windows XP Media Center Edition 2005 Capabilities
MEDIA CENTER: THE BEST DIGITAL ENTERTAINMENT FROM ONE SOURCE
Designed to interact with a remote control, Media Center is a valid tool to have fun with home
entertainment. Elegantly designed, Media Center’s animated transition from one menu to the next is
easy to use.
Media Center Start Up display. The connections allow quick access to the most often
used functions.
FUNCTIONS
The user can get comfortable anywhere in the room and watch a DVD, listen to music or the radio
along with watch, pause and record live television programs. It is possible to use the entire Media
Center screen or the thumbnail image window to enjoy multimedia content while you do other tasks. If
you forget the remote control on the sofa or you are sitting at the desk, just touch the mouse to display
the commands on your desktop to control the entertainment session using the mouse and keyboard.
Media Center’s Capabilities
•
•
•
View the full screen: The Media Center’s start up screen shows all the multimedia content and is
conceived to display and interact with a remote control
Window mode. This allows you to watch the TV in one window while you use your computer
in another. You can adjust the size of the windows, as you like.
Thumbnail image window. The multimedia content running at the moment is displayed in a
thumbnail image window while you browse Media Center
The multimedia information like the name and track length identifies the current selection.
___________________________________________________________________________
WMC MANUAL rev 1.0
6
•
•
•
•
•
•
•
•
•
•
•
Cyclical menu. Media Center’s menu constantly cycles to allow quick access to the type of
entertainment you want.
Desktop Commands. Moving the mouse displays the recording tool bar and the Media
Center connection bar that guarantees full control of the multimedia activities running while
you are in frond of a Media Center PC.
Desktop Volume Control. A display on the screen shows the volume level and shows when
the audio is deactivated.
Appearance and current capabilities. The easy to use menu gives audio warnings,
animated transitions and backgrounds that can be personalized. Characters, layouts and
transitions remain current for any type of entertainment and in Windows XP.
The latest 16:9 format support. Media Center allows you to use the widescreen formats to their
best giving more elements in some menus, including photo and video thumbnail images and
elements from the TV Guide. While watching a DVD or a television program, it is possible to
expand the proportions of the images, enlarge or reduce the screen or view in the original format.
Set options. The Settings menu allows you to turn on or turn off sound effects and
background and transition animation.
Call waiting. A notice appears on the screen when someone is trying to call on the telephone
and shows the number that is calling (this functionality is available only in a few countries,
moreover, it is necessary to have a modem that is able to identify the call and a telephone
service that allows identification).
Improved design for easier and faster control. The headings in the menu have a new type of
character that makes it easier to read them from a distance.
More menu choices. In the Media Center start up screen, when you highlight and select a menu,
you can choose from the most recently used menus.
Windows Messenger for Media Center. Now, Windows Messenger is integrated in
Media Center, therefore, it is possible to know when your friends are on line and send
messages to any name in your contact list. You can participate in chats with friends and
to comment on programs, make an appointment to meet on-line or simply contact family
members wherever they might be.
Burn multimedia content on CDs or DVDs. Using the remote control, it is possible to create CDs
or DVDs of your favorite music or record television programs, images and films that have already
been memorized in Media Center, the DVD burn functionality is available only as an OEM option.
Try this
Use the navigation arrow keys (arrows/pointer) and press the OK button on the
remote control to go from one type of entertainment to another. It is also
possible to navigate in Media Center with the keyboard, using the arrow keys
and ENTER and the mouse.
• If Media Center PC is connected to a 16:9 format widescreen, it is possible to
control the video content display. While you watch a DVD, home video or
television program, press the More Info/Details key to alternate from the
zoom modes. You can modify image proportions, increase, decrease or
display the content in the original format.
FUNCTIONS
EN
___________________________________________________________________________
WMC MANUAL rev 1.0
6.1
EN
User and power options
Windows Media Center Edition 2005 offers various user and energy saving options that can be
accessed with the Media Center Start up Menu.
The options include:
Exit. This closes the Media Center and returns to desktop
Log Off. This closes the user account without turning off the computer and disconnects it or goes
to another user with the remote control.
Shut Down. This turns off the computer and, if toggled on when you select Shut down the system,
Media Center PC goes into Standby mode, (see below.)
Restart. This restarts the computer.
Standby. This puts the computer into a state of low power consumption, the monitor and hard disk
turn off, leaving applications and files open on the desktop.
Media Center PC in the Standby mode is ready to use in just a few seconds; just press the “on” button
or the “green” Media Center button on the remote control. Other infrared devices, a wireless keyboard
or other buttons on the remote control, do not turn off the Standby mode, so you cannot accidentally
power up Media Center when in this mode.
For example, while watching or recording a television program, listening to music or running a
slideshow, it is possible to press the Power button on the remote control or PC. The system will seem
to be off, the images disappear from the screen and the speakers are turned off but the system
continues to record the television program in the background. The slideshow and/or music stop until
the user returns. When the PC is in Standby mode, just insert a CD or DVD in the relative unit to
reactivate the system, the speakers and screen wake up and the content plays immediately.
FUNCTIONS
NEW Standby mode. Introduced in the Cumulative 2 update, the Standby mode allows analog
functions of consumer electronic devices as long as the hardware is supported; this function is
available only on a few new PCs. In this mode, the system can run activities automatically while it
seems to be turned off. Thanks to the Standby mode, users can turn off and turn on Media Center as if
it were a set-top box, CD/DVD player or DVR burner.
___________________________________________________________________________
WMC MANUAL rev 1.0
6.2
EN
PRELIMINARY OPERATIONS: MEDIA CENTER CONFIGURATION
Windows XP Media Center Edition 2005 can configure Media Center based on the specific type
of screen, speakers installed, the type of TV signal and other settings. In a few short steps,
Media Center is optimized to guarantee the best quality based on the hardware available and
the configuration of the room.
To set up Media Center, it is necessary to complete two secessions:
Obligatory Set Up. Media Center verifies the components like the network, the Internet connection
and the remote control
Optional Set Up. It is possible to set up the capabilities and advanced settings to satisfy your needs.
Set up tuner, TV signal and TV Guide
Optimize the Media Center appearance on the screen
Set up the speakers and surround sound
Use the remote control or keyboard and mouse to select the Set Up menus and operate the desired
selections. Keep information like your ZIP/post code or Country code and TV service supplier handy. This
information is necessary to configure television and the relative TV Guide.
To use the TV Guide and program recording sessions, it is necessary to connect Media Center PC to
the Internet. An active Internet connection is necessary also to download information about
CDs/DVDs like the thumbnail image images of the album cover and the track titles.
PRELIMINARY OPERATIONS
Media Center Set Up Wizard
___________________________________________________________________________
WMC MANUAL rev 1.0
6.3
EN
Display Calibration Wizard
A series of screen adjustment tests optimizes the settings:
Centering and resizing the display. Centers images and insure that the proportions are correct
according to the type of screen.
Aspect Ratio (shape). Insures that the shapes, for example circles and straight lines, are
precisely shown on the screen.
Brightness. Adjusts the visibility of dark colors and shadows.
Contrast. Adjusts the level and Sharpness of white.
Color. Adjusts the accurateness of the colors on the screen.
Sharpness (edge enhancement). Influences how angles are shown on the screen.
To start the display calibration wizard, select Settings > TV > General > Adjust display settings.
The display calibration tests optimize the images shown.
TIPS
• If you would like to run the entire set up on a previously configured computer, go to the
Settings Menu in Start Media Center and select General. Select Configure Media center
and the select Run again to configure Media Center.
• To verify a part of the guided configuration, open the Settings menu in Start Media Center
and choose General. From this position, run the wizard in Set Up Remote Control and Set
Up Internet Connection.
PRELIMINARY OPERATIONS
The display calibration wizard is a sophisticated tool that helps obtain the best video playing quality
possible for the specific type of screen in use. The wizard asks a series of simple questions to
establish the type of screen used. Then, it generates a personalized guide that configures the screen
to provide bright, clear and lively colored images.
___________________________________________________________________________
WMC MANUAL rev 1.0
6.4
EN
MY TV
User scenario
The support of two tuners
allows you to watch and record
two different programs at the
same
time
insuring
the
maximum flexibility to watch and
record television programs.
John returns home from an evening out with friends just in time to see his favorite prime time TV
programs He makes himself comfortable, gets the Media Center remote control and selects Media
Center’s TV Guide. Before getting involved in one of his favorite programs, he must decide what to
watch, the sitcom that starts in a few minutes or the latest episode of a mystery series. He wants to
laugh, so the decision is easy.
John browses the listing of mystery series, selects the one he wants to see and presses Rec (Record)
on the remote control. He changes to the sitcom and enjoys a very funny episode. Half an hour later,
John decides to watch the film and save the mystery series for the weekend. He selects Movies from
the main My TV menu. Using the buttons, he scrolls through the alphabetic list to find the movie in the
guide. He selects a movie and highlights it to see a list of the cast and read a review. Certain to have
found the film he wants to see and gets comfortable. During the first scene, the telephone rings
and John presses the Pause button on the remote control and answers the telephone, thanks his
friend for a wonderful evening and in a few minutes is ready to watch the film.
For the third time this evening, he has not missed on second of his programs. He presses the
Play button and the film restarts exactly from where it stopped.
MY TV
The recorded TV programs are sorted in an easy to
consult playlist.
My TV - Highlights
Complete control of the television: The My TV menu offers an ample range of capabilities that allow you to
watch your favorite programs exactly when you want.
Thanks to digital video recording, it is extremely simple to program the recording of your favorite shows and
series and take complete control of when and how to watch TV. A range of 14 days of television
programming on the display is an easy way to find the desired program. It is even possible to program
recordings while browsing the TV Guide. Just highlight the show you want to record from the list of
programs, press Rec, and the program will be ready to play from the Recorded TV menu when you want.
___________________________________________________________________________
WMC MANUAL rev 1.0
6.5
EN
The My TV menu also controls live television programs. While you watch the TV, press the Pause button
on the remote control to stop the program for up to 30 minutes. When you are ready to watch the program,
press Play to watch the show from where it stopped. It is also possible to press Skip to go 29 seconds
ahead or rewind and fast forward recorded programs by pressing the REW and FWD buttons. Thanks to
Windows Media Center, you will not miss one second of your favorite programs.
The support of two tuners in Windows XP Media Center Edition 2005 allows you to watch one show
while recording another or you can record two at the same time.
The My TV menu includes four principle menus, TV Guide, TV, Recorded TV and Search.
Program Guide (TV Guide)
Inset window. While you browse the TV Guide, a window displays the multimedia content
being shown at the moment.
Channel Guide. Select the channel in the TV Guide grid to see the list of the programs
planed for that channel..
Possibility to program the shows to record directly from the TV Guide. Browse the TV
Guide to find the program or series you want to record, highlight the programs you want to
record then press the Rec button.
Selecting Parental Control allows parents to block TV programs. It is possible to block all
the films without ratings and/or set the maximum ratings for films and television programs.
Automatic Guide Update. Media Center can automatically update the lists of the TV
programs from the Internet once or twice a day. Naturally, the TV guide can be manually
updated at any time.
16:9 format support. In widescreens, the TV Guide grids add an additional 30 minutes to
the TV program listings.
Introduction Demo
Launch the TV Guide
Press the TV Guide button on the remote control to quickly access the TV Guide. The titles of the
programs, the channel and the time and length will appear. When you select the title of a program
already in progress, the display expands automatically to the full screen.
MY TV
If available, the TV Guide is a convenient way to find the programs you want to watch and record.
Updated with the information from your TV provider, the TV Guide shows a grid for up to 14 days
of programming. It is free for Windows XP Media Center Edition 2005 users: just connect to the Internet
to receive the updated list of programs. The capabilities include:
Browse the TV Guide
Use the Channel/Page Arrows (+ o -) to examine seven selections per time. The up, down and lateral
navigation arrows show more information. Press the Skip or Replay button to skip forward or back 12
hours and press the FWD or REW button to skip forward or back 3 hours.
___________________________________________________________________________
WMC MANUAL rev 1.0
6.6
EN
TV Guide Program Filter Lists
While browsing the TV Guide, to see only the films from a certain genre or specific content, sport,
films, news, special programs for children for example. Within the TV Guide, press the Guide button to
access the filter options. The TV Guide will show only the listings of the specific types of programs
you want to see, so you can quickly watch or record them.
Display Program Information
In the TV Guide’s program listings, select the title of a program to display the details like the total length and
the category. From the program information display, it is possible to program the recording of single episodes
or the entire series and find other broadcast times of the same program.
Search for Programs to Watch and Record
Search the TV Guide to find television programs using the title or a keyword and select the
category. To begin, press the Start button on the remote control, select My TV , then select Search.
Select Categories to search for programs based on genre like films or sport. Use the navigation
arrow buttons to scroll through the search results. Select Title to use the number keypad on the
remote control in order to type the title of the program. Press OK to confirm the selection. Select
Keyword to use the number keys to type a keyword of the title or description of a program. Use
the arrow buttons to scroll through the search results.
From the main Media Center menu, select TV Settings, TV, and then Guide. Select Edit Channels.
Remove the checks (√) of the channels you wish to eliminate from the TV Guide and press OK. In the
same way, it is possible to reinsert the channel in the list or go directly to the channel desired at any time
using the numeric keyboard on the remote control.
If necessary, it is also possible to edit the channels’ numbers.
Live TV
It is possible to watch your favorite television programs in full screen mode or in a window. The
capabilities include:
MY TV
Personalize the TV Guide’s channel list
It is possible to personalize the channels displayed in the TV Guide and remove the channels you do not
want to watch. It is possible run this operation in the TV Settings Menu.
TV in full screen mode or with a window. It is possible to watch the TV in a window using
Media Center PC or in the full screen mode from a distance.
Enhanced 16:9 format support. It is possible to alternate from normal zoom and size to
optimize widescreen displays.
Clear Video Quality. De-interlacing the video signal guarantees high resolution and images in
scale to improve the quality making the television pictures clear and uniform on your PC
monitor.
Closed Captioning. Display the subtitles that scroll at the bottom of the screen in a ticker
window. The audio settings turn on or turn off the automatic subtitles when the audio is mute.
___________________________________________________________________________
WMC MANUAL rev 1.0
6.7
EN
Introduction Demo
Start TV with full screen
Press the Live TV button on the remote control to display the TV in full screen mode with any Media
Center activity. You can also press the Start Media Center button to display the Start menu and then
select My TV . If you run start from the My TV menu, the last channel selected will broadcast.
Change channel
Select a channel using the channel/page buttons (+ o -) or the number keys on the remote control.
Pause and Live TV Program Rewind
In case you are interrupted while watching a program, just push the Pause button on the remote
control to stop the live television broadcast until you are ready to watch the program at the same point.
Because the Live TV Buffer automatically records the last 30 minutes of the program, it is possible to
rewind it at any time during the program. When you start to record during a show, the buffer contents
are also included, therefore, you can watch the program from the beginning.
Display program information
MY TV
During the control of Recorded TV, a status
bar is displayed to make it easier to change
from one program to another.
Intuitive
commands like pause, rewind, automatic
repeat, skip back seven seconds, fast forward,
skip forward 29 seconds and frame step insure
complete control of your television viewing.
Press More Info/Details to access the selections of the overlapped window that displays the More
Information. Select More Info/Details to display program details like the title, length and a synopsis . From
the menu, it is also possible to access the recording options, start Messenger, adjust the settings, display
the Guide on line and choose other options.
TV displayed in a window
To enjoy Media Center entertainment and run other applications at the same time, it is possible to run
Media Center in a small window and move it where you want on the desktop.
Move the mouse to access the desktop commands. Click the Restore Down button and then use the
mouse to move and increase or decrease the size of the television window on the desktop.
To return to the full screen mode using the remote control, press the green Start button twice.
___________________________________________________________________________
WMC MANUAL rev 1.0
6.8
EN
Display the Recording Options
Highlight a film's Title/Thumbnail Image and press OK. From the Program Information display, it is
possible to obtain detailed information about the film, recording schedule, set recording options and
find additional show times of the film selected.
Display the Film’s Details and Ratings
The film’s details are always at hand. It is possible to see the director and cast’s names, other films
directed by the director or with the same actors. Moreover, there are ratings and you can find similar
films that your might enjoy.
Record Live Television Programs
Automatic Update of the Recording Schedule. If the broadcast date or time of the program
changes, Media Center automatically updates the recording based on the new time.
Advanced Conflict Management. This functionality allows you to verify the most recent
information in the TV Guide automatically guaranteeing that the programs will be recorded
also if the show time has been changed. If a recording is already set for the time you set
for a new recording, a notice will appear to make choosing the recording time easier.
Video Recording from Standby. This function automatically activates your Media Center PC from
the energy saver mode to start the scheduled recording.
Start Early/End Late. You can choose to start a recording early or end late, so you do not
lose one second of the recorded program.
Introduction Demo
Record Live Television Programs with One Touch
Press the Rec button on the remote control to record the television program you are watching. The
recording will stop automatically when the show is scheduled to stop.
MY TV
Thanks to Windows XP Media Center Edition 2005, it is particularly simple to record television
programs. The digital video recorder allows you to record and watch television programs easily or
program the recording of a show. The ample range of recording options allows you to a record single
program or entire series and even eliminate the reruns. It is also possible to watch a recorded
program while recording another one live. In particular, the double tuner support allows you to watch
one show while recording another or record two programs at the same time. The capabilities include:
Schedule Recording While Browsing the TV Guide
While browsing the TV Guide, it is possible to highlight a program in the list and press Rec once to
record a single program; press again to record the entire series. It is also possible to program a
recording from the program information display.
Automatically Record Programs That You Would Probably Enjoy
This function allows you to automatically record a personalized selection of television programs
without having to browse the TV Guide or manually program the recording. Keyword recording finds
and records shows that satisfy specified criteria.
Select Recorded TV from the main My TV menu. Select Scheduled, the Add Recording Selection
finally select Keyword and write a keyword. Media Center will record all programs that contain the
keyword like the name of an actor or director, the title or a key genre word.
___________________________________________________________________________
WMC MANUAL rev 1.0
6.9
EN
Schedule a Recording Manually
To program a personalized recording using specific parameters manually set like with a
videocassette recorder, select Recorded TV from the main My TV menu. Select Scheduled then
Add Recording. Select Channel Any Time. Specify the date and when you want to start and
end the recording, the channel and the length of the recording. If you want, you can assign a
name to the recording and choose the frequency, for example, every day, every weekday, every
Sunday.
Watch and Manage Recordings (Recorded TV)
Recordings, available in the main My TV menu, are the personal guide of recorded programs and those
scheduled to be recorded. The television program is recorded in the background and does not interfere
with other applications or Media Center activities. The programs can be recorded while you use you PC for
other activities or also if someone else accesses the computer. The PC is also able to record programs in
Standby mode; for More Information see Standby mode in the New Capabilities section of Media Center.
Browse for Recorded Programs
To look for recorded programs, select My TV, then Recorded TV. Use the navigation arrows on
the remote control to scroll through the list of recorded programs to see the relative information
including description, network and original broadcast date.
Manage a recorded program
Select a recorded program in the list then select:
Play to watch the selected program.
Delete to remove a recoding from the hard disk.
Keep until to indicate the date you want to delete the recording.
Record a Series to record the all the episodes of a series.
Other Episodes to find alternative broadcast times.
Manage Recording Scheduled
Select Schedule to display a list of the shows scheduled to be recorded.
MY TV
To organize the list, select Sort by Date or Sort by Category. The series programs are filed in a
secondary folder making it easier to organize the list to search quicker.
Scroll through the list using the navigation arrow buttons, It is possible to sort the list by date or title.
To display or modify a scheduled recording, highlight a program and then press OK. From the
Program Info menu, it is possible to modify the recording settings, indicate the amount of time you
want to keep a scheduled recording, remove a scheduled recording by selection Do Not Record
display information about the series or find other episodes.
TIP
In addition to canceling a scheduled recording from Scheduled Recordings, it is possible to delete a
schedule recording from the Guide or from Search using the red Record button. Press the Record
button once to record a single program, twice to record a series and three times to cancel the
scheduled recording of a series.
___________________________________________________________________________
WMC MANUAL rev 1.0
6.10
EN
Display the Scheduled Recording Status (History)
In History there is a list of the programs that have been recorded and any type of errors are shown like
an operation cancelled by the user, TV or Media Center PC signal problems or other specific technical
problems. It is possible to use Sort by Date, Sort by Status, Sort by Title or Delete History to remove
the titles listed. Highlight a program and select OK to see the error details.
Configuration of the Recording Acquisition Mode
The digital video recorder allows you to automate the complex of aspect of the recording offering the
freedom to configure the acquisition mode.
From the main Media Center menu, select Settings, TV, Video Recorder then Recording Settings. It is
possible to choose the video quality, specify when the memorized recordings must be deleted or
overwritten, start and stop recording for various minutes before and/of after the scheduled time and modify
the series recording options.
Set the Recording Priorities (Conflict Management)
Media Center manages the recordings and displays notices for schedule conflicts. Media Center
supplies an advanced recording management in order that programs are recorded even if the
established show times change. It also automatically manages the conflicts, eliminates reruns and
looks for alternative broadcast times in case of change or overlap.
Recording Storage Setting Management
Manage the storage space for television recordings and adjust the recorded program quality.
-
From the main My TV menu, select Settings then Recorder Storage. The available space for
recorded television programs depends on the size of your hard disk, the percentage of your hard
disk dedicated to recorded programs and the quality of the recordings selected.
-
Choose the quality level and file sized of the recordings to optimize the space on your hard disk.
Media Center makes recorded program management easy allowing you to maintain the recorded
programs until you delete them manually, they have been watched or space on the hard disk is
required to record new programs.
-
The length of the recording available is shown on the status bar that clearly shows how much recording
space there is and how much is being used by recorded programs and other content.
-
For the best playback quality, select Maximum. For the maximum recording time, select Fair.
MY TV
If you program two recording for the same time, a message appears to resolve the conflict. Media
Center searches the TV Guide for alternative broadcasts of the programs and, if one exists for one or
the other programs, Media Center offers the possibility to choose one. The Recording Priority menu
allows you to assign TV recording priorities to be sure that your favorite programs are recorded. If
there is a conflict between two programs, the one marked with the highest priority will be recorded.
___________________________________________________________________________
WMC MANUAL rev 1.0
6.11
EN
The following table shows the approximate sizes of files. The effective file sizes vary
based on audio and video content of the recorded TV programs.
Recording quality
Approximate sizes of files (Code Speed)
Maximum
Optimum
Good
Fair
3 GB/hour (6,8 MB/second)
2,5 GB/ hour (5,8 MB/ second)
2 GB/ hour (4,6 MB/ second)
1 GB/ hour (2,4 MB/ second)
TIP
For better filing capacity, it is possible to add an internal hard disk with NTFS format partitions if
the space allow it or you can connect to an external NTFS multimedia unit with an IEEE 1394 or
USB 2.0.
For example, an external 300 GB 2.0 USB dedicated to television programs can file from
100 to 300 hours of programming.
How to Use High-Resolution Content Best
For more information about WMV HD DVD or films to download, visit http://www.wmvhd.com .
MY TV
Windows Media High-Resolution Video (WMV HD) allows you to watch extraordinary high-resolution
films. Just connect your PC to a high-resolution monitor, for example, a plasma television and a
surround sound audio to have an incredible experience at home as if you were at the theater. Insert a
WMV HD DVD in the PC or download a brief WMV HD from the web.
___________________________________________________________________________
WMC MANUAL rev 1.0
6.12
EN
MY MUSIC
User Scenario
My Music allows you to file all your music in one location, create personal playlists and listen to songs
wherever you are.
It’s Friday evening. Helen and Dave are going to the seaside tomorrow morning for the weekend. While
Helen packs her suitcase, Dave cleans the home. To create the right atmosphere for the weekend, Dave
decides to listen to his favorite group’s latest album. He picks up the Media Center remote control, presses
Start to run Media Center, and selects Music. He runs a search for the album he wants and presses Play.
Helen takes a break and wants to surprise Dave with a new song. The day before, Helen created a
personalized recording playlist that includes their favorite songs. She grabs the remote control and selects
Playlists from the My Music menu. She finds the title of the personalized playlist, “Our Favorites”, and
presses Play.
My Music - Highlights
Windows XP Media Center Edition 2005 allows you to reproduce digital music on your computer
very easily from anywhere in the room.
Media Center’s Music functionality, based on Windows Media platform, offers the freedom to enjoy
your music from anywhere in the room. It is possible to create Windows Media Audio (WMA), MP3
and WAV audio file by scrolling through album cover s or looking through organized genre or artist
lists. Moreover, the track, album and information about the artist displayed on the screen are exactly
what you are listening to.
It is simple to take advantage of the easy and intuitive search function to find an album, artist, song or
playlists quickly. You can insert a personalized playlists of any occasion; all you have to do is press
the button to play in order or shuffle the playlists, music by artist or genre or your entire music library.
It is even possible to make CDs from your playlists.
MY MUSIC
Dave really likes the compilation and decides to take it with them on the trip, so he puts an empty
CD-R in the Media Center CD unit and selects Create CD from the Tasks menu and looks for “Our
Favorites” in the playlists. In just a few minutes, the new CD entitled “Songs for our Trip” is ready
to go.
___________________________________________________________________________
WMC MANUAL rev 1.0
6.13
EN
My Music Overview
Select Music from the Media Center Start menu to choose, listen to and manage your songs. In
the main My Music menu, the Recent Music menu is displayed to give you rapid access to a CD
album, artist or playlists listened to recently. It is possible to use the menu options to search for
an album, artist, playlists, song or genre.
Album. Allows you to see the albums in the Media Library like alphabetical lists, Show by
lists, or Cover s, Show by cover s. It is possible to listen to all the albums in your library by
selecting Play, and Shuffle to listen to the albums in a random order.
Artists. Allows you to search for songs scrolling through an alphabetical list of artists. When
more than one artist performs on an album, names that the user might not know and can
stimulate the users’ interest are shown.
Songs. Allows you to select a specific song from an alphabetical playlist of songs in your library.
Genre. When music is filed on the hard disk, Windows Media Player automatically puts the songs
in categories by genre or musical style. Select a Genre, for example Folk, Rock, Country or Blues, to
find all the albums in your collection with that type of music quickly.
Playlists. This allows you to see playlists automatically created by the user with Windows Media
Player. The playlists are personalized collections of songs suitable for various occasions like a party
or a candlelight dinner.
MY MUSIC
Introduction Demo
My Music has been conceived to make song selection easy. If you want to create a particular
atmosphere, listen to a specific artist of just enjoy a random group of songs, just use the remote
control to select and control your choices.
___________________________________________________________________________
WMC MANUAL rev 1.0
6.14
EN
The Auto Playlists make it easy to create and edit compilations of songs with dynamic playlists that
are updated automatically when new songs are added or modified in a multimedia catalog. The
features in Windows Media Player include more than 20 automatic playlists for any type of use:
from your favorite music for the weekend to random compilations of songs that you want to burn on
a CD to take with you or to put in your MP3 player.
TIP
Play all the songs in your digital collection, from A to Z. Scroll to View Songs, then select
Play. To shuffle the songs within a collection select Shuffle. To play the songs over and over
select Repeat.
TIP
Search for an artist or the title of a song typing the letters of the last name of an artist or a keyword of a title
like “Bea” for “The Beatles” or “Sun” for “Good Day Sunshine”. The search function reduces the choices as
you add letters; it is not necessary to give complete information.
Play an Audio CD
Insert an audio CD in the CD unit. If Media center is running, a warning asks if you want to play the CD. If
Media Center is not active, you will be asked to choose the multimedia player to use from those available in
Media Center. The metadata, including album art, the songs’ name, the artist’s name and title of the album,
are gathered automatically and displayed in a few seconds.
TIP
A CD might not start automatically, so it is possible that you might not be asked to choose the setter in
the AutoPlay settings in Windows has been modified. To modify the AutoPlay settings, minimize or
close Media Center, select Start on the Windows taskbar and then My Computer. Right click on the
CD unit you are using with the mouse and then select Properties. Open the AutoPlay folder and verify
the settings for the music device.
MY MUSIC
Search for a Song
Use the o button on the remote control to identify a song, album or artist. Use the numeric keypad
on the remote control to type name of the album or artist pressing once for the first letter on the
key for the first letter, press a key twice to type the second letter on the key and three times for
the third letter, etc. Use the Page Up/Down button to type the less common characters like letters
with accents and symbols like @ and $. With each letter, a more limited playlist is displayed.
Create a Digital Jukebox
It is possible to copy music from your CD collection to the My Music folder to create a digital music
collection in Media Center PC. With all the songs in a single location, it is possible to listen to your
collection from a single location and in a completely new fashion: shuffle the songs in an album or
select, create and edit playlists, search for songs and even use displays that interact with the music.
While you listen to a CD, select Copy CD to file the songs on your hard disk in a WMA or MP3 format.
Media Center downloads the album cover, the artist’s data, the song’s titles and other data from the
Internet, so your music is organized and accessible from a single location.
___________________________________________________________________________
WMC MANUAL rev 1.0
6.15
EN
If you use Windows Media Player, it is possible to choose the settings for the type of audio files that will be
filed in your Music collection. The Copy Music settings determine the quality and the size of the audio files.
To modify the current settings, open Windows Media Player, then select Tools, Options, and Copy Music to
choose the new format.
Play Music from Your Collection
When you play songs included in your music library or on a CD, the Now Playing window opens. From
this position, it is possible to select different playing options:
Display Cover . Allows you to display the album cover and title and the current song.
Display Queue. Allows you to display a list of all the songs on the CD. Scroll through the list
using the navigation arrow buttons, highlight a song and press OK to play it.
Shuffle. If you love surprises, choose the Shuffle option to play all the songs of an album, the
songs on a playlist or your entire music collection randomly without repeating until all the
songs have been played.
Repeat. To play an album or a favorite playlist over and over, choose Repeat from the menu
on the right of the screen. A tick will indicate the selection made. Cancel the selection to
return to the Play mode without repeating.
Buy Music. Just press a button to find other songs of the artist in the music collection. Buy
Music allows you to connect directly to catalog new songs for sale by the artists that you are
listening to. It is possible to buy the music and find other new songs directly from your web
browser.
Graphic Effect. High quality displays within the screen that make the music live with surprising
effects and styles. Press the arrow buttons or CH+/CH- to change the display.
Edit Queue. Allows you to modify the sequence of the music playlist of the songs that are going to
play. It is possible to add or eliminate songs, change the order or save the list as a personalized
playlist and is accessible in the Playlists menu.
MY MUSIC
There are three Windows Media Audio formats as well as MP3 at a high bit rate:
Windows Media Audio (WMA). Songs are copied using a constant bit rate. The quality and size of
the files can be modified as desired. The bit rates vary from 48 Kbps (Kilobit per second; approx.
22 MB per CD) to 192 Kbps (approx 86 MB per CD). A lower constant bit rate allows you to
save memory on the hard disk, the higher the bit rate, the higher the quality of the music.
Variable WMA bit rate. The songs are copied using a range of bit rates to obtain the
compression desired. The results are a smaller file that maintains its excellent quality.
WMA Lossless mode. The songs maintain their original CD audio quality. Music lovers can
use this mode to file CDs efficiently and enjoy the best quality possible.
High Bit-Rate MP3. Choose Copy CD in WMA format or high quality MP3. The bit rate values
available include 128 Kbps, 192 Kbps, 256 Kbps and 320 Kbps.
TIP
If it is not possible to play an audio file, make sure that you have not pressed the Mute or Pause button
on the remote control and the volume is not set to zero. All of these functions are displayed
graphically on the screen, just look to see if the parameters are correct.
___________________________________________________________________________
WMC MANUAL rev 1.0
6.16
EN
Play Music in an Ample Range of File Formats
The following are types of digital audio files are compatible with Media Center. Media Center is also
able to play music in any format if the relative provider makes the plug-in available. For More
Information on music file formats, refer to the on-line Media Play Guide.
Type of File (format)
CD audio
Windows Media audio file
Windows audio file
MP3
File Name Extension
.CDA
.ASF, .ASX, .WAX, .WM, .WMA, .WMD
.WMP, .WMX, .WVX, .WAV
.MP3, .M3U
Use the Keyboard Shortcuts
If you prefer, it is possible to use the computer keyboard instead of the remote control. Many
multimedia keyboards have Media Center PC shortcut keys included that make using Media
Center’s capabilities easier. Additionally, the navigation arrow buttons on the keyboard work like
the navigation arrow buttons on the remote control and the ENTER key works like the OK button
on the remote control
User Scenario
The My Pictures menu offers all the tools necessary to import, edit, view and transfer digital photographs:
it’s like have a real digital photography laboratory.
Luisa and her best friends have just returned from a vacation in the Caribbean with great memories, all
captured with Luisa’s digital camera. Wanting to share her photos with her travel companions, she
invites them to her home.
Before they arrive, Luisa connects her digital camera’s USB cable to the USB port in the front of her
Media Center PC. Media Center recognizes the digital camera and imports all the photographs to the
My Pictures folder. Using the remote control, Luisa chooses the Caribbean Trip folder, highlights first
image thumbnail image and presses OK to see it on the full screen. She presses Forward to view the
thumbnail image of all the pictures.
While looking through the images, she sees that many have a fairly similar quality defect. In one
image, all of the four friends on the beach at sunset have “Red Eye”, typical of photographs taken with
a flash. Luisa selects Touch Up in the Picture Details menu and selects Correct Red Eye. In just a few
seconds, Media Center analyses and corrects the photograph. Another image in the slide show taken
during a hike would be perfect to frame if a tourist had not passed in between the camera and the girls.
Luisa selects Crop from the Touch Up menu and uses the navigation arrows on the remote control to
adjust the borders of the photograph eliminating the intruder for the picture that she will hang in the
wall.
MY PICTURES
MY PICTURES
Luisa’s friends arrive and get comfortable on the sofa. To create a festive Caribbean atmosphere, she
chooses a reggae album from her music collection. She selects Slide Show from the My Pictures menu
and the show is on.
Luisa’s friends love the show and want to show them to her friends and family. Luisa scrolls
through the Activities menu, selects Create CD and adds the images to the list. A short while
later, she presents each friend with a CD with the atmosphere and memories from the Caribbean.
Imagines - Highlights
It is possible to use the Media Center remote control or the keyboard and mouse and the menus on the
screen to order and find your photographs and images in the My Pictures and Shared Pictures folders. The
Touch Up tool allows you to crop your photographs, adjust the contrast and eliminate Red Eye from the
subjects.
___________________________________________________________________________
WMC MANUAL rev 1.0
6.17
EN
Introduction demo
Media Center PC offers a new and fun way to see and share your digital photographs. With the
remote control, it is possible to view photographs and graphics, play slide shows or presentations,
Touch Up photos and burn them on a CD.
My Pictures Overview
Select My Pictures from Media Center’s Start menu or press the My Pictures button on the remote control
for quick access. The thumbnail image of the albums and photographs in you collection are shown on the
main screen. To move from the menu to the thumbnail image and folders, use the navigation arrow
buttons on the remote control.
View you’re My Pictures Collection
From the main Media Center menu, select My Pictures . Within My Pictures, use the navigation arrow
buttons on the remote control to scroll through the images in your collection. A green border identifies
the selected image. The filed photographs in the My Pictures and Shared Pictures folders can be
sorted. Select Sort by Date to order them by the date they were last modified.
MY PICTURES
It is possible to view your digital photographs once at a time or create automated slide shows. You can
also add background music to the presentation to create the right atmosphere and adjust the volume or
change songs during a presentation: all without loosing one second. You can share you photographs with
family or friends by creating a personalized CD of your images.
To view photographs not filed in the My Pictures folder, press the More Info/Details button on the
remote control or click with the right mouse and select the Add Pictures option. A wizard shows you
how to add, or remove, folder in other locations on your PC or in your home network.
___________________________________________________________________________
WMC MANUAL rev 1.0
6.18
EN
TIP
•
When images are saved from a digital* camera or a scanner in the computer Windows XP
usually files them in the My Pictures folder included in the My Documents folder. From within
the My Pictures folder, it is possible to add, delete, move and rename files. Any additions or
modifications are made immediately to the My Pictures within Media Center.
• In addition, if you take pictures with a traditional camera, it is possible to create presentations
and share the images using Media Center. Most photo shops can develop film digitally and
put the photographs on a CD or make them available on-line so you can download them to
your PC.
*Note: Windows XP Media Center Edition 2005 supports a vast range of interfaces to connect your
digital camera, for example Fire Wire (IEEE 1394) and USB, as well as the most popular memory
cards for cameras.
-
Start an Automated Slide Show. In the Start menu, select My Pictures and then choose the
folder to show using the navigation arrow buttons on the remote control. Select Slide Show.
If it is necessary to stop the presentation, press Pause. An indicator is displayed on the screen for
five seconds then disappears. Press Play or Pause to restart the presentation or press the
navigation arrow buttons to go to the next or previous slide.
-
Add Background Music to a Slide Show. Media Center allows you to listen to music and watch
images at the same time. It is even possible to create playlists to give atmosphere for a certain
presentation. In Media Center’s Start menu, select My Music and identify the music you want to
hear and press Play. Press the Start button to return to the main menu, then select My Pictures.
The information about the music that you are listing to remains visible in the thumbnail image
window. When you start the presentation, the view changes to the full screen mode and the music
continues in the background.
-
Modify the Performance Settings. In My Pictures, select Settings to change the mode you see a
presentation. It is possible to set the transition time from one picture to the next choosing a value
between two and 60 seconds; the default time is five seconds. You can also select how the slides
will be shown, in order or randomly and if to include a sub-folder or not.
TIP
It is possible to choose the length of time an image is displayed during a presentation by
setting a value between 2 and 60 seconds. Select Settings in the main My Pictures menu and
the edit or put the number of seconds you want to see the images.
MY PICTURES
Play a Slide Show
The automated slide shows can be uses as extraordinary background for parties and are an ideal way
to share your favorite photos with your family and friends.
___________________________________________________________________________
WMC MANUAL rev 1.0
6.19
EN
Full Screen Mode
To see images on the full screen, select an image and press OK. To see the next image in the folder, use
the FWD, Skip or the Move Right button. Use the REW, Replay or Move Left button to see the
previous image. To return to My Pictures, press Back on the remote control. At any moment while you
look at your photos on the full screen, press Play to alternate from manual to automatic commands.
Zoom and Pan a Picture
It is possible to zoom and pan a picture with the remote control. Press the OK button to enlarge a photo
and use the arrow buttons to see pan it. To rotate the image, select the image and press the More
Info/Details button. Select Picture Details from the menu and choose Rotate to rotate the image 90°
counter clockwise.
Fix a Picture
In the Picture Details menu, select Touch Up to correct errors in the photo and change the viewing
mode. Media Center is able to adjust images’ contrast and remove Red Eye, a problem common with
photographs taken with a built-in flash. To apply the correction, mark the Correct Red Eye and/or
Contrast: Media Center will analyses the image and automatically adjust to the optimum.
To correct the photo’s layout, select Touch Up. Use the icons to frame the image horizontally or
vertically, enlarge or reduce and modify the photo’s layout, horizontal/vertical.
Select Thumbnail Image to check the results, then Save the Touched Up picture.
Modify the Way You View a Pictures and Slide Shows
Select Settings to adjust the picture display options. From this position, it is possible to choose to see
the pictures in random order, make them viewable in sub-folders, adjust the transition time from one
image to the next during a slideshow, modify the background color, adjust the transition Effects and
find images filed in the computer.
Use the Keyboard Shortcuts and Mouse in My Pictures
If you prefer, it is possible to view the images using the computer’s keyboard or mouse instead of the
remote control. The arrow keys on the keyboard work the same as those on the remote control.
Some multimedia keyboards include shortcut keys and any time that you click with the mouse popup
messages are displayed.
View Pictures from a Wide Range of Supported File Types
My Pictures supports the most common type of image files as shown below.
Type of File (format)
Joint Photographic Experts Group
Tagged Image File Format
Graphics Interchange Format
Bitmap
Windows Metafile
Portable Network Graphics
MY PICTURES
Print a Picture
While you are looking at an image press the More Info/Details button, then select Print from the menu. It
is also possible to select Print Screen on the keyboard to send the image to the printer.
File Name Extension
.JPG e .JPEG
.TIF e .TIFF
.GIF*
*Animated .GIF are snow as static
images
.BMP
.WMF e .EMF
.PNG
___________________________________________________________________________
WMC MANUAL rev 1.0
6.20
EN
TIP
If an image is not shown correctly, it is probable that the type of file is not supported. The types of files
not supported are ignored during presentations. In this case, it might be necessary to modify the
image using a photograph editor, the save it in a supported file format.
MY VIDEOS
User Scenario
With Windows Movie Maker 2.1 e Media Center PC, It is possible to create, modify, watch and share
all your video memories with friends and family.
The next day, Mike connected his video camera to the USB port on his Media Center PC and exported the
film to the hard disk. Using Windows Movie Maker 2.1, he combined clips of the ceremony and shots
of the family adding transition effects and music to give a real professional touch. He memorized the
fill in the My Video folder and used the DVD burning functionality in Movie Maker 2.1 to make a DVD.
The next weekend he invited his parents to see the film. After sitting them on the sofa, Mike pressed Start
on the remote control to run Media Center. He chose My Video from the Media Center menu, the used the
navigation arrows on the remote control to choose the anniversary video. He pressed Play and the movie
started. Mike adjusted the volume with the VOL +/- button on the remote control. He pressed pause
to set the following scene and then pressed Play to continue. He selected Rewind to listen to
George’s toast then Skip to go the next scene.
Mike and his parents enjoyed the evening reliving the silver anniversary celebration and the video became
a precious testimony to a memorable event. At the end of the evening, when his parents were preparing to
go home, Mike gave them the DVD, so they could share it with other friends.
MY Video – Highlights
MY VIDEO
For their 25th wedding anniversary, George and Ruth wanted to repeat the ceremony and renew their
vows. Their son Mike recorded the ceremony and the silver wedding anniversary reception with his digital
video camera.
It is no longer necessary to look for a videocassette in the closet or find the appropriate cables to
connect your video camera. My Video allows you to file and organize your video files in a centralized
multimedia library making it easy to play your home videos or video files downloaded from the Internet.
Use the remote control or the mouse and the keyboard to select My Video from Media Center. The
My Video menu allows you to order, choose and play video content for everyone’s pleasure. It is
possible to invite friends to watch your vacation videos or enjoy music videos from your sofa or favorite
armchair. Windows Media Video 9 insures full screen video quality without precedence.
Windows XP Media Center Edition 2005 includes the new Windows Movie Maker 2.1 for Windows
XP. Windows Movie Maker 2, completely redesigned, takes simple and fast creation of video to a new
level: now, to create, edit and share video on your computer, all you have to do is drag and drop.
___________________________________________________________________________
WMC MANUAL rev 1.0
6.21
EN
Learn More!
Learn more about Windows Movie Maker 2 in the Additional Information section. More information is
available in Windows Media Player and Digital Media Experience in the Windows XP Reviewer's
Guide.
Introduction Demo
My Video allows you to organize your films in a digital multimedia library and to manage and play
video files from the desktop or remote with the remote control.
Browse Videos
In My Video, it is possible to use the remote control or the mouse and the keyboard to browse the
videos in your collection. On the right side of the screen, you see the thumbnails in the folder, if the
video have been filed in a folder. To move from the menu to the thumbnail or the folders, use the
navigation arrow buttons on the remote control.
TIPS
•
•
To go from the full screen mode to the inset window, select the Inset Window using the
navigation arrow buttons on the remote control, the press OK. To return to the previous
screen, use the Back button on the remote control.
Adapt a coherent naming system in order to identify what you are looking for easily. For
example, “2005_Vacation Party” is a name that is easier to identify compared to just “Party”.
Search for Videos
In Media Center PC, it is possible to identify videos and add them to a folder shared with another computer.
If more than one user is configured for Media Center PC, it is possible to use the Shared Video functionality
to have easy access to video files that you wish to share with others. Move these videos, or make a
connection, to the Shared Video folder. To find this folder, select Start from the Windows desktop, then My
Computer and open the Shared Documents folder
To view video not filed in the My Video folder, press the More Info/Details button on the remote
control, or click with the right mouse, and select the Add Video option. A wizard will show you how to
add or remove the folders located in other positions in the PC or the home network.
MY VIDEO
Sort Videos
In the Media Center menu, select My Video, the Sort by Name or Sort by Date to find a specific video
quickly. Sorting by date allows you to organize a list based on date/hour of the video file. Some digital
video cameras include this information automatically on the video file.
Create a CD/DVD
It is possible to transfer video from your collection to a CD or a recordable DVD, for More Information, see
the information about burning a CD and DVD in the Other Programs section further in this guide.
Play a Video
Highlight the video you want to play and press OK. It is possible to watch the video in full screen
mode or in a window. Press More Info/Details on the remote control to view information about the
video like the date it was created or modified and the size of the file. It is also possible to play a video
directly from the menu.
To view the counter, press play on the remote control while the video is playing.
___________________________________________________________________________
WMC MANUAL rev 1.0
6.22
EN
Play different video format files
Type of File (format)
Windows Media Video and playlists
AVI video file*
MPEG video file
File Name Extension
.WMV, .ASF, .ASX, e .WPL
.AVI
.MPEG, .MPG, .MPE, .M1V, .MP2, .MPV2
e .MPA
Indeo video file
.IVF
*It is possible to play other formats using Windows Media Player 9 Series to install the
appropriate codec.
PLAY DVD
User Scenario
Media Center offers a complete series of capabilities to play DVDs: Pause, Fast Forward, Rewind as well
as More Information and content including chapters, ratings, camera angles and cover art.
Before playing the film, Eva examines the special content in the DVD. She watches an interview with the
director and the crew and is fascinated by the stories how the make-up artists were able to transform the actor
into an alien. Eva selects DVD Menu on the remote control and presses Play to view the main feature.
During the segment where the alien transforms, Eva presses the Replay button to return to the beginning of
the chapter and watches the segment to discover how they did the special effects. During the film, she often
presses Pause and Rewind to watch the film frame by frame and see if she can recognize any stand-ins in the
action scenes. The telephone rings and Eva presses Stop. When she is ready to get back into the film, she
presses Play and the DVD start from where it stopped.
Play DVD - Highlights
It is possible to use the Media Center remote control to stop, pause, fast forward and rewind DVDs, as well
as access additional information and content including chapters, synopses, multiple camera angles and
cover art. Simple menus in Settings make it easy to change the DVDs’ preset audio settings and language
setting. Parental control uses MPAA ratings to block some of the DVDs’ content, so it cannot be seen by
children.
PALY DVD
Eva starts Windows Media Center, inserts a science fiction film in the DVD drive and gets comfortable with a
nice hot cup of tea. The DVD starts automatically.
___________________________________________________________________________
WMC MANUAL rev 1.0
6.23
EN
The video capabilities include:
AutoPlay. When the DVD is loaded in the unit, it starts automatically
Play DVD in full screen mode or in a window. Watch your DVD in the high quality full
screen mode while you sit on the sofa or in a window while you browse Media Center at your
desk.
Detailed DVD information. Press the More Info/Details to display the title, chapter titles genre,
parental (MPAA) rating, length, and current position.
Parental controls. Parents can block DVD content according to their specific and unique needs.
Block all movies, unrated movies, or set a maximum allowed movie rating.
Adaptive de-interlacing and video scaling. Hardware accelerated video de-interlacing
eliminates visible scan-lines and video flicker effect. Hardware accelerated video scaling delivers a
smoother, sharper picture on high-resolution progressive scan displays.
Introduction Demo
View DVD information
Press the More Info/Details button on the remote control to view the title, chapter titles genre,
parental (MPAA) rating, length, and current position.
Access special content
Use the DVD Menu button on the remote control to access the corresponding menu. In most DVDs, this
menu gives access to single chapters and other special content. Use the navigation arrows on the remote
control to select what you want to see.
Personalize DVD Commands
It is possible to personalize the DVD Commands in Settings > DVD > buttons then press Program on the
remote control.
Try this
While you watch a DVD, use the CH +/- (Channel +/-) buttons on the remote control to skip from one
DVD chapter to another. If you are connected to the Internet while you do this, you can see also the
titles and number of the chapters.
PLAY DVD
Play a DVD
Insert a DVD in the appropriate unit and close it. If the AutoPlay function is enabled, the DVD will start
automatically. It is also possible to play a DVD already in the unit by selecting Play a DVD from the main
Media Center menu.
___________________________________________________________________________
WMC MANUAL rev 1.0
6.24
EN
RADIO
User Scenario
Media Center PC has a radio tuner that offers a complete series of FM radio capabilities including live
radio pause, preset stations and scan. It is also possible to choose from hundreds of Internet radio
stations.
Eric returns home after a day in the office. He picks up the Media Center remote control on the table
and starts Windows Media Center. To relax at the end of a hard day, he chooses Radio from the main
menu and uses the navigation arrows to look for his favorite local classical music radio station
While he prepares dinner, he remembers one of his favorite writers is the guest on a radio talk show, one
that he never misses. Using the navigation arrows, he highlights the preset NPR station and presses OK to
dial the station automatically. He tunes in right as the host is presenting the writer. The host cites the
author’s web site but Eric did not hear it. He presses Replay on the remote control to rewind seven
seconds of the broadcast. This time he hears the web address.
Right after that, Eric remembers that he has not returned the DVD that he rented. He presses Pause on the
remote control and races out of the house. A few minutes later, he comes back and presses Play. Eric
relaxes on the sofa and listens to the rest of the interview that started without missing one second.
In Media Center Edition 2005, Radio offers a multifunction radio tuner directly on the desktop giving you
full control of your listening experience. The preset stations allow you to access your favorite stations
immediately by pressing just one button, while the scan capabilities allow you to find the stations’
bandwidth in just a few seconds.
Now, it is possible to control the radio using Media Center’s personal recording capabilities. While you
listen, press Pause on the remote control to suspend and replay for up to 30 minutes. Replay allows you
to rewind seven seconds in order to replay important details while you listen to a radio broadcast.
The capabilities include:
-
DVB-T Radio Support. Now you can receive digital radio through Digital Video Broadcast, DVB-T,
in countries that offer it like Australia, England, France and Germany.
RADIO
Radio - Highlights
TIP
The Radio feature is active only if your Media Center PC is configured with the FM input
on the TV tuner card. If your Media Center PC does not have an FM tuner, you will not be
able to select the Radio menu.
Introduction Demo
From the main Media Center menu, select Radio to start the tuner.
Scan for a Radio Station.
From the main Radio menu, use the navigation arrows on the remote control to scroll through the tuner
interface options.
-
Dial a Station. Use the numeric keypad to dial a station. Press OK to confirm the selection.
___________________________________________________________________________
WMC MANUAL rev 1.0
6.25
EN
-
Scan for a station. Use the navigation arrows to select.
Create a Preset Station
To dial your favorite radio station quickly, it is possible to preset up to nine radio stations. To
memorize a preset station, tune to a station and select Save. Media Center will automatically
assign the station to a Preset
Control Live Radio
Now it is possible to pause and replay the content of a radio program with complete control of how to
listen to live radio
-
Pause Live Radio. To pause a live radio broadcast, press the Pause button on the remote
control. Press Play or Pause to restart the program where it was paused. The pause buffer
memorizes up to 30 minutes of radio content.
-
Replay. If you missed the number to call for a radio contest, press Replay on the remote control to
replay the last seven seconds of the broadcast.
ONLINE SPOTLIGHT
Online Spotlight offers Media Center PC users a simple way to find services and software directly on
the main Media Center menu. With Online Spotlight, it is possible to find continuously expanding
world of services thanks to the contribution of partners. This portal is integrated in Media Center in
order to explore content easily with the remote control.
The Online Spotlight capabilities include numerous services like the possibility to have information on
the latest movies, purchase films and TV programs, listen to radio stations on the Internet and browse
web sites especially made for Media Center users. You can also read the latest news, shop on-line
and check your bank account.
MORE PROGRAMS
The More Programs area offers an ample range of tools and ways to manage your multimedia content.
It is possible to burn CDs or DVDs, start Messenger on Media Center, and move multimedia content to
a portable device or a removable media and others.
ONLINE SPOTLIGHT
To access a preset station, use the navigation arrows to reach the Presets, then scroll through the
list of stations to find the one you want or enter the preset number using the numeric keypad.
It is possible to sort the preset stations by selecting Settings in the Radio menu. Use the navigation arrows on
the remote control to scroll through the preset stations, the press the Up (▲) and Down (▼) buttons to
assign the station another preset number. To remove the preset station, use the Delete (X) button
or the Delete key on the keyboard.
Create CD and DVD
Now, in Media Center, it is possible to create CDs or DVDs of your favorite files easily. You can store
recorded televisions programs, a slide shows or music files on a DVD. CD/DVD burning is based on
Sonic™ technology and is completely integrated in the Windows Media Center interface to insure
intuitive but powerful capabilities.
___________________________________________________________________________
WMC MANUAL rev 1.0
6.26
EN
Thanks to the upgraded Sonic DVD burning module, Media Center’s DVD burning performance
and capabilities are even better than before. Now, it is possible to burn high-resolution television
programs on DVD and from other locations on the network like a Media Center Extender.
Windows XP Media Center 2005 supports dual layer burning allowing you to store twice as many
music, video, image and data files on a DVD. Dual layer burning writes two layers of information on
the same side of the DVD doubling the storage capacity.
The Create CD feature is accessed from Recorded TV, My Music, My Video or My Pictures.
Insert a writable CD or DVD in the relative unit, see the CD/DVD manufacturer’s manual for format
supported. Create CD asks you to name the CD. Use the Keyboard or the remote control to write a name.
Select the multimedia content in Recorded TV, My Music, My Video or My Pictures. The storage space
will be displayed in the lower part of the screen.
Select View CD to preview a track list. It is possible to add or remove tracks from the list. Select Burn CD
to create the CD/DVD.
It is also possible to use Windows XP Movie Maker 2.1 to create DVDs of your favorite home movies.
Send Instant Message
Thanks to Windows Messenger, integrated in Windows Media Center, it is possible to know when
friends are on-line and send instant messages to any name on your contact list. The user can talk with
friends to comment on programs seen, fix a meeting or stay in touch with family anywhere in the world.
From this location in Media Center, press the More Info/Details button on the remote control and select
Messenger in the pop up window. To access and send messages, you must have a Messenger
account.
Sync with Portable Devices
Now, Media Center offers an extremely easy way to transfer images, video files, recorded television
programs and music on removable storage devices like memory sticks and external hard drives. In the
appropriate folder, select the multimedia files you want to transfer and click Done. Select Start to transfer
the selected file to the removable device.
MORE PROGRAMS
Burn Multimedia Content on a CD or DVD
With the CD and DVD burning capabilities integrated in Media Center, it is possible to move and store
any multimedia content.
Create a DVD video with your video files or recorded television programs (compatible with any
DVD player).
Create an audio CD with your favorite music programs (compatible with any DVD player).
Create a CD or DVD with data content in Media Center PC in order to store or move them on
another PC.
Transfer Files to a Portable Media Center
Portable Media Center integrates Windows XP’s capabilities in order to manage, store and play
multimedia content in an easy-to-use electronic device the size of a palmtop. Portable Media Center
connects seamlessly with Windows XP, allowing you to transfer music, home movies, photos and
recorded television programs easily, so you can enjoy them wherever you are.
___________________________________________________________________________
WMC MANUAL rev 1.0
6.27
EN
Once the compression format is transcoded, a new feature called Auto Sync, introduced in Windows
Media Player 10, makes transferring multimedia content to a Portable Media Center easy. Just
connect the Portable Media Center to your Media Center PC with Windows XP. The software
automatically recognized the device and immediately transfers the multimedia content encoded in the
Portable Media Center format without having to download drivers or use third-party digital multimedia
applications. There are three different ways to add music, videos and images to a Portable Media
Center from your computer using Windows Media Players 10’s Auto Sync technology; Automatic,
Manual and Customized:
Automatically transfer content from your computer to your Portable Media Center. Selecting
this method, the content is automatically downloaded to the device from the Windows Media
Player. Windows Media Player selects the content and loads as much as it can to the device.
Auto Sync is the device’s default method.
Manually transfer content from your computer to your Portable Media Center. Selecting this
method, it is possible to choose the content to upload to your Portable Media Center. If the
Auto Sync loads only the content that it can, Manual Transfer allows you to choose the music,
video and photos that you want.
Create custom playlists to transfer content from your computer to your Portable Media
Center. Selecting Manual Transfer or Auto Sync then selecting Customize the Playlists it is
possible to load the playlists created in Media Center or Windows Media Player to your
Portable Media Center.
Besides the auto sync of files, Auto Sync automatically sorts the content in the device insuring that
only those specified are loaded and data is not accidentally cancelled. If a device does not have
enough storage space available to store the entire library, Auto Sync, depending on the device used,
will transfer data according to the set defaults of the playlists first. For example, the content like four
and five-star rated files, new music tracks and the pictures loaded last month. You can modify the
settings in the Set Up Sync section of the player
Since Windows Media Player 10 has the latest video and image support to synchronize these
devices, it is possible to transfer any type of multimedia content easily, including digital film, photos
and recorded television programs to your Portable Media Center. It also supports Windows’ latest
Digital Rights Management platform that allows you to take on-line subscription content with you.
For example, in a service like Napster, the subscriber can access hundred or thousands of songs,
download them to their portable device and take them anywhere only for a low monthly fee.
Synchronizing to your Portable Media Center: Step by Step
Synchronizing a Portable Media Center’s with Media Center needs almost not configuration. The
following description describes how to transfer recorded television programs from your Media Center
to your Portable Media Center in a few minutes.
MORE PROGRAMS
For example, you can record your favorite sitcom with your Media Center PC, then save the show in a
format compatible with Portable Media Center. It is possible to set your Media Center PC to transcode
recorded television programs from one compression format to another in the background automatically
at the end of the episode. The transcodeing time takes approximately 1.2 times the length of the show
in a PC with a 2 GHz processor.
Connect your Portable Media Center to your PC using the USB synchronization cable, then start
Media Center pressing the green button on the remote control. Select More Programs from the
program list. Highlight Sync to Device with the right navigation arrow on the remote control and press
OK. Select Add More and press the OK button.
___________________________________________________________________________
WMC MANUAL rev 1.0
6.28
EN
Select Recorded TV from the Add More syncing options. Select the TV options you want to
synchronize with the device. In this case, all the programs available will be synced. Select Save
and press OK.
It is the moment to start the sync process. This passage takes a few minutes while Media Center
optimized the recorded television files for Portable Media Center as it transfers the content. Select
Start Sync and press OK on the remote control.
Clicking OK during the Sync to Device process, Media Center transfers the recorded television
programs in the background allowing you to watch a TV program, listen to music, Play a DVD, burn a
CD or anything you would like with Media Center. Leave your Portable Media Center connected until
the synchronization is complete.
After loading your content on your Portable Media Center, the shows are ready to watch. Just use
the scroll arrows to select My TV and press OK. Navigating Portable Media Center’s menus is the
same as those in Media Center on a television.
Access Settings from Media Center Start menu and from the main menu for any type of entertainment
allowing you to adjust the volume and modify the Media Center’s appearance, insure that the remote
control’s functions are correct and to configure the Internet connection. It is also possible to access the
TV/DVD, Pictures, Music and Radio Presets settings.
General Settings
Windows Start Up Settings. The options include:
Choose to keep the Media Center always on top.
Show the “Not designed for Media Center” dialog box.
Launch Media Center when Windows starts Startup. This starts Media Center
when Windows starts or goes directly to the desktop.
New! Automatic Optimization. To be sure that your Media Center PC works correctly,
optimization activities are run automatically as set by the user.
Visual and Sound Effect. The options include:
Turn on/Turn off transition animation between screens.
Play music while using Media Center
Select background color
SETTINGS
SETTINGS
More Programs Options. The options include:
Settings: Choose if the applications can control Media Center, detect Media Center’s
present status and show Media Center’s metadata. The options are set at the default.
New! External Applications. Configures how third-party application function in Media
Center.
Set Up Media Center. The options include:
Set up Internet Connection Wizard. Opens the Internet Connection Wizard in order
to setup your Internet connection.
___________________________________________________________________________
WMC MANUAL rev 1.0
6.29
EN
Configure your TV or monitor. Use this wizard to modify the settings the control
Media Center’s appearance. Select the type of screen in use, adjust the desired
settings to view Media Center as you wish.
Windows Update Settings. Turn on or turn off the automatic download and installation
of Windows updates.
Remote Desktop Settings. Set remote access to your Media Center PC. Remote
Desktop allows you to access a running Windows secession on your computer when
you are at another computer. For example, it is possible to use remote desktop to
connect to your home computer from work in order to access all the application, files
and network resources as if they were part of your LAN at work.
Speaker Setup adjusts your speaker’s settings.
Reset to Factory Defaults resets the settings to the original state.
Automatic Download Options. It is possible to choose to purchase multimedia file licenses
automatically to allow Media Center to have the information of CD/DVDs.
Information about Media Center. Information about the product’s license and version.
My TV Settings
Recorder. Display the status of recorded programs, set the recording storage options and
modify the default settings.
TV Guide. Customize the list of channels for each user and Change the lineup, configure the TV
Guide, update the TV Guide and TV guide information to receive notices from your television
service provider.
Set up the TV signal This wizard sets up the TV signal.
Adjust Display Settings. Set up the display settings used for Media Center.
Audio. Options to adjust audio and closed captioning options..
Note: when multiple-user accounts are set up on your Media Center PC, only the administrator
can access some settings. All the users can customize their own channels, audio and TV
settings. However, Parental Control settings, Recording and other TV Guide capabilities
within the system can be modified only but the computer’s administrator.
SETTINGS
Privacy. Configure Microsoft’s startup information in order to improve Media Center’s
performance. From this position, it is possible to decide if you want to send your
computer’s configuration to Microsoft and only Microsoft. This information will help
determine why certain problems occur in order to improve future Window XP Media Center
Edition 2005 versions.
Picture Settings
It is possible to adjust the settings as follows:
Choose to show pictures in random order, show pictures in the subfolders or show the
captions.
Choose to show the song details during a slide show.
Choose transition animation or cross-fade or to turn off the transition.
___________________________________________________________________________
WMC MANUAL rev 1.0
6.30
EN
Additional Details
Use the -/+ keys to define the length of time each picture stays on the screen.
Choose the slide show’s background color. If the size of some pictures are irregular, the
empty screen area will be filled with the choosen background color.
Music Settings
DVD
Language. Adjust the language options for subtitles, song and DVD menus.
Audio. Adjusts the audio settings.
Remote Control. Program Skip and Replay buttons on the remote control. Choose whether
these buttons skip chapters or skip forward or back.
Communication Settings
Notification. Turn on or turn off the messages coming from Media Center and to configure the
telephone call notifications.
Radio
Sorts and manages the Preset radio stations.
ADDITIONAL DETAILS
Visualize. Select the visualization effect to play on the screen when you choose Visualize in
the Now Playing menu
Visualization Options. Select to start visualization when you play music and to show the
song’s details during visualization effects.
Add music. Add or remove folders that Media Center looks in for Music.
___________________________________________________________________________
WMC MANUAL rev 1.0
7
EN
Configure the PC hardware
Media Center’s Standard configuration is similar to a traditional PC. The only additional steps are
connecting a TV signal and the sensor. Refer to the manufacturer’s manual to configure the PC
hardware. The following section show only the additional Media Center PC connections,
specifically that of the TV signal (from Co-axial or S-Video), the sensor (if external, therefore USB)
and the IR controller (3,175 mm, 1/8” mini-jack). The PC manufacturer can provide the additional
instructions and more precise hardware configuration.
Connect an FM antenna to your PC
Find the FM jack on the PC’s TV tuner and connect the antenna. As in all cases, you might have to
adjust the FM antenna’s position for the best reception.
ADDITIONAL DETAILS
To use your FM tuner on the PC board, it is necessary to connect it to an antenna. FM antennas are
available in many shapes and sizes.
Two examples are show below.
___________________________________________________________________________
WMC MANUAL rev 1.0
7.1
EN
Windows Media Center with Extender Technology
MEDIA CENTER
EXTENDER
TECHNOLOGY
INCORPORATED IN
XBOX 360
Xbox 360 allows you to use
Windows XP Media Center
Edition 2005 remotely with
televisions and monitors in your
home.
Xbox 360 is the latest
generation
entertainment
system and video game player
that is without comparison.
Xbox 360 is the start of a new
era of digital entertainment;
always connected, always
customized and always high
definition.
From a single Media Center PC, it is possible to access from the
desk, (1), music from the bedroom (2), television programs from
the living room (3), and pictures and home video from the den
(4): all at the same time using the familiar and coherent Media
center interface.
Media Center Extender technology is integrated in Xbox 360™ and provides access to digital
multimedia content from anywhere in the home. Each Xbox 360 has Media Center Extender
capabilities incorporated and is ready to use. This capability, in combination with the most
recent software upgrades, the Cumulative 2 upgrade for Windows XP Media Center Edition
2005 offers problem free access to digital music, home videos, pictures, movies and standard
and high-resolution television programs in your Media Center Edition 2005 based PC with any
Xbox 360.
Some capabilities and key advantages of Media Center Extender technologies are:
•
•
Easy access to digital multimedia content. Your Media Center PC is the hub for digital
entertainment that guarantees immediate access to a single, coherent digital multimedia
content library from any Windows Media Center Extender device in your home.
Extremely compatibility. Media Center Extender can be connected to any television or home
theater system.
EXTENDER TECNOLOGY
Windows Media Center with Extender technology is the easiest way to enjoy television programs,
music, home videos, pictures and favorite movies anywhere in the house. It transmits the multimedia
content in your Media Center PC to any television or monitor. Thanks to the remote control, you can
listen to music in your digital music library, watch and record live television programs, look at family
photos and home video; all this with the familiar Media Center interface.
•
___________________________________________________________________________
WMC MANUAL rev 1.0
8
•
•
•
•
•
•
•
Connect to wired or wireless networks. Thanks to Media Center PC, wired or high-speed wireless
home network connections are supported.
High Resolution Video and Audio Home Theater. Xbox 360 guarantees excellent audio and
video quality comparable to 5.1 discrete channel digital surround sound home theater, 24 bit audio
and high resolution monitor video support (high resolution WMV)
Coherent Media Center Experience. Thanks to Xbox 360, it is easy to enjoy digital music,
pictures, television programs and home video using the same remote control and the same
familiar Media Center interface.
Just one remote control. It is possible to access and control Media Center’s multimedia
content using only one remote control designed for all Media Center devices including
Extenders and Media Center PCs.
Multi-user capability support. You can use up to five different Media Center Extender devices at
the same time. With an Xbox in the living room, one user can watch a recorded television
program while another can browse the family’s music collection on their Media Center PC in the
Family room.
Media Center update support. Windows Media Center Extender devices always offer the latest
Media Center capabilities including the newest available for Windows XP Media Center Edition
2005: dual TV tuner, improved TV Guide and an ample selection of applications and additional
Media Center Services
Third-party services and application support. Third-party applications and services further
increase the digital multimedia content that can be used at home like streaming music and payper-view movies. Online Spotlight allows you to access music and pay-per-view movies, video
games, information services and others. Press only one button to access the Xbox Guide, a real
gateway to entertainment and take advantage immediate of Xbox 360’s capabilities to entertain
yourself as you wish with games, friends and music.
Keep in touch with family and friends. Messenger for Media Center allows you to keep in touch with
family and friends while you use Media Center in other ways. It is possible to attach an Xbox 360
video camera to participate in video phone calls or send video messages to friends throughout the
world with Xbox Live™.
EXTENDER TECNOLOGY
EN
___________________________________________________________________________
WMC MANUAL rev 1.0
8.1
EN
The all-in-one Hantarex remote control and the relative infrared receiver for Windows Media
Center use a proprietary communication protocol. In case you want to use remote controls
and wireless keyboards developed for WMC, it is necessary to connect the infrared receiver to
your PC’s USB port.
During the initial registration procedure of the operation system, it may be necessary to
connect a keyboard or mouse to the USB port.
In case the PC is on and youre using the remote control in WMC mode (please refer to
Remote Control section), the commands sent by the remocon are processed in any way by
the PC, even if the video source displayed by your Flat TV is not PC/DVI.
The general power switch is the same for the Flat TV and the PC. Make sure to shut down
the PC correctly before turning off the power.
Since the system has two TV tuners, one for the Flat TV and one for the WMC PC, it is
possible to watch two television programs using the Picture in a Picture feature; see the LCD
TV User’s Manual for details.
In addition, if it is possible to connect the Media Center PC to the Flat TV with other types of
video connections, we suggest always using the DVI connection for the best results.
To view the television best in full screen mode within Windows Media Center, choose the
Zoom 3 Visualization options; press the INFO button while watching a television channel.
For problems or additional information about the PC hardware, refer to the attached
manufacturer’s technical documentation.
For updates or additional information about the Windows Media Center operating system,
refer to the Internet site: www.microsoft.com.
The information contained in this guide is intended to supply additional support to the end user of
Hantarex products with Windows Media Center integrated.
The information contained in this document is indented for the current product with the software
version available at the moment of publication.
Due to the possibility of upgrades by Microsoft, the information could not describe or represent the software
accurately. This guide should be used only for information and does not construe a guarantee, explicitly or
implied, relative to the guide or the information contained herein.
Please don’t open the device for whatever reason, if you need please contact an authorized Assistance Center.
Warranty is void if the seals on the PC or on the TV are broken.
TIPS AND WARNINGS
TIPS AND WARNINGS
Microsoft, Windows, the Windows logo, the Microsoft Internet Explorer logo, Xbox 360, MSN, the MSN, Windows Media logo,
the Windows Start It Up logo, Xbox and Xbox Live are trademarks or registered brands of Microsoft Corp. in the United States
and or other countries
The names of companies or products cited in this document could be brands or the respective owners.
___________________________________________________________________________
WMC MANUAL rev 1.0
9
18.2
Le informazioni ed i dati tecnici contenuti sono soggetti a modifiche anche senza preavviso – Product specification are subject to change without notice.
made by
Cod. 53894850
SAMBERS ITALIA S.P.A.
Via Friuli, 10/d
20046 Biassono (MI)
Web site : www.hantarex.it
Mail : [email protected]