1
Entry Switch
3. Before mounting, hold transmitter and magnet in selected
location and verify operation. While holding the transmitter
stationary, move the magnet away from transmitter to simulate
door or window being opened. Verify red LED on transmitter
flashes momentarily and receiver turns light on. Return magnet
to original position simulating door or window being closed.
Verify red LED on transmitter flashes momentarily and receiver
turns light off. Note: If transmitter does not operate correctly,
see Troubleshooting Guide.
4. Mount Transmitter.
Screw Mounting: Attach transmitter back cover to wall using two
short screws (provided). Snap transmitter onto back cover.
Tape Mounting: Apply large piece of foam tape (provided)
to the transmitter back cover. Stick transmitter back cover to
frame of door or window in desired position. Snap transmitter
onto back cover.
5. Repeat step 4 to attach magnet to door or window.
Installation
Note: Entry system includes a transmitter and magnet.
The system can be used to signal that a door or window
has been opened or to automatically turn the light on
when entering a closet, attic, room, etc.
1. Remove Tab from Battery Chamber. Remove transmitter back
cover from transmitter using small, flat-blade screwdriver. Gently
pull tab out of battery chamber.
ON
1 2 3 4
Removing Battery Tab
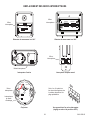
Important Considerations:
• Entry transmitter components are for indoor use only.
• The transmitter should be mounted on the frame of door or
window (stationary surface). The magnet should be mounted
on door or window (moving surface). See illustration below for
mounting
configurations and possible directions of movement.
Possible Directions
Transmitter Mounted On Stationary Surface
Possible Directions
Possible
Directions of
of Movement
Movement
screwdriver.
2. Carefully pry battery
loose with small, flat-blade
screwdriver. Battery will
pop up.
3. Install replacement battery
in socket plus (+) side up
(see illustration). Press
down on battery until it
snaps into place.
4. Snap transmitter onto
back cover.
Note: The magnet does not
require a battery.
Possible Directions
Possible
Directions of
of Movement
Movement
Magnet Mounted On Moving Surface
Mounting Configurations and Possible Directions of
Movement
• A compatible receiver must be used to complete the system. The
receiver should be located within 100 feet (30 m) of transmitter
(maximum distance may vary depending on type of structures
Possible Directions
between transmitter and receiver).
of Movement
2. Select mounting location for entry transmitter. Note: Maximum
gap between transmitter and magnet is 3/8” and the arrows
located on the face of each component must be in alignment
(see illustration). Also, the front surfaces of the transmitter
and magnet must be flush. If magnet is recessed, use magnet
extension and two long screws (provided) to ensure proper
alignment.
Flat-Blade
Screwdriver
3 VOLTS
of Movement
Battery Replacement
The entry transmitter requires a type CR2032, 3-volt lithium
battery to operate. The transmitter is shipped with the battery
installed. With typical use, the battery will last approximately five
years. Remove battery when transmitter will not be used for an
extended period of time.
1. Remove transmitter from
transmitter back cover
Transmitter
using small, flat-blade
CR2032
Flat-Head
Screwdriver
3 VOLTS
Tab
Battery (Type
CR2032)
CR2032
Transmitter
1 2 3 4
CR2032 Lithium Battery
Battery Replacement
3/8" MAXIMUM
ON
598-1306-05