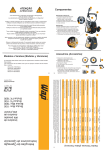
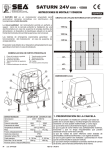
1
®
media:scape® mini
PHILLIPS DRIVE
If you have a problem, question, or request, call
your local dealer, or Steelcase Line 1 at
888.STEELCASE (888.783.3522)
for immediate action by people who want to help you.
(Outside the U.S.A., Canada, Mexico, Puerto Rico,
and the U.S. Virgin Islands, call: 1.616.247.2500)
Or visit our website: www.steelcase.com
© 2011 Steelcase Inc.
Grand Rapids, MI 49501
U.S.A.
Printed in U.S.A.
Si tiene algún problema, pregunta o pedido, llame
a su distribuidor local , o a la línea 1 de Steelcase al
888.STEELCASE (888.783.3522)
para una respuesta inmediata de parte de quienes
desean ayudarle.
(Fuera de los EE.UU., Canadá, México, Puerto Rico y las
Islas Vírgenes de los EE.UU., llame al 1.616.247.2500)
o visite nuestro sitio web: www.steelcase.com
© 2011 Steelcase Inc.
Grand Rapids, MI 49501
U.S.A.
Impreso en los EE.UU.
Page 1 of 11
939501987 Rev G
®
IMPORTANT SAFETY INSTRUCTIONS - When using an electrical furnishing, basic precautions
should always be followed, including the following: Read all instructions before using the media:scape.
Maximum operating temperature is 40 C.
NOTE:
The Socket Outlet shall be installed near the equipment and shall be easily accessible.
FCC COMPLIANCE STATEMENT - This device complies with part 15 of the FCC Rules.
Operation is subject to the following two conditions:
1) This device may not cause harmful interference, and
2) This device must accept any interference received, including interference that may cause
undesired operation.
FCC WARNING - This equipment has been tested and found to comply with the limits for a Class A
digital device, pursuant to part 15 of the FCC Rules. These limits are designed to provide reasonable
protection against harmful interference when the equipment is operated in a commercial environment.
This equipment generates, uses, and can radiate radio frequency energy and, if not installed and used i
n accordance with the instruction manual, may cause harmful interference to radio communications.
Operation of this equipment in a residential area is likely to cause harmful interference in which case the
user will be required to correct the interference at his own expense.
The Federal Communications Commission warns that changes or modifications of the unit not expressly
approved by the party responsible for compliance could void the user’s authority to operate the equipment.
This Class A digital apparatus complies with Canadian ICES-003.
Cet appareil numériqué de la classe A est conformé à la norme NMB-003 du Canada.
DANGER - To reduce the risk of electric shock:
Always unplug this furnishing from the electrical outlet before cleaning.
DANGER - Pour réduire les risques de choc électrique:
Débranchez toujours cet appareil de la prise électrique immédiatement après son utilisation.
WARNING - To reduce the risk of burns, fire, electric shock, or injury to persons:
1) Unplug from outlet before putting on or taking off parts.
2) Use this furnishing only for its intended use as described in these instructions. Do not use
attachments not recommended by the manufacturer.
3) Never operate this furnishing if it has a damaged cord or plug, Return the furnishing to a
service center for examination and repair.
4) Keep the cord away from heated surfaces.
5) Never operate the furnishing with the air openings blocked. Keep the air openings free of
lint, hair, and the like.
6) Never drop or insert any object into any opening.
7) Do not use outdoors.
8) Do not operate where aerosol (spray) products are being used or where oxygen is being
administered.
9) Risk of Electric Shock - Connect this furnishing to a properly grounded outlet only.
See Grounding Instructions.
10) To reduce the risk of fire or electric shock, DO NOT expose this apparatus to rain or moisture.
AVERTISSEMENT - Pour réduire les risques de brûlures, d'incendie, d'électrocution
ou de blessures aux personnes:
1) Débranchez de la prise de courant avant d'ajouter ou de retirer des pièces.
2) Utilisez cet appareil que pour son utilisation prévue telle que décrite dans ces instructions.
Ne pas utiliser de fixations non recommandées par le fabricant.
3) Ne faites jamais fonctionner cet appareil s'il dispose d'une prise ou d'un cordon endommagé.
Renvoyez l'appareil à un centre de services pour examen et réparation.
4) Gardez le cordon loin de surfaces chauffées.
5) Ne faites jamais fonctionner l'appareil avec des orifices d'air bloqués. Assurez-vous que les
orifices d'air ne sont pas bloqués par des fibres, des cheveux, etc.
6) N'insérez jamais ou ne laissez jamais tomber n'importe quel objet dans n'importe quel orifice.
7) N'utilisez jamais à l'extérieur.
8) Ne faites pas fonctionner lorsque des produits aérosol (bombe) sont utilisés ou lorsque
l'oxygène est administré.
9) Risque d'Electrocution - Branchez cet appareil seulement à une prise de courant
correctement mise à la terre. Voir Instructions de Mise à la Terre.
SAVE THESE INSTRUCTIONS
This appliance is intended for commercial use only.
Connect this appliance to a properly grounded outlet only. See Grounding Instructions.
OPERATING INSTRUCTIONS - Please refer to the attached Installation Instructions.
USER-MAINTENANCE INSTRUCTIONS
The receptacle power block is equipped with a circuit breaker that will shut off power in an
overload condition. Press to reset the circuit breaker to restore power.
GROUNDING INSTRUCTIONS
This product must be grounded. If it should malfunction or breakdown, grounding provides a
path of least resistance for electric current to reduce the risk of electric shock. This product is
equipped with a cord having an equipment-grounding conductor and a grounding plug. The
plug must be plugged into an appropriate outlet that is properly installed and grounded in
accordance with all local codes and ordinances. When the main (power supply) plug or an
appliance coupler is used as the disconnect device, the disconnect device shall remain
readily operable.
DANGER - Improper connection of the equipment-grounding conductor can result in a risk
of electric shock. Check with a qualified electrician or serviceman if you are in doubt as to
whether the product is properly grounded. Do not modify the plug provided with the product
- if it will not fit the outlet, have a proper outlet installed by a qualified electrician.
DANGER - Le fait de ne pas brancher correctement le fil de mise à la terre peut entraîner
un risque de choc électrique. Consultez un électricien ou un expert en réparation électrique
en cas de doute quant au raccordement à la terre de l'appareil. Ne modifiez pas la fiche dont
est doté l'appareil; si vous n'arrivez pas à la brancher dans la prise de courant, faites installer
une fiche appropriée par un électricien qualifié.
This product is for use on a nominal 120-V circuit and has a grounding plug that looks
like the plug illustrated in sketch A in Figure 67.1. Make sure that the product is connected to
an outlet having the same configuration as the plug. No adapter should be used with this
product.
Figure 67.1
Grounding method
GROUNDED
OUTLET
GROUNDING
PIN
GROUNDED
OUTLET BOX
Page 2 of 11
939501987 Rev G
®
INSTRUCCIONES IMPORTANTES DE
SEGURIDAD
Cuando utilice un equipo eléctrico, debe seguir siempre las precauciones básicas, incluyendo
las siguientes: Lea todas las instrucciones antes de utilizar el equipo media:scape.
PELIGRO - Para reducir el riesgo de electrocución:
Desenchufe siempre este equipo del tomacorriente antes de limpiarlo.
ADVERTENCIA
- Para reducir el riesgo de quemaduras, incendio,
choque eléctrico o lesiones a las personas:
1) Desconecte el aparato antes de ponerle o quitarle piezas.
2) Utilice este aparato sólo para los fines que se describen en estas instrucciones.
No use accesorios no recomendados por el fabricante.
3) Nunca opere este aparato si tiene el cable o enchufe dañado. Devuelva el aparato
a un centro de servicio para su revisión y reparación.
4) Mantenga el cable alejado de superficies calientes.
5) No use nunca el aparato si las aberturas de ventilación están bloqueadas.
Mantenga estas aberturas sin pelusas, cabellos y cosas similares.
6) Nunca deje caer ni inserte un objeto en ninguna abertura.
7) No lo use al aire libre.
8) No lo use en lugares donde se usen productos con aerosol (pulverizadores) o donde
se administre oxígeno.
9) Riesgo de electrocución - Conecte este aparato solo a un enchufe correctamente
conectado a tierra. Vea las instrucciones de conexión a tierra.
GUARDE ESTAS INSTRUCCIOES
Este aparato está diseñado solo para uso comercial. Conecte este aparato solo a un
enchufe correctamente conectado a tierra. Vea las instrucciones de conexión a tierra.
INSTRUCCIONES DE OPERACIÓN
Por favor lea las instrucciones de instalación adjuntas.
INSTRUCCIONES DE MANTENIMIENTO
PARA
EL USUARIO
El bloque de alimentación del receptáculo está equipado con un disyuntor que apagará
la alimentación en caso de sobrecarga. Pulse para restablecer el disyuntor para
restaurar la alimentación.
INSTRUCCIONES DE CONEXIÓN A
TIERRA
Este producto debe estar conectado a tierra. Si funciona mal o se descompone, la
conexión a tierra ofrece una ruta de menor resistencia a la corriente eléctrica para
reducir el riesgo de electrocución. Este producto está equipado con un cable que
tiene un conductor de tierra para el equipo y un enchufe de conexión a tierra. El
enchufe debe ser enchufado en un tomacorriente apropiado que esté correctamente
instalado y conectado a tierra de acuerdo con todos los códigos y ordenanzas locales.
PELIGRO
- La conexión incorrecta del conductor de tierra del equipo
puede ocasionar un riesgo de electrocución. Consulte con un electricista o técnico
calificado si tiene dudas sobre si el producto está correctamente conectado a tierra.
No modifique el enchufe que viene con el producto - si no calza en el tomacorriente,
haga instalar un tomacorriente adecuado por un electricista calificado.
Este producto es para usarse en un circuito nominal de 120 Voltios y tiene un
enchufe de conexión a tierra que se parece al enchufe ilustrado en el esquema
A de la figura 67.1. Asegúrese de que el producto esté conectado a un tomacorriente
que tenga la misma configuración que el enchufe. No se debe usar ningún
adaptador con este producto.
Figura 67.1
Métodos de conexión a tierra
TOMACORRIENTE DE
CONEXIÓN A TIERRA
ENCHUFE DE
CONEXIÓN A TIERRA
CAJA DE SALIDA
CONECTADA A TIERRA
Page 3 of 11
939501987 Rev G
®
IMPORTANT SAFETY INSTRUCTIONS
(continued)
When using an electrical furnishing, basic precautions should always be followed,
including the following: Read all instructions before using the media:scape.
CAUTION - To prevent the risk of tip over:
1) Never install on unstable or uneven surfaces.
2) Only install Mini on tables, stands, etc. capable of supporting 160 lbs. that are
at least 42 inches wide x 22 inches deep.
3) Place unit so it does not cause table, stand, etc. to become unstable. Mini nust not
overhang or extend beyond the table edges.
4) Do not use on mobile tables, carts, etc.
5) Do not allow children to climb on or play with furniture and Mini.
6) Care should be taken to install Mini where it cannot be pushed, pulled or knocked over.
7) Care should be taken to route all power cords and cables so they cannot be pulled by
children.
CAUTION - To prevent damage to electrical cords:
1) Care should be taken to route all power cords and cables so they cannot be pulled by
children.
2) Protect power cords from being walked on or pinched particularly at plugs, convenience
receptacles, and the point where they exit from the product.
CAUTION - To prevent injury:
Due to the size and weight of the unit, two people are required to move/handle the product.
INSTRUCCIONES IMPORTANTES DE
SEGURIDAD (continuación)
Cuando utilice un aparato eléctrico, hay ciertas precauciones que se deben seguir,
incluyendo las siguientes: Lea todas las instrucciones antes de utilizar media:scape.
PRECAUCIÓN - Para evitar el riesgo de un vuelco:
1) Nunca lo instale sobre superficies inestables o irregulares.
2) Instale el Mini sobre mesas, estantes, etc., que puedan soportar 160 libras. y
que tengan por lo menos 42 pulgadas de ancho x 22 pulgadas de profundidad.
3) Coloque la unidad de tal forma que no haga que la mesa, estante, etc. se vuelva
inestable. El Mini no debe sobresalir o extenderse más allá de los bordes de la mesa.
4) No lo utilice sobre mesas móviles, carritos, etc.
5) No permita que los niños se suban o jueguen con los muebles o el equipo Mini.
6) Se debe tener cuidado de instalar el Móvil donde no se lo pueda empujar, halar
o derribar.
7) Se debe tener cuidado de enrutar todos los cables de alimentación y los cables
de modo que no puedan ser halados por los niños.
PRECAUCIÓN - Para evitar hacer daño a los cables eléctricos:
1) Se debe tener cuidado de enrutar todos los cables de alimentación y los cables
de modo que no puedan ser halados por los niños.
2) Proteja los cables de alimentación para que no sean pisados o aplastados,
especialmente en los enchufes, receptáculos y en el punto donde salen del producto.
PRECAUCIÓN
- Para evitar lesiones:
Debido al tamaño y peso de la unidad, se requieren dos personas para
mover/manipular el producto.
Page 4 of 11
939501987 Rev G
1. UNPACK AND PREPARE MEDIA:SCAPE MINI
NOTE: Be careful not to grasp the trim cover
when removing the unit from the box. This may
cause damage to the cover.
TIP: Screws for step 1, power cord for step 2,
and brackets for step 3 are shipped in the
carton with this unit.
1. DESEMPAQUE Y PREPARE EL MEDIA:SCAPE MINI
NOTA: Tenga cuidado de no agarrar la tapa de la
guarnición cuando retira la unidad de la caja. Esto
puede causar daño a la cubierta.
SUGERENCIA: Los tornillos para el paso 1, el cable de
alimentación para el paso 2, y los soportes para el
paso 3 se envían en la caja de cartón con esta unidad.
PHILLIPS
PHILLIPS
M6 x 16 mm
(7) Screws
(7) tornillos
M6 x 16 mm
(2) Star Washers
Arandelas en
estrella (2)
Page 5 of 11
939501987 Rev G
®
Do not exceed maximum monitor weight
and maximum diagonal size of 42”.
NOTE: The monitor weight for a media:scape mini is
rated up to a maximum of 55 pounds (25 Kg).
3. ADD MOUNTING BRACKETS
TO BACK OF MONITOR
3. AÑADA SOPORTES DE MONTAJE A
LA PARTE TRASERA DEL MONITOR
40" MONITOR
MONITOR DE 40 PULGADAS
No exceda el peso máximo del monitor y el tamaño
máximo diagonal de 42 pulgadas.
NOTA: El peso del monitor para el media:scape mini
está calculado hasta un máximo de 55 libras (25 Kg).
Se proveen ranuras en los soportes para
aceptar a otros monitores diferentes al
Samsung de 40 pulgadas y al LG de 42
pulgadas recomendados por Steelcase.
42" MONITOR
MONITOR DE 42 PULGADAS
TOP
PARTE SUPERIOR
TOP
PARTE SUPERIOR
BOTTOM
PARTE INFERIOR
Slots are provided in brackets to
accommodate monitors other than the
Steelcase recommended 40" Samsung
and 42" LG.
BOTTOM
PARTE INFERIOR
Page 6 of 11
939501987 Rev G
®
5. INSTALL MONITOR ONTO MEDIA:SCAPE MINI
5. INSTALE EL MONITOR EN EL MEDIA:SCAPE MINI
4. PLUG THE POWER, MONITOR CONNECTION
AND AUDIO FROM THE MEDIA:SCAPE MINI TO
THE MONITOR.
4. ENCHUFE LA ALIMENTACIÓN, LA CONEXIÓN DEL
MONITOR Y EL AUDIO DESDE EL MEDIA:SCAPE MINI
AL MONITOR.
Monitor security locking features
Características de bloqueo de seguridad del
or
Kensington Lock
Candado Kensington
Padlock
Candado
To remove monitor, locate anti-dislodgement
clips on each side. Press them towards the
monitor, lift monitor up & out.
Para retirar el monitor, localice los clips de
anti-desprendimiento en cada lado. Presiónelos hacia el
monitor, levante el monitor hacia arriba y hacia fuera.
Page 7 of 11
939501987 Rev G
®
6. INSTALL SHROUD ONTO MEDIA:SCAPE MINI
NOTE: During assembly listen for (2) "clicks" to ensure
that the shroud anti-dislodgement clips fully engage with
shroud "L" bracket.
6. INSTALE LA PROTECCIÓN SOBRE EL MEDIA:SCAPE MINI
NOTA: Durante el montaje, escuche dos (2) "clics" para
garantizar que los clips de anti-desprendimiento de la
protección se sujeten por completo al soporte "L" de la
protección.
!
ICK!
L
C IC
¡CL
!
ICK
CL IC!
¡CL
To remove shroud, locate anti-dislodgement
clips on each side. Press them towards the
monitor and lift up & out.
Para retirar la protección, localice los clips de
anti-desprendimiento en cada lado. Presiónelos hacia
el monitor y levántelo hacia arriba y hacia fuera.
Page 8 of 11
939501987 Rev G
®
OPTIONAL
RELOCATING THE POWER CORD EXIT
OPCIONAL
CAMBIO DE LA SALIDA DEL CABLE
DE ALIMENTACIÓN
Page 9 of 11
939501987 Rev G
®
With the shroud removed, feed the web camera cord down into the base cover.
Remount the shroud and position the web camera securely.
OPTIONAL
Use two (2) people to lift and rotate the unit onto its back. Be carefull not to pinch
any cables.
INSTALL WEB CAMERA ONTO MEDIA:SCAPE MINI
Route web camera cord through cable management tabs and out the front of the
unit. Make sure enough cable length is available to connect your computer.
OPCIONAL
Use two (2) people to rotate the unit into its upright position.
INSTALE LA CÁMARA WEB SOBRE EL
MEDIA:SCAPE MINI
Una vez quitada la protección, pase el cable de la cámara web hacia abajo y
adentro de la cubierta de la base.
Vuelva a montar la protección y posicione la cámara web en forma segura.
Use dos (2) personas para levantar y girar la unidad sobre su parte de atrás. Tenga
cuidado de no pellizcar los cables.
Pase el cable de la cámara web por las lengüetas para tendido de cables y hacia
fuera por la parte frontal de la unidad. Asegúrese de tener suficiente cable para
conectar su computadora.
Use dos (2) personas para girar la unidad a su posición recta.
Page 10 of 11
939501987 Rev G
®
FLOCKING PLATE
PLACA ATERCIOPELADA
OPTIONAL
OPCIONAL
METHOD TO SECURE MEDIA:SCAPE
MINI TO WORKSURFACE
MÉTODO PARA ASEGURAR EL MEDIA:SCAPE
MINI A LA SUPERFICIE DE TRABAJO
1) Place media:scape Mini in desired location.
1) Coloque el media:scape Mini en el lugar deseado.
2) Using a magnet, remove two (2) flocking
plates from inside housing.
2) Usando un imán, quite las dos (2) placas
aterciopeladas del interior del bastidor.
3) Mark location on worksurface where hole
needs to be drilled for fasteners.
3) Marque el lugar en la superficie de trabajo donde
se necesita perforar un agujero para los sujetadores.
4) Move Mini unit and drill through worksurface.
4) Mueva la unidad Mini y taladre a través de la
superficie de trabajo.
5) Attach Mini to worksurface.
NOTE: Recommended fastening system:
• 1/4-20 threaded insert (or 6 mm).
• 1/4-20 (or 6 mm) pan head machine screw
(length needs to be 1-1/4" long PLUS the
thickness of the worksurface).
MAGNET
IMÁN
2
5) Fije el Mini a la superficie de trabajo.
NOTA: Sistema de sujeción recomendado:
• Inserto roscado de 1/4-20 (o de 6 mm).
• Tornillo de cabeza cilíndrica de 1/4-20 (o de 6 mm)
(la longitud debe ser de 1-1/4 pulgadas de largo
MÁS el espesor de la superficie de trabajo).
3
4
Page 11 of 11
939501987 Rev G