1
I
II
III
1690 & 1691
Instruction Manual
Fan
PLEASE READ ALL INTRUCTIONS BEFORE USING THIS APPLIANCE
Manual de Instrucciones
Ventilador
LEA TODAS L AS INSTRUCCIONES ANTES DE USAR ESTE APAR ATO
IMPORTANT SAFEGUARDS
When using electric appliances, basic safety precautions must always be followed,
including the following:
• Read all instructions before first use.
• Before connecting the unit, make sure the voltage in your outlet is the same as the
voltage indicated on the appliance's rating label.
• To protect against risk of electric shock, do not immerse the unit in water or any other
liquid.
• Children should not use this appliance. Moving blades could hurt them. Adult
supervision is necessary when the appliance is being used near children.
• The unit should always be turned "OFF" before plugging or unplugging from the outlet.
Never yank the cord to disconnect it from the outlet. Instead, grasp the plug and pull to
disconnect.
• Do not operate the unit with a damaged cord or if the unit has been dropped or
damaged. To avoid the risk of electric shock, do not disassemble the unit. Take it to an
authorized service center for examination and repair. Incorrect re-assembly can cause
a risk of electric shock when the iron is used.
• The use of attachments not recommended by the manufacturer may cause fire,
electrical shock, or injury.
• Do not use outdoors.
• Use this electric iron only for its intended use.
• Do not allow the cord to touch hot surfaces. Loop cord loosely around iron when
storing.
• Use on a flat and stable surface.
• Due to aggregated air flow and oscillation of the unit, keep hair, clothing, curtains or
any other object that could be absorbed and entangled with the back mesh, interrupting
the flow of air
• Avoid contact with moving arts
• Never use gasoline or other flammable chemicals to clean the unit. Wipe it with a
damp cloth
• Do not use the unit near ovens, fireplaces, stoves or other sources of high temperature
heat.
1
• Never use the fan partially assembled.
• Using the fan without the frontal mesh might cause accidents.
• Do not insert your fingers or any other object through the protective mesh
SAVE THESE INSTRUCTIONS
FOR HOUSEHOLD USE ONLY
Welcome
Congratulations on the purchase of your Oster® fan! Oster® Fans are designed to
provide the utmost in quality, ease of use and convenience.
2
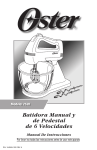
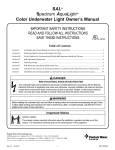
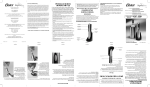
LEARNING ABOUT YOUR FAN
2
3
4
1
1. Air flow Speed Selector
2. Oscillation control.
3. Pitch control
4. Heel Rest
3
USING YOUR FAN
1. Oster fans feature an oscillation control enabling continuous oscillation silently and
uniformly. Oscillation control knob is located on the upper housing of the motor. Press
the knob to enable oscillation, and pull the knob to focus the airflow.
2. Speed control: Airflow quantity is adjusted through a 3-speed rotary switch. Speed 3
supplies the highest amount of airflow and 1 the minimum. To select the airflow speed,
just turn the switch to the desired number.
3. Pitch control. Adjusting fan pitch must be performed when the fan is disconnected. To
direct the airflow up or down, hold the back of the motor housing and move it up or
down vertically adjusting to the desire pitch.
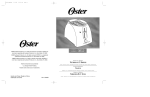
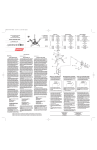
Mounting Instructions
Model 1691 (desk) and model 1690 (Stand)
Fans are packed dissembled. For your safeguard, it is necessary to correct assemble
the fan before its use. Proceed assembling by following the instructions and illustrations
provide in this manual.
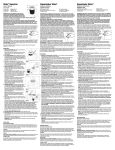
Mounting the back mesh:
1. Place the back mesh over the motor shaft. Make sure the aligning hole of the mesh
fits the fastener located at the front of the motor.
2. Hold the back housing of the motor while keeping the mesh fitted in place. Then
adjust the lock nut to the motor shaft turning it to the right.
Mounting the blade:
1. Insert the blade through the motor shaft.
2. To adjust the blades twist the plastic button to the left.
Mounting the front mesh:
1. Superpose the front mesh to the back mesh and close the locks.
4
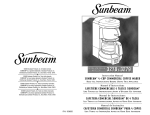
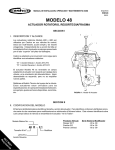
Mounting the pedestal:
(model 1690 only)
1. Insert base plugs.
2. Arm the base in cross shape.
3. Fix the pedestal tubes to the base with the screws.
4. Place the decorative plastic cover
5. Insert the chromed tube through the pedestal leaving the upper part outside.
6. Place the plastic ring .
7. Insert the upper fan (control box and motor) to the chromed tube. adjust it with
screws.
Cleaning Instructions:
1. It is recommended to clean your fan periodically. Accumulated dust can affect the
product performance.
2. Before cleaning make sure the fan is disconnected from the outlet
3. For deep cleaning you might take out the blade and meshes. Once the fan is cleaned
make sure to reassemble the fan according to the instructions.
4. Use only a damp cloth. Do not use chemicals products, detergent or alcohol.
5. To dismount the fan proceed backwards as detailed in the mounting instructions
5
1 - YEAR LIMITED WARRANTY
Sunbeam Products, Inc. ("Sunbeam") warrants that for a period of ONE year from the
date of purchase,this product will be free from defects in material and workmanship.
Sunbeam, at its option, will repair or replace this product or any component of the
product found to be defective during this warranty period. Replacement will be made
with a new or remanufactured product or component. If the product is no longer
available, replacement may be made with a similar product of equal or greater value.
This is your exclusive warranty.
This warranty is valid for the original retail purchaser from the date of initial retail
purchase and is not transferable. Keep the original sales receipt. Proof of purchase is
required to obtain warranty performance. Sunbeam dealers, service centers or retail
stores selling Sunbeam products do not have the right to alter, modify or any way
change the terms and conditions of this warranty.
This warranty does not cover normal wear of parts or damage resulting from any of the
following: negligent use or misuse of the product, use on improper voltage or current,
use contrary to the operating instructions, disassembly, repair or alteration by anyone
other than Sunbeam or an Oster® Authorized Service Center. Further, the warranty
does not cover Acts of God, such as fire, flood, hurricanes and tornadoes.
Sunbeam shall not be liable for any incidental or consequential damages caused by the
breach of any express or implied warranty. Except to the extent prohibited by applicable
law, any implied warranty of merchantability or fitness for a particular purpose is limited
to the duration of the above warranty.
How To Obtain Warranty Service
Please see the country specific warranty insert or contact your local authorized distributor.
DO NOT RETURN THIS PRODUCT TO THE PLACE OF PURCHASE.
6
PRECAUCIONES IMPORTANTES
Cuando se utilice aparatos eléctricos, siempre deben tomarse precauciones básicas de
seguridad, incluyendo las siguientes:
• Lea todas las instrucciones cuidadosamente antes de utilizar su Ventilador Oster.
• Antes de enchufar su unidad, asegúrese que el voltaje del toma corriente sea el mismo
que el voltaje indicado en la base del aparato.
• Utilice este aparato solo para el uso indicado.
• Para prevenir riesgos de descargas eléctricas, no sumerja el aparato o enchufe en
agua u otros líquidos.
• No permita el uso de este aparato a sus hijos, pues la hélice en movimiento puede
herirlos. La supervisión de un adulto es necesaria, cuando el aparato es utilizado
cerca de ellos.
• Para desconectar la unidad, sujete el enchufe y retírelo en forma recta hacia afuera.
Nunca hale el cable.
• No opere esta unidad con el cordón dañado, quemado o después de que el aparato
haya funcionado inadecuadamente o haya sido dañado de alguna forma. Para evitar
el riesgo de un choque eléctrico no desarme la unidad. Llévela a un centro de servicio
técnico autorizado para que sea examinada y/o reparada. Si la unidad ha sido
reensamblada incorrectamente, puede existir riesgos de choques eléctricos cuando se
utilice.
• El uso de accesorios o aditamentos no recomendados por el fabricante pueden causar
incendios, descargas eléctricas o lesiones personales.
• No use a la intemperie o para usos comerciales.
• Use este aparato solo para lo que ha sido diseñado.
• No permita que el cordón cuelgue sobre la orilla de una mesa o entre en contacto con
superficies calientes, incluyendo cocinas eléctricas o a gas.
• Use sobre una superficie plana y estable.
• Por motivo del flujo agregado y la oscilación del conjunto, mantenga alejado cabellos,
ropa, cortinas o cualquier otro objeto que pueda ser absorbido, ya que podrían
enredarse en la rejilla posterior interrumpiendo el flujo de aire.
• Evite el contacto con las partes en movimiento.
7
• Para limpiar el ventilador no use gasolina, diluyente para pintura, disolventes u otros
químicos. Utilice un paño suave y humedecido.
• No utilice el ventilador cerca de hornos, chimeneas, cocinas u otras fuentes de calor
de alta temperatura.
• Nunca utilice el ventilador sin estar totalmente ensamblado.
• No utilice el ventilador sin la malla o rejilla frontal, puede ocasionar accidentes.
• No introduzca los dedos o cualquier otro objeto en la rejilla que protege la hélice
puede ocasionar accidentes.
GUARDE ESTAS INSTRUCCIONES
PARA USO DOMESTICO SOLAMENTE
Palabras de Bienvenida
!Felicitaciones en la compra de su producto Oster® ! Los productos Oster® están
diseñados para ofrecerle la máxima calidad, facilidad de uso y conveniencia.
8
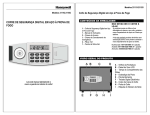
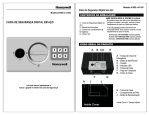
INFORMACIÓN SOBRE EL VENTILADOR
2
3
4
1
1. Selector de velocidad
2. Control de oscilación
3. Control de inclinación
4. Talón de Apoyo
9
COMO OPERAR SU VENTILADOR
1. Los ventiladores Oster® poseen un control que posibilita la oscilación continua,
silenciosa y uniforme. El botón para el control de oscilación se encuentra en la parte
alta de la carcasa del motor. Presione el botón para que el ventilador gire, y hale el
botón hacia arriba para fijar hacia un punto único el flujo de aire.
2. Control de velocidades, los ventiladores Oster® disponen de un interruptor giratorio de
tres velocidades, siendo tres (3) el flujo máximo de aire y uno (1) el mínimo. Para
seleccionar la velocidad deseada simplemente gire la perilla.
3. Control de inclinación, el ajuste de inclinación deberá ser realizado con el aparato
desconectado. Para dirigir el flujo de aire hacia arriba abajo, sostenga la carcasa del
motor, por la parte trasera, presiónelo y gírelo en forma vertical ajustando la
inclinación hasta la posición deseada.
Instrucciones de Montaje
Modelo 1691 (Mesa) y Modelo 1690 (Pedestal)
El aparato se entrega desarmado. Para su seguridad es necesario ensamblarlo
correctamente antes de usarlo. Debe proceder al montaje respetando las instrucciones
o ilustraciones dadas en este manual.
Montaje de la rejilla o malla trasera:
1. Coloque la rejilla posterior sobre el eje del motor, asegurándose de que el orificio de
alineación de la rejilla posterior encaje en el pasador de alineación en la parte frontal
del motor.
2. Sosteniendo el motor por la parte trasera y con la rejilla posicionada, coloque la
tuerca de fijación de la rejilla sobre el eje del motor y ajústela dentro del motor
girándola hacia la derecha.
Montaje de la Hélice:
1. Encaje la hélice en el eje del motor.
2. Para ajustar la hélice enrosque el botón plástico, girándolo hacia la izquierda.
Montaje de la Rejilla Frontal:
1. Tome la rejilla frontal y sitúela contra la rejilla posterior y cierre las pestañas.
10
Montaje del Pedestal:
(modelo 1690 solamente)
1. Inserte los tapones en la base.
2. Arme la base en forma de cruz.
3. Fije el tubo en la base con los tornillos
4. Coloque la cubierta plástica.
5. Inserte el tubo cromado con el otro, dejando la parte superior del tubo afuera.
6. Coloque el aro plástico.
7. Inserte la caja del interruptor con el motor en el tubo cromado y ajústelo con los
tornillos.
Instrucciones de Limpieza
1. Se aconseja una limpieza periódica de su ventilador ya que el polvo acumulado
puede afectar el desempeño del producto
2. Antes de iniciar el proceso de limpieza asegúrese que el ventilador se encuentre
desconectado de la toma eléctrica.
3. Para una limpieza a fondo se pueden sacar las rejillas y la hélice del ventilador,
después de haber limpiado todo el ventilador asegúrese de volver a colocar
correctamente todas las piezas de acuerdo a las instrucciones de montaje.
4. Utilice únicamente un paño levemente humedecido, no utilice ningún producto
químico, detergente o alcohol.
5. Para desarmar el ventilador, proceda a la inversa de como se detalla en la
instrucciones de montaje.
11
GARANTÍA LIMITADA DE 1 AÑO
Sunbeam Products Inc. ("Sunbeam") garantiza que, por un período de UN año a partir
de la fecha de compra, este producto estará libre de defectos en el material y en su
fabricación. Bajo la opinión de Sunbeam, reparará o repondrá este producto o cualquier
componente del mismo si se encuentra defectuoso durante el periodo de garantía. La
reposición se hará con un producto o un componente nuevo o refabricado. Si el producto
ya no está disponible, la reposición se hará con un producto similar de igual o mayor
valor. Esta es su garantía exclusiva.
Esta garantía es válida para el comprador original a partir de la fecha de compra inicial
y no es transferible. Guarde el recibo de compra original. La prueba de compra es
requerida para obtener los servicios de garantía. Los vendedores de productos
Sunbeam, los centros de servicio o tiendas que vendan productos Sunbeam no tienen
el derecho de alterar, modificar o realizar ningún otro cambio a los términos y
condiciones de esta garantía.
Esta garantía no cubre el desgaste por uso normal o daños de partes como resultado
de lo siguiente: uso negligente o mala utilización del producto, uso con una corriente
eléctrica o un voltaje inadecuado, uso contrario a las instrucciones de operación,
desensambles, reparaciones o alteraciones que no sean hechas por Sunbeam o por un
Centro de Servicio Oster® Autorizado. Además, la garantía no cubre Actos de Dios tales
como incendios, inundaciones, huracanes y tornados.
Sunbeam no se hace responsable por ningún daño emergente o incidental causado por
el rompimiento de cualquier garantía expresa o implícita. Excepto al alcance prohibido
por la ley aplicable, cualquier garantía implícita de comercialización o arreglo para un
propósito particular, está limitada en duración de la garantía antes mencionada.
Cómo Obtener el Servicio de Garantía
Por favor consulte el inserto de la garantía
correspondiente al país o póngase en contacto con su distribuidor autorizado local.
NO DEVUELVA ESTE PRODUCTO AL LUGAR DONDE FUE ADQUIRIDO.
12
©2004 Sunbeam Products, Inc. All rights reserved.
OSTER® is a registered trademark of Sunbeam Products, Inc.
Distributed by Sunbeam Products, Inc., Boca Raton, FL. 33431.
©2004 Sunbeam Products, Inc. Todos los derechos reservados.
OSTER® es una marca registrada de Sunbeam Products, Inc.
Distribuido por Sunbeam Products, Inc., Boca Raton, FL. 33431.
Printed in Venezuela
Impreso en Venezuela
P.N. 112736