1
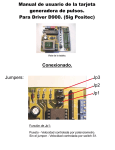
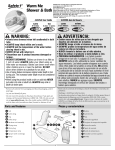
©2011 Dorel Juvenile Group. All Rights Reserved. Todos derechos reservados. www.djgusa.com (800) 544-1108 www.safety1st.com Made in CHINA. Hecho en CHINA. Styles and colors may vary. Los estilos y los colores pueden variar. Distributed by (distribuido por) Dorel Juvenile Group, Inc., 2525 State St. Columbus, IN 47201-7494 Dorel Distribution Canada, 873 Hodge, St. Laurent, QC H4N 2B1 03/25/11 4358-5045C Travel Ease Elite Play Yard Corral “Travel Ease Elite” PY071 User Guide PY071 Guía del Usuario Read all instructions BEFORE assembly and USE of product. KEEP INSTRUCTIONS FOR FUTURE USE. Adult assembly required. CAUTION: Keep small parts away from children during assembly. ANTES de armar y USAR el producto, lea todas las instrucciones. GUARDE LAS INSTRUCCIONES PARA USO FUTURO. Se requiere el armado por parte de un adulto. PRECAUCIÓN: Durante el armado, mantenga las piezas pequeñas fuera del alcance de los niños. WARNING: Failure to follow these warnings ADVERTENCIA: El incumplimiento de estos and the instructions could result in serious injury or death. avisos e las instrucciones puede provocar lesiones graves o fatales. ADVERTENCIA: WARNING: DE ESTRANGULACIÓN: STRANGULATION HAZARD: PELIGRO •S iempre fije el cambiador en forma firme. Si el cambiador •A lways attach changing station securely. If changing station is not secured, child in play yard / non-full size crib can lift or shift changing station and get neck trapped between changing station and non-full size crib/play yard frame. • The product, including side rails, must be fully erected prior to use. • Make sure latches are secure. • Strings can cause strangulation! DO NOT place items with a string around a child’s neck such as hood strings or pacifier cords. DO NOT suspend strings over a bassinet / play yard or attach strings to toys. •D iscontinue use of the product when child is able to climb out or reaches the height of 35-in. (89-cm). • When child is able to pull to standing position, remove bumper pads, large toys, and other objects that could serve as steps for climbing out. •D O NOT place product near a window where cords from blinds or drapes can strangle a child. •D O NOT use a water mattress with this product. • Use ONLY mattress/pad provided by manufacturer. • Always provide the supervision necessary for the continued safety of your child. When used for playing, never leave child unattended. • To reduce the risk of SIDS, pediatricians recommend healthy infants be placed on their back to sleep, unless otherwise advised by your physician. • Never use this product if there are any loose or missing fasteners, loose joints, broken parts or torn mesh/fabric. Check before assembly and periodically during use. Contact Dorel Juvenile Group for replacement parts and instructions if needed. Never substitute parts. WARNING – NEVER LEAVE INFANT IN PRODUCT WITH SIDES DOWN. • INFANT MAY ROLL INTO SPACE BETWEEN PAD AND LOOSE MESH SIDE CAUSING SUFFOCATION. CONTINUED ON NEXT PAGE no está lo suficientemente firme, el niño en el corral o en una cuna que no sea grande puede levantar o mover el cambiador y su cuello puede quedar atrapado entre el cambiador y el armazón de la cuna o el corral. • El producto, incluidas las barandas laterales, debe armarse por completo antes de usarlo. • Verifique que las trabas estén bien seguras. • ¡Las cuerdas pueden provocar estrangulación! NO cuelgue del cuello del bebé ningún artículo atado con cuerdas como capuchas, o chupetes. NO cuelgue cuerdas sobre el moisés/ corral ni ate los juguetes con cuerdas. •D eje de utilizarlo cuando el niño pueda treparse y salir de él, o si alcanza una estatura de 35-pulgadas (89-cm). •C uando el niño pueda ponerse de pie sujetándose de algún objeto, retire las almohadillas protectores, los juguetes grandes y otros objetos que puedan servirle de apoyo para trepar y salir. •N O COLOQUE el producto cerca de una ventana en que las cuerdas de persianas o cortinas puedan estrangular al bebé. •N O utilice colchones de agua con este producto. • Utilice ÚNICAMENTE el colchón o la almohadilla provistos por el fabricante. • Proporcione siempre la supervisión necesaria para la seguridad continua de su hijo. Cuando se utiliza para jugar, nunca deje al niño sin supervisión. •P ara reducir el riesgo de SIDS (síndrome de muerte súbita del bebé), los pediatras recomiendan colocar a los bebés sanos boca arriba para dormir, a menos que su médico le aconseje otra cosa. •N unca utilice este producto si hay elementos de sujeción faltantes o flojos, uniones sueltas, partes rotas o tela/malla rota. Inspeccione el producto antes del armado y periódicamente durante el uso. Comuníquese con Dorel Juvenile Group para obtener piezas de repuesto. Jamás sustituya ninguna pieza. ADVERTENCIA – NUNCA DEJE AL NIÑO DENTRO DEL PRODUCTO CON LOS LADOS HACIA ABAJO. • EL NIÑO PODRÍA RODAR HASTA EL ESPACIO ENTRE LA ALMOHADILLA Y LA MALLA SUELTA, Y ASFIXIARSE. CONTINÚA EN LA PÁGINA SIGUIENTE WARNING – INFANTS CAN ADVERTENCIA – LOS BEBÉS PUEDEN ASFIXIARSE: SUFFOCATE: • En los espacios existentes entre un colchón demasiado • In gaps between a mattress too small or too thick and product sides • On soft bedding NEVER add a mattress, pillow, comforter or padding. USE ONLY mattress/pad supplied by manufacturer. • Never use plastic shipping bags or other plastic film as mattress covers not sold and intended for that purpose. They can cause suffocation. • Child can become entrapped and die when improvised netting or covers are placed on top of a play yard. Never add such items to confine child in play yard. pequeño o demasiado grueso y los costados del producto • En ropa de cama mullida NUNCA añada un colchón, una almohada, un acolchado o almohadilla. UTILICE ÚNICAMENTE el colchón o la almohadilla provistos por el fabricante. • Nunca utilice como fundas de colchón bolsas plásticas de embalaje u otros materiales de película plástica que no hayan sido vendidos y diseñados con ese fin. Podrían causar asfixia. • Si coloca redes o fundas improvisadas encima del corral, el niño puede quedar atrapado y morir. Nunca añada artículos para encerrar al niño en el corral. Uso del moisés Using the Bassinet WARNING: ADVERTENCIA: • F ailure to follow these warnings and the instructions could result in serious injury or death. • F ALL HAZARD - To help prevent falls, do not use this product when the infant begins to push up on hands and knees or reaches manufacturer’s recommended maximum weight of 15 lbs. (6.8 kg), whichever comes first. •S UFFOCATION HAZARD: Infants can suffocate: • In gaps between an extra pad and side of the bassinet • On soft bedding NEVER add a mattress, pillow, comforter, or padding. Use ONLY the pad provided by manufacturer. • If a sheet is used with the pad, use only the one provided by the bassinet or cradle manufacturer or one specifically designed to fit the dimension of the bassinet mattress. • To reduce the risk of SIDS, pediatricians recommend healthy infants be placed on their back to sleep, unless otherwise advised by your physician. •B assinet must be fully assembled and installed, including top rails, fasteners and bottom pad before using. Make sure all hook-and-loop straps are tightly secured. •W hen the bassinet is used for sleeping you must still provide the supervision necessary for continued safety of your child. •U se the bassinet with only one child at a time. •N ever place child under bassinet. •U se ONLY the bedding provided by the manufacturer. • El incumplimiento de estos avisos e las instrucciones puede provocar lesiones graves o fatales. •P ELIGRO DE CAÍDA – Para ayudar a prevenir caídas, este producto no debe utilizarse cuando el bebé comience a levantarse sobre las manos o las rodillas, o cuando alcance el peso máximo de 15 libras (6.8 kg) recomendado por el fabricante, según lo que ocurra primero. •P ELIGRO DE ASFIXIA: Los bebés pueden asfixiarse • En los espacios existentes entre una almohadilla adicional y los costados de la cuna • En ropa de cama mullida NUNCA añada un colchón, una almohada, un acolchado, o almohadilla. Utilice ÚNICAMENTE la almohadilla provistos por el fabricante. •S i se utiliza una sábana junto con la almohadilla, utilice sólo la sábana provista por el fabricante de la cuna o moisés, o bien una sábana diseñada para las dimensiones del colchón de la cuna o moisés. •P ara reducir el riesgo de SIDS (síndrome de muerte súbita del bebé), los pediatras recomiendan colocar a los bebés sanos boca arriba para dormir, a menos que su médico le aconseje otra cosa. •A ntes de utilizar el moisés, este debe estar totalmente armado e instalado, incluidas las barandas superiores, los elementos de sujeción y la almohadilla inferior. Asegúrese de que todas las correas de ganchos y lazos estén firmemente ajustadas. •C uando el moisés se utilice para dormir, usted aún debe supervisar al niño para garantizar su seguridad en todo momento. •U tilice el moisés con un solo niño a la vez. •N unca coloque al niño debajo del moisés. •U tilice ÚNICAMENTE la funda para cuna provista por el fabricante. Using the Baby Care Organizer Uso del organizador para cuidado del bebé WARNING: ADVERTENCIA: • T o avoid possible tipping, NEVER place more than 3-lbs. • Para evitar posibles vuelcos, NUNCA coloque más de 3 libras (1.36-kg) in the baby care organizer. (1.36-kg) sobre el organizador para cuidado del bebé. • Never allow child to play with or hang on the baby care • No permita nunca que el niño juegue o se cuelgue del organizador para cuidado del bebé. organizer. • M •A lways keep objects out of reach of child. Remove baby care antenga siempre los objetos fuera del alcance del niño. Retire el organizador para cuidado del bebé cuando el niño organizer when child is able to pull himself up in play yard. pueda levantarse por sí solo. CONTINUED ON NEXT PAGE 2 CONTINÚA EN LA PÁGINA SIGUIENTE Using the Changing Station Uso del cambiador • FALL HAZARD - To prevent death or serious injury, always keep child within arms reach. • Read all instructions before use of the changing table. • Keep instructions for future use. • Do not use the changing table if it is damaged or broken. •D iscontinue using the changing station when your child can push up on hands and knees, is able to pull themselves up, or reaches manufacturer’s recommended maximum weight of 15-lbs. (6.8-kg), whichever comes first. •D O NOT use changing station as a sleeping area or play area. Using the Toybar •P ELIGRO DE CAÍDA - Para prevenir accidentes fatales y lesiones graves, tenga siempre al niño al alcance de la mano. • Lea todas las instrucciones antes de usar la mesa cambiadora. • Guarde las instrucciones para futuras consultas. • No utilice la mesa cambiadora si está dañada o rota. •D eje de utilizar el cambiador cuando el niño pueda erguirse usando las manos y las rodillas, levantarse por sí solo o cuando alcance el peso máximo de 15 libras (6.8-kg) recomendado por el fabricante, según lo que ocurra primero. • NO use el cambiador como área para dormir o para jugar. Cómo utilizar la barra de juguetes •A lways attach the toybar securely. If the toybar is not secured, child in play yard can lift or shift the toybar and get neck trapped between toybar and play yard frame. • Toybar is a possible entanglement injury. Keep out of baby’s reach. • Remove toybar from crib or playpen when baby begins to push up on hands and knees, from birth to 5 months. • Toybar is intended for visual stimulation and is not intended to be grasped by the child. • Always attach all provided fasteners (strings, straps, clamps, etc.) tightly to a crib or play yard according to instructions. Check frequently. • Do not add additional strings or straps to attach the toys or toybar to the play yard. • Siempre fije la barra de juguetes en forma firme. Si la barra de juguetes no está firmemente asegurado, el niño puede levantar o correr la barra de juguetes desde el corral y su cuello podría quedar atascado entre la barra de juguetes y el armazón del corral. • La barra de juguetes es un posible riesgo de lesión por enredo. Mantenga el producto fuera del alcance del bebé. • Retire la barra de juguetes de la cuna o del corral cuando el bebé comience a erguirse usando las manos y las rodillas, desde el nacimiento hasta los 5 meses de edad. • El propósito dla barra de juguetes es estimular visualmente el niño y no que éste lo sujete. • Retire la barra de juguetes cuando el bebé comience a erguirse usando las manos y las rodillas. • Fije siempre todos los elementos de sujeción provistos (cuerdas, correas, abrazaderas, etc.) de manera segura a la cuna o corral, se acuerdo con las instrucciones. Verifíquelo con frecuencia. • No agregue cuerdas o correas adicionales para sujetar los juguetes o la barra de juguetes al corral. Parts List Lista de piezas WARNING: WARNING: ADVERTENCIA: ADVERTENCIA: F H A K I B C D L E G J A Corral A Play yard B Mattress B Colchón C Travel bag C Bolso de transporte D Changing station fabric (with changing station frame) D Tela del cambiador (con armazón del cambiador) E Connector bars (left & right) E Barras conectoras (izquierda y derecha) F Baby care organizer F Organizador para cuidado del bebé G Bassinet bars (4) G Barras de moisés (4) H Bassinet H Moisés I Toybar middle support I Soporte central de la barra de juguetes J Toybar support ends K Soft toybar cover J Extremos del soporte de la barra de juguetes K Cubierta suave para la barra de juguetes L Juguetes L Toys • Remove all contents from packaging and discard box and/or poly bags. • Lay out and identify all parts. • Do not return this product to the place of purchase. If any parts are missing, email [email protected], call Consumer Relations at (800) 544-1108, or fax at (800) 207-8182. You can also visit our website at www.safety1st.com. Have the model number (PY071) and date code (manufacture date) located underneath the play yard. •R etire todo el contenido del embalaje y deseche la caja y/o las bolsas de polietileno. • Despliegue e identifique todas las piezas. • No devuelva este producto al lugar donde lo compró. Si falta alguna pieza, envíe un correo electrónico a [email protected], llame al Departamento de Relaciones con el Consumidor al (800) 544-1108, o envíe un fax al (800) 207-8182. También puede visitar nuestro sitio web en www.safety1st.com. Tenga a mano el número de modelo (PY071) y el código de fecha (fecha de fabricación) situados debajo del corral. 3 To Assemble 1 Unfasten mattress and remove play yard. Set mattress aside. 2 KEEPING CENTER UP — open play yard as shown. 1 1 Mattress Colchón HACIA ARRIBA — abra el corral como se muestra. 3 3a Firmly grasp SHORT RAIL as shown (Figure 3). FLIP rail upward and listen for DOUBLE CLICK* to lock (Figure 3a). FLIP and CLICK other SHORT RAIL. *Can sound like one click. la parte central. CLICK LONG railings. 4 Mientras mantiene la mano en la parte 4 central, VOLTEE y haga CLIC las barandas LARGAS. ADVERTENCIA: The play yard, including side rails, should be fully erected prior to use. Make sure all four rails are locked into place before use. El corral, incluyendo los rieles laterales, debe estar totalmente levantado antes de utilizarse. Asegúrese de que los cuatro rieles estén bloqueados en su sitio antes de utilizarse. 5 Eleve el extremo del corral y empuje el 5 center down. centro hacia abajo. Check to make sure all railings are locked into position by pressing down on each rail. If rail does not lock, return rail to unlocked position and repeat Steps 3 and 4. 6 Place mattress in play yard. Pass center hook-and-loop strip through slot at bottom of play yard and secure. Repeat on other side. NOTE: If center hook-and-loop strip does not align with slot, turn mattress around and try again. Sujete firmemente la BARANDA CORTA, como se muestra (Figura 3). VOLTEE la baranda hacia arriba hasta oír DOS CLICS* que indican que está trabada (Figura 3a). VOLTEE la otra BARANDA CORTA hasta oír los CLICS. *Pueden sonar como uno solo. PARA TRABAR LAS BARANDAS, EL CENTRO DEBE ESTAR HACIA ARRIBA. WARNING: 5 Pick up end of play yard and push Nota: Para facilitar el armado, trabe las ruedas. 3 Coloque la mano en la parte superior de TO LOCK RAILINGS, CENTER MUST BE UP. 4 Keeping hand on center hub, FLIP and Separe el colchón y retire el corral. Deje a un lado el colchón. 2 MIENTRAS MANTIENE EL CENTRO 2 Note: For easier set up, lock wheels. 3 Place hand on top of center hub. Armado Compruebe que todas las barandas estén trabadas en posición presionando cada una hacia abajo. Si la baranda no se traba, vuelva a colocarla en la posición de destraba y repita los Pasos 3 y 4. 6 Coloque la tabla del piso en el 6 corral. Pase la banda de ganchos y lazos central a través de la ranura que se encuentra en la parte inferior del corral y asegúrela. Repita el procedimiento en el otro extremo. NOTA: Si la banda de ganchos y lazos central no se alinea con la ranura, dé vuelta el colchón y pruebe nuevamente. 4 To Assemble (continued) Armado (continuación) IMPORTANT NOTE: Review the Bassinet Warnings on Page 2. 7 Clips Broches NOTE: Do not place child in bassinet until assembly is complete. 7 Attach Bassinet G H NOTA: No coloque al niño en el moisés hasta no finalizar completamente el armado. 7 Coloque el moisés : Remove mattress. Locate clips on bassinet and loops on inside of play yard. Clip the bassinet to the inside of the play yard. Secure the hook-and-loop patches between clips. 8 Insert two halves of bassinet NOTA IMPORTANTE: Lea las advertencias sobre el uso del moisés en la Página 2. Hook-andLoop Patches Parches de ganchos y lazos G H : Retire el colchón. Localice los clips en el moisés y los lazos en el interior del corral. Enganche el moisés al interior del corral. Enganche el moisés al interior del corral. Asegure los parches de ganchos y lazos entre los clips. 8 Inserta dos mitades de la 8 bar into sleeves. Connect bars by lifting and lining up middle ends and connecting. Repeat for other bassinet bar assembly. NOTE: Ensure bars are secure. barra del moises en las fundas. Conecte las barras levantando y el forma fila los fines del centro y conectar. Repita para otra asamblea de la barra del moises. NOTA: Asegúrese de que las barras del moisés estén firmes. Sleeve Funda 9 Place mattress (padded side up) in bassinet. Press down firmly on mattress to ensure hook-and-loop patches on mattress are attached to hookand-loop patches on bottom of bassinet (Figure 9). 9 Coloque el colchón (con el lado 9 acolchado hacia arriba) en el moisés. Hook-andLoop Patches Parches de ganchos y lazos To Attach Toybar IMPORTANT NOTE: Review the Toybar Warnings on Page 3. 10Attach Toybar I J K Coloque la barra de juguetes 10 9 10a 10b Snap together one toybar support end to the toybar middle (Figure 10). Place toybar cover over toybar (Figure 10a). Snap together other toybar support end to the toybar middle piece and pull soft cover over support end (Figure 10b). Attach hook-and-loop fasteners to toys (Figure 10c). To use: Press ends onto top rails. 10c NOTA IMPORTANTE: Lea las advertencias sobre el uso de la barra de juguetes en la Página 3. 10Coloque la barra de juguetes L : Presione firmemente sobre el colchón para asegurarse de que sus parches de ganchos y lazos se adhieran a las correas correspondientes del moisés (Figura 9). J K L : Encaje el otro extremo de soporte de la barra de juguetes en la pieza central y tire de la cubierta para deslizarla sobre la barrar (Figura 10b). Presiónela sujetadores de ganchos y lazos en los juguetes (Figura 10c). Uso: Coloque extremo en la barandas superiores. 10d 5 I Encaje uno de los extremos de la barra de juguetes en el soporte central (Figura 10). Coloque la cubierta sobre la barra de juguetes (Figura 10a). To Assemble (continued) Armado (continuación) IMPORTANT NOTE: Review the Changing Station Warnings on Pages 1 and 3. NOTA IMPORTANTE: Lea las advertencias sobre el uso del cambiador en las Páginas 1 y 3. NOTE: Do not place child in changing station until assembly is complete. NOTA: No coloque al niño en el cambiador hasta no finalizar completamente el armado. 11 Attach Changing Station Locate two corners on play yard that have holes to receive changer assembly (Figure 11a). Insert bars into holes on play yard corners until they click. Secure fabric over play yard top rail using clips. Remove Changing Station: Unfasten fabric flaps. Locate two buttons at play yard corners. Press both buttons and lift assembly off play yard. IMPORTANT NOTE: Review the Baby Care Organizer Warnings on Page 2. 11 Coloque el cambiador 11 D E : Position the left and right connector bars with the curves as shown and with pins and holes facing down (Figure 11). Slide each connector bar into frame until it clicks into place. Pull on the connectors to ensure they are secure. D E Coloque las barras conectoras izquierda y derecha con las curvas tal como se muestran, y con las clavijas y los orificios hacia abajo (Figura 11). Deslice cada barra conectora en el armazón hasta que encaje en posición. Tire de los conectores para asegurarse de que estén firmes. Pin Clavija 11a Clip Clip Loop Lazo Localice las dos esquinas del corral que tienen orificios para recibir el conjunto del cambiador (Figura 11a). Inserte las barras en los orificios del corral hasta que hagan clic. Fije la tela sobre la baranda superior del corral con clips. Retirar el conjunto del cambiador:Localice los dos botones en las esquinas del corral. Oprima ambos botones y levante el conjunto fuera del corral. NOTA IMPORTANTE: Lea las advertencias sobre el organizador para cuidado del bebé en la Página 2. 12 12 Attach Baby Care 12Coloque el organizador Organizer F: On non-wheeled side of play yard, locate the two small holes at each corner of the frame (Figure 12). Insert the organizer wires into the holes on each side (Figure 12a). 12a 6 : para cuidado F: En el costado del corral que no tiene ruedas, localice los dos orificios pequeños en cada esquina del armazón (Figura 12). Inserte las alambres del organizador en el orificios de cada lado (Figura 12a). To Operate Play Yard 1 To lock and unlock wheels: Push lever down to lock wheel. Pull lever up to unlock wheel. 2 Folding: Para operar el corral 1 1 UNLOCK DESTRABAR LOCK TRABAR Empuje la palanca hacia abajo para trabar la rueda. Tire de la palanca hacia arriba para destrabar la rueda. 2 Plegado: 2 Retire todos los accesorios del corral. Retire el colchón. Tire hacia arriba de la lengüeta en el centro del piso. Remove all accessories from play yard. Take out mattress. Pull up on finger tab in center of floor. 3 IMPORTANT: Center floor must be raised 3 3 IMPORTANTE: Para destrabar todas las A LIFT/LEVANTAR at all times to unlock all rails. barandas, el centro del piso debe estar continuamente levantado. FIRST, unlock LONG rails, then unlock SHORT rails. PRIMERO, destrabe las barandas LARGAS y luego las CORTAS. Para destrabar cada baranda: To unlock each rail: A LIFT: With hand over top rail and fingers underneath latch, LIFT rail up slightly (Figure 3). 3a A LEVANTAR: Con la mano sobre el B SQUEEZE/APRETAR Release two locks Libere dos trabas B SQUEEZE: With fingers, firmly SQUEEZE underneath latch to release two locks (Figure 3a). 1 Special Note: • If rail does not unlock, return rail to lock position and repeat steps. 4 Move railings toward center 3b hágalo BAJAR (Figura 3b). (Figura 4). 5 Envuelva el colchón alrededor del 5 Wrap mattress around play yard and corral y ajuste las correas (Figura 5). fasten straps (Figure 5). Travel Bag Pull travel bag over play yard. Nota especial: • Si la baranda no se destraba, hágala volver a la posición trabada y repita los pasos. 4 Desplace las barandas hacia el centro 5 (Figure 4). 1 con los dedos debajo de las trabas para liberarlas. (Figura 3a). C BAJAR: Con la mano sobre el riel, C DROP DOWN/BAJAR 4 riel superior y los dedos debajo de la traba, LEVANTE ligeramente la baranda (Figura 3). B APRETAR: APRIETE firmemente 2 C DROP DOWN: With hand on railing, DROP DOWN railing (Figure 3b). Para trabar y destrabar las ruedas: Bolso de transporte 1 Accessory Compartment Compartimento de accesorios 1 TIP: Store bassinet, changing station, baby care organizer and toybar with toys in accessory compartment (Figure 1). 7 Deslice el bolso de transporte sobre el corral. CONSEJO: Guarde el moisés, cambiador, organizador para cuidado del bebé y la barra de juguetes en el compartimento de accesorios (Figura 1). Care and Maintenance Cuidado y mantenimiento • Ocasionalmente, verifique que el corral no tenga partes •F rom time to time, check your play yard for worn parts, torn material or stitching. Replace or repair the parts as needed. gastadas ni material roto o descosido. Reemplace o repare las partes según sea necesario. • If play yard is used at the beach, you MUST clean sand off your play yard, including the feet, before packing into travel bag. Sand may damage top rail lock. •S i lo usa en la playa, DEBE limpiar la arena del corral, incluyendo las patas, antes de volver a colocarlo en el bolso de transporte. La arena podría dañar la traba de las barandas superiores. • The play yard, mattress, bassinet, baby care organizer, toys, toybar and changing station are surface wash only. Use only household soap or detergent and warm water. To wash travel bag, machine wash in warm water on delicate cycle and drip-dry. DO NOT USE BLEACH. One (1) Year Limited Warranty •E l corral, el colchón, el moisés, organizador para cuidado del bebé, juguetes, la barra de juguetes y el cambiador deben limpiarse únicamente en su superficie. Utilice solamente jabón o detergente de uso doméstico y agua tibia. Lave el bolso de transporte en lavarropas, con agua tibia y en ciclo para ropa delicada. Deje secar al aire, sin retorcer. NO USE BLANQUEADOR. Garantía limitada durante un (1) año Dorel Juvenile Group, Inc. warrants to the original purchaser that this product (Travel Ease Elite Play Yard), is free from material and workmanship defects when used under normal conditions for a period of one (1) year from the date of purchase. Should the product contain defects in material or workmanship Dorel Juvenile Group, Inc., will repair or replace the product, at our option, free of charge. Purchaser will be responsible for all costs associated with packaging and shipping the product to Dorel Juvenile Group Consumer Relations Department at the address noted on the front page and all other freight or insurance costs associated with the return. Dorel Juvenile Group will bear the cost of shipping the repaired or replaced product to the purchaser. Product should be returned in its original package accompanied by a proof of purchase, either a sales receipt or other proof that the product is within the warranty period. This warranty is void if the owner repairs or modifies the product or the product has been damaged as a result of misuse. La firma Dorel Juvenile Group, Inc. asegura al comprador original que este producto (Corral “Travel Ease Elite”) está garantizado contra materiales defectuosos o mano de obra deficiente durante un (1) año a partir de la fecha de compra, si se utiliza en condiciones normales.Si el producto presentara materiales defectuosos o mano de obra deficiente, Dorel Juvenile Group, Inc. reparará o sustituirá el producto, a nuestra discreción, de manera gratuita. El comprador cubrirá todos los costos relacionados con el envase y envío del producto al Departamento de Relaciones con el Consumidor de Dorel Juvenile Group, a la dirección que aparece al inicio de este documento, y los demás costos de transportación o aseguramiento relacionados con el envío. Dorel Juvenile Group cubrirá los costos de devolución al comprador del producto reparado o sustituido. El producto debe enviarse en su envase original junto con una prueba documental de la compra, ya sea el recibo de venta u otro medio demostrativo de que el producto aún está dentro del período de garantía. Esta garantía quedará anulada si el propietario hubiera reparado o modificado el producto, o si éste se hubiera dañado como consecuencia del uso incorrecto. This warranty excludes any liability other than that expressly stated previously, including but not limited to, any incidental or inconsequential damages. Esta garantía excluye cualesquiera otras responsabilidades ajenas a la expresada más arriba, entre otras, los daños incidentales o consecuentes. SOME STATES DO NOT ALLOW THE EXCLUSION OR LIMITATION OF INCIDENTAL OR CONSEQUENTIAL DAMAGES, SO THE ABOVE LIMITATION OR EXCLUSION MAY NOT APPLY TO YOU. EN ALGUNOS ESTADOS NO SE PERMITEN LAS EXCLUSIONES O LIMITACIONES REFERENTES A LOS DAÑOS INCIDENTALES O CONSECUENTES, DE MODO QUE LA LIMITACIÓN O EXCLUSIÓN ANTES EXPUESTA QUIZÁS NO SE APLIQUE EN SU CASO PARTICULAR. THIS WARRANTY GIVES YOU SPECIFIC LEGAL RIGHTS, AND YOU MAY ALSO HAVE OTHER RIGHTS THAT MAY VARY FROM STATE TO STATE. ESTA GARANTÍA LE OTORGA DERECHOS LEGALES ESPECÍFICOS Y ES POSIBLE QUE USTED TAMBIÉN CUENTE CON OTROS DERECHOS QUE PODRÍAN VARIAR EN DISTINTOS ESTADOS. 8