1
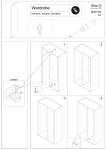
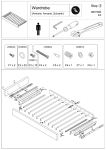
ARLO WARDROBE
INSTRUCTIONS
Instrucciones para armario Arlo
E
ARANT
EE
GU
E
Garantía de 4 años válida sólo en Reino Unido e Irlanda
11
(1)
(3)
(2)
(6)
(4)
(5)
(7) x 2
(9)
(8) x 2
B
A
Φ8 x 25mm x 6pcs
6pcs for top bar
C
Φ7 x 16mm x 36pcs
12pcs for Rail bracket(G)
24pcs for Hinge(J)
E
D
Φ12mm(1/4”) x 30mm x 8pcs
4pcs for top panel
4pcs for bottom panel
Φ8 x 16mm x 40pcs
40pcs for back panel
F
Φ6 x 30mm x 20pcs
8pcs for top bar
4pcs for top panel
4pcs for center support rail
4pcs for bottom panel
H
G
2pcs
4pcs for Rail(H)
J
K
4sets
6pcs
L
M
1pc
1set
8sets
1
2
1
1
A x6
2
E x12
2
1
4
5
3
E x2
D x4
E x8
3
6
D x4
4
7
7
C x40
5
8
8
F x8
6
K
K
G
G
K
K
B x6
7
G
H
G
H
B x6
8
J4
J3
J1
J2
J4
9
B x12
9
J3
J3
J3
B x12
10
11
L
GB
IMPORTANT: READ THESE INSTRUCTIONS CAREFULLY
BEFORE USE AND KEEP THEM FOR FUTURE REFERENCE.
YOUR CHILD’S SAFETY MAY BE AFFECTED IF YOU DO NOT
FOLLOW THESE INSTRUCTIONS
user guide
Thank you for choosing a Cosatto product. Please take a little time to read the important safety notes
detailed below. This will ensure many years of happy, safe use.
safety: take note
WARNING: A CHILDS SAFETY IS YOUR RESPONSIBILITY
• The wardrobe must be used on a level and stable surface.
• To ensure the wardrobe cannot fall over e.g. as a result of pulling on the open door, the top of the
wardrobe should be fastened to the wall behind it using the security strap supplied. It is suggested a
number 12 round head screw of at least 5 cm in length be used in conjunction with a wall fixing
appropriate to the wall type. If you are uncertain about doing this, consult a builder.
• Discourage your child from climbing on or playing with this wardrobe as it is not a toy.
• Glue is not included but can be used at your discretion on dowelled joints to further strengthen
the wardrobe.
• Once assembled, it is inadvisable to disassemble the wardrobe.
parts information
Please retain all packaging until you are certain no parts are missing.
In the case of assembly difficulties, missing parts or other queries, please contact our aftersales team
on +44 (0)870 050 5900 or email [email protected]
After assembly, please dispose of all packaging carefully, recycling where possible.
A medium sized flat bladed and medium sized cross head screwdrivers are required for assembly.
The help of an assistant will make assembly easier.
list of parts
6 x 25mm flat headed screw (A)
40 x 16mm round headed screw (C)
20 x wooden dowel (E)
4 x rail bracket (G)
6 x hinge (J)
1 x safety strap (inc. screw) (L)
36 x 16mm flat headed screw (B)
6 x bolt (D)
8 x shelf bracket with screw (F)
2 x rail (H)
4 x magnetic catch with screw (K)
1 x allen key (M)
1 x top panel (1)
2 x top bar (2)
1 x bottom panel (3)
1 x left side panel (4)
1 x centre support panel (5)
1 x right side panel (6)
2 x back panel (7)
2 x shelf unit (8)
2 x door (9)
wardrobe assembly
Step 1 – top panel
Insert four wooden dowels (E) into the top panel (1) and four wooden dowels (E) into each top bar (2).
Secure each top bar (2), with the lip facing outward, onto the top panel, using six 25mm screws (A) for
the top panel.
Step 2 – outer frame
Insert four wooden dowels (E) into the bottom panel (3) and four wooden dowels (E) into the centre
support panel (5). Secure the bottom panel using two bolts (D), top panel (1) using two bolts (D) and
centre support panel to the left side panel (4), making sure all of the wooden dowels (E) are aligned and
bolts are tightened with the supplied allen key (M).
Step 3 – right side panel
Secure the right side panel (6) to the assembled piece using four bolts (D), two bolts (D) for the bottom
panel and two bolts (D) for the top panel. Again, make sure all of the wooden dowels (E) are aligned
and bolts are tightened.
Step 4 – back panel
Stand wardrobe upright and secure the two back panels (7) using forty 16mm screws (C).
Step 5 – fitting shelves
Top shelf: insert two shelf brackets (F) into the right side panel and two into the left side panel at the
desired height. Place a shelf unit (8) onto the four shelf brackets and secure with four screws.
Bottom shelf: repeat step 5.
Step 6 – magnetic catches and rails
Affix the four magnetic catches (K), two to the top panel and two to the bottom panel using two
screws per magnetic catch.
Secure 2 rail brackets (G) to the right side panel at the desired height using three 16mm screws (B)
per bracket.
Step 7 – rails
Top rail: insert a rail (H) into the affixed rail bracket on the right side panel, place a rail bracket (G) over
the free end of the rail. Using three 16mm screws (B), secure to the left side panel at the desired height.
Bottom rail: repeat step 7.
Step 8 – doors
Preparing the six hinges (J); each hinge needs to be split into its two components. Loosen screw (J1)
by half-a-turn and separate the hinge spring (J4) from the hinge bracket (J3).
Affix three hinge springs to each door (9) using two 16mm screws (B) per hinge spring.
Step 9 – hinge bracket
Secure all six hinge brackets (J3) to the six pre-drilled hinge bracket supports, ensuring the longer piece
of the hinge bracket faces outwards, using two 16mm screws (B) per hinge bracket.
Step 10 – fitting doors
Align each hinge spring to its relevant hinge bracket and tighten (J1) screw. Each door position can be
adjusted using (J2) screw.
Step 11 – security
Secure the safety strap (L) to the rear of the wardrobe using the supplied screw and secure to your wall.
We suggest a number 12 round head screw of at least 5 cm in length be used in conjunction with a wall
fixing appropriate to the wall type (please note: wall fixings not included). If you are uncertain about
doing this, consult a builder.
WARNING: Failing to secure your wardrobe may cause injury to your loved ones.
care, maintenance and cleaning
Regularly check the tightness of bolts and tighten as necessary.
Check for damage which could render your wardrobe unsafe or cause splinters.
To clean use a damp cloth, avoiding the use of strong detergents or abrasives.
An occasional light application of a wax polish will help maintain a good appearance.
Replacement parts
The replacement parts listed below are available for your product. In the event that you require any of
these parts, please contact your local store or contact us at [email protected]
• top panel
• top bar
• bottom panel
• left side panel
• right side panel
• back panel
• centre support panel
• shelf unit
• door
• fixing pack
• safety strap (inc. screw)
E
IMPORTANT: READ THESE INSTRUCTIONS CAREFULLY
BEFORE USE AND KEEP THEM FOR FUTURE REFERENCE. LA
SEGURIDAD DEL NIÑO PUEDE VERSE AFECTADA SI USTED
NO SIGUE ESTAS INSTRUCCIONES
Guía del usuario
Gracias por elegir los productos Cosatto. Por favor, tenga un poco de tiempo para leer las notas de
seguridad importantes se detallan a continuación. Esto asegurará muchos años de uso alegre y seguro.
seguridad: tomar nota.
ADVERTENCIA: A LA SEGURIDAD ES SU RESPONSABILIDAD CHILDS
• El vestuario debe ser usado en una superficie plana y estable.
• Para garantizar el armario no se tumbe por ejemplo, como resultado de tirar de la puerta abierta, la
parte superior del armario debe fijarse a la pared detrás de él con la correa de seguridad provistos. Se
sugiere un número de tornillo 12 de cabeza redonda de al menos 5 cm de longitud se utiliza junto
con una fijación a pared adecuada al tipo de pared. Si no está seguro acerca de cómo hacerlo,
consulte a un constructor.
• Disuadir a los niños trepen a la o jugar con este armario, ya que no es un juguete
• Pegar no está incluido pero se puede utilizar a su discreción en las articulaciones enclavijados para
fortalecer aún más el vestuario.
• Una vez montado, no es aconsejable desmontar el armario.
piezas de información
Por favor retenga todo el embalaje hasta que esté seguro no le faltan piezas.
En el caso de dificultades en el montaje, piezas faltantes o duda, por favor contacte con nuestro equipo
de post-venta en +44 (0)870 050 5900 o por correo electrónico [email protected]
Después del montaje del equipo disponga de todos los envases con cuidado, el reciclado siempre que
sea posible.
Un medianas empresas de hoja plana y medianas empresas destornilladores con cabeza de cruz son
necesarias para armar.
La ayuda de un asistente facilitar el montaje.
lista de piezas
6 x 25 mm el tornillo de cabeza plana (A)
40 x 16 mm tornillo de cabeza redonda (C)
20 x pasador de madera (E)
4 x soporte de ferrocarril (G)
6 x bisagra (J)
1 x correa de seguridad (incluye tornillo) (L)
1 x panel superior (1)
36 x 16 mm tornillo de cabeza plana (B)
6 x perno (D)
8 x soporte de estante con el tornillo (F)
2 x ferrocarril (H)
4 x cierre magnético con el tornillo (K)
1 x una llave allen (M)
2 x barra superior (2)
1 x panel inferior (3)
1 x panel lateral izquierdo (4)
1 x panel de soporte central (5)
1 x panel lateral derecho (6)
2 x el panel posterior (7)
2 x estantería (8)
2 x puerta (9)
armario de montaje
Paso 1 - panel superior
Inserte cuatro clavijas de madera (E) en la cara superior (1) y cuatro clavijas de madera (E) cada uno en
la barra de arriba (2). Asegure cada barra superior (2), con el labio hacia afuera, en el panel superior, con
seis tornillos de 25 mm (A) para el panel superior.
Paso 2 - marco exterior
Inserte cuatro clavijas de madera (E) en el panel inferior (3) y cuatro clavijas de madera (E) en el panel de
soporte central (5). Fije el panel inferior con dos tornillos (D), panel superior (1) utilizando dos tornillos
(D) y el panel de soporte central en el panel lateral izquierdo (4), asegurándose de que todas las clavijas
de madera (E) están alineados y los tornillos se aprietan con la llave Allen (M).
Paso 3 - panel lateral derecho
Asegure el panel lateral derecho (6) a la pieza montada medio de cuatro tornillos (D), dos tornillos (D)
para el panel inferior y dos pernos (D) para el panel superior. De nuevo, asegúrese de que todos los
pasadores de madera (E) estén alineados y tuercas apretadas son.
Paso 4 - panel trasero
Póngase de pie y armario asegurar los dos paneles posteriores (7) con cuarenta 16mm tornillos (C).
Paso 5 - estantes montaje
Estante superior: insertar dos soportes del estante (F) en el panel lateral derecho y dos en el panel lateral
izquierdo a la altura deseada. Coloque una estantería (8) en los cuatro soportes del estante y asegúrelo
con cuatro tornillos.
estante inferior: Repita el paso 5.
Paso 6 - las capturas y barras magnéticas
Coloque los cuatro enganches magnéticos (K), dos a la cara superior y dos en el panel inferior con dos
tornillos por cierre magnético.
Asegure los soportes de 2 carriles (G) al panel de la derecha a la altura deseada mediante tres tornillos de
16 mm (B) por soporte.
Paso 7 - rieles
Top ferrocarril: insertar un carril (H) en el soporte de la guía colocada en el panel lateral derecho,
coloque un soporte de la guía (G) sobre el extremo libre del ferrocarril. Con tres tornillos de 16 mm (B),
seguro para el panel lateral izquierdo a la altura deseada.
Riel inferior: Repita el paso 7.
Paso 8 - puertas
Preparación de los seis bisagras (J); cada bisagra tiene que ser dividida en sus dos componentes. Afloje
el tornillo (J1) a la mitad-una vez-y separar la bisagra de primavera (J4) desde el soporte de la bisagra
(J3).
Fije la bisagra tres muelles para cada puerta (9) utilizando dos tornillos de 16 mm (B) por la bisagra de
primavera.
Paso 9 - soporte de la bisagra
Asegure todos los seis soportes con bisagras (J3) a los seis que ya está perforado soportes de las
bisagras del soporte, garantizando la pieza más larga del soporte de la bisagra orientado hacia el
exterior, utilizando dos tornillos de 16 mm (B) por soporte de la bisagra.
Paso 10 - las puertas de ajustes
Align each hinge spring to its relevant hinge bracket and tighten (J1) screw. Each door position can be
adjusted using (J2) screw.
Paso 11 - seguridad
egure la correa de seguridad (L) en la parte trasera del armario con el tornillo incluido y seguro a su
pared.
Le proponemos una serie de tornillo 12 de cabeza redonda de al menos 5 cm de longitud se utiliza junto
con una fijación a pared adecuada al tipo de pared (por favor, tenga en cuenta: las fijaciones no
incluidos). Si no está seguro acerca de cómo hacerlo, consulte a un constructor.
ADVERTENCIA: El no poder garantizar su armario puede causar daño a sus seres queridos.
cuidado, mantenimiento y limpieza
Revise periódicamente el apriete de los tornillos y apriete según sea necesario.
Compruebe si hay daños que podría hacer su guardarropa inseguros o hacer astillas.
Para la limpieza utilice un paño húmedo, evitando el uso de detergentes fuertes o abrasivos.
Una aplicación ocasional de poca intensidad de un pulimento de cera ayudará a mantener una buena
apariencia.
Replacement parts
Las piezas de repuesto se enumeran a continuación están disponibles para su producto. En caso de
necesitar alguna de estas piezas, por favor póngase en contacto con su tienda local o póngase en
contacto con nosotros en [email protected]
• panel superior
• barra superior
• parte inferior del panel
• panel lateral izquierdo
• panel lateral derecho
• Panel trasero
• Panel de soporte central
• estantería
• Puerta
• Pack de fijación
• Correa de seguridad (inc. tornillo)
ML02062010
Cosatto Ltd, Bentinck Mill, Bentinck Street, Farnworth, Bolton, Lancashire, BL4 7EP.
Tel: +44(0)870 050 5900 www.cosatto.com
For up to date information and manuals for all cosatto products visit www.cosatto.com