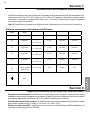
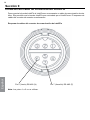
1
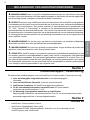
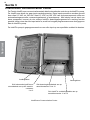
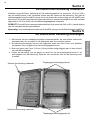
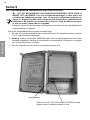
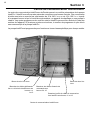
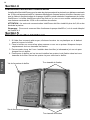
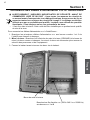
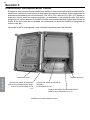
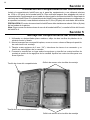
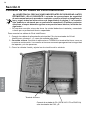
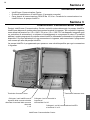
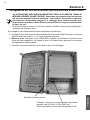
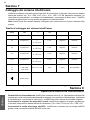
™
2
Deutsch
Installation Guide / Installatiehandleiding
Bedienungsantleitung / Guide de l’installation
Guia de instalacion / Guide all’installazione
English
intellicomm
Automation
9
Nederlands
16
Français
23
Español
30
Italiano
37
IMPORTANT SAFETY INSTRUCTIONS READ AND FOLLOW ALL INSTRUCTIONS SAVE THESE INSTRUCTIONS
WATER SOLUTIONS P-INSB-ICOMM (Rev. 05/2012)
2
English
English
Contents
Important Safety Precautions3
Section 1: Installation Steps Summary
3
Section 2: Kit Contents
3
Section 3: IntelliComm Communication Center
4
Section 4: Installing the IntelliComm enclosure
5
Section 5: Mounting the IntelliComm enclosure
5
Section 6: Connecting AC power wires to IntelliComm
6
Section 7: IntelliComm system wiring
7
Section 8: IntelliComm electrical specifications
7
Section 9: Connecting the IntelliFlo communication cable
8
Customer Support
HERENTALS, BELGIUM (8:30 A.M. to 4:30 P.M.) CET
Website: www.pentairpooleurope.com
Declaration of Conformity
We declare, under our sole responsibility, that the product identified in this declaration, and to which
this declaration relates, are in conformity with the protection requirements of Council Directive 98/
37/EEG
US Patents Pending
Manufactured by Pentair Aquatic Systems
© 2012 Pentair. All rights reserved
This document is subject to change without notice
Trademarks and disclaimers: IntelliComm, IntelliFlo, and the Pentair logo are trademarks of Pentair. Other trademarks
and trade names may be used in this document to refer to either the entities claiming the marks and names or their
products. Pentair disclaims proprietary interest in marks and names of others.
3
IMPORTANT SAFETY PRECAUTIONS
CAUTION When using the IntelliComm communication center with the IntelliFlo pump, it is
recommended to wire the IntelliComm power center to a ground fault circuit-interrupter (GFCI)
to protect the circuit. A green colored terminal (or a wire connector marked “G”, “GR”, “Ground”
or “Grounding”) is provided within the terminal compartment in the Power Center transformer
enclosure. To reduce risk of electric shock, connect this terminal or connector to the grounding
terminal of your electric service or supply panel with a conductor equivalent in size to the circuit
conductors supplying this equipment.
WARNING To reduce the risk of injury, installation or service should only be attempted by a
qualified Pool Service Professional.
WARNING To reduce the risk of injury, do not permit children to use this product unless they
are closely supervised at all times.
CAUTION The IntelliFlo pump is for use with permanently installed pools and may also be
used with hot tubs and spas if so marked. Do not use with storable pools. A permanently installed
pool is constructed in or on the ground or in a building such that it cannot be readily disassembled
for storage. A storable pool is constructed so that it may be readily disassembled for storage and
reassembled to its original integrity.
Section 1
Installation Steps Summary
The recommended IntelliComm Communication Center installation steps are:
1. Review Important Safety Precautions: Review this important
information.
2. Review IntelliComm Overview: Review the product overview.
3. Installing IntelliComm: Installing the IntelliComm enclosure.
4. Connecting the AC wires to IntelliComm: Connecting AC wires to
terminal 1 and 2.
5. Connecting control input wires to IntelliComm: Connecting control input
wires to terminals 3 to 10 from source devices such as automation controllers or
heaters.
Section 2
Kit Contents
• IntelliComm Communication Center
• IntelliComm Installation Guide (this manual)
• Two wire RS-485 communication cable. Used to communicate to the IntelliFlo pump
from IntelliComm.
English
WARNING Read and follow all safety warning notices and instructions in this manual before
installing this product. Failure to follow safety warnings and instructions can result in severe injury,
death, or property damage.
English
English
4
Section 3
IntelliComm Communication Center
The Pentair IntelliComm communication center provides automatic control of the IntelliFlo pump.
The IntelliComm provides four pairs of input terminal connections. These inputs connectors are
actuated by either 15 VAC to 240 VAC or 15 VDC to 100 VDC from the source device such as an
automation controller, heater, or heat pump. Using the device’s inputs, the four IntelliFlo external
control programs can be enabled. If more than one input is active, the highest program number
will be communicated to the IntelliFlo pump.
The IntelliFlo pump is programmed to run at a specific speed for each input.
Ground terminal
Ground terminal
Attach incoming IntelliComm AC
power wires to AC terminals
1 and 2
Attach control input wires to
terminals 3 through 10
Attach IntelliFlo communication cable
wires to terminals 11 and 12
IntelliComm Communication Center
5
Section 4
Install the IntelliComm enclosure at the equipment pad at a maximum of 15.24 m (50ft.) from
the IntelliFlo pump. Leave sufficient clearance on all sides of the enclosure. Be sure that the
communication cable from the IntelliFlo pump can reach the IntelliComm enclosure location.
The IntelliComm enclosure can be mounted on a wall or vertical flat surface up to 15.24 m (50ft.)
away from the cell controller.
CAUTION: The IntelliComm communication center must be installed more than 2.44 m (8 ft.)
from the pool edges.
Note: For IntelliFlo 4 pump operating instructions, see the IntelliFlo 4 User’s Guide.
Section 5
Mounting the IntelliComm enclosure
1. Using a medium flat blade screwdriver, loosen the two plastic screws on the front
cover and open the front cover.
2. Mount the enclosure on a flat surface such as a wall or post. Mark each mounting
screw hole location.
3. Drill four 6 mm (1/4 inch) holes. Install anchors if necessary and one screw for each
enclosure hole.
4. Position the enclosure in place over the holes and install the four mounting screws
into the enclosure screw holes. Tighten the four screws to secure the enclosure.
Enclosure retaining screw
Mounting screw access hole
Enclosure retaining screw
Mounting screw access hole
English
Installing the IntelliComm enclosure
English
English
6
Section 6
Conecting AC power wires to IntelliComm
WARNING! IMPORTANT SAFETY PRECAUTIONS. BEFORE STARTING READ
THE FOLLOWING: Read all the safety precautions in this manual before attempting
any electrical wiring. Be sure to read and follow all safety Instructions on page
ii. Wiring should only be performed by a qualified professional. When using
electrical products, basic precautions should always be followed, including the
following:
• Grounding is required. The unit should be installed by a qualified service person and
grounded.
To connect the AC power wires to IntelliComm:
1. Connect the main AC power wires to the IntelliComm AC terminals number 1 and 2
as shown below.
2. Grounding: Attach incoming GROUND wire to the ground terminal as shown below.
Earth grounding is necessary to ensure personal safety and safety of equipment.
3. Close the front cover and tighten the two cover screws.
Ground terminal
Attach incoming AC (100 VAC to 240 VAC 50/60 Hz)
wires to AC terminals 1 and 2
7
Section 7
The IntelliComm provides four pairs of input terminals which can be actuated by either 15 to 240
VAC or 15 to 100 VDC from the source device, (automation controller, heater, heat pump etc.).
There are four IntelliFlo external control programs that can be enabled.
Note: The IntelliComm will always be configured to communicate to pump address 1.
IntelliComm system wiring table
Terminal number
Terminal name
Voltage
Maximum current
Phase type
Frequency
1-2
Power supply
100 - 240 VAC
100 mA
1 Input
50/60 Hz
3-4
Program 1
15 -240 VAC
or
15 - 100 VDC
1 mA*
1 Input
50/60 Hz
5-6
Program 2
15 -240 VAC
or
15 - 100 VDC
1 mA*
1 Input
50/60 Hz
7-8
Program 3
15 -240 VAC
or
15 - 100 VDC
1 mA*
1 Input
50/60 Hz
9-10
Program 4
15 -240 VAC
or
15 - 100 VDC
1 mA*
1 Input
50/60 Hz
-5 to +5 VDC
5 mA
1 Output
N/A
RS-485
11
12
+ Data: Yellow
- Data: Green
Ground
Note: (*) indicates current controlled input, voltage independent.
Section 8
IntelliComm electrical specifications
Power Requirements: The IntelliComm draws less than 1 amp. Over current protection of
the wires connecting the source device, (automation controller, heater, heat pump etc.) to the
IntelliComm must be provided at the source.
Inputs from remote device: The IntelliComm has four current sensing inputs that are activated by either
15 VAC to 240 VAC or 15 VDC to 100 VDC.
Output to IntelliFlo pumps: The IntelliComm communicates with IntelliFlo pumps via a two wire
RS-485 Serial link.
English
IntelliComm system wiring
English
English
8
Section 9
Connecting the IntelliFlo communication cable
A two-wire communication cable is required to connect either the IntelliFlo pump to IntelliComm.
This allows the IntelliFlo pump to be controlled by IntelliComm. The cable pinout is shown below.
IntelliFlo communication cable pinout
Pin 6 (Green) RS-485 (N)
Note: Pins 1 - 5 are not used.
Pin 7 (Yellow) RS-485 (P)
9
Inhaltsverzeichnis
Wichtige Sicherheitshinweise10
10
Abschnitt 2: Inhalt des Sets
11
Abschnitt 3: Der IntelliComm-Steuerkasten
11
Abschnitt 4: Einbauen des IntelliComm-Kastens
12
Abschnitt 5: Montieren des IntelliComm-Kastens
12
Abschnitt 6: Anschließen der AC-Stromkabel
13
Abschnitt 7: Anschließen der Steuerkabel
14
Abschnitt 8: Elektrische Daten
14
Abschnitt 9: Anschließen des IntelliFlo-Verbindungskabels
15
Kundendienst
HERENTALS, BELGIEN (8:30 Uhr bis 16:30 Uhr) MEZ
Internet: www.pentairpooleurope.com
Konformitätserklärung
Wir erklären unter unserer alleinigen Verantwortung, dass das in dieser Erklärung genannte
Produkt, auf das sich diese Erklärung bezieht, den Schutzanforderungen der Richtlinie 98/
37/EWG entspricht.
In den USA zum Patent angemeldet
Hersteller: Pentair Aquatic Systems
© 2012 Pentair. Alle Rechte vorbehalten.
Änderungen der Anleitung vorbehalten.
Marken und Haftungsausschluss: IntelliComm, IntelliFlo und das Logo von Pentair sind Marken der Pentair. Andere in
dieser Anleitung verwendete Marken und Handelsnamen beziehen sich auf den jeweiligen Eigentümer der Marke oder
des Namens bzw. auf dessen Produkte. Pentair erklärt hiermit, keine Eigentumsansprüche auf Marken und Namen von
anderen zu erheben.
Deutsch
Abschnitt 1: Reihenfolge der Installationsschritte
Deutsch
Deutsch
10
WICHTIGE SICHERHEITSHINWEISE
WARNUNG Lesen Sie vor dem Installieren des Geräts alle Warnhinweise und Anweisungen
durch und befolgen Sie diese. Die Missachtung von Warnhinweisen und Anweisungen kann zu
Sachschäden sowie schweren Verletzungen, u. U. mit Todesfolge, führen.
ACHTUNG Bei Verwendung des IntelliComm-Steuerkastens in Verbindung mit einer IntelliFloPumpe empfehlen wir, den IntelliComm-Schaltkasten zum Schutz des Stromkreises über einen
FI-Schutzschalter anzuschließen. Die Anschlussleiste im Schaltkasten umfasst eine grüne Klemme
bzw. eine mit 'G', 'GR', 'Ground' oder'Grounding' (Erdung) beschriftete Verbindungsklemme. Um
die Gefahr von Stromschlägen zu vermeiden, muss diese Klemme über einen Leiter vom selben
Durchmesser wie die Leiterdrähte, über welche dieses Gerät versorgt wird, an die Erdung des
Stromkastens angeschlossen werden.
WARNUNG Um die Gefahr von Verletzungen zu vermeiden, dürfen Installation und Wartung
nur von qualifizierten Fachkräften vorgenommen werden.
WARNUNG Um Verletzungen zu vermeiden, lassen Sie Kinder dieses Gerät nicht benutzen,
es sei denn sie werden dabei ständig beaufsichtigt.
ACHTUNG Die IntelliFlo-Pumpe darf nur für fest installierte Pools verwendet werden sowie für
Whirlpools und Warmwasserbecken, sofern sie entsprechend gekennzeichnet ist. Nicht für nicht
fest installierte Aufstellpools verwenden. Ein fest installierter Pool ist in den Boden eingelassen
bzw. fest auf dem Boden oder im Gebäude verankert, so dass er nicht beliebig demontiert oder
abgebaut werden kann. Aufstellpools hingegen sind so konzipiert, dass sie jederzeit demontiert
und eingelagert und bei Bedarf wieder komplett aufgebaut werden können.
Abschnitt 1
Reihenfolge der Installationsschritte
Wir empfehlen, bei der Installation des IntelliComm-Steuerkasten folgende Reihenfolge zu
beachten:
1. Lesen der wichtigen Sicherheitshinweise: Lesen Sie diese
Hinweise bitte unbedingt durch.
2. Lesen der Beschreibung des IntelliComm: Lesen Sie sich die allgemeine
Produktbeschreibung durch.
3. Montieren des IntelliComm-Steuerkastens: Montieren Sie den IntelliCommKasten.
4. Anschließen der AC-Drähte an den IntelliComm: Schließen Sie die ACDrähte an die Klemmen 1 und 2 an.
5. Anschließen der Steuerkabel an den IntelliComm: Schließen Sie die
Drähte der Steuerkabel von Ausgangsgeräten wie z. B. automatische Steuerungen oder
Heizgeräten an die Klemmen 3 bis 10 an.
11
Abschnitt 2
Inhalt des Sets
• IntelliComm-Steuerkasten
• Installations- und Bedienungsanleitung
• Zweiadriges RS-485 Verbindungskabel für die Verbindung zwischen IntelliCommSteuerkasten und IntelliFlo-Pumpe
Abschnitt 3
Der IntelliComm-Steuerkasten
Die IntelliFlo-Pumpe ist für jeden Eingang auf eine bestimmte Geschwindigkeit programmiert.
Erdungsklemme
IntelliComm AC-Eingangskabel an
AC-Klemmen
1 und 2 anschließen
Erdungsklemme
Steuereingangskabel an
Klemmen 3 bis 10 anschließen
Drähte des IntelliFlo-Verbindungskabels
an Klemmen 11 und 12 anschließen
IntelliComm-Steuerkasten
Deutsch
Mit dem Pentair IntelliComm-Steuerkasten kann die IntelliFlo-Pumpe automatisch gesteuert
werden. Der IntelliComm umfasst vier Eingangsklemmenpaare. Diese Eingänge werden über
entweder 15V AC bis 240V AC oder 15V DC bis 100V DC vom Ausgangsgerät wie z. B. einer
automatischen Steuerung, einer Heizung oder einer Heizpumpe gesteuert. Über die Eingänge
des Geräts können die vier externen IntelliFlo-Steuerprogramme aktiviert werden. Ist mehr als
ein Eingang aktiv, hat das Programm mit der höheren Programmnummer Vorrang und wird an
die IntelliFlo-Pumpe übertragen.
Deutsch
Deutsch
Deutsch
12
Abschnitt 4
Einbauen des IntelliComm-Kastens
Installieren Sie den IntelliComm-Kasten auf den zugehörigen Gehäuse-Pads in maximal 15,24 m
Entfernung zur IntelliFlo-Pumpe. Lassen Sie rund um den Kasten ausreichend Abstand. Achten
Sie darauf, dass das Verbindungskabel von der IntelliFlo-Pumpe bis zum IntelliComm-Kasten
reicht. Der IntelliComm-Kasten kann an einer Wand oder einer anderen senkrechten Fläche in
einer Entfernung von maximal 15,24 m zur Steuerung angebracht werden.
ACHTUNG: Der IntelliComm-Steuerkasten muss in einer Entfernung von mindestens 2,44 m
zum Rand des Pools installiert werden.
Hinweis: Für nähere Hinweise zur Bedienung der IntelliFlo-Pumpe siehe Bedienungsanleitung
zur IntelliFlo 4-Pumpe.
Abschnitt 5
Montieren des IntelliComm-Kastens
1. Lösen Sie mit einem mittelgroßen Schlitzschraubendreher die beiden Kunststoffschrauben
am Gehäusedeckel und öffnen Sie diesen.
2. Halten Sie den Kasten an die Einbaustelle, z. B. eine gerade Wand oder einen Pfosten.
Zeichnen Sie die Position der Bohrlöcher an.
3. Bohren Sie vier Löcher mit einem 6-mm-Bohrer. Setzen Sie ggf. Dübel in die vier
Bohrlöcher ein und legen Sie sich vier Schrauben bereit.
4. Richten Sie den Kasten über den Bohrlöchern aus und stecken Sie die vier Schrauben
durch die Öffnungen im Gehäuse in die Dübel. Ziehen Sie die Schrauben fest, um
den Kasten an der Wand zu sichern.
Öffnung für Befestigungsschraube
Gehäuse-Verschlussschraube
Gehäuse-Verschlussschraube
Öffnung für Befestigungsschraube
13
Abschnitt 6
Anschließen der AC-Stromkabel an den IntelliComm-Steuerkasten
So schließen Sie das AC-Stromkabel an:
1. Schließen Sie die Drähte des AC-Stromkabels an die Klemmen 1 und 2 im IntelliComm
wie unten gezeigt an.
2. Erdung: Schließen Sie das Erdungskabel wie unten gezeigt an die Erdungsklemme
an. Die Erdung ist für die Sicherheit von Mensch und Gerät erforderlich.
3. Schließen Sie den Gehäusedeckel und ziehen Sie die beiden Kunststoffschrauben
fest.
Erdungsklemme
AC-Stromkabel (100V AC bis 240V AC, 50/60 Hz) an
die AC-Klemmen 1 und 2
Deutsch
WARNUNG! WICHTIGE SICHERHEITSHINWEISE! LESEN SIE SICH VOR
BEGINN DER ARBEITEN FOLGENDE HINWEISE DURCH: Lesen Sie vor jeglichen
elektrischen Verkabelungsarbeiten die Sicherheitshinweise in dieser Anleitung.
Lesen und beachten Sie unbedingt die Sicherheitshinweise auf Seite ii. Die
Verkabelung darf nur von qualifizierten Fachkräften vorgenommen werden.
Beim Umgang mit Elektrogeräten sind grundlegende Sicherheitsmaßnahmen
zu beachten, einschließlich folgender:
• Das Gerät muss geerdet werden. Das Gerät muss von einem qualifizierten Fachmann
installiert und geerdet werden.
Deutsch
14
Abschnitt 7
Anschließen der IntelliComm-Steuerkabel
Der IntelliComm-Steuerkasten umfasst vier Eingangsklemmenpaare, die über entweder 15V
AC bis 240V AC oder 15V DC bis 100V DC vom Ausgangsgerät, wie z. B. einer automatischen
Steuerung, einer Heizung oder einer Heizpumpe, gesteuert werden. Es gibt vier externe IntelliFloSteuerprogramme, die über die Eingänge des Geräts aktiviert werden können.
Hinweis: Der IntelliComm ist werksseitig so eingestellt, dass er stets eine Verbindung zu Adresse
1 der Pumpe aufbaut.
Tabelle zur Zuordnung der Klemmen
Klemmennummer
Anschluss
Spannung
Max. Strom
Phasentyp
Frequenz
1-2
Stromversorgung
100 - 240V AC
100 mA
1 Eingang
50/60 Hz
3-4
Programm 1
15 - 240V AC
oder
15 - 100V DC
1 mA*
1 Eingang
50/60 Hz
5-6
Programm 2
15 - 240V AC
oder
15 - 100V DC
1 mA*
1 Eingang
50/60 Hz
7-8
Programm 3
15 - 240V AC
oder
15 - 100V DC
1 mA*
1 Eingang
50/60 Hz
9-10
Programm 4
15 - 240V AC
oder
15 - 100V DC
1 mA*
1 Eingang
50/60 Hz
-5 bis +5V DC
5 mA
1 Ausgang
k. A.
RS-485
11
12
+ Daten: Gelb
- Daten: Grün
Erdung
Hinweis: (*) Stromgesteuerter Eingang, spannungsunabhängig.
Abschnitt 8
Elektrische Daten des IntelliComm-Steuerkastens
Leistungsaufnahme: Der IntelliComm benötigt weniger als 1 Ampere Strom. Die Verbindungskabel
zwischen Ausgangsgerät (z. B. automatische Steuerung, Heizgerät, Heizpumpe) und Steuerkasten
müssen am Ausgangsgerät mit einem Überspannungsschutz versehen werden.
Eingänge von anderen Geräten: Der IntelliComm umfasst vier Eingänge, die als Stromsensoren
agieren und über entweder 15V AC bis 240V AC oder 15V DC bis 100V DC aktiviert werden.
Ausgänge an IntelliFlo-Pumpen: Der IntelliComm ist über ein zweiadriges serielles RS-485Kabel mit der IntelliFlo-Pumpe verbunden.
15
Abschnitt 9
Anschließen des IntelliFlo-Verbindungskabels
Ein zweiadriges Verbindungskabel ist erforderlich, um die IntelliFlo-Pumpe mit dem IntelliCommSteuerkasten zu verbinden. Über dieses Kabel steuert der IntelliComm die IntelliFlo-Pumpe. Die
Belegung der Kontakte wird unten angezeigt.
Kontaktbelegung des IntelliFlo-Verbindungskabels
Deutsch
Kontakt 6 (grün) RS-485 (N)
Hinweis: Kontakte 1 bis 5 sind nicht belegt.
Kontakt 7 (gelb) RS-485 (P)
16
Inhoud
Belangrijke veiligheidsvoorzorgen17
17
Sectie 2: Inhoud kit
17
Sectie 3: IntelliComm Communication Center
18
Sectie 4: De IntelliComm behuizing installeren
19
Sectie 5: De IntelliComm behuizing bevestigen.
19
Sectie 6: AC stroomkabels aansluiten op IntelliComm
20
Sectie 7: IntelliComm systeembekabeling
21
Sectie 8: IntelliComm elektrische specificaties
21
Sectie 9: De IntelliFlo verbindingskabel aansluiten
22
Nederlands
Sectie 1: Installatiestappen - samenvatting
Klantendienst
HERENTALS, BELGIUM (8.30 uur tot 16.30 uur) CET
Website: www.pentairpooleurope.com
Conformiteitsverklaring
We verklaren, op eigen verantwoordelijkheid, dat het product dat beschreven wordt in dit document
en waarop deze informatie betrekking heeft, overeenstemt met de vereisten van de Richtlijn van de
Raad 98/37/EEG
Patenten aangevraagd in VS
Producent: Pentair Aquatic Systems
© 2012 Pentair. Alle rechten voorbehouden
Dit document kan worden gewijzigd zonder kennisgeving
Handelsmerken en disclaimers: IntelliComm, IntelliFlo en het Pentair-logo zijn handelsmerken van Pentair. Het is
mogelijk dat andere handelsmerken en handelsnamen worden gebruikt in dit document om te verwijzen naar de entiteiten
die aanspraak maken op de merken en de namen of hun producten. Pentair wijst elk eigendomsbelang in merken en
namen van anderen af.
17
BELANGRIJKE VEILIGHEIDSVOORZORGEN
WAARSCHUWING Lees en volg alle veiligheidswaarschuwingen en -instructies in deze gids
voordat u dit product installeert. Als deze waarschuwingen en instructies niet worden opgevolgd,
kan dit ernstige letsels, overlijden of materiële schade veroorzaken.
OPGELET wanneer u het IntelliComm communicatiecentrum met de IntelliFlo pomp gebruikt,
is het aanbevolen de IntelliComm stroomcentrale aan te sluiten op een verliesstroomschakelaar
om het circuit te beschermen. Een groene terminal (of een kabelconnector gemarkeerd met
"G", "GR", "Ground" of "Grounding") is voorzien in het aansluitcontactencompartiment in de
transformatorkast van de elektriciteitcentrale . Om het risico op elektrische schok te verminderen,
dit aansluitcontact of connector aansluiten op de aardingsterminal van uw elektrisch bedieningsof voedingspaneel met een geleider die qua afmeting overeenstemt met de circuitgeleiders die
deze installatie voeden.
WAARSCHUWING Om het risico op letsels te verminderen, mogen kinderen dit product niet
gebruiken, tenzij ze permanent onder streng toezicht staan.
OPGELETDe IntelliFlo-pomp is voor gebruik in permanent geïnstalleerde zwembaden en kan
ook worden gebruikt in warmwaterbaden en spa's indien dat zo is aangegeven. Niet gebruiken
voor opbergbare zwembaden. Een permanent geïnstalleerd zwembad is in of op de vloer of in
een gebouw geïnstalleerd zodat het niet gemakkelijk kan worden gedemonteerd voor opslag.
Een opbergbaar zwembad is zo geconstrueerd dat het gemakkelijk kan worden gedemonteerd
voor opslag en opnieuw gemonteerd in zijn originele vorm.
Sectie 1
Installatiestappen - samenvatting
De aanbevolen installatiestappen voor het IntelliComm Communication Center zijn als volgt:
1. Lees de belangrijke veilgheidsinstructies: Lees deze belangrijke
informatie.
2. Lees het IntelliComm Overzicht: Lees het productoverzicht.
3. IntelliComm installeren: De IntelliComm behuizing installeren.
4. De AC stroomkabels aansluiten op IntelliComm: AC stroomkabels
aansluiten op aansluitcontacten 1 en 2.
5. De besturing-ingangskabels aansluiten op IntelliComm:
Besturingsinput aansluiten op aansluitcontacten 3 tot 10 van broncomponenten zoals
automatiseringscontrollers of verwarmingselementen.
Sectie 2
Inhoud kit
• IntelliComm Communication Center
• IntelliComm Installatiegids (deze gids)
• Twee-draads RS-485 verbindingskabel. Gebruikt voor de verbinding van de
IntelliFlo-pomp naar IntelliComm.
Nederlands
WAARSCHUWING Om het het risico op letsels te verminderen, de installatie of bediening
alleen laten uitvoeren door een gekwalificeerde zwembadspecialist.
18
Sectie 3
IntelliComm Communication Center
De Pentair IntelliComm communicatiecentrale biedt automatische controle op de IntelliFlo-pomp.
De IntelliComm biedt vier paar input-aansluitcontacten. Deze inputconnectoren worden gevoed
door ofwel 15 VAC tot 240 VAC ofwel 15 VDC tot 100 VDC van de broncomponent zoals een
automatiseringscontroller, verwarmingselement of warmtepomp. Met behulp van de input van
deze component, kunnen de vier externe IntelliFlo besturingsprogramma's in werking worden
gesteld. Indien meer dan één input actief is, wordt het hoogste programmanummer doorgegeven
aan de IntelliFlo-pomp.
Nederlands
De IntelliFlo-pomp is geprogrammeerd om voor elke input op een specifieke snelheid te draaien.
Aardingsklem
Aardingsklem
Sluit inkomende IntelliComm
stroomkabels aan op AC aansluitcontacten
1 en 2
Sluit besturingsinputkabels aan op
aansluitcontacten 3 tot 10
Sluit IntelliFlo verbindingskabels aan op
aansluitcontacten 11 en 12
IntelliComm Communication Center
19
Sectie 4
De IntelliComm behuizing installeren
Installeer de IntelliComm behuizing bij het bedieningspaneel op maximum 15.24 m (50ft.)
van de IntelliFlo-pomp. Laat voldoende ruimte aan alle zijdes van de behuizing. Zorg dat de
verbindingskabel van de IntelliFlo-pomp tot op de plaats van de behuizing van de IntelliComm
kan komen. De IntelliComm-behuizing kan aan een muur worden bevestigd of een vlak verticaal
oppervlak tot 15.24 m (50ft) van het celbesturingsapparaat verwijderd.
OPGELET: De IntelliComm communicatiecentrale moet op meer dan 2.44 m (8 ft.) van de randen
van het zwembad worden geïnstalleerd.
Opmerking: Voor bedieningsinstructies van de IntelliFlo 4-pomp, zie de Gebruikersgids IntelliFlo 4 .
Sectie 5
De IntelliComm behuizing bevestigen.
Schroef die behuizing vasthoudt
Toegangsgat bevestigingsschroef
Schroef die behuizing vasthoudt
Toegangsgat bevestigingsschroef
Nederlands
1. Met behulp van een middelgrote platte schroevendraaier, de twee plastic schroeven
losdraaien aan de voorzijde en de afdekplaat aan de voorzijde openen.
2. De behuizing bevestigen op een vlak oppervlak zoals een muur of een zuil. Markeer
de plaatsen voor de gaten van de bevestigingsschroeven.
3. Boor vier gaten van 6 mm (1/4 inch). Breng indien nodig pluggen aan en een schroef
voor elk behuizingsgat.
4. Plaats de behuizing over de gaten en draai de vier bevestigingsschroeven in de
schroefgaten van de behuizing. Draai de vier schroeven vast om de behuizing vast
te zetten.
20
Sectie 6
AC stroomkabels aansluiten op IntelliComm
LET OP! BELANGRIJKE VEILIGHEIDSVOORZORGEN. LEES VOOR U
BEGINT HET VOLGENDE: Lees alle veiligheidsvoorzorgen in deze gids voor
u elektrische bekabeling aanlegt. Lees en volg alle veiligheidsinstructies op
pagina ii. Bekabeling dient alleen uitgevoerd te worden door gekwalificeerde
vakmensen. Bij gebruik van elektrische producten, altijd de basisvoorzorgen
in acht te nemen, waaronder de volgende:
• Aarding is vereist. De eenheid dient geïnstalleerd te worden door een gekwalificeerde
onderhoudsman en geaard.
Nederlands
Om de AC stroomkabels aan te sluiten op IntelliComm:
1. Sluit de AC hoofdstroomkabels aan op de IntelliComm AC aansluitcontacten nummer
1 en 2 zoals hieronder afgebeeld.
2. Aarding: Verbind inkomende AARDING-kabel met het aardingaansluitcontact zoals
hieronder afgebeeld. Aarding is noodzakelijk om persoonlijke veiligheid en veiligheid
van de uitrusting zeker te stellen.
3. Sluit de voorplaat en zet de twee voorplaatschroeven vast.
Aardingsklem
Sluit toevoer AC (100 VAC tot 240 VAC 50/60 Hz) aan
kabels naar AC aansluitcontacten 1 en 2
21
Sectie 7
IntelliComm systeembekabeling
De IntelliComm voorziet vier paar input-aansluitcontacten die gevoed kunnen worden door
ofwel 15 tot 240 VAC ofwel 15 tot 100 VDC vanaf de broncomponent, automatiseringscontroller,
verwarmingselement, warmtepomp, enz.) Er kunnen vier externe IntelliFlo besturingsprogramma's
worden ingeschakeld.
Opmerking: De IntelliComm is altijd geconfigureerd om in verbinding te staan met pomp adres 1.
IntelliComm systeembekabeling
Benaming aansluitcontact
Voltage
Maximum stroomsterkte
Fasetype
Frequentie
1-2
Stroomtoevoer
100 - 240 VAC
100 mA
1 Input
50/60 Hz
3-4
Programma 1
15 -240 VAC
of
15 - 100 VDC
1 mA*
1 Input
50/60 Hz
5-6
Programma 2
15 -240 VAC
of
15 - 100 VDC
1 mA*
1 Input
50/60 Hz
7-8
Programma 3
15 -240 VAC
of
15 - 100 VDC
1 mA*
1 Input
50/60 Hz
9-10
Programma 4
15 -240 VAC
of
15 - 100 VDC
1 mA*
1 Input
50/60 Hz
-5 tot +5 VDC
5 mA
1 Output
N/A
RS-485
11
12
+ Gegevens: Geel
- Gegevens: Groen
Aarding
Opmerking: (*) geeft stroomgecontroleerde input aan, onafhankelijk van voltage.
Sectie 8
IntelliComm elektrische specificaties
Benodigd vermogen: De IntelliComm vraagt minder dan 1 amp. Stroombegrenzing van de kabels
die in verbinding staan met de broncomponent, (automatiseringscontroller, verwarmingselement,
warmtepomp etc.) naar de IntelliComm moet voorzien zijn aan de bron.
Input van de afstandsbediening: De IntelliComm heeft vier input-stroomsensoren die geactiveerd
kunnen worden door ofwel 15 VAC tot 240 VAC of 15 VDC tot 100 VDC.
Output naar IntelliFlo pompen: De IntelliComm staat in verbinding met de IntelliFlo pompen
via een twee-draads RS-485 serieschakeling.
Nederlands
Aansluitcontactnummer
22
Sectie 9
De IntelliFlo verbindingskabel aansluiten
Er is een twee-draadsverbindingskabel nodig om de IntelliFlo-pomp aan te sluiten op IntelliComm.
Hierdoor kan de IntelliFlo-pomp geregeld worden door IntelliComm. De penbezetting wordt
hieronder afgebeeld.
Nederlands
Penbezetting IntelliFlo verbindingskabels
Pen 6 (Groen) RS-485 (N)
Opmerking: Pennen 1 - 5 worden niet gebruikt.
Pen 7 (Geel) RS-485 (P)
23
Sommaire
Mesures importantes de sécurité24
Section 1 : Résumé des étapes de l'installation
24
Section 2 : Contenu du kit
24
Section 3 : Centre de communication IntelliComm
25
Section 4 : Installation du boîtier IntelliComm
26
Section 5 : Fixation du boîtier IntelliComm
26
Section 6 : Connexion des câbles d'alimentation c.a. à l'IntelliComm
27
Section 7 : Câblage du système IntelliComm
28
Section 8 : Spécifications électriques de l'IntelliComm
28
Section 9 : Connexion du câble de communication IntelliFlo
29
Service clientèle
Site web : www.pentairpooleurope.com
Déclaration de conformité
Nous déclarons, sous notre seule responsabilité, que le produit identifié dans cette déclaration, et
concerné par cette déclaration, est en conformité avec les exigences de la Council Directive 98/
37/EEG
Brevets américains en cours
Fabricant : Pentair Aquatic Systems
© 2012 Pentair. Tous droits réservés
Ce document est sujet à modification sans préavis
Marques et clauses d'exclusion de responsabilité : « IntelliComm », « IntelliFlo » et le logo « Pentair » sont des
marques de Pentair. D'autres marques et noms commerciaux peuvent être utilisés dans ce document pour désigner les
entités revendiquant les marques et les noms ou bien leurs produits. Pentair renonce à tout intérêt de propriété pour les
marques et noms d'autres sociétés.
Français
HERENTALS, BELGIQUE (8h30 à 16h30) HNEC
24
MESURES IMPORTANTES DE SÉCURITÉ
AVERTISSEMENT Lisez et respectez toutes les instructions et consignes de sécurité de ce
manuel avant d'installer ce produit. Le non-respect des instructions et consignes de sécurité peut
entraîner des blessures graves, la mort ou des dégâts matériels.
ATTENTION Lorsque vous utilisez le centre de communication IntelliComm avec la pompe
IntelliFlo, il est recommandé de brancher le centre d'alimentation IntelliComm à un disjoncteurdétecteur de fuites à la terre (DDFT) afin de protéger le circuit. Une borne de couleur verte (ou
un connecteur de fil marqué « G », « GR », « Ground » ou « Grounding ») est fourni à l'intérieur
du compartiment à bornes dans le boîtier transformateur du centre d'alimentation. Afin de réduire
le risque de décharge électrique, branchez cette borne ou ce connecteur à la borne de mise à
la terre de votre service électrique ou tableau de distribution avec un conducteur équivalent en
taille aux conducteurs du circuit qui alimentent l'équipement.
AVERTISSEMENT Afin de réduire le risque de blessures, l'installation ou le service ne doit
être exécuté que par un professionnel qualifié en matière de piscine.
Français
AVERTISSEMENT Afin de réduire le risque de blessures, ne laissez pas les enfants utiliser
ce produit s'ils ne sont pas surveillés attentivement à tous moments.
ATTENTION La pompe IntelliFlo est réservée pour une utilisation sur des piscine installées à
demeure et peut également être utilisée avec des jacuzzis et des spas, s'ils sont identifiés comme
tels. Ne pas utiliser avec des piscines temporaires. Une piscine à demeure est construite dans le
sol ou sur le sol, ou dans un bâtiment et ne peut pas être facilement démontée pour le rangement.
Une piscine temporaire est construite afin d'être facilement démontée pour le rangement et
remontée dans son intégrité d'origine.
Section 1
Résumé des étapes de l'installation
Voici les étapes de l'installation recommandée du centre de communication IntelliComm :
1. Examinez les mesures importantes de sécurité : Consultez ces
informations importantes.
2. Examinez la présentation d'IntelliComm : Consultez la présentation du
produit.
3. L'installation d'IntelliComm : Installer le boîtier IntelliComm.
4. Connexion des câbles c.a. à l'IntelliComm : Brancher les câbles c.a. aux
bornes 1 et 2.
5. Connexion des câbles d'entrée de commande à l'IntelliComm (page 4) : Brancher
les câbles d'entrée de commande aux bornes 3 à 10 à partir d'appareils source tels que
des contrôleurs automatiques ou des appareils de chauffage.
Section 2
Contenu du kit
• Centre de communication IntelliComm
• Guide d'installation IntelliComm (le présent manuel)
• Câble de communication RS-485 sur deux fils. Utilisé pour la communication entre
la pompe IntelliFlo et l'IntelliComm.
25
Section 3
Centre de communication IntelliComm
Le centre de communication IntelliComm de Pentair permet un contrôle automatique de la pompe
IntelliFlo. L'IntelliComm offre quatre paires de connexions aux bornes d'entrée. Ces connecteurs
d'entrée sont mis en marche par une tension de 15 à 240 V c.a. ou de 15 à 100 V c.c. à partir
d'un appareil source tel qu'un contrôleur automatique, un appareil de chauffage ou une pompe à
chaleur. Les quatre programmes de contrôle externe IntelliFlo peuvent être activés à l'aide des
entrées de l'appareil. Si plusieurs entrées sont actives, le numéro de programme le plus élevé
sera communiqué à la pompe IntelliFlo.
La pompe IntelliFlo est programmée pour fonctionner à une vitesse spécifique pour chaque entrée.
Français
Borne de mise à la terre
Borne de mise à la
terre
Branchez les câbles d'alimentation c.a. d'arrivée IntelliComm aux
bornes c.a.
1 et 2
Branchez les câbles d'entrée de
commande aux
bornes 3 à 10
Branchez les fils du câble de communication IntelliFlo aux bornes 11 et 12
Centre de communication IntelliComm
26
Section 4
Installation du boîtier IntelliComm
Installez le boîtier IntelliComm avec le reste des équipements de la piscine à une distance maximale
de 15,24 m de la pompe IntelliFlo. Laissez suffisamment d'espace autour du boîtier. Assurez-vous
que le câble de communication de la pompe IntelliFlo puisse atteindre l'emplacement du boîtier
IntelliComm. Le boîtier IntelliComm peut être fixé sur un mur ou une surface verticale plane à
une distance maximale de 15,24 m du contrôleur de cellules.
ATTENTION : Le centre de communication IntelliComm doit être installé à plus de 2,44 m des
bords de la piscine.
Remarque : Pour savoir comment faire fonctionner la pompe IntelliFlo 4, voir le mode d'emploi
de l'IntelliFlo 4.
Section 5
Fixation du boîtier IntelliComm
Français
1. À l'aide d'un tournevis plat moyen, dévissez les deux vis en plastique sur le battant
avant et ouvrez le boîtier.
2. Fixez le boîtier sur une surface plane comme un mur ou un poteau. Marquez chaque
emplacement de trous taraudés de fixation.
3. Percez quatre trous de 6 mm. Installez des chevilles (si nécessaire) et une vis pour
chaque trou du boîtier.
4. Positionnez le boîtier sur les trous et installez les quatre vis de fixation dans les trous
taraudés du boîtier. Serrez les quatre vis pour sécuriser le boîtier.
Vis de fermeture du boîtier
Trou taraudé de fixation
Vis de fermeture du boîtier
Trou taraudé de fixation
27
Section 6
Connexion des câbles d'alimentation c.a. à l'IntelliComm
AVERTISSEMENT ! MESURES IMPORTANTES DE SÉCURITÉ. AVANT DE
COMMENCER, LISEZ CE QUI SUIT : Lisez toutes les mesures de sécurité de
ce manuel avant d'entreprendre tout câblage électrique. Assuez-vous de lire et
respecter toutes les consignes de sécurité de la page ii. Le câblage ne doit être
effectué que par un professionnel qualifié. Lorsque vous utilisez des produits
électriques, il faut toujours suivre ces précautions de base :
• il faut une mise à la terre. Cette unité doit être installée par un professionnel qualifié
et mise à la terre.
Pour connecter les câbles d'alimentation c.a. à l'IntelliComm :
1. Branchez les principaux câbles d'alimentation c.a. aux bornes numéro 1 et 2 de
l'IntelliComm comme ci-dessous.
2. Mise à la terre : Branchez le fil d'arrivée de mise à la terre (GROUND) à la borne de
mise à la terre comme ci-dessous. La mise à la terre est nécessaire pour assurer la
sécurité des personnes et de l'équipement.
3. Fermez le battant avant et serrez les deux vis du battant.
Français
Borne de mise à la terre
Branchez les fils d'arrivée c.a. (100 à 240 V c.a. 50/60 Hz)
aux bornes c.a. 1 et 2
28
Section 7
Câblage du système IntelliComm
L'IntelliComm dispose de quatre paires de bornes d'entrée qui peuvent être mises en marche
par une tension de 15 à 240 V c.a. ou de 15 à 100 V c.c. à partir d'un appareil source (contrôleur
automatique, appareil de chauffage, pompe à chaleur, etc.). Quatre programmes de contrôle
externe IntelliFlo peuvent être activés.
Remarque : L'IntelliComm sera toujours configuré pour communiquer avec l'adresse 1 de la
pompe.
Français
Tableau du câblage du système IntelliComm
Numéro de borne
Nom de la borne
Voltage
Courant maximum
Type de phase
Fréquence
1-2
Alimentation
100 - 240 V c.a.
100 mA
1 entrée
50/60 Hz
3-4
Programme 1
15 -240 V c.a.
ou
15 - 100 V c.c.
1 mA*
1 entrée
50/60 Hz
5-6
Programme 2
15 -240 V c.a.
ou
15 - 100 V c.c.
1 mA*
1 entrée
50/60 Hz
7-8
Programme 3
15 -240 V c.a.
ou
15 - 100 V c.c.
1 mA*
1 entrée
50/60 Hz
9-10
Programme 4
15 -240 V c.a.
ou
15 - 100 V c.c.
1 mA*
1 entrée
50/60 Hz
-5 à +5 V c.c.
5 mA
1 sortie
n.d.
RS-485
11
12
Données positives : jaune
Données négatives : vert
Terre
Remarque : (*) indique la sortie contrôlée du courant, indépendante du voltage.
Section 8
Spécifications électriques de l'IntelliComm
Alimentation requise : L'IntelliComm nécessite moins d'1 ampère. Il faut une protection au
niveau de la source qui soit supérieure à celle du courant des câbles qui connectent l'appareil
source (contrôleur automatique, appareil de chauffage, pompe à chaleur, etc.) à l'IntelliComm.
Entrées à partir d'un appareils à distance : L'IntelliComm dispose de quatre entrées détectrices
qui sont activées par une tension de15 à 240 V c.a. ou de 15 à 100 V c.c.
Sortie vers les pompes IntelliFlo : L'IntelliComm communique avec les pompes IntelliFlo au
moyen d'un lien série RS-485 à deux fils.
29
Section 9
Connexion du câble de communication IntelliFlo
Un câble de communcation à deux fils est nécessaire pour connecter la pompe IntelliFlo à
l'IntelliComm. Cette connexion permet à la pompe IntelliFlo d'être contrôlée par l'IntelliComm.
Vous pouvez voir le brochage du câble ci-dessous.
Brochage du câble de communication IntelliFlo
Français
Broche 6 (verte) RS-485 (N)
Broche 7 (jaune) RS-485 (P)
Remarque : Les broches 1 à 5 ne sont pas utilisées.
30
Índice
Precauciones importantes de seguridad31
Sección 1: Resumen de los pasos de instalación
31
Sección 2: Contenido del kit
31
Sección 3: IntelliComm Communication Center
32
Sección 4: Instalación del compartimiento del IntelliComm
33
Sección 5: Montaje del compartimiento del IntelliComm
33
Sección 6: Conexión de los cables de CA al IntelliComm
34
Sección 7: Cables del sistema IntelliComm
35
Sección 8: Especificaciones eléctricas de IntelliComm
35
Sección 9: Conexión del cable de comunicación con IntelliFlo
36
Asistencia al cliente
HERENTALS, BÉLGICA (8:30 A.M. - 4:30 P.M.) CET
Sitio web: www.pentairpooleurope.com
Español
Declaración de conformidad
Declaramos, bajo nuestra única responsabilidad, que el producto mencionado en esta declaración,
al que la misma se refiere, cumple con los requisitos de protección de la Directiva del Consejo Europeo 98/37/EEG
Pendiente de patente en EE. UU.
Fabricante: Pentair Aquatic Systems
© 2012 Pentair. Todos los derechos reservados
Este documento está sujeto a cambios sin previo aviso
Marcas registradas y exención de responsabilidad: IntelliComm, IntelliFlo y el logotipo Pentair son marcas registradas
de Pentair . El resto de marcas y nombres comerciales que puedan figurar en este documento ser refieren a las entidades
propietarias de las marcas o a sus productos. Pentair niega cualquier tipo de interés sobre dichas marcas y nombres
de terceros.
31
PRECAUCIONES IMPORTANTES DE SEGURIDAD
AVISO Lea y siga todas las instrucciones y mensajes de precaución de este manual antes
de instalar el producto. En caso de no seguir las instrucciones y avisos de seguridad, podrían
provocarse daños, lesiones graves o incluso la muerte.
PRECAUCIÓN Cuando use el centro de comunicación IntelliComm con la bomba IntelliFlo,
se recomienda conectar el centro de alimentación del IntelliComm a un interruptor de circuito
con pérdida a tierra (GFCI) para proteger el circuito. El compartimiento de terminales situado
en la carcasa del centro de alimentación incluye un terminal de color verde (o un conector para
cable identificado como "G", "GR", "Ground" o "Grounding"). Para reducir el riesgo de descarga
eléctrica, conecte este terminal o conector al terminal de toma de tierra de su instalación eléctrica
o panel de suministro con un conductor equivalente en tamaño a los conductores del circuito
que alimente este aparato.
AVISO Para reducir el riesgo de lesiones, la instalación y la reparación sólo deberá ser
efectuada por un profesional capacitado de mantenimiento de piscinas.
AVISO Para reducir el riesgo de accidentes, no permita a los niños utilizar este producto sin
la constante supervisión de un adulto.
PRECAUCIÓN La bomba IntelliFlo está destinada a su uso en piscinas de instalación
permanente, y también puede usarse en bañeras y sistemas de hidromasaje si así viene
identificada. No utilizar con piscinas desmontables. Una piscina de instalación permanente es
toda aquella que se sitúa sobre el terreno o dentro del mismo, o en un edificio de manera que no
pueda desmontarse para su almacenaje. Una piscina desmontable es toda aquella que puede
desmontarse para su almacenaje y volverse a montar íntegramente.
Sección 1
Resumen de los pasos de instalación
Los pasos recomendados para la instalación del IntelliComm Communication Center son:
Sección 2
Contenido del kit
• IntelliComm Communication Center
• Guía de instalación de IntelliComm (este manual)
• Cable de comunicaciones RS-485 de hilo doble. Sirve para comunicar la bomba
IntelliFlo con el IntelliComm.
Español
1. Revisar las precauciones importantes de seguridad: Revise esta
información de importancia.
2. Revisar la descripción general de IntelliComm: Revise la descripción
general del producto.
3. Instalar el IntelliComm: Instale el compartimiento del IntelliComm.
4. Conectar los cables de CA al IntelliComm: Conecte los cables de CA a
los terminales 1 y 2.
5. Conectar los cables de control de entrada al IntelliComm: Conecte los
cables de control de entrada a los terminales 3 a 10 desde los dispositivos de fuente,
como controles de automatización o calentadores.
32
Sección 3
IntelliComm Communication Center
El centro de comunicación Pentair IntelliComm realiza el control automático de la bomba IntelliFlo.
IntelliComm cuenta con cuatro pares de terminales de conexión de entrada. Estos conectores de
entrada son accionados por una corriente de 15 a 140 V (CA) o bien de 15 a 100 V (CC) desde un
dispositivo fuente, como un control automático, un calentador o una bomba de calor. Los cuatro
programas de control externo de IntelliFlo pueden accionarse mediante dichos dispositivos de
fuente. Si se activa más de una entrada, se comunicará con la bomba IntelliFlo el programa de
número más alto.
La bomba IntelliFlo se programa a una velocidad específica para cada entrada.
Español
Terminal de tierra
Terminal de tierra
Conecte los cables de alimentación de CA procedentes de IntelliComm a los terminales de CA
1y2
Conecte los cables de control de
entrada a
los terminales 3 a 10
Conecte los cables de comunicación de
IntelliFlo a los terminales 11 y 12
IntelliComm Communication Center
33
Sección 4
Instalación del compartimiento del IntelliComm
Instale el compartimiento IntelliComm en el panel de equipamiento a una distancia máxima
de 15,24 m (50 pies) de la bomba IntelliFlo. Deje suficiente espacio libre alrededor de todo el
compartimiento. Asegúrese de que el cable de comunicación de la bomba IntelliFlo llega hasta la
ubicación del IntelliComm. El compartimiento del IntelliComm puede montarse en una pared o un
a superficie horizontal, a una distancia máxima de 15,24 m (50 pies) del controlador de la célula.
PRECAUCIÓN: El centro de comunicación IntelliComm debe instalarse a más de 2,44 m (8 pies)
de los bordes de la piscina.
Nota: Para conocer las instrucciones de uso de la bomba IntelliFlo 4, consulte la Guía del Usuario
de IntelliFlo 4.
Sección 5
Montaje del compartimiento del IntelliComm
1. Utilizando un destornillador plano mediano, afloje los dos tornillos de plástico de la
cubierta frontal y ábrala.
2. Monte la carcasa en una superficie plana, como un muro o columna. Marque la posición
de cada tornillo de montaje.
3. Taladre cuatro agujeros de 6 mm (1/4"). Introduzca los tacos si es necesario y un
tornillo en cada agujero de la carcasa.
4. Presente la carcasa en su lugar sobre los agujeros y atornille los cuatro tornillos de
montaje a través de los agujeros de la carcasa. Apriete los cuatro tornillos para una
firme sujeción.
Tornillo de cierre del compartimiento
Orificio de acceso a los tornillos de montaje
Español
Tornillo de cierre del compartimiento
Orificio de acceso a los tornillos de montaje
34
Sección 6
Conexión de los cables de CA al IntelliComm
¡ADVERTENCIA! PRECAUCIONES IMPORTANTES DE SEGURIDAD. ANTES
DE EMPEZAR, LEA LO SIGUIENTE: Lea todas las precauciones de seguridad
de este manual antes de proceder a cualquier conexión eléctrica. Asegúrese de
leer y seguir todas las instrucciones de seguridad de la página ii. La conexión
sólo deberá ser efectuada por un profesional capacitado. Al utilizar productos
eléctricos, siempre deberán seguirse unas precauciones básicas, incluidas las
siguientes:
• Se requiere conexión a toma de tierra. La unidad deberá ser instalada y conectada
a tierra por un profesional técnico capacitado.
Español
Para conectar los cables de CA al IntelliComm:
1. Conecte los cables de alimentación principal de CA a los terminales de CA del
IntelliComm, números 1 y 2, como se muestra más abajo.
2. Conexión a tierra: Conecte el cable externo TIERRA a la terminal de tierra, como se
muestra a continuación. La conexión a tierra es necesaria para garantizar la seguridad
del aparato y de las personas.
3. Cierre la cubierta frontal y ajuste los dos tornillos de la cubierta.
Terminal de tierra
Conecte la entrada de CA (100 a 240 V CA a 50/60 Hz)
a las terminales de CA 1 y 2
35
Sección 7
conexiones del sistema IntelliComm
IntelliComm dispone de cuatro pares de terminales de entrada que pueden ser accionados por
una corriente de 15 a 140 V (CA) o bien de 15 a 100 V (CC) desde un dispositivo fuente (control
automático, calentador, una bomba de calor, etc.). Ello permite disponer de cuatro programas
de control externo de IntelliFlo.
Nota: El IntelliComm siempre se configurará para comunicarse con la dirección de bomba 1.
Tabla de conexiones del sistema IntelliComm
Número de terminal
Nombre de terminal
Voltaje
Corriente máxima
Tipo de fase
Frecuencia
1-2
Alimentación
100 - 240 V (CA)
100 mA
1 entrada
50/60 Hz
3-4
Programa 1
15 - 240 V (CA)
o
15 - 100 V (CC)
1 mA*
1 entrada
50/60 Hz
5-6
Programa 2
15 - 240 V (CA)
o
15 - 100 V (CC)
1 mA*
1 entrada
50/60 Hz
7-8
Programa 3
15 - 240 V (CA)
o
15 - 100 V (CC)
1 mA*
1 entrada
50/60 Hz
9-10
Programa 4
15 - 240 V (CA)
o
15 - 100 V (CC)
1 mA*
1 entrada
50/60 Hz
-5 a +5 V (CC)
5 mA
1 salida
N/D
RS-485
11
12
+ Datos: Amarillo
- Datos: Verde
Nota: (*) indica la entrada de corriente controlada, independiente del voltaje.
Sección 8
Especificaciones eléctricas del IntelliComm
Requisitos de alimentación: IntelliComm consume menos de 1 amperio. La protección contra
subidas de corriente de los cables que conectan el IntelliComm con el dispositivo de fuente (control
automático, calentador, bomba de calor, etc.) deberá realizarse en la fuente.
Entradas de dispositivos remotos: El IntelliComm tiene cuatro entradas detectoras de corriente
que pueden activarse con 15 a 240 V (CA) o de 15 a 100 V (CC).
Salida a bombas IntelliFlo: IntelliComm se comunica con las bombas IntelliFlo mediante una
conexión en serie de dos hilos RS-485.
Español
Tierra
36
Sección 9
Conexión del cable de comunicación IntelliFlo
Para conectar la bomba IntelliFlo al IntelliComm es necesario un cable de comunicación de dos
hilos. Ello permitirá que la bomba IntelliFlo sea controlada por el IntelliComm. El esquema de
cables del conector se muestra a continuación.
Español
Esquema de cables del conector de comunicación de IntelliFlo
Pin 6 (Verde) RS-485 (N)
Nota: Los pines 1 a 5 no se utilizan.
Pin 7 (Amarillo) RS-485 (P)
37
Contenuti
Precauzioni importanti per la sicurezza38
Sezione 1: Riepilogo delle istruzioni di installazione
38
Sezione 2: Contenuto del kit
39
Sezione 3: IntelliComm Communication Center
39
Sezione 4: Installazione della copertura di IntelliComm
40
Sezione 5: Montaggio della copertura di IntelliComm
40
Sezione 6: Collegamento dei cavi della corrente elettrica alternata a IntelliComm
41
Sezione 7: Cablaggio del sistema IntelliComm
42
Sezione 8: Specifiche elettriche IntelliComm
42
Sezione 9: Connessione del cavo di comunicazione IntelliFlo
43
Assistenza clienti
HERENTALS, BELGIO (dalle 8:30 A.M. alle 4:30 P.M.) CET
Sito Web: www.pentairpooleurope.com
Dichiarazione di conformità
Dichiariamo, sotto la nostra esclusiva responsabilità, che i prodotti identificati in questa dichiarazione
e a cui in essa viene fatto riferimento, sono conformi ai requisiti di protezione della Direttiva del Consiglio 98/37/EEG
In attesa di brevetto USA
Produttore: Pentair Aquatic Systems
Il presente documento è soggetto a modifiche senza preavviso.
Informazioni legali e note sui marchi: I logo IntelliFlo e Pentair sono marchi registrati di Pentair. Nel presente documento
possono essere citati altri marchi registrati o commerciali che possono fare riferimento tanto alle aziende proprietarie dei
marchi quanto ai relativi prodotti. Pentair riconosce di non aver alcun diritto o interesse sui marchi registrati e commerciali
che non siano di sua proprietà.
Italiano
© 2012 Pentair. Tutti i diritti riservati.
38
PRECAUZIONI IMPORTANTI PER LA SICUREZZA
ATTENZIONE Leggere e seguire gli avvisi di sicurezza e le istruzioni contenute nel presente
manuale prima di installare il prodotto. La mancata osservanza delle istruzioni e degli avvisi di
sicurezza potrebbe produrre conseguenze quali danni alle cose, lesioni personali gravi o morte.
IMPORTANTE Nell'utilizzo di IntelliComm Communication Center con la pompa IntelliFlo si
consiglia di collegare il trasformatore IntelliComm Power Center a un interruttore salvavita GFCI
a protezione del circuito. È disponibile un terminale di colore verde (o un connettore per cavi
indicato con “G”, “GR”, “Ground” o “Grounding”) nello scomparto dei terminali nella copertura del
trasformatore Power Center. Per ridurre il pericolo di scariche elettriche, connettere il terminale o
il connettore al terminale di messa a terra della rete elettrica o del pannello di alimentazione con
un conduttore di dimensione pari ai conduttori dei circuiti forniti con l'apparato.
ATTENZIONE Per ridurre il pericolo di lesioni, l'installazione o la manutenzione devono essere
eseguite solo da personale qualificato Pool Service Professional.
ATTENZIONE Per ridurre il pericolo di lesioni, non consentire ai bambini di utilizzare il prodotto,
se non sotto stretta supervisione.
IMPORTANTE La pompa IntelliFlo è destinata all'uso con piscine ad installazione permanente,
oltre che con vasche idromassaggio e spa se specificamente indicato. Non utilizzare con piscine
riponibili. Per piscina ad installazione permanente si intende una vasca interrata o costruita sul
terreno o in un edificio tale che non possa essere rimossa o immagazzinata. Per piscina riponibile
si intende una vasca prodotta in modo tale da poter essere smontata e riposta nel proprio stato
originale.
Sezione 1
Riepilogo delle istruzioni di installazione
Italiano
Si raccomanda di installare IntelliComm Communication Center secondo la procedura indicata:
1. Consultare le precauzioni importanti per la sicurezza: prestare
attenzione a queste informazioni importanti.
2. Consultare la panoramica su IntelliComm: prestare attenzione alla
panoramica sul prodotto.
3. Installare IntelliComm: istruzioni sull'installazione della copertura di
IntelliComm.
4. Collegare i cavi della corrente elettrica alternata a IntelliComm:
collegamento dei cavi della corrente elettrica alternata ai terminali 1 e 2.
5. Collegare i cavi di controllo in ingresso a IntelliComm: collegamento dei
cavi di controllo in ingresso ai terminali dal 3 al 10 ai dispositivi sorgente quali controllori
di automatismo o sistemi di riscaldamento.
39
Sezione 2
Contenuto del kit
• IntelliComm Communication Center
• Guida all'installazione di IntelliComm (il presente manuale)
• Cavo doppio di comunicazione RS-485 da 15,24 m. Consente la comunicazione tra
IntelliComm e la pompa IntelliFlo.
Sezione 3
IntelliComm Communication Center
Pentair IntelliComm Communication Center controlla automaticamente la pompa IntelliFlo.
IntelliComm dispone di quattro paia di connessioni terminali in ingresso. Tali connettori in ingresso
sono attivati da tensioni tra i 15 e i 240 V CA e tra i 15 e i 100 V CC da dispositivi sorgente quali
un controllore di automatismi, un sistema di riscaldamento o una pompa di calore. È possibile
abilitare i quattro programmi di controllo esterni IntelliFlo utilizzando le connessioni in ingresso del
dispositivo. Se viene attivata più di una connessione in ingresso, sarà comunicato il programma
con numero più alto alla pompa IntelliFlo.
La pompa IntelliFlo è programmata per operare a una velocità specifica per ogni connessione
in ingresso.
Terminale di messa a terra
Terminale di messa a terra
Collegare i cavi di controllo in
ingresso ai
terminali dal 3 al 10
Collegare i cavi di comunicazione IntelliFlo
ai terminali 11 e 12
IntelliComm Communication Center
Italiano
Collegare i cavi IntelliComm di
ingresso della corrente elettrica
alternata ai terminali della corrente
alternata
1e2
40
Sezione 4
Installazione della copertura di IntelliComm
Installare la copertura di IntelliComm alla base del dispositivo a non più di 15,24 m dalla pompa
IntelliFlo. Lasciare spazio libero a sufficienza da tutti i lati della copertura. Verificare che il cavo di
comunicazione dalla pompa IntelliFlo possa raggiungere la copertura di IntelliComm. La copertura
di IntelliComm può essere montata su di un muro o una superficie verticale a non più di 15,24 m
dal controllore di cella.
IMPORTANTE: IntelliComm Communication Center deve essere installato ad almeno di 2,44 m
dai bordi della piscina.
Nota: per le istruzioni operative della pompa IntelliFlo 4 fare riferimento alla Guida all'uso di
IntelliFlo 4.
Sezione 5
Montaggio della copertura di IntelliComm
1. Utilizzando un cacciavite a punta media piatta, allentare le due viti di plastica sul
pannello anteriore e aprirlo.
2. Montare la copertura su di una superficie piatta come un muro o un pilastro. Segnare
la posizione di ciascuna vite di montaggio.
3. Trapanare quattro fori di 6 mm di diametro. Se necessario aggiungere gli stop e usare
una vite per ciascun foro della copertura.
4. Posizionare la copertura sopra i fori appena trapanati e installare le quattro viti di
montaggio sui relativi fori nella copertura. Avvitare le quattro viti per fissare la copertura.
Foro di accesso alla vite di montaggio
Italiano
Vite di fissaggio della copertura
Vite di fissaggio della copertura
Foro di accesso alla vite di montaggio
41
Sezione 6
Collegamento dei cavi della corrente elettrica alternata a IntelliComm
ATTENZIONE! PRECAUZIONI IMPORTANTI PER LA SICUREZZA. PRIMA DI
INIZIARE LEGGERE QUANTO SEGUE: Consultare le precauzioni per la sicurezza
nel presente manuale prima di collegare i cavi elettrici. Consultare e attenersi
alle istruzioni di sicurezza a pagina ii. Il cablaggio deve essere eseguito solo
da personale qualificato. Nell'utilizzo di prodotti elettrici seguire le precauzioni
di base, tra cui:
• Presenza di messa a terra. L'unità deve essere installata da personale qualificato e
collegata alla messa a terra.
Per collegare i cavi della corrente elettrica alternata a IntelliComm:
1. Collegare i cavi della corrente elettrica alternata ai terminali IntelliComm per la corrente
elettrica alternata numero 1 e 2 come da figura seguente.
2. Messa a terra: Collegare il cavo GROUND in ingresso al terminale di messa a terra
come da figura seguente. La messa a terra è necessaria per garantire la sicurezza
dell'apparato e delle persone.
3. Chiudere il pannello anteriore e avvitare le due viti di fissaggio.
Collegare i cavi per la corrente elettrica alternata in
ingresso (tra 100 e 240 V CA e 50/60 Hz)
ai terminali della corrente elettrica alternata 1 e 2
Italiano
Terminale di messa a terra
42
Sezione 7
Cablaggio del sistema IntelliComm
IntelliComm dispone di quattro paia di terminali di connessioni in ingresso che possono essere
attivati da tensioni tra i 15 e i 240 V AC o tra i 15 e i 100 V CC dal dispositivo sorgente (un
controllore di automatismo, un sistema di riscaldamento, una pompa di calore ecc.). IntelliFlo
consente di selezionare uno tra quattro programmi di controllo esterni.
Nota: IntelliComm deve essere sempre configurato per comunicare con il primo indirizzo della
pompa.
Tabella di cablaggio del sistema IntelliComm
Numero del terminale
Nome del terminale
Voltaggio
Corrente massima
Tipo di fase
Frequenza
1-2
Alimentazione
100 - 240 V CA
100 mA
1 Ingresso
50/60 Hz
3-4
Programma 1
15 -240 V CA
o
15 - 100 V CC
1 mA*
1 Ingresso
50/60 Hz
5-6
Programma 2
15 -240 V CA
o
15 - 100 V CC
1 mA*
1 Ingresso
50/60 Hz
7-8
Programma 3
15 -240 V CA
o
15 - 100 V CC
1 mA*
1 Ingresso
50/60 Hz
9-10
Programma 4
15 -240 V CA
o
15 - 100 V CC
1 mA*
1 Ingresso
50/60 Hz
Da -5 a +5 V CC
5 mA
1 Uscita
Non disponibile
RS-485
11
12
+ Dati: Giallo
- Dati: Verde
Messa a terra
Nota: (*) indica un ingresso controllato dalla corrente, indipendente dal voltaggio.
Sezione 8
Italiano
Specifiche elettriche IntelliComm
Caratteristiche di assorbimento: IntelliComm consuma meno di 1 A. La protezione dai picchi di
corrente sui cavi di connessione dal dispositivo sorgente (un controllore di automatismo, un sistema
di riscaldamento, una pompa di calore ecc.) a IntelliComm deve essere fornita dalla sorgente.
Connessioni in ingresso da dispositivi remoti: IntelliComm dispone di quattro ingressi per
la corrente che possono essere attivati da tensionitra i 15 e i 240 V CA o tra i 15 e i 100 V CC.
Connessioni in uscita alle pompe IntelliFlo: IntelliComm comunica con le pompe IntelliFlo
grazie a una connessione seriale RS-485 a due cavi.
43
Sezione 9
Connessione del cavo di comunicazione IntelliFlo
È necessario un cavo di comunicazione doppio per collegare la pompa IntelliFlo a IntelliComm.
Questo consente a IntelliComm di controllare la pompa IntelliFlo. Il pinout del cavo è illustrato
nella figura seguente.
Pinout del cavo di comunicazione IntelliFlo
Pin 6 (Verde) RS-485 (N)
Pin 7 (Giallo) RS-485 (P)
Nota: i pin da 1 a 5 non sono utilizzati.
Italiano
44
SAVE THESE INSTRUCTIONS !
PENTAIR AQUATIC SYSTEMS
INDUSTRIEPARK WOLFSTEE, TOEKOMSTLAAN 30, 2200 HERENTALS - BELGIUM, WWW.PENTAIRPOOLEUROPE.COM
Copyright – Limited License: except as specifically permitted herein, no portion of the content on this document may be reproduced in any form or by any mean without the
prior written permission of Pentair International SRL.
Copyright – Eingeschränkte Lizenz: soweit hierin nicht ausdrücklich zugelassen, dürfen die Inhalte dieses Dokuments ohne vorausgehende schriftliche Genehmigung der
Pentair International SRL weder ganz noch auszugsweise und in gleich welcher Form und mit welchen Mitteln vervielfältigt werden.
Copyright – Beperkte licentie: behalve zoals hierin specifiek toegestaan, mag geen enkel deel van de inhoud van dit document op om het even welke manier of hoe dan ook
gereproduceerd worden zonder de voorafgaande schriftelijke toestemming van Pentair International SRL.
Copyright – Licence limitée: sauf expressément autorisé ci-après, aucune partie du contenu de ce document ne peut être reproduite sous toute forme ou par tout moyen
sans la permission écrite préalable de Pentair International SRL.
Copyright – Licencia limitada: salvo en lo expresamente permitido en el presente documento, se prohíbe la reproducción total o parcial del mismo por cualquier medio sin
la previa autorización por escrito de Pentair International SRL.
Copyright – Licenza limitata: se non indicato specificatamente di seguito, nessuna porzione del contenuto di questo documento può essere riprodotta in qualsiasi forma o
con qualsiasi mezzo senza preventiva autorizzazione scritta di Pentair International SRL.