1
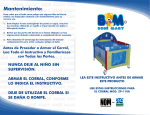
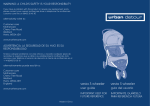
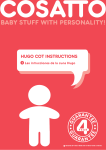
Guía para el usuario
your child's safety is your responsibility
If you have a problem with this product or require replacement parts,
please contact your nearest Mothercare store or telephone
the Mothercare customer care line on 08453 30 40 30
Alternatively write to:
Customer Care
Mothercare
Cherry Tree Road
Watford
Herts. WD24 6SH
westbury
cotbed
user guide
www.mothercare.com
IMPORTANT - READ CAREFULLY AND KEEP FOR FUTURE REFERENCE
important notes
This cot conforms to BS EN 716 -1: 1996, Safety Standard for Cots.
Please take a few minutes to read this user guide.
Unpack your cot carefully onto a soft level surface, such as a carpeted floor.
Familiarise yourself with the parts by comparing them with the PARTS CHECK LIST
below. Do not discard any packaging until you are sure you have all the parts.
The Recommended mattress for this cot is a Mothercare “Cot Bed” sized mattress,
(140cm x 70cm).
Please note that timber is a natural product. The colour will change with age.
menos de 500mm con la base en la
posición más baja o de 200mm con la base
en la posición más alta. La pata de la cuna
tiene una marca indicando esta altura. Es
preciso que todos los accesorios de
montaje sean siempre y correctamente
apretados. Hay que tener cuidado en que
ningún tornillo esté suelto, porque al niño
podría enganchar alguna parte de su
cuerpo o de sus prendas de vestir (p.ej.
la seguridad de su niño es su responsabilidad
Si surgiera algún problema con este producto o si necesita piezas de recambio,
sírvase ponerse en contacto con el almacén Mothercare más próximo o llamar a la
línea de Atención al Cliente de Mothercare número (+44) 1923 210 210
También puede escribir a:
Customer Care, Mothercare, Cherry Tree Road, Watford, Herts. WD24 6SH, Inglaterra.
parts check list
www.mothercare.com
fig
1a
fig
1b
fig
1d
2 Fixed Sides
1 Foot End
fig
1e
1 Head End
1 Mattress Base
fig
1c
2 Mattress Base Rails
fig
1f
16 Bolts (60mm)
fig
1g
fig
1i
1 Allen Key
You will also need a screwdriver
fig
1h
1
cuerdas, collares, cintas para chupetes) lo
que representaría un peligro de
estrangulamiento. El colchón a utilizar en
esta cuna no debe ser más de 30mm más
corto o más estrecho que la longitud o
anchura interiores de la cuna. Las fuentes
de calor fuerte, p.ej chimeneas, estufas a
gas o eléctricas en las proximidades de la
cuna pueden ser peligrosas si se colocan
cerca de la cuna.
8 Barrel Nuts
Español:
Guía del usuario para la cuna camita Aylesbury.
Contiene información importante, lea aténtamente
y retenga para referencia futura.
assembly
fig 2
1
Por favor, recuerde que todas las ilustraciones a las que se hace referencia en
esta guía se encuentran en la sección en inglés al principio de la guía.
Notas importantes
Esta cuna camita cumple con la Norma de
Seguridad BS EN 716-1: 1996 para cunas. Por
favor, tómese unos minutos en leer esta
guía de usuario. Desembale
cuidadosamente la cuna sobre una
superficie plana y blanda, tal como un suelo
enmoquetado. Familiarícese con las piezas,
comparándolas con el catálogo de piezas
que sigue. No tire el embalaje hasta que
esté seguro de que tiene todas las piezas. El
colchón recomendado para esta cuna es
un colchón Mothercare de tamaño 'COT
BED' (140 cm x 70cm). Por favor nótese que
madera es un producto natural. En breve, el
color se oscurecerá.
Catálogo de piezas
2 lados fijos (fig 1a)
1 Base para el colchón (fig 1b)
2 Soportes para la base del colchón (fig 1c)
1 Extremo de pie (fig 1d)
1 Cabecera (fig 1e)
16 Pernos de 60mm (fig 1f)
1 Llave “Allén” (fig 1g)
8 Tuercas (fig 1h)
También se va a necesitar
un destornillador (fig 1i)
Montaje
La base de la cuna tiene 3 posibilidades de
posición. Es preciso escoger una altura
ahora mismo. La posición más baja es la
más segura y debe utilizarla siempre desde
que sea el niño bastante para sentarse.
Utilizando los pernos de 60mm y la llave
Allén, apriete por el extremo de cuna y
hasta los soportes para la base,
introduciendo una tuerca en cada agujero
en la cara de los soportes los que
aceptarán los pernos. Puede utilizar el
destornillador para alinear la tuerca con el
perno.
Para facilitar montaje, no apriete todavía
los pernos.
2
Coloque la base del colchón entre los
soportes. (Véase fig 2).
3
Monte los lados, utilizando los pernos de
60mm y la llave Allén, tal como se indica.
Apriete todos los pernos. (Véase fig 3).
Para convertir en cama
Desmonte la cuna, cuidando los pernos
y las tuercas.
Divide el extremo de pie, quitando la parte
inferior, incluso el entrepaño. Se utilicen la
parte superior como extremo para la cama.
(Véase fig 4).
Asegure los soportes para la base a los
extremos en la posición más alta (extremo
de pie), y más baja (cabecera), utilizando
los pernos de 60mm y las tuercas, tal como
antes.
Coloque de nuevo la base del colchón.
Hay dos agujeros en los soportes para la
base (X). Son para montar una Barrera de
cama Mothercare (Véase fig 5).
Your cot has 3 mattress positions.
Decide which mattress base
position you require now. The
lowest base position is the safest
and should always be used as
soon as the baby is old enough
to sit up.
Using the 60mm bolts and Allen
key, screw through the cot end
and into the mattress base rails,
inserting one barrel nut into each
pre-drilled hole of the mattress
base rail, for the bolt to secure
into. A screwdriver may need to
be used to align the barrel nut
with the bolt.
To ease assembly do not fully
tighten the fittings at this stage.
Place the Mattress base between
the rails.
fig 3
Attach the sides, using the 60mm
bolts and the Allen Key, as shown.
Tighten all the fittings.
Cuidado del producto
Compruebe periódicamente todos los
accesorios para asegurarse de que no se
hayan aflojado. Puede limpiar su cuna con
un paño húmedo y secarla con un paño
suave y seco. Nunca la limpie con
limpiadores abrasivos ni basado en
amoníaco, lejía o alcohol. Tenga cuidado al
manejar o mover la cuna. Un manejo sin
cuidado puede dañar los muebles de
madera.
Medidas de seguridad
La posición más baja de la base es la más
segura y debe utilizarla siempre desde que
el niño sea bastante para sentarse. No
deje nunca en la cuna cualquiera cosa que
pueda servir de escalón o represente un
peligro de asfixia o estrangulamiento. El
grosor del colchón elegido no debe reducir
la profundidad interior (desde la superficie
2
converting to a bed
care of your product
fig 4
Periodically check all fittings to ensure that none have come loose.
Dismantle the cot, keeping the
bolts and nuts.
Detach the lower portion of the
foot end, including the short
panel. The upper section will be
used as the bed end.
The cot can be cleaned by wiping with a damp cloth and drying with a soft dry cloth.
Never clean with abrasive, ammonia based, bleach based, or spirit type cleaners.
Take care when handling or moving the cot. Careless handling can damage wooden
furniture.
safety notes
The lowest base position is the safest and should always be used as soon as the
baby is old enough to sit up.
Never leave anything inside the cot that could provide a foothold or present a risk
of suffocation or strangulation.
The thickness of the mattress chosen must not reduce the internal depth (from
mattress surface to the top of the side) to less than 500mm with the base in the
lowest position or 200mm with the base in the highest position. The leg of the cot
has a mark indicating this height.
All assembly fittings should always be tightened properly. Care should be taken
that no screws are loose, because the child could trap parts of the body or clothing,
(e.g. Strings, necklaces, ribbons for babies’ dummies), which would pose a risk of
strangulation.
fig 5
Attach the mattress base rails to
the ends, in the lower position on
the head end and in the upper
position on the foot end, as
shown, using the 60mm bolts and
nuts, as before. Replace the
mattress base.
The mattress used with this cot should be no more than 30mm shorter or narrower
than the internal length or width of the cot.
Strong heat sources, e.g. open, electric or gas fires in the vicinity of the cot may be
dangerous if placed near the cot.
Notice the 2 holes, bored in the
mattress rails (X). These are not
a manufacturing error, but
to enable the fitting of a
Mothercare bed guard.
x
3
4