1
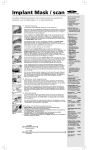
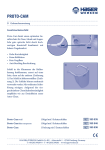
MIRATRAY-IMPLANT
Transparente Einweg-Abformlöffel für Implantologen
• Gebrauchsanweisung
• Instructions for Use
• Mode d’emploi
• Instruções de Uso
• Instrucciones para el uso
• Istruzioni per l’uso
• Gebruiksaanwijzing
Hager & Werken GmbH & Co. KG • Postfach / P.O.B. 10 06 54 • D-47006 Duisburg (Germany)
Tel.: +49 (0) 203-99 269-0 • Fax: +49 (0) 203-29 92 83 • E-mail: [email protected] • www.hagerwerken.de
MIRATRAY-IMPLANT
Transparente Einweg-Abformlöffel für Implantologen
Gebrauchsanweisung
Die Idee für diese neuartigen transparenten Abformlöffel für Implantologen basiert auf der Tatsache, dass
diese transparenten Abformlöffel es einem erlauben, sicher die Position der Konstruktionen zu markieren.
MIRATRAY-IMPLANT kann nach der Kennzeichnung ausgebohrt werden, so dass eine sichere und
korrekte Platzierung des Abformlöffels einfach durchzuführen ist. MIRATRAY-IMPLANT ist speziell für
Abformungen in der Implantologie entwickelt worden und zeichnet sich durch hohe Stabilität, besondere
Konstruktion und seine Transparenz aus. MIRATRAY-IMPLANT wird als Einführungsset für bezahnte
und unbezahnte Kiefer mit je zwei Abformlöffeln für Ober- und Unterkiefer angeboten. Nachfüllpackungen
für die jeweilige Größe können separat bestellt werden.
Material
MIRATRAY-IMPLANT ist aus einem plastischen, FDA (Food and Drug Administration [U.S.A.])- geprüften
Plexiglas® hergestellt. MIRATRAY-IMPLANT ist hitzebeständig bis zu einer Temperatur von max. 98°
C und somit nicht für den Autoklaviervorgang geeignet! Um mögliche Infektionen zu vermeiden, sollten
die Abformlöffel nach dem Gebrauch entsorgt werden!
Auswahl des Abformlöffels bei bezahntem Kiefer
Durch intraorales Abmessen mit dem Messzirkel kann der passende Abformlöffel bestimmt werden. Die
Messplatten des Zirkels werden dann in Kontakt mit M2 und P2 gebracht (Abb. 1). Bei der Auswahl des
OK-Löffels passiert dieses vestibulär und bei der Auswahl des UK-Löffels lingual. Der Zirkel wird dann
auf der Messschablone platziert. Wenn die Messplatten des Zirkels die schwarzen Schatten der Zahlen
vollständig bedecken, kann die entsprechende Löffelgröße abgelesen werden. Die Größe des
entsprechenden Löffels sollte dann auch direkt in die Patientendatei (-karte) eingetragen werden. Führen
Sie den Löffel in den Mund ein und kontrollieren Sie den zur Verfügung stehenden Platz zwischen dem
Abformlöffel und den eventuell vorhandenen Weisheitszähnen oder der Tuber Retromolare.
Auswahl des Abformlöffels bei unbezahntem Kiefer
Unterer Kieferbogen:
Messen Sie intraoral mit Hilfe des Messzirkels den Abstand zwischen den retromolaren Polstern. Der
Zirkel wird dann auf der Messschablone platziert, so dass die Löffelgröße abgelesen werden kann.
Oberer Kieferbogen:
Messen Sie den weitesten Abstand zwischen den bukkalen Flächen des Alveolarkamms mit dem
Messzirkel. Der Zirkel wird dann ebenso auf der Messschablone platziert, so dass die Löffelgrösse
abgelesen werden kann.
Vorbereitung des Abformlöffels für die Abformung
Nach der Auswahl des passenden MIRATRAY-IMPLANT Abformlöffels können die Positionen der
Implantatpfeiler auf der transparenten Oberfläche mit Hilfe eines geeigneten Markers angezeichnet
werden. Nun können genau an den angezeichneten Stellen problemlos Löcher für die Abdruckpfosten
in die Oberfläche des Löffels gefräst werden.
Abformtechnik
Für die endgültige Abformung wird eine Silikon- oder Polyetherabformmasse mit hoher Endhärte empfohlen.
Bitte benutzen Sie immer ein Adhäsiv! Es wird empfohlen, während der Abbindezeit des Abdruckmaterials
parallel die Implantatpfosten mit dem Abdrucklöffel zu verblocken.
Desinfektion der Abformung
Nach der Entnahme der Abformung aus dem Patientenmund sollte diese zur Vorbeugung jeglicher
Infektionsgefahren unbedingt desinfiziert werden!
2
MIRATRAY-IMPLANT (bezahnter Kiefer)
Abb. 1
Abb. 2:
Anprobe des transparenten
MIRATRAY-IMPLANT Abformlöffels.
Die Position der Implantate wird
angezeichnet und an dieser Stelle
werden dann die Löcher gefräst.
Abb. 3:
Bohrloch in transparentem
MIRATRAY-IMPLANT Abformlöffel.
MIRATRAY-IMPLANT (unbezahnter Kiefer)
Abb. 4:
Anprobe und Anzeichnen der
Durchtrittsstelle der Abdruckpfosten
an einem transparenten MIRATRAYIMPLANT Abformlöffel.
Abb. 5:
Fräsen der beiden Löcher im
MIRATRAY-IMPLANT Abdrucklöffel
und Anprobe.
Artikelnr. Produkt
101 220
Set MIRATRAY-IMPLANT
Kieferbeschaffenheit
bezahnter Kiefer
101 221
Set MIRATRAY-IMPLANT
unbezahnter Kiefer
101 222
101 223
101 224
101 225
101 226
101 227
101 228
101 229
101 230
101 231
101 232
101 233
101 234
101 235
101 236
101 237
4er Nachfüllpackung
4er Nachfüllpackung
4er Nachfüllpackung
4er Nachfüllpackung
4er Nachfüllpackung
4er Nachfüllpackung
4er Nachfüllpackung
4er Nachfüllpackung
4er Nachfüllpackung
4er Nachfüllpackung
4er Nachfüllpackung
4er Nachfüllpackung
4er Nachfüllpackung
4er Nachfüllpackung
4er Nachfüllpackung
4er Nachfüllpackung
bezahnter Kiefer
bezahnter Kiefer
bezahnter Kiefer
bezahnter Kiefer
bezahnter Kiefer
bezahnter Kiefer
bezahnter Kiefer
bezahnter Kiefer
unbezahnter Kiefer
unbezahnter Kiefer
unbezahnter Kiefer
unbezahnter Kiefer
unbezahnter Kiefer
unbezahnter Kiefer
unbezahnter Kiefer
unbezahnter Kiefer
3
Abb. 6:
Während des Aushärtens der
Abformmasse werden parallel dazu
die Abdruckpfosten verblockt.
Inhalt
je 1 x Größe 42, 43, 44 und 45 OK
je 1 x Größe 52, 53, 54 und 55 UK
1 Messzirkel, 1 Größenkarte, 1 Anleitung
je 1 x Größe 22, 23, 24 und 25 UK
je 1 x Größe 32, 33, 34 und 35 OK
1 Messzirkel, 1 Größenkarte, 1 Anleitung
4 x OK-Löffel Größe 42
4 x OK-Löffel Größe 43
4 x OK-Löffel Größe 44
4 x OK-Löffel Größe 45
4 x UK-Löffel Größe 52
4 x UK-Löffel Größe 53
4 x UK-Löffel Größe 54
4 x UK-Löffel Größe 55
4 x UK-Löffel Größe 22
4 x UK-Löffel Größe 23
4 x UK-Löffel Größe 24
4 x UK-Löffel Größe 25
4 x OK-Löffel Größe 32
4 x OK-Löffel Größe 33
4 x OK-Löffel Größe 34
4 x OK-Löffel Größe 35
MIRATRAY-IMPLANT
Transparent disposable impression tray for implantologists
Instructions for Use
The idea for this new transparent impression tray for implantologists is based on the fact that this
transparent tray allows to mark the position of the constructions safely. The MIRATRAY-IMPLANT can
be drilled after marking it and a safe and correct placement of the tray for implantology is easy. MIRATRAY
-IMPLANT has been developed especially for impressions in the implant field and is excellent regarding
stability, construction and transparency. MIRATRAY-IMPLANT comes as an introductory kit for dentulous
and edentulous cases with both upper and lower trays. Refill boxes per size can be ordered separately.
Material
MIRATRAY-IMPLANT is made from Plexiglas® plastic, an FDA-approved material. The MIRATRAYIMPLANT can withstand a maximum heat of up to 98 degrees Celsius, and are, therefore, unsuitable
for an autoclave. In order to prevent possible infections, trays should be disposed off after use.
Tray Selection dentulous
The correct tray is determined by taking measurements in the mouth with a divider. The divider’s measuring
metal plates are brought into contact with the M2 and P2 (Fig.1). When selecting the upper tray, this
occurs vestibularly, and when selecting the lower tray, this occurs lingually. The divider is then placed
on the measuring template. When the metal measuring plates completely cover the black shadow figures,
the tray number has been identified. The tray number is immediately noted on the patient data card.
Insert the tray into the mouth. Clearly check the space between the impression tray and the wisdom
teeth, or tubera.
Tray selection edentulous
Lower arch:
Measure intraorally the distance between the retromolar pads, using the divider. The divider is then placed
on the measuring template and the tray number has been identified.
Upper arch:
Measure the greatest distance between the buccal faces of the alveolar ridge with the divider. The divider
is then placed on the measuring template and the tray number has been identified.
Preparing MIRATRAY-IMPLANT for impression
After fitting the MIRATRAY-IMPLANT, the position of the abutments can be indicated on the transparent
MIRATRAY-IMPLANT surface with a marker. Than holes can be drilled exactly on the position for the
implant posts.
Impression Technique
For the final impression it is recommended to use a silicone or polyether with high endhardness. Always
use an adhesive. During the setting of the impression material it is recommended to block the implant
posts parallel to the tray.
Disinfection of the Impression to prevent any kind of luxation
The impression should be disinfected in accordance with the instructions provided by the producer of
the impression material.
4
MIRATRAY-IMPLANT (case dentulous)
Fig. 2:
Fitting the transparent MIRATRAYIMPLANT. Position of the implants are
marked and holes are drilled.
Fig. 1
Fig. 3:
Drill hole in transparent
MIRATRAY-IMPLANT.
MIRATRAY-IMPLANT (case edentulous)
Fig. 4:
Tray fitting and marking of the opening
for the implant post on a transparent
MIRATRAY-IMPLANT.
Fig. 5:
Drilling the 2 holes in the
MIRATRAY-IMPLANT.
Art. No.
101 220
Product
Set MIRATRAY-IMPLANT
sorts of cases
case dentulous
101 221
Set MIRATRAY-IMPLANT
case edentulous
101 222
101 223
101 224
101 225
101 226
101 227
101 228
101 229
101 230
101 231
101 232
101 233
101 234
101 235
101 236
101 237
4 in one refill
4 in one refill
4 in one refill
4 in one refill
4 in one refill
4 in one refill
4 in one refill
4 in one refill
4 in one refill
4 in one refill
4 in one refill
4 in one refill
4 in one refill
4 in one refill
4 in one refill
4 in one refill
case dentulous
case dentulous
case dentulous
case dentuous
case dentulous
case dentulous
case dentulous
case dentulous
case edentulous
case edentulous
case edentulous
case edentulous
case edentulous
case edentulous
case edentulous
case edentulous
5
Fig. 6:
During the setting of the impression
the implant post are blocked on the
tray.
Contents
1 x size upper-trays 42, 43, 44 and 45
1 x size lower-trays 52, 53, 54 and 55
1 dividerl, 1 size chart, 1 manual
1 x size lower-trays 22, 23, 24 and 25
1 x size upper-trays 32, 33, 34 and 35
1 divider, 1 size chart, 1 manual
4 x upper-trays per size 42
4 x upper-trays per size 43
4 x upper-trays per size 44
4 x upper-trays per size 45
4 x lower-trays per size 52
4 x lower-trays per size 53
4 x lower-trays per size 54
4 x lower-trays per size 55
4 x lower-trays per size 22
4 x lower-trays per size 23
4 x lower-trays per size 24
4 x lower-trays per size 25
4 x upper-trays per size 32
4 x upper-trays per size 33
4 x upper-trays per size 34
4 x upper-trays per size 35
MIRATRAY-IMPLANT
Porte-empreintes à usage unique pour implantologues
Mode d´emploi
L´idée de base pour ces nouveaux porte-empreintes transparents pour implantologues était qu´ils
permettent de marquer de manière sûre la position de la construction. Les MIRATRAY-IMPLANT peuvent
être perforés après le marquage, de sorte que les porte-empreintes peuvent être placés correctement
facilement. Les MIRATRAY-IMPLANT ont été conçus spécialement pour la prise d´empreinte en
implantologie, et se caractérisent par une haute stabilité, une construction particulière et leur transparence.
Les MIRATRAY-IMPLANT sont vendus en kit d´introduction pour maxillaires dentés et édentés avec 2
porte-empreintes pour le haut et 2 pour le bas. Des boites de réassortiment avec 4 pièces d´une taille
sont vendus séparément.
Matériau
Les MIRATRAY-IMPLANT sont fabriqués en Plexiglas® avec contrôle FDA, c.a.d. reconnu par la Food
and Drug Administration des USA. Ils ne résistent à la chaleur que jusqu´à 98°C et ne sont donc pas
autoclavables! Pour éviter toute infection, il est recommandé de les jeter après usage!
Choix du porte-empreinte pour maxillaire denté
On peut déterminer quel porte-empreinte utiliser en prenant la mesure intra-orale. Les plots de mesure
du compas sont mis en contact avec M2 et P2 (Fig. 1). Ceci se fait du côté vestibulaire pour le choix
d´un porte-empreinte du maxillaire supérieur et du côté lingual pour un porte-empreinte du maxillaire
inférieur. On place alors le compas sur le pochoir de mesure. Lorsque les plots de mesure du compas
recouvrent complètement les ombres noires des chiffres, on peut lire la taille du porte-empreinte à choisir.
Il est recommandé d`inscrire cette taille dans le dossier du patient. Mettez alors le porte-empreinte dans
la bouche du patient et contrôlez la place à disposition entre celui-ci et les dents de sagesse éventuelles
ainsi que la tuberosité rétromolaire.
Choix du porte-empreinte pour maxillaire édenté
Maxillaire inférieur:
Mesurez avec le compas la distance entre les bourrelets rétromolaires. Placez alors le compas sur le
pochoir, pour pouvoir lire la taille du porte-empreinte à choisir.
Maxillaire supérieur:
Mesurez la distance la plus grande entre les surfaces buccales de la crête alvéolaire. On peut alors
placer le compas sur le pochoir et déterminer la taille du porte-empreinte à choisir.
Preparation du porte-empreinte avant la prise d´empreinte
Après avoir choisi le porte-empreinte, on peut marquer la position des piliers d´implants sur la surface
transparente à l´aide d´un marqueur approprié. On peut maintenant fraiser sans problème les trous pour
les piliers dans la surface du porte-empreinte.
Technique d´empreinte
Pour prendre l´empreinte définitive, on utilise une masse silicone ou polyéther à haute dureté finale.
Toujours utiliser un spray adhésif ! De plus, il est recommandé de bloquer pendant la prise du matériau
les piliers avec le porte-empreinte en position parallèle.
Désinfection de l´empreinte
Une fois sortie de la bouche du patient, l´empreinte doit être obligatoirement désinfectée pour éviter tout
risque d´infection!
6
MIRATRAY-IMPLANT (maxillaire avec dents)
Fig. 1
Fig. 2:
Essayage du porte-empreinte
MIRATRAY-IMPLANT transparent.
On marque la position des implants
et fraise les emplacements.
Fig.3:
Trou de fraisage dans le porteempreinte MIRATRAY-IMPLANT
transparent.
MIRATRAY-IMPLANT (maxillaire édenté)
Fig. 4:
Essayage et marquage du passage
du pilier dans un MIRATRAYIMPLANT transparent.
Fig. 5:
Fraisage des 2 trous dans le
MIRATRAY-IMPLANT transparent et
essayage.
No.
101 220
Produit
Set MIRATRAY-IMPLANT
Situation du maxillaire
maxillaire avec dents
101 221
Set MIRATRAY-IMPLANT
maxillaire édenté
101 222
101 223
101 224
101 225
101 226
101 227
101 228
101 229
101 230
101 231
101 232
101 233
101 234
101 235
101 236
101 237
Kit de rechange avec 4 pcs.
Kit de rechange avec 4 pcs.
Kit de rechange avec 4 pcs.
Kit de rechange avec 4 pcs.
Kit de rechange avec 4 pcs.
Kit de rechange avec 4 pcs.
Kit de rechange avec 4 pcs.
Kit de rechange avec 4 pcs.
Kit de rechange avec 4 pcs.
Kit de rechange avec 4 pcs.
Kit de rechange avec 4 pcs.
Kit de rechange avec 4 pcs.
Kit de rechange avec 4 pcs.
Kit de rechange avec 4 pcs.
Kit de rechange avec 4 pcs.
Kit de rechange avec 4 pcs.
maxillaire avec dents
maxillaire avec dents
maxillaire avec dents
maxillaire avec dents
maxillaire avec dents
maxillaire avec dents
maxillaire avec dents
maxillaire avec dents
maxillaire édenté
maxillaire édenté
maxillaire édenté
maxillaire édenté
maxillaire édenté
maxillaire édenté
maxillaire édenté
maxillaire édenté
7
Fig. 6:
Pendant la prise, on bloque les piliers
en position parallèle.
Contenu
1 de chaque des tailles 42, 43, 44, 45 MS
1 de chaque des tailles 52, 53, 54, 55 MI
1 compas, 1 cartes des tailles, 1 mode
1 de chaque des tailles 22, 23, 24, 25 MI
1 de chaque des tailles 32, 33, 34, 35 MS
1 compas, 1 cartes des tailles, 1 mode
4 porte-empreintes taille 42 MSup
4 porte-empreintes taille 43 MSup.
4 porte-empreintes taille 44 MSup.
4 porte-empreintes taille 45 MSup
4 porte-empreintes taille 52 MInf.
4 porte-empreintes taille 53 MInf.
4 porte-empreintes taille 54 MInf.
4 porte-empreintes taille 55 MInf.
4 porte-empreintes taille 22 MInf.
4 porte-empreintes taille 23 MInf.
4 porte-empreintes taille 24 MInf.
4 porte-empreintes taille 25 MInf.
4 porte-empreintes taille 32 MSup.
4 porte-empreintes taille 33 MSup.
4 porte-empreintes taille 34 MSup.
4 porte-empreintes taille 35 MSup.
MIRATRAY-IMPLANT
Moldeiras de impressão descartável, transparente, para implantologistas
Instruções de Uso
A idéia desta nova moldeira para implantologistas é baseada no fato de que uma moldeira transparente
também permite marcar a posição da construção com segurança. O MIRATRAY-IMPLANT pode ser
perfurado após marcá-lo e um ajuste correto e seguro da moldeira para o implante é facilitado. MIRATRAYIMPLANT Y vem sendo desenvolvido especialmente para impressões no campo de implante e detém
uma característica de excelente estabilidade, construção e transparência. MIRATRAY-IMPLANT se
apresenta com um kit de introdução para casos de dentulos e edentulos com moldeiras superiores e
inferiores. Caixas de refil em tamanhos diferentes podem ser pedidas separadamente.
Material
O MIRATRAY-IMPLANT é fabricado em plástico Plexiglas® aprovado pelo FDA (Food and Drug
Administration, EUA). Pode também suportar uma temperatura máxima de 98°C, sendo portanto impróprio
para uso em autoclave. Para prevenção de possíveis infecções, as moldeiras devem ser eliminadas
após o uso.
Seleção de Moldeira para Dentulos
A moldeira correta é determinada em função de medições bucais com um divider. Os pratos de metal
para medição divider são colocados em contato com o M2 e o P2 (Fig. 1). Se a moldeira superior for
selecionada, isto ocorrerá vestibularmente, e se a moldeira inferior for selecionada isto ocorrerá
lingualmente. O divider é então colocado na guia de medição. Quando os pratos de metal para medição
cobrirem por completo as sombras negras das figuras, o número da moldeira terá sido identificado. O
número da moldeira é então imediatamente anotado no cartão de dados do paciente. Insira a moldeira
na boca do paciente. Confira o espaço entre a moldeira de impressão e os terceiros molares.
Seleção de Moldeiras para Edentulos
Arco inferior:
Medir intra-oralmente a distância entre os enchimentos retro-molares, usando o divider. O divider é então
posicionado na guia de medição e o número da moldeira será identificado.
Arco superior:
Medir a grande distância entre a face bucal e a aresta alveolar com o divider. O divider é então posicionado
na guia de medição e o número da moldeira será identificado.
Preparando o MIRATRAY-IMPLA para impressão
Após encaixar o MIRATRAY-IMPLANT, a posição dos abutments podem ser indicadas na superfície
transparente do MIRATRAY-IMPLANT com um marcador. Então furos podem ser feitos exatamente na
posição dos pinos de implante.
Técnica de Impressão
Para a impressão final é recomendado o uso de silicone ou poliéster com grande dureza na ponta. Usar
sempre adesivo. Durante a fixação do material de impressão é recomendado bloquear os pinos de
implante paralelos à moldeira.
Desinfetando a Impressão a Título de Prevenção
A impressão deveria ser desinfetada de acordo com as instruções fornecidas pelo fabricante do material
de impressão.
8
MIRATRAY-IMPLANT caso dentulo
Fig. 1
Fig. 2:
Encaixando o MIRATRAY-IMPLANT
transparente. Posição dos implantes
é marcada e os furos são feitos.
Fig. 3:
Fazer o furo no MIRATRAY-IMPLANT.
MIRATRAY-IMPLANT caso edentulo
Fig. 4:
Encaixe da moldeira e marcação das
aberturas do MIRATRAY-IMPLANT.
Fig. 5:
Fazendo duas pefurações no
MIRATRAY-IMPLANT.
Código
101 220
Produto
Set MIRATRAY-IMPLANT
Tipos de caso
caso dentulo
101 221
Set MIRATRAY-IMPLANT
caso edentulo
101 222
101 223
101 224
101 225
101 226
101 227
101 228
101 229
101 230
101 231
101 232
101 233
101 234
101 235
101 236
101 237
4 em um refil
4 em um refil
4 em um refil
4 em um refil
4 em um refil
4 em um refil
4 em um refil
4 em um refil
4 em um refil
4 em um refil
4 em um refil
4 em um refil
4 em um refil
4 em um refil
4 em um refil
4 em um refil
caso dentulo
caso dentulo
caso dentulo
caso dentulo
caso dentulo
caso dentulo
caso dentulo
caso dentulo
caso edentulo
caso edentulo
caso edentulo
caso edentulo
caso edentulo
caso edentulo
caso edentulo
caso edentulo
Fig. 6:
Durante o encaixe da impressão dos
pinos de implante em um MIRATRAYIMPLA NT transparente e o encaixe
dos pinos de implante são bloqueados
na moldeira.
Conteúdo
1x tamanho superior 42, 43, 44, 45
1x tamanho inferior 52, 53, 54, 55
1x divider, tamanho quadro, manual
1x tamanho inferior 22, 23, 24, 25
1x tamanho superior 32, 33, 34,35
1x divider, tamanho quadro, manual
4 moldeiras superiores por tamanho 42
4 moldeiras superiores por tamanho 43
4 moldeiras superiores por tamanho 44
4 moldeiras superiores por tamanho 45
4 moldeiras inferiores por tamanho 52
4 moldeiras inferiores por tamanho 53
4 moldeiras inferiores por tamanho 54
4 moldeiras inferiores por tamanho 55
4 moldeiras inferiores por tamanho 22
4 moldeiras inferiores por tamanho 23
4 moldeiras inferiores por tamanho 24
4 moldeiras inferiores por tamanho 25
4 moldeiras superiores por tamanho 32
4 moldeiras superiores por tamanho 33
4 moldeiras superiores por tamanho 34
4 moldeiras superiores por tamanho 35
9
E
MIRATRAY-IMPLANT
Cubetas de impresión transparentes para los implantologos
Modo de empleo
La idea para estas nuevas cubetas de impresion transparentes para los implantologos se funda al hecho
que estas permiten marcar la posición de la construcción con seguridad. MIRATRAY-IMPLANT se puede
perforar despues de la marcación, de modo que una firme y correcta colocación de la cubeta es realizable.
MIRATRAY-IMPLANT fue diseñado especialmente para la impresión en la implantologia y se distingue
por su gran estabilidad, su particular construcción y su transparencia. MIRATRAY-IMPLANT viene ofertado
en paquete de introducción, para mandibulas / maxilares con y sin dientes, con dos cubetas para
impresión en la mandibula inferior y dos para impresión en el maxilar superior. Paquetes de relleno se
pueden encargar por separado en el respectivo tamaño.
Material
MIRATRAY-IMPLANT se compone de un Plexiglas®, probado por la FDA americana (Food and Drug
Administration). MIRATRAY-IMPLANT es resistente al calor hasta una temparatura de max. 98°C y por
lo tanto no apropiado para la esterilisazión en autoclave. Para evitar posibles infecciónes se eliminarían
las cubetas MIRATRAY-IMPLANT despues de utilización.
Selección de la cubeta de impresión en mandibula con dientes
Por medir intraoral con el compas de medición se puede determinar la conveniente cubeta. Las placas
de medición del compas entran en contacto con M2 y P2 (véase foto 1). La selección de la cubeta para
la mandibula superior sucede vestibular y para la cubeta para la mandibula inferior, lingual. Entonces
se coloca el compas sobre el patrón de medición. Cuando las placas de medición del compas cubren
las sombras negras de los numeros completamente, se puede leer el correspondiente tamaño de la
cubeta. El tamaño de la cubeta debe estar registrado en seguida en la ficha del paciente. Introduca la
cubeta en la boca y controle el sitio que qeuda a la disposición entre la cubeta y las eventualmente
presentes muelas del juicio o la tuberosidad retromolar.
Selección de la cubeta de impresión en mandibula sin dientes
Arco de la mandibula inferior:
Miede intraoral con ayuda del compas de medición la distancia entre los rellenos retromolares. El compas
se coloca sobre el patrón de medición, de modo que se puede leer el tamaño de la cubeta.
Arco de la mandibula superior:
Miede la mas larga distancia entre las areas buccales de la cresta alveolar con el compas de medición.
El compas se coloca al mismo modo sobre el patrón de medición, de manera que se puede leer el
tamaño de la cubeta.
Preparación de la cubeta para la impresión
Después de la selección de la cubeta de impresión MIRATRAY-IMPLANT se puede marcar la posición
de los pilares del implante sobre la superficie transparente con ayuda de un apropiado lapiz. Ahora se
puede fresar sin problemas los orificios para el pasaje de los pilares del implante en la superficie de la
cubeta.
Técnica de impresión
Para la definitiva impresión se recomenda un material de impresión silicona o poliéter con gran dureza
final. Por favor utiliza siempre un adhesivo! Se recomenda durante el tiempo de la toma del material
de impresión de bloquear paralelmente el anclaje implantato.
Desinfección de la impresión
Después de la toma de la impresión de la boca del paciente, se debe desinfectarla absolutamente para
prevenir todas infecciónes!
10
MIRATRAY-IMPLANT (mandibula con dientes)
Foto 1
Foto 2:
Prueba de la cubeta para impresión
transparente MIRATRAY-IMPLANT.
Se marca la posición de los implantes
y a ese sitio se fresan los agujeros.
Foto 3:
Taladro en la cubeta para impresión
transparente MIRATRAY-IMPLANT.
MIRATRAY-IMPLANT (mandibula sin dientes)
Foto 4:
Prueba y marcación del pasaje del
pilar en una cubeta para impresión
transparente MIRATRAY-IMPLANT.
Foto 5:
Fresar de los dos agujeros en la
cubeta MIRATRAY-IMPLANT y
prueba.
No.
101 220
Producto
Set MIRATRAY-IMPLANT
Estado de mandibula
mandibula con dientes
101 221
Set MIRATRAY-IMPLANT
mandibula sin dientes
101 222
101 223
101 224
101 225
101 226
101 227
101 228
101 229
101 230
101 231
101 232
101 233
101 234
101 235
101 236
101 237
Repuesto con 4 cubertas
Repuesto con 4 cubertas
Repuesto con 4 cubertas
Repuesto con 4 cubertas
Repuesto con 4 cubertas
Repuesto con 4 cubertas
Repuesto con 4 cubertas
Repuesto con 4 cubertas
Repuesto con 4 cubertas
Repuesto con 4 cubertas
Repuesto con 4 cubertas
Repuesto con 4 cubertas
Repuesto con 4 cubertas
Repuesto con 4 cubertas
Repuesto con 4 cubertas
Repuesto con 4 cubertas
mandibula con dientes
mandibula con dientes
mandibula con dientes
mandibula con dientes
mandibula con dientes
mandibula con dientes
mandibula con dientes
mandibula con dientes
mandibula sin dientes
mandibula sin dientes
mandibula sin dientes
mandibula sin dientes
mandibula sin dientes
mandibula sin dientes
mandibula sin dientes
mandibula sin dientes
11
Foto 6:
Durante la toma del material de
impresión se bloquen paralelmente
los pilares del implante.
Contenido
1 Cada 1x tamaño 42, 43, 44 y 45 SUP.
1 Cada 1x tamaño 52, 53, 54 y 55 INF.
1 compas, 1 patrón de medición, 1 mode
1 Cada 1x tamaño 22, 23, 24 y 25 INF.
1 Cada 1x tamaño 32, 33, 34 y 35 SUP.
1 compas, 1 patrón de medición, 1 mode
4 x cubetas SUP. tamaño 42
4 x cubetas SUP. tamaño 43
4 x cubetas SUP. tamaño 44
4 x cubetas SUP. tamaño 45
4 x cubetas INF. tamaño 52
4 x cubetas INF. tamaño 53
4 x cubetas INF. tamaño 54
4 x cubetas INF. tamaño 55
4 x cubetas INF. tamaño 22
4 x cubetas INF. tamaño 23
4 x cubetas INF. tamaño 24
4 x cubetas INF. tamaño 25
4 x cubetas SUP. tamaño 32
4 x cubetas SUP. tamaño 33
4 x cubetas SUP. tamaño 34
4 x cubetas SUP. tamaño 35
I
MIRATRAY-IMPLANT
Portaimpronte trasparenti per implantologi
Istruzioni per l’uso
L’idea di questo nuovo portaimpronte trasparente per implantologia è basato sul fatto che la trasparenza
permette di marcare la posizione dei nuovi impianti con sicurezza. MIRATRAY-IMPLANT può essere
fresato dopo aver segnato la posizione e quindi si ha un sicuro, corretto e facile posizionamento del
portaimpronte. MIRATRAY-IMPLANT è stato sviluppato specialmente per le impronte dell’area sulla quale
andremo a posizionare gli impianti; ha un eccellente stabilità, una costruzione particolare e è trasparente.
MIRATRAY-IMPLANT viene fornito come kit di introduzione per arcate con denti o senza denti (2
portaimpronte superiori e 2 portaimpronte inferiori). Scatole con 4 portaimpronte di ricambio co singola
misura possono essere ordinate separatamente.
Il materiale
MIRATRAY-IMPLANT è fatto in Plexiglass®, un materiale approvato dalla FDA americana; può essere
portato a una temperatura max di 98°C e quindi non è autoclavabile! Per prevenire possibili infezioni il
MIRATRAY-IMPLANT deve essere monouso!
Come prendere le impronte con arcate con denti
Per trovare il portaimpronte giusto bisogna prendere le misure intraorale. Le piastre del compasso
vengono messe in contatto con M2 e P2 (Fig. 1). Quando si seleziona il portaimpronte superiore questo
occorre al lato vestibolare, quando si seleziona il portaimpronte inferiore occorre al lato linguale. Il calibro
è quindi piazzato sulla sagoma di misurazione. Quando le piastre di misurazione del compasso ricoprono
totalmente le cifre nere, si può leggere il numero del portaimpronte da scegliere. Il numero del portaimpronte
dovrà quindi essere annotato sulla scheda paziente. Inserite quindi il vassoio in bocca, con controlo il
posto a disposizione tra il portaimpronte e i denti del giudizio eventuali o il tuber retromolare.
Per misurare in mascella con denti
Arcata inferiore:
Bisogna misurare con il compasso la distanza tra i cuscinetti retromolari. Il compasso è quindi piazzato
sulla sagoma di misurazione e il numero del portaimpronte è ben identificato.
Arcata superiore:
Misurare la più grande distanza tra le superficie buccali de la cresta alveolare. Il compasso viene quindi
piazzato sulla sagoma di misurazione e il numero viene identificato.
Preparazione del MIRATRAY-IMPLANT prima dell´ impronta
Dopo aver selezionato il portaimpronte, bisogna indicare con un pennarello il posizionamento dei pilastri
d´impianto sulla superficie trasparente, a questo punto si può forare il portaimpronte esattamente nella
posizione dell’impianto desiderata.
Tecnica dell’impronta
Per l’impronta finale è consigliato l’utilizzo di un silicone o di un polietere ad alta durezza. Utilizzare
sempre un adesivo! Durante la presa del materiale per l’impronte è raccomandato fissare i pilastri
implantari al portaimpronte in posizione parallela.
Disinfezione dell’impronta
L’impronta deve essere disinfettata (rispettando le istruzioni del produttore del materiale da impronta)
per evitare ogni rischio di infezione!
12
MIRATRAY-IMPLANT (mascella con denti)
Fig. 1
Fig. 2:
Prova in bocca del portaimpronte
MIRATRAY-IMPLANT trasparente.
Il posizionamanto dei impianti viene
segnato e quindi i bucchi vengono
forati.
Fig. 3:
Bucco forato nel portaimpronte
MIRATRAY-IMPLANT trasparente.
MIRATRAY-IMPLANT (mascella senza denti)
Fig. 4:
Prova e segnatura del passagio del
pilastro nel MIRATRAY-IMPLANT
trasparente.
Fig. 5:
Foratura dei 2 bucchi nel
MIRATRAY-IMPLANT trasparente e
prova.
Cod.
101 220
Prodotto
Kit MIRATRAY-IMPLANT
Qualità di mascella
mascella con denti
101 221
Kit MIRATRAY-IMPLANT
mascella senza denti
101 222
101 223
101 224
101 225
101 226
101 227
101 228
101 229
101 230
101 231
101 232
101 233
101 234
101 235
101 236
101 237
Set con 4 cucchiai
Set con 4 cucchiai
Set con 4 cucchiai
Set con 4 cucchiai
Set con 4 cucchiai
Set con 4 cucchiai
Set con 4 cucchiai
Set con 4 cucchiai
Set con 4 cucchiai
Set con 4 cucchiai
Set con 4 cucchiai
Set con 4 cucchiai
Set con 4 cucchiai
Set con 4 cucchiai
Set con 4 cucchiai
Set con 4 cucchiai
mascella con denti
mascella con denti
mascella con denti
mascella con denti
mascella con denti
mascella con denti
mascella con denti
mascella con denti
mascella senza denti
mascella senza denti
mascella senza denti
mascella senza denti
mascella senza denti
mascella senza denti
mascella senza denti
mascella senza denti
13
Fig. 6:
Durante la presa del materiale, i pilastri
vengono bloccati in posizione parallela.
Contenuto
1x grandezza 42, 43, 44 e 45 Masc.SUP.
1x grandezza 52, 53, 54 e 55 Masc.INF.
1 compasso, 1 sagoma, 1 istruzioni
1x grandezza 22, 23, 24 e 25 Masc. INF.
1x garndezza 32, 33, 34 e 35 Masc. SUP.
1 compasso, 1 sagmo, 1 istruzioni
4 x portaimpronte No 42 masc sup.
4 x portaimpronte No 43 masc sup.
4 x portaimpronte No 44 masc sup.
4 x portaimpronte No 45 masc sup.
4 x portaimpronte No 52 masc inf.
4 x portaimpronte No 53 masc inf.
4 x portaimpronte No 54 masc inf.
4 x portaimpronte No 55 masc inf.
4 x portaimpronte No 22 masc inf.
4 x portaimpronte No 23 masc inf.
4 x portaimpronte No 24 masc inf.
4 x portaimpronte No 25 masc inf.
4 x portaimpronte No 32 masc sup.
4 x portaimpronte No 33 masc sup.
4 x portaimpronte No 34 masc sup.
4 x portaimpronte No 35 masc sup.
NL
MIRATRAY-IMPLANT
Transparante disposable afdruklepels voor implantologen
Gebruiksaanwijzing
Het idee voor deze vernieuwde transparante afdruklepels voor implantologen is gebaseerd op het feit
dat deze transparante afdruklepel het mogelijk maakt de positie van constructies nauwkeurig te markeren.
MIRATRAY-IMPLANT kan op de gemarkeerde plaats doorboord worden wat een nauwkeurige en correcte
plaatsing van de afdruklepel mogelijk maakt. MIRATRAY-IMPLANT is speciaal voor afdrukken in de
implantologie ontwikkeld en kenmerkt zich door een hoge stabiliteit, bijzondere constructie en transparantie.
MIRATRAY-IMPLANT wordt als introductieset voor betande en onbetande kaken met twee afdruklepels
voor de boven-en de onderkaak geleverd. Navulverpakkingen in verschillende maten kunnen apart
besteld worden.
Materiaal
MIRATRAY-IMPLANT is vervaardigd uit vervormbaar, FDA (Food and Drug Administration [U.S.A.])
goedgekeurd Plexiglas®. MIRATRAY-IMPLANT is hittebestendig tot een temperatuur van 98°C en
daardoor niet autoclaveerbaar! Om infectie-overdracht te voorkomen dient de lepel na gebruik gereinigd
te worden.
Keuze van de afdruklepel bij betande kaken
Door intra-orale meting met behulp van een passer kan een passende lepel gevonden worden. De
meetvlakken van de passer worden in contact gebracht met de tweede molaren of tweede premolaren
(zie afbeelding 1). Bij de keuze van bovenkaaklepels gebeurt dit vestibulair en bij onderkaaklepels
linguaal. De passer wordt dan op het meetsjabloon geplaatst. Waar de meetvlakken van de passer de
zwarte afbeelding op het sjabloon volledig omvatten kan de juiste lepelmaat worden afgelezen. Deze
maat kan direct in de patiëntenkaart worden genoteerd. Breng de lepel in de mond en controleer de
speling tussen de afdruklepel en eventueel aanwezige verstandskiezen of tubercula retromolare.
Keuze van de afdruklepels bij onbetande kaken
Onderste kaakboog (U.K.):
Meet intra-oraal met behulp van de passer de afstand tussen het retromolare epitheel. Plaats dan de
passer op de meetsjabloon om de lepelmaat af te lezen.
Bovenste kaakboog (O.K.):
Meet de breedtste afstand tussen de buccale vlakken van de alveolaire processus met de passer.
Voorbereiding van de afdruklepel op de afdruk
Na de keuze voor een passende MIRATRAY-IMPLANT afdruklepel kan de positie van de implantaatpeiler
op het transparante oppervlak gemarkeerd worden met een geschikte marker. Nu kan exact op de
aangegeven plaats probleemloos een uitsparing voor de afdrukstift in het oppervlak van de afdruklepel
gefreesd worden.
Afdruktechniek
Voor de definitieve afdruk wordt een siliconen of polyether afdrukmassa met hoge eindsterkte aanbevolen.
Gebruik altijd een lepeladhesief! Het wordt aanbevolen om tijdens het verharden van het afdrukmateriaal
de afdrukstiften met de afdruklepel te fixeren.
Desinfectie van de afdruk
Na het uitnemen van de afdruk uit de mond van de patient dient de afdruk ten behoeve van infectiepreventie
onvoorwaardelijk gedesinfecteerd te worden!
14
MIRATRAY-IMPLANT (betande kaak)
Afb. 2:
Passen van de transparante
MIRATRAY-IMPLANT afdruklepel.
De positie van het implantaat wordt
gemarkeerd en op deze plaats wordt
de uitsparing gefreesd.
Afb. 1
Afb. 3:
Uitsparing in transparante MIRATRAYIMPLANT afdruklepel.
MIRATRAY-IMPLANT (onbetande kaak)
Afb. 4:
Passen en markeren van de lokatie
van de afdrukstift op de transparante
MIRATRAY-IMPLANT afdruklepel.
Afb. 5:
Frezen van beide gaten in afdruklepel
en passen van de transparante
MIRATRAY-IMPLANT afdruklepel.
Nr.
101 220
Produkt
Set MIRATRAY-IMPLANT
Toestnd van de kaak
betande kaak
101 221
Set MIRATRAY-IMPLANT
onbetande kaak
101 222
101 223
101 224
101 225
101 226
101 227
101 228
101 229
101 230
101 231
101 232
101 233
101 234
101 235
101 236
101 237
Navulset met 4 afdruklepels
Navulset met 4 afdruklepels
Navulset met 4 afdruklepels
Navulset met 4 afdruklepels
Navulset met 4 afdruklepels
Navulset met 4 afdruklepels
Navulset met 4 afdruklepels
Navulset met 4 afdruklepels
Navulset met 4 afdruklepels
Navulset met 4 afdruklepels
Navulset met 4 afdruklepels
Navulset met 4 afdruklepels
Navulset met 4 afdruklepels
Navulset met 4 afdruklepels
Navulset met 4 afdruklepels
Navulset met 4 afdruklepels
betande kaak
betande kaak
betande kaak
betande kaak
betande kaak
betande kaak
betande kaak
betande kaak
onbetande kaak
onbetande kaak
onbetande kaak
onbetande kaak
onbetande kaak
onbetande kaak
onbetande kaak
onbetande kaak
15
Afb. 6:
Tijdens het verharden van de afdruk
worden tegelijkertijd de afdrukstiften
gefixeerd.
Inhoud
per maat 1 stuk 42, 43, 44 en 45 (O.K.)
per maat 1 stuk 52, 53, 54 en 55 (U.K.)
1 passer, 1 meetsjabloon, 1 aanwijzing
per maat 1 stuk 22, 23, 24 en 25 (U.K.)
per maat 1 stuk 32, 33, 34 en 35 (O.K.)
1 passer, 1 meetsjabloon, 1 aanwijzing
4 x afdruklepels maat No 42 (O.K.)
4 x afdruklepels maat No 43 (O.K.)
4 x afdruklepels maat No 44 (O.K.)
4 x afdruklepels maat No 45 (O.K.)
4 x afdruklepels maat No 52 (U.K.)
4 x afdruklepels maat No 53 (U.K.)
4 x afdruklepels maat No 54 (U.K.)
4 x afdruklepels maat No 55 (U.K.)
4 x afdruklepels maat No 22 (U.K.)
4 x afdruklepels maat No 23 (U.K.)
4 x afdruklepels maat No 24 (U.K.)
4 x afdruklepels maat No 25 (U.K.)
4 x afdruklepels maat No 32 (O.K.)
4 x afdruklepels maat No 33 (O.K.)
4 x afdruklepels maat No 34 (O.K.)
4 x afdruklepels maat No 35 (O.K.)
150904165-2P
Hager & Werken GmbH & Co. KG • Postfach / P.O.B. 10 06 54 • D-47006 Duisburg (Germany)
Tel.: +49 (0) 203-99 269-0 • Fax: +49 (0) 203-29 92 83 • E-mail: [email protected] • www.hagerwerken.de