1
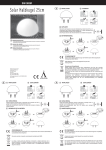
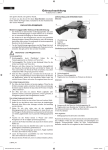
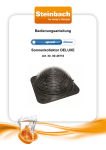
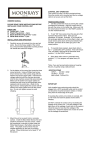
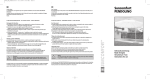
COPENHAGEN
D/GB/F/E
2 Jahre
Garantie
2 years
guarantee
2 ans de
garantie
2 años de
garantía
COPENHAGEN
D
. . . . . . . . . . . . . . . . . . . . . . . . . . . . . . . . . . . . . . . . . . . .1 - 3
GB
............................................4-6
F
. . . . . . . . . . . . . . . . . . . . . . . . . . . . . . . . . . . . . . . . . . . .7 - 9
E
. . . . . . . . . . . . . . . . . . . . . . . . . . . . . . . . . . . . . . . . . .10 - 12
COPENHAGEN
D
Bedienungsanleitung
Herzlichen Glückwunsch zum Erwerb Ihrer COPENHAGEN von WAGNER. Lesen Sie
vor Inbetriebnahme des Gerätes die Bedienungsanleitung genau durch und beachten
Sie die Sicherheitshinweise. Bewahren Sie die Bedienungsanleitung sorgfältig auf.
HINWEIS:
Ihre COPENHAGEN ist witterungsbeständig und sollte bei direkter
Sonneneinstrahlung betrieben werden. Stellen Sie Ihre COPENHAGEN so
auf, dass das Solarmodul möglichst starker Sonneneinstrahlung
ausgesetzt ist, da so dessen Leistungsfähigkeit erhöht wird.
Die COPENHAGEN ist mit einem NiCd-Akku ausgestattet. Dieser Akku
wird in ungeladenem Zustand ausgeliefert. Nach der Inbetriebnahme
benötigt der Akku ca. 3 sonnige Tage um seine volle Leistungsfähigkeit zu
erreichen. Bei diesem ersten Ladevorgang muß der Hauptschalter auf
„OFF“ stehen.
Technische Daten
Solarfeld
Grösse
Leistung bei voller Sonneneinstrahlung
Akku (3)
Spannung
Ladekapazität
Leuchtmittel
Leuchtdauer
Monokristallin
ca. 10.200 mm²
ca. 0,45 W
NiCd
3 x 1,2 V DC
1000 mAh
3 LED
max. 16 h
MONTAGE (Bild 1 - 3)
WARNUNG!
Drücken Sie nicht auf das Solarfeld, da hierdurch das Modul
beschädigt werden könnte!
Beachten Sie beim Bohren von Löchern, daß Sie nicht auf
verborgene Leitungen treffen. Der Kontakt mit verborgenen
Leitungen kann zu schweren Verletzungen oder gar zum Tod
führen!
Entnehmen Sie Ihre COPENHAGEN und Zubehörteile vorsichtig aus dem Karton.
Bohren Sie zwei Löcher entsprechend der Maßskizze und versehen Sie diese mit
den beiden Dübeln 햲.
● Drehen Sie jeweils eine Schraube in einen Dübel soweit ein, daß die
COPENHAGEN straff eingehängt werden kann 햳.
● Hängen Sie die COPENHAGEN mit den Befestigungsösen in die Schrauben ein und
überprüfen Sie den festen Sitz 햳.
● Schalter auf “ON” stellen 햴.
●
●
Ihre COPENHAGEN ist jetzt betriebsbereit.
1
COPENHAGEN
D
AUFSTELLUNG
Wählen Sie Ihren Montageort so, daß das Solarfeld den freien Himmel sieht und nach
Süden, Osten oder Westen ausgerichtet ist. Wählen Sie für die Aufstellung einen Ort
mit möglichst viel Sonneneinstrahlung. Stellen Sie die COPENHAGEN nicht im
Schatten von Bäumen, Gebüsch und Gebäuden auf, da sich ansonsten der
Aufladungseffekt Ihrer COPENHAGEN verringert.
LEISTUNG
Die Leistung Ihrer COPENHAGEN ist von der Jahreszeit abhängig. Die
COPENHAGEN ist im Sommer nachts länger betriebsbereit als im Winter. Wie lange
die COPENHAGEN nachts leuchtet hängt davon ab, wie lange das Solarmodul
tagsüber direkter Sonneneinstrahlung ausgesetzt war. Bei bedeckten Himmel ist zum
Beispiel weniger Sonnenenergie verfügbar um den Akku aufzuladen. In der
darauffolgenden Nacht ist die Leuchtdauer der COPENHAGEN daher geringer. An
Wintertagen ist die Leuchtdauer stark eingeschränkt, bedingt durch geringere Sonneneinstrahlung.
HINWEIS:
Reinigen Sie regelmässig das Solarmodul der Solarleuchte mit einem
feuchten Tuch, um die optimale Leistung des Sonnenkollektors zu
gewährleisten. Verwenden Sie zur Reinigung keinerlei Lösungsmittel.
Üben Sie beim Reinigen keinen Druck auf das Solarmodul aus.
FEHLERBEHEBUNG
Sollte die COPENHAGEN trotz Beachtung aller Hinweise einmal nicht funktionieren, so
verfahren Sie wie in den nachfolgenden Schritten beschrieben:
1) Betätigen Sie den Wahlschalter mehrmals zwischen den Positionen “OFF” und “ON”.
2) Es kann der Fall auftreten, dass Ihre COPENHAGEN zwar betriebsbereit ist, jedoch
von einer anderen Lichtquelle überdeckt wird. In diesem Fall verändern Sie den
Standort der COPENHAGEN.
3) Stellen Sie sicher, daß die COPENHAGEN während des Tages nicht im Schatten
steht.
4) Überprüfen Sie den Akku auf Korrosion.
AKKU HERAUSNEHMEN / WECHSELN (Bild 4 - 6)
Lösen Sie die Schrauben 햵.
Nehmen Sie den Akkudeckel ab 햶.
Nehmen Sie den Akku heraus um diesen zu laden bzw. auszutauschen 햷.
Der Zusammenbau erfolgt sinngemäß in umgekehrter Reihenfolge.
●
●
●
ACHTUNG: 1) Beim Herausnehmen/Wechseln des Akkus muss sich der
Wahlschalter in der Stellung “OFF” befinden. 햴
2) Verwenden Sie ausschließlich Original-WAGNER-Akkus.
3) Achten Sie beim Einsetzen des Akkus auf die richtige Polarität (+/-).
2
COPENHAGEN
D
ÜBERWINTERUNG
Wir empfehlen Ihre COPENHAGEN im Winter, bei Temperaturen unter 0° C an einem
frostfreien Ort zu lagern und im Frühjahr wieder aufzustellen. Die Akkus sollten hierfür
möglichst vollständig geladen sein. Schalter auf “OFF” stellen 햴.
UMWELTSCHUTZ
Das Gerät samt Zubehör sollte einer umweltgerechten Wiederverwertung
zugeführt werden. Geben Sie das Gerät bei der Entsorgung nicht in den Hausmüll.
Unterstützen Sie den Umweltschutz und bringen Sie deshalb Ihr Gerät inklusive
Akku zu einer örtlichen Entsorgungsstelle oder erkundigen Sie sich im
Fachhandel.
ZUBEHÖR
Akku NiCd 1,2 V DC / 1100 mAh (1)
Art.-No. 1020 336
2 Jahre Garantie
Die Garantie beträgt 2 Jahre, gerechnet vom Tag des Verkaufes (Kassenbon). Sie umfasst
und beschränkt sich auf die kostenlose Behebung der Mängel, die nachweisbar auf die
Verwendung nicht einwandfreien Materials bei der Herstellung oder Montagefehler
zurückzuführen sind oder kostenlosen Ersatz der defekten Teile. Verwendung oder
Inbetriebnahme, sowie selbständig vorgenommene Montagen oder Reparaturen, die nicht in
unserer Bedienungsanleitung angegeben sind, schließen eine Gewährleistung aus. Dem
Verschleiß unterworfene Teile sind ebenfalls von der Gewährleistung ausgeschlossen. Die
Gewährleistung schließt den gewerblichen Einsatz aus. Die Gewährleistung der Garantie
behalten wir uns ausdrücklich vor. Die Garantie erlischt, wenn das Gerät von anderen
Personen als dem WAGNER Service - Personal geöffnet wurde. Transportschäden,
Wartungsarbeiten sowie Schäden und Störungen durch mangelhafte Wartungsarbeiten fallen
nicht unter die Garantieleistungen. Der Nachweis über den Erwerb des Gerätes muss bei
Inanspruchnahme der Gewährleistung durch Vorlage des Originalbeleges geführt werden.
Soweit gesetzlich möglich, schließen wir jede Haftung für jegliche Personen,- Sach- oder
Folgeschäden aus, insbesondere, wenn das Gerät anders als für den in der
Bedienungsanleitung angegebenen Verwendungszweck eingesetzt wurde, nicht nach unserer
Bedienungsanleitung in Betrieb genommen oder instandgesetzt oder Reparaturen selbständig
von einem Nichtfachmann ausgeführt wurden. Reparaturen oder Instandsetzungsarbeiten, die
weitergehen als in dieser Bedienungsanleitung angegeben, behalten wir uns im Werk vor.
Im Garantie- oder Reparaturfall wenden Sie sich bitte an Ihre Verkaufsstelle.
Sehr geehrter WAGNER-Kunde,
unser Service-Zentrum bietet Ihnen die beste Unterstützung durch unsere Hotline, die
wir für Sie unter der Telefon-Nummer 0180/1000 227 (zum Ortstarif) geschaltet haben.
Unsere Experten garantieren Ihnen schnelle Hilfe und kompetente Auskunft. Sie
geben Tips und Tricks zum Benutzen unserer Produkte.
3
COPENHAGEN
GB
Operating Instructions
Congratulations on the purchase of your WAGNER suspended lamp COPENHAGEN.
Read the operating instructions carefully before putting the device into operation and
observe the safety instructions. Keep the operating instructions in a safe place.
Note!
Your COPENHAGEN is weather-resisting and should be operated with
direct exposure to solar radiation. Erect your COPENHAGEN so that it
receives maximum exposure to the solar radiation to increase its capacity.
COPENHAGEN is equipped with a NiCd-rechargeable battery. This
rechargeable battery is not loaded upon delivery. After the device has been
put into operation, the rechargeable battery requires ca. three days of sun
to attain its full capacity. For this first charging, the main switch must be set
to „OFF“.
Technical data
Solar field
Size
Capacity at full exposure to solar radiation
Rechargeable battery (3)
Voltage
Loading capacity
Luminous element
Duration of emission of light
Mono-crystalline
ca. 10.200 mm²
ca. 0,45 W
NiCd
3 x 1,2 V DC
1000 mAh
3 LED
max. 16 h
ASSEMBLY (Fig. 1 - 3)
WARNING! Do not exert pressure on the solar panel, as this may cause damage
to the solar module!
When drilling holes, make sure you do not hit any concealed wires.
Contact with such wires can lead to severer or even fatal injuries.
● Carefully remove your COPENHAGEN and the fittings out of the box.
● Drill two holes as shown in the dimensioned sketch and insert the two plugs 햲.
● Twist a screw into each plug until the COPENHAGEN can be firmly attached 햳.
● Mount the COPENHAGEN on the screws by the fixing eyelets and check to make
●
sure it is secure 햳.
Turn the switch in position “ON” 햴.
Your COPENHAGEN is now ready for operation.
4
COPENHAGEN
GB
INSTALLATION
Choose an assembly point where the solar panel is fully exposed to the sky and facing
south, east or west. Choose a site for installation with as much irradiation as possible.
Do not place the COPENHAGEN in the shade of trees, bushes or buildings, as this will
greatly reduce the degree of efficiency of the COPENHAGEN.
PERFORMANCE
The performance of your COPENHAGEN depends on the time of year. COPENHAGEN
is ready for operation longer in summer than in winter.
How long COPENHAGEN shines at night depends on how long COPENHAGEN was
exposed to direct solar radiation during the day. For example, when the sky is overcast,
less solar energy is available to load the rechargeable battery. During the following
night, the duration of emission of light of COPENHAGEN is therefore shorter.
The duration of emission of light is strongly limited on winter days due to lower exposure
to solar radiation.
NOTE:
Clean the solar module regularly with a damp towel to guarantee
optimum performance of the solar collectors. Do not use any
solvents for cleaning. Do not put any pressure on the solar module
during cleaning.
FAILURE CORRECTION
If COPENHAGEN should fail to function despite observance of all instructions, please
proceed as described in the following steps :
1) Turn the selector switch several times to the positions „OFF“ and „ON“.
2) It may occur that your COPENHAGEN is ready for operation but it is covered by
another source of light. In this case, relocate the solar station.
3) Ensure that your COPENHAGEN does not stand in the shade during the day.
4) Check the rechargeable battery for corrosion.
REMOVING / CHANGING THE RECHARGEABLE BATTERY (Fig. 4 - 6)
●
●
●
Loosen the screws 햵.
Remove the cover of the rechargeable battery 햶.
Remove the rechargeable battery to re-load it and/or exchange it 햷.
Re-assembly is accordingly conducted in the reverse order.
ATTENTION:
1) When removing/replacing the rechargeable battery, the
selector switch must be in position „OFF“! 햴
2) Use Original WAGNER rechargeable batteries only.
3) When inserting batteries, make sure the polarity is correct (+/-)
5
COPENHAGEN
GB
WINTERRISE
We recommend storing your COPENHAGEN in winter at temperatures below 0° C in a
frost-free location and re-erecting it in spring. The accumulators should be loaded
completely to this purpose as far as possible. Turn the switch in position “OFF” 햴.
ENVIRONMENTAL PROTECTION
The appliance and accessories should be recycled in an environmentally friendly
way. Do not dispose of the appliance with household waste. Support
environmental protection by taking the appliance (including rechargeable battery)
to a local collection point or obtain information from a specialist retailer.
SPARE PARTS
Akku NiCd 1,2 V DC / 1100 mAh (1)
Art.-No. 1020 336
2 years guarantee
The guarantee is valid for two years, calculated from the day of purchase (proof of purchase).
It includes and is limited to free repair of faults which can be proved to be due to the use of
inferior materials in the manufacture or assembly faults or replacement free of charge of the
defective parts. False use or operation as well as assembly or repair not mentioned in our
operating instructions hich are carried out independently render the guarantee null and void.
Parts subject to wear and tear are also excluded from the guarantee. Our decision on all
matters relating to the guarantee shall be final. The guarantee becomes null and void if the
machine has been opened. Transport damage, maintenance work as well as damage and
failures due to poor maintenance work are not covered by the guarantee. Proof of purchase of
the equipment in the form of the original receipt must be provided for any claims under
guarantee. As far as is legally possible, we do not accept liability for any personal, material or
resultant damage, especially if the machine has been used other than for those stipulated in
the operating instructions, was not operated or maintained according to our operating
instructions or if repairs were carried out independently or by a non-expert. We reserve the
right to carry out repair or maintenance work which goes further than that mentioned in these
operating instructions in the factory.
In case of guarantee or repair, please refer to your point of sale.
6
COPENHAGEN
F
Mode d'emploi
Nous vous félicitons pour l'achat de votre lampe solaire COPENHAGEN de WAGNER.
Avant la mise en service de l'appareil, veuillez lire attentivement ce mode d'emploi, en
particulier les consignes de sécurité. Garder le mode d'emploi soigneusement.
REMARQUE: Votre COPENHAGEN est résistant aux intempéries et devrait être
exploité en plein soleil. Pour augmenter la performance de votre
COPENHAGEN, l'installer en veillant à ce que le module solaire soit
placé le plus possible en plein soleil.
Le COPENHAGEN est pourvu d'un accumulateur NiCd. Ce dernier est
livré à l'état non chargé. Après la mise en service, l'accumulateur a
besoin de 3 jours pleinement ensoleillés pour être complètement
chargé. Pour ce faire mettre l'interrupteur principal sur „OFF” .
Caractéristiques techniques COPENHAGEN
Champ solaire
monocristallin
Dimensions
environ 10.200 mm²
Puissance lors de l’ensoleillement plein
environ 0,45 W
Accumulateur (3)
NiCd
Tension
3 x 1,2 V DC
Capacité de chargement
1000 mAh
Diode électroluminescente
3 DEL
Durée d’illumination
max. 16 h
MONTAGE (Illustr. 1 - 3)
ATTENTION!
Ne pas exercer de pression sur le champ solaire, vu que ceci
pourrait endommager le module solaire!
Lorsque vous forez les trous, veillez à ne pas tomber sur des
conduites électriques. L’entrée en contact avec des conduites
cachées peut entraîner de graves blessures et même la mort.
Déballer soigneusement votre COPENHAGEN et ses accessoires.
Forez deux trous suivant la fiche de cote et enfoncez-y les chevilles 햲.
Vissez une vis dans chaque cheville de manière à ce que le COPENHAGEN puisse
être accroché solidement 햳.
● Accrochez le COPENHAGEN avec les oeillets de fixation dans les vis et contrôlez si
ce dernier est solidement 햳.
● Actionner le sélecteur sur “ON” 햴.
●
●
●
Maintenant votre COPENHAGEN est prêt à fonctionner.
7
COPENHAGEN
F
EMPLACEMENT
Choisissez l’emplacement de manière à ce que le champ solaire soit exposé librement
au ciel et qu’il soit orienté au sud, à l’est ou à l’ouest. Comme emplacement, choisir un
endroit bien ensoleillé et enfoncer le COPENHAGEN dans le sol. Ne pas placer le
COPENHAGEN à l'ombre des arbres, arbustes ou bâtiments, car ceci pourrait diminuer
la capacité de chargement de votre COPENHAGEN.
PUISSANCE
La puissance de votre COPENHAGEN varie en fonction des saisons. En été, le
COPENHAGEN marche plus longtemps la nuit qu'en hiver. La durée de marche du
COPENHAGEN pendant la nuit dépend de la durée pendant laquelle le module solaire a
été soumis à l'intensité des rayons solaires pendant la journée. Lorsque le ciel est
couvert il y a moins d'énergie solaire disponible pour charger l'accu. La durée
d'illumination du COPENHAGEN sera par conséquent moindre dans la nuit qui suit.
En raison de la faible intensité solaire en hiver, la durée d'illumination est fortement
limitée.
REMARQUE: Afin de garantir une puissance optimale des capteurs solaires,
nettoyer régulièrement le module solaire avec un chiffon humide. Ne
pas utiliser de détergent. Ne pas exercer de pression sur le module
solaire pendant le nettoyage.
SUPPRESSION DES PANNES
Si, malgré le respect de toutes les indications mentionnées plus haut, le
COPENHAGEN ne fonctionne pas correctement, veuillez procéder comme suit:
1) Actionner plusieurs fois le sélecteur entre les positions „OFF“ et „ON“.
2) Il se peut que votre COPENHAGEN est prêt à fonctionner mais qu'il est cou vert par
une autre source lumineuse. Dans ce cas-là changer l'emplacement de la station solaire.
3) Veiller à ce que le COPENHAGEN ne soit pas à l'ombre pendant la journée.
4) Contrôler si l'accumulateur n'est pas corrodé.
ENLEVER / REMPLACER L’ACCU (Illustr. 4 - 6)
●
●
●
Desserrez les écrous 햵.
Enlever le couvercle 햶.
Retirer l'accumulateur pour le recharger ou le remplacer 햷.
Le montage a lieu dans l'ordre inverse du démontage.
ATTENTION:
8
1) Avant d'enlever/remplacer les accus, veillez à ce que le
sélecteur se trouve sur „OFF“. 햴
2) Utiliser uniquement des accus d'origine WAGNER.
3) En remplaçant l’accu, veiller respecter la bonne polarité (+/-).
COPENHAGEN
F
ENTREPOSAGE POUR L’HIVER
Pendant l'hiver, lorsque les températures tombent en dessous de 0° C nous
recommandons d'entreposer votre COPENHAGEN dans un endroit à l'abri du gel et de
ne le ressortir qu'au printemps. Les accus devraient à cet effet être chargés le plus
complètement possible. Actionner le sélecteur sur “OFF” 햴.
PROTECTION DE L’ENVIRONNEMENT
L'appareil ainsi que l'ensemble des accessoires sont à amener à un point de
recyclage dans votre région. Ne pas jeter l'appareil dans les ordures ménagères.
Protégez l'environnement et amener dès lors l'appareil (accus compris) à un point
de recyclage local ou renseignez-vous auprès de votre commerçant spécialisé.
ACCESSOIRES SPECIAUX
Accumulateur 1,2 V DC / 1100 mAh (1)
N° de réf. 1020 336
2 ans de garantie
Nous accordons une garantie de deux ans sur ce produit, à partir de la date d’achat (bon de
caisse).La garantie comprend et se limite à la suppression gratuite des vices de fabrication ou
de matériel, d’erreurs de montage à la fabrication ou au remplacement gratuit des pièces
défectueuses. Les dommages occasionnés par une utilisation inadéquate, une mise en
service non conforme, des travaux ou réparations non mentionnés dans nos instructions de
service ne bénéficient pas de la garantie. Ceci est également d’application pour les pièces
d’usure. Nous nous réservons tout droit de prétention à la garantie. La garantie prend fin
lorsque l’appareil a été ouvert.
Les dégâts dus au transport, travaux d’entretien ainsi que les dégâts et pannes surgissant à la
suite de travaux d’entretien insuffisants ne bénéficient pas de la garantie. En cas de
revendication du droit de garantie, il faudra effectuer la preuve de l'achat de l'appareil, en
présentant la pièce justificative d'origine. Sauf dispositions légales contraires, nous déclinons
toute responsabilité pour les dommages corporels, matériels et les dégâts y consécutifs,
surtout si l’appareil a été utilisé à d’autres fins que celles mentionnées dans les instructions de
service, si l’appareil n’a pas été mis en service ou réparé conformément à nos instructions de
service ou si des réparations ont été effectuées de son propre chef par une personne non
spécialisée.
Nous nous réservons le droit d’effectuer tous les travaux de réparation dépassant le cadre de
celles mentionnées dans les instructions de service.
Merci de vous-adressez dans la garantie ou un cas de réparation à votre point de vente.
9
COPENHAGEN
E
Modo de empleo
Le felicitamos por haber adquirido el farol colgante solar COPENHAGEN.
Antes de poner en funcionamiento el aparato, lea a fondo las instrucciones indicadas
en el modo de empleo y preste atención a las indicaciones sobre la seguridad. Guarde
estas instrucciones cuidadosamente.
OBSERVACION:
El farol COPENHAGEN es resistente a la intemperie y
recomendamos utilizarlo a pleno sol. Coloque su farol
COPENHAGEN de modo que el módulo solar esté expuesto a una
fuerte irradiación solar para aumentar su rendimiento.
El farol COPENHAGEN está equipado con una batería de NiCd.
Esta batería se entrega descargada. Después de la puesta en
funcionamiento, la batería requiere aprox. 3 días de sol para
alcanzar su rendimiento completo. El interruptor principal tiene que
estar en “OFF” durante esta primera carga.
Datos técnicos
Campo solar
Dimensión
Rendimiento a plena irradiación solar
Batería (3)
Tensión
Capacidad de carga
Medio luminoso
Duración de la iluminación
Monocristalino
aprox. 10.200 mm²
aprox. 0,45 W
NiCd
3 x 1,2 V DC
1000 mAh
3 Diodos electroluminosos
max. 16 h
MONTAJE (Ilustración 1 - 3)
¡AVISO!
No haga presión sobre el campo solar porque si no podría dañar
el módulo solar!
¡Preste atanción al cavar y taladrar agujeros de no tropezar con
conductos eléctricos instalados bajo tierra. El contacto con
conductos cubiertos puede llevar consigo graves heridas o
incluso la muerte.
Saque con cuidado el farol COPENHAGEN con sus accesorios del cartón.
Taladre dos agujeros según el croquis de dimensiones y ponga dos espigas en
éstos 햲.
● Apriete un tornillo en cada espiga de manera que el COPENHAGEN se pueda
colgar de un modo rígido햳.
● Cuelgue el COPENHAGEN en los tornillos usando para est efin los ojos de sujeción
y controle si está bien colgado 햳.
● Poner el selector en “ON” 햴.
El farol COPENHAGEN está ahora preparado para su funcionamiento.
●
●
10
COPENHAGEN
E
INSTALACION
Elija el lugar de montaje de manera que el campo solar esté al descubierto y orientado
hacia el sur, este u oeste. No ponga el farol COPENHAGEN a la sombra de árboles,
matorrales o edificios porque sino se reduciría el efecto de carga del mismo.
RENDIMIENTO
El rendimiento del farol COPENHAGEN depende de la estación del año. El farol
COPENHAGEN funciona por las noches de verano más tiempo que en las de invierno.
La duración del funcionamiento del farol COPENHAGEN por la noche depende del
tiempo de la exposición del módulo solar a una irradiación directa durante el día. Por
ejemplo, si el cielo está cubierto, hay menos energía solar disponible para cargar la
batería - por consecuencia -, la duración de la iluminación del farol COPENHAGEN es
menor durante la noche siguiente. La duración de la iluminación está limitada
fuertemente durante los días de invierno a causa de la débil intensidad del sol.
OBSERVACION:
Limpie periódicamente el módulo solar de la estación con un
trapo húmedo a fin de garantizar un rendimiento óptimo de
los colectores solares. No utilice nunca disolventes para
limpiarlo. No ejerza presión sobre el módulo solar durante la
limpieza.
ELIMINACION DE ERRORES
Si el farol COPENHAGEN no funciona alguna vez a pesar de respetar todas las
indicaciones, proceda en este caso como descrito en los siguientes pasos:
1) Accione el interruptor selector varias veces entre las posiciones “ON” y “OFF”.
2) Es posible que el farol COPENHAGEN esté preparado para funcionar pero esté
tapado por otra fuente de luz. En este caso, cambie el emplazamiento de la estación
solar.
3) Asegúrese de que el no esté a la sombra durante el día.
4) Compruebe si la batería presenta corrosión.
SACAR / CAMBIAR LA BATERIA (Ilustración 4 - 6)
● Afloje las tornillos 햵.
● Retire la tapa de la batería 햶.
● Saque la batería para cargarla o
cambiarla 햷.
El montaje se efectúa análogamente en la secuencia inversa.
¡ATENCION!
1) ¡El interruptor selector tiene que estar en la posición “OFF” al
sacar/cambiar la batería! 햴
2) Utilice solamente baterías originales WAGNER.
3) Preste atención al emplear la batería a la polaridad
correcta (+/-).
11
COPENHAGEN
E
Conservación durante el invierno
Recomendamos almacenar el farol COPENHAGEN en invierno, en el caso de
temperaturas bajo 0, en un lugar protegido contra las heladas y volver a instalarlo en
primavera. A ser posible las baterías deberán estar completamente cargados.
Poner el selector en “OFF” 햴.
Protección del medio ambiente
El aparato con todos sus accesorios se deberá llevar a una planta de reciclaje que
cumpla las normas de protección del medio ambiente. No tire el aparato junto con
la basura doméstica. Ayude a mantener limpio el medio ambiente y lleve así su
aparato (incluidas las pilas) a un centro local de recogida de residuos o infórmese
del modo de proceder a este respecto en el comercio especializado.
Accesorios especiales
Batería NiCd 1,2 V DC / 1100 mAh (1)
No. articulo: 1020 336
2 años de garantía
La garantía es de 2 años, calculada a partir del día de la venta (recibo de la caja). Abarca y se
limita a la eliminación gratuita de los defectos ocasionados, con justificación, por la utilización
de materiales no perfectos en la fabricación o por un error en el montaje, o la sustitución
gratuita de las piezas defectuosas.
Esta garantía queda anulada en caso de utilización o puesta en funcionamiento falsas así
como de montaje o reparaciones realizados por cuenta propia que no están indicados en
nuestras instrucciones de empleo. Las piezas sometidas a desgaste están excluidas de esta
garantía. Nos reservamos expresamente el derecho de aplicación de la garantía. La garantía
se anula si el aparato ha sido abierto.
Los daños causados durante el transporte, trabajos de mantenimiento así como daños y fallos
ocasionados por trabajos defectuosos de mantenimiento no caen bajo las aplicaciones de
garantía.
Por favor, presente el resguardo original como justificante de la adquisición del aparato en el
caso de recurrir a la garantía.
Manteniéndonos dentro de lo prescrito por la ley, no nos responsabilizamos por aquellos
daños a personas, a bienes o consecuenciales, especialmente, si el aparato ha sido aplicado
de otra forma que la indicada en las instrucciones de empleo, no ha sido puesto en
uncionamiento ni mantenido según nuestras instrucciones de empleo, o un profano ha
realizado por su cuenta reparaciones. Nos reservamos el derecho de realizar reparaciones o
trabajos de mantenimiento en fábrica que vayan más allá de lo indicado en estas
instrucciones de empleo.
Por favor, diríjase al lugar de venta en el caso de garantía o de reparación.
12
COPENHAGEN
D
CE Konformitätserklärung
Wir erklären in alleiniger Verantwortung, dass dieses Produkt den folgenden einschlägigen Bestimmungen
entspricht: 89/336 EWG; 2002/95/EG; 2002/96/EG
Angewandte harmonisierte Normen: EN 55015: 2001, EN 61547: 2001
GB
CE Declaration of Conformity
We declare under sole responsibility that this product conforms to the following relevant stipulations:
89/336 EWG; 2002/95/EG; 2002/96/EG
Applied harmonised norms: EN 55015: 2001, EN 61547: 2001
F
CE Déclaration de conformité
Nous déclarons sous notre responsabilité que ce produit est en conformité avec les réglementations
suivantes: 89/336 EWG; 2002/95/EG; 2002/96/EG
Conforme aux normes et documents normalisés : EN 55015: 2001, EN 61547: 2001
E
Declaración de conformidad CE
Mediante la presente garantizamos, bajo nuestra exclusiva responsabilidad, que este producto cumple
con las correspondientes disposiciones: 89/336 EWG; 2002/95/EG; 2002/96/EG
Normas armonizadas aplicadas: EN 55015: 2001, EN 61547: 2001
J. Wagner GmbH
Otto-Lilienthal-Str. 18
A. Aepli
M. Šafár
D-88677 Markdorf
Division Manager
Development Manager
www.wagner-group.com
Änderungen vorbehalten.
Sous réserve de modifications.
We reserve the right to make modifications.
Salvo modificationes.
Part. No. 1019 864
02/2006
© Copyright by J. Wagner GmbH
Printed in China/Impreso en China