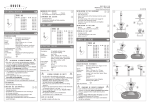
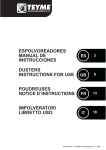
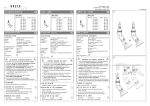
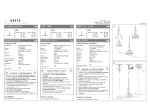
1
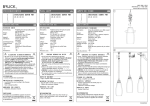
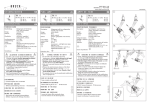
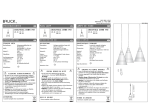
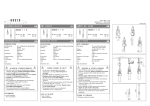
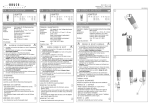
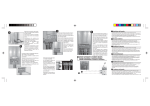
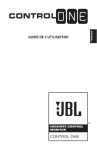
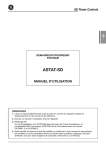
BRUCK GMBH & CO.KG
INDUSTRIESTR. 22 • 44628 HERNE
internet http://www.bruck.de
STECKERLEUCHTEN
D
PLUG LAMP
GB
LAMPE DE FICHE
F
MICROS
MICROS
MICROS
ART.-NO. 220 410 ch ID.-NO. 403 181
220 410 g
403 198
220 410 mc
403 204
ART.-NO. 220 410 ch ID.-NO. 403 181
220 410 g
403 198
220 410 mc
403 204
ART.-NO. 220 410 ch ID.-NO. 403 181
220 410 g
403 198
220 410 mc
403 204
GEBRAUCHSANLEITUNG
D
INSTRUCTIONS FOR USE
GB
MODE D´EMPLOI
T E C H N I S C H E DAT E N
SPECIFICATIONS
CARACTERISTIQUES TECHNIQUES
Beschreibung:
Description:
Description:
NV-Strahler mit Schirm zur blendfreien
Beleuchtung.
Design:
BRUCK-Team
Maße:
H = 130 mm, Schirm Ø = 62 mm
Material:
Aluminium, Messing verchromt /
vergoldet / matt verchromt
Leuchtenspannung: 12 V SELV
Lampenleistung:
max. 50 W
Fassung:
Gu 5,3
Leuchtmittel:
Nur Niederdruck Kaltlichtspiegellampe
QR 51 aluminium- bedampft. Wird
die Leuchte ohne Schirm eingesetzt
sind alle handelsüblichen Niederdruck
Kaltlichtspiegellampen QRCB 51
verwendbar.
ALLGEMEINE SICHERHEITSHINWEISE
1. Bei allen an der Leuchte durchzuführenden Arbeiten
(Wartung, Reinigung) Leuchte spannungsfrei schalten!!
2. Leuchte ist nicht für Feuchträume geeignet.
3. Achtung, Gefahr durch Stromschlag !! Leuchte niemals direkt an die Netzspannung anschließen!
4. Vorsicht! Leuchte und Leuchtmittel werden in Betrieb heiß.
5. Den angegebenen Mindestabstand der Leuchtmittel
zu brennbaren Gegenständen beachten!
( siehe Leuchte
)
6. Keine Gegenstände über die Leuchte hängen:
Kurzschluß und Brandgefahr!
7. Kein Garantieanspruch bei eigenmächtigen
Veränderungen und oder unsachgemäßer Benutzung!
1 Leuchte MICROS komplett mit Schirm ohne Leuchtmittel
ANBRINGEN DER LEUCHTE
- Einstecken
- Einrasten
- Fixieren.
- Zum Drehen der Leuchte Fixierung D lösen.
GENERAL REMARKS ON SAFETY
CONSIGNES DE SECURITE GENERALES
1.For all work to be performed on the lamp
(maintenance, cleaning): Switch off power to the lamp!!
2.Lamp not suitable for installation in wet rooms.
3.Attention, electric shock hazard!! Never connect
the lamp directly to the mains voltage!
4.Take care! Lamp and illuminant become hot during
operation.
5.Observe the stated minimum distance of the illumi
nants to flammable objects! ( see lamp
)
6.Do not hang objects over the lamp: Hazard of short
circuit and fire hazard!
7.No warranty claim in case of unauthorized modifications
and / or improper use!
1.Avant d’effectuer tout travail sur le luminaire (entretien
et nettoyage) mettre le luminaire hors tension
2.N’est pas approprié à être installé dans des pièces humides
3.Attention danger d’électrocution !!Ne jamais raccorder
le luminaire directement sur le réseau
4.Attention ! Les luminaires et les lampes sont brûlantes
lors de leur utilisation.
5.Veiller à respecter l’intervalle minimum indiqué des lampes par
rapport à des objets inflammables! ( voir luminaires
)
6.Ne pas suspendre d’objets au-desus des luminaires,
danger de court-circuit et d’incendie.
7.Nous ne donnons aucune garantie lors de modifications
effectuées sur le matériel ou lors d’une utilisation inadéquate
1
2
ETENDUE DE LIVRAISON
1 lamp MICROS complete with screen, without bulb
INSERTING THE BULB
1 lampe MICROS complète avec écran, sens ampoule
1
- Push the rubber ring A onto the housing of the socket.
- Put the screen B onto the socket housing.
- Put the contact pins of the bulb into the socket
up to the detention point.
- The security springs of the socket must clutch into the
grooves C of the bulb.
- Lay the screen B onto the bulb.
- For the fixing procedure push the rubber ring A
against the screen B.
INSTALLATION OF THE LAMP
- plug in
- engage
- affix
- for turning the lamp, loosen fixation D.
A
B
C
2
Type de protection:
SCOPE OF DELIVERY
L I E F E R U M FA N G
- Gummiring A auf Fassungsgehäuse aufschieben.
- Schirm B auf Fassungsgehäuse aufstecken.
- Kontaktstifte des Leuchtmittels bis zum Anschlag in die
Fassung einstecken.
- Die Sicherungsfedern der Fassung müssen in den
Nuten C des Leuchtmittel-sockels einrasten.
- Schirm B auf Leuchtmittel auflegen.
- Zum Fixieren, Gummiring A gegen Schirm B schieben.
Lamp voltage:
Lamp wattage:
Lamp socket:
Bulb:
Protective class :
Schutzklasse:
EINSETZEN DES LEUCHTMITTELS
Design:
Dimensions:
Material:
1
F
beamer de bas voltage avec écran
pour l’illumination anti-éblouissante.
Design:
BRUCK Team
Dimensions:
H = 130 mm, écran Ø = 62 mm
Matériaux:
alluminium, laiton, chromé,
doré, mat-chromé
Voltage de la lampe:
12 V SELV
Rendement de l’ampoule: max. 50 W
Douille:
Gu 5,3
Ampoule:
seulement lumière de verre de basse pression
QRCB 51 aluminium évapouré. Si la lampe est
colloquée sens aucun écran, toutes les lampes
courentes de lumière froide de verre de basse
pression peuvent être utilisées QRCB 51.
low voltage beamer with screen for the
blend-free illumination.
BRUCK Team
H = 130 mm, screen Ø = 62 mm
aluminium, brass chrome-plated /
gold-plated /matt-chromed
12 V SELV
max. 50 W
Gu 5,3
Only low pressure cold light mirror lamp
QRCB 51 aluminium vapor-plated. If the
lamp is set in without any screen, all
common low pressure cold light mirror
lamps QRCB 51 can be used.
151032993A
C O L L O Q U E R L’ A M P O U L E
1
- Pousser l’ aneau de gomme A dans la cassette de la douille.
- Mettre l’ écran B dans la cassette de la douille.
- Mettre les connections de contact de l’ampoule
dans la douille jusqu’ au point de détention.
- Les ressorts de securité de la douille doivent être
connectées dans les ranures C de l’ ampoule.
- Mettre l’ écran B sur l’ ampoule.
- Pour la procédure de fixation pousser l’ aneau de
gomme A contre l’ écran B.
2
MONTAGE DE LA LAMPE
- Introduire
- enclencher
- fixer
- Pour tourner la lampe, retirer la fixation D.
2
D
BRUCK GMBH & CO.KG
INDUSTRIESTR. 22 • 44628 HERNE
internet http://www.bruck.de
LÁMPARA DE CLAVIJA
1
C
2
I
MICROS
ART.-NO. 220 410 ch ID.-NO. 403 181
220 410 g
403 198
220 410 mc
403 204
ART.-NO. 220 410 ch ID.-NO. 403 181
220 410 g
403 198
220 410 mc
403 204
E
ISTRUZIONI PER L´USO
ESPECIFICACIONES TÉCNICAS
DATI TECNICI
Descripción:
Descrizione:
beamer de bajo voltaje con pantalla para
la iluminación anti-deslumbrante.
Design:
BRUCK Team
Dimensiones:
H=130mm, pantalla Ø= 62mm
Material:
aluminio, latón, cromado,
dorado, cromado en mate
Voltaje de la lámpara:
12 V SELV
Rendimiento de la lámpara: max. 50 W
Portalámparas:
Gu 5,3
Bombilla:
sólo luz de espejo de baja presión QRCB
51 aluminio evaporado. Si la lámpara está
colocada sin ninguna pantalla, todas las
lámparas corrientes de luz fría de espejo de
baja presión pueden ser utilizadas QRCB 51.
B
LAMPADA DI SPINA
MICROS
MODO DE EMPLEO
A
E
I
PLANUNGSHILFE
PLANNING AIDS
AIDE DE PLANIFICATION
AYUDA DE PLANIFICACIÓN
A I U TO D I P L A N I F I C A Z I O N E
beamer di basso voltaggio con schermo
per l'illuminazione anti-abbagliante.
Design:
BRUCK Team
Dimensioni:
H = 130 mm, schermo Ø = 62 mm
Materiale:
alluminio, l'ottone, cromato,
dorato, mat-cromato
Voltaggio della lampada:
12 V SELV
Rendimento della lampada: max. 50 W
Portalampade:
Gu 5,3
Lampadina:
soltanto luce di schermo di vetro di bassa
pressione QRCB 51 aluminio evaporato. Se
la lampada é collocata senza nessun
schermo, tutte le lampade correnti di luce
fredda di vetro di bassa pressione
possono essere utilizzate QRCB 51.
Clase de protección:
Tipo di protezione:
INDICACIONES GENERALES DE SEGURIDAD
D
1. ¡En todos los trabajos a llevar a cabo en las
lámparas (trabajos de mantenimiento y limpieza)
han de mantenerse las lámparas libre de tensión!
2. El sistema no es apropiado para la instalación en locales húmedos.
3. ¡Atención peligro de electrocución! ¡Las lámparas no
deben conectarse nunca directamente a la tensión de red!
4 ¡Cuidado! Las lámparas y las bombillas o reflectores se
calientan durante el funcionamiento.
5. ¡Ha de observarse la distancia mínima indicada de las
bombillas o reflectores respecto de los objetos
combustibles! (véase la lámpara
).
6. No colgar ningún objeto por encima del sistema:
¡peligro de cortocircuito y de incendio!
7. ¡Se pierden las reivindicaciones de garantía al llevar modifi
caciones a cabo por propia cuenta y / o empleo incorrecto!
VOLUMEN DE SUMINISTRO
VOLUME DELLA FORNITURA
1 lampada MICROS completa con schermo, senza lampadina
1 lámpara MICROS completa con pantalla, sin bombilla
INSERTAR LA BOMBILLA
AVVERTENZE GENERALI PER LA SICUREZZA
1.Per tutti i lavori da eseguire sulla lampada (manutenzio
ne, pulitura) eliminare la tensione dalla lampada!!
2.La lampada non è adatta per locali umidi.
3.Attenzione, pericolo di scosse di corrente !! Non collegare la lampada mai direttamente alla tensione della rete!
4.Attenzione! La lampada ed il mezzo illuminante
scottano quando funzionanti.
5.Osservare la distanza minima indicata del mezzo illumi
nante da oggetti combustibili! (vedi lampada
)
6.Non appendere oggetti al di sopra della lampada:
pericolo di corto circuito e di incendio!
7.Nessun diritto di garanzia in caso di modifiche apportate
di propria iniziativa e/o di utilizzo inappropriato!
1
COLLOCARE LA LAMPADINA
1
- Empujar el anillo de goma A en la caseta del portalámparas.
- Poner la pantalla B en la caseta del portalámparas.
- Poner las conexiones de contacto de la bombilla en
el portalámparas hasta el punto de detención.
- Los resortes de seguridad del portalámparas tienen
que conectarse en las ranuras C de la bombilla.
- Poner la pantalla B sobre la bombilla.
- Para la procedura de fijación empujar el anillo de goma Acontra la pantalla B.
- Scivolare l'anello di gomma A nella cassetta del portalampade.
- Mettere lo shermo B nella cassetta del portalampade.
- Mettere le connessioni di contatto della lampadina
nel portalampade fino al punto di detenzione.
- I ressorti di securità del portalampade devono
essere connessi nelle ranure C del portalampade.
- Mettere lo shermo B sopra la lampadina.
- Per il procedimento di fissaggio scivolare l' anello di
gomma A contro lo shermo B.
COLOCAR LA LÁMPARA
MONTAGGIO DELLA LAMPADA
- Insertar - Encajar - Fijar.
- Para girar la lámpara, soltar el dispositivo de fijación D.
2
- Infilare - innestare in posizione - fissare
- Per girare la lampada allentare il fissaggio B.
2
1 cm = 1 m