1
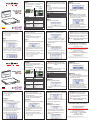
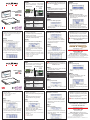
Étape 1
►► Connecter la source de synchronisation
(Antenne, câble Ethernet, …) et les sorties.
BACK
TIME
SERVER
TDF / DCF
GPS
IRIG B / AFNOR
CODE
CODE
CODE
ASCII 1 : RXD
ASCII 2 : TXD
GND
ASCII 1 : E/S +
ASCII 2 : E/S GND
Ethernet
ASCII RS232
ASCII RS485
NTP
►► La dernière ligne permet de renseigner la
politique de changement d’heure (été / hiver).
Exemple : Pour la France, il faut renseigner :
►► UTC : + 01H00
►► DST : Europe
Étape 6
OK
ESC
NTP
CODE
GND
CODE
RT9s
►► La deuxième ligne permet de renseigner
l’adresse IP du produit.
►► La troisième ligne permet d’indiquer le
masque de sous réseau.
►► La dernière ligne permet de renseigner la
passerelle par défaut (facultatif).
Étape 7
Réglage de l’adresse IP
Note : Contacter l’administrateur réseau pour
connaître les paramètres de votre réseau.
Activation des sorties (si disponibles)
Validation
Retour à l’étape précédente
Déplacement dans l’écran en cours
Modification des valeurs
Étape 3
►► La troisième ligne permet d’indiquer le
fuseau horaire sur la sortie par rapport à
l’heure UTC.
►► La dernière ligne permet de renseigner la
politique de changement d’heure (été / hiver).
Exemple : Pour la France, pour avoir les sorties
en heure locale, il faut renseigner :
►► UTC : + 01H00
►► DST : Europe
STEP 1
►► Connecting the synchronisation input (antenna, Ethernet cable…) and outputs.
►► Appuyer sur la touche «OK» pour lancer le
démarrage rapide.
Étape 8
Option impulsion (si disponible)
►► Saisir l’heure à laquelle les horloges
réceptrices impulsions se sont arrêtées
pour que le RT9s détermine le nombre
d’impulsions à envoyer.
46
20.59
TIMING
GORGY
BACK
TIME
SERVER
TDF / DCF
GPS
IRIG B / AFNOR
ASCII RS232
ASCII RS485
NTP
►► The bottom line is to define daylight saving
time policy (DST).
Example: for France, you shall put:
►► UTC : + 01H00
►► DST : Europe
STEP 6
IP address setting
Remark : contact your network administrator for
information on network parameters.
CODE
CODE
CODE
ASCII 1 : RXD
ASCII 2 : TXD
GND
ASCII 1 : E/S +
ASCII 2 : E/S GND
Ethernet
►► The second line allows entering IP
address of the product.
►► The third line allows indicating the subnet
mask.
►► The bottom line allows entering the
gateway address if any (optional).
STEP 7
Activating outputs (if available)
►► Appuyer sur le bouton «OK» pour valider
les réglages. Le RT9s va alors redémarrer. Vous devez voir l’écran suivant.
►► If the clock is not connected to a computer
network or if your network has a DHCP server, select YES and go to STEP 7.Otherwise,
select NO to set manually the parameters:
Example: for France, to have local time output,
you shall put:
►► UTC : + 01H00
►► DST : Europe
Étape 5
Réglage de la date et de l’heure
►► Pour réglez l’heure manuellement, sélectionner OUI, sinon sélectionner NON et
passer à l’étape 6.
►► La deuxième ligne permet de renseigner
la date et l’heure courante.
►► La troisième ligne permet d’indiquer le
fuseau horaire par rapport à l’heure UTC.
Étape 10
►► Pour les configurations avancées (Réglage
par l’interface Web) ou la programmation
des relais, reportez-vous au mode d’emploi
disponible sur le DVD Gorgy Timing (Fourni).
☛☛Un ordinateur est indispensable pour
ces configurations.
SUPPORT TECHNIQUE
depuis la France sur un poste fixe :
GORGY TIMING SAS
Quartier Beauregard
38350 La Mure d'Isère (Grenoble France)
Tél: +33 4 76 30 48 20 Fax: +33 4 76 30 85 33
email: [email protected] - www.gorgy-timing.com
RADIO TIMING®, LEDI®, LEDICA®, HANDI® sont des marques déposées GORGY TIMING.
GORGY TIMING RC 74 B 38 - Toutes modifications d’ordre technique ou esthétique peuvent être apportées sans préavis
Numéro de déclaration d’activité de prestataire de formation : 82 38 04877 38
QUICKSTART_RT9s-6002V1.0
☛☛
No polarity required for connection of
TDF, DCF and GPS antenna, or for IRIG B and
AFNOR time code.
STEP 4
Choosing the language
STEP 2
►► Connecting the device to power and wait
for startup (about 1 minute).
Validation
Return to previous step
Navigate on screen
Modifications of values
STEP 3
►► Choose the language for interface then
validate.
STEP 5
Date and time setting
►► To set up time manually, select YES.
Otherwise, select NO and go
to Step 6.
Activating rapid startup
►► Press on «OK» button to launch quick
startup.
STEP 8
Pulse option (if available)
►► E
nter the current time indicated on slave
impulse clocks, RT9s will automatically
determine the right number of pulses to
send to clocks.
STEP 9
►► The third line allows to specify the time
offset from UTC of the output.
►► The bottom line allows entering daylight
saving time policy (DST).
►► Choisir la langue de l’interface puis
valider.
[email protected]
OK
ESC
NTP
CODE
CODE
RT9s
GND
MMER
PROGRA
ETHERNET
Validation des réglages
Buttons on LCD front display
ASCII 2
OK
ASCII 1
Quick Start
Guide
ASCII 1
ASCII 2
GND
Reserved
CODE
CODE
FUSE 1A
ȵ
IMPULS
Wall Mount Version
NTP
Rack Version
Réglage de la langue
Activation du démarrage rapide
Étape 9
►► Si l’horloge n’est pas connectée au réseau
informatique ou si votre réseau possède un
serveur DHCP, sélectionner OUI et passer
à l’étape 7. Sinon, sélectionner NON pour
le réglage manuel des paramètres :
Étape 4
Étape 2
►► Connecter l’alimentation et attendre que le
produit démarre (Environ 1 minute).
Boutons sur l’interface LCD
ASCII 2
46
20.59
TIMING
GORGY
ETHERNET
ȵ
IMPULS
ASCII 1
OK
MMER
PROGRA
Guide
de démarrage
rapide du
ASCII 1
ASCII 2
GND
Reserved
CODE
CODE
FUSE 1A
Version boîtier
NTP
Version rack
☛☛
Les antennes TDF, DCF et GPS ainsi que
le code IRIG B et AFNOR ne possèdent pas de
polarité.
Validation of setting
►► P
ress on «OK» button to validate all settings. RT9s will then restart. The following
screen will appear:
►► The second line allows entering current
date and time.
►► The third line allows indicating time offset
from UTC.
STEP 10
►► For advanced configuration (via web page
interface) or programming of relays, please
refer to user manual on Gorgy Timing DVD
(delivered with the product).
☛☛A PC is required for configuration.
TECHNICAL SUPPORT
+33 476 30 48 20
[email protected]
GORGY TIMING SAS
Quartier Beauregard
38350 La Mure d'Isère (Grenoble France)
Phone: +33 4 76 30 48 20 Fax: +33 4 76 30 85 33
www.gorgy-timing.com/en/
email: [email protected]
RADIO TIMING®, LEDI®, LEDICA®, HANDI® are trademarks by GORGY TIMING.
Gorgy Timing RC74B38 - Any technical, aesthetic, color modifications can be made without notice.
Number of statement for training provider activity : 82 38 04877 38
QUICKSTART_RT9s-6002V1.0
PASO 1
►► Conectar la fuente de sincronización (Antena, cable Ethernet,…) y las salidas.
46
20.59
TIMING
GORGY
BACK
TIME
SERVER
TDF / DCF
GPS
IRIG B / AFNOR
CODE
CODE
CODE
ASCII 1 : RXD
ASCII 2 : TXD
GND
ASCII 1 : E/S +
ASCII 2 : E/S GND
Ethernet
ASCII RS232
ASCII RS485
NTP
►► La última línea permite introducir las consignas
de cambio de hora (verano / invierno).
Ejemplo: Para España, habrá que indicar:
►► UTC : + 01H00
►► DST : Europa
PASO 6
Configuración de la dirección IP
Nota: Contactar el administrador de red para
conocer los parámetros de su red.
►► La segunda línea permite configurar la
dirección IP del equipo.
►► La tercera línea permite indicar la máscara de red.
►► La última línea permite configurar la
pasarela por defecto (opcional).
PASO 7
Activación de las salidas (si están disponibles)
Validación
Retorno al paso anterior
Desplazamiento en la pantalla actual
Modificación de los valores
PASO 3
►► La tercera línea permite indicar la zona
horaria de salida con respecto a la hora
UTC.
►► La última línea permite introducir las consignas
de cambio de hora (verano / invierno).
Ejemplo: Para España, para obtener las salidas
en hora local, habrá que indicar:
►► UTC : + 01H00
►► DST : Europa
SCHRITT 1
►► Schließen Sie das Eingangssignal
(Antenne Kabel, Netzwerk Kabel,…) und
die Ausgänge an.
Quick Start
►► Presionar la tecla “OK” para empezar el
inicio rápido.
PASO 8
Opción impulsión (si está disponible)
►► Seleccionar la hora a la cual los relojes
receptores de impulsos se han parado
para que el RT9s determine el número de
impulsos a enviar.
TDF / DCF
GPS
IRIG B / AFNOR
ASCII RS232
ASCII RS485
NTP
►► Die letzte Zeile ermöglicht die Eingabe der
Winter-/Sommerzeitumstellung.
Beispiel für Deutschland:
►► UTC: + 01H00
►► DST: Europe
SCHRITT 6
Einstellung der IP Adresse
Hinweis: Für die Einstellungen ihres Netzwerks
kontaktieren Sie ihren Netzwerkadministrator.
CODE
CODE
CODE
ASCII 1 : RXD
ASCII 2 : TXD
GND
ASCII 1 : E/S +
ASCII 2 : E/S GND
Ethernet
►► Die zweite Zeile ermöglicht die Eingabe
der IP Adresse des Gerätes.
►► Die dritte Zeile ermöglicht die Eingabe
der Netzwerkmaske.
►► Die letzte Zeile ermöglicht die Eingabe
der Gateway Adresse (Fakultativ).
SCHRITTZ 7
Aktivierung der Ausgänge (wenn vorhanden)
►► Presione el botón “OK” para validar las
configuraciones realizadas. El RT9s se
reiniciará. Aparecerá la siguiente pantalla:
☛☛
Folgende Anschlüsse haben keine
Polarität (DCF, TDF, GPS, IRIG CODE, AFNOR
CODE).
Beispiel für Deutschland (Ausgang Lokalzeit):
►► UTC : + 01H00
►► DST : Europe
Configuración de la fecha y de la hora.
►► Para configurar la hora manualmente,
seleccione SI o en caso contrario selecciones NO y pase al paso 6.
►► La segunda línea permite configurar la
fecha y la hora actuales.
►► La tercera línea permite indicar la zona
horaria con respecto a la hora UTC.
PASO 10
►► Para las configuraciones avanzadas (Configuración del interfaz Web) o la programación de
los relés, vea el modo de empleo disponible
en el DVD Gorgy Timing (Entregado).
☛☛Para realizar estas configuraciones es
indispensable un PC.
SOPORTE TÉCNICO
Desde fuera de Francia : +33 476 30 48 20
[email protected]
World Trade Center - Edificio Este, 6ª Plta.
C/ Moll de Barcelona, s/n
08039 Barcelona – ESPAÑA
Tel.: +34 93 508 83 53 Fax: +34 93 508 83 54
email: [email protected]
www.gorgy-timing.com
SCHRITT 4
Einstellung der Sprache
SCHRITT 2
►► Schließen Sie das Gerät an das Stromnetz und warten Sie ca. 1 Min.
Bestätigen
Zurück zum vorherigen Schritt
Bewegung in dem aktuellen Bildschirm
Änderung der Werte
SCHRITT 3
►► Wählen Sie die Sprache auf der Benutzeroberfläche und drücken Sie bestätigen.
SCHRITT 5
Datum und Zeiteinstellung
►► Bei der manuellen Einstellung der Uhrzeit
„JA“ wählen, ansonsten „NEIN“ und mit
dem Schritt 6 fortfahren.
Aktivierung des Quick Starts
►► Drücken Sie auf OK um den Quick Start
zu starten.
SCHRITT 8
Minutenimpuls-Ausgang (wenn vorhanden)
►► Geben Sie die Zeit ein, die auf den
Nebenuhren Steht damit die Hauptuhr die
Nebenuhren nachstellen kann.
SCHRITT 9
►► Die dritte Zeile ermöglicht die Eingabe
der Ausgangszeitzone in Bezug auf die
UTC- Zeit.
►► Die letzte Zeile ermöglicht die Eingabe
der Winter-/Sommerzeitumstellung.
PASO 5
RADIO TIMING®, LEDI®, LEDICA®, HANDI® sont marcas registradas GORGY TIMING.
Gorgy Timing RC74B38 Cualquier modificación de orden técnico, estético o de color pueden realizarse sin previo aviso.
Numéro de déclaration d’activité de prestataire de formation : 82 38 04877 38
QUICKSTART_RT9s-6002V1.0
Bestätigung der Einstellungen
►► Wenn die Uhr nicht am Netzwerk
angeschlossen ist oder wenn Ihr Netzwerk
einen DHCP Server hat, wählen Sie JA
und gehen Sie zum SCHRITTT 7,
ansonsten wählen Sie NEIN für eine
manuelle Parametereinstellung. :
►► Escoger el idioma del interfaz y a continuación validar.
GORGY TIMING SPAIN
OK
ESC
NTP
CODE
TIME
SERVER
RT9s
CODE
BACK
GND
46
20.59
TIMING
GORGY
ASCII 2
MMER
PROGRA
Validación de las configuraciones
Tasten auf der Frontseite
ASCII 1
OK
ETHERNET
ASCII 1
ASCII 2
GND
Reserved
CODE
CODE
FUSE 1A
ȵ
IMPULS
Wand Ausführung
NTP
Rack Ausführung
Configuración del idioma
Activación del inicio rápido
PASO 9
►► Si el reloj no está conectado a la red informática o si su red posee un servidor DHCP,
seleccione SI y pase al paso 7. En caso
contrario, seleccione NO para la configuración manual de los parámetros :
PASO 4
PASO 2
►► Conectar la alimentación y esperar que
el equipo se inicie (aproximadamente
1 minuto).
OK
ESC
NTP
CODE
GND
CODE
ASCII 2
RT9s
OK
MMER
PROGRA
ETHERNET
código IRIG B y AFNOR, no tienen polaridad.
Botones del interfaz LCD
ASCII 1
GUÍA DE INICIO
RÁPIDO DEL
ASCII 1
ASCII 2
GND
Reserved
CODE
CODE
FUSE 1A
ȵ
IMPULS
Versión caja
NTP
Versión rack
☛☛Las antenas TDF, CDF y GPS así como el
►► Die zweite Zeile ermöglicht die Eingabe
des aktuellen Datums und Uhrzeit.
►► Die dritte Zeile ermöglicht die Eingabe
der Zeitzone in Bezug auf die UTC-Zeit.
SCHRITT 10
►► Für detaillierte Einstellungen (per WEBOberfläche) oder Relais-Einstellungen,
verwenden Sie bitte die Gebrauchsanleitung
auf der mitgelieferten DVD.
☛☛Für diese Einstellungen ist ein
Rechner notwendig.
TECHNICHER SUPPORT
+33 476 30 48 20
[email protected]
►► Drücken Sie auf OK, um die Einstellungen zu bestätigen. Der RT9s wird neu
gestartet. Folgender Bildschirm muss
erscheinen.
GORGY TIMING GMBH
Östliche Rheinbrückenstr. 50
D-76187 Karlsruhe - DEUTSCHLAND
Tél: +49 721 60156 Fax: +49 721 695259
www.gorgy-timing.de
email: [email protected]
RADIO TIMING®, LEDI®, LEDICA®, HANDI® Marke und Modelle geschützt GORGY TIMING.
GORGY TIMING RC 74 B 38 - Änderungen der Technik und Gestaltung vorbehalten
Numéro de déclaration d’activité de prestataire de formation : 82 38 04877 38
UICKSTART_RT9s-6002V1.0