1
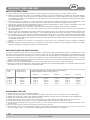
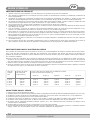
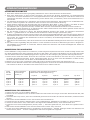
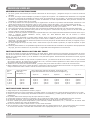
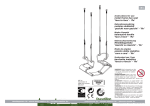
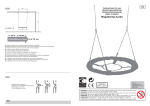
Instructions for use
Modo de empleo
Gebruiksaanwijzing
Instruzioni per l’uso
Mode d’emploi
Instrukcja obsługi
zip wire ‘para’
kabelbaan ‘para’
tyrolienne ‘para’
tirolina ‘para’
244.
teleferica ‘para’
zjazdu linowego ‘para’
Gebrauchsanweisung
Seilbahn ‘para’
PROTECTED
DESIGN
OHIM
KBT nv
Hemelrijken 8
2890 Sint-Amands
BELGIUM
KBT Polska Sp.zo.o.
Ul.Konopnickiej 6
00-491 Warszawa
POLAND
WARNING! Only for domestic use! Not suitable for children under 3 years - no specific precautions for
toddlers - risk of falling!
WAARSCHUWING! Alleen voor huishoudelijk gebruik! Niet geschikt voor kinderen jonger dan 3 jaar - geen
speciale voorzieningen naar peuters toe - valgevaar!
ATTENTION! Réservé à un usage familial! Ne convient pas aux enfants de moins de 3 ans - sans équipement
spéciale pour les petits enfants - danger de chute!
WARNUNG! Nur für den Hausgebrauch! Nicht geeignet für Kinder unter 3 Jahren - keine spezielle Maßnahme
für Kleinkinder vorgesehen - Sturzgefahr!
¡ADVERTENCIA! Sólo para uso doméstico! No conveniente para niños más joven de 3 años - ningunas precauciones
específicas para los niños pequeños - riesgo de caída!
ATTENZIONE! Solo per uso domestico! Non per i bambini sotto i 3 anni - senza attrezzatura speciale per i bimbi - rischio
di caduta!
OSTRZEŻENIE! Tylko do użytku przydomowego! Nieodpowiednie dla dzieci w wieku poniżej 3 roku życia ze względu na brak
dodatkowych zabezpieczeń - ryzyko upadku!
EN
INSTRUCTIONS FOR USE
SAFETY INSTRUCTIONS
1. Please keep this instruction sheet safely for future reference, and ensure that you review it with all users.
2. Please do not modify the product or the assembly details in any way. Modifications will affect the structural integrity
and replacement parts will be at the buyers’ expense. Inappropriate use or faulty application of the product is explicitly forbidden and absolves the manufacturer of all liability. This product needs to be mounted and checked thoroughly
by an adult before use.
3. The use of the item is allowed only under continuous supervision by an adult. The product is only intended for use as
a zip wire between two points, for 1 user older than 8 years and with a maximum weight of up to 70 kg.
4. This product meets all security specifications of the European standard EN71-1, EN71-2, EN71-3 and EN71-8. It is only
suitable for domestic use, both indoors and outdoors.
5. The zip wire should only be used after it has been properly installed according to the following guidelines.
6. The application of the item as part of a play frame or any other construction will have to be such that it excludes all
risk of entrapment.
7. When mounting or assembling the product, attention should be given to the minimum required distance between the
product and eventual obstacles: walls, fencing, … This distance should be a minimum of 2 meter (see last page, FIG I).
8. In this safety area no hard, angular or pointed objects should be present. The surface underneath the product should
be flat and shockabsorbing. The product must not be placed on asphalt, concrete or any other hard surface. We advise
the removal and storage of all accessories during the winter because the characteristics of the soil (when frozen) are
not suitable for safe play.
9. Please ensure that the tree, branch or construction to which the zip wire is attached, is able to support a weight of
300 kg.
10.All pieces should be checked regularly. For replacement material and expansion of the playground equipment, please
contact the supplier. Consequently safety will be guaranteed.
INSTRUCTIONS FOR CABLE HEIGHT
In order to assemble the zip wire correctly and safely, the following height requirements need to be followed. One end of
the cable must be mounted at a higher level than the other end. These heights are dependant on the height of the user
and the distance between the fixing points. In order to determine the right heights, the following steps must be followed:
1. Measure the height of the user. If there is more than one user, and the difference in height is less than 15 cm, use the
height of the tallest user. If the difference is more than 15 cm, the zip wire needs to be adjusted every time the user’s
height is outside the specified range.
2. Add 75 cm to the measured height of the user and mark this point on the tree or construction frame.
3. Measure the distance between the 2 fixing points. Determine the corresponding height in the following table and mark
this height on the tree / construction at the other side.
height
user
height lowest
fixing point (x)
1,20
1,40
1,50
1,70
1,80
m
m
m
m
m
2,00
2,10
2,30
2,45
2,60
height highest fixing point according to the following
distances between the 2 fixing points (y)
24,50 m
m
m
m
m
m
2,90
3,00
3,20
3,35
3,50
m
m
m
m
m
21,50 m
2,75
2,90
3,00
3,20
3,35
m
m
m
m
m
18,50 m
2,60
2,75
2,90
3,00
3,20
m
m
m
m
m
15,50 m
2,45
2,60
2,75
2,90
3,00
m
m
m
m
m
12, 50 m
2,30
2,45
2,60
2,75
2,90
m
m
m
m
m
GUIDELINES FOR USE
1. Always start from a secure and stable platform.
2. Always hold the trolley firmly with both hands (or hold on tight to the rope of the monkey swing if applicable).
3. Release the trolley only when it has reached complete standstill, and feet can be placed onto the ground/platform.
4. Always use the product under supervision of an adult.
5. Always check the structure, fixings, trolley, cable tensioners, cable spanner and cable before using the zip wire.
6. Do not allow children under, next to or in the neighbourhood of the construction when it is in use.
7. Do not wear loose fitting clothing (ponchos, scarfs,…) when using the zip wire. This can be dangerous because of entrapment risk.
8. Do not use the zip wire when the construction and the trolley are wet.
9. Only the KBT monkey seat with special D-shackle is permitted to be attached to the trolley of the zip wire. The use of
any other seats, ropes…. is considered as inappropriate use and is deemed to be dangerous.
2
zip wire ‘para’
NL
GEBRUIKSAANWIJZING
VEILIGHEIDSINSTRUCTIES
1. Gelieve deze gebruiksaanwijzing zorgvuldig te bewaren en met alle gebruikers door te nemen.
2. Gelieve geen wijzigingen aan het product aan te brengen, deze kunnen de structurele integriteit beïnvloeden en vervangstukken zullen ten koste van de koper zijn. Onaangepast gebruik of foutieve montage van het product is uitdrukkelijk verboden en ontslaat de fabrikant van elke aansprakelijkheid. Dit product moet door een volwassene gemonteerd
worden of anders moet, voor gebruik, het resultaat grondig door een volwassene nagekeken worden.
3. Het gebruik van het product is enkel toegelaten onder voortdurend toezicht van een volwassene. Het product is enkel
geschikt als kabelbaan tussen 2 punten, voor 1 gebruiker ouder dan 8 jaar en met een gewicht tot 80 kg.
4. Dit product voldoet aan alle veiligheidsvoorschriften voorgeschreven in de Europese Normen EN71-1, EN71-2, EN71‑3
en EN71-8. Het is enkel geschikt voor huishoudelijk gebruik, dit zowel binnenshuis als buitenshuis.
5. De kabelbaan mag pas gebruikt worden nadat deze geïnstalleerd werd volgens de richtlijnen hieronder.
6. Het inbouwen van dit product in een speeltoestel of andere constructie dient zodanig te gebeuren dat gevaar voor
beknelling uitgesloten is.
7. Bij de montage dient men erop te letten dat er voldoende afstand is tussen het speeltuig en eventuele hindernissen:
muren, afsluitingen,... Deze afstand moet minimaal 2 meter bedragen (zie laatste pagina, FIG I).
8. In deze veiligheidszones mogen zich geen harde of hoekige voorwerpen bevinden. De ondergrond moet vlak zijn en een
schokdempende werking hebben. Het product mag dus niet geplaatst worden boven asfalt, beton of een ander hard
oppervlak. We adviseren alle toebehoren in de winter te verwijderen en op te slaan daar de bodemeigenschappen (bij
vorst) niet geschikt zijn om veilig te spelen.
9. Ga na of de boom, tak of constructie waaraan de kabelbaan bevestigd moet worden een gewicht van 300 kg kan
dragen.
10.Alle onderdelen moeten regelmatig gecontroleerd worden. Voor vervangmateriaal en bij uitbreiding van het speeltoestel, dient men zich tot de fabrikant te wenden. Hierdoor wordt de veiligheid het meeste gevrijwaard.
BEPALING KABELHOOGTE
Om de kabelbaan juist en veilig te installeren moeten volgende aanbevelingen voor de hoogte gevolgd worden. Het ene
uiteinde van de kabel moet hoger opgehangen worden dan het andere. Deze hoogten zijn afhankelijk van de grootte van
de gebruiker en de afstand tussen de bevestigingspunten. Volg voor het bepalen van de juiste hoogte volgende stappen:
1. Meet de grootte van de gebruiker. Is er meer dan 1 gebruiker en het verschil in grootte is niet meer dan 15 cm, neem
dan de grootte van de grootste gebruiker. Is het verschil in grootte meer dan 15 cm, dan moet de kabelbaan versteld
worden wanneer de gebruiker die buiten de range valt de kabelbaan wil gebruiken.
2. Tel 75 cm bij de gemeten grootte en duid dit aan op de boom / constructie.
3. Meet de afstand tussen de 2 bevestigingspunten. Zoek de overeenkomstige hoogte in de tabel en duid deze aan op de
boom / constructie aan het andere uiteinde.
grootte
gebruiker
hoogte laagste
connectiepunt (x)
1,20
1,40
1,50
1,70
1,80
m
m
m
m
m
2,00
2,10
2,30
2,45
2,60
hoogte punt kabel bij volgende afstand
tussen de connectiepunten (y)
24,50 m
m
m
m
m
m
2,90
3,00
3,20
3,35
3,50
m
m
m
m
m
21,50 m
2,75
2,90
3,00
3,20
3,35
m
m
m
m
m
18,50 m
2,60
2,75
2,90
3,00
3,20
m
m
m
m
m
15,50 m
2,45
2,60
2,75
2,90
3,00
m
m
m
m
m
12, 50 m
2,30
2,45
2,60
2,75
2,90
m
m
m
m
m
RICHTLIJNEN VOOR GEBRUIK
1. Vertrek steeds vanaf een stabiel platform.
2. Neem de trolley steeds stevig met beide handen vast (of indien van toepassing, houd stevig het touw van de schotelschommel vast).
3. Laat de trolley pas los nadat hij tot stilstand gekomen is en je de voeten op de grond / platform kan plaatsen.
4. Gebruik de kabelbaan steeds onder toezicht van een volwassene.
5. Check de structuur, bevestigingen, trolley, kabelklemmen, kabelspanner en kabel voor elk gebruik.
6. Laat geen kinderen onder, naast of in de buurt van de kabelbaan lopen wanneer deze gebruikt wordt.
7. Draag geen loshangende kledij (poncho’s, sjaals,…) Dit kan gevaarlijk zijn wanneer deze ergens achterhaken.
8. Gebruik de kabelbaan niet wanneer de constructie en de trolley nat zijn.
9. Aan de trolley van deze kabelbaan mag enkel het KBT zitje met speciale D-sluiting gehangen worden. Het gebruik met
andere zitjes, touwen,… wordt als oneigenlijk gebruik en gevaarlijk beschouwd.
kabelbaan ‘para’
3
Instructions for use - M244.03 - zip wire ‘para’
FR
MODE D’EMPLOI
INSTRUCTIONS DE SÉCURITÉ
1. Veuillez conserver précieusement ce mode d’emploi et le consulter avec tous les utilisateurs.
2. Une utilisation inadéquate ou un montage erroné du produit est formellement interdit(e) et décharge le fabricant de
toute responsabilité.
3. L’utilisation du produit est uniquement autorisée sous la surveillance permanente d’un adulte. Le produit ne peut être
utilisé que comme téléphérique entre deux points, pour un utilisateur de plus de 8 ans et d’un poids jusqu’à 80 kg.
4. Ce produit est conforme aux normes de sécurité selon la Norme Européenne EN71-1, EN71-2, EN71-3 et EN71-8 et est
exclusivement à usage familial et le jouet est destiné à un usage extérieur et intérieur.
5. La tyrolienne peut être utilisée après l’installation correcte selon les directives ci-dessous.
6. L’intégration de ce produit dans une aire de jeux ou dans une autre construction doit être effectuée de façon à éviter
tout danger de coinçage.
7. Lors du montage, il convient de s’assurer qu’une distance suffisante sépare le jouet des éventuels obstacles: murs,
cloisons, etc. Cette distance doit s’élever à minimum 2 mètres (voir dernière page, FIG I).
8. Aucun objet dur ou anguleux ne peut se trouver dans ces zones de sécurité. Le sol doit être plat et doit pouvoir absorber les chocs. Le produit ne peut donc pas être installé au-dessus de l’asphalte, du béton ou d’une autre surface dure.
Nous conseillons de démonter tous les accessoires en hiver vu que les caractéristiques du sol (en cas de gel) ne sont
pas adaptées à la pratique sécurisée de ce jeu.
9. Assurez-vous que l’arbre, la branche ou la construction auquel/à laquelle le téléphérique doit être fixé peut supporter
un poids de 300 kg.
10.Tous les pièces doivent être contrôlées régulièrement. Pour le remplacement et aussi pour l‘expansion du produit on
peut seulement utiliser des pièces du fabricant. Conséquemment on peut garantir la validité fonctionnelle.
INSTRUCTIONS POUR L’HAUTEUR DU CÂBLE
Pour installer la tyrolienne de façon sécurisée et correcte, les recommandations de hauteur suivantes doivent être respectées. L’une des deux extrémités du câble doit être suspendue à une hauteur plus élevée que l’autre. Les hauteurs dépendent de la taille de l’utilisateur et de la distance entre les points de fixation. Suivez les étapes suivantes pour déterminer la hauteur adéquate:
Mesurez la taille de l’utilisateur. Si le produit est utilisé par plusieurs utilisateurs et si la différence de taille n’est pas supérieure à 15 cm, prenez la taille du plus grand utilisateur. Si la différence de taille est supérieure à 15 cm, la tyrolienne
doit être réglée lorsque l’utilisateur d’une taille plus élevée que la hauteur de réglage de la tyrolienne souhaite l’utiliser.
1. Ajoutez 75 cm à la taille mesurée et indiquez la hauteur sur l’arbre / la construction.
2. Mesurez la distance entre les deux points de fixation. Recherchez la hauteur correspondante dans le tableau ci-dessous
et indiquez-la sur l’arbre / la construction à l’autre extrémité.
taille de
hauteur du point
l’utilisa-
de connexion
teur
le plus bas (x)
1,20
1,40
1,50
1,70
1,80
m
m
m
m
m
2,00
2,10
2,30
2,45
2,60
m
m
m
m
m
point le plus élevé du câble pour la distance suivante
entre les points de connexion (y)
24,50 m
2,90
3,00
3,20
3,35
3,50
m
m
m
m
m
21,50 m
2,75
2,90
3,00
3,20
3,35
m
m
m
m
m
18,50 m
2,60
2,75
2,90
3,00
3,20
m
m
m
m
m
15,50 m
2,45
2,60
2,75
2,90
3,00
m
m
m
m
m
12, 50 m
2,30
2,45
2,60
2,75
2,90
m
m
m
m
m
DIRECTIVES POUR L’USAGE
1. Partez toujours d’une plateforme stable.
2. Agrippez toujours le trolley fermement à deux mains (ou agrippez fermement la corde de la balançoire disque s’il y en a une).
3. Ne lâchez le trolley qu’après son immobilisation et dès que vous pouvez poser vos pieds au sol / sur le plateforme.
4. Utilisez toujours la tyrolienne sous la surveillance d’un adulte.
5. Contrôlez la structure, les fixations, le trolley, le serre câble, le tendeur de câble et le câble avant chaque utilisation.
6. Ne laissez aucun enfant passer sous, à côté ou dans les environs du téléphérique lors de son utilisation.
7. Ne portez pas de vêtements flottants (écharpe, poncho, etc.). Ces vêtements peuvent constituer un danger s’ils se
coincent dans le mécanisme.
8. N’utilisez pas la tyrolienne lorsque la construction et le trolley sont humides.
9. Seul le siège KBT équipé de la manille D spéciale peut être suspendu au trolley de cette tyrolienne. L’utilisation d’autres
sièges, cordes, etc. est considérée comme une utilisation inadéquate et dangereuse.
4
tyrolienne ‘para’
DE
GEBRAUCHSANWEISUNG
SICHERHEITSHINWEISE
1. Bitte dieser Gebrauchsanweisung sorgfältig aufbewahren und mit allen Benutzern durchzuschauen.
2. Bitte keine Änderungen an dem Produkt vornehmen, dies könnte die Struktur beeinflussen und Austauschstücke
werden dann zu Kosten des Käufers sein. Unangepasstes Benutzen oder falsche Montage ist ausdrücklich verboten und
entlastet den Hersteller von seiner Verantwortung. Dieser Artikel muss, vor Gebrauch, durch einen Erwachsenen montiert werden.
3. Der Gebrauch des Artikels ist nur zugelassen unter Aufsicht eines Erwachsenen. Das Produkt ist nur als Kabelbahn zwischen 2 Punkten zugelassen für eine Person älter als 8 Jahre und einem Gewicht bis 80 kg.
4. Dieses Produkt entspricht allen Anforderungen der Europäischen Norm EN71-1, EN71-2, EN71-3 und EN71-8. Dieser
Artikel ist nur für den häuslichen Gebrauch bestimmt, dies gilt für den Innen- sowie Außenbereich.
5. Die Kabelbahn darf nur gebraucht werden, nachdem diese nach den unterstehenden Richtlinien montiert worden ist.
6. Beim Einbauen dieses Produktes in ein Spielgerät oder andere Konstruktionen muss darauf geachtet werden das ein
Einklemmen von Körperteilen ausgeschlossen ist.
7. Bei der Montage ist darauf zu achten, das folgende Abstände zwischen dem Artikel und möglichen Hindernissen
(Mauern …) gewährleitstet ist. Der Abstand muss mindestens 2 Meter betragen (letzte Seite, FIG I).
8. In dieser Sicherheitszone dürfen sich keine harten oder eckigen Gegenstände befinden. Der Untergrund muss flach und
Stossabsorbierenden sein. Das Produkt darf also nicht über Asphaltboden, Beton oder andere harten Oberflächen montiert werden. Wir empfehlen alle Zubehörteile im Winter reinzuholen, da die Bodeneigenschaften (bei Frost) nicht geeignet ist um zu spielen.
9. Kontrollieren Sie ob der Baum, oder die Konstruktion woran die Kabelbahn befestigt wird ein Gewicht von 300 kg tragen
kann.
10.Alle Teile müssen regelmäßig überprüft werden. Für den Austausch und auch bei Nachrüstungen sind nur Original-Serienersatzteile vom Hersteller zu verwenden. Dadurch werden die Sicherheit und Funktionstüchtigkeit der Geräte am
besten gewährleistet.
ANWEISUNG FUR KABELHÖHE
Um die Kabelbahn richtig und sicher zu installieren, müssen folgende empfohlenen Werte für die Höhe befolgt werden. Das
eine Ende des Kabels muss höher gehangen werden wie das andere. Die Höhen sind abhängig von der Größe des Kindes
und den abstand zwischen den Befestigungspunkten. Folgen Sie für die Festlegung der genauen Höhe folgende Punkte:
1. Messen Sie die Größe des Kindes. Sind mehr als 1 Benutzer und der Unterschied ist nicht mehr als 15 cm, nehmen Sie
die Größe des größeren Benutzers. Ist der Unterschied größer als 15 cm, dann muss die Kabelbahn verstellt werden,
wenn der Benutzer welcher aus der Norm ist die Kabelbahn benutzen will.
2. Nehmen Sie 75 cm zu der gemessenen Größe und zeichnen Sie dies an dem Baum oder Konstruktion an.
3. Messen Sie den Abstand zwischen den zwei Befestigungspunkten. Suchen Sie die übereinkommende Höhe in der Tabelle
und zeichnen Sie diese an dem Baum oder Konstruktion an dem anderen Ende ein.
Große
Höhe niedrigster
des Be-
Verbindungs-
nutzers
punkt (x)
1,20
1,40
1,50
1,70
1,80
m
m
m
m
m
2,00
2,10
2,30
2,45
2,60
Höchster Punkt des Kabel bei folgendem
Abstand der Verbindungspunkte (y)
m
m
m
m
m
24,50 m
2,90
3,00
3,20
3,35
3,50
m
m
m
m
m
21,50 m
2,75
2,90
3,00
3,20
3,35
m
m
m
m
m
18,50 m
2,60
2,75
2,90
3,00
3,20
m
m
m
m
m
15,50 m
2,45
2,60
2,75
2,90
3,00
m
m
m
m
m
12, 50 m
2,30
2,45
2,60
2,75
2,90
m
m
m
m
m
ANWEIZUNG FUR GEBRAUCH
1. Starten Sie immer von einer stabilen Plattform.
2. Nehmen Sie die Laufkatze immer mit beiden Händen fest oder halten Sie sich gut am Seil des Tellerschaukels fest, falls
zutreffend.
3. Lassen Sie den Trolly erst los, wenn Sie im Stillstand gekommen sind und Sie die Füße auf dem Boden / Plattform setzen
können.
4. Gebrauchen Sie die Kabelbahn immer unter Aufsicht eines Erwachsenen.
5. Kontrollieren Sie die Struktur, Befestigungen, Trolly, Kabelklemmen, Kabelspanner und Kabel vor jedem Gebrauch.
6. Lassen Sie keine Kinder unter, neben oder in der Gegend der Kabelbahn laufen, wenn diese benutzt wird.
7. Tragen Sie keine losen Kleidungsstücke (Poncho, Schal …). Dies kann gefährlich sein, wenn diese sich irgendwo verfangen.
8. Gebrauchen Sie die Kabelbahn nicht wenn die Konstruktion und der Trolly nass sind.
9. An dem Trolly dieser Kabelbahn darf nur ein KBT Sitz, mit speziellem D – Schäkel, gehangen werden. Der Gebrauch mit
anderen Sitzen, Seilen … wird als unangepasster Gebrauch und gefährlich eingestuft.
Seilbahn ‘para’
5
Instructions for use - M244.03 - zip wire ‘para’
ES
MODO DE EMPLEO
SEGURIDAD LAS INSTRUCCIONES
1. Por favor guarde este manual para futuras referencias de forma segura, y asegúrese de que lo revisa con todos los
usuarios.
2. Por favor, de ningun modo modifique el product o alguna de sus partes. Las modificaciones afectarán a la integridad
estructural y las piezas de recambio correrán a cargo del consumidor. El uso inexacto o el montaje incorrecto de este
producto está expresamente prohibido y libera al fabricante de toda responsabilidad. Este producto necesita ser
montado por un adulto antes de ser usado.
3. El uso del producto sólo está permitido bajo la vigilancia de un adulto. El producto está destinado únicamente a ser
usado como tirolina entre dos puntos, para un único usuario mayor de 8 años, y con un peso máximo de 80 kg.
4. Este producto cumple con todos los aspectos de seguridad según las Normas Europeas EN71-1, EN71-2, EN71-3 y
EN71-8, y está unicamente indicado para uso doméstico familiar, en interior y en exterior.
5. La tirolina solo debe ser usada tras haber sido correctamente instalada de acuerdo a las instrucciones siguientes.
6. La instalación de este producto como parte de otro conjunto o construcción de juego, ha de ser de tal modo que
excluya cualquier riesgo de atrapamiento.
7. Cuando se monte el producto se debe poner especial atención a los requerimientos de distancias mínimas entre el producto y cualquier posible obstáculo: muros, vayas, etc. Esta distancia debe ser de mínimo 2 metros
(vea última página, FIG I).
8. En esta área de seguridad no pueden haber objetos duros o angulosos. El suelo tiene que ser plano y amortiguar
choques. El producto no se puede colocar por lo tanto sobre el asfalto, cemento u otra superficie dura. Aconsejamos
desmontar y guardar todos los accesorios durante el invierno porque las características del suelo (al congelar) no permiten jugar con seguridad.
9. Por favor, asegúrese de que el arbol, rama o construcción al que se instale el producto, es capaz de soportar un peso
de 300 kg.
10.Todas las piezas deben ser comprobadas regularmente. Para materiales de recambio o de ampliación del equipamiento
de juego, por favor contacte con el proveedor. La seguridad estará asegurada en consecuencia.
INSTRUCCIONES PARA LA ALTURA DEL CABLE
Con el fin de montar la tirolina correctamente y de modo seguro, deben seguirse los siguientes requerimientos de altura.
Uno de los extremos del cable debe ser montado a una altura superior al otro extremo. Estas alturas deben ir en concordancia con la altura del usuario y con la distancia a los puntos de fijación. Para determinar las alturas correctas, siga los
siguientes pasos:
1. Mida la altura del usuario. Si hay más de un posible usuario, y la diferencia de altura es menor a 15 cm, use la altura
del usuario más alto. Si la diferencia es mayor de 15 cm, la tirolina necesita ajustarse en altura cada vez que la altura
del usuario está fuera del rango especificado.
2. Añada 75 cm a la altura del usuario medida, y marque este punto sobre el árbol o el marco de la construcción.
3. Mida la distancia entre los 2 puntos de fijación. Determine la altura correspondiente de acuerdo a la siguiente table, y
marque esta altura sobre el árbol o marco de construcción al otro extremo.
Altura
Altura del punto
del
más bajo
usuario
de fijación (x)
1,20
1,40
1,50
1,70
1,80
m
m
m
m
m
2,00
2,10
2,30
2,45
2,60
m
m
m
m
m
Altura del punto más alto de fijación, de acuerdo a las
siguientes distancias entre los dos puntos de fijación (y)
24,50 m
2,90
3,00
3,20
3,35
3,50
m
m
m
m
m
21,50 m
2,75
2,90
3,00
3,20
3,35
m
m
m
m
m
18,50 m
2,60
2,75
2,90
3,00
3,20
m
m
m
m
m
15,50 m
2,45
2,60
2,75
2,90
3,00
m
m
m
m
m
12, 50 m
2,30
2,45
2,60
2,75
2,90
m
m
m
m
m
INSTRUCCIONES PARA EL USO
1. Salga siempre de una plataforma estable y segura.
2. Mantenga siempre el carro firmemente con ambas manos (o sujete fuerte la cuerda del asiento pendular en su caso).
3. Suelte el carro solo cuando haya alcanzado totalmente la verticalidad, y puedan ponerse ambos pies en el suelo o la
plataforma.
4. El product debe usarse siempre bajo la supervisión de un adulto.
5. Compruebe siempre la estructura, fijaciones, carro, tensores del cable, bridas y el cable antes de usar la tirolina.
6. No permita niños bajo, cerca o al lado de las inmediaciones de la construcción cuando esté en uso.
7. No lleve calzado que pueda desprenderse (como chanclas, calzado descubierto, etc. ) mientras use la tirolina. Esto
puede ser peligroso por riesgo de atrapamiento.
8. No use la tirolina cuando la construcción o el carro estén húmedos.
9. Solo se permite el uso conjunto del asiento pendular KBT con grillete especial en D, a la hora de usarlo con la tirolina.
El uso de otros asientos o cuerdas está considerado como inapropiado para su uso y podría ser peligroso.
6
tirolina ‘para’
IT
ISTRUZIONI PER L’USO
INDIRIZZAMENTI PER L’USO
1. Conservare le istruzioni con cura al fine di poterle consultare con tutti i futuri utilizzatori.
2. Non apportare al prodotto delle modifiche che possono intaccare l’integrità strutturale; i costi eventuali di ricambio sono
a carico dell’acquirente. L’uso improprio oppure il montaggio sbagliato è vietato e solleva il fabbricante di ogni responsibilità. Questo prodotto deve essere montato da un adulto prima dell’uso.
3. Il prodotto deve essere utilizzato esclusivamente sotto la costante supervisione di un adulto. Il prodotto è costituito di
teleferica per cavo metallico fissato in due punti, è omologato per l’uso di una sola persona di età superiore agli otto
anni e di peso massimo di 80 kg.
4. Questo prodotto è conforme a tutti i requisiti descritti nelle Norme Europee EN71-1, EN71-2, EN71-3 e EN71-8 relative
alla sicurezza, conviene soltanto per uso residenziale sia in casa, sia all’aperto.
5. La teleferica deve essere usata solo dopo essere stato installato secondo le seguenti istruzioni
6. L’applicazione di questo articolo come componente di una struttura ludica o di altro genere deve prevedere il controllo
e l’applicazione escludendo qualsiasi rischio di sinistro o intrappolamento.
7. Quando si monta o si assembla il prodotto, si deve fare attenzione a rispettare la distanza minima richiesta fra il gioco
ed eventuali ostacoli: muri, recinzioni o altro. La distanza minima deve essere di pari misura alla lunghezza delle corde
più 2 metro (vedere ultima pagina, FIG I).
8. In quest’area di sicurezza non devono essere presenti oggetti duri, con spigoli o appuntiti. Il gioco non deve essere
posto su piazzole asfaltate o su qualsiasi superficie dura. Deve essere posto su superfici anti trauma. Noi consigliamo
di rimuovere e porre al riparo tutti gli accessori durante l’inverno perché le caratteristiche del terreno, in presenza di
ghiaccio non sono sufficientemente sicure per l’uso del gioco.
9. Assicurarsi che l’albero o la costruzione alla quale si applica la teleferica sia solida e capace di supportare il peso di
300 kg.
10.Tutti i pezzi devono essere controllati regolarmente. Per il materiale di sostituzione e l’ampliamento delle attrezzature
parco giochi, si prega di contattare il fornitore. Di conseguenza, la sicurezza sarà garantita.
ISTRUZIONI PER L’ALTEZZA DEL CAVO
Al fine di applicare correttamente ed in sicurezza la teleferica è necessario seguire esattamente le altezze richieste. Entrambi i capi
del cavo devono essere montati alla stessa altezza. Queste altezze dipendono dall’altezza di chi le dovrà utilizzare e dalla distanza dei
due punti di fissaggio. Al fine di determinare le corrette altezze seguire i passaggi qui indicati:
1. Misurare l’altezza del bambino che utilizzerà il prodotto. Se c’è più di un utente e la differenza è meno di 15 cm, tenere
di riferimento l’altezza dell’utente più alto.Se la differenza è più di 15 cm, la teleferica dovrà essere aggiustata ogni volta
l’altezza del bambino sarà maggiore di quanto impostato.
2. Aggiungere 75 cm all’altezza misurata per l’utente e segnare questo punto sulla struttura di sostegno sia essa albero o
costruzione.
3. Misurare le distanze tra I due punti di fissaggio. Determinare l’altezza eguale seguendo le successive indicazioni e segnarla sull’albero o sulla struttura di sostegno.
altezza
altezza di dell’uten-
fissaggio
te
più basso (x)
1,20
1,40
1,50
1,70
1,80
m
m
m
m
m
2,00
2,10
2,30
2,45
2,60
altezza punto di fissaggio più alto in accordo con le seguenti
distanze tra i 2 punti di fissaggio (y)
m
m
m
m
m
24,50 m
2,90
3,00
3,20
3,35
3,50
m
m
m
m
m
21,50 m
2,75
2,90
3,00
3,20
3,35
m
m
m
m
m
18,50 m
2,60
2,75
2,90
3,00
3,20
m
m
m
m
m
15,50 m
2,45
2,60
2,75
2,90
3,00
m
m
m
m
m
12, 50 m
2,30
2,45
2,60
2,75
2,90
m
m
m
m
m
INDIRIZZAMENTI PER L’USO
1. Partire sempre da una struttura a piattaforma stabile.
2. Assicurare sempre la maniglia di scorrimento da entrambi i lati (o prende forte la corda, se del caso).
3. Rilasciare la maniglia solo quando si è raggiunto completamente l’arresto nella corsa e porre i piedi a terra o sulla piattaforma.
4. Utilizzare sempre il gioco sotto la supervisione di un adulto.
5. Controllare sempre la struttura, il fissaggio, lo slittamento, la tensione del cavo, la chiave del cavo e il cavo prima dell’
uso.
6. Non lasciare che i bambini stiano nelle vicinanze del gioco durante l’utilizzo da parte di un’altra persona, non rimanere
ne sotto ne accanto ne nelle vicinanze.
7. Non indossare abbigliamento non aderente come sciarpe e ponchos al fine di evitare il rischio di intrappolamento durante
l’uso del gioco.
8. Non utilizzare la teleferica quando la costruzione e la maniglia di scorrimento sono bagnati.
9. Solo il seggiolino tondo KBT, con l’aggancio speciale a D puo’ essere utilizzato e attaccato alla carrucola di scorrimento.
L’uso di qualsiasi altro materiale seggiolini, corde… è considerato un uso inappropriato e puo’ essere causa di danni.
teleferica ‘para’
7
Instructions for use - M244.03 - zip wire ‘para’
PL
INSTRUKCJA OBSŁUGI
INSTRUKCJA BEZPIECZEŃSTWA
1. Proszę zachować niniejszą instrukcję obsługi w celu wykorzystania jej w przyszłości. Z instrukcją powinni zapoznać się
wszyscy użytkownicy urządzenia.
2. Prosimy nie modyfikować urządzenia ani innych danych montażowych w jakikolwiek sposób. Zmiany będą miały wpływ
na integralność strukturalną i wymiana części zamiennych nastąpi na koszt nabywcy. Niewłaściwe używanie lub zastosowanie produktu niezgodne z przeznaczeniem jest zabronione i zwalnia producenta z jakiejkolwiek odpowiedzialności.
Przed użyciem produkt musi być zmontowany przez osobę dorosłą.
3. Użycie tylko pod opieka osoby dorosłej. Produkt przeznaczony jest wyłącznie do użytku jako zjazd pomiędzy dwoma
punktami dla jednego użytkownika w wieku od 8 lat i wadze maksymalnej do 80 kg.
4. Produkt spełnia europejskie normy bezpieczeństwa EN71-1, EN71-2, EN71-3 i EN 71-8. Przeznaczony jest wyłącznie do
użytku przydomowego, zarówno w pomieszczeniach, jak i na zewnątrz.
5. Zjazd linowy może być użytkowany po prawidłowym montażu zgodnie z poniższymi wytycznymi.
6. Podczas montowania produktu należy upewnić się, czy nie występuje ryzyko zakleszczenia.
7. Podczas montażu lub instalacji zjazdu należy sprawdzić, czy został zachowany minimalny odstęp między urządzeniem
a jakąkolwiek przeszkodą, np. ścianami, ogrodzeniami, itd. Ze względów bezpieczeństwa przeszkody muszą znajdować
się w odległości co najmniej 2 m (patrz ostatnia strona, FIG I).
8. W strefie bezpieczeństwa nie mogą znajdować się żadne twarde, kanciaste i spiczaste przedmioty. Powierzchnia pod
zjazdem powinna być płaska i posiadać właściwości amortyzujące. Produktu nie wolno ustawiać na asfalcie, betonie lub
innej twardej powierzchni.
9. Należy upewnić się, że drzewo, gałąź lub konstrukcja, do której przymocowana jest kolejka, może utrzymywać ciężar 300 kg.
10.Regularne sprawdzanie produktu, jest gwarancją bezpieczeństwa. W przypadku wymiany lub zapotrzebowania na
więcej produktów należy skontaktować się z dostawcą.
WSKAZÓWKI DOTYCZĄCE WYSOKOŚCI LINY
W celu właściwego i bezpiecznego montażu kolejki, należy przestrzegać poniższych wymagań dotyczących wysokości liny.
Jeden koniec liny musi być zamontowany na wyższym poziomie niż drugi koniec. Wysokości te zależą od wzrostu użytkownika i odległości między punktami mocowania. W celu ustalenia właściwych wysokości, należy wykonać następujące czynności:
1. Zmierzyć wzrost użytkownika. Jeśli kolejka będzie używana przez kilka osób i różnica ich wzrostu nie przekracza 15 cm,
należy uwzględnić wzrost najwyższego użytkownika. Jeśli różnica wzrostu przekracza 15 cm, wysokość kolejki musi być
regulowana za każdym razem, gdy wzrost użytkownika jest poza ustalonym zakresem.
2. Do zmierzonego wzrostu należy dodać 75 cm i zaznaczyć odpowiedni punkt na drzewie lub ramie konstrukcji.
3. Zmierzyć odległość między punktami mocowania, ustalić odpowiednią wysokość w poniższej tabeli i zaznaczyć tę wysokość na drzewie / konstrukcji po drugiej stronie.
Wysokość
Wysokość naj-
użytkow-
wyższego punktu
nika
mocowania (x)
1,20
1,40
1,50
1,70
1,80
m
m
m
m
m
2,00
2,10
2,30
2,45
2,60
m
m
m
m
m
Wysokość najwyższego punkt umocowania według następujących
odległości między 2 punkami mocowania (y)
24,50 m
2,90
3,00
3,20
3,35
3,50
m
m
m
m
m
21,50 m
2,75
2,90
3,00
3,20
3,35
m
m
m
m
m
18,50 m
2,60
2,75
2,90
3,00
3,20
m
m
m
m
m
15,50 m
2,45
2,60
2,75
2,90
3,00
m
m
m
m
m
12, 50 m
2,30
2,45
2,60
2,75
2,90
m
m
m
m
m
WSKAZÓWKI DOTYCZĄCE UŻYWANIA PRODUKTU
1. Zawsze należy rozpoczynać jazdę z pewnej i stabilnej platformy.
2. Zawsze należy trzymać mocno wózek obiema rękami (lub mocno trzymać linę huśtawki typu „małpka”, jeśli jest zainstalowana).
3. Wózek można puścić dopiero kiedy całkowicie zatrzyma się i użytkownik może oprzeć stopy na ziemi / platformie.
4. Z urządzenia należy korzystać zawsze pod nadzorem osoby dorosłej.
5. Przed użyciem kolejki zawsze należy sprawdzić konstrukcję, mocowania, wózek, linę, napinacze i klucz naciągający.
6. Podczas używania kolejki nie mogą znajdować się pod nią, obok niej ani w pobliżu żadne inne dzieci.
7. Użytkownik nie powinien nosić luźnych ubrań (peleryn, szalików itp.), ponieważ mogą one zostać wciągnięte w mechanizm kolejki.
8. Nie należy używać kolejki, gdy konstrukcja i wózek są mokre.
9. Do wózka kolejki można podczepiać wyłącznie huśtawkę typu „młpka” firmy KBT ze specjalną klamrą typu D. Stosowanie innych siedzisk, lin itp. jest uważane za zastosowanie niezgodne z przeznaczeniem i niebezpieczne.
8
zjazd linowy ‘para’
EN
INSPECTION AND MAINTENANCE
The frequency of inspection and maintenance will vary with the type of equipment or materials used or other factors (e.g.
heavy use, levels of vandalism, coastal location, air pollution, age of equipment, ...). Special attention should be given to
the swing hooks, rings, eights, plastic welds and ropes. Moving metal parts must be oiled regularly.
Routine visual inspection (weekly to monthly)
- Always check that the bolts and nuts are securely fastened.
- Check the shock absorbing surface for objects that don’t belong there.
- Check for missing parts.
- Check the equipment ground clearances.
Operational inspection (1 to 3 months)
- Check the stability of the construction.
- Check every part for excessive wear and replace when necessary.
Annual inspection (1 to 2 times per year)
- Check for rust and corrosion.
- Check every part for excessive wear and replace when necessary.
NL
INSPECTIE EN ONDERHOUD
De frequentie van controle en onderhoud hangt af van het type artikel of het materiaal of andere factoren (vb. intensiteit
van gebruik, vandalisme, ouderdom van het materiaal, omgeving, ...). Speciale aandacht verdienen de ophanghaken,
ringen, stelachten, kunststofverbindingen en touwen. Bewegende metalen delen moeten regelmatig gesmeerd worden.
Routinekeuring (wekelijks tot maandelijks)
- Kijk na of alle bouten en moeren nog voldoende vastzitten.
- Controleer de bodemafwerking op vreemde voorwerpen.
- Controleer op ontbrekende onderdelen.
- Controleer dat de veiligheidszone ontruimd is.
Werkingskeuring (1 tot 3 maandelijks)
- Controleer de stabiliteit van de constructie.
- Controleer elk onderdeel op extreme slijtage en vervang indien nodig.
Periodieke controle (1 tot 2 keer per jaar)
- Controleer op roest en corrosie.
- Controleer elk onderdeel op extreme slijtage en vervang indien nodig.
FR
CONTRÔLE ET ENTRETIEN
La fréquence des inspections et entretiens dépend du matériel utilisé ou d’autres éléménts (utilisation intensive, niveau de
vandalisme, situation littorale, pollution d’air, âge de l’équipement…). Une attention spéciale est requise pour les éléments
suivants : crochets, anneaux, huits réglables, surmoulages plastic et cordes. Les pièces métalliques mobiles doivent être
huilées régulièrement.
Inspection visuelle de routine (hebdomadaire ou mensuelle)
- Toujours s’assurer que les boulons et les écrous soient bien serrés.
- Vérifier que la surface amortissante soit libre.
- Vérifier qu’il n’y aient des pièces manquantes.
- Contrôler que la piste soit dégagée.
Inspection opérationelle (1 à 3 mois)
- Contrôler la stabilité de la construction.
- Contrôler chaque pièce sur usure excessive et remplacer si nécessaire.
Inspection annuelle (1 à 2 fois par an)
- Inspecter sur présence de rouille et corrosion.
- Contrôler chaque pièce sur usure excessive et remplacer si nécessaire.
DE
INSPEKTION UND WARTUNG
Die Frequenz der Kontrolle und Unterhalt hängt ab von dem Typ Artikel oder das Material oder andere Faktoren (z.B. Intensität des Gebrauchs, Vandalismus, Alter des Materials, Umwelt). Spezielle Überwachung brauchen folgende Teile : Aufhängehaken, Ringe, Stellachter, Kunststoffverbindungen und Seile. Bewegliche Metallteile soll man regelmäßig ölen.
Routinekontrolle (wöchentlich bis monatlich)
- Kontrollieren Sie ob alle Bolzen und Muttern noch fest genug sitzen.
- Kontrollieren Sie die Bodenausführung auf fremde Sachen.
- Kontrollieren Sie auf fehlende Unterteile.
- Kontrollieren Sie, dass die Sicherheitszone evakuiert ist.
Wirkungskontrolle (1 bis 3 Monaten)
- Kontrollieren Sie die Stabilität der Konstruktion.
- Kontrollieren Sie auf außergewöhnlichen Verschleiß und ersetzen Sie wenn nötig.
Periodische Kontrolle (1 bis 2 Mal pro Jahr)
- Kontrollieren Sie auf Rost und Erosion.
- Kontrollieren Sie auf außergewöhnlichen Verschleiß und ersetzen Sie wenn nötig.
9
Instructions for use - M244.03 - zip wire ‘para’
ES
INSPECCIÓN Y MANTENIMIENTO
La frecuencia de inspecciones y mantenimiento dependerá del tipo de equipo o materiales utilizados y otros factores (por
ejemplo, uso muy frecuente, grado de vandalismo, ubicación en la costa, contaminación del aire, antigüedad del equipo,
...). Atención especial merecen los ganchos y anillas para colgar, los enlaces de plástico, las anillas y ochos y las cuerdas.
Las partes metálicas móviles deben ser engrasadas con regularidad.
Inspección visual rutinaria (semanalmente o mensualmente)
- Asegúrese siempre de que los pernos y las tuercas están bien fijados.
- Verifique que no existen obstáculos en el área de seguridad del producto.
- Compruebe que no faltan piezas.
- Verifique las distancias entre el aparato y el suelo.
Inspección operacional (1 a 3 meses)
- Verifique la estabilidad de la construcción.
- Verifique todos los componentes por si hubiera un desgaste excesivo y sustitúyalos cuando sea necesario.
Inspección anual (de 1 a 2 veces al año)
- Compruebe que no hay partes oxidadas o con herrumbre.
- Verifique todos los componentes por si hubiera un desgaste excesivo y sustitúyalos cuando sea necesario.
IT
ISPEZIONE E MANUTENZIONE
La frequenza delle ispezioni e della manutenzione dipende del materiale utilizzato per l’attrezzatura o di altri fattori (p.e.
uso intensivo, livello di vandalismo, ubicazione litorale, inquinamento atmosferico, età dell’attrezzatura,…). Si dovrà prestare particolare attenzione ai ganci di sospensione, agli anelli, ai ganci a “8”, ai connettori di plastica e alle corde. È necessario lubrificare regolarmente le parti metalliche mobili.
Ispezione visuale di routine (settimanale o mensile)
- Sempre assicurarsi che i bulloni e dadi siano bene serrati.
- Assicurarsi che la superficie antitrauma sia sgombra da oggetti che non dovrebbero starci.
- Assicurarsi che non ci manchino delle parti.
- Controllare che la pista sia sgombra da oggetti.
Ispezione operativa (1 a 3 mesi)
- Controllare la stabilità della costruzione.
- Controllare ogni parte su logoramento eccessivo e sostituire se necessario.
Ispezione annuale (1 a 2 volte ogni anno)
- Controllare la ruggine e la corrosione.
- Controllare ogni parte su logoramento eccessivo e sostituire se necessario.
PL
KONTROLA I KONSERWACJA
Częstotliwość kontroli i konserwacji zależy od rodzaju artykułu, użytych materiałów bądź innych czynników (np. dużego
obciążenia, umyślnego zniszczenia, wilgotności powietrza, zanieczyszczenia powietrza, wieku wyposażenia itp.). Szczególną uwagę należy zwrócić na zawiesia, kółka, ósemki, zgrzewy, liny. Ruchome metalowe elementy powinny być regularnie
oliwione.
Rutynowa kontrola (raz na tydzień lub raz na miesiąc)
- Zawsze należy sprawdzać, czy śruby i nakrętki są mocno dokręcone.
- Na podłożu amortyzującym pod produktem nie powinny znajdować się żadne przedmioty.
- Należy sprawdzać, czy nie brakuje żadnych elementów.
- Należy kontrolować odległość między siedziskiem a podłożem.
Kontrola robocza (raz na 1 do 3 miesięcy)
- Należy sprawdzać stabilność konstrukcji.
- Należy sprawdzić zużycie każdej części i w razie potrzeby wymienić na nową.
Kontrola roczna (1 lub 2 razy do roku)
- Należy sprawdzać elementy konstrukcji pod kątem obecności rdzy i korozji.
- Należy sprawdzić zużycie każdej części i w razie potrzeby wymienić na nową.
10
ASSEMBLY - MONTAGE - MONTAJE
MONTAGGIO - MONTAŻ
PART LIST - ONDERDELEN - LISTE DES PIÈCES - UNTERTEILE
LISTA DE PARTES - ELENCO DEGLI ELEMENTI - LISTA CZĘŚCI
-Take all parts out of the packaging and check if anything is damaged, and if all parts are present.
-Verwijder alle onderdelen uit de verpakking en kijk of er beschadigde of ontbrekende delen zijn.
-Sortez toutes les pièces de l’emballage et vérifiez s’il y a des pièces abîmées ou manquantes.
-Holen Sie alle Unterteile aus der Verpackung und kontrollieren Sie, ob es beschädigte oder fehlende Teile gibt.
-Saque todas las piezas del embalaje y compruebe si algo está dañado, y si todas las piezas están presentes.
-Rimuovere tutte le parte dalla confezione, controllare che niente sia danneggiato e che tutti i pezzi siano presenti.
-Wyjąć wszystkie części z opakowania, sprawdzić, czy jakiegoś elementu nie brakuje lub czy nie uległ zniszczeniu.
(3)
A
(2)
(1)
B
C
D
3X
2X
A zip wire
A Seilbahn
B
B
C
D
(1) cable spanner
(2) rubber sleeve
(3) trolley
cable (wedged)
cable tensioners
nut cap
for cable spanner
C
D
A kabelbaan
A tirolina
B
B
C
D
(1) kabelspanner
(2) rubberen kous
(3) trolley
kabel
kabelklemmen
beschermdop
voor kabelspanner
C
D
A teleferica
B
B
C
D
C
D
(1) linka
(2) gumowy hamulec
(3) trolej
B linka
C mechanizm napinający
D przykrywka dla zjazd linowy
(1) tensor del cable
(2) funda de goma
(3) carro
cable (enlazado)
bridas
tapa de la tuerca para
el tensor del cable
A tyrolienne
(1) treuil de tension
(2) gaine
(3) chariot
câble coincé
serres câble
cache-écrou
pour treuil de tension
A zjazd linowy
(1) Kabelspanner
(2) Gummischutz
(3) Trolly
Geklemmtes Kabel
Kabelklemme
Schutzkappe für
den Kabelspanner
(1) dispositivo di tensione
(2) copertura cavo in gomma
(3) maniglia di scorrimento
cavo
tirante per cavo
copridado per dispositivo
di tensione
ASSEMBLY - MONTAGE - MONTAJE - MONTAGGIO - MONTAŻ
11
Instructions for use - M244.03 - zip wire ‘para’
ASSEMBLY - MONTAGE - MONTAJE
MONTAGGIO - MONTAŻ
ASSEMBLY STEPS
1.Mark the correct height on both fixing points according to the explanation in paragraph ‘Instructions for cable
height’ (see page 2).
2.Create a loop by wrapping the short cable B (the one with 2 loops at the end) around the tree / construction.
3.Turn the ends of the cable spanner and open the device as far as possible.
4.Attach the cable spanner to the loop around the tree / construction.
5.Pull the other end of the cable till it reaches the other fixing point. Tension the cable, make a loop around the
fixing point, position the cable tensioner, pull the cable as tight as possible, and close the cable tensioner.
Please take care that the cable tensioners are not positioned too close to the tree / construction (see FIG II).
6.Turn the cable spanner at the other fixing point, till the cable is tensioned at its maximum. If the cable is not
sufficiently tensioned, loosen the cable tensioner at the second fixing point, reopen the cable spanner and
repeat the steps from point 5.
7.Cut the cable with sharp pliers. Apply sellotape to the loose end of the cable to ensure that all wires of the cable
remain together.
8.Pull the rubber sleeve over the cable spanner and place the nut caps.
MONTAGESTAPPEN
1.Markeer de juiste hoogte op beide bevestigingspunten aan de hand van de uitleg in de paragraaf ‘Bepaling kabelhoogte’ (zie pagina 3).
2.Maak met de korte kabel B (2 lussen aan het uiteinde) een lus rond de boom/constructie.
3.Draai aan de uiteinden van de kabelspanner, zet deze zoveel mogelijk open.
4.Bevestig de kabelspanner aan de lus rond de boom / constructie.
5.Trek het ander uiteinde van de kabel tot bij het andere bevestigingspunt. Trek de kabel aan, maak een lus
rondhet bevestigingspunt, plaats de kabel-klem, trek de kabel zo hard mogelijk aan en zet vast met de kabelklem. Let er op dat de kabelklem niet te dicht bij de boom/constructie geplaatst wordt (zie FIG II).
6.Draai de kabelspanner aan het andere bevestigingspunt aan, totdat de kabel maximaal is opgespannen. Indien
de kabel na deze stap nog niet voldoende opgespannen is, maak dan de kabelklem aan het 2e uiteinde los,
open opnieuw de kabelspanner en herhaal de stappen vanaf 5.
7.Kort de kabel in met een scherpe kniptang. Omwikkel het losse uiteinde met plakband, zodat alle draden van
de kabel goed bij elkaar gehouden worden.
8.Trek de rubberen kous over de kabelspanner en plaats de moerdoppen.
ÉTAPPES DE MONTAGE
1.Marquez la hauteur adéquate sur les deux points de fixation à l’aide de l’explication dans le paragraphe ‘Instructions pour l’hauteur du câble’ (voir page 4).
2.Au moyen du câble court B, faites une boucle (deux boucles à l’extrémité) autour de l’arbre /de la construction.
3.Tournez aux extrémités du tendeur de câble, ouvrez-les au maximum.
4.Fixez le tendeur de câble à la boucle autour de l’arbre / de la construction.
5.Tirez l’autre extrémité du câble jusqu’à l’autre point de fixation. Tendez le câble, faites une boucle autour du
point de fixation, placez le serre câble, tendez le câble au maximum et fixez-le au moyen du serre câble. Veillez
à ce que le serre câble ne soit pas placé trop près de l’arbre / de la construction (voir FIG II).
6.Serrez le tendeur de câble à l’autre point de fixation jusqu’à ce que le câble soit tendu au maximum. Si le câble
n’est pas encore suffisamment tendu après cette étape, détachez le serre câble au niveau de la deuxième extrémité, ouvrez à nouveau le tendeur de câble et répétez les étapes à partir de 5.
7.Raccourcissez le câble à l’aide d’une pince coupante aiguisée. Enveloppez l’extrémité découpée de bande adhésive pour que tous les fils du câble soient fermement regroupés.
8.Couvrez le tendeur de câble avec la gaine et mettez les cache-écroux.
MONTAGESCHRITTE
1.Markieren sie die genauen Höhen an beiden Befestigungspunkten, welche Sie Anhand der Ausrechnung ‘Anweisung fur Kabelhöhe‘ ausgerechnet haben. (siehe Seite 5).
2.Machen Sie mit dem kurzen Kabel B (2 Schlaufen am Ende) eine Schlaufe rund um dem Baum / Konstruktion.
3.Drehen Sie am Ende des Kabelspanners, sodass dieser größtmöglich offen steht.
4.Befestigen Sie den Kabelspanner an der Schlaufe welche um dem Baum / Konstruktion ist.
5.Ziehen Sie das andere Ende des Kabels bis zum anderen Befestigungspunkt. Ziehen Sie das Kabel an, machen
Sie eine Schlaufe rund um den Befestigungspunkt und setzen Sie die Kabelklemme. Ziehen Sie das Kabel so
stramm wie möglich und befestigen Sie dieses mit der Kabelklemme. Passen Sie auf, dass die Kabelklemme
nicht zu dicht beim Baum / Konstruktion gesetzt wird (siehe FIG II).
12
ASSEMBLY - MONTAGE - MONTAJE - MONTAGGIO - MONTAŻ
ASSEMBLY - MONTAGE - MONTAJE
MONTAGGIO - MONTAŻ
6.Drehen Sie den Kabelspanner am anderen Ende des Befestigungspunktes an, sodass das Kabel maximal gespannt ist. Ist das Kabel nach diese Schritt noch nicht genug gespannt, machen Sie die Kabelklemme am
zweiten Ende los, öffnen Sie den Kabelspanner nochmals und wiederholen Sie die Schritte ab 5.
7.Kürzen Sie das Stahlseil mit einer scharfen Zange. Umwickeln Sie das lose Ende mit Klebeband, sodass all
Drähte des Kabel gut zusammen gehalten werden.
8.Ziehen sie das Gummistück über den Kabelspanner und setzen Sie den Mutterdeckel fest.
PASOS DE MONTAJE
1.Marque la altura correcta de ambos puntos de fijación, de acuerdo a las instrucciones del párrafo ‘instrucciones
para la altura del cable’ (vea página 6).
2.Cree un lazo atando el cable corto B (el que tiene dos lazos en la punta) alrededor del árbol o construcción.
3.Gire los extremos del tensor de cable y ábralo tanto como sea posible.
4.Monte el tensor de cable al lazo de alrededor del árbol o construcción.
5.Tire del otro extreme del cable hasta que alcance el otro punto de fijación. Tensione el cable, haciendo un lazo
alrededor del punto de fijación, colocando el tensador del cable, tirando del cable tanto como sea posible, y
cierre el tensador. Por favor tenga cuidado de que el tensador no esté demasiado cercano al árbol o marco de
construcción (vea FIG II).
6.Gire el tensor en otro punto de fijación, hasta que el cable esté tensionado al máximo. Si el cable no está suficientemente tensionado, desmonte la brida del segundo punto de fijación, reabra el tensor de cable y repita
los pasos desde el punto 5.
7.Corte el cable con un cortafríos afilado. Aplique cinta adhesiva al extremo cortado del cable para asegurarse
de que todos los hilos permanecen juntos.
8.Deslice la funda de goma sobre el tensor de cable y coloque las tapas de tuerca.
OPERAZIONI DI MONTAGGIO
1.Segnare l’altezza corretta in entrambi I punti di fissaggio in base a quanto specificato nel paragrafo ‘Instruzioni per l’altezza del cavo’ (vedere pagina 7).
2.Creare un cappio con il cavo corto B (quello con due cappi finali) attorno all’albero o alla struttura di fissaggio.
3.Aprire la chiave del cavo fino alla fine, aprire il congegno il più lontano possibile.
4.Attaccare la chiave del cavo al cappio attorno all’albero o struttura di sostegno.
5.Tirare l’altro capo del cavo sino all’altro punto di fissaggio. Tendere il cavo, facendo un cappio attorno al
secondo punto di sostegno, posizionare il tirante per il cavo, tirare il cavo al fine di renderlo il più solido possibile, chiudere il tirante per il cavo. Attenzione controllare che i tiranti del cavo non siano posizionati troppo
vicino all’albero o alla costruzione (vedere FIG II).
6.Girare la chiave per il cavosino all’altro punto di fissaggio, sino a che il cavo abbia raggiunto la sua massima
tensione. Se il cavo non è sufficientemente tirato, slegare il cavo dal secondo punto di ancoraggio, riaprire la
chiave per cavo e ripetere l’operazione dal punto 5.
7.Tagliare il cavo in eccesso alle estremità con pinze taglienti, applicare il nastro adesivo al termine delle due
estrimità e assicurarsi che i filamenti che compongono il cavo stiano insieme.
8.Estrarre il tubo di gomma sopra il dispositivo di tensione e metere il copridado.
MONTAŻ KROK PO KROKU
1.Zaznaczyć odpowiednią wysokość dla obu punktów mocowania zgodnie ze wskazówkami rozdziału ‘Wskazówki
dotyczące wysokości liny’ (patrz strona 8).
2.Krótką linę B (z 2 pętlami na końcach) owinąć wokół drzewa / konstrukcji.
3.Ustawić zakończenia śruby rzymskiej (napinacza), tak by uzyskać maksymalną długość.
4.Przymocować śrubę rzymską do pętli na linie owiniętej wokół drzewa / konstrukcji.
5.Przeciągnąć drugi koniec liny aż do drugiego punktu mocowania. Napiąć linę, wykonać pętlę wokół punktu mocowania, ustawić śrubę rzymską, naciągnąć maksymalnie linę i zamknąć napinacz. Należy zwrócić uwagę, by
napinacze liny nie znajdowały się zbyt blisko drzewa / konstrukcji (patrz FIG II).
6.Skręcać śrubę rzymską aż do uzyskania maksymalnego naciągnięcia liny. Jeśli lina nie jest dostatecznie naciągnięta, należy zwolnić napinacz w drugim punkcie mocowania, ponownie otworzyć napinacz i powtórzyć czynności od punktu 5.
7.Nadmiar liny należy odciąć ostrymi nożycami. Luźny koniec liny należy owinąć taśmą klejącą tak, aby druty nie
odstawały.
8.Naciągnąć gumowy wąż na śrubę rzymską i założyć nakładki na nakrętki.
ASSEMBLY - MONTAGE - MONTAJE - MONTAGGIO - MONTAŻ
13
Instructions for use - M244.03 - zip wire ‘para’
ASSEMBLY - MONTAGE - MONTAJE
MONTAGGIO - MONTAŻ
1
X
Y
2
3
ma
x
ma
x
4
13
14
ASSEMBLY - MONTAGE - MONTAJE - MONTAGGIO - MONTAŻ
ASSEMBLY - MONTAGE - MONTAJE
MONTAGGIO - MONTAŻ
5
FIG II
7
6
7
8
ASSEMBLY - MONTAGE - MONTAJE - MONTAGGIO - MONTAŻ
15
Instructions for use - M244.03 - zip wire ‘para’
ASSEMBLY - MONTAGE - MONTAJE
MONTAGGIO - MONTAŻ
TOOLS - GEREEDSCHAP - OUTILS
WERKZEUGE - HERRAMIENTAS
STRUMENTI DA LAVORO - NARZĘDZIA
7
pencil
potlood
crayon
Bleistift
lápiz
matita
ołówek
wire cutter
kniptang
coupe-fil
Kneifzange
cortafríos
cizalla para alambre
obcęgi
sellotape
plakband
bande adhésive
Klebeband
cinta adhesiva
nastro adesivo
taśmą klejącą
13
ratchet spanner with cap 7 or 13
ratelsleutel met dop 7 of 13
clé à cliquet avec douille 7 ou 13
Universalschraubenschlüssel mit Aufsatz 7 oder 13
llave de trinquete con boca del 7 o 13
chiave a cricchetto con attacco da 7 o 13
klucz z grzechodką i nakładką 7 lub 13
FIG I
45° max
min. 2 m
min. 2 m
min. 2 m
min. 2 m
16
ASSEMBLY - MONTAGE - MONTAJE - MONTAGGIO - MONTAŻ