1
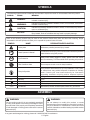
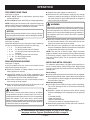
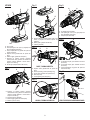
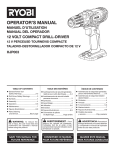
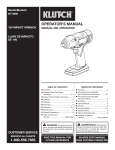
Model/Modelo: NT18CD 18 VOLT 1/2 in. 2-SPEED DRILL-DRIVER OPERATOR’S MANUAL MANUAL DEL OPERADOR TALADRODESTORNILLADOR DE 18 V 13 mm (1/2 pulg.) DOS VELOCIDADES INCLUDES: Drill, Double-ended Bit, Operator’s Manual **************** TABLE OF CONTENTS **************** ÍNDICE DE CONTENIDO Warranty................................................2 Parts Ordering and Service...................................Back page Garantía.................................................2 Advertencias de seguridad para herramientas eléctricas..............3-4 Advertencias de seguridad taladrodestornillador........................................ 4 Símbolos...............................................5 Armado..................................................5 Funcionamiento..................................6-7 Mantenimiento....................................... 8 Figuras (illustraciones)........................... 9 Pedidos de piezas y servicio............................. Pág. posterior WARNING: To reduce the risk of injury, the user must read and understand the operator’s manual before using this product. ADVERTENCIA: Para reducir el riesgo de lesiones, el usuario debe leer y comprender el manual del operador antes de usar este producto. SAVE THIS MANUAL FOR FUTURE REFERENCE GUARDE ESTE MANUAL PARA FUTURAS CONSULTAS General Power Tool Safety Warnings............................................3-4 Drill-Driver Safety Warnings.................. 4 Symbols.................................................5 Assembly...............................................5 Operation............................................6-7 Maintenance.......................................... 8 Figures (Illustrations)............................. 9 CUSTOMER SERVICE SERVICIO AL CLIENTE 1-800-556-7885 INCLUYE: Taladro, punta de destornillador doble, manual del operador WARRANTY / GARANTÍA KLUTCH POWER TOOL – LIMITED THREE YEAR WARRANTY Northern Tool and Equipment warrants its KLUTCH power tools with the following conditions: WHAT THIS WARRANTY COVERS: This KLUTCH power tool is warranted to the original purchaser only to be free from defects in material and workmanship subject to certain exceptions and limitations stated below, for a period of three (3) years after the date of purchase. Batteries and chargers sold with your KLUTCH power tool are warranted to the original purchaser only to be free from defects in material and workmanship subject to certain exceptions and limitations stated below, for a period of one (1) year after the date of purchase. HOW TO GET SERVICE: Just return the power tool or batteries, properly packaged and postage prepaid to an Authorized KLUTCH Service Center. You can obtain the location of the Authorized KLUTCH Service Center nearest you by contacting a service representative at Northern Tool and Equipment, 2800 Southcross Drive West, Burnsville, MN 55306, by calling 1-800-556-7885 or by logging on to www.northerntool.com. When you request warranty service, you must also present proof of purchase documentation, which includes the date of purchase (for example, a bill of sale). We will repair any faulty workmanship, and either repair or replace any part covered under the warranty, at our option. We will do so without any charge to you. WHAT’S NOT COVERED: This warranty applies only to the original purchaser at retail and may not be transferred. This warranty only covers manufacturing defects and does not cover part failure or damage due to normal wear or any malfunction, failure, or defect resulting from misuse, abuse, neglect, alteration, lack of maintenance, accidents, modification or repairs made or attempted by anyone other than an Authorized KLUTCH Service Center. Northern Tool and Equipment makes no warranties, representations or promises as to the quality or performance of its power tools other than those specifically stated in this warranty. ADDITIONAL LIMITATIONS: To the extent permitted by applicable law, any implied warranties granted under state law, including all warranties of merchantability or fitness for a particular purpose, that cannot be disclaimed under state law are limited to three (3) years from the date of purchase. Northern Tool and Equipment is not responsible for direct, indirect, incidental or consequential damages. No retailer or other party has any authority to create any other warranty or add to or vary this limited warranty. Northern Tool and Equipment’s maximum liability in any event under this warranty will not exceed the purchase price paid by the original purchaser. Some states do not allow limitations on how long an implied warranty lasts and/or do not allow the exclusion or limitation of incidental or consequential damages, so the above limitations and exclusions may not apply to you. This warranty gives you specific legal rights, and you may also have other rights which vary from state to state. HERRAMIENTA ELÉCTRICA KLUTCH - GARANTÍA LIMITADA DE TRES AÑOS Northern Tool and Equipment garantiza sus herramientas eléctricas KLUTCH con las siguientes condiciones: LO QUE CUBRE ESTA GARANTÍA: Esta garantía de la herramienta eléctrica KLUTCH se ofrece exclusivamente al comprador original y cubre los defectos en los materiales y en la mano de obra sujetos a ciertas excepciones y limitaciones que se indican a continuación, durante un período de tres (3) años a partir de la fecha de compra. La garantía de las baterías y cargadores vendidos con la herramienta eléctrica KLUTCH se ofrece exclusivamente al comprador original y cubre los defectos en los materiales y en la mano de obra sujetos a ciertas excepciones y limitaciones que se indican a continuación, durante un período de un (1) año a partir de la fecha de compra. FORMA DE OBTENER SERVICIO TÉCNICO: Simplemente envíe la herramienta eléctrica o las baterías, debidamente empaquetadas y con franqueo pagado a un Centro de servicio técnico autorizado de KLUTCH. Puede obtener información sobre la ubicación del Centro de servicio técnico autorizado de KLUTCH más cercano escribiendo a Northern Tool and Equipment, 2800 Southcross Drive West, Burnsville, MN 55306, llamando al 1-800-556-7885 o ingresando en www.northerntool.com. Cuando solicite el servicio técnico de garantía, también deberá presentar el comprobante de compra que incluya la fecha de compra (por ejemplo, una factura de venta). Repararemos toda mano de obra deficiente del producto y repararemos o reemplazaremos cualquier pieza cubierta por la garantía, a nuestra sola discreción. Lo haremos sin cargarle ningún costo a usted. LO QUE NO ESTÁ CUBIERTO: Esta garantía se ofrece exclusivamente al comprador original minorista y no puede transferirse. Esta garantía sólo cubre defectos de fábrica y no cubre fallas de las piezas o daños debidos al desgaste normal o a cualquier malfuncionamiento, falla o defecto por el uso indebido, maltrato, negligencia, alteración, falta de mantenimiento, accidentes, modificaciones o reparaciones efectuadas o intentadas por terceros ajenos a los Centros de servicio técnico autorizados de KLUTCH. Northern Tool and Equipment no ofrece ninguna garantía, declaración o promesa en relación con la calidad o el desempeño de sus herramientas eléctricas más que las señaladas específicamente en esta garantía. LIMITACIONES ADICIONALES: En la medida en que lo permitan las leyes aplicables, cualquier garantía implícita otorgada de conformidad con las leyes estatales, incluidas las garantías de comerciabilidad o idoneidad para un uso particular que no pueden ser negadas según las leyes estatales, están limitadas a tres (3) años a partir de la fecha de compra. Northern Tool and Equipment no es responsable de daños directos, indirectos, incidentales o consecuentes. Los vendedores minoristas o terceros no tienen autorización para crear cualquier otra garantía o realizar adiciones o cambios a esta garantía limitada. La responsabilidad máxima de Northern Tool and Equipment ante cualquier caso descrito en esta garantía no sobrepasará el precio de compra pagado por el comprador original. Algunos estados no permiten limitaciones en cuanto al período de vigencia de una garantía implícita y/o no permiten la exclusión o limitación de los daños incidentales o consecuentes, por lo que es posible que estas limitaciones y exclusiones no se apliquen en su caso. Esta garantía le confiere derechos legales específicos, y es posible que usted además goce de otros derechos, los cuales pueden variar de estado a estado. 2 GENERAL POWER TOOL SAFETY WARNINGS operating power tools may result in serious personal injury. WARNING Read all safety warnings and all instructions. Failure to follow the warnings and instructions may result in electric shock, fire and/or serious injury. Save all warnings and instructions for future reference. The term “power tool” in the warnings refers to your mains-operated (corded) power tool or battery-operated (cordless) power tool. WORK AREA SAFETY Keep work area clean and well lit. Cluttered or dark areas invite accidents. Do not operate power tools in explosive atmospheres, such as in the presence of flammable liquids, gases or dust. Power tools create sparks which may ignite the dust or fumes. Keep children and bystanders away while operating a power tool. Distractions can cause you to lose control. ELECTRICAL SAFETY Power tool plugs must match the outlet. Never modify the plug in any way. Do not use any adapter plugs with earthed (grounded) power tools. Unmodified plugs and matching outlets will reduce risk of electric shock. Avoid body contact with earthed or grounded surfaces such as pipes, radiators, ranges and refrigerators. There is an increased risk of electric shock if your body is earthed or grounded. Do not expose power tools to rain or wet conditions. Water entering a power tool will increase the risk of electric shock. Do not abuse the cord. Never use the cord for carrying, pulling or unplugging the power tool. Keep cord away from heat, oil, sharp edges or moving parts. Damaged or entangled cords increase the risk of electric shock. When operating a power tool outdoors, use an extension cord suitable for outdoor use. Use of a cord suitable for outdoor use reduces the risk of electric shock. If operating a power tool in a damp location is unavoidable, use a ground fault circuit interrupter (GFCI) protected supply. Use of a GFCI reduces the risk of electric shock. Use battery only with charger listed. For use with 18V lithium-ion battery packs, see tool/appliance/battery pack/charger correlation supplement 990000299. PERSONAL SAFETY Stay alert, watch what you are doing and use common sense when operating a power tool. Do not use a power tool while you are tired or under the influence of drugs, alcohol or medication. A moment of inattention while Use personal protective equipment. Always wear eye protection. Protective equipment such as dust mask, non-skid safety shoes, hard hat, or hearing protection used for appropriate conditions will reduce personal injuries. Prevent unintentional starting. Ensure the switch is in the off-position before connecting to power source and/or battery pack, picking up or carrying the tool. Carrying power tools with your finger on the switch or energising power tools that have the switch on invites accidents. Remove any adjusting key or wrench before turning the power tool on. A wrench or a key left attached to a rotating part of the power tool may result in personal injury. Do not overreach. Keep proper footing and balance at all times. This enables better control of the power tool in unexpected situations. Dress properly. Do not wear loose clothing or jewellery. Keep your hair, clothing and gloves away from moving parts. Loose clothes, jewellery or long hair can be caught in moving parts. If devices are provided for the connection of dust extraction and collection facilities, ensure these are connected and properly used. Use of dust collection can reduce dust-related hazards. Do not wear loose clothing or jewelry. Contain long hair. Loose clothes, jewelry, or long hair can be drawn into air vents. Do not use on a ladder or unstable support. Stable footing on a solid surface enables better control of the power tool in unexpected situations. POWER TOOL USE AND CARE Do not force the power tool. Use the correct power tool for your application. The correct power tool will do the job better and safer at the rate for which it was designed. Do not use the power tool if the switch does not turn it on and off. Any power tool that cannot be controlled with the switch is dangerous and must be repaired. Disconnect the plug from the power source and/or the battery pack from the power tool before making any adjustments, changing accessories, or storing power tools. Such preventive safety measures reduce the risk of starting the power tool accidentally. Store idle power tools out of the reach of children and do not allow persons unfamiliar with the power tool or these instructions to operate the power tool. Power tools are dangerous in the hands of untrained users. Maintain power tools. Check for misalignment or binding of moving parts, breakage of parts and any other condition that may affect the power tool’s 3 - English GENERAL POWER TOOL SAFETY WARNINGS operation. If damaged, have the power tool repaired before use. Many accidents are caused by poorly maintained power tools. Keep cutting tools sharp and clean. Properly maintained cutting tools with sharp cutting edges are less likely to bind and are easier to control. Use the power tool, accessories and tool bits etc. in accordance with these instructions, taking into account the working conditions and the work to be performed. Use of the power tool for operations different from those intended could result in a hazardous situation. BATTERY TOOL USE AND CARE Recharge only with the charger specified by the manufacturer. A charger that is suitable for one type of battery pack may create a risk of fire when used with another battery pack. Use power tools only with specifically designated battery packs. Use of any other battery packs may create a risk of injury and fire. When battery pack is not in use, keep it away from other metal objects, like paper clips, coins, keys, nails, screws or other small metal objects, that can make a connection from one terminal to another. Shorting the battery terminals together may cause burns or a fire. Under abusive conditions, liquid may be ejected from the battery; avoid contact. If contact accidentally occurs, flush with water. If liquid contacts eyes, additionally seek medical help. Liquid ejected from the battery may cause irritation or burns. SERVICE Have your power tool serviced by a qualified repair person using only identical replacement parts. This will ensure that the safety of the power tool is maintained. When servicing a power tool, use only identical replacement parts. Follow instructions in the Maintenance section of this manual. Use of unauthorized parts or failure to follow Maintenance instructions may create a risk of shock or injury. DRILL-DRIVER SAFETY WARNINGS Hold power tool by insulated gripping surfaces, when performing an operation where the cutting accessory may contact hidden wiring. Cutting accessory contacting a “live” wire may make exposed metal parts of the power tool “live” and could give the operator an electric shock. Know your power tool. Read operator’s manual carefully. Learn its applications and limitations, as well as the specific potential hazards related to this power tool. Following this rule will reduce the risk of electric shock, fire, or serious injury. Always wear eye protection with side shields marked to comply with ANSI Z87.1. Following this rule will reduce the risk of serious personal injury. Protect your lungs. Wear a face or dust mask if the operation is dusty. Following this rule will reduce the risk of serious personal injury. Protect your hearing. Wear hearing protectors during extended periods of operation. Following this rule will reduce the risk of serious personal injury. Battery tools do not have to be plugged into an electrical outlet; therefore, they are always in operating condition. Be aware of possible hazards when not using your battery tool or when changing accessories. Following this rule will reduce the risk of electric shock, fire, or serious personal injury. Do not crush, drop or damage battery pack. Do not use a battery pack or charger that has been dropped or received a sharp blow. A damaged battery is subject to explosion. Properly dispose of a dropped or damaged battery immediately. Batteries can explode in the presence of a source of ignition, such as a pilot light. To reduce the risk of serious personal injury, never use any cordless product in the presence of open flame. An exploded battery can propel debris and chemicals. If exposed, flush with water immediately. Do not charge battery tool in a damp or wet location. Following this rule will reduce the risk of electric shock. For best results, your battery tool should be charged in a location where the temperature is more than 50°F but less than 100°F. To reduce the risk of serious personal injury, do not store outside or in vehicles. Under extreme usage or temperature conditions, battery leakage may occur. If liquid comes in contact with your skin, wash immediately with soap and water. If liquid gets into your eyes, flush them with clean water for at least 10 minutes, then seek immediate medical attention. Following this rule will reduce the risk of serious personal injury. Save these instructions. Refer to them frequently and use them to instruct others who may use this tool. If you loan someone this tool, loan them these instructions also. Do not place battery tools or their batteries near fire or heat. This will reduce the risk of explosion and possibly injury. 4 - English SYMBOLS The following signal words and meanings are intended to explain the levels of risk associated with this product. SYMBOL SIGNAL MEANING DANGER: Indicates an imminently hazardous situation, which, if not avoided, will result in death or serious injury. WARNING: Indicates a potentially hazardous situation, which, if not avoided, could result in death or serious injury. CAUTION: Indicates a potentially hazardous situation, which, if not avoided, may result in minor or moderate injury. NOTICE: (Without Safety Alert Symbol) Indicates important information not related to an injury hazard, such as a situation that may result in property damage. Some of the following symbols may be used on this product. Please study them and learn their meaning. Proper interpretation of these symbols will allow you to operate the product better and safer. SYMBOL V min no .../min NAME DESIGNATION/EXPLANATION Safety Alert Indicates a potential personal injury hazard. Read Operator’s Manual To reduce the risk of injury, user must read and understand operator’s manual before using this product. Eye Protection Always wear safety goggles or safety glasses with side shields and, as necessary, a full face shield when operating this product. Wet Conditions Alert Do not expose to rain or use in damp locations. Recycle Symbols This product uses lithium-ion (Li-ion) batteries. Local, state, or federal laws may prohibit disposal of batteries in ordinary trash. Consult your local waste authority for information regarding available recycling and/or disposal options. Volts Voltage Minutes Time Direct Current Type or a characteristic of current No Load Speed Rotational speed, at no load Per Minute Revolutions, strokes, surface speed, orbits etc., per minute ASSEMBLY WARNING: Do not use this product if it is not completely assembled or if any parts appear to be missing or damaged. Use of a product that is not properly and completely assembled or with damaged or missing parts could result in serious personal injury. WARNING: Do not attempt to modify this product or create accessories not recommended for use with this product. Any such alteration or modification is misuse and could result in a hazardous condition leading to possible serious personal injury. If any parts are damaged or missing, please call 1-800-556-7885 for assistance. 5 - English OPERATION WARNING: WARNING: Do not allow familiarity with products to make you careless. Remember that a careless fraction of a second is sufficient to inflict severe injury. WARNING: Battery tools are always in operating condition. Lock the switch when not in use or carrying at your side, when installing or removing the battery pack, and when installing or removing bits. INSTALLING/REMOVING BATTERY PACK Always remove battery pack from the tool when you are assembling parts, making adjustments, cleaning, or when not in use. Removing battery pack will prevent accidental starting that could cause serious personal injury. WARNING: See Figure 2, page 9. Lock the switch trigger. Insert the battery pack into the product as shown. Make sure the latches on each side of the battery pack snap in place and that battery pack is secured in the product before beginning operation. Depress the latches to remove the battery pack. Always wear eye protection with side shields marked to comply with ANSI Z87.1. Failure to do so could result in objects being thrown into your eyes, resulting in possible serious injury. APPLICATIONS You may use this product for the purposes listed below: Drilling in all types of wood products (lumber, plywood, paneling, composition board, and hard board), ceramics, plastics, fiberglass, laminates, masonry and metals INSTALLING/REMOVING BITS See Figures 3 - 4, page 9. The arrows on the keyless chuck indicate which direction to rotate the chuck body to tighten or release the drill bit. Do not use a wrench to tighten or loosen the chuck jaws. To install bits, lock the switch trigger. Open or close the chuck jaws until the opening is slightly larger than the bit size you intend to use. Raise the front of the drill slightly and insert the drill bit. Driving screws into wood and drywall with screwdriver bits VARIABLE SPEED SWITCH TRIGGER See Figure 1, page 9. The variable speed switch trigger delivers higher speed with increased trigger pressure and lower speed with decreased trigger pressure. To turn the drill ON, depress the switch trigger. To turn it OFF, release the switch trigger and allow the chuck to come to a complete stop. NOTE: A whistling or ringing noise coming from the switch during use is a normal part of the switch function. WARNING: Make sure to insert the drill bit straight into the chuck jaws. Do not insert the drill bit into the chuck jaws at an angle then tighten. This could cause the drill bit to be thrown from the drill, resulting in possible serious personal injury or damage to the chuck. Grasp and hold the collar of the chuck with one hand. With your other hand, rotate the chuck body to close and tighten the chuck jaws. DIRECTION OF ROTATION SELECTOR (FORWARD/REVERSE/CENTER LOCK) See Figure 1, page 9. Set the direction of rotation selector in the OFF (center lock) position to lock the switch trigger and help prevent accidental starting when not in use. Position the direction of rotation selector to the left of the switch trigger for forward drilling. Position the selector to the right of the switch trigger to reverse the direction. NOTE: The drill will not run unless the direction of rotation selector is pushed fully to the left or right. WARNING: Do not hold the chuck body with one hand and use the power of the drill to tighten the chuck jaws on the drill bit. The chuck body could slip in your hand, or your hand could slip and come in contact with the rotating drill bit. This could cause an accident resulting in serious personal injury. To remove bits, lock the switch trigger and open the chuck jaws. The bit provided with the drill can be placed in the storage area, located on the base of the drill. NOTICE: To prevent gear damage, always allow the chuck to come to a complete stop before changing the direction of rotation. 6 - English OPERATION TWO SPEED GEAR TRAIN Depress the switch trigger to start the drill. See Figure 5, page 9. Select LO (1) speed for applications requiring higher power and torque. Move the bit into the workpiece, applying only enough pressure to keep the bit cutting or driving the screw. Do not force the drill or apply side pressure to elongate a hole. Let the tool do the work. Select HI (2) speed for fast drilling or driving applications. NOTE: Running at low speeds under constant usage may cause the drill to become overheated. If this occurs, cool the drill by running it without a load and at full speed. NOTICE: Never change speeds while the tool is running. Failure to obey this caution could result in serious damage to the drill. ADJUSTING TORQUE See Figure 6, page 9. Rotate the adjustment ring to the proper torque setting for the type of material and size of screw you are using. • 1-4 For driving small screws • 5-8 For driving screws into soft material • 9 - 12 For driving screws into soft and hard materials • 13 - 16 For driving screws into hard wood • 17 - 23 For driving large screws • For heavy drilling DRILLING/DRIVING SCREWS WARNING: When drilling, be prepared for binding at bit breakthrough. When these situations occur, drill has a tendency to grab and kick opposite to the direction of rotation and could cause loss of control when breaking through material. If not prepared, this loss of control can result in possible serious injury. With hard, smooth surfaces, use a center punch to mark the desired hole location. This will prevent the bit from slipping off-center as the hole is started. If the bit jams in the workpiece or if the drill stalls, stop the tool immediately. Remove the bit from the workpiece and determine the reason for jamming. NOTE: This drill has an electric brake. When the switch trigger is released, the chuck stops turning. When the brake is functioning properly, sparks will be visible through the vent slots on the housing. This is normal and is the action of the brake. WOOD AND METAL DRILLING See Figure 7, page 9. A level is located on the top of the motor housing to help keep the drill bit level during use. Check the direction of rotation selector for the correct setting (forward or reverse). Use LO (1) speed for high torque applications and HI (2) speed for fast drilling or driving applications. Refer to Two Speed Gear Train and Adjusting Torque. Secure the workpiece in a vise or with clamps to keep it from turning as the bit rotates. Hold the drill firmly and place the bit at the point to be drilled, or where the screw is to be driven. WARNING: Do not drive a screw where there is likely to be hidden wiring behind the surface. Contact with a “live” wire will make exposed metal parts of the tool “live” and possibly shock the operator. If you must drive a screw where hidden wire may be present, always hold tool by insulated gripping surfaces (handle) when performing the operation to prevent a shock to the operator. For maximum performance, use high speed steel bits for wood or metal drilling. Select drilling mode. Begin drilling at a very low speed to prevent the bit from slipping off the starting point. Wood Drilling Increase the speed as the drill bit bites into the material. When drilling through holes, place a block of wood behind the workpiece to prevent ragged or splintered edges on the back side of the hole. Metal and Steel Drilling Use a light oil on the drill bit to keep it from overheating. The oil will prolong the life of the bit and increase the drilling action. Maintain a speed and pressure which allows cutting without overheating the bit. Applying too much pressure will: • Overheat the drill; • Wear the bearings; • Bend or burn bits; and • Produce off-center or irregular-shaped holes. When drilling large holes in metal, start with a small bit, then finish with a larger bit. NOTE: Maintenance information begins on page 8 after Spanish language section. Figures (Illustrations) start on page 9. 7 - English ADVERTENCIAS DE SEGURIDAD PARA HERRAMIENTAS ELÉCTRICAS ADVERTENCIA Lea todas las advertencias de seguridad y las instrucciones. El incumplimiento de las advertencias e instrucciones puede ocasionar descarga eléctrica, fuego o lesiones graves. Guarde todas las advertencias e instrucciones para futuras consultas. El término “herramienta eléctrica” empleado en todos los avisos de advertencia enumerados abajo se refiere a las herramientas eléctricas de cordón (alámbricas) y de baterías (inalámbricas). SEGURIDAD EN EL ÁREA DE TRABAJO Mantenga limpia y bien iluminada el área de trabajo. Un área de trabajo mal despejada o mal iluminada propicia accidentes. No utilice herramientas motorizadas en atmósferas explosivas, como las existentes alrededor de líquidos, gases y polvos inflamables. Las herramientas eléctricas generan chispas que pueden encender el polvo y los vapores inflamables. Mantenga alejados a los niños y circunstantes al maniobrar una herramienta eléctrica. Toda distracción puede causar pérdida del control de la herramienta. SEGURIDAD ELÉCTRICA Las clavijas de las herramientas eléctricas deben corresponder a las tomas de corriente donde se conectan. Nunca modifique la clavija de ninguna forma. No utilice ninguna clavija adaptadora con herramientas eléctricas dotadas de contacto a tierra. Conectando las clavijas originales en las tomas de corriente donde corresponden se disminuye el riesgo de una descarga eléctrica. Evite el contacto del cuerpo con las superficies de objetos que estén haciendo tierra o estén conectados a ésta, como tuberías, radiadores, estufas y refrigeradores. Existe un mayor riesgo de descargas eléctricas si el cuerpo está haciendo tierra. No exponga las herramientas eléctricas a la lluvia ni a condiciones de humedad. La introducción de agua en una herramienta eléctrica aumenta el riesgo de descargas eléctricas. No maltrate el cordón eléctrico. Nunca utilice el cordón para trasladar, desconectar o tirar de la herramienta eléctrica. Mantenga el cordón alejado del calor, del aceite, de bordes afilados y de piezas móviles. Los cordones eléctricos dañados o enredados aumentan el riesgo de descargas eléctricas. Al utilizar una herramienta eléctrica a la intemperie, use un cordón de extensión apropiado para el exterior. Usando un cordón adecuado para el exterior se disminuye el riesgo de descargas eléctricas. Si inevitablemente debe utilizar una herramienta eléctrica en un lugar húmedo, utilice un interruptor de circuito con pérdida a tierra (GFCI) para tener un suministro protegido. El uso de un GFCI disminuye el riesgo de descarga eléctrica. Cargue las baterías solamente con el cargador indicado. Para utilizar con paquetes de baterías de iones de litio de 18V, consulte el folleto de la herramienta/aparato/paquete de baterías/ cargador complementario 990000299. SEGURIDAD PERSONAL Permanezca alerta, preste atención a lo que esté haciendo y aplique el sentido común al utilizar herramientas eléctricas. No utilice la herramienta eléctrica si está cansado o se encuentra bajo los efectos de alguna droga, alcohol o medicamento. Un momento de inatención al utilizar una herramienta eléctrica puede causar lesiones corporales serias. Use equipo de seguridad. Siempre póngase protección ocular. El uso de equipo de seguridad como mascarilla para el polvo, calzado de seguridad, casco y protección para los oídos en las circunstancias donde corresponda disminuye el riesgo de lesiones. Evite un arranque accidental de la unidad. Asegúrese de que el interruptor esté en la posición de apagado antes de conectar la herramienta. Portar las herramientas eléctricas con el dedo en el interruptor, o conectarlas con el interruptor puesto, propicia accidentes. Retire toda llave o herramienta de ajuste antes de encender la herramienta eléctrica. Toda llave o herramienta de ajuste dejada en una pieza giratoria de la herramienta eléctrica puede causar lesiones. No estire el cuerpo para alcanzar mayor distancia. Mantenga una postura firme y buen equilibrio en todo momento. De esta manera se logra un mejor control de la herramienta eléctrica en situaciones inesperadas. Vístase adecuadamente. No vista ropas holgadas ni joyas. Mantenga el cabello, la ropa y los guantes alejados de las piezas móviles. Las ropas holgadas, las joyas y el cabello largo pueden engancharse en las piezas móviles. Si se suministran dispositivos para conectar mangueras de extracción y captación de polvo, asegúrese de que éstas estén bien conectadas y se usen correctamente. La utilización de captador de polvo puede disminuir los peligros relacionados con el polvo. No vista ropas holgadas ni joyas. Recójase el cabello si está largo. Las ropas holgadas y las joyas, así como el cabello largo, pueden resultar atraídas hacia el interior de las aberturas de ventilación. No utilice la unidad al estar en una escalera o en un soporte inestable. Una postura estable sobre una superficie sólida permite un mejor control de la herramienta eléctrica en situaciones inesperadas. EMPLEO Y CUIDADO DE LA HERRAMIENTA ELÉCTRICA No fuerce la herramienta eléctrica. Utilice la herramienta eléctrica adecuada para cada trabajo. La herramienta eléctrica adecuada efectúa mejor y de manera más segura el trabajo, si además se maneja a la velocidad para la que está diseñada. No utilice la herramienta si el interruptor no enciende o no apaga. Cualquier herramienta eléctrica que no pueda controlarse con el interruptor es peligrosa y debe repararse. Desconecte la clavija del suministro de corriente o retire el paquete de baterías de la herramienta eléctrica, según sea el caso, antes de efectuarle cualquier ajuste, cambiarle accesorios o guardarla. Tales medidas preventivas de seguridad reducen el riesgo de poner en marcha accidentalmente la herramienta. Guarde las herramientas eléctricas desocupadas fuera del alcance de los niños y no permita que las utilicen personas no familiarizadas con las mismas o con estas instrucciones. Las herramientas eléctricas son peligrosas en manos de personas no capacitadas en el uso de las mismas. Preste servicio a las herramientas eléctricas. Revise para ver si hay desalineación o atoramiento de piezas móviles, ruptura de piezas o cualquier otra condición que pueda 3 - Español ADVERTENCIAS DE SEGURIDAD PARA HERRAMIENTAS ELÉCTRICAS afectar el funcionamiento de la herramienta. Si está dañada la herramienta eléctrica, permita que la reparen antes de usarla. Numerosos accidentes son causados por herramientas eléctricas mal cuidadas. Mantenga las herramientas de corte afiladas y limpias. Las herramientas de corte bien cuidadas y con bordes bien afilados, tienen menos probabilidad de atascarse en la pieza de trabajo y son más fáciles de controlar. Utilice la herramienta eléctrica, los accesorios y brocas, hojas y cuchillas de corte, ruedas de esmeril, etc. de conformidad con estas instrucciones, tomando en cuenta las condiciones de trabajo y la tarea por realizar. Si se utiliza la herramienta eléctrica para operaciones diferentes de las indicadas podría originar una situación peligrosa. EMPLEO Y CUIDADO DE LA HERRAMIENTA DE BATERÍAS Sólo cargue el paquete de baterías con el cargador especificado por el fabricante. Un cargador adecuado para un tipo paquete de baterías puede significar un riesgo de incendio si se emplea con un paquete de baterías diferente. Utilice las herramientas eléctricas sólo con los paquetes de baterías específicamente indicados. El empleo de paquetes de baterías diferentes puede presentar un riesgo de incendio. Cuando no esté utilizándose el paquete de baterías, manténgalo lejos de otros objetos metálicos, como clips, monedas, llaves, clavos, tornillos o otros objetos metálicos, pequeños que puedan establecer conexión entre ambas terminales. Establecer una conexión directa entre las dos terminales de las baterías puede causar quemaduras o incendios. Si se maltratan las baterías, puede derramarse líquido de las mismas; evite todo contacto con éste. En caso de contacto, lávese con agua. Si el líquido llega a tocar los ojos, además busque atención médica. El líquido de las baterías puede causar irritación y quemaduras. SERVICIO Permita que un técnico de reparación calificado preste servicio a la herramienta eléctrica, y sólo con piezas de repuesto idénticas. De esta manera se mantiene la seguridad de la herramienta eléctrica. Al dar servicio a una herramienta eléctrica, sólo utilice piezas de repuesto idénticas. Siga las instrucciones señaladas en la sección Mantenimiento de este manual. El empleo de piezas no autorizadas o el incumplimiento de las instrucciones de mantenimiento puede significar un riesgo de descarga eléctrica o de lesiones. ADVERTENCIAS DE SEGURIDAD TALADRO-DESTORNILLADOR Sujete las herramientas eléctricas por las superficies aisladas de sujeción al efectuar una operación en la cual la herramienta de corte pueda entrar en contacto con cables ocultos o con su propio cordón eléctrico. Todo contacto de una herramienta con un cable cargado carga las piezas metálicas expuestas de la herramienta y da una descarga eléctrica al operador. Familiarícese con su herramienta eléctrica. Lea cuidadosamente el manual del operador. Aprenda sus usos y limitaciones, así como los posibles peligros específicos de esta herramienta eléctrica. Con el cumplimiento de esta regla se reduce el riesgo de una descarga eléctrica, incendio o lesión seria. Siempre póngase protección ocular con la marca de cumplimiento de la norma ANSI Z87.1. Con el cumplimiento de esta regla se reduce el riesgo de lesiones corporales serias. Protéjase los pulmones. Use una careta o mascarilla contra el polvo si la operación genera mucho polvo. Con el cumplimiento de esta regla se reduce el riesgo de lesiones serias. Protéjase los oídos. Durante períodos prolongados de utilización del producto, póngase protección para los oídos. Con el cumplimiento de esta regla se reduce el riesgo de lesiones corporales serias. No se necesita conectar a una toma de corriente las herramientas de baterías; por lo tanto, siempre están en condiciones de funcionamiento. Esté consciente de los posibles peligros cuando no esté usando la herramienta de baterías o cuando esté cambiando los accesorios de la misma. Con el cumplimiento de esta regla se reduce el riesgo de una descarga eléctrica, incendio o lesión corporal seria. No coloque herramientas de baterías ni las baterías mismas cerca del fuego o del calor. De esta manera se reduce el riesgo de explosiones y de lesiones. No aplaste, deje caer o dañe de baterías. Nunca utilice una batería o cargador que se ha caído, aplastado, recibido un golpe contundente o ha sido dañado(a) de alguna manera. Las baterías dañadas pueden sufrir explosiones. Deseche de inmediato toda batería que haya sufrido una caída o cualquier daño. Las baterías pueden explotar en presencia de fuentes de inflamación, como los pilotos de gas. Para reducir el riesgo de lesiones serias, nunca use un producto inalámbrico en presencia de llamas expuestas. La explosión de una batería puede lanzar fragmentos y compuestos químicos. Si ha quedado expuesto a la explosión de una batería, lávese de inmediato con agua. No cargue herramientas de baterías en lugares mojados o húmedos. Con el cumplimiento de esta regla se reduce el riesgo de una descarga eléctrica. Para obtener resultados óptimos, debe cargar la herramienta de baterías en un lugar donde la temperatura esté entre 10 y 38 °C (entre 50 y 100 °F). No guarde la herramienta a la intemperie ni en el interior de vehículos. En condiciones extremas de uso o temperatura las baterías pueden emanar líquido. Si el líquido llega a tocarle la piel, lávese de inmediato con agua y jabón. Si le entra líquido en los ojos, láveselos con agua limpia por lo menos 10 minutos, y después busque de inmediato atención médica. Con el cumplimiento de esta regla se reduce el riesgo de lesiones corporales serias. Guarde estas instrucciones. Consúltelas con frecuencia y empléelas para instruir a otras personas que puedan utilizar esta herramienta. Si presta a alguien esta herramienta, facilítele también las instrucciones. 4 - Español SÍMBOLOS Las siguientes palabras de señalización y sus significados tienen el objeto de explicar los niveles de riesgo relacionados con este producto. SÍMBOLO SEÑAL SIGNIFICADO PELIGRO: Indica una situación peligrosa inminente, la cual, si no se evita, causará la muerte o lesiones serias. ADVERTENCIA: Indica una situación peligrosa posible, la cual, si no se evita, podría causar la muerte o lesiones serias. PRECAUCIÓN: Indica una situación potencialmente peligrosa la cual, si no se evita, puede causar lesiones leves o moderadas. AVISO: (Sin el símbolo de alerta de seguridad) Indica información importante no relacionada con ningún peligro de lesiones, como una situación que puede ocasionar daños físicos. Es posible que se empleen en este producto algunos de los siguientes símbolos. Le suplicamos estudiarlos y aprender su significado. Una correcta interpretación de estos símbolos le permitirá utilizar mejor y de manera más segura el producto. SÍMBOLO V min no .../min NOMBRE DENOMINACIÓN/EXPLICACIÓN Alerta de seguridad Indica un peligro posible de lesiones personales. Lea el manual del operador Para reducir el riesgo de lesiones, el usuario debe leer y comprender el manual del operador antes de usar este producto. Protección ocular Siempre póngase protección ocular con protección lateral con la marca de cumplimiento de la norma ANSI Z87.1. Alerta de condiciones húmedas No exponga la unidad a la lluvia ni la use en lugares húmedos. Símbolos de reciclado Este producto contiene baterías iones de litio (Li-ion). Es posible que algunas leyes municipales, estatales o federales prohíban desechar las baterías de en la basura normal. Consulte a las autoridades reguladoras de desechos para obtener información en relación con las alternativas de reciclado y desecho disponibles. Volts Voltaje Minutos Tiempo Corriente continua Tipo o característica de corriente Velocidad en vacío Velocidad de rotación, en vacío Por minuto Revoluciones, carreras, velocidad superficial, órbitas, etc.,por minuto ARMADO ADVERTENCIA: ADVERTENCIA: No use este producto si no está totalmente ensamblado o si alguna pieza falta o está dañada. El uso de un producto que no está adecuadamente y completamente ensamblado o posee partes dañadas o faltantes puede resultar en lesiones personales graves. No intente modificar este producto ni crear accesorios que no estén recomendados para usar con este producto. Dichas alteraciones o modificaciones constituyen un uso indebido y podrían provocar una situación de riesgo que cause posibles lesiones personales graves. Si hay piezas dañadas o faltantes, le suplicamos llamar al 1-800-556-7885, donde le brindaremos asistencia.sistance. 5 - Español FUNCIONAMIENTO AVISO: ADVERTENCIA: No permita que su familarización con las herramientas lo vuelva descuidado. Tenga presente que un descuido de un instante es suficiente para causar una lesión grave. Para evitar dañar el engranaje, antes de cambiar el sentido de rotación siempre permita que se detenga completamente el portabrocas. ADVERTENCIA: ADVERTENCIA: Siempre retire el paquete de baterías de la herramienta cuando esté ensamblando partes, realizando ajustes, limpiando o cuando ésta no esté en uso. Retirando el paquete de baterías se evita arrancar accidentalmente la unidad, lo cual puede causar lesiones serias. ADVERTENCIA: Las herramientas de baterías siempre están en condiciones de funcionamiento. Bloquee el interruptor cuando no esté en uso o lo lleve a su lado, al instalar o extraer el paquete de baterías y al instalar o extraer brocas. INSTALACIÓN / DESMONTAR DEL PAQUETE DE BATERÍAS Vea la Figura 2, página 9. Siempre póngase protección ocular con protección lateral con la marca de cumplimiento de la norma ANSI Z87.1. Si no cumple esta advertencia, los objetos que salen despedidos pueden producirle lesiones serias en los ojos. USOS Bloquee el gatillo del interruptor. Coloque el paquete de baterías en el producto como se muestra. Asegúrese de que los pestillos situados a ambos lados del paquete de baterías entren completamente en su lugar con un chasquido y de que el paquete quede bien asegurado en la herramienta antes de comenzar a utilizarla. Este producto puede emplearse para los fines siguientes: Oprima los pestillos para extraer el paquete de baterías. Taladrado productos de madera (madera aserrada, madera contrachapada, paneles. madera compuesta y madera dura), cerámicas, plásticos, fibra de vidrio, material laminado, mampostería y metales INSTALACIÓN / DESMONTAR DE LAS BROCAS Enroscar tornillos en madera y paneles de yeso con punta de destornillador No utilice ninguna llave para apretar o aflojar las mordazas del portabrocas. GATILLO DEL INTERRUPTOR DE VELOCIDAD VARIABLE Vea la Figuras 3 y 4, página 9. Las flechas en el portabrocas sin llaves indican en qué dirección girar el cuerpo del portabrocas para apretar o soltar la broca. Para instalar las brocas, bloquee el gatillo del interruptor. Vea la Figura 1, página 9. Abra o cierre las mordazas del portabrocas a tal punto que la abertura sea levemente más grande que la broca deseada. El gatillo de velocidad variable produce mayor velocidad cuanta mayor presión se aplica en el gatillo, y menor velocidad cuanta menor presión se aplica en el mismo. Levante la parte delantera del taladro ligeramente e inserte la broca. Para ENCENDER el taladro, oprima el gatillo del interruptor. Para DETENER el taladro, suelte el gatillo del interruptor y permita que se detenga completamente el portabrocas. NOTA: Un silbido o zumbido que viene del interruptor durante el uso es una parte normal de la función del interruptor. SELECTOR DE SENTIDO DE ROTACIÓN (MARCHA ADELANTE/ATRÁS/SEGURO EN EL CENTRO) Vea la Figura 1, página 9. Ajuste el selector de sentido de rotación en la posición de APAGADO (seguro en el centro) para bloquear el gatillo del interruptor y ayudar a prevenir un arranque accidental cuando no esté en uso. Ubique el selector de sentido de rotación a la izquierda del gatillo del interruptor para taladrar hacia adelante. Ubique el selector a la derecha del gatillo del interruptor para taladrar hacia atrás. NOTA: El taladro no funciona a menos que se empuje el selector de dirección de giro completamente a la izquierda o derecha. ADVERTENCIA: Asegúrese de introducir la broca recta en las mordazas del portabrocas. No introduzca en ángulo la broca en las mordazas del portabrocas para después apretarla. Podría causar que la broca salga disparada del taladro, y por consecuencia, posibles lesiones corporales serias, o daños al portabrocas. Sujete con una mano el collar del portabrocas y no lo suelte. Con la otra mano, gire el cuerpo del portabrocas para cerrar y apretar las mordazas del portabrocas. ADVERTENCIA: Asegúrese de introducir la broca recta en las mordazas del portabrocas. No introduzca en ángulo la broca en las mordazas del portabrocas para después apretarla. Podría causar que la broca salga disparada del taladro, y por consecuencia, posibles lesiones corporales serias, o daños al portabrocas. 6 - Español FUNCIONAMIENTO Para extraer las brocas, bloquee el gatillo del interruptor y abra las mordazas del portabrocas. La broca suministrada con el taladro pueden colocarse en el compartimiento situado en la base de la unidad. TREN DE ENGRANAJES DE DOS VELOCIDADES Oprima el gatillo del interruptor para encender el taladro. Introduzca la broca en la pieza de trabajo, aplicando la presión suficiente para manterner el corte de la broca. No fuerce el taladro ni aplique presión lateral para ovalar el orificio. Permita que la producto realice el trabajo. Vea la Figura 5, página 9. Seleccione la velocidad LO (1) (BAJA) para aplicaciones que requieren una mayor potencia y torsión. Seleccione la velocidad HI (2) (ALTA) para aplicaciones de taladrado o atornillado rápidas. NOTA: Si se hace funcionar el taladro a baja velocidad en uso constante puede recalentarse. Si ocurre tal situación, enfríe el taladro poniéndolo a funcionar en vacío y a toda velocidad. AVISO: Nunca cambie de gama de velocidad mientras esté funcionando la herramienta. El incumplimiento de esta precaución puede producir daños serios en el taladro. AJUSTE DE LA FUERZA DE TORSIÓN Vea la Figura 6, página 9. Gire el anillo de ajuste a la configuración de torsión adecuada para el tipo de material y tamaño de tornillo que está utilizando. • 1 a 4 • 5 a 8 • 9 a 12 • 13 a 16 • 17 a 23 • Para enroscar tornillos pequeños Para enroscar tornillos en material blando Para enroscar tornillos en material blando o duro Para enroscar tornillos en madera dura Para enroscar tornillos grandes Para taladrado pesado TALADRADO/INTRODUCCIÓN DE TORNILLOS Vea la Figura 7, página 9. Un niveau est situé sur le dessus du logement du moteur pour faire en sorte que la mèche de perçage demeure à la même hauteur pendant l’utilisation. Revise el selector de sentido de rotación para ver si está en la posición correcta (marcha adelante o atrás). Use velocidad BAJA (1) para aplicaciones de alta fuerza de torsión y velocidad ALTA (2) para aplicaciones rápidas de taladrado o con destornilladores. Consulte tren de Tren de engranajes de dos velocidades y Auste de la fuerza de torsión. Asegure la pieza de trabajo en una prensa o con abrazaderas para evitar que rote a medida que la broca gira. Sostenga firmemente el taladro y coloque la broca en el punto a taladrar o donde se colocará el tornillo. ADVERTENCIA: No introduzca tornillos donde pudiera haber cables ocultos detrás de la superficie. Todo contacto de una herramienta con un cable cargado carga las piezas metálicas expuestas de la herramienta y da una descarga eléctrica posiblemente al operador. Si debe introducir tornillos donde pudiera haber cables ocultos, siempre sujete la herramienta por las superficies aisladas de sujeción (mango) al efectuar una operación para evitar una descarga eléctrica al operador. ADVERTENCIA: Al taladrar, esté preparado por si se atasca la broca al traspasar la pieza de trabajo. Cuando ocurren estas situaciones, el taladro presenta una tendencia a trabarse y dar un contragolpe en la dirección opuesta, y podría causar una pérdida de control al perforar el material. Si usted no está preparado, esta pérdida de control podría ser causa de lesiones serias. Al taladrar superficies lisas y duras, use un punzón para marcar la ubicación deseada del orificio. De esta manera se evita que la broca se desplace del centro al iniciar la perforación. Si se atora la broca en la pieza de trabajo, o si se detiene el taladro, apague de inmediato la producto. Retire la broca de la pieza de trabajo y determine la razón causante del atoramiento. NOTA: Este taladro dispone de un freno eléctrico. Al soltarse el gatillo del interruptor, el portabrocas cesa de girar. Cuando el freno funciona correctamente, se observan chispas a través de las ranuras de ventilación del alojamiento del motor. Esto es normal y es la acción del freno. TALADRADO EN MADERA Y METAL Para obtener un desempeño óptimo de la unidad, utilice brocas de acero de alta velocidad para taladrado en madera o en metal. Seleccione el modo de taladrado. Comience a taladrar a una velocidad muy baja para impedirle a la broca abandonar el punto inicial. Taladrado en madera Aumente la velocidad a medida que la broca penetra en el material. Al taladrar orificios de lado a lado, coloque un bloque de madera detrás de la pieza de trabajo para evitar producir orillas deshilachadas o astilladas en la parte posterior del orificio. Taladrado en metal y acero Aplique aceite de baja viscosidad en la broca para evitar el recalentamiento de la misma. El aceite prolonga la vida de servicio de la broca y aumenta la eficacia de la operación de taladrado. Mantenga una velocidad y una presión tales que permitan taladrar sin recalentar la broca. Si se aplica demasiada presión: • Se recalienta el taladro; • Se gastan los cojinetes; • Se doblan o queman las brocas; y • Se producen orificios descentrados o de forma irregular. Al taladrar agujeros grandes en metal, comience con una broca pequeña y luego termine con una grande. 7 - Español MAINTENANCE BATTERY PACK REMOVAL AND PREPARATION FOR RECYCLING WARNING: When servicing, use only identical replacement parts. Use of any other parts could create a hazard or cause product damage. WARNING: GENERAL MAINTENANCE Upon removal, cover the battery pack’s terminals with heavyduty adhesive tape. Do not attempt to destroy or disassemble battery pack or remove any of its components. Batteries must be recycled or disposed of properly. Also, never touch both terminals with metal objects and/or body parts as short circuit may result. Keep away from children. Failure to comply with these warnings could result in fire and/or serious injury. Avoid using solvents when cleaning plastic parts. Most plastics are susceptible to damage from various types of commercial solvents and may be damaged by their use. Use clean cloths to remove dirt, dust, oil, grease, etc. CALIFORNIA PROPOSITION 65 WARNING: This product and some dust created by power sanding, sawing, grinding, drilling, and other construction activities may contain chemicals, including lead, known to the State of California to cause cancer, birth defects, or other reproductive harm. Wash hands after handling. Some examples of these chemicals are: • lead from lead-based paints, • crystalline silica from bricks and cement and other masonry products and, • arsenic and chromium from chemically treated lumber. Your risk from exposure to these chemicals varies, depending on how often you do this type of work. To reduce your exposure, work in a well-ventilated area and with approved safety equipment, such as dust masks that are specially designed to filter out microscopic particles. MANTENIMIENTO REMOCIÓN DEL PAQUETE DE BATERÍAS PARA EL RECICLADO ADVERTENCIA: Al dar servicio a la unidad, sólo utilice piezas de repuesto idénticas. El empleo de piezas diferentes podría causar un peligro o dañar el producto. ADVERTENCIA: Al retirar el paquete de baterías, cubra las terminales del mismo con cinta adhesiva reforzada. No intente destruir o desarmar el paquete de baterías, ni de desmontar ninguno de sus componentes. Las baterías deben reciclarse o desecharse debidamente. Asimismo, nunca toque ambas terminales con objetos metálicos y partes del cuerpo, ya que puede producirse un corto circuito. Manténgase fuera del alcance de los niños. La inobservancia de estas advertencias puede causar incendios y lesiones corporales serias. MANTENIMIENTO GENERAL Evite el empleo de solventes al limpiar piezas de plástico. La mayoría de los plásticos son susceptibles a diferentes tipos de solventes comerciales y pueden resultar dañados. Utilice paños limpios para eliminar la suciedad, el polvo, el aceite, la grasa, etc. CALIFORNIA - PROPUESTA DE LEY NÚM. 65 ADVERTENCIA: Este producto y algunos polvos generados al efectuarse operaciones de lijado, aserrado, esmerilado, taladrado y otras actividades de la construcción, contienen sustancias químicas reconocidas por el estado de California como causantes de cáncer, defectos congénitos y otras afecciones del aparato reproductor. Lávese las manos después de utilizar el aparato. Algunos ejemplos de estas sustancias químicas son: • plomo de las pinturas a base de plomo, • sílice cristalino de los ladrillos, del cemento y de otros productos de albañilería, y • arsénico y cromo de la madera químicamente tratada. El riesgo de la exposición a estos compuestos varía, según la frecuencia con que se realice este tipo de trabajo. Para reducir la exposición personal, trabaje en áreas bien ventiladas, y con equipo de seguridad aprobado, tal como las caretas para el polvo especialmente diseñadas para filtrar partículas microscópicas. 8 NT18CD Fig. 2 B Fig. 5 B A A 1 C 2 D C B F C A E A-LO speed (baja velocidad) B-Two-speed gear train (hi-lo) [engranaje de dos velocidades (alta-baja)] C-HI speed (alta velocidad) A-Depress latches to release battery pack (para soltar el paquete de baterías oprima los pestillos) B -Battery pack (paquete de baterías) C -Latches (pestillos) G A-Level (nivel) B-Two-speed gear train (HI-LO) (engranaje de dos velocidades [alta-baja]) C-Torque adjustment ring (anillo de ajuste de fuerza de torsión) D-Keyless chuck (portabrocas de apriete sin llave) E -Switch trigger (gatillo del interruptor) F - Direction of rotation selector (forward/ reverse/center lock) [selector de sentido de rotación (marche adelante / marche atrás / seguro en el centro)] G -Bit storage (compartimiento de brocas) Fig. 3 B D A A C A C B D E RIGHT / FORMA CORRECTA Fig. 1 Fig. 6 A-Keyless chuck (portabrocas de apriete sin llave) B-Unlock (release) [unlock (desasegurar)] C-Chuck jaws (mordazas del portabrocas) D -Drill bit (broca) E -Lock (tighten) [lock (asegurar)] A-To decrease torque (para disminuir la fuerza de torsión) B-To increase torque (para aumentar la fuerza de torsión) C-Torque adjustment ring (anillo de ajuste de fuerza de torsión) Fig. 7 Fig. 4 C B A - Direction of rotation selector (forward/ reverse/center lock) [selector de sentido de rotación (marche adelante / marche atrás / seguro en el centro)] B -Forward (marcha adelante) C -Switch trigger (gatillo del interruptor) D -Reverse (marcha atrás) WRONG / FORMA INCORRECTA 9 LEVEL TOP VIEW / VISTA SUPERIOR DE NIVEL NOTES / NOTAS 10 Model/Modelo: NT18CD PARTS AND SERVICE Prior to requesting service or purchasing replacement parts, please obtain your model and serial number from the product data label. • MODEL NUMBER_________________________ • SERIAL NUMBER _________________________ HOW TO OBTAIN REPLACEMENT PARTS: Replacement parts can be purchased online at www.northerntool.com or by calling 1-800-556-7885. Replacement parts can also be obtained at one of our Authorized Service Centers. 18 VOLT 1/2 in. 2-SPEED DRILL-DRIVER TALADRODESTORNILLADOR DE 18 V 13 mm (1/2 pulg.) DOS VELOCIDADES HOW TO LOCATE AN AUTHORIZED SERVICE CENTER: Authorized Service Centers can be located online at www.northerntool.com or by calling 1-800-556-7885. HOW TO OBTAIN CUSTOMER OR TECHNICAL SUPPORT: To obtain Customer or Technical Support please contact us at 1-800-556-7885. PIEZAS DE REPUESTO Y SERVICIO Antes de solicitar servicio técnico o comprar piezas de repuesto, obtenga su modelo y número de serie de la etiqueta de datos del producto. • NÚMERO DE MODELO____________________ • NÚMERO DE SERIE_______________________ CÓMO OBTENER PIEZAS DE REPUESTO: Las piezas de repuesto se pueden comprar en nuestro sitio en la red mundial, en la dirección www.northerntool.com o llamando al 1-800-556-7885. Las piezas de repuesto también se pueden obtener en uno de nuestros Centros de Servicio Autorizados. CÓMO LOCALIZAR UN CENTRO DE SERVICIO AUTORIZADO: Puede encontrar los Centros de Servicio Autorizados visitando nuestro sitio en la red mundial, en la dirección www.northerntool.com o llamando al 1-800-556-7885. CÓMO OBTENER SERVICIO O ASISTENCIA TÉCNICA AL CONSUMIDOR: Para obtener Servicio o Asistencia Técnica al Consumidor, sírvase comunicarse con nosotros llamando al 1-800-556-7885. NORTHERN TOOL AND EQUIPMENT 990000263 10-16-12 (REV:02) 2800 Southcross Drive West Burnsville, MN 55306 www.northerntool.com 1-800-556-7885 CUSTOMER SERVICE SERVICIO AL CLIENTE 1-800-556-7885