1
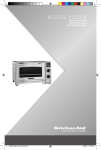
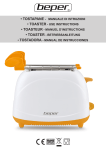
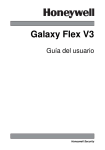
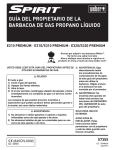
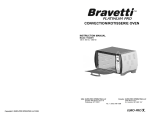
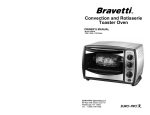
6 SLICE STAINLESS STEEL
CONVECTION TOASTER OVEN
HORNO TOSTADOR DE CONVECCIÓN DE
ACERO INOXIDABLE PARA 6 REBANADAS
OWNER’S MANUAL
MANUAL DEL PROPIETARIO
Model / Modelo TO289N2
120V., 60Hz., 1200 Watts
USA: EURO-PRO OPERATING LLC
CANADA:
94 Main Mill Street, Door 16
Plattsburgh, NY 12901
Tel.: 1 (800) 798-7398
www.euro-pro.com
COPYRIGHT © EURO-PRO OPERATING LLC 2006
EURO-PRO OPERATING LLC
4400 Bois Franc
St. Laurent, QC H4S 1A7
IMPORTANT SAFETY INSTRUCTIONS
Modelo
TO289N2
GARANTÍA LIMITADA POR UN (1) AÑO
EURO-PRO Operating LLC garantiza que este producto no presentará defectos de materiales
ni mano de obra durante un período de un (1) año a partir de la fecha de la compra original,
siempre que se utilice para uso doméstico normal, sujeto a las siguientes condiciones,
exclusiones y excepciones.
Si el artefacto no funcionara adecuadamente al usarlo en condiciones domésticas normales
dentro del período de garantía, devuelva el artefacto completo y sus accesorios, con flete
pagado por adelantado a:
EE.UU.: EURO-PRO Operating LLC, 94 Main Mill Street, Door 16, Plattsburg, N.Y. 12901
Canadá:
EURO-PRO Operating LLC, 4400 Bois Franc, St. Laurent, Quebec H4S 1A7
Si EURO-PRO considera que el artefacto presenta defectos de materiales o mano de obra,
EURO-PRO lo reparará o cambiará en forma gratuita. Deben incluirse el documento que
compruebe de la fecha de compra y $ 12.95 para cubrir el costo del envío y manipulación. *
La responsabilidad de EURO-PRO Operating LLC se limita exclusivamente al costo de la
reparación o cambio de la unidad, según su criterio. Esta garantía no cubre el desgaste normal
de las piezas y no se aplica a ninguna unidad que haya sido alterada o utilizada para propósitos
comerciales. Esta garantía limitada no cubre los daños causados por mal uso, abuso, manejo
negligente o los daños debidos a defectos en el embalaje o maltratos en el tránsito. Esta
garantía no cubre los daños o defectos causados o que resulten de daños por envío o
reparación, servicio o alteraciones al producto o a cualquiera de sus piezas, realizados por un
técnico no autorizado por EURO-PRO.
Esta garantía se extiende al comprador original de la unidad y excluye toda otra garantía legal
y/o convencional. La responsabilidad de EURO-PRO Operating LLC, de haberla, se limita a las
obligaciones específicas que asume expresamente según los términos de la garantía limitada.
En caso alguno EURO-PRO Operating LLC es responsable de daños incidentales o indirectos
de ninguna naturaleza. Algunos estados/provincias no permiten la exclusión o limitación de
daños incidentales o indirectos, por lo que lo anterior podría no aplicarse a usted.
Esta garantía le otorga derechos legales específicos y usted también podría tener otros
derechos, que varían de un estado a otro o de una provincia a otra.
*Importante: Embale cuidadosamente el artículo para evitar que se dañe durante el envío.
Asegúrese de incluir el documento que demuestre la fecha de compra y una etiqueta con
su nombre, dirección completa y número de teléfono con una nota con los datos de la
compra, número de modelo y una explicación de lo que piensa que es el problema.
Recomendamos asegurar el paquete (ya que los daños producidos durante el envío no
los cubre la garantía). En el exterior del paquete, coloque “ATTENTION CUSTOMER
SERVICE”. Nos esforzamos constantemente por mejorar nuestros productos, de modo
que las especificaciones aquí contenidas están sujetas a cambio sin aviso previo.
TARJETA DE REGISTRO DE PRODUCTO
SÓLO PARA CONSUMIDORES CANADIENSES
Complete y devuelva dentro de diez (10) días de la compra. El registro nos permitirá ponernos
en contacto con usted en caso de que se descubra un defecto en el producto. Al devolver esta
tarjeta usted reconoce haber leído y comprendido las instrucciones de uso y las advertencias
que se establecen en las instrucciones adjuntas. ENVIAR A:
EURO-PRO Operating LLC, 4400 Bois Franc, St. Laurent, Quebec H4S 1A7
TO289N2
____________________________________________________________________________
Modelo del Artefacto
____________________________________________________________________________
Fecha de Compra
Nombre de la tienda
____________________________________________________________________________
Nombre del Propietario
____________________________________________________________________________
Dirección
Ciudad
Provincia
Código Postal
Impreso en China
20
When using your Convection Toaster Oven, basic safety precautions should always
be observed, including the following:
1.
2.
3.
4.
5.
6.
7.
8.
9.
10.
11.
12.
13.
14.
15.
16. Oversized foods or metal utensils must
not be inserted in a toaster oven as
they may create a fire or risk of electric
shock.
17. A fire may occur if the oven is covered
or touching flammable material,
including curtains, draperies, walls and
the like when in operation. Do not
place any items on the oven during
operation.
18. Extreme caution should be exercised
when using cooking or baking
containers constructed of anything
other than metal or ovenproof glass.
19. Be sure that nothing touches the top or
bottom elements of the oven.
20. Do not place any of the following
materials in the oven: cardboard,
plastic, paper, or anything similar.
21. Do not store any materials other than
manufacturer’s recommended
accessories in this oven when not in
use.
22. This appliance is OFF when the Timer
Control button is in the “OFF” position.
23. Always wear protective, insulated oven
gloves when inserting or removing
items from the hot oven.
24. This appliance has a tempered, safety
glass door. The glass is stronger than
ordinary glass and more resistant to
breakage. Tempered glass can still
break around the edges. Avoid
scratching door surface or nicking
edges.
25. Do not use outdoors.
26. Do not use appliance for other than
intended use.
Read all instructions before using your
Convection Toaster Oven.
Do not touch hot surfaces. Always
use handles or knobs.
Close supervision is necessary when
any appliance is used by or near
children.
To protect against electric shock, do
not immerse cord, plug or any parts of
the oven in water or any other liquids.
Do not let cord hang over edge of
table or counter, or touch hot surfaces.
Do not operate appliance with
damaged cord or plug or after the
appliance malfunctions or has been
damaged in any manner. Return
appliance to the nearest EURO PRO
Operating LLC for examination, repair
or adjustment.
The use of accessory attachments not
recommended by the appliance
manufacturer may cause hazard or
injury.
Do not place on or near a hot gas or
electric burner.
When operating the oven, keep at
least four inches of free space on all
sides of the oven to allow for adequate
air circulation.
Unplug from outlet when not in use and
before cleaning. Allow to cool before
putting on or taking off parts, and
before cleaning.
To disconnect, turn the time control
button to OFF, then remove the plug.
Always hold the plug, and never pull
the cord.
Extreme caution must be used when
moving a drip pan containing hot oil or
other hot liquids.
Do not cover crumb tray or any part of
the oven with metal foil. This may
cause the oven to overheat.
Use extreme caution when removing
the tray, racks or disposing of hot
grease or other hot liquids.
Do not clean the inside of the oven
with metal scouring pads. Pieces can
break off the pad and touch electrical
parts, creating a risk of electric shock.
This unit has a short power supply cord to
reduce the risk resulting from becoming
entangled in or tripping over a long cord. An
extension cord may be used if you are
careful in its use:
1. The electrical rating of the extension
cord should be at least as great as the
electrical rating of the appliance.
2. An extension cord with the power cord
must be arranged so that it will not
drape over the countertop or tabletop
where they can not be pulled on by
children or tripped over accidentally.
SAVE THESE INSTRUCTIONS
For Household Use Only
WARNING: To reduce the risk of electric shock, this appliance has a polarized plug (one blade
is wider than the other). This plug will fit in a polarized outlet only one way. If the plug does not
fit fully in the outlet, reverse the plug. If it still does not fit, contact a qualified electrician to install
the proper outlet. Do not modify the plug in any way.
1
Rev. 08/06
GETTING TO KNOW YOUR
CONVECTION TOASTER OVEN
Cuidado y Limpieza
Advertencia: Asegúrese de desenchufar el horno y dejar que se enfríe antes
de limpiarlo.
K
A.
B.
C.
D.
E.
F.
G.
H.
I.
J.
K.
L.
Si lo desea, repase las paredes con una esponja húmeda, trapo o almohadilla de
nylon y con un detergente suave.
NO UTILICE ALMOHADILLAS DE LANA DE ACERO, LIMPIADORES ABRASIVOS
O RASPE LAS PAREDES CON UTENSILIOS METÁLICOS, YA QUE TODOS
ESTOS MÉTODOS PUEDEN DAÑAR EL RECUBRIMIENTO AUTOLIMPIANTE.
Todos los accesorios se deben lavar con agua tibia y detergente o bien en un
lavavajillas. La puerta se puede limpiar con una esponja húmeda y secar con una
toalla de papel o paño. Limpie el exterior con una esponja húmeda. NO USE UN
LIMPIADOR ABRASIVO, YA QUE PUEDE DAÑAR EL ACABADO DEL EXTERIOR.
NO USE LIMPIADORES ABRASIVOS O ESPONJAS DE ALAMBRE EN LA
BANDEJA RECOGEGOTAS, YA QUE SE PUEDE DAÑAR EL ACABADO CON
BARNIZ DE PORCELANA.
DEJE QUE TODOS LOS COMPONENTES Y SUPERFICIES SE SEQUEN BIEN
ANTES DE ENCHUFAR EL HORNO Y USARLO.
Housing
Temperature Control
Function Control
Power ON Light
Timer
Upper Heating Element
Rack Support Guides
Lower Heating Element
Glass Door
Crumb Tray
Wire Rack (x2)
Broiler Pan
Technical Specifications
Voltage:
120V., 60Hz.
Power:
1200 Watts
* Note: Illustrations may differ from actual product
CONTROL PANEL
2
19
Grill
Observe que la función Grill es lo mismo que asar, pero sin la función de convección.
Para obtener los mejores resultados se recomienda precalentar el horno durante 15
minutos a 450ºF.
Operación
•
•
•
•
•
•
•
•
•
•
•
•
Ajuste el control de temperatura a 450ºF.
Ajuste el control de funciones en Grill.
Precaliente el horno.
Coloque la rejilla sobre la bandeja para migajas.
Coloque el alimento en la rejilla y deslícela en la guía de soporte de rejilla superior
o en la guía de soporte de rejilla media, según el tamaño del alimento que esté
cocinando.
El alimento debe colocarse lo más cerca posible del calefactor superior, sin
tocarlo.
Ajuste el control de temperatura en el nivel adecuado.
Pase un pincel a los alimentos con las salsas o aceite, según lo desee.
Gire el control de tiempo a la posición “Stay On” (Permanecer Encendido).
Es aconsejable dejar la puerta ligeramente entreabierta.
Dé vuelta el alimento cuando haya transcurrido el tiempo de cocción prescrito.
Cuando termine el grillado, gire el control de tiempo a la posición “OFF”.
Keep Warm (Mantener caliente)
Mantiene los alimentos cocinados calientes durante 30 minutos. No se recomiendan
períodos más prolongados, porque los alimentos se secarán o estropearán.
Operación
•
•
•
•
Coloque el control de temperatura en 150ºF.
Gire el control de funciones a Keep Warm.
Gire el control de tiempo a la posición “Stay On”.
Cuando haya terminado con Keep Warm, gire el control de tiempo a la posición
“Off”.
Precaución: Al deslizar las bandejas fuera del horno, siempre sostenga la
rejilla. NO LA SUELTE HASTA ESTAR SEGURO DE QUE LA
REJILLA ESTÁ FIRMEMENTE APOYADA.
18
Read all the sections of this booklet and follow all the instructions carefully.
Before Using Your Convection Toaster Oven
1.
2.
3.
4.
5.
Read all of the instructions included in this manual.
Make sure that the oven is unplugged and the Time Control is in the “OFF”
position.
Wash all the accessories in hot, soapy water or in the dishwasher.
Thoroughly dry all accessories and re-assemble in oven. Plug oven into outlet
and you are ready to use your new Toaster Oven with Convection.
After re-assembling your oven, we recommend that you run it at the highest
temperature (450° F) on the Toast Function for approximately 15minutes to
eliminate any packing residue that may remain after shipping. This will also
remove all traces of odor initially present.
Please Note: Initial start-up operation may result in minimal smell and smoke (about
15 minutes). This is normal and harmless. It is due to burning of the
protective substance applied to the heating elements in the factory.
Using Your Convection Toaster Oven
Please familiarize yourself with the following oven functions and accessories prior to
first use:
Temperature Control
Choose the desired temperature from 150°F (Keep Warm) to 450°F for baking,
broiling, toasting or grilling.
Function Control
This oven is equipped with five positions for a variety of cooking needs:
Bake w/Convection - Cakes, pies, cookies, poultry, beef, pork, etc.
Toast w/ Convection - Bread, muffins, frozen waffles, etc.
Grill - For grilling fish, steak, sandwiches, bacon & eggs, etc.
Broil w/ Convection - For broiling fish, steak, poultry, pork chops, etc.
Keep Warm - To keep cooked food warm for up to 30 minutes.
Time Control
When you turn the control to the left, (counter-clockwise), the oven will “STAY ON”
until it is manually shut “OFF”. To activate the timer segment of the control, turn to the
right (clockwise) to toast or use as a timer. This function also has a bell that rings at
the end of the programmed time.
Convection Fan
The convection fan works automatically on Broil, Bake and Toast settings.
• Power “On” Light - It is illuminated whenever the oven is turned on.
• Broiler Pan - For use in broiling and roasting meat, poultry, fish and various other
foods
3
Convection Cooking
Pizza
Convection cooking combines hot air movement by means of a fan with the regular
features (broil, bake and toast). Convection cooking provides faster cooking in many
cases than regular radiant types toaster ovens. The fan gently sends air to every area
of the food, quickly browning, crisping and sealing in moisture and flavor. It produces
more even temperature all around the food by air movement, so that food
cooks/bakes/broils evenly versus the normal ovens hot and cold spots. The convection
feature allows cooking/baking at lower temperatures, which saves energy and helps
keep the kitchen cooler. Convection air is superheated and it circulates around the
food so it cooks food significantly faster than conventional ovens.
Cocine su pizza preferida en el horno tostador. Puede colocar recipientes de hasta 12
pulgadas de diámetro en su horno. Nunca utilice plástico, cartón, papel o algo similar
en el horno. Utilice la guía de soporte central para cocinar pizza.
Warning: To avoid risk of injury or burns, do not touch hot surfaces when
oven is in use. Always use oven mitts.
Caution: Always use extreme care when removing broiler pan, wire rack or
any hot container from a hot oven. Always use an oven mitt when
removing hot items from the oven.
Operación
• Coloque la bandeja de alambre redondeada en la guía central.
• Precaliente el horno durante 15 minutos a 450ºF.
• Gire la perilla de control de función a “Bake”.
• Coloque la perilla de control del temporizador en la posición “STAY ON”.
• Baje la temperatura de acuerdo con las instrucciones de la receta.
• Coloque la pizza en el horno y comience a cocinarla.
• Una vez que haya terminado de cocinar, gire el control de tiempo a “OFF”.
Pizzas Congeladas
Cocine durante 5-8 minutos o como se indique en el paquete. Es recomendable
sacar la pizza del congelador 10 minutos antes de ponerla en el horno. Coloque la
pizza en el horno tostador para cocinarla.
Polvo para preparar Pizza
Siga las instrucciones de la caja. Coloque la pizza en el horno para cocinarla.
Cocínela durante 18-25 minutos.
Pizza Empezando desde Cero
Siga las instrucciones desde el comienzo. Coloque la pizza en el horno tostador para
cocinarla.
Tostado con Convección
La gran capacidad del horno permite tostar 4 a 6 rebanadas de pan, 6 panecillos,
barquillos congelados o pan queques congelados. Cuando tueste sólo 1 ó 2 unidades,
coloque el alimento en la rejilla al centro del horno.
Operación
•
•
•
•
•
•
Coloque el control de temperatura en 450ºF.
Gire el control de funciones a Toast/Convection.
Coloque el alimento que desea tostar en una rejilla.
Asegúrese de que la bandeja para migajas esté instalada.
Gire el control de tiempo a la posición deseada. (Claro a oscuro).
La campanilla sonará para indicar el fin del ciclo de tostado.
Nota: La rejilla se debe colocar en el medio del horno con la parte dentada hacia
abajo.
Ajuste de Tostado
Light (claro):
Medium (mediano):
Dark (oscuro):
4 min.
7 min.
9 min.
Precaución: Al tostar, no deje los alimentos dentro del horno durante más tiempo
que los períodos antes indicados. Un tostado que exceda los tiempos
recomendados quemará los alimentos.
4
17
Horneado con Convección
El horneado por convección es muy uniforme y parejo. El horno se calienta
rápidamente, de modo que no es necesario ni deseable precalentarlo. El ventilador
hace circular el aire caliente en todo el alimento, haciendo que los productos
horneados suban en forma rápida y pareja.
Hornee sus galletas, tartas, pasteles, bizcochos de chocolate y nueces, etc. En el
horno caben utensilios para hornear hasta de 9 pulgadas de longitud. No
recomendamos el uso de bolsas para asar al horno ni recipientes de vidrio.
NUNCA UTILICE PLÁSTICO, CARTÓN, PAPEL O MATERIALES SIMILARES EN
EL HORNO.
Nota: Coloque la rejilla en la guía de soporte inferior.
Operación
•
•
•
•
•
Coloque la rejilla en la guía de soporte de rejilla inferior o media según la altura
del recipiente o de acuerdo con la receta.
Coloque el recipiente con los alimentos que se hornearán en la rejilla.
Gire el control de funciones a Bake/Convection.
Gire el control de tiempo a la posición “Stay On”.
Cuando termine el horneado, gire el control de tiempo a la posición “OFF”.
Broiling with Convection
The top heating elements cycle on and off to maintain maximum temperature in the
oven. For best results, the oven should be preheated for 20 minutes at 450° F before
adding the food to be broiled. In the convection oven, it is not necessary to turn the
food because the fan circulates the hot air around the food. The food must be placed
on the wire rack with the crumb tray beneath it (see illustration) to allow the circulation
of air.
Operation
• Set Temperature Control to 450°F.
•
•
•
•
•
Turn Function Control to Broil/Convection.
WIRE RACK
Preheat the oven.
Place the Wire Rack on the Crumb Tray.
Place the food on the Wire Rack and slide into the
Top Rack Support Guide or Middle Rack Support
Guide depending on the thickness of the food that
CRUMB TRAY
you are cooking.
Food should be placed as close as possible to the
Top Heating Element without touching it.
Set temperature control to the appropriate temperature.
Brush food with sauces or oil, as desired.
Turn Time Control to position “Stay On”.
It is advisable to leave the door slightly ajar.
When broiling is complete, turn the Time Control to “OFF”.
Galletas: Utilice las guías de soporte inferior y media.
Bizcochos de Varias Capas: Utilice únicamente la guía de soporte inferior (hornee
uno a la vez).
Pasteles: Utilice la guía de soporte inferior.
•
•
•
•
•
Horneado de Galletas
Broiling Guide
Para hornear galletas, sugerimos ajustar la temperatura de horneado y usar una
bandeja galletera sobre la rejilla. Además, el uso de papel pergamino sobre una
bandeja galletera podría ser útil al hornear ciertos tipos de galletas.
1. Use papel pergamino sobre la bandeja galletera para que las galletas no se
peguen.
2. Las bandejas galleteras, los tiempos y las temperaturas de horneado pueden
variar dependiendo de los materiales de horneado.
Cooking results may vary depending on thickness of food being broiled, adjust these
times to your individual requirements. Also, remember to turn the meat/fish over halfway through the cooking time and to check often during broiling to avoid overcooking.
Ubicación de la Rejilla
Nota: El aire de convección se sobrecalienta y circula alrededor de los alimentos, lo
que permite que se cocinen hasta más rápidamente. Al hornear sus recetas favoritas
o alimentos envasados, siga las instrucciones de la receta y recuerde no precalentar
el horno. Controle los alimentos horneados unos minutos antes del tiempo de
horneado más breve recomendado.
Guía de Horneado
Siga las instrucciones del envase o de la receta para conocer los tiempos y
temperatura de horneado.
MEAT
OVEN TEMP
RIB STEAK
400
T-BONE STEAK
400
HAMBURGER
400
PORK CHOPS
400
LAMB CHOPS
400
CHICKEN LEGS
400
FISH FILETS
350
SALMON STEAKS
350
COOKING TIME
20-25 min.
20-25 min.
15-25 min.
25-35 min.
30-40 min.
25-35 min.
15-25 min.
15-25 min.
Note: All broiling times are based on meats at refrigerator temperature.
Frozen meats may take considerably longer.
Therefore, use of a meat thermometer is highly recommended.
16
5
Baking with Convection
Asado a la Parrilla con Convección
Convection baking is very consistent and even. The oven heats quickly, so preheating
is not necessary or desirable. The fan circulates the hot air around the food making
baked goods rise quickly and evenly.
Bake your favorite cookies, cakes, pies, brownies, etc. The bakeware that will fit in
your oven are up to 9 inches in length.
We do not recommend the use of oven roasting bags or glass containers in the
oven.
NEVER USE PLASTIC, CARDBOARD, PAPER OR ANYTHING SIMILAR IN THE
OVEN.
Los calefactores superiores tienen un ciclo de encendido y apagado para mantener el
máximo de temperatura en el horno. Para obtener mejores resultados, el horno debe
precalentarse por 20 minutos a 450ºF antes de incorporar el alimento que se va a
asar. En el horno de convección, no es necesario dar vuelta al alimento, porque el
ventilador hace circular el aire caliente a su alrededor. Para permitir la circulación del
aire, el alimento debe colocarse en la rejilla con la bandeja para migajas debajo de
éste (vea la ilustración).
Note: Position the wire rack in the Lowest Support Guide.
Operation
•
•
•
•
•
Place the wire rack in the lowest or middle Rack Support Guide depending on the
height of the pan or according to the recipe.
Place pan with item(s) to be baked on the wire rack.
Turn the Function Control to Bake/Convection.
Turn the Time Control to position “Stay On”.
When baking is complete, turn the Time Control to “OFF”.
Positioning of the Wire Rack
Cookies - Use bottom and middle Support Guides.
Layer Cakes - Use bottom Support Guide only (bake one at a time).
Pies - Use bottom Support Guide.
Baking Cookies
For baking cookies, we suggest adjusting baking temperature and using a cookie
sheet placed on the wire rack. Also, using parchment paper on a cookie sheet might
prove helpful when baking certain types of cookies.
1. Use parchment paper on cookie sheet so cookies will not stick.
2. Cookie sheets, baking times and temperatures may differ from those necessary
when using other baking materials.
Operación
•
•
•
•
•
•
•
•
•
•
•
Ajuste el control de temperatura a 450ºF.
Gire el control de funciones a Broil/Convection
Precaliente el horno.
Rejilla
Coloque la rejilla sobre la bandeja para migajas.
Coloque el alimento en la rejilla y deslícela en la
guía de soporte de rejilla superior o en la guía de
soporte de rejilla media, según el tamaño del
alimento que esté cocinando.
Bandeja para
El alimento debe colocarse lo más cerca posible
las migajas
del calefactor superior, sin tocarlo.
Ajuste el control de temperatura en el nivel adecuado.
Pase un pincel a los alimentos con las salsas o aceite, según lo desee.
Gire el control de tiempo a la posición “Stay On”.
Es aconsejable dejar la puerta ligeramente entreabierta.
Cuando esté listo, gire el control de tiempo a la posición “OFF”.
Guía para Asar a la Parrilla
Los resultados de la cocción pueden variar según el tamaño del alimento que se ase;
ajuste estos tiempos a sus requerimientos individuales. Además, recuerde dar vuelta
a la carne/pescado en la mitad del tiempo de cocción y controlarlo con frecuencia
mientras se asa para evitar que se cocine en exceso.
Note: Convection air is superheated and it circulates around the food, so it cooks food
CARNE
faster. When baking your favorite recipes or packaged goods, follow recipe
instructions remembering not to preheat. Check the baked goods a few minutes before
the shortest recommended baking time.
FILETE DE COSTILLA
CHULETÓN DE COSTILLA
CON HUESO
HAMBURGUESA
CHULETAS DE CERDO
CHULETAS DE CORDERO
PIERNAS DE POLLO
FILETES DE PESCADO
BISTECS DE SALMÓN
Baking Guide
Follow the package or recipe instructions for baking times and temperature.
TEMP DEL
HORNO
400
TIEMPO DE
COCCIÓN
20 a 25 m in.
400
20 a 25 m in.
400
400
400
400
350
350
15
25
30
25
15
15
a
a
a
a
a
a
25
35
40
35
25
25
m in.
m in.
m in.
m in.
m in.
m in.
Nota: Todos los tiempos de asado se basan en carnes a temperatura de
refrigerador. Las carnes congeladas pueden tomar considerablemente
más tiempo. Por lo tanto, se recomienda la utilización de un termómetro
para carne.
6
15
Uso del Horno Tostador de Convección
Pizza
Control de Tiempo
Cuando se gira el control hacia la izquierda (en sentido contrario a las agujas del
reloj), el horno permanece encendido (“STAY ON”) hasta que se apaga manualmente
(“OFF”). Para activar el segmento de cronómetro del control, gire hacia la derecha (en
el sentido de las agujas del reloj) para tostar o utilizar como cronómetro. Esta función
también tiene una campanilla que suena cuando termina el tiempo programado.
Ventilador de Convección
El ventilador de convección funciona automáticamente en las posiciones Broil, Bake y
Toast.
Luz de Encendido
Permanece encendida mientras el horno está en uso.
Bandeja Recogegotas
Se usa cuando se asan carnes, aves, pescado y otros alimentos.
Bake your favorite pizzas in the toaster oven. The bake ware that will fit in your oven is
up to 12 inches in diameter. Never use plastic, cardboard, paper or anything similar in
the oven. Use the middle support guide to bake a pizza.
Advertencia: Para evitar el riesgo de sufrir lesiones o quemaduras, no toque
las superficies calientes cuando el horno esté en uso. SIEMPRE
USE GUANTES DE COCINA.
Precaución: Siempre tenga mucho cuidado al retirar la bandeja recogegotas,
rejilla o cualquier recipiente caliente de un horno caliente.
SIEMPRE USE GUANTES DE COCINA PARA SACAR OBJETOS
CALIENTES DEL HORNO.
Operation
• Set the rounded wire rack into the middle support guide.
• Preheat oven for 15 minutes on 450°F.
• Turn the function control knob to “Bake”.
• Set On/Off timer control knob to “STAY ON” position.
• Then lower temperature according to baking instructions.
• Place pizza in the oven, and begin baking.
• When pizza is ready, turn the On/Off time control knob to “OFF” position.
Frozen Pizzas
Cook for 5-8 minutes or as indicated on the package. It is advisable to remove the
pizza from the freezer 10 minutes before placing in the oven. Place pizza in toaster
oven to bake.
Pizza Mix
Follow the instructions on the box. Place pizza in oven to bake. Cook for 18-25
minutes.
Pizza From Scratch
Follow the recipe instructions. Place pizza in the toaster oven to bake.
Toasting with Convection
Large capacity oven allows for toasting 4 to 6 slices of bread, 6 muffins, frozen waffles
or frozen pancakes. When toasting only 1 or 2 items, place food on the Wire Rack in
the center of the oven.
Operation
• Set the Temperature Control to 450°F.
• Turn the Function Control to Toast/Convection.
• Place food to be toasted on the Wire Rack.
• Ensure Crumb Tray is in place.
• Turn the Time Control to desired darkness. (Light to Dark).
• Bell will ring to signal the end of the Toast cycle.
Note: Wire Rack should be positioned in the middle of the oven with the indentations
pointing down.
Toast Settings
Light:
Medium:
Dark:
4 min.
7 min.
9 min.
Caution: When toasting, do not leave food in for longer periods of
time other than what is listed above. Toasting for longer
than recommended times will burn food.
14
7
Grill
Please note that the Grill function is the same as broiling but without the convection
feature. For best results, it is recommended that you preheat the oven for 15 minutes
on 450°F.
Operation
•
•
•
•
•
•
•
•
•
•
•
•
Set Temperature Control to 450°F.
Turn Function Control to Grill.
Preheat the oven.
Place the Wire Rack on the Crumb Tray.
Place the food on the Wire Rack and slide into the Top Rack Support Guide or
Middle Rack Support Guide depending on the thickness of the food that you are
cooking.
Food should be placed as close as possible to the Top Heating Element without
touching it.
Set temperature control to the appropriate temperature.
Brush food with sauces or oil, as desired.
Turn Time Control to position “Stay On”.
It is advisable to leave the door slightly ajar.
Turn food over midway through the prescribed cooking time.
When grilling is complete, turn the Time Control to “OFF”.
Keep Warm
Keep cooked food warm for up to 30 minutes. Longer periods of time are not
recommended as food will become dry or will spoil.
Operation
• Set the Temperature Control to 150°F.
• Turn the Function Control to Keep Warm.
• Turn the Time Control to “Stay On” position.
• Turn the Time Control to “Off” position when finished with Keep Warm.
Caution: When sliding trays out of oven, always support the rack.
Do not let go until you are sure the rack is securely supported.
8
Lea todas las secciones de este folleto y siga cuidadosamente todas las instrucciones.
Antes de Usar El Horno Tostador de Convección
1.
2.
3.
4.
5.
Lea todas las instrucciones incluidas en este manual.
Asegúrese de que el horno esté desenchufado y que el control de tiempo esté en
la posición de apagado (“OFF”).
Lave todos los accesorios en agua caliente con detergente o en el lavavajillas.
Deje secar bien todos los accesorios y vuelva a armarlos en el horno. Enchufe el
artefacto en el tomacorriente y ya está listo para usar el Horno Tostador de
Convección.
Una vez armado nuevamente el horno, recomendamos que lo haga funcionar
a la temperatura más alta (450°F) en la función de tostador por unos
15 minutos, para eliminar cualquier residuo del embalaje que pudiera haber
quedado después del envío. Esto también eliminará cualquier rastro de olor
inicialmente presente.
Tenga Presente: La primera vez que se hace funcionar, se podría percibir un olor
y humo (alrededor de 15 minutos). Esto es normal y no es dañino. Se debe a que
se queman las sustancias protectoras aplicadas en la fábrica a los calefactores.
Cocción por Convección
La cocción con convección combina el movimiento de aire caliente por un ventilador con
las operaciones normales (asado, horneado y tostado). La cocción con convección
proporciona una cocción más rápida que la de hornos convencionales a radiación para
la mayoría de los casos. El ventilador envía aire a toda la superficie de los alimentos,
dejándolos rápidamente dorados, crocantes y atrapando la humedad y el sabor.
Produce una temperatura más pareja alrededor de toda la comida debido al movimiento
del aire, de modo que los alimentos se cocinan/hornean/tuestan más parejo comparado
con las zonas calientes y frías de los hornos comunes. La función de convección
permite asar/hornear a temperaturas más bajas, lo que ahorra energía y ayuda a
mantener más fría la cocina. El aire convección de sobrecalienta y circula alrededor de
la comida por lo tanto cocina los alimentos mucho más rápido que los hornos
convencionales.
Uso del Horno Tostador de Convección
Antes usarlo por primera vez, familiarícese con las siguientes funciones y accesorios
del horno:
Control de Temperatura
Seleccione la temperatura deseada desde 150°F (Mantener Caliente) a 450°F para
hornear, asar, tostar o grillar.
Control de Funciones
Este horno está provisto de cinco posiciones para diversas necesidades de cocción:
Bake w/Convection (Horneado c/convección): Tartas, pasteles, galletas,
aves, vacuno, cerdo, etc.
Toast w/Convection (Tostado c/convección): Pan, panecillos, barquillos
congelados, etc.
Grill: Para grillar pescados, carnes, sandwiches, huevos con tocino, etc.
Broil w/Convection (Asado a la parrilla c/convección): Para asar a la parrilla
pescados, carnes, aves, chuletas de cerdo, etc.
Keep Warm (Mantener caliente): Para mantener calientes los alimentos
cocinados durante 30 minutos.
13
CONOZCA EL HORNO TOSTADOR DE CONVECCIÓN
Care & Cleaning
Warning: Be sure to unplug the oven and allow it to cool before cleaning.
K
A.
B.
C.
D.
E.
F.
G.
H.
G.
J.
K.
L.
To clean the inside of your oven, wipe the walls with a damp sponge, cloth or nylon
scouring pad and mild detergent.
DO NOT USE STEEL WOOL SCOURING PADS, ABRASIVE CLEANSERS OR
SCRAPE THE WALLS WITH A METAL UTENSIL, AS ALL OF THESE METHODS
MAY DAMAGE THE INTERIOR FINISH.
All accessories should be washed in hot soapy water or can be cleaned in a
dishwasher. The door can be wiped with a damp sponge and wiped dry with a paper
or cloth towel. Clean the outside with a damp sponge. DO NOT USE AN ABRASIVE
CLEANER AS IT MAY DAMAGE THE EXTERIOR FINISH.
DO NOT USE AN ABRASIVE CLEANER OR STEEL WOOL SCOURING PAD ON
THE BROILER PAN AS IT MAY DAMAGE THE PORCELAIN ENAMEL FINISH.
LET ALL PARTS AND SURFACES DRY THOROUGHLY PRIOR TO PLUGGING
OVEN IN AND USING.
Caja
Control de temperatura
Control de funciones
Luz de encendido
Cronómetro
Calefactor superior
Guías de soporte de rejillas
Calefactor inferior
Puerta de vidrio
Bandeja para las migajas
Rejilla (x2)
Bandeja recogegotas
Especificaciones Técnicas
Voltaje:
120V., 60Hz.
Potencia:
1200 Watts
PANEL DE CONTROL
*Nota: El dibujo puede no ser igual al producto real.
12
9
INSTRUCCIONES DE SEGURIDAD IMPORTANTES
Model
TO289N2
ONE (1) YEAR LIMITED WARRANTY
EURO-PRO Operating LLC warrants this product to be free from defects in material and
workmanship for a period of one (1) year from the date of the original purchase, when utilized for
normal household use, subject to the following conditions, exclusions and exceptions.
If your appliance fails to operate properly while in use under normal household conditions within
the warranty period, return the complete appliance and accessories, freight prepaid to
In U.S.:
EURO-PRO Operating LLC, 94 Main Mill Street, Door 16, Plattsburg, N.Y. 12901
In Canada: EURO-PRO Operating LLC, 4400 Bois Franc, St. Laurent, Quebec H4S 1A7
If the appliance is found by EURO-PRO to be defective in material or workmanship, EURO-PRO
will repair or replace it free of charge. Proof of purchase date and $ 12.95 to cover the cost of
return shipping and handling must be included. *
The liability of EURO-PRO Operating LLC is limited solely to the cost of the repair or
replacement of the unit at our option. This warranty does not cover normal wear of parts and
does not apply to any unit that has been tampered with or used for commercial purposes. This
limited warranty does not cover damage caused by misuse, abuse, negligent handling or
damage due to faulty packaging or mishandling in transit. This warranty does not cover damage
or defects caused by or resulting from damages from shipping or repairs, service or alterations to
the product or any of its parts, which have been performed by a repair person not authorized by
EURO-PRO Operating LLC.
This warranty is extended to the original purchaser of the unit and excludes all other legal and/or
conventional warranties. The responsibility of EURO-PRO Operating LLC if any, is limited to the
specific obligations expressly assumed by it under the terms of the limited warranty. In no event
is EURO-PRO Operating LLC liable for incidental or consequential damages of any nature
whatsoever. Some states/provinces do not permit the exclusion or limitation of incidental or
consequential damages, so the above may not apply to you.
This warranty gives you specific legal rights, and you may also have other rights which vary from
state to state or province to province.
*Important: Carefully pack item to avoid damage in shipping. Be sure to include proof of
purchase date and to attach tag to item before packing with your name, complete address
and phone number with a note giving purchase information, model number and what you
believe is the problem with item. We recommend you insure the package (as damage in
shipping is not covered by your warranty). Mark the outside of your package “ATTENTION
CUSTOMER SERVICE”. We are constantly striving to improve our products, therefore the
specifications contained herein are subject to change without notice.
Al utilizar el Horno Tostador de Convección, siempre se deben considerar las
siguientes precauciones básicas de seguridad:
1.
2.
3.
4.
5.
6.
7.
8.
9.
10.
11.
12.
PRODUCT REGISTRATION CARD
13.
FOR CANADIAN CONSUMERS ONLY
Please complete and return within ten (10) days of purchase. The registration will enable us to
contact you in the event a product defect is discovered. By returning this card you acknowledge
to have read and understood the instructions for use, and warnings set forth in the
accompanying instructions. RETURN TO:
EURO-PRO OPERATING LLC, 4400 BOIS FRANC, ST. LAURENT, QUEBEC H4S 1A7
TO289N2
____________________________________________________________________________
Appliance Model
____________________________________________________________________________
Date of Purchase
Name of store
____________________________________________________________________________
Owner’s name
____________________________________________________________________________
Address
City
Prov.
Postal Code
Printed in China
10
14.
15.
Lea todas las instrucciones antes de
utilizar el Horno Tostador de
Convección.
No toque las superficies calientes. Use
siempre asas o mangos.
Es importante poner mucha atención
cuando sea usado por niños o cerca de
éstos.
Para protegerse contra descargas
eléctricas, no sumerja el cable, enchufe ni
ninguna otra parte del horno en el agua o
ningún otro líquido.
No deje que el cable cuelgue por el borde
de la mesa o mesada ni que toque
superficies calientes.
No haga funcionar el artefacto si el cable o
el enchufe está dañado o si éste no está
funcionando correctamente o ha sufrido
algún daño. Devuelva el artefacto al
EURO-PRO Operating LLC más cercano
para que lo examinen, reparen o ajusten.
El uso de accesorios adicionales no
recomendados por el fabricante puede
implicar riesgos ni causar lesiones.
No lo coloque sobre ni cerca de un
quemador a gas o eléctrico.
Cuando el horno esté funcionando, deje
por lo menos cuatro pulgadas de espacio
en todos sus costados para permitir una
adecuada circulación de aire.
Desconéctelo del tomacorriente cuando
no esté en uso y antes de limpiarlo. Deje
que se enfríe antes de colocarle o sacarle
partes y antes de limpiarlo.
Para desconectarlo, gire el botón de
control de tiempo a la posición de
apagado (‘OFF’) y luego saque el
enchufe. Tome siempre el enchufe y
nunca jale del cable.
Se debe tener extremo cuidado al mover
una bandeja recogegotas que contenga
aceite u otros líquidos calientes.
No cubra la bandeja para las migajas o
cualquier parte del horno con papel de
aluminio. Esto puede hacer que el horno
se recaliente.
Tenga mucho cuidado al quitar la bandeja,
rejillas o al eliminar aceite caliente u otros
líquidos calientes.
No limpie el interior del horno con
esponjas de alambre. Podrían
desprenderse pedazos y entrar en
contacto con los componentes eléctricos,
creando un riesgo de descarga eléctrica.
16. En un horno tostador no se debe colocar
alimentos de gran tamaño ni utensilios de
metal, ya que se podrían incendiar o se
podrían producir descargas eléctricas.
17. Puede ocurrir un incendio si el horno se
cubre o queda en contacto con material
inflamable, como cortinas, tapices,
paredes y otros similares cuando está en
funcionamiento. No coloque ningún objeto
sobre el horno mientras esté en uso.
18. Se debe tener extremo cuidado al utilizar
recipientes para cocción y horneado de
materiales que no sean metal o vidrio
refractario.
19. Asegúrese de que nada toque los
elementos superiores o inferiores del
horno.
20. No coloque ninguno de los siguientes
materiales en el horno: cartón, plástico,
papel ni nada similar.
21. Cuando el horno no esté en uso, no
guarde en su interior ningún material que
no sean los accesorios que recomienda el
fabricante.
22. Este artefacto está apagado cuando el
botón del control de tiempo está en la
posición ‘OFF’.
23. Use siempre guantes protectores con
aislantes al colocar o retirar platos del
horno caliente.
24. Este artefacto tiene una puerta de vidrio
templado. Este vidrio es más fuerte que
el vidrio convencional y no se rompe tan
fácilmente. Aún así, el vidrio templado
puede romperse en los bordes. Evite
arañar la superficie de la puerta o mellar
los bordes.
25. No lo use al aire libre.
26. No utilice el artefacto sino para el uso que
está destinado.
Esta unidad tiene un cable eléctrico corto para
reducir el riesgo de enredarse o de tropezarse,
como sucede con los cables largos. Se puede
usar un alargador, si se tiene cuidado al
utilizarlo:
1. La potencia eléctrica indicada del
alargador debe ser al menos igual a la
potencia eléctrica del artefacto.
2. El alargador con el cable de energía se
debe disponer de tal modo que no
cuelgue por la mesada o mesa para evitar
que los niños lo jalen o tropezarse
accidentalmente con él.
GUARDE ESTAS INSTRUCCIONES
Sólo Para Uso Doméstico
ADVERTENCIA: Para reducir el riesgo de descarga eléctrica, este artefacto tiene un enchufe
polarizado (una clavija es más ancha que la otra). Este enchufe calza sólo de una manera en un
tomacorriente polarizado. Si el enchufe no encaja totalmente en el tomacorriente, inviértalo. Si
aún así no entra, póngase en contacto con un electricista calificado para que instale un
tomacorriente adecuado. No modifique el enchufe de forma alguna.
11
Rev. 08/06