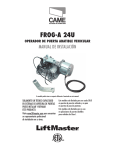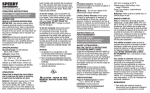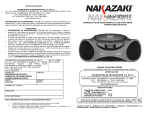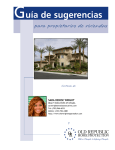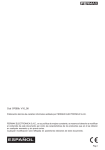
1
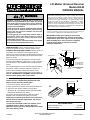
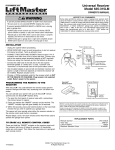
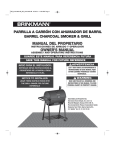
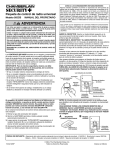
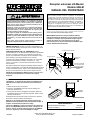
PRECAUCION
©
ADVERTENCIA
Los niños que operen o jueguen con un abrepuerta de garaje
pueden lesionarse ellos mismos o a los demás. La puerta del
garaje podría cerrarse y causar lesiones graves o fatales. No
dejar que los niños operen los botones pulsadores de la
pared ni los controles remotos.
Instalar el control de la puerta (o los botones pulsadores
adicionales) fuera del alcance de los niños y lejos de todas
las piezas móviles y de los componentes de la puerta, pero
donde sea visible la puerta del garaje.
Una puerta de garaje en movimiento podría lesionar grave o
fatalmente a alguien bajo la misma. Activar el abrepuerta sólo
cuando la puerta esté debidamente ajustada, pueda verse
claramente y no hayan obstrucciones al recorrido de la
puerta.
Para evitar electrocutarse, desconectar la energía al
abrepuerta de garaje antes de instalar el receptor.
Receptor universal Lift-Master
Modelo 620LM
MANUAL DEL PROPIETARIO
AVISO A LOS CONSUMIDORES DENTRO DE EE.UU.:
Algunos estados prohiben el servicio o reparación de abrepuertas
de garaje que no pueden realizarse cumpliendo las normas de
seguridad contenidas en UL 325 (revisión de 1988). A fin de cumplir
con la letra y la intención de estas leyes, este radiocontrol universal
no debe usarse con ningún abrepuerta Lift-Master®, Chamberlain® o
Sears Craftsman® fabricado antes del 1 de abril de 1982. Para
averiguar si el abrepuerta que se tiene fue fabricado antes o
después del 1 de abril de 1982, llamar por favor al 1-800-528-9131
antes de instalar este radiocontrol universal.
Para cumplir con las reglas de la FCC, se prohibe el ajuste o modificación del receptor y/o el
transmisor, salvo para cambiar el ajuste del código y reemplazar la batería del transmisor.
NO HAY OTRAS PIEZAS QUE PUEDA REPARAR EL USUARIO.
IMPORTANTE: Desactivar el receptor existente antes de
instalar esta unidad de reemplazo. Si no es posible, localizar
el receptor lo más lejos que se pueda del receptor original.
Cuando se instalen dos o más receptores en un garaje,
posicionarlos por los menos a 3.05 metros de distancia para
prevenir interferencias electrónicas.
ABRIR EL RECEPTOR: Insertar un pequeño destornillador en la
ranura del panel delantero del receptor como se indica. Girar hacia
arriba la tapa del actuador.
CONECTAR EL RECEPTOR Y EL ABREPUERTA: Retirar
aproximadamente 1/4” de aislamiento de cada extremo del alambre
de 2 hilos. Conectar un extremo a los terminales de tornillo del
receptor (la polaridad NO se requiere). Guiar el alambre a lo largo
de los canales y fuera del panel inferior como se ilustra.
Luz indicador de encendido
Terminales
Tapa del actuador
Canales de
alambre
Luz indicadora
"inteligente"
Conectar el otro extremo del alambre de timbre a los dos tornillos
de terminal del abrepuerta rotulados “2” (blanco) y “1” (rojo),
“común” y “comando” o los terminales usados para el control de
botón pulsador.
Conectar el alambre
a los terminales del
abrepuerta de garaje
Usar grapas aisladas para asegurar el alambre de timbre entre el
receptor y el abrepuerta. La longitud del alambre depende de dónde
se vaya a instalar el receptor. Volver a colocar la tapa del receptor.
Botón
"inteligente"
Alambre
Escoger una toma polarizada de 120Vca para el receptor que esté
FUERA DEL ALCANCE DE LOS NIÑOS. Enchufar el receptor en la
toma seleccionada. Restablecer el suministro de energía al
abrepuerta.
Se puede activar el abrepuerta hasta con cuatro transmisores
“Inteligentes”, un sistema de llave digital y transmisores con
interruptores de código que cuenten con luces indicadoras
rojas.
1. Retirar la tapa del boton del receptor.
2. Presionar y SOSTENER presionado el botón pulsador del
transmisor (Ilustración A).
Receptor universal
A
Botón
"inteligente"
3. Luego presionar el botón “Inteligente” del receptor (Ilustración
B). DESTELLARA la luz del indicador adyacente. Soltar el botón
pulsador del transmisor.
El abrepuerta ahora funcionará cuando se presionen el actuador
del receptor o el botón pulsador del transmisor.
NOTA: Si no se sostiene presionado el botón pulsador del
transmisor hasta que destelle la luz indicadora del receptor, el
receptor no almacenará en memoria el código.
Para borrar TODOS los códigos de transmisor de la memoria:
Presionar y SOSTENER presionado el botón “Inteligente” del
receptor. Cuando la luz del indicador adyacente se APAGUE
(en unos 6 segundos) se borrarán TODOS los códigos.
114A2022
B
Luz indicadora
PIEZAS DE REPUESTO
Tapa del actuador del receptor . . . . . . . . . . . . . . . . . . . .41A3591
Receptor (completo) . . . . . . . . . . . . . . . . . . . . . . . . . . . .41A4161-2
©1996, The Chamberlain Group, Inc.
Todos los derechos reservados
Impreso en México
WARNING
ING
©
ON
WARNING
Children operating or playing with a garage door
opener can injure themselves and others. The garage
door could close and cause serious injury or death. Do
not allow children to operate the push buttons or the
remote control transmitters.
Install the receiver (and any additional push buttons)
out of the reach of children and away from all moving
parts of the door and door hardware, but where the
garage door is visible.
A moving garage door could injure someone under it.
Activate the opener only when the door is properly
adjusted, you can see it clearly, and there are no
obstructions to door travel.
To avoid electrocution, disconnect power to the garage
door opener before installing the receiver.
OPEN RECEIVER: Insert a small screwdriver in slot on
receiver front panel as shown. Twist up actuator cover.
CONNECT RECEIVER AND OPENER: Remove about 1/4"
of insulation from each end of the 2-strand bell wire.
Connect one end to the receiver screw terminals (polarity is
NOT required). Route wire along the channels and out the
bottom as shown.
Connect the other end of the bell wire to the two opener
terminal screws labeled “2” (white) and “1” (red), “common”
and “command” or the terminals used for the push button
control.
Use insulated staples to secure bell wire between receiver
and opener. Length of bell wire depends on where the
receiver will be installed. Replace the actuator cover.
Choose a 120Vac polarized outlet for the receiver which is
OUT OF THE REACH OF CHILDREN. Plug receiver into
selected outlet. Return power to the opener.
ERTENCIA
Lift-Master Universal Receiver
Model 620LM
OWNERS MANUAL
NOTICE TO U. S. CONSUMERS:
Some states prohibit the service or repair of garage door openers
whch cannot be made to comply with the safety standards
contained in UL 325 (1988 revision). In order to comply with both
the letter and the spirit of these laws, this universal radio control
should not be used with any Lift-Master®, Chamberlain®, or Sears
Craftsman® garage door opener manufactured prior to April 1, 1982.
To find out if your Chamberlain-made garage door opener was
manufactured prior to or after April 1, 1982, please call 1-800-528-9131
before installing this universal radio control.
To comply with FCC rules, adjustment or modification of receiver and/or
transmitter is prohibited, except for changing the code setting and replacing the
transmitter battery. THERE ARE NO USER SERVICEABLE PARTS.
IMPORTANT: Disable your existing receiver before
installing this replacement unit. If this is not possible,
locate receiver as far from original receiver as possible.
When installing two or more receivers in a garage,
position them at least 10 feet apart to prevent
electronic interference.
Power Indicator Light
Terminals
Actuator Cover
Bell Wire
Channels
"Smart"
Indicator
Light
Connect Bell Wire
To Garage Door
Opener Terminals
ADVERTENCIA
"Smart"
Actuator
Bell Wire
ADVERTENCIA
You can activate your opener with up to four “Smart”
remote controls, a Keyless Entry System and code
switch remotes with red indicator lights.
1. Remove the receiver actuator cover.
2. Press and HOLD the remote push button (Illustration A).
3. Then press the “Smart” actuator on the receiver
(Illustration B). The adjacent indicator light will FLASH.
Release the transmitter push button.
The opener will now operate when either the receiver
actuator or the transmitter push button is pressed.
NOTE: If the transmitter push button is not held down
until the receiver indicator light flashes, the receiver
will not learn the code.
To erase ALL transmitter codes from memory: Press
and HOLD receiver “Smart” actuator. When the
adjacent indicator light turns OFF (in about 6 seconds)
ALL codes will be erased.
AUCION
114A2022
Universal Receiver
B
A
"Smart"
Actuator
Indicator Light
REPLACEMENT PARTS
Receiver Actuator Cover . . . . . . . . . . . . . . . . . . . .41A3591
Receiver (complete) . . . . . . . . . . . . . . . . . . . . .41A4161-2
©1996, The Chamberlain Group, Inc.
All Rights Reserved
Printed in Mexico