Transcript
GETTING STARTED
EMPEZANDO COMMENCER
This quick start guide has basic information for the use
and safe operation of this machine. However, the owner’s
manual has important, detailed information. Carefully read
both before starting your new ProTeam vacuum.
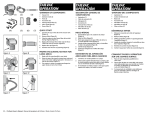
Choose one of the following ways to wear the TailVac:
1
Connect the monostrap and
sling it over the shoulder.
Conecte la monocorrea y pásela
sobre el hombro.
Connectez la mono-sangle et
placez-la sur votre épaule.
WEARING THE TAILVAC:
Esta guía de inicio rápido contiene información básica sobre el
uso y funcionamiento seguro de esta máquina. Sin embargo, el
manual del propietario tiene información importante y detallada.
Léalos cuidadosamente antes de comenzar a usar la aspiradora
ProTeam.
Elija una de las siguientes formas de transportar la TailVac:
2
3
With the waist belt facing you, use
your right hand to separate the exposed Velcro between the end of flap
and the back of the belt.
Con la correa de la cintura orientada
hacia usted, use la mano derecha para
separar el Velcro expuesto entre el extremo de la solapa y la parte posterior
de la correa.
Le ceinturon vous faisant face, séparez
avec votre main droite la bande de velcro exposée entre l’extrémité du rabat et
le revers de la sangle.
Slide the monostrap up over your
preferred shoulder. Fasten the belt
by bringing the right flap across
the front. Then bring the left flap
over on top of it.
Coloque la monocorrea sobre el
hombro que prefiera. Apriete la
correa pasando la solapa derecha
por delante, luego pase la correa
izquierda por sobre ésta.
Glissez la mono-sangle sur l’épaule
que vous préférez. Attachez la
sangle en amenant le rabat droit
sur le devant, puis placez le rabat
gauche dessus.
SAFETY INSTRUCTIONS:
Wrap the waist belt up in the
envelope-style packet, and carry the
TailVac by the molded top handle.
Enrolle la correa de la cintura en el
paquete tipo sobre y transporte la
TailVac utilizando la manilla superior
moldeada.
Insérez le ceinturon dans l’enveloppe,
et portez le TailVac en le tenant par sa
poignée moulée supérieure.
Port de l’aspirateur à TAILVAC :
Slide the Velcro strap under the
molded plastic handle of the vacuum
and back over the top of the handle.
Attach the end of the strap to the
Velcro tab.
Pase la correa de Velcro por debajo
de la manilla plástica moldeada de la
aspiradora y regrese por la parte superior de la manilla. Fije el extremo de la
correa a la lengüeta de Velcro.
Glissez la sangle en velcro sous la poignée en plastique moulé de l’aspirateur,
puis à nouveau sur le dessus de la poignée. Attachez l’extrémité de la sangle
sur la languette en velcro.
Continue to slide your right hand all the way to
the left to separate the remaining Velcro. With
your left hand, pull the flap out from behind the
waist belt and toward you to expose flap.
Siga pasando su mano derecha por completo
hacia la izquierda para separar el Velcro
restante. Con la mano izquierda, tire de
la
solapa desde detrás de la correa de la
cintura hacia la solapa expuesta.
Continuez de glisser votre
main droite jusqu’à
l’extrémité gauche afin de
séparer le reste de la bande velcro.
Avec votre main gauche, tirez le rabat du revers du
ceinturon et tirez-le vers vous pour exposer le rabat.
Vous pouvez porter le TailVac des manières suivantes :
Wear the TailVac around the waist
with or without the monostrap for
support.
Use la TailVac alrededor de la
cintura con o sin la monocorrea
de apoyo.
Portez le Tailvac autour de la taille,
avec ou sans la mono-sangle comme
support.
Uso de la aspiradora a la TAILVAC:
Detach the Velcro®
strap from the base of
the waist belt and lift
the strap.
Desprenda la correa
de Velcro de la base
de la correa de la
cintura y levántela.
Détachez la sangle en
velcro de la base du
ceinturon, puis levez la
sangle.
Ce guide de démarrage rapide contient tous les renseignements de
base sur l’utilisation et le fonctionnement de cet appareil en toute
sécurité. Toutefois, tous ces renseignements se retrouvent plus
en détail dans manuel d’instructions. Lire attentivement les deux
documents avant d’utiliser un aspirateur ProTeam neuf.
Adjust the comfort of the
shoulder strap by adjusting
the length of the strap and/or
attaching the front snap hook
to any of the other rings on the
front of the waist belt.
Acomode la correa de hombro
ajustando el largo de ésta o
sujetando el gancho a presión
delantero a cualquiera de los
anillos de la parte delantera de
la correa de la cintura.
Pour ajuster le confort de la
bandoulière, réglez la longueur de
la sangle et/ou attachez le crochet
avant à un autre anneau sur le
devant du ceinturon.
INSTRUCCIONES DE SEGURIDAD:
MESURES DE SÉCURITÉ:
TIPS FOR SUCCESSFUL BACKPACK VACUUMING
TIPS FOR SUCCESSFUL BACKPACK VACUUMING
BEFORE
CHECK the filter bag, dome filter, and hose cuffs.
BEFORE
CHECK the filter bag, dome filter, and hose cuffs.
PLACE the extension cord under the hip belt.
PLACE the extension cord under the hip belt.
DURING REMEMBER a vac is on your back - be careful when turning
DURING REMEMBER a vac is on your back - be careful when turning
corners amd bending over.
corners amd bending over.
CHECK the cord often, giving it plenty of slack.
CHECK the cord often, giving it plenty of slack.
KEEP the hose from rubbing up against anything.
KEEP the hose from rubbing up against anything.
EMPTY the cloth bag after two hours of vacuuming.
EMPTY the cloth bag after two hours of vacuuming.
Shake out the paper filter bag often.
Shake out the paper filter bag often.
AFTER
UNPLUG the cord at both ends. Wrap without twisting.
AFTER
UNPLUG the cord at both ends. Wrap without twisting.
SHAKE out the bag.
SHAKE out the bag.
RINSE dome filter and foam diffuser.
RINSE dome filter and foam diffuser.
REVIEW the SAFETY LABEL on the vacuum.
For additional safety information, read the
vacuum owner’s manual.
REVISE la ETIQUETA DE SEGURIDAD de la
aspiradora. Para obtener información de
seguridad adicional, lea el manual del
propietario de la aspiradora.
LIRE L’ÉTIQUETTE DE SÉCURITÉ de l’aspirateur.
Pour plus de renseignements sur la sécurité,
consulter le manuel d’instruction de l’appareil.
DO NOT vacuum liquids or expose the vacuum to rain or
water. DO NOT use the vacuum outdoors or on wet surfaces.
DO NOT handle the vacuum or plug with wet hands.
NO aspire líquidos ni exponga la aspiradora a la lluvia o al agua.
NO use la aspiradora en exteriores ni en superficies húmedas. NO
manipule la aspiradora ni la enchufe con las manos húmedas.
NE PAS aspirer de débris liquides ni exposer l’aspirateur à la pluie ou
aux projections d’eau. NE PAS utiliser l’aspirateur à l’extérieur ou sur
une surface trempée. NE PAS manier l’aspirateur ou la fiche lorsqu’on
a les mains mouillées.
ALWAYS hold the plug when plugging in or
unplugging the vacuum.
SIEMPRE sostenga el enchufe cuando conecte o
desconecte la aspiradora.
TOUJOURS brancher ou débrancher l’aspirateur
en tenant le cordon par la fiche.
DO NOT tie short powercord and extension cord
in a knot.
NO haga un nudo con el cable de alimentación corto
y el de extensión.
NE PAS attacher le cordon d’alimentation électrique
pour le raccourcir et ne pas permettre la formation de
nœuds dans une rallonge électrique.
FILTER MAINTENANCE:
3
INTERCEPT MICRO FILTER
INTERCEPT MICRO FILTER
FILTRO DE DOMO
MICROFILTRE INTERCEPT
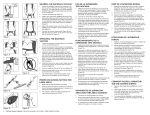
To replace the Intercept Micro Filter, slide filter into
Cloth Filter and secure into vacuum body.
Para cambiar el filtro Intercept Micro Filter, colóquelo
en el filtro de tela y fíjelo al cuerpo de la aspiradora.
Pour remettre le microfiltre Intercept en place, glisser
ce dernier dans le filtre à tissus et le fixer solidement
dans le corps de l’aspirateur.
DÔME FILTRANT
Once a week, or as necessary, clean or replace the Dome Filter. First, remove
the Intercept Micro Filter and Cloth Filter. Reach into the vacuum body and
twist dome filter from motor.
Una vez a la semana, o según sea necesario, limpie o cambie el filtro de domo.
Primero, retire el filtro Intercept Micro Filter y el filtro de tela. Meta la mano en el
cuerpo de la aspiradora y gire el filtro de domo para sacarlo del motor.
Une fois par semaine, ou lorsque c’est nécessaire, nettoyer ou remplacer le dôme
filtrant. Retirer d’abord le microfiltre Intercept et le filtre à tissus. Insérer ensuite
la main à l’intérieur du corps de l’aspirateur, saisir le filtre et le tourner pour le
séparer du moteur et l’extraire.
ProTeam, Inc.
Post Office Box 7385
Boise, Idaho 83707
4
DO NOT vacuum with a frayed, worn or damaged cord. Do not modify the vacuum plug.
Use the extension cord provided.
NO aspire si el cable está pelado, desgastado o
dañado. No modifique el enchufe de la aspiradora. Use el cable de extensión que se proporciona.
NE PAS utiliser l’aspirateur si le cordon
d’alimentation électrique est effiloché, usé ou
endommagé.
DO NOT pull or carry the vacuum by the cord or
use the cord as a handle.
NO transporte la aspiradora con el cable ni tire de
éste; tampoco debe usarlo como manilla.
NE PAS tirer ou transporter l’aspirateur par le cordon
d’alimentation électrique, ni utiliser ce dernier
comme poignée.
ENTRETIEN DES FILTRES:
USE SÓLO FILTROS DE REPUESTO PROTEAM GENUINOS
PARA GARANTIZAR UN RENDIMIENTO ÓPTIMO, OBTENER
UNA MEJOR CALIDAD DE AIRE EN EL INTERIOR Y MANTENER
VÁLIDA LA GARANTÍA DE LA ASPIRADORA.
EMPTY and INSPECT the Intercept Micro Filter every time you start and
finish vacuuming, replace the filter if necessary. A clogged and dirty filter
restricts airflow and results in overheating and reduced suction.
VACÍE e INSPECCIONE el filtro Intercept Micro Filter cada vez que comience
y termine de aspirar; cambie el filtro si fuese necesario. Un filtro obstruido y
sucio restringe el flujo de aire y provoca sobrecalentamiento y menor succión.
VIDER et INSPECTER le microfiltre Intercept chaque fois avant de commencer
à passer l’aspirateur et après l’avoir passé. Remplacer le filtre si nécessaire.
Un filtre obstrué ou souillé restreint le débit d’air et provoque la surchauffe de
l’appareil et diminue la qualité d’aspiration.
DOME FILTER
Turn off the unit before unplugging. Unplug the
unit from the outlet before servicing.
Apague la unidad antes de desenchufarla.
Desenchufe la unidad del tomacorriente antes de
realizar el mantenimiento.
Éteindre l’aspirateur avant de le débrancher.
L’appareil doit être débranché avant de procéder à
son entretien.
MANTENIMIENTO DEL FILTRO:
USE ONLY GENUINE PROTEAM REPLACEMENT
FILTERS TO ENSURE OPTIMAL PERFORMANCE,
IMPROVED INDOOR AIR QUALITY AND MAINTAIN
A VALID VACUUM WARRANTY.
1
DO NOT vacuum flammable or combustible
materials or anything that is burning or smoking,
such as cigarettes, matches or hot ashes.
NO aspire materiales inflamables o combustibles ni
ningún tipo de material ardiente o humeante, como
cigarrillos, fósforos o cenizas calientes.
NE PAS aspirer des matières inflammables oucombustibles ou tout autre débris enflammé ou fumant
comme des cigarettes, des allumettes ou de la cendre
chaude.
2
N’UTILISER QUE LES FILTRES PROTEAM AUTHENTIQUES AFIN
D’ASSURER LE RENDEMENT APPROPRIÉ DE L’ASPIRATEUR,
D’AMÉLIORER LA QUALITÉ DE L’AIR INTÉRIEURE ET DE
MAINTENIR LA GARANTIE DE L’ASPIRATEUR EN VIGUEUR.
CLOTH FILTER
Filtro de tela
FILTRE À TISSUS
Once a month, or as necessary, hand or machine wash the
cloth filter and let it dry. DO NOT PUT IT IN THE DRYER.
Una vez al mes, o según sea necesario,
lave a mano o a máquina el filtro de tela y déjelo secar al aire.
NO LO COLOQUE EN LA SECADORA.
Une fois par mois, ou lorsque c’est nécessaire, laver à la main
ou à la machine le filtre à tissus et le laisser sécher à l’air libre.
NE PAS LE METTRE À LA SÉCHEUSE.
EXHAUST FILTER
FILTRO DE ESCAPE
FILTRE D’ÉCHAPPEMENT
Every three months (or as necessary) take off the shroud assembly by
removing the two screws. Clean the foam attached to the inside of the
shroud.
Una vez al mes (o según sea necesario) saque el conjunto de rec brimiento retirando los dos tornillos. Cambie la espuma sujeta al interior del recubrimiento.
À chaque trois mois ou selon les besoins, enlevez le flasque en enlevant les deux vis.
Nettoyez la mousse attachée à l’intérieur du flasque.
ph 866.888.2168
fax 208.377.3014
www.pro-team.com
The American Lung Association
does not endorse products.
SP6846 1/12