1
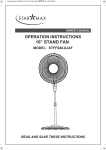
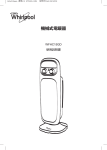
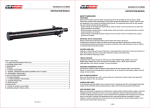
145x210mm MRP5621-001 FS45-3D 说明书 365 20150307
OWNER’S MANUAL
3 SPEED
18” STAND FAN
MODEL: STFFS45-3DF
READ AND SAVE THESE INSTRUCTIONS
CAUTION
Read Rules for Safe Operation and Instructions Carefully.
WARNING
1. Do not leave the fan running unattended.
2. Keep electrical appliances out of reach from Children or infirm
persons. Do not let them use the appliances without supervision.
3. If the supply cord is damaged, it must be replaced by
manufacturer or its service agent or a similarly qualified person in
order to avoid a hazard.
4. This appliance can be used by children aged from 8 years and
above and persons with reduced physical, sensory or mental
capabilities or lack of experience and knowledge if they have been
given supervision or instruction concerning use of the appliance in
a safe way and understand the hazards involved. Children shall
not play with the appliance. Cleaning and user maintenance shall
not be made by children without supervision.
5. When the fan was assembled, the rotor blade guard shall not be
taken off anymore
- Prior cleaning unplug the fan
- The rotor guard shall not be dissembled/opened to clean the
rotor blades
- wipe the fan enclosure and rotor blade guard with a slightly damp
cloth
RULES FOR SAFE OPERATION
1. Never insert fingers, pencils, or any other object through the grille
when fan is running.
2. Disconnect fan when moving from one location to another.
3. Be sure fan is on a stable surface when operating to avoid
overturning.
4. DO NOT use fan in window, rain may create electrical hazard.
5. Indoor use only.
6
PART FIGURE
Front Guard
Blade
Plastic Nut
Motor shaft
Oscillating Knob
Motor
Tilt adjustment knob
Plastic sleeve
Tighten
Speed
Regulator
Circlip
Fan body
Back Guard
Loosen
Spinner
Internal Pole
Fasten
Base
Extension
pole
Height
adjustment ring
“7” Finger screw
ASSEMBLY OF CHASIS & COLUMN UNIT
1. Unscrew the “7” finger screw from the Extension Pole. (Fig.1)
2. Insert the extension pole in the chassis and tighten the “7” Finger screw. (Fig.2)
3. From the extension pole loosen the height adjustment ring and adjust the internal
pipe to the desired height. (Note: If you can’t find the internal pole, it slides inside
the extension pole. You can pull it out from the extension pole.) (Fig.3)
4. To attach the head unit to the extension pole, loosen the thumb screw on the
bottom of the head unit. Place the head unit on the extension pole and tighten the
thumb screw in alignment with the groove on the internal pole. (Fig.4)
CAUTION: Height adjustment ring must be fully fastened before the assembly of
the motor section to the extension pole.
Fig.1
Fig.3
Fig.2
Fig.4
Mounting hole
Thumb screw
Loose
7
Annular groove
ASSEMBLY OF BLADE OF GRILLES
1. Unscrew the spinner clockwise (or take the spinner out from the bag) and the
plastic nut counter clockwise to remove both of them. Fix the rear guard to the
motor then tighten the plastic nut again. (Fig. 5)
2. Insert the blade into shaft, and make sure the rotor shaft pin is fitted into groove
of the blade. Turn the spinner counterclockwise to tighten the blade. (Fig. 5)
3. Fix the front guard and the rear guard with circlip and then tighten the fan guard
locking screw and nut. (Fig. 7)
Fig.5
Fig.6
Fig.7
OPERATING INSTRUCTION
1. Speed is controlled by depressing the piano keys.
0---Stop
1---Lower 2---Medium
3---High
2. To make/stop the fan head oscillate. Push down/pull up the
clutch knob.
3. The airflow can be adjusted upward or downward by loosening
the tilt adjustment knob and adjusted the vertical angle as
desired. Retighten the knob securely.
4. The height of the fan can be adjusted by loosening the height
adjustment ring carefully raising or lowering the fan and firmly
tightening the ring.
MAINTENANCE INSTRUCTION
The fan requires little maintenance. Do not try to fix it by yourself. Refer it to
qualified service personnel if service is needed.
1. Before cleaning and assembling, do not plug the pins into the socket.
2. To ensure adequate air circulation to the motor. Keep vents at the rear of the
motor housing from dust, fluff and etc. A vancuum cleaner can not be used to
clean these vents before unplug. Do not disassemble the fan remove fluff.
8
3. Please wipe the exterior parts with a soft cloth soaking a mild detergent.
Do not use any abrasive detergent or solvents to avoid scratching the sufrace.
Do not use of the following as a cleaner: gasoline, thinner, bending.
4. Do not allow water or any other liquid into the motor housing or interior parts.
CLEANING
1. Be sure to unplug from the electrical supply source before cleaning.
2. Plastic parts should be cleaned with a soft cloth moisten with mild soap.
Thoroughly remove soap film with dry cloth.
DISPOSAL: Do not dispose of electrical appliances as unsorted
municipal waste, use separate collection facilities. Contact you
local government for information regarding the collection systems
available. If electrical appliances are disposed of in landfills or
dumps, hazardous substances can leak into the groundwater and get into the food
chain, damaging your health and well-being.
www.starmaxelectronics.com
9
MANUAL DEL PROPIETARIO
VENTILADOR DE PIE OSCILANTE
DE 3 VELOCIDADES
MODELO: STFFS45-3DF
LEA Y CONSERVE ESTAS INSTRUCCIONES
PRECAUCIÓN
Lea detenidamente las instrucciones y recomendaciones para usar
su ventilador de manera segura.
ADVERTENCIA
1. No deje el ventilador funcionando solo.
2. Mantenga todo artefacto eléctrico fuera del alcance de los niños y
de las personas enfermas o débiles. No permita que ellos usen
artefactos eléctricos sin supervisión.
3. Si el cable eléctrico se daña, haga que lo cambie el fabricante, su
agente de servicio o una persona igualmente calificada, para
evitar riesgos innecesarios.
4. Este aparato se puede utilizer por los niños de 8 años, los
mayores y las personas con capacidades físicas, sensoriales o
mentales reducidas o falta de experiencia y conocimiento, si se ha
concedido la supervisión o instrucción sobre el uso del aparato de
manera segura por una persona quien conoce el peligro incluido.
Los niños ni pueden jugar con el aparato. Los niños no hagan la
limpieza ni el mantenimiento sin supervisión.
5. Cuando el ventilador está montado, nunca quite el protector de la
hoja del rotor.
- Desenchufe el ventilador antes de limpiarlo.
- No puede abrir el protector de la hoja del rotor para limpiar la hija
de rotor.
- Limpie la rejilla y el protector de la hoja del rotor con un paño
poco mojado.
CÓMO USAR SU VENTILADOR DE MANERA SEGURA
1. Nunca introduzca los dedos, lápices, ni ningún otro objeto a través
de la rejilla cuando el ventilador esté en funcionamiento.
2. Desenchufe el ventilador antes de cambiarlo de lugar.
3. Asegúrese de poner el ventilador en una superficie estable antes
de encenderlo para evitar que se vuelque.
4. NO ponga el ventilador en una ventana porque la lluvia puede
causar una descarga eléctrica.
5. Use su ventilador solamente bajo techo.
1
PARTES
DEL VENTILADOR
Tuerca plástica Eje del motor
Aspas
Malla frontal
Perilla de oscilación
Carcasa del motor
Perilla de ángulo
Botonera
Tunel plastico
Botones
Aro Plástico
Malla posterior
Ajustar
Aflojar
Tuerca de
sujeción
Tubo
interior
Base
Tubo de
extensión
Ajustar
Anillo de
ajuste de
altura
Tornillo de orejetas “7”
CONEXIÓN DE LA BASE Y DEL BARRAL PRINCIPAL
1. Afloje el tornillo de apriete manual “7” del barral de extensión. (Fig. 1)
2. Inserte el barral de extensión en la base y ajuste el tornillo de apriete manual “7”.
(Fig. 2)
3. Afloje el anillo regulador de la altura que está en el barral de extensión, y ponga
el tubo interior a la altura deseada. (Nota: Si usted no puede encontrar el barral
interior, es porque éste se ha deslizado dentro del barral de extensión.
Localícelo allí y tire de él para sacarlo). (Fig. 3)
4. Para instalar el cabezal en el barral de extensión, afloje el tornillo de apriete
manual que está en la parte inferior del cabezal. Coloque el cabezal en el barral
de extensión y ajuste el tornillo de apriete manual de modo que quede alineado
con la ranura del barral interior. (Fig. 4)
PRECAUCIÓN: Ajuste completamente el anillo para regular la altura antes de
instalar la parte del motor en el barral de extensión.
Fig.1
Fig.3
Fig.2
Fig.4
Orificio de montaje
Aflojar
Tornillo de apriete manual
Ranura anular
2
CÓMO ARMAR LAS ASPAS Y LAS REJILLAS
1. Saque el cono de la hélice y la tuerca de plástico que están en la parte delantera
del motor. Fije la rejilla posterior en el motor, vuelva a poner la tuerca de plástico
y ajústela. (Fig. 5)
2. Inserte la hélice en el eje. Asegúrese de que la espiga del retén haya encajado
en la ranura del aspa. Gire el cono de la hélice en sentido antihorario para
ajustar el aspa. (Fig. 6)
3. Fije ambas rejillas con el anillo de plástico y con un destornillador ajuste el
tornillo fijador. (Fig. 7)
Fig.5
Fig.6
Fig.7
OPERACIÓN
1. Control de velocidad
La velocidad se controla presionando las teclas.
0-“Off”(Apagar)
1-“Low”(Baja)
2-“Medium”(Media) 3-“High”(Alta)
2. Perilla de embrague
Para que el ventilador oscile, presione esta perilla. Para que
el caudal de aire fluya en una sola dirección, tire de esta perilla
después de poner el ventilador en la dirección deseada.
3. Ajuste de la inclinación
Para dirigir el caudal de aire hacia arriba o hacia abajo,
empuje ligeramente la rejilla en la dirección deseada.
4. Regulación de la altura
Para regular la altura del ventilador, afloje la tuerca de
ajuste cuidadosamente, suba o baje el ventilador, y vuelva
a ajustar la tuerca.
MANTENIMIENTO
El ventilador precisa de poco mantenimiento. No intente arreglarlo usted mismo. Si
precisa algún servicio, comuníquese con el personal de servicio calificado.
1. Desenchufe el ventilador antes de limpiarlo y de armarlo o desarmarlo.
2. Para que el motor tenga ventilación adecuada, mantenga libres de polvo los
conductos de ventilación que están en la parte posterior del motor. No desarme
el ventilador para eliminar el polvo.
3
3. Por favor, limpie la parte exterior del ventilador pasándole un trapo limpio con
detergente suave.
4. No utilice ningún detergente abrasivo ni solventes porque éstos rayarán la
superficie de su ventilador. Tampoco utilice ninguno de los siguientes productos
para limpiar: nafta, diluyente o benceno.
5. Evite que entre agua u otros líquidos en la caja del motor y en las piezas
internas del artefacto.
LIMPIEZA
1. Asegúrese de desenchufar el ventilador del tomacorriente antes de limpiarlo.
2. Las piezas plásticas deben limpiarse con un trapo suave humedecido con jabón
suave. Elimine todo vestigio de detergente con un trapo seco.
CÓMO DESECHAR ESTE ARTEFACTO: No tire los artefactos eléctricos
con la basura general, utilice los locales de recolección correspondientes.
Comuníquese con su autoridad local para informarse acerca de los
sistemas de recolección disponibles. Si los artefactos eléctricos se
desechan en rellenos sanitarios o vertederos de basura, las sustancias nocivas de
dichos artefactos pueden filtrarse en el suelo, contaminar el agua del subsuelo e
ingresar en la cadena alimenticia causando estragos en su salud y bienestar.
www.starmaxelectronics.com
4