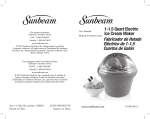
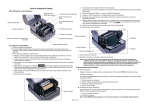
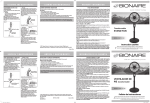
1
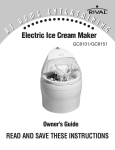
1 YEAR LIMITED WARRANTY
Sunbeam Products, Inc. doing business as Jarden Consumer Solutions or if in Canada, Sunbeam
Corporation (Canada) Limited doing business as Jarden Consumer Solutions (collectively “JCS”)
warrants that for a period of one year from the date of purchase, this product will be free from
defects in material and workmanship. JCS, at its option, will repair or replace this product or any
component of the product found to be defective during the warranty period. Replacement will be
made with a new or remanufactured product or component. If the product is no longer available,
replacement may be made with a similar product of equal or greater value. This is your exclusive
warranty. Do NOT attempt to repair or adjust any electrical or mechanical functions on this product.
Doing so will void this warranty.
This warranty is valid for the original retail purchaser from the date of initial retail purchase and is
not transferable. Keep the original sales receipt. Proof of purchase is required to obtain warranty
performance. JCS dealers, service centers, or retail stores selling JCS products do not have the right to
alter, modify or any way change the terms and conditions of this warranty.
This warranty does not cover normal wear of parts or damage resulting from any of the following:
negligent use or misuse of the product, use on improper voltage or current, use contrary to the
operating instructions, disassembly, repair or alteration by anyone other than JCS or an authorized
JCS service center. Further, the warranty does not cover: Acts of God, such as fire, flood, hurricanes and
tornadoes.
What are the limits on JCS’s Liability?
JCS shall not be liable for any incidental or consequential damages caused by the breach of any
express, implied or statutory warranty or condition.
Except to the extent prohibited by applicable law, any implied warranty or condition of merchantability
or fitness for a particular purpose is limited in duration to the duration of the above warranty.
JCS disclaims all other warranties, conditions or representations, express, implied, statutory or otherwise.
JCS shall not be liable for any damages of any kind resulting from the purchase, use or misuse of, or
inability to use the product including incidental, special, consequential or similar damages or loss of
profits, or for any breach of contract, fundamental or otherwise, or for any claim brought against
purchaser by any other party.
Some provinces, states or jurisdictions do not allow the exclusion or limitation of incidental or
consequential damages or limitations on how long an implied warranty lasts, so the above
limitations or exclusion may not apply to you.
This warranty gives you specific legal rights, and you may also have other rights that vary from
province to province, state to state or jurisdiction to jurisdiction.
How to Obtain Warranty Service
In the U.S.A.
If you have any question regarding this warranty or would like to obtain warranty service, please call
1-800-557-4825 and a convenient service center address will be provided to you.
In Canada
If you have any question regarding this warranty or would like to obtain warranty service, please call
1-800-557-4825 and a convenient service center address will be provided to you.
In the U.S.A., this warranty is offered by Sunbeam Products, Inc. doing business as Jarden Consumer
Solutions located in Boca Raton, Florida 33431. In Canada, this warranty is offered by Sunbeam
Corporation (Canada) Limited doing business as Jarden Consumer Solutions, located at 20 B Hereford
Street, Brampton, Ontario L6Y 0M1. If you have any other problem or claim in connection with this
product, please write our Consumer Service Department. PLEASE DO NOT RETURN THIS PRODUCT TO
ANY OF THESE ADDRESSES OR TO THE PLACE OF PURCHASE.
© 2011 Sunbeam Products, Inc. doing business as Jarden Consumer Solutions. All rights reserved.
Distributed by Sunbeam Products, Inc. doing business as Jarden Consumer Solutions, Boca Raton,
Florida 33431.
152983-Rev.1
GCDS-RIV24034-SZ
Riv_ 1-1.5Qt_Gel_canister_11ESM2
Printed in China
™
1-1.5 Quart Electric Ice Cream Maker
Owner’s Guide
READ AND SAVE THESE INSTRUCTIONS
IMPORTANT SAFEGUARDS
When using electrical appliances, basic safety precautions
should always be followed including the following:
READ ALL INSTRUCTIONS BEFORE USE
1. Read all instructions before using.
2. To protect against fire, electric shock and personal injury, do not
immerse appliance, its cord or plug, in water or other liquid.
3. Close supervision is necessary when any appliance is used by or
near children.
4. Unplug from outlet when not in use, before putting on or taking
off parts, and before cleaning.
5. Avoid contact with moving parts. Keep hands, hair, clothing, as well
as spatulas and other utensils away during operation to reduce the
risk of injury to persons and/or damage to the appliance.
6. Do not operate any appliance with a damaged cord or plug, or
after appliance malfunctions or is dropped or damaged in any
manner. Return appliance (see warranty) for examination, repair
or electrical or mechanical adjustment.
7. The use of attachments not recommended by the appliance
manufacturer may result in fire, electric shock or personal injury.
8. Do not use outdoors.
9. Do not let cord hang over edge of table or counter, or touch hot
surfaces, including the stove.
10.To disconnect, unplug from wall outlet.
11. Do not operate unit dry. Always have ice cream mixture in the
canister when you plug in the unit.
12.Keep hands and utensils out of gel canister while in use to reduce
the risk of injury to persons and damage to the appliance. DO
NOT USE SHARP OBJECTS OR UTENSILS INSIDE THE GEL CANISTER!
Sharp objects will scratch and damage the inside of the Gel
Canister. A rubber spatula or wooden spoon may be used, when
the appliance is in the OFF position.
-E2-
13.Be sure that the voltage indicated on the name plate matches
with your home’s voltage.
14.During operation keep your hands and the cord away from hot
parts of the appliance during operation.
15.Do not place or use the appliance on hot surfaces, such as stoves,
hotplates, or near open gas flames.
16.Do not expose the Gel Canister to temperatures above 105°F/41°C.
Do not clean Gel Canister in dishwasher.
17.Do not place any part of the Unit in the dishwasher.
18.Do not use extension cord.
19.Close supervision is necessary when appliance is in use.
SAVE THESE INSTRUCTIONS
This appliance is for HOUSEHOLD USE ONLY. No user-serviceable
parts inside. Power unit never needs lubrication. Do not attempt
to service this product. Do not immerse in water or other
liquid. Any servicing should be performed by an authorized
service representative.
POLARIZED PLUG INFORMATION
This appliance has a polarized plug (one blade is
wider than the other). To reduce the risk of electric
shock, this plug is intended to fit into a polarized
outlet only one way. If the plug does not fit fully
into the outlet, reverse the plug. If it still does not
fit, contact a qualified electrician. Do not attempt to modify the
plug in any way. If the plug fits loosely into the AC outlet or if the
AC outlet feels warm, do not use that outlet.
-E3-
KNOW YOUR ICE CREAM MAKER
ON/OFF SWITCH
MIXING FEEDER
MOTOR COVER
PADDLE
GEL CANISTER
LOCKING TABS
BUCKET
BEFORE YOU USE YOUR ICE CREAM MAKER
Remove all literature and packing materials from inside the
ice cream maker. Wash the Gel Canister, Bucket, and Paddle
in warm, soapy water. Be sure to rinse and dry all parts
thoroughly. DO NOT immerse Motor COVER in water. To clean,
wipe with a damp cloth.
-E4-
FREEZING THE GEL CANISTER
The most important step in making frozen desserts is to make
sure the Gel Canister is properly frozen. Your Ice Cream Maker
features a double insulated bowl and requires thorough
freezing. For best results, the Canister should be wrapped in
a plastic bag and placed upright in the back of your freezer,
where the temperature is the coldest. Wrapping your Canister
in a plastic bag will guard against freezer burn. The length of
time necessary to properly freeze the Canister will depend on
how cold the freezer temperature is.
As there is liquid in between the Canister walls, shake the
Canister to check the ideal freezing condition; you should not
hear any liquid moving within the walls.
NOTE: Continually storing the Gel Canister in the freezer
allows you the flexibility to make your favorite frozen dessert
at a moment’s notice.
Freezer Temperature
Approx. Min. Freezing Time
-30°C/-22°F
8–9 hours
-25°C/-13°F
12–13 hours
-18°C/0°F
20–22 hours
-15°C/5°F
24 hours or more
-E5-
HOW TO USE YOUR ICE CREAM MAKER
HOW TO USE YOUR ICE CREAM MAKER (CONT.)
This ice cream maker can make up to 1 or 1.5 quart of ice cream
(selected models only). Due to an increase in volume during
preparation, the maximum amount must not exceed 0.5
quarts of liquid. If using your own recipes, adapt the volume of
mixture to these amounts.
1. Make sure unit switch is in OFF position.
2. Remove Gel Canister from freezer.
3. Insert Paddle into Canister.
4. Place Motor Cover on top of Canister and put into the Bucket so
that all the locking tabs are aligned and the extender fits into
the Paddle. Once you have made certain everything is properly
together, rotate the Motor Cover clockwise slightly until the 4
tabs “snap” into place. Insert the plug into outlet, then turn the
unit ON immediately. This will prevent the Paddle from freezing
onto the Canister.
5. Pour the prepared ice cream mixture through the Mixing Feeder
located on the Motor Cover.
Note: It is extremely important that the Canister be used
immediately after it is removed from the freezer, as it begins to
thaw once removed. First, make sure that the ice cream mixture is
ready, then remove the Canister from freezer.
6. Leave the machine on for approximately 20–40 minutes, or until
the mixture reaches the desired consistency. Do not turn the
appliance off during use, as the mixture may freeze and prevent
the movement of the Paddle. After 40 minutes turn unit OFF.
7. To add ingredients after the freezing process has begun, gently
add them through the Mixing Feeder.
8. To avoid overheating the Motor, the direction of the rotation
will change if the mixture becomes too thick. If the direction of
rotation continues to change, the mixture is completely prepared,
turn off unit immediately.
9. Remove Paddle from ice cream. Only use rubber, plastic, or
wooden utensils to serve from the Canister bowl. Metal spoons
may damage the bowl.
10. To further harden the ice cream, you may put the Canister with
the ice cream contents into the freezer for a short period of time
(no more than 30 minutes). Long term freezing, however, should
be done in an airtight container.
-E6-
AUTO SAFETY SHUT OFF
This Ice Cream Maker is supplied with an auto safety shutoff. Should
the motor become overheated it will turn off. In order to restart the
Ice Cream Maker the following steps must be followed:
1. Unplug the Ice Cream Maker.
2. Wait at least 20 minutes for the motor to cool.
3. Plug in and operate normally.
HOW TO CLEAN YOUR ICE CREAM MAKER
Make sure the unit is turned off and unplugged. The gel canister
should be cleaned in warm water and mild detergent, then dried
thoroughly. Never clean with scouring powders or hard implements.
Never replace Canister in Freezer if it is still wet. Do not use sharp
utensils, scouring pads or abrasive detergents when cleaning Gel
Canister.
The Motor Cover can be cleaned by using a damp cloth. Never
immerse Motor Cover in water.
Do not place canister in dishwasher!
-E7-
HELPFUL HINTS
HELPFUL HINTS
• Some recipes require the mixture to be pre-cooked. Make
the recipe at least one day ahead. This will allow the
mixture to cool completely and adds volume.
• Uncooked recipes will yield best results when an electric
mixer is used to cream the eggs and sugar. This helps
increase volume in the ice cream mixture. Eggs must be
cooked properly. See our eggbased recipes for instructions.
• Most ice cream recipes are a combination of cream, milk,
eggs and sugar. You can use any type of cream you like, but
the type of cream you use will affect the flavor and texture.
The higher percentage of fat, the richer the ice cream and
the softer the texture. For example, heavy cream has at
least 36% fat, followed by: whipping cream (30%), coffee or
light cream (18%) and half & half (10%). Any combination
can be used, but make sure the liquid measurement
remains the same. For example, lighter ice creams can be
made by using more milk than cream, or by eliminating
cream altogether. Skim milk may be used, but there will be
a noticeable difference in texture and taste.
• The ice cream mixture will stay fresh in the refrigerator
for several days. Be sure to shake well before adding to the
Canister.
• When pouring mixture into the Canister, be sure to stop
at least 1” (2.5 cm) from the top, as mixture will increase in
volume during the freezing process.
• Alcohol inhibits the freezing process. To add alcohol to a
recipe, add when the mixture is semi-stiff.
• The flavor of a sorbet will depend greatly on the ripeness
and sweetness of the fruit and/or juice. If fruit is too tart,
add sugar; if the fruit is very ripe, decrease or omit the
sugar. Freezing subdues sweetness, so the recipe will not
be quite as sweet when frozen.
• Artificial sweeteners can be used as a substitute for sugar.
NOTE: Heat affects the sweetness of artificial sweetener.
Only add artificial sweeteners to mixture that are cold
or have been completely cooled. When a recipe calls for
heating liquid to dilute sugar, omit the heating process
and simply stir in the sweetener until it is well dissolved.
1 packet of sweetener = 2 teaspoons (10ml) sugar
6 packets = 1/4 cup (60ml)
8 packets = 1/3 cup (75ml)
12 packets = 1/2 (125ml)
• The ice cream mixture should be liquid when preparation
starts. Do not use stiff mixtures (i.e. whipped cream, frozen
liquids).
• When adapting your own recipes to the maximum amount
of 1 or 1.5 quart (selected models only), you should change
all ingredients to the same percentage.
• Do not operate the appliance longer than required. If after
40 minutes, the mixture is not yet solid, or has thawed
again, do not continue.
Possible reasons for mixture not freezing:
- the Gel Canister was not cold enough
- the mixture was too warm
- the proportion of ingredients was incorrect
• Do not store prepared ice cream in the Gel Canister for
more than a few days.
-E8-
-E9-
WASTE DISPOSAL
The liquid in the Gel Canister contains no toxic materials.
Dispose as normal household waste.
Questions? Please contact us at
www.rivalproducts.com or at 1.800.557.4825.
RECIPES
DELICIOUS HOMEMADE ICE CREAM
For great tasting homemade ice cream
use with our Rival™ Ice Cream Mixes to
create your favorite recipes. It’s fast, easy
and tastes great!
For more information please visit
www.rivalproducts.com.
HINT FOR LOWER-FAT RECIPES
For lower fat content, substitute 1% milk for whole milk, whole
milk for half and half; and evaporated skim milk for whipping
cream. Higher fat dairy products – such as whipping
cream – create a smooth, rich and creamy dessert. Lower fat
dairy products create a lighter dessert with a slightly different
texture.
RECIPES
IMPORTANT:
* The following recipes (pages E11-14) have been created using dairy products produced
in the United States.
EASY VANILLA ICE CREAM
1 Quart: 1 cup whole milk
1
⁄2 cup sugar
Dash salt
2
⁄3 cup half and half 1
⁄3 cup whipping cream
1
⁄2 teaspoon vanilla extract
1.5 Quart:
11⁄2 cups whole milk
3
⁄4 cup sugar
Dash salt
1 cup half and half
1
⁄2 cup whipping cream
1 teaspoon vanilla extract
Combine milk, sugar and salt. Stir with a wire whisk until sugar is dissolved.
Stir in half and half, whipping cream and vanilla.
Pour into canister and freeze as directed on pages E4–7.
OLD FASHIONED VANILLA ICE CREAM
1 Quart: 1
⁄2 cup sugar
Dash salt
1 cup whole milk
1 egg, beaten
1 cup whipping cream
2 teaspoons pure vanilla extract
1.5 Quart:
3
⁄4 cup sugar
1
⁄8 teaspoon salt
13⁄4 cups whole milk
2 eggs, beaten
1 1⁄2 cups whipping cream
1 tablespoon pure vanilla extract
Combine sugar, salt and milk in saucepan. Cook over medium heat, stirring occasionally
until mixture almost boils. Reduce heat to low.
Gradually stir about ½ cup of hot milk into the beaten eggs. Add eggs to remaining hot
mixture. Cook over low heat, stirring constantly until slightly thickened, about 2–3
minutes. Remove from heat and refrigerate at least 2 hours.
Combine whipping cream, vanilla and chilled mixture, stirring with a wire whisk to
combine.
Pour into canister and freeze as directed on pages E4–7.
Variations: Add a variety of ingredients to the ice cream during the last 5 minutes of
freezing. Use 1/2 cup of any of the following: chocolate chips, crumbled chocolate
sandwich cookies, M&M’s, crushed peppermint candies, chocolate covered peanuts, etc.
Fruit: Add 1 cup of pureed fruit such as strawberries, bananas, peaches, blueberries, etc.
-E10-
-E11-
RECIPES
PRALINE ALMOND FUDGE ICE CREAM
1 Quart: 1
⁄2 cup light brown sugar
dash salt
11⁄2 cups whole milk
1 egg, beaten
2
⁄3 cup whipping cream
2 teaspoons pure vanilla extract
1
⁄2 cup slivered almonds
1 tablespoon butter
1
⁄3 cup chocolate fudge topping
1.5 Quart:
3
⁄4 cup light brown sugar
1
⁄8 teaspoon salt
2¼ cups whole milk
2 eggs, beaten
1 cup whipping cream
1 tablespoon pure vanilla extract
3
⁄4 cup slivered almonds
2 tablespoons butter
1
⁄2 cup chocolate fudge topping
Combine brown sugar, salt and milk in a saucepan. Cook over medium heat until
mixture starts to bubble around the edges. Gradually stir about 1 cup of hot milk into
the beaten eggs. Add to remaining hot milk, stirring constantly. Continue cooking 1
minute. Remove from heat. Refrigerate 2 hours.
Combine whipping cream and vanilla in large bowl; add chilled mixture, stirring with a
wire whisk to combine.
Sauté almonds in butter over low heat about 5 minutes. Stir into ice cream mixture.
Pour into canister and freeze as directed on pages E4–7. During last 5 minutes of
freezing pour chocolate fudge topping through opening in top of lid to combine into the
ice cream.
STRAWBERRY SORBET
1 Quart: 22⁄3 cups fresh or frozen (thawed) strawberries, pureed
1
⁄3 cup sugar
2
⁄3 cup water
2 teaspoons lemon juice
1.5 Quart:
4 cups fresh or frozen (thawed) strawberries,
pureed ½ cup sugar
1 cup water
1 tablespoon lemon juice
RECIPES
EASY CHOCOLATE ICE CREAM
1 Quart: 11⁄3 cups chocolate milk
¼ cup sweetened, condensed milk
1
⁄3 cup whipped dessert topping
1.5 Quart:
2 cups chocolate milk
1
⁄3 cup sweetened, condensed milk
1
⁄2 cup whipped dessert topping
Combine all ingredients. Pour into canister and freeze as directed on pages E4–7.
CHOCOLATE ICE CREAM
1 Quart: 11⁄2 cups whole milk
2
⁄3 cup sugar
Dash salt
2 ounces semisweet chocolate squares, finely chopped
1 egg, beaten
1
⁄2 cup half and half
1
⁄3 cup whipping cream
1
⁄2 teaspoon vanilla extract
1.5 Quart:
2¼ cups whole milk
1 cup sugar
Dash salt
3 ounces semisweet chocolate
squares, finely chopped
2 eggs, beaten
3
⁄4 cup half and half
1
⁄2 cup whipping cream
1 teaspoon vanilla extract
Combine milk, sugar, salt and chocolate in a saucepan. Cook over medium heat, stirring
constantly, until chocolate is melted and mixture almost boils. Gradually stir about 1 cup
of the hot mixture into the beaten eggs. Add the eggs to remaining hot mixture. Cook
and stir over low heat until slightly thickened (2 minutes). Stir in half and half, whipping
cream and vanilla. Cover and refrigerate for 2 hours.
Pour into canister and freeze as directed on pages E4–7.
Combine sugar and water in a small saucepan. Heat to boiling. Reduce heat and simmer
until sugar dissolves. Remove from heat and cool completely (1– 2 hours). Combine with
pureed strawberries and lemon juice.
Pour into canister and freeze as directed on pages E4–7.
-E12-
-E13-
RECIPES
CINNAMON WALNUT ICE CREAM
1 Quart: 1 cup whole milk
2
⁄3 cup half and half
1
⁄3 cup whipping cream
1
⁄2 cup sugar
2
⁄3 cup chopped walnuts
3
⁄4 teaspoon vanilla extract
¼ teaspoon cinnamon
Dash salt
1.5 Quart:
11⁄2 cups whole milk
1 cup half and half
1
⁄2 cup whipping cream
3
⁄4 cup sugar
1 cup chopped walnuts
1¼ teaspoons vanilla extract
1
⁄3 teaspoon cinnamon
Dash salt
Thoroughly combine all ingredients. Pour into canister and freeze as directed on pages
E4–7.
DOUBLE ALMOND CHOCOLATE ICE CREAM
1 Quart: 1 cup whole milk
1
⁄2 cup sugar
Dash salt
2 ounces semisweet chocolate square, finely chopped
1 egg, beaten
1 cup whipping cream
1
⁄2 teaspoon vanilla extract
1
⁄2 teaspoon almond extract
1
⁄2 cup chopped almonds
1.5 Quart:
11⁄2 cups whole milk
3
⁄4 cup sugar
Dash salt
2 ounces semisweet chocolate
square, finely chopped
2 eggs, beaten
11⁄2 cups whipping cream
1 teaspoon vanilla extract
2 teaspoons almond extract
1 cup chopped almonds
Combine milk, sugar, salt and chocolate in saucepan. Cook over medium heat, stirring
constantly, until chocolate is melted and mixture almost boils. Gradually stir 1 cup of the
hot mixture into the beaten egg. Pour eggs into the remaining hot mixture and
continue cooking over low heat until slightly thickened (2–3 minutes). Remove from
heat.
Stir in whipping cream, vanilla, almond extract and chopped almonds.
Cover and refrigerate 2 hours.
Pour into canister and freeze as directed on pages E4–7.
-E14-
GARANTÍA LIMITADA DE 1 AÑO
Sunbeam Products, Inc. operando bajo el nombre de Jarden Consumer Solutions, o en Canadá,
Sunbeam Corporation (Canada) Limited operando bajo el nombre de Jarden Consumer Solutions,
(en forma conjunta, “JCS”), garantiza que por un período de un año a partir de la fecha de compra,
este producto estará libre de defectos de materiales y mano de obra. JCS, a su elección, reparará o
reemplazará este producto o cualquier componente del mismo que presente defectos durante el
período de garantía. El reemplazo se realizará por un producto o componente nuevo o reparado. Si el
producto ya no estuviera disponible, se lo reemplazará por un producto similar de valor igual o superior.
Ésta es su garantía exclusiva. No intente reparar o ajustar ninguna función eléctrica o mecánica de este
producto. Al hacerlo elimínará ésta garantía.
La garantía es válida para el comprador minorista original a partir de la fecha de compra inicial y la
misma no es transferible. Conserve el recibo de compra original. Para solicitar servicio en garantía
se requiere presentar un recibo de compra. Los agentes y centros de servicio de JCS o las tiendas
minoristas que venden productos de JCS no tienen derecho a alterar, modificar ni cambiar de ningún
otro modo los términos y las condiciones de esta garantía.
Esta garantía no cubre el desgaste normal de las piezas ni los daños que se produzcan como resultado
de uso negligente o mal uso del producto, uso de voltaje incorrecto o corriente inapropiada, uso
contrario a las instrucciones operativas, y desarme, reparación o alteración por parte de un tercero
ajeno a JCS o a un Centro de Servicio autorizado por JCS. Asimismo, la garantía no cubre actos fortuitos
tales como incendios, inundaciones, huracanes y tornados.
¿Cuál es el límite de responsabilidad de JCS?
JCS no será responsable de daños incidentales o emergentes causados por el incumplimiento de
alguna garantía o condición expresa, implícita o legal.
Excepto en la medida en que lo prohíba la ley aplicable, cualquier garantía o condición implícita de
comerciabilidad o aptitud para un fin determinado se limita, en cuanto a su duración, al plazo de la
garantía antes mencionada.
JCS queda exenta de toda otra garantías, condiciones o manifestaciones, expresa, implícita, legal o de
cualquier otra naturaleza.
JCS no será responsable de ningún tipo de daño que resulte de la compra, uso o mal uso del producto,
o por la imposibilidad de usar el producto, incluidos los daños incidentales, especiales, emergentes o
similares, o la pérdida de ganancias, ni de ningún incumplimiento contractual, sea de una obligación
esencial o de otra naturaleza, ni de ningún reclamo iniciado contra el comprador por un tercero.
Algunas provincias, estados o jurisdicciones no permiten la exclusión o limitación de los daños
incidentales o emergentes ni las limitaciones a la duración de las garantías implícitas, de modo que es
posible que la exclusión o las limitaciones antes mencionadas no se apliquen en su caso.
Esta garantía le otorga derechos legales específicos y es posible que usted tenga otros derechos que
varían de un estado, provincia o jurisdicción a otro.
Cómo solicitar el servicio en garantía
En los Estados Unidos
Si tiene alguna pregunta sobre esta garantía o desea recibir servicio de garantía, llame al
1-800-557-4825 y podrá obtener la dirección del centro de servicio que le resulte más conveniente.
En Canadá
Si tiene alguna pregunta sobre esta garantía o desea recibir servicio de garantía, llame al 1-800-557-4825 y podrá obtener la dirección del centro de servicio que le resulte más conveniente.
En los Estados Unidos, esta garantía es ofrecida por Sunbeam Products, Inc. operando bajo el nombre
de Jarden Consumer Solutions, Boca Ratón, Florida 33431. En Canadá, esta garantía es ofrecida por
Sunbeam Corporation (Canada) Limited operando bajo el nombre de Jarden Consumer Solutions, 20
B Hereford Street, Brampton, Ontario L6Y 0M1. Si usted tiene otro problema o reclamo en conexión
con este producto, por favor escriba al Departamento de Servicio al Consumidor. POR FAVOR NO
DEVUELVA ESTE PRODUCTO A NINGUNA DE ESTAS DIRECCIONES NI AL LUGAR DE COMPRA.
© 2011 Sunbeam Products, Inc. operando bajo el nombre de Jarden Consumer Solutions. Todos los
derechos reservados. Distribuido por Sunbeam Products, Inc. operando bajo el nombre de Jarden
Consumer Solutions, Boca Raton, Florida 33431.
Impreso en China
™
Manual del Propietario
LEA Y GUARDE ESTAS INSTRUCCIONES
INDICACIONES DE SEGURIDAD
IMPORTANTES
Cuando use aparatos eléctricos, debe seguir una serie de
precauciones básicas de seguridad, entre ellas:
LEA TODAS LAS INSTRUCCIONES ANTES DE USARLO
1. Lea todas las instrucciones antes de usarlo.
2. Para protegerse de descargas eléctricas o accidentes personales,
no sumerja el cable, enchufe o motor en agua u otro cualquier
líquido.
3. Mantenga una vigilancia estrecha de la unidad cuando se use
cerca de niños.
4. Desenchufe cuando no esté en uso, o antes de antes de montar o
desmontar piezas y antes de limpiarla.
5. Evite tocar las partes cuando estén en movimiento. Mantenga las
manos, cabello, ropa, así como las espátulas y otros utensilios
alejados durante el funcionamiento para reducir riesgos de
accidentes personales y/o daños en el artefacto.
6.No opere ningún aparato que tenga el cable o el enchufe
dañados, cuando funcione mal, se haya caído o recibido cualquier
tipo de daño. Devuelva el artefacto (vea garantía) para su
examen, reparación o ajuste mecánico o eléctrico.
7. El uso de accesorios adicionales no recomendados por el
fabricante podrían causar incendios, descargas eléctricas o
accidentes personales.
8. No lo use en exteriores.
9. No deje el cable colgando de la mesa o el mostrador, ni que toque
superficies calientes, incluyendo la estufa.
10.Para desconectar, retire el enchufe del tomacorriente.
11. No utilice su Fabricador de Helado en seco. Siempre tenga mezcla
de helado Dentro del envase cuando enchufe la unidad.
12.Mantenga las manos y los utensilios fuera del envase de gel
mientras esté en uso para reducir para reducir riesgos de
-S2-
accidentes personales y daños en el artefacto. NO UTILICE
OBJETOS O UTENSILIOS AFILADOS DENTRO DEL ENVASE DE GEL!
Los objetos afilados rayarán y dañarán el interior del envase de
Gel. Una espátula de goma o madera puede usarse, cuando el
artefacto está apagado ( posición OFF).
13.Asegúrese que el voltaje indicado en la placa coincida con el de su casa.
14.Mientras esté funcionando mantenga las manos y el cable
alejados de las partes calientes del artefacto.
15.No coloque o utilice el artefacto sobre superficies calientes, como
estufas, hornillas, o cerca de llamas provenientes de gas.
16.No exponga el Envasende Gel a temperaturas por encima de
105°F/41°C. No lave el Envase de Gel en el lavaplatos.
17.No coloque ninguna parte de la Unidad en el lavaplatos.
18.No utilice cable de extensión.
19.Mantenga una vigilancia estrecha durante el uso de esta unidad.
GUARDE ESTE INSTRUCTIVO
Este aparato es para USO DOMESTICO SOLAMENTE. En el interior
no hay piezas a las que el usuario les pueda dar mantenimiento.
El motor de la unidad no necesita lubricación. No intente dar
mantenimiento ni reparar este producto. No lo sumerja en agua
ni en otro líquido. Cualquier servicio que requiera debe ser provisto por un Centro de Servicio Autorizado.
ENCHUFE POLARIZADO INFORMACIÓN
Este aparato tiene un enchufe polarizado (una
pata es más ancha que la otra). Para reducir el
riesgo de descarga eléctrica, este enchufe está
diseñado para ajustarse sólo de una forma en un
tomacorriente polarizado. Si el enchufe no se
ajusta completamente en el tomacorriente, dé vuelta al enchufe. Si
todavía no se ajusta, contacte a un electricista califi cado. No
intente modifi car el enchufe de ninguna manera. Si el enchufe
está fl ojo en el tomacorriente de CA, o si el tomacorriente se siente
caliente, no utilice ese tomacorriente.
-S3-
CONOZCA SU GRANIZADORA DE
HIELO PARA RASPADOS
BOTÓN DE ENCENDIDO/APAGADO (ON/OFF)
APERTURA PARA LA MEZCLA
TAPA MOTOR
PALETA
ENVASE DE GEL
LENGÜETAS DE FIJACIÓN
CUBO ENFRIADOR
ANTES DE USAR SU FABRICADOR DE HELADO
Retire toda la literatura y material de empaque del interior
de su fabricador de helado. Lave el Envase de Gel, el Cubo
Enfriador y la Paleta en agua tibia con jabón. Asegúrese de
enjuagar y secar todas las partes. NO sumerja la TAPA MOTOR
en agua. Para limpiar, use un paño húmedo.
-S4-
CONGELACIÓN DEL ENVASE DE GEL
El paso más importante para hacer postres de helados es
asegurarse que el Envase de Gel esté apropiadamente
congelado. Su Fabricador de helado tiene una característica
de tener un recipiente con doble aislamiento y requiere una
congelación completa. Para mejores resultados, el Envase
debería estar envuelto en una bolsa de plástico y colocado en
posición vertical en su congelador, donde esté la temperatura
más fría. Envolviendo su Envase en una bolsa de plástico
evitará que se queme por el frío. El tiempo necesario para la
congelación dependerá de cuan frío es la temperatura de su
congelador.
En caso que haya líquido entre las paredes del Envase, agite
el envase para revisar la condición ideal de congelación. No
debería oír ningún líquido moviéndose dentro de las paredes.
NOTA: Si guarda siempre el Envase de Gel en el congelador le
permitiría la flexibilidad de hacer su postre favorito de helado
en cualquier momento.
Temperatura del Congelador
Min.Aprox. de Tiempo
-30°C/-22°F
8–9 horas
-25°C/-13°F
12–13 horas
-18°C/0°F
20–22 horas
-15°C/5°F
24 horas o más
-S5-
COMO USAR SU FABRICADOR DE HELADO
COMO USAR SU FABRICADOR DE HELADO (CONT.)
El fabricador de Helado puede hacer de 1 a 1.5 cuartos de galón
de helado (en los modelos seleccionados únicamente) . Debido
al aumento del volumen durante la preparación, la cantidad
máxima de líquido no debe exceder de 0.5 cuartos de galón. Si
utiliza sus propias recetas, adapte las cantidades de mezcla a
este volumen.
1.Asegúrese que la Unidad esté apagada (posición OFF).
2.Retire el Envase de Gel del congelador.
3.Inserte la Paleta al Envase.
4.Coloque la Tapa Motor sobre el Envase y póngala dentro del
Cubo Enfriador de tal forma que las lengüetas de fijación estén
alineadas y el extensor entre dentro de la Paleta. Una vez que se
asegure que todo está calzado, gire la Tapa Motor en sentido de
las agujas del reloj hasta que las 4 pestañas encajan en su lugar.
Enchufe el cable eléctrico en el tomacorriente, prenda la unidad
inmediatamente. Esto evitará que la Paleta se congele.
5.Vierta la mezcla para helado ya preparada a través de la Apertura
para la Mezcla localizada en la Tapa Motor.
NOTA: Es extremadamente importante que el Envase se utilice
inmediatamente después de retirarlo del congelador, ya que
empieza a derretirse una vez retirado. Primero, asegúrese que
la mezcla para helado esté l ista y entonces retire el Envase del
congelador.
6.Deje la unidad prendida durante 20-40 minutos, o hasta que la
mezcla adquiera la consistencia deseada. No apague el artefacto
durante su funcionamiento, ya que la mezcla se congelaría y la
Paleta se detendría. Después de 40 minutos apague la unidad (OFF).
7.Para agregar ingredientes después de que el proceso ha
comenzado, añádaselo suavemente a través de la Apertura para
Mezcla.
8.Para evitar el recalentamiento del Motor, la dirección de la
rotación variará si la mezcla es muy gruesa. .Si la dirección de la
rotación continúa cambiando, la mezcla está completamente
lista, apague la unidad inmediatamente.
9.Retire la Paleta del helado. Solamente utilice utensilios de goma,
plástico o madera para servir del Envase. Las cucharas de metal
dañarían el recipiente.
10. Para endurecer más adelante el helado, ponga el Envase con su
contenido de helado dentro del congelador por un tiempo breve
(no más de 30 minutos ). Tiempos más largos de congelación
deben hacerse en un envase hermético.
-S6-
SEGURIDAD DE APAGADO AUTOMÅTICO
Este fabricador de helado está equipado con un sistema de seguridad
de apagado automático. Si el motor se recalienta se apagará. Para
reiniciar el congelamiento del helado, hay que seguir los siguientes
pasos:
1. Desenchufe el congelador de helado.
2. Espere por lo menos 20 minutos para que el motor se enfríe.
3. Enchufe y proceda a operarlo normalmente.
COMO LIMPIAR SU FABRICADOR DE HELADO
Asegúrese que la unidad esté apagada y desenchufada. El envase
de gel debe limpiarse con agua tibia y jabón suave, luego secarse
completamente. Nunca lo limpie con polvos abrasivos u objetos
ásperos.
Nunca vuelva poner el Envase en el congelador si aún está mojado.
No utilice utensilios afilados, esponjas de metal o detergentes
abrasivos cuando limpie el Envase de Gel.
La Tapa Motor puede limpiarse con un paño húmedo. Nunca sumerja
la Tapa Motor en agua.
No coloque el envase en el lavaplatos!
-S7-
CONSEJOS ÚTILES
• Algunas recetas requieren la mezcla precocinada. Haga
la receta por lo menos un día antes. Esto permitirá que la
mezcla se enfríe completamente y le añadirá volumen.
• Recetas sin cocinar tendrán mejores resultados si se
utilizan batidoras eléctricas para batir los huevos con el
azúcar. Esto ayuda incrementar el volumen en la mezcla de
helado. Los huevos deben estar cocinados adecuadamente.
Para instrucciones vea nuestras recetas basadas en huevos.
• La mayoría de las recetas de helado son una combinación
de crema, leche, huevos y azúcar. Usted puede utilizar
cualquier tipo de crema que guste, pero el sabor y la
textura variará de acuerdo al tipo de crema que utilice.
Mientras mayor porcentaje de grasa tiene, el helado es
más rico en grasa y la textura es más suave. Por ejemplo,
la crema de leche (“heavy cream” ) tiene al menos 36 % de
grasa, seguido por: crema para batir (30%), crema de café o
crema ligera (18%) y crema de leche (“half & half”) (10%) .
Cualquier combinación se puede usar, pero asegúrese que
se mantenga la misma medida de líquido. Por ejemplo,
helados más ligeros se pueden hacer usando más leche
que crema, o eliminando la crema por completo. Leche
descremada puede usarse, pero habrá una diferencia
notable en textura y sabor.
• La mezcla de helado se mantendrá fresca en el refrigerador
por varios días. Asegúrese de agitarlo bien antes de
verterlo en el Envase.
• Cuando vierta la mezcla dentro del Envase, asegúrese de
detenerse al menos en 1" (2.5 cm) antes del tope, ya que
la mezcla va a crecer en volumen durante el proceso de
congelación.
• El alcohol impide el proceso de congelación. Para añadir
alcohol a una receta, agréguelo cuando la mezcla esté
medio tiesa.
-S8-
CONSEJOS ÚTILES
• El sabor de un sorbete dependerá principalmente de
la madurez y dulzura de la fruta y/o jugo. Si la fruta es
demasiado agria, añada azúcar; si la fruta está muy
madura, disminuya u omita el azúcar. La congelación
disminuye un poco la dulzura, o sea la receta cuando se
vuelva helado no estará tan dulce.
• Los edulcorantes artificiales pueden usarse como
sustitutos de azúcar.
NOTA: El calor afecta la dulzura del edulcorante artificial.
Solamente agregue e artificial a la mezcla que esté fría o
se haya enfriado completamente. Cuando en una receta
hay que calentar el líquido para disolver el azúcar, omita
el proceso de calentamiento y simplemente revuelva el
edulcorante hasta que se disuelva bien.
1 paquete de edulcorante= 2 cucharaditas (10 ml) de azúcar
6 paquetes= 1/4de taza (60 ml)
8 paquetes= 1/3 de taza (75ml)
12 paquetes= 1/2 de taza (125 ml)
•La mezcla de helado debe estará líquida cuando la
preparación comienza. No utilice mezclas tiesas (ejemplo
crema batida, líquidos congelados).
• Cuando está adaptando sus propias recetas a la cantidad
máxima de 1 o 1.5 cuartos de galón (modelos seleccionados
únicamente), debe cambiar todos los ingredientes al
mismo porcentaje
• No ponga a funcionar el artefacto durante un tiempo
más largo que lo requerido. Si después de 40 minutos, la
mezcla aún no está sólida, o se haya derretido otra vez, no
continúe. Posible razones para que la mezcla no congele:
- - el Envase de gel no está suficientemente frío.
- - La mezcla estaba muy caliente
- - la proporción de ingredientes era incorrecta
• No guarde el helado preparado en el Envase de Gel por más
de algunos días.
-S9-
ELIMINACIÓN DE RESIDUOS
El líquido en el Envase de Gel no contiene materiales tóxicos.
La eliminación es en la basura normal.
Preguntas? Por favor contáctenos en
www.rivalproducts.com o al 1.800.557.4825.
RECETAS
HELADO CASERO DELICIOSO
Para helados de delicioso sabor casero,
use las Mezclas para Helado Rápidas y
Fáciles de Rival™ para crear sus recetas
favoritas.
Son rápidas, fáciles y saben deliciosas!
Para mayor información visite
www.rivalproducts.com
SUGERENCIA PARA RECETAS BAJAS EN GRASA
Para reducir el contenido de grasa, sustituya leche de 1% en
lugar de leche entera, leche entera en lugar de crema de leche,
leche evaporada descremada en lugar de crema para batir.
Los productos lácteos altos en grasa-como crema para batircrean un postre suave, rico y cremoso. Los que son bajos en
grasa crean postres más ligeros con una mínima diferencia en
textura.
-S10-
RECETAS
IMPORTANTE
* La siguientes recetas (páginas S11-14) han sido creadas utilizando productos lácteos
producidos en los Estados Unidos.
HELADO FÁCIL DE VAINILLA
1 cuartos de galón: 1 taza de leche completa 1
⁄2 taza de azúcar Una pizca de sal 2
⁄3 taza de crema de leche 1
⁄3 taza de crema para batir 1
⁄2 cucharadita de extracto de vainilla 1.5 cuartos de galón:
11⁄2 tazas de leche completa
3
⁄4 taza de azúcar
Una pizca de sal
1 taza de crema de leche
1
⁄2 taza de crema para batir
1 cucharadita de extracto de vainilla
Combine la leche, azúcar, y sal. Revuelva con un batidor de alambre hasta que el azúcar
se disuelva. Añada revolviendo la crema de leche, crema de batir y vainilla.
Vierta dentro del envase y congele como se indica en las páginas S4-7.
HELADO DE VAINILLA A LA ANTIGUA
1 cuartos de galón: 1
⁄2 taza de azúcar
Una pizca de sal 1 taza de leche 1 huevo, batido 1 taza de crema para batir 2 cucharaditas de extracto de vainilla 1.5 cuartos de galón:
3
⁄4 taza de azúcar
1
⁄8 de cucharadita de sal
13⁄4 tazas de leche
2 huevos, batidos
1 1⁄2 tazas de crema para batir
1 cucharada de extracto de vainilla
Gradualmente vierta 1⁄2 taza de leche caliente dentro de los huevos batidos. Agregue los
huevos a la mezcla caliente que quedaba. Cocine a fuego bajo, revolviendo
constantemente hasta que espese, alrededor de 2-3 minutos. Retírelo del calor. Refrigere
por lo menos 2 horas. Combine la crema de batir, la vainilla y la mezcla fría, revolviendo
con un batidor de alambre para que se mezcle todo.
Viértalo dentro del Envase y congele como se indica en las páginas S4-7.
Variaciones: Agregue una variedad de ingredientes al helado durante los últimos 5
minutos de la congelación. Use 1⁄2 de taza de cualquiera de lo siguiente: pedacitos de
chocolate, chocolate desmoronado, alfajores, M&M’s, caramelos triturados de menta,
cacahuetes cubiertos de chocolate, etc.
Fruta: Agregue 1 taza de puré como de fresas, bananas, melocotones, arándanos
(blueberries), etc.
-S11-
RECETAS
HELADO CON FUDGE DE PRALINE DE ALMENDRA
1 cuartos de galón: 1
⁄2 de taza de azúcar morena clara
Pizca de sal
11⁄2 tazas de leche
1 huevo, batido
2
⁄3 taza de crema para batir
2 cucharaditas de extracto de vainilla 1
⁄2 taza de almendras
1 cucharada de mantequilla
1
⁄3 taza de cubierta de fudge de chocolate
1.5 cuartos de galón:
3
⁄4 de taza de azúcar morena clara
1
⁄8 cucharadita de sal
2 tazas de leche
2 huevos, batids
1 taza de crema para batir
1 cucharada de extracto de vainilla
3
⁄4 taza de almendras
2 cucharadas de mantequilla
1
⁄2 taza de cubierta de fudge de chocolate
Combine el azúcar, leche y sal en una olla. Cocine a fuego mediano, hasta que la mezcla
empiece a burbujear de los lados. Gradualmente vierta 1 taza de leche caliente dentro
de los huevos batidos. Agregue la mezcla de huevo a la leche caliente que quedaba,
revolviendo constantemente. Cocine 1 minuto; sáquelo del calor. Refrigere por 2 horas.
Combine la crema de batir y la vainilla en un recipiente redondo grande; agregue la
mezcla fría, revolviendo con un batidor de alambre. Saltee las almendras en mantequilla
sobre fuego bajo durante 5 minutos. Revuélvalo dentro de la mezcla de helado. Viértalo
dentro del Envase y congele según las instrucciones en las páginas S4-7. Durante los
últimos 5 minutos de congelación vierta la cubierta de fudge de chocolate en la parte
superior de la tapa para mezclarlos con el helado.
SORBETE DE FRESA
1 cuartos de galón: 22⁄3 tazas de puré fresas frescas o congeladas (descongeladas )
1
⁄3 taza de azúcar
2
⁄3 taza de agua
2 cucharaditas de jugo de limón
1.5 cuartos de galón:
4 tazas de puré fresas frescas o congeladas
(descongeladas)
½ taza de azúcar
1 taza de agua
1 cucharada de jugo de limón
RECETAS
HELADO FÁCIL DE CHOCOLATE
1 cuartos de galón: 11⁄3 tazas de leche chocolatada
¼ taza de leche condensada
1
⁄3 taza de cubierta para postre batida
1.5 cuartos de galón:
2 tazas de leche chocolatada
1
⁄3 taza de leche condensada
1
⁄2 taza de cubierta para postre batida
Combine todos los ingredientes. Vierta dentro del Envase y congele como se indica en
las páginas S4-7.
HELADO DE CHOCOLATE
1 cuartos de galón: 2
⁄3 de taza de azúcar Pizca de sal 1 1⁄2 tazas de leche completa 1 huevo, batido 2 onzas de cuadritos de chocolate semidulce, picados fino 1
⁄2 de taza de crema de leche 1
⁄3 taza de crema para batir 1
⁄2 cucharaditas de extracto de vainilla 1.5 cuartos de galón:
1 taza de azúcar
Pizca de sal
2 ¼ tazas de leche completa
2 huevos, batidos
3 onzas de cuadritos de chocolate semidulce,
picados fino
3
⁄4 de taza de crema de leche
1
⁄2 taza de crema para batir
1 cucharadita de extracto de vainilla
Combine el azúcar, leche y sal en una olla. Cocine a fuego mediano hasta que el
chocolate se derrita y la mezcla casi empiece a hervir, revolviendo constantemente.
Gradualmente añada 1 taza de la mezcla caliente a los huevos batidos. Agregue los
huevos a la mezcla caliente que quedaba, revolviendo constantemente. Cocine y
revuelva a fuego lento hasta que espese ligeramente (como 2 minutos). Añada
revolviendo la crema de leche, la crema para batir y la vainilla. Cubra y refrigere por 2
horas. Vierta dentro del Envase y congele como se indica en las páginas S4-7.
Combine el azúcar y el agua en una olla pequeña. Caliente hasta hervir. Reduzca el calor
y deje que se disuelva el azúcar. Retire del calor y deje enfriar completamente (1-2 horas).
Combine con el puré de fresas y jugo de limón. Vierta dentro del envase y congele como
se indica en las páginas S4-7.
-S12-
-S13-
RECETAS
HELADO DE CANELA Y NUECES
1 cuartos de galón: 1 taza de leche completa
2
⁄3 de taza crema de leche 1
⁄3 taza de crema para batir 1
⁄2 taza de azúcar
2
⁄3 taza de nueces picadas 3
⁄4 cucharadita de extracto de vainilla ¼ cucharadita de canela
Una pizca de sal
1.5 cuartos de galón:
1 1⁄2 tazas de leche completa
1 taza de crema de leche
1
⁄2 taza de crema para batir
3
⁄4 taza de azúcar
1 taza de nueces picadas
1 ¼ cucharaditas de extracto de vainilla
1
⁄3 cucharadita de canela
Una pizca de sal
Combine completamente todos los ingredientes. Vierta dentro del Envase y congele
como se indica en las páginas S4-7.
HELADO DE CHOCOLATE CON DOBLE ALMENDRA
1 cuartos de galón: 1
⁄2 taza de azúcar
Pizca de sal
1 taza de leche completa 1 huevo, batido 2 onzas de cuadritos de chocolate semidulce, picados fino 1
⁄2 de taza de crema de leche
1 taza de crema para batir
1
⁄2 cucharadita de extracto de vainilla
1
⁄2 cucharadita de extracto de almendra 1
⁄2 taza de almendras picadas 1.5 cuartos de galón:
¾ de taza de azúcar
Pizca de sal
1 1⁄2 tazas de leche completa
2 huevos, batidos
2 onzas de cuadritos de chocolate semidulce,
picados fino
¾ de taza de crema de leche
1
1 ⁄2 tazas de crema para batir
1 cucharadita de extracto de vainilla
2 cucharaditas de extracto de almendra
1 taza de almendras picadas
Combine el azúcar, leche, chocolate y sal en una olla. Cocine a fuego mediano hasta que
el chocolate se derrita y la mezcla casi empiece a hervir, revolviendo constantemente.
Gradualmente añada 1 taza de la mezcla caliente a los huevos batidos. Agregue los
huevos a la mezcla caliente que quedaba, revolviendo constantemente. Cocine y
revuelva a fuego lento hasta que espese ligeramente (como 2-3 minutos).
Retire del calor. Añada revolviendo la crema de leche, la crema para batir, la vainilla el
extracto de almendra y las almendras picadas. Cubra y refrigere por 2 horas.
Vierta dentro del Envase y congele como se indica en las páginas S4-7.
-S14-