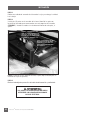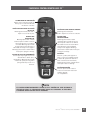
1
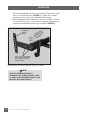
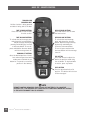
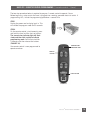
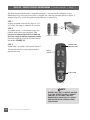
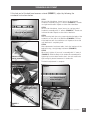
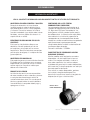
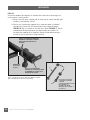
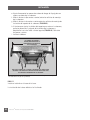
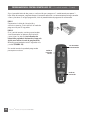
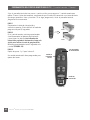
99301003-e EDR12093 12/12
English / Spanish
OWNERS MANUAL
n DC Type Whisper Quiet Operating System
n Wallhugger®
n CFR 1633 Compliant
n 1-3-20 Warranty
[ adjustable bases ]
CONTENTS
Advisory....................................................................................................................... 3
Acoustics..................................................................................................................... 5
Installation.................................................................................................................. 6
Basis C3™ Remote Control.......................................................................................... 14
Basis C3™ Remote Control Programming...................................................................... 15
Accessories................................................................................................................ 20
Turnbuckle Adjustment............................................................................................... 21
Troubleshooting.......................................................................................................... 22
1-3-20 Warranty......................................................................................................... 23
Spanish translation begins on page 25.
La traducción en español inicia en la página 25.
If adjustable base does not operate or if parts are missing, call:
800-888-3078
Do not contact retail store or dealer.
ADVISORY
IMPORTANT INFORMATION
READ THE FOLLOWING INFORMATION CAREFULLY BEFORE USING THIS PRODUCT
FOR OPTIMUM ADJUSTABLE BASE
OPERATION, USE A GROUNDED,
ELECTRICAL SURGE PROTECTION DEVICE
(NOT INCLUDED). FAILURE TO USE A
SURGE PROTECTION DEVICE COULD
COMPROMISE SAFETY OR CAUSE PRODUCT
MALFUNCTION.
ELECTRICAL RATING
Electrical components are rated for 110/120
voltage, 60Hz, 100W.
ELECTRICAL GROUNDING
This product is equipped with a polarized or
grounded electrical power cord. The power cord
will only fit into a grounded, electrical surge
protection device (not included) or a grounded
electrical outlet.
WARRANTY WARNING
Do not open any control boxes, motors or
remote control devices (with the exception
of the remote control battery compartment).
The product warranty will be void if these
components are tampered with. Do not attempt
to alter component wiring or adjust or modify
the structure of the product in any way or the
warranty will be void. Any repair or replacement
of base parts must be performed by authorized
personnel.
LUBRICATION
This product is designed to be maintenance
free. The lift motors are permanently lubricated
and sealed—no additional lubrication is
required. Do not apply lubricant to lift motor
lead screws or any nylon nuts or the bed may
inadvertently creep downward from the elevated
position.
PRODUCT RATINGS
The base lift motors are not designed for
continuous use. Reliable operation and full
life expectancy will be realized as long as
the lift motors do not operate any more than
five (5) minutes over a forty-five (45) minute
period, or approximately 11% duty cycle. Note:
massage equipped bases are not designed
for continuous, extended massage operation.
Massage systems are rated for a maximum
of 2 hours of use within any 6 hour period.
Any attempt to circumvent or exceed product
ratings will shorten the life expectancy of the
product and may void the warranty.
The recommended weight restrictions for
this adjustable base is 450 lb (204 kg), all
sizes. The base will structurally support the
recommended weight distributed evenly across
the head and foot sections. This product is not
designed to support or lift this amount in the
head or foot sections alone. Note: exceeding
the recommended weight restrictions could
damage the base and void the warranty.
For best performance, consumers should enter
and exit the adjustable base with the base in
the flat (horizontal) position. DO NOT SIT ON
THE HEAD OR FOOT SECTIONS WHILE IN THE
RAISED POSITION.
UL (Underwriters Laboratories) recognized
components.
CFR 1633 approved for use with most
mattresses.
Assembled in USA.
TM
Basis C3
Owners Manual 99301003-e
3
ADVISORY
IMPORTANT INFORMATION
READ THE FOLLOWING INFORMATION CAREFULLY BEFORE USING THIS PRODUCT
SMALL CHILDREN / PETS WARNING
After the base is unboxed, immediately dispose
of packaging material as it can smother small
children and pets. To avoid injury, children or
pets should not be allowed to play under or on
the bed. Children should not operate this base
without adult supervision.
HOSPITAL USE DISCLAIMER
This base is designed for in-home use only. It
is not approved for hospital use and does not
comply with hospital standards. Do not use this
base with tent type oxygen therapy equipment,
or use near explosive gases.
PACEMAKER WARNING
This product produces a vibrating sensation.
It is possible that individuals with heart-assist
pacemakers may experience a sensation similar
to exercise. Consult physician for complete
information.
SERVICE REQUIREMENTS
Service technicians are not responsible for
moving furniture, removing headboards and
footboards or any items required to perform
maintenance on the base. In the event the
technician is unable to perform service due
to lack of accessibility, the service call will
be billed to the purchaser and the service will
have to be rescheduled.
FCC COMPLIANCE
Components meet Class B digital device
rating (Part 15, FCC rules) for residential use.
Adjustable bases generate, use and may radiate
radio frequency energy. Radio communication
may be affected if not installed and operated
as recommended in this manual. Changes or
modifications not expressively approved by the
party responsible for compliance could void the
user’s authority to operate the equipment.
Radio frequency = 310MHz.
LOCKING CASTER SAFETY FEATURE (OPTIONAL)
Many adjustable bases are equipped with
locking casters to prohibit the base from
movement. For best results, place rubber caster
cups under locking casters when the base is
located on smooth or hard surface flooring—it
is possible for locking caster equipped bases to
slide without the use of rubber caster cups.
To activate locking casters, push down on the
lock tab. To disengage the locking mechanism,
push up on the lock tab (see illustration below).
LOCKING CASTER
DETAIL
K
C
LO
4
TM
Basis C3
Owners Manual 99301003-e
ACOUSTICS
LIFTING/LOWERING MECHANISMS
The lift/lower feature will emit a minimal
humming sound during operation. This is
normal.
During operation, the lift arm wheels make
contact with the platform support of the base.
This applies slight tension on the moving
components and resonance is reduced to a
minimum level. If excessive noise or vibration
is experienced, reverse the movement
action (up or down) of the base with the
remote control. This should realign the
base’s activating mechanisms to the proper
operational position.
LOCATION ENVIRONMENT
The level of sound experienced during
operation is directly related to the location
environment. For example, when a base is
located on a hardwood floor with the massage
feature in operation, a vibrating tone will be
audible. To minimize this resonance, place
a piece of carpet—or optional rubber caster
cups—under each leg or caster of the base.
See the accessory page in this manual for
rubber caster cup order information.
It is possible to experience vibration or noise
from the headboard brackets, headboards or
footboards if mounting bolts are not firmly
tightened.
MASSAGE OPERATION
The massage feature will emit a minimal tone
during operation. This is normal. When the
massage level is increased, motor resonance
will intensify accordingly.
TM
Basis C3
Owners Manual 99301003-e
5
INSTALLATION
For installation and setup, complete the numbered procedure indicated below and on the
following pages:
STEP 1
Before discarding any packing materials,
check the adjustable base shipping carton
and verify the following items are
included:
• (1) Mattress Retainer
• (4) Legs (7” standard with this product)
• (2) Headboard Bracket Assemblies (certain
models only)
MATTRESS
RETAINER
(1 per base)
• (1) Headboard Bracket Hardware Kit (certain
models only)
•
•
•
•
(1)
(1)
(1)
(1)
Remote Control
Owners Manual
Warranty Activation Card
Adjustable Base Quick Setup Guide
7” LEG
(4 PIECES)
REMOTE CONTROL
7” leg standard with product. Other legs may be included
based on provider’s discretion. If different leg height is
desired, please refer to Accessories page in this manual
for purchase options.
HEADBOARD BRACKET ASSEMBLIES
Either twin or queen size—queen size shown.
Twin size does not come with angle brace.
Standard for certain models only. (4 pieces, 2 assemblies)
6
TM
Basis C3
Owners Manual 99301003-e
HEADBOARD BRACKET
HARDWARE KIT
Standard for certain
models only.
(hardware: 16 pieces)
INSTALLATION
STEP 2
Carefully lift the bed base frame from the shipping carton, keeping the
unit top-side-down.
STEP 3
Install (4) legs into the base frame. Simply screw each leg into a tapped
hole at each corner of the base frame (FIGURE 1). Insert casters into the
bottom of each bed leg, if applicable.
CASTERS – PRESS-FIT
INTO BOTTOM OF LEGS
(IF APPLICABLE; SOME
MODELS MAY NOT INCLUDE
CASTERS)
LEGS – SCREW INTO
TAPPED HOLE AT
EACH CORNER (LEG
(OPTIONS VARY PER
MODEL TYPE)
FIGURE 1: Leg installation. Caster installation, if applicable. (Optional 4” leg with caster shown.)
STEP 4
Remove and extend out power cord from the protective packaging.
POWER CORDS MUST NOT INTERFERE WITH
ANY ADJUSTABLE BASE MECHANISMS.
TM
Basis C3
Owners Manual 99301003-e
7
INSTALLATION
STEP 5
Remove the plastic packaging from the bed base frame. Carefully rotate the
base frame over to position the base top-side-up.
STEP 6
Plug electrical power cord into a working, grounded electrical outlet.
Note: an electrical surge protection device is recommended (not included).
STEP 7
Install batteries in remote control(4-AAA size, included). Briefly activate
all functions of the base with the remote controlto verify all features are
in working order. If base does not operate, refer to the Troubleshooting
section of this manual.
STEP 8
Return base to the level position.
STEP 9
Install mattress retainer at the foot end of the bed base as follows:
a.Locate grommeted holes at foot of bed base (FIGURE 2).
D
E
ET
M
OM S
GR HOLE
SE
TE
ND
O
FO
FIGURE 2: Grommeted hole locations.
8
TM
Basis C3
Owners Manual 99301003-e
OF
B
ED
BA
INSTALLATION
b.Place mattress retainer ends into grommeted holes in top surface of
adjustable bed base (FIGURES 3 and 4). Press down until horizontal
retainer section is flush against bed base.
MATTRESS
RETAINER
E
AS
OT
FO
D
EN
OF
B
ED
B
FIGURE 3: Mattress retainer installation.
FIGURE 4: Mattress retainer installed.
NOTE: If base is to be set up without a headboard,
basic installation is now complete. If headboard is to be
installed, proceed to Headboard Bracket Installation.
TM
Basis C3
Owners Manual 99301003-e
9
INSTALLATION
HEADBOARD BRACKET INSTALLATION
Install headboard brackets to the bed base frame. When attaching (2) twin
size units to a king size headboard an optional swing hinge kit may be used
to connect the twin units.
NOTE
FAILURE TO FOLLOW HEADBOARD BRACKET
INSTALLATION INSTRUCTIONS MAY CAUSE
HEADBOARD BRACKET INTERFERENCE WITH
BASE FOAM DURING BASE OPERATION.
BASE FOAM OR BASE COVER DAMAGE
COULD RESULT.
NOTE: It is important to position the bottom of the headboard cross
member a maximum distance of 3 inches (76.2mm) between the
headboard and the top of the mattress (FIGURE 5). Do not exceed 3
inches (76.2mm).
.
AX
M
hes
nc
3i
FIGURE 5: Headboard cross member location must not exceed 3 inches
(76.2mm) from the top of the mattress.
10
TM
Basis C3
Owners Manual 99301003-e
INSTALLATION
STEP 10
Install headboard brackets to the bed base frame as follows:
a.Raise the head section of the base (with remote control) to gain access
to the bed base frame.
b.Slide one headboard bracket channel onto one side of the bed base
frame. Using (2) carriage bolts/nuts (FIGURE 6) attach channel to
base frame (FIGURE 7). Hand tighten bolts/nuts (loosely) to allow
adjustment of the headboard bracket channels. Repeat procedure to
install the other headboard bracket channel to the other side.
USE (2) 3 INCH CARRIAGE BOLTS AND NUTS
TO ATTACH EACH BRACKET CHANNEL TO
BED BASE FRAME EXTENSION
BED BASE
FRAME
SLIDE HEADBOARD
BRACKET CHANNEL
OVER THE BED BASE
FRAME EXTENSION
C
A
FIGURE 6: Headboard bracket channel installation (one each
side of the head section of the bed). (Optional 4” leg with caster
shown.)
B
HEADBOARD BRACKET
HARDWARE KIT CONTAINS:
(4) 3 INCH CARRIAGE BOLTS - A
(4) 1 INCH HEX HEAD BOLTS - B
(8) NUTS - C
FIGURE 7: Headboard bracket hardware.
TM
Basis C3
Owners Manual 99301003-e
11
INSTALLATION
c.Attach one headboard bracket flange to one of the bracket channels
with (2) hex head bolts/nuts (FIGURE 8). Tighten bolts. Repeat
procedure to attach the other headboard bracket flange.
d.Slide headboard bracket assemblies (in or out) to achieve a distance of
1.5 inches (38.1mm) to 2 inches (50.8mm) between the edge of the
bed base and headboard bracket flange assemblies (FIGURE 8).
HEADBOARD
BRACKET
FLANGE
KET
RAC N OR
B
I
DE
SLI BLIES EVE
I
M
H
E
C
ASS TO A N
OUT OSITIO
P
USE (2) 1 INCH LONG HEX HEAD
BOLTS AND NUTS (TIGHTEN) TO
ATTACH BRACKET FLANGE TO
BRACKET CHANNEL
FIGURE 8: Headboard bracket flange installation (attach one flange to each of
the headboard bracket channels). (Optional 4” leg with caster shown.)
NOTE
TWIN SIZE HEADBOARD BRACKET
ASSEMBLIES ARE SHOWN (FIGURES 8 AND
9). QUEEN SIZE HEADBOARD BRACKETS ARE
EQUIPPED WITH ANGLE BRACES.
12
TM
Basis C3
Owners Manual 99301003-e
INSTALLATION
e.Firmly tighten the 3 inch carriage bolts of both headboard bracket
channels.
f.Measure the distance (center-to-center) between the mounting holes
in the headboard.
g.Measure the center-to-center distance between the mounting slots of
the headboard bracket flanges (FIGURE 9).
h.If bracket flange adjustment is required to accept the headboard,
remove the 1 inch headboard bracket flange bolts and move flanges
side-to-side for the adjustment (FIGURE 9). Reinstall bolts and
tighten.
i. Install headboard.
MEASURE FLANGE SLOTS
CENTER-TO-CENTER TO CHECK
HEADBOARD HOLE LOCATION
REMOVE 1 INCH LONG HEX HEAD BOLTS AND RELOCATE
FLANGES TO ACHIEVE CENTER-TO-CENTER DISTANCE
REQUIRED FOR HEADBOARD MOUNTING HOLES
FIGURE 9: Headboard bracket measurement and adjustment to accept headboard. (Optional
4” leg with caster shown.)
STEP 11
Install mattress on bed base.
Typical adjustable base installation is now complete.
TM
Basis C3
Owners Manual 99301003-e
13
BASIS C3™ REMOTE CONTROL
TRANSMISSION
INDICATOR LIGHT
Verifies a button is being pressed
and data is being sent to the bed.
FOOT UP/DOWN BUTTONS
Press and hold to raise or lower
the foot section.
HEAD UP/DOWN BUTTONS
Press and hold to raise or lower
the head section.
FOOT MASSAGE BUTTONS
To activate the foot massage, press
and release the increase button.
Adjust massage intensity by
pressing and holding the increase
or decrease button. To turn off,
press and hold the decrease button
until the massage turns off.
HEAD MASSAGE BUTTONS
To activate the head massage,
press and release the increase
button. Adjust massage intensity
by pressing and holding the
increase or decrease button.
To turn off, press and hold the
decrease button until the massage
turns off.
PROGRAM SET BUTTONS
Once the desired position of head,
foot and massagers have been
made, press and hold the set
button for 2 seconds to record the
position in the memory.
POS BUTTON
Press and release to adjust the
bed to the position saved using
the set button. To stop bed while
in motion, press any button.
LEVEL BUTTON
Press to adjust bed to the flat
position. This button will also turn
off the massagers.
NOTE
REMOTE CONTROL REQUIRES FOUR (4) AAA SIZE BATTERIES. TO CONSERVE
BATTERY LIFE, THE TRANSMITTER TURNS OFF ALL FUNCTIONS WHEN ANY BUTTON
IS PRESSED FOR MORE THAN 50 SECONDS.
14
TM
Basis C3
Owners Manual 99301003-e
BASIS C3™ REMOTE CONTROL PROGRAMMING (1 remote control - 1 base)
The two step procedure below is required to program 1 remote control to operate 1 base.
Before beginning, make certain the base is plugged into a working grounded electrical outlet. If
programming fails, initiate the programming procedure a second time.
STEP 1
Unplug the power cord and plug back in. This
will enable the program mode for 90 seconds.
STEP 2
On the remote control, simultaneously press
and hold the level and the foot up buttons.
The transmission indicator light will flash
slowly and then flash rapidly to indicate
programming mode. Continue to hold for
5 seconds and then release the buttons
(FIGURE 10).
TRANSMISSION
INDICATOR LIGHT
One remote control is now programmed to
operate one base.
FOOT UP
BUTTON
LEVEL BUTTON
FIGURE 10
TM
Basis C3
Owners Manual 99301003-e
15
BASIS C3™ REMOTE CONTROL PROGRAMMING (2 remote controls - 1 base)
The three step procedure below is required to program 2 remote controls to operate 1 base.
Before beginning, make certain the base is plugged into a working grounded electrical outlet. If
programming fails, initiate the programming procedure a second time.
STEP 1
Unplug the power cord and plug back in. This
will enable the program mode for 90 seconds.
STEP 2
On remote control 1, simultaneously press and
hold the level and the foot up buttons. The
transmission indicator light will flash slowly and
then flash rapidly to indicate programming mode.
Continue to hold for 5 seconds and then release
the buttons (FIGURE 10).
REMOTE
CONTROL 1
REMOTE
CONTROL 2
STEP 3
Repeat Step 1 and Step 2 with remote control 2.
Two remote controls are now programmed to
operate one base.
TRANSMISSION
INDICATOR LIGHT
FOOT UP
BUTTON
LEVEL BUTTON
FIGURE 10
NOTE
OPERATE ONLY ONE (1) REMOTE CONTROL
AT A TIME. OPERATING TWO (2) REMOTE
CONTROLS AT THE SAME TIME WILL
MOMENTARILY BLOCK BOTH RF SIGNALS
AND PREVENT BOTH CONTROLS FROM
FUNCTIONING.
16
TM
Basis C3
Owners Manual 99301003-e
BASIS C3™ REMOTE CONTROL PROGRAMMING (1 remote control - 2 bases)
The three step procedure below is required to program 1 remote controlto operate 2 bases. Before
beginning, make certain both bases are plugged into a working grounded electrical outlet. If
programming fails, initiate the programming procedure a second time.
STEP 1
Unplug the power cord of base 1 and plug back
in. This will enable the program mode for 90
seconds.
STEP 2
On the remote control, simultaneously press
and hold the level and the foot up buttons. The
transmission indicator light will flash slowly and
then flash rapidly to indicate programming mode.
Continue to hold for 5 seconds and then release
the buttons (FIGURE 10).
BASE 1
BASE 2
STEP 3
Repeat Step 1 and Step 2 for base 2.
TRANSMISSION
INDICATOR LIGHT
One remote control is now programmed to
operate two bases.
FOOT UP
BUTTON
LEVEL BUTTON
FIGURE 10
TM
Basis C3
Owners Manual 99301003-e
17
BASIS C3™ REMOTE CONTROL PROGRAMMING (2 remote controls - 2 bases)
The six step procedure below is required to program 2 remote controls to operate 2 bases. Before
beginning, make certain both bases are plugged into a working grounded electrical outlet. If
programming fails, initiate the programming procedure a second time.
STEP 1
Unplug the power cord of base 1 and plug back
in. This will enable the program mode for 90
seconds.
STEP 2
On remote control 1, simultaneously press
and hold the level and the foot up buttons. The
transmission indicator light will flash slowly
and then flash rapidly to indicate programming
mode. Continue to hold for 5 seconds and then
release the buttons (FIGURE 10).
BASE 1
REMOTE
CONTROL 1
REMOTE
CONTROL 2
BASE 2
STEP 3
Repeat Step 1 and Step 2 with remote control
2.
STEP 4
Unplug the power cord of base 2 and plug back
in. This will enable the program mode for 90
seconds.
TRANSMISSION
INDICATOR LIGHT
FOOT UP
BUTTON
STEP 5
On remote control 1, simultaneously press
and hold the level and the foot up buttons. The
transmission indicator light will flash slowly
and then flash rapidly to indicate programming
mode. Continue to hold for 5 seconds and then
release the buttons (FIGURE 10).
LEVEL BUTTON
STEP 6
Repeat Step 4 and Step 5 with remote control 2.
Two remote controls are now programmed to
operate two bases.
FIGURE 10
NOTE
OPERATE ONLY ONE (1) REMOTE CONTROL
AT A TIME. OPERATING TWO (2) REMOTE
CONTROLS AT THE SAME TIME WILL
MOMENTARILY BLOCK BOTH RF SIGNALS
AND PREVENT BOTH CONTROLS FROM
FUNCTIONING.
18
TM
Basis C3
Owners Manual 99301003-e
BASIS C3™ REMOTE CONTROL PROGRAMMING (separating 2 bases)
The six step procedure below is required to separate 2 remote controls from operating 2 bases. One
remote control per base operation will result. Before beginning, make certain both bases are plugged
into a working grounded electrical outlet. If programming fails, initiate the programming procedure a
second time.
STEP 1
Unplug the power cord of base 1 and plug back
in. This will enable the program mode for 90
seconds.
STEP 2
On remote control 1, simultaneously press
and hold the level and the foot up buttons. The
transmission indicator light will flash slowly
and then flash rapidly to indicate programming
mode. Continue to hold for 5 seconds and then
release the buttons (FIGURE 10).
STEP 3
Repeat Step 1 and Step 2 with remote control 1.
Note: Wait 90 seconds before proceeding to
Step 4.
STEP 4
Unplug the power cord of base 2 and plug back
in. This will enable the program mode for 90
seconds.
BASE 1
REMOTE
CONTROL 1
BASE 2
REMOTE
CONTROL 2
TRANSMISSION
INDICATOR LIGHT
FOOT UP
BUTTON
STEP 5
On hand control 2, simultaneously press and
hold the level and the foot up buttons. The
transmission indicator light will flash slowly
and then flash rapidly to indicate programming
mode. Continue to hold for 5 seconds and then
release the buttons (FIGURE 10).
STEP 6
Repeat Step 4 and Step 5 with remote control 2.
Independent hand control operation is now
restored (remote control 1 operating base 1;
remote control 2 operating base 2).
LEVEL BUTTON
FIGURE 10
NOTE
OPERATE ONLY ONE (1) REMOTE CONTROL
AT A TIME. OPERATING TWO (2) REMOTE
CONTROLS AT THE SAME TIME WILL
MOMENTARILY BLOCK BOTH RF SIGNALS
AND PREVENT BOTH CONTROLS FROM
FUNCTIONING.
TM
Basis C3
Owners Manual 99301003-e
19
ACCESSORIES
Basis C3™ OPTIONAL EQUIPMENT
Contact customer service toll free (800-888-3078) to order the accessories indicated in the
chart below.
ACCESSORY DESCRIPTION
Headboard Brackets - TXL
4B6117
Headboard Brackets - FXL / Q
4B6118
Leg / Caster Kit
(Set of 4)
Rubber Caster Cups
4” Legs
(Set of 4)
TM
Basis C3
Owners Manual 99301003-e
4B3644
4B1034
4B1833
(Set of 4)
Push-in Locking Casters
20
CODE
(Set of 4)
4B0107
IMAGE
TURNBUCKLE ADJUSTMENT
If the foot end of the bed base becomes unlevel (FIGURE 1), adjust by following the
numbered instructions below.
STEP 1
On one side of bed base, loosen jam nut on board end of
turnbuckle assembly using a ½” wrench (FIGURE 2). Threads
are right-hand threads. Repeat on other side of bed base.
FIGURE 1
FOOT END OF BED UNLEVEL
STEP 2
On one side of bed base, loosen jam nut on carriage end of
turnbuckle assembly with ½” wrench (FIGURE 3). Threads are
left-hand threads. Repeat on other side of bed base.
STEP 3
After loosening both jam nuts, grasp and rotate the body of the
turnbuckle on one side of the bed base (FIGURE 4). The foot
of the bed base will rise and flatten out. Repeat on other side
until bed base is completely level.
FIGURE 2
STEP 4
After adjustments have been made, check the levelness of the
bed base using a straight-edge instrument (FIGURE 5).
STEP 5
When level, tighten all jam nuts in assembly with ½“ wrench
(FIGURE 6). Hold the body of the turnbuckle assembly while
tightening to ensure base remains level. Jam nuts need to be
tight enough to prevent movement in turnbuckle.
JAM NUT - BOARD
END OF ASSEMBLY
Turnbuckle adjustment is complete.
FIGURE 3
JAM NUT - CARRIAGE
END OF ASSEMBLY
FIGURE 5
USE STRAIGHT-EDGE TO
CHECK LEVELNESS
ROTATE BODY OF
TURNBUCKLE UNTIL
BED BASE FLATTENS
OUT
WHEN LEVEL,
TIGHTEN ALL
JAM NUTS
FIGURE 4
FIGURE 6
TM
Basis C3
Owners Manual 99301003-e
21
TROUBLESHOOTING
If adjustable base fails to operate, investigate the symptoms and possible solutions provided
in the chart below:
SYMPTOM
Remote control illuminates and appears to be
operable, but will not activate bed.
SOLUTION
• Verify power cord is plugged into a working, grounded
electrical outlet. A grounded, electrical surge protection
device is recommended. Test outlet by plugging in
another working appliance.
• Program the remote control (see Remote control
Programming section of this manual for programming
procedures).
No features of the base will activate.
• Unplug power cord, wait 30 seconds and plug in to
reset electronic components.
• Electrical circuit breaker may be tripped. Check
electrical service breaker box to verify.
• Defective surge protection device or electrical outlet.
Test outlet by plugging in another working appliance.
Remote control will not illuminate.
Head or foot section will elevate, but will not
return to the horizontal (flat) position.
• Replace batteries in the remote control.
• Base mechanism may be obstructed. Elevate base and
check for obstruction. Remove obstruction.
• Head section may be too close to the wall.
• Headboard may be too close the edge of the mattress.
Verify a 1.5” (38.1mm) to 2” (50.8mm) distance between
headboard brackets and mattress. Adjust if required.
• Verify headboard brackets were removed during
installation. Remove headboard brackets if still
attached to the underneath side of base.
• If base is located on hard surface flooring, place carpet
pieces or rubber caster cups under each leg or caster
of the base. (See Accessory section of this manual for
rubber caster cup order information.)
Excessive massage motor noise.
• Elevate the head or foot section a short distance (with
the remote control) to realign the lift/lower mechanisms
with the base support platform.
• Verify that the base is not positioned against a wall,
nightstand, or other object that may cause vibration or
noise.
• If base is installed over a bed frame, verify massage
motors are not causing bed frame (or bed frame
components) to vibrate.
• Verify that headboard attachment hardware is tightened
firmly (if used).
22
TM
Basis C3
Owners Manual 99301003-e
1 YEAR, 3 YEAR AND 20 YEAR LIMITED WARRANTY
In this warranty: “Adjustable base” means the adjustable base foundation sold by L&P to the dealer. The “adjustable
base” does not include the mattress. “L&P” means Leggett & Platt, Incorporated. “Purchaser” and “You” both mean the
consumer who is the original purchaser of this adjustable base made by L&P. This warranty is not transferrable. “Warranty
Commencement Date” means either (i) the date You purchased a new and unused L&P adjustable base or (ii) the date of
manufacture of this adjustable base if You purchased an L&P adjustable base that has been used as floor or display model.
L&P warrants this adjustable base to You on the terms and over the reducing periods of time set out below. All warranty claims
require notice from You to be given to L&P in the manner set out below, and to be received by L&P inside the applicable
warranty time period.
1ST YEAR FULL WARRANTY
For the first year from the Warranty Commencement Date,
your adjustable base is warranted against non-excluded
defects in L&P’s workmanship or materials. During the
first year from the Warranty Commencement Date, L&P
will repair or replace (at no cost to You) any defective
adjustable base part, and L&P will pay all authorized labor
and transportation costs associated with the repair or
replacement of any parts found to be defective.
2ND & 3RD YEAR LIMITED WARRANTY
During the second and third year from the Warranty
Commencement Date, L&P will replace any adjustable
base part found to be defective and not excluded by
this warranty. You are responsible to pay all service and
transportation costs related to the costs of receiving and
installation of the new part.
4TH YEAR TO END OF 20TH YEAR LIMITED WARRANTY
Starting in the fourth year from the Warranty
Commencement Date and through to the end of the 20th
year from the Warranty Commencement Date, L&P will
replace steel and mechanical base parts found to be
defective and not excluded by this warranty. This warranty
does not cover any electronics, electrical components,
drive motors or massage motors. You are responsible
to pay all service and transportation costs related to
receiving and installation of the new part and a portion
of the cost of the replacement steel and mechanical
part, based on the number of months that the base has
been owned by you since the fourth anniversary of the
Warranty Commencement Date. By the end of the 20th
year, no portion of the replacement cost is covered by
L&P. You will be required to pay 1/17th of the then
current replacement cost of the part multiplied by the
number of years past the third year from the Warranty
Commencement Date. This portion is calculated using the
following formula: Cost of the part divided by 17 [being
the number of years in years 4 to 20 inclusive, multiplied
by the number of years you have owned the base since
the end of the first 3 years. For example, if you make a
claim for a part eligible for this warranty in the 5th year
since the Warranty Commencement Date, you would be
responsible for paying: $100 part cost divided by 17,
multiplied by 5 = $29.41.
23
TM
Basis C3
Owners Manual 99301003-e
ADDITIONAL TERMS AND CONDITIONS
This warranty requires notice to be given to L&P of any
claim for repairs or replacement parts.
EXCLUSIONS:
This warranty does not apply; (a) to any damage caused
by You; (b) if there has been any repair or replacement
of adjustable base parts by an unauthorized person; (c)
if the adjustable base has been mishandled (whether
in transit or by other means), subjected to physical or
electrical abuse or misuse, or otherwise operated in any
manner inconsistent with the operation and maintenance
procedures outlined in the Owner’s Manual and this
warranty; (d) to damage to mattresses, fabric, cables,
electrical cords or items supplied by dealers (contact
the dealer for warranty information on these items); (e)
if there has been any modification of the adjustable base
without prior written consent by L&P or (f) to costs for
unnecessary service calls, including costs for in-home
service calls solely for the purpose of educating You
about the adjustable base or finding a satisfactory power
connection.
This warranty will be void if either the recommended
weight restriction is not followed (refer to the advisory
section of the Owner’s Manual) or You sell or give or
transfer the base to another person.
Any repairs to or replacement to Your adjustable base or
its components under the terms of this limited warranty
does not extend the applicable warranty from the Warranty
Commencement Date. This time limitation may not apply
in some jurisdictions, including the Province of Quebec.
The decision to repair or to replace defective parts under
this warranty shall be made, or cause to be made, by L&P
at its option and in its sole discretion.
Continued on next page...
1 YEAR, 3 YEAR AND 20 YEAR LIMITED WARRANTY
Repair or replacement shall be the sole remedy of the
Purchaser. There shall be no liability on the part of L&P
for any special, indirect, incidental, or consequential
damages or for any other damage, claim, or loss not
expressly covered by the terms of this warranty.
This limited warranty does not include reimbursement for
inconvenience, removal, installation, setup time, loss of
use, shipping, or any other costs or expenses. L&P and
its service technicians will not be responsible for moving
furniture or any other items not attached to the adjustable
base in order to perform service on the adjustable base.
It is the sole responsibility of You to provide adequate
space and accessibility to the adjustable base. In the
event that the technician is unable to perform service due
to lack of accessibility, the service call will be billed to
You and the service will have to be rescheduled.
L&P makes no other warranty whatever, express or
implied, and all implied warranties of merchantability and
fitness for a particular purpose are disclaimed by L&P and
excluded from this agreement.
Some American States do not allow the exclusion or
limitation of incidental or consequential damages, so the
above limitation or exclusion may not apply to You.
This warranty gives You specific legal rights, and the
You may also have other rights, which may vary from
jurisdiction to jurisdiction. This warranty is valid in all 50
American States, the District of Columbia, Puerto Rico,
and the 10 Provinces and 3 Territories of Canada.
For customer service under this limited warranty, give
notice to L&P by mail, phone, email or online to the
addresses set out below:
Leggett & Platt, Incorporated
PO Box 668
Lexington, North Carolina 27293
toll free phone: 1.800.888.3078
online: lpadjustablebases.com
email: [email protected]
PLEASE DO NOT CONTACT YOUR RETAIL DEALER
OR ANY OTHER SERVICE PERSONNEL
TM
Basis C3
Owners Manual 99301003-e
24
CONTENIDOS
Recomendaciones....................................................................................................... 28
Acústica.................................................................................................................... 30
Instalación................................................................................................................. 31
Control remoto Basis C3™........................................................................................... 39
Programación del control remoto Basis C3™.................................................................. 40
Accesorios................................................................................................................. 45
Ajuste del tensor........................................................................................................ 46
Resolución de problemas............................................................................................. 47
Garantía 1-3-20......................................................................................................... 48
Si la base ajustable no funciona o si faltan piezas, llame al 800-888-3078.
Por favor no contacte al distribuidor.
RECOMENDACIONES
INFORMACIÓN IMPORTANTE
LEA LA SIGUIENTE INFORMACIÓN CUIDADOSAMENTE ANTES DE UTILIZAR ESTE PRODUCTO
PARA UN FUNCIONAMIENTO ÓPTIMO
DE LA BASE AJUSTABLE, UTILICE UN
DISPOSITIVO DE PROTECCIÓN CONTRA
SOBRETENSIÓN ELÉCTRICA CONECTADO A
TIERRA (NO INCLUIDO). NO UTILIZAR TAL
DISPOSITIVO PODRÍA PONER EN RIESGO
LA SEGURIDAD U OCASIONAR EL MAL
FUNCIONAMIENTO DEL PRODUCTO.
CONEXIÓN A TIERRA
Este producto está equipado con un cable
polarizado de alimentación eléctrica conectado
a tierra. El cable de alimentación encaja sólo en
un dispositivo de protección contra sobretensión
eléctrica puesto a tierra (no incluido), o en un
tomacorriente puesto a tierra.
ADVERTENCIA DE LA GARANTÍA
No abra las cajas de control, motores, o
dispositivos de control remoto (a excepción de
los compartimentos para pilas de los controles
remotos). La garantía del producto perderá
validez si se alteran estos componentes y si se
altera el cableado de los componentes, o si se
ajusta o modifica de manera alguna la estructura
del producto. Cualquier reparación o reemplazo
de alguna de las partes de la base deberá
efectuarse por personal autorizado.
LUBRICACIÓN
El diseño de este producto permite prescindir de
mantenimiento. Los motores de elevación están
lubricados y sellados en forma permanente, por
lo que no se requiere lubricación adicional. No
aplique lubricante en los tornillos principales del
motor de elevación o en las tuercas de nylon, o la
base podría descender inadvertidamente desde la
posición de elevación.
26
TM
Basis C3
Manual del Propietario 99301003-e
ESPECIFICACIONES DEL PRODUCTO
Los motores de elevación de la base no están
diseñados para el uso continuo. Para mayor
seguridad y máxima vida útil, no se deberán
operar los motores de elevación por más de
cinco (5) minutos en un período de media hora,
o aproximadamente el 11% del ciclo de trabajo.
Nota: La función de masajes en las bases
equipadas con esta opción no podrá utilizarse en
forma continua o por períodos prolongados. Los
sistemas de masajes han sido diseñados para un
máximo de 2 horas de uso en un período de 6
horas. Cualquier intento de evadir o exceder las
especificaciones del producto acortará la vida útil
del mismo y puede invalidar la garantía.
A continuación se detallan las restricciones de
peso recomendadas para las bases es 450 lb.
(204 kg) todos los tamaños. La base soportará
estructuralmente los pesos recomendados,
distribuidos de manera uniforme entre su
cabecera y pie. Este producto no está diseñado
para soportar o elevar estos pesos sólo en las
secciones de la cabecera o pie. Nota: Exceder las
restricciones de los pesos recomendados podría
dañar su base e invalidar la garantía.
Para un mejor rendimiento, se debe entrar y salir
de la base ajustable mientras la misma está en
posición plana (horizontal). NO SE SIENTE EN LAS
SECCIONES DE LA CABECERA O PIE MIENTRAS LA
BASE ESTÉ EN LA POSICIÓN ELEVADA.
Componentes fabricados conforme a UL
(Underwriters Laboratories).
CFR 1633 aprobado para el uso con la mayoría de
los colchones.
Ensamblado en los Estados Unidos.
RECOMENDACIONES
INFORMACIÓN IMPORTANTE
LEA LA SIGUIENTE INFORMACIÓN CUIDADOSAMENTE ANTES DE UTILIZAR ESTE PRODUCTO
ADVERTENCIA CON NIÑOS PEQUEÑOS Y MASCOTAS
Después de desembalar la base, deseche
inmediatamente el material de embalaje, ya
que puede producir asfixia a niños pequeños
y mascotas. Para evitar lesiones, los niños o
mascotas no deberán jugar bajo o sobre la base.
No deben, asimismo, operar esta base sin la
supervisión de un adulto.
EXENCIÓN DE RESPONSABILIDAD POR USO EN
HOSPITALES
Esta base ha sido diseñada sólo para uso
doméstico. No está aprobada para el uso
en hospitales y no cumple con las normas
hospitalarias. No utilice esta base con equipos
para terapias de oxígeno, ni la ubique cerca de
gases explosivos.
ADVERTENCIA POR MARCAPASOS
Este producto genera una sensación de vibración.
Es posible que los individuos con marcapasos
experimenten una sensación similar a cuando
realizan ejercicio. Consulte al médico para
obtener más información.
REQUISITOS DEL SERVICIO
Los técnicos de servicio no son responsables
de mover muebles o retirar cabeceras, pieceras
o cualquier otro elemento para realizar el
mantenimiento de su base. En caso de que el
técnico no pueda brindar el servicio debido a
inaccesibilidad, el comprador deberá pagar y
reprogramar la visita.
CONFORMIDAD CON LA FCC (FEDERAL
COMMUNICATIONS COMMISSION)
Los componentes eléctricos se encuentran en la
categoría de dispositivos digitales Clase B (Parte
15, reglas de la FCC) para uso residencial. Las
bases generan, utilizan y pueden irradiar energía
de radiofrecuencia. La comunicación radial puede
verse afectada si su instalación y operación no
corresponden con las recomendaciones de este
remoto. Los cambios o modificaciones no aprobados
explícitamente por la parte responsable del
cumplimiento podrían invalidar la autorización del
usuario para operar el equipo.
Frecuencia de Radio = 310MHz.
CARACTERÍSTICA DE SEGURIDAD DE LA RUEDA
BLOQUEABLE (OPCIONAL)
Muchos modelos están equipadas con ruedas
bloqueables a fin de impedir que la base se
mueva. Para mejores resultados, al ubicar la
base sobre superficies lisas o duras coloque
sujetadores de goma bajo las ruedas bloqueables;
de lo contrario, las bases equipadas con este tipo
de ruedas podrían deslizarse.
Para activar las ruedas bloqueables, presione
hacia abajo la lengüeta de bloqueo. Para
desactivar el mecanismo, levante la lengüeta de
bloqueo (ver la figura a continuación).
DETALLE DE LA
RUEDA BLOQUEABLE
O
UE
Q
O
BL
TM
Basis C3
Manual del Propietario 99301003-e
27
ACÚSTICA
MECANISMOS DE ELEVACIÓN/DESCENSO
La función de elevación/descenso emitirá un
zumbido mínimo durante la operación. Este
sonido es normal.
Durante el funcionamiento, las ruedas del brazo
de elevación hacen contacto con el soporte de
la plataforma de la base. Esto produce una leve
tensión en los componentes en movimiento, y
la resonancia se reduce a un nivel mínimo. Si
ocurrieran vibración o ruido excesivos, revierta
el movimiento (ascendente o descendente) de la
base con el control remoto. Esto debería realinear
los mecanismos de activación de la base para
que quede en la posición de funcionamiento
adecuada.
OPERACIÓN DE MASAJES
La función de masajes emitirá un sonido mínimo
durante la operación. Este sonido es normal. Al
incrementar el nivel de los masajes, la resonancia
del motor se intensificará en consecuencia.
28
TM
Basis C3
Manual del Propietario 99301003-e
ENTORNO DONDE SE ENCUENTRA UBICADO EL EQUIPO
El nivel de sonido durante el funcionamiento
de la base se relaciona directamente con el
entorno en el que se encuentra ubicada. Por
ejemplo, si la base se encuentra sobre un piso
de madera dura con la función de masajes
activada, se escuchará un sonido de vibración.
Para reducirlo al mínimo, coloque un trozo de
alfombra—o sujetadores de goma opcionales—
debajo de cada pata o rueda de la base. Consulte
la hoja de accesorios incluida con este producto
para obtener información sobre el pedido de
sujetadores de goma.
Si los pernos de montaje no están ajustados
firmemente, es posible que se produzca vibración
o ruido al pie o en la cabecera de la base, o en
los soportes de la cabecera.
INSTALACIÓN
Para la instalación y ensamblado, complete el procedimiento enumerado según se indica a
continuación y en las siguientes páginas:
PASO 1
Antes de desechar los materiales de empaque,
verifique el empaque de la base ajustable para
confirmar que los siguientes elementos estén incluidos:
• (1) Retenedor del colchón en la piecera (por base)
• (4) Patas para base (Patas estandar de 7” vienen con el
producto.)
RETENEDOR DE
COLCHÓN EN LA PIECERA
(por base)
• (2) Ensamblados de los soportes de cabecera (sólo
para ciertos modelos)
• (1) Kit de accesorios para soportes de la cabecera
(sólo para ciertos modelos)
• (1) Control remoto
• (1) Remoto para propietarios
• (1) Tarjeta de activación de garantía
•(1) Guía de ensamblaje rápido para la base
ajustable
PATA DE 7”
(4 PIEZAS)
CONTROL REMOTO
Patas estandar de 7” vienen con el producto. Otras patas
pueden estar incluidas de acuerdo con la discreción del
proveedor. Si se desea una pata con diferente altura, por
favor consulte la página de Accesorios de este manual,
para ver las opciones de compra.
ENSAMBLADOS DE LOS SOPORTES
DE CABECERA
Se muestra el tamaño Queen—Los soportes para
cabecera tamaño individual (o más pequeño) no
vienen con soporte angular. Estándar solamente
para ciertos modelos. (4 piezas, 2 ensamblados)
KIT DE ACCESORIOS PARA
SOPORTES DE LA CABECERA
Estándar solamente para
ciertos modelos.
(accesorios: 16 piezas)
TM
Basis C3
Manual del Propietario 99301003-e
29
INSTALACIÓN
PASO 2
Retire con cuidado el armazón de la base de la caja y mantenga la unidad
hacia abajo.
PASO 3
Instale las (4) patas en el armazón de la base. Atornille las patas en
los orificios roscados que se encuentran en cada esquina del armazón
(FIGURA 1). Inserte las ruedas en el extremo inferior de cada pata, si
aplica.
RUEDAS – INSÉRTELAS A PRESIÓN EN LA PARTE INFERIOR DE
LAS PATAS, SI APLICA (SI APLICA,
ALGUNOS DE LOS MODELOS NO
INCLUYEN LAS RUEDECILLAS)
PATAS– ENRÓSQUELAS EN EL
ORIFICIO ROSCADO EN CADA
ESQUINA (LAS OPCIONES DE
PATAS VARÍAN DEPENDIENDO
DEL MODELO)
FIGURA 1: Instalación de patas. Instalación de ruedas, si aplica. (Aquí se muestran patas con
ruedecillas de 4” que son opcionales.)
PASO 4
Retire el embalaje de protección del cable de alimentación y extiéndalo.
LOS CABLES DE ALIMENTACIÓN NO DEBEN
INTERFERIR CON NINGÚN MECANISMO DE
LA BASE ELÉCTRICA.
30
TM
Basis C3
Manual del Propietario 99301003-e
INSTALACIÓN
PASO 5
Retire la envoltura plástica del armazón de la base de la base. Gírelo
cuidadosamente de modo que la base quede hacia arriba.
PASO 6
Enchufe el cable de alimentación a un tomacorriente conectado a tierra
que funcione. Nota: Se recomienda utilizar un dispositivo de protección
contra sobrecarga eléctrica (no incluido).
PASO 7
Instale las baterías en el control remoto (se incluyen 4 baterías AAA).
Active todas las funciones de la base usando el control remoto para
verificar que todas las funciones estén operando. Si la base no está
funcionando, refiérase a la sección de Localización y Corrección de Fallas
de este remoto.
PASO 8
Regrese la base a la posición horizontal.
PASO 9
Instale el sujetador de colchón en el extremo del pie de la base de la base
de la siguiente manera:
a.Ubique los orificios con sello en el pie de la base de la base (FIGURA 4).
N
CO
OS
I
C
IFI LO
OR SEL
SE
A
AB
L
DE
E
I E
L P BAS
E
D
O LA
EM DE
TR
EX
FIGURA 4: Ubicaciones de los orificios con sello.
TM
Basis C3
Manual del Propietario 99301003-e
31
INSTALACIÓN
b. Coloque los extremos del sujetador de colchón en los orificios con sello en
la superficie de la base de la base ajustable (FIGURAS 5 y 6). Presiónelo
hacia abajo hasta que la sección horizontal del sujetador se alinee con la
base de la base.
SUJETADOR
DE COLCHÓN
A
EL
SE
BA
D
PIE SE
L
DE BA
MO E LA
E
XTR D
E
FIGURA 5: Instalación del sujetador de colchón.
FIGURA 6: Sujetador de colchón instalado.
NOTA: Si desea armar la base sin cabecera, la
instalación básica ha finalizado. Si desea instalar la
cabecera, continúe el procedimiento desde la Instalación
del Soporte de Cabecera.
32
TM
Basis C3
Manual del Propietario 99301003-e
INSTALACIÓN
INSTALACIÓN DEL SOPORTE DE CABECERA
Sujete los soportes de la cabecera en el armazón de la base de la base.
Al agregar (2) unidades de tamaño individual a una cabecera tamaño
king, utilice un kit opcional de bisagras giratorias (ver la sección de
accesorios) para conectar las unidades individuales.
NOTA
EL NO SEGUIR LAS INSTRUCCIONES PARA
LA INSTALACIÓN DEL SOPORTE DE LA
CABECERA, PODRÍA INTERFERIR CON LA
BASE DE ESPUMA AL OPERAR LA BASE Y ASÍ
DAÑAR LA CUBIERTA DE LA ESPUMA.
NOTA: Es importante ubicar la parte inferior del travesaño de la
cabecera a una distancia máxima de 3 pulgadas (76.2 mm) entre
ésta y la parte superior del colchón (FIGURA 5). No exceda las 3
pulgadas (76.2 mm).
.
ÁX
a
ulg
3p
M
das
FIGURA 5: La ubicación del travesaño de la cabecera no debe exceder las 3
pulgadas (76.2 mm) desde la parte superior del colchón.
TM
Basis C3
Manual del Propietario 99301003-e
33
INSTALACIÓN
PASO 10
Instale los soportes de cabecera al armazón de la base de la base según las
instrucciones a continuación:
a.Eleve la sección de la cabecera de la base (con el control remoto) para
acceder al armazón de la base.
b.Deslice una canaleta del soporte de la cabecera sobre un lado del
armazón de la base. Con (2) pernos/tuercas de cabeza de hongo
(FIGURA 6) fije la canaleta al armazón de la base (FIGURA 7). Ajuste
remotomente los pernos/tuercas (no demasiado) para sujetar las
canaletas del soporte de la cabecera. Repita el procedimiento para
instalar la otra canaleta en el lado contrario.
UTILICE (2) PERNOS DE CABEZA DE
HONGO DE 3 PULGADAS Y TUERCAS
PARA FIJAR CADA CANALETA AL
ARMAZÓN
ARMAZÓN DE
LA BASE DE
LA BASE
DESLICE LA CANALETA DEL
SOPORTE DE LA CABECERA SOBRE
EL ARMAZÓN DE LA BASE DE LA
EXTENSIÓN DE LA BASE
C
A
FIGURA 6: Instalación de la canaleta del soporte de la cabecera
(uno a cada lado de la cabecera de la base). (Aquí se muestran
patas con ruedecillas de 4” que son opcionales.)
B
EL KIT DE ACCESORIOS DEL
SOPORTE DE LA CABECERA
CONTIENE:
(4) PERNOS DE CABEZA DE HONGO
DE 3 PULGADAS - A
(4) PERNOS DE CABEZA
HEXAGONAL DE 1 PULGADA - B
(8) TUERCAS - C
FIGURA 7: Accesorios para el soporte de la cabecera.
34
TM
Basis C3
Manual del Propietario 99301003-e
INSTALACIÓN
c.Fije una de las bridas del soporte de la cabecera a una de las
canaletas con (2) pernos/tuercas de cabeza hexagonal (FIGURA
8). Ajuste los pernos. Repita el procedimiento para sujetar la otra
brida del soporte de la cabecera.
d.Deslice los ensamblados del soporte de la cabecera (hacia
adentro o hacia afuera) a fin de obtener una distancia entre 1.5
(38.1 mm) y 2 pulgadas (50.8 mm) entre el borde de la base
de la base y los ensamblados de las bridas para el soporte de la
cabecera (FIGURA 8).
BRIDA DE
SOPORTE DE
CABECERA
LOS DE
ICE ADOS
L
S
L
DE AMB ACIA A
R
H
ENS ORTE AFUE
O
P
A
SO NTRO AR L DA
A
R
E
AD LOG DECU
A
A
R
PA ICIÓN
POS
UTILICE (2) PERNOS Y TUERCAS DE CABEZA
HEXAGONAL DE 1 PULGADA (APRIETE) PARA
SUJETAR LA BRIDA DEL SOPORTE DE LA
CABECERA A CADA CANALETA
FIGURA 8: Instalación de la brida del soporte de la cabecera (fije una brida a
cada una de las canaletas del soporte de la cabecera). (Aquí se muestran patas
con ruedecillas de 4” que son opcionales.)
NOTA
SE MUESTRAN LOS ENSAMBLADOS DEL
SOPORTE DE CABECERA DE TAMAÑO
INDIVIDUAL (FIGURAS 8 Y 9). LOS SOPORTES
DE CABECERA DE TAMAÑO QUEEN ESTÁN
EQUIPADOS CON SOPORTE ANGULAR.
TM
Basis C3
Manual del Propietario 99301003-e
35
INSTALACIÓN
e.Ajuste firmemente los pernos de cabeza de hongo de 3 pulgadas en
ambas canaletas de la cabecera.
f.Mida la distancia (de centro a centro) entre los orificios de montaje
de la cabecera.
g.Mida la distancia de centro a centro entre los orificios de montaje de
las bridas del soporte de la cabecera (FIGURA 9).
h.Si tuviera que ajustar las bridas del soporte para colocar la cabecera,
quite los pernos de 1 pulgada de las bridas de la cabecera y
desplácelas hacia los lados a fin de lograrlo (FIGURA 9). Reinstale
los pernos y ajuste.
i. Instale la cabecera.
MIDA LAS RANURAS DE
LAS BRIDAS DE CENTRO A
CENTRO PARA VERIFICAR LA
UBICACIÓN DE LOS ORIFICIOS
DE LA CABECERA
QUITE LOS PERNOS DE 1 PULGADA Y REUBIQUE LAS BRIDAS PARA
OBTENER LA DISTANCIA DE CENTRO A CENTRO NECESARIA PARA
LOS ORIFICIOS DE MONTAJE DE LA CABECERA
FIGURA 9: Medición y ajuste del soporte para colocar la cabecera. (Aquí se muestran patas
con ruedecillas de 4” que son opcionales.)
PASO 11
Instale el colchón en la base de la base.
La instalación de la base eléctrica ha finalizado.
36
TM
Basis C3
Manual del Propietario 99301003-e
FUNCIÓN DEL CONTROL REMOTO BASIS C3™
LUZ INDICADORA DE TRANSMISIÓN
Verifica que se está presionando un
botón y que se está transmitiendo
información a la base.
BOTÓN PARA SUBIR/ BAJAR LA SECCIÓN
DE LOS PIES
Mantenga presionado para subir o
bajar la sección de los pies.
BOTÓN PARA SUBIR/ BAJAR LA CABECERA
Mantenga presionado para
subir o bajar la sección de la cabecera.
BOTONES PARA
MASAJE DE PIES
Mantenga presionado el botón
aumentar para encender la función
de masaje de pies en su máxima
velocidad. Mantenga presionado
el botón reducir para disminuir la
intensidad del masaje. Para apagarlo
Mantenga presionado el botón reducir
hasta que se apague el masaje.
BOTONES PARA
MASAJE DE CABEZA
Mantenga presionado el botón
aumentar para encender la función
de masaje de cabeza en su máxima
velocidad. Presione el botón reducir
para disminuir la intensidad del
masaje. Para apagarlo Mantenga
presionado el botón reducir hasta que
se apague el masaje.
BOTONES DE AUSTE DE PROGRAMACIÓN
Una vez que haya elegido la posición
deseada de la cabeza, pies y
masajeadores, Mantenga presionado
el botón de ajuste por 2 segundos
para guardar la posición en la
memoria.
BOTÓN POS
Presione y suelte para regresar la
base a la posición guardada usando
el botón de ajuste. Para detener la
base cuando está en movimiento,
Mantenga presionado cualquier botón
hasta que la base se detenga.
BOTÓN DE NIVELACIÓN
Presione para retornar la base a
la posición horizontal. Este botón
también apagará
los masajeadores.
NOTA
EL CONTROL REMOTO REQUIERE CUATRO (4) PILAS TAMAÑO AAA. PARA ALARGAR LA
VIDA DE LAS PILAS, EL TRANSMISOR APAGA TODAS LAS FUNCIONES AL PRESIONAR
CUALQUIER BOTÓN POR MÁS DE 50 SEGUNDOS.
TM
Basis C3
Manual del Propietario 99301003-e
37
PROGRAMACIÓN DEL CONTROL REMOTO BASIS C3™ (1 control remoto - 1 base)
Siga el procedimiento de dos pasos a continuación para programar 1 control remoto para operar 1
base. Antes de comenzar, asegúrese de que la base esté conectada a un tomacorriente que tenga conexión
a tierra y funcione. Si no logra programarlo, inicie el procedimiento de programación nuevamente.
PASO 1
Desconecte el cable de alimentación y
vuélvalo a conectar. Esto habilitará el modo de
programación por 90 segundos.
PASO 2
En el control remoto, mantenga presionados
simultáneamente los botones de nivelación
y para elevar los pies. La luz indicadora de
transmisión parpadeará lentamente y luego más
rápido para indicar el modo de programación.
Mantenga presionado durante 5 segundos más
y suelte (FIGURA 10).
Un control remoto ha quedado programado
para operar una base.
LUZ INDICADORA
DE TRANSMISIÓN
BOTÓN DE
ELEVACIÓN
DE PIES
BOTÓN DE
NIVELACIÓN
FIGURA 10
38
TM
Basis C3
Manual del Propietario 99301003-e
PROGRAMACIÓN DEL CONTROL REMOTO BASIS C3™ (2 controles remotos - 1 base)
Siga el procedimiento de tres pasos a continuación para programar 2 controles remotos para
operar 1 base. Antes de comenzar, asegúrese de que la base esté conectada a un tomacorriente que
tenga conexión a tierra y funcione. Si no logra programarlo, inicie el procedimiento de programación
nuevamente.
PASO 1
Desconecte el cable de alimentación y
vuélvalo a conectar. Esto habilitará el modo de
programación por 90 segundos.
PASO 2
En el control remoto 1, mantenga presionados
simultáneamente los botones de nivelación
y para elevar los pies. La luz indicadora de
transmisión parpadeará lentamente y luego más
rápido para indicar el modo de programación.
Mantenga presionado durante 5 segundos más
y suelte (FIGURA 10).
PASO 3
Repita los Pasos 1 y 2 con el control remoto 2.
CONTROL
REMOTO 1
CONTROL
REMOTO 2
LUZ INDICADORA
DE TRANSMISIÓN
BOTÓN DE
ELEVACIÓN
DE PIES
Los dos controles remotoes están programados
para operar una base.
BOTÓN DE
NIVELACIÓN
FIGURA 10
NOTA
OPERE SOLO UN (1) CONTROL REMOTO A LA
VEZ. SI OPERA DOS (2) CONTROLES AL MISMO
TIEMPO, BLOQUEARÁ MOMENTÁNEAMENTE
AMBAS SEÑALES RF E IMPEDIRÁ EL
FUNCIONAMIENTO DE AMBOS CONTROLES.
TM
Basis C3
Manual del Propietario 99301003-e
39
PROGRAMACIÓN DEL CONTROL REMOTO BASIS C3™ (1 control remoto - 2 bases)
Siga el procedimiento de tres pasos a continuación para programar 1 control remoto para
operar 2 bases. Antes de comenzar, asegúrese de que la base esté conectada a un tomacorriente
que tenga conexión a tierra y funcione. Si no logra programarlo, inicie el procedimiento de
programación nuevamente.
PASO 1
Desconecte el cable de alimentación y
vuélvalo a conectar. Esto habilitará el modo de
programación por 90 segundos.
BASE 1
PASO 2
En el control remoto, mantenga presionados
simultáneamente los botones de nivelación
y para elevar los pies. La luz indicadora de
transmisión parpadeará lentamente y luego más
rápido para indicar el modo de programación.
Mantenga presionado durante 5 segundos más
y suelte (FIGURA 10).
BASE 2
PASO 3
Repita los pasos 1 y 2 para la base 2.
Un control remoto está ahora programado para
operar dos bases.
LUZ INDICADORA
DE TRANSMISIÓN
BOTÓN DE
ELEVACIÓN
DE PIES
BOTÓN DE
NIVELACIÓN
FIGURA 10
40
TM
Basis C3
Manual del Propietario 99301003-e
PROGRAMACIÓN DEL CONTROL REMOTO BASIS C3™ (2 controles remotos - 2 bases)
Siga el procedimiento de seis pasos a continuación para programar 2 controles remotos para
operar 2 bases. Antes de comenzar, asegúrese de que la base esté conectada a un tomacorriente que
tenga conexión a tierra y funcione. Si no logra programarlo, inicie el procedimiento de programación
nuevamente.
PASO 1
Desconecte el cable de alimentación y
vuélvalo a conectar. Esto habilitará el modo de
programación por 90 segundos.
PASO 2
En el control remoto 1, mantenga presionados
simultáneamente los botones de nivelación
y para elevar los pies. La luz indicadora de
transmisión parpadeará lentamente y luego más
rápido para indicar el modo de programación.
Mantenga presionado durante 5 segundos más
y suelte (FIGURA 10).
PASO 3
Repita los pasos 1 y 2 con el control remoto 2.
PASO 4
Desconecte el cable de alimentación de la base
2 y vuélvalo a conectar. Esto habilitará el modo
de programación por 90 segundos.
BASE 1
CONTROL
REMOTO 1
CONTROL
REMOTO 2
BASE 2
LUZ INDICADORA
DE TRANSMISIÓN
BOTÓN DE
ELEVACIÓN
DE PIES
PASO 5
En el control remoto 1, mantenga presionados
simultáneamente los botones de nivelación
y para elevar los pies. La luz indicadora de
transmisión parpadeará lentamente y luego más
rápido para indicar el modo de programación.
Mantenga presionado durante 5 segundos más
y suelte (FIGURA 10).
BOTÓN DE
NIVELACIÓN
PASO 6
Repita los pasos 4 y 5 con el control remoto 2.
FIGURA 10
Dos controles remoto están ahora programados
para operar dos bases.
NOTA
OPERE SOLO UN (1) CONTROL REMOTO A LA
VEZ. SI OPERA DOS (2) CONTROLES AL MISMO
TIEMPO, BLOQUEARÁ MOMENTÁNEAMENTE
AMBAS SEÑALES RF E IMPEDIRÁ EL
FUNCIONAMIENTO DE AMBOS CONTROLES.
TM
Basis C3
Manual del Propietario 99301003-e
41
PROGRAMACIÓN DEL CONTROL REMOTO BASIS C3™ (para la separación de 2 bases)
Siga el procedimiento de seis pasos a continuación para separar 2 controles remoto que
operaban 2 bases. Este procedimiento dará como resultado que un control remoto opere por base.
Antes de comenzar, asegúrese de que la base esté conectada a un tomacorriente que tenga conexión
a tierra y funcione. Si no logra programarlo, inicie el procedimiento de programación nuevamente.
PASO 1
Desconecte el cable de alimentación y
vuélvalo a conectar. Esto habilitará el modo de
programación por 90 segundos.
PASO 2
En el control remoto 1, mantenga presionados
simultáneamente los botones de nivelación
y para elevar los pies. La luz indicadora de
transmisión parpadeará lentamente y luego más
rápido para indicar el modo de programación.
Mantenga presionado durante 5 segundos más
y suelte (FIGURA 10).
PASO 3
Repita los pasos 1 y 2 con el control remoto 1.
Nota: espere 90 segundos antes de proceder
con el Paso 4.
PASO 4
Desconecte el cable de alimentación de la base
2 y vuélvalo a conectar. Esto habilitará el modo
de programación por 90 segundos.
BASE 1
CONTROL
REMOTO 1
BASE 2
CONTROL
REMOTO 2
LUZ INDICADORA
DE TRANSMISIÓN
BOTÓN DE
ELEVACIÓN
DE PIES
PASO 5
En el control remoto 2, mantenga presionados
simultáneamente los botones de nivelación
y para elevar los pies. La luz indicadora de
transmisión parpadeará lentamente y luego más
rápido para indicar el modo de programación.
Mantenga presionado durante 5 segundos más
y suelte (FIGURA 10).
BOTÓN DE
NIVELACIÓN
PASO 6
Repita los pasos 4 y 5 con el control remoto 2.
Se ha restaurado la operación independiente
del control remoto (el control remoto opera 1
base; el control remoto 2 opera la base 2).
FIGURA 10
NOTA
OPERE SOLO UN (1) CONTROL REMOTO A LA
VEZ. SI OPERA DOS (2) CONTROLES AL MISMO
TIEMPO, BLOQUEARÁ MOMENTÁNEAMENTE
AMBAS SEÑALES RF E IMPEDIRÁ EL
FUNCIONAMIENTO DE AMBOS CONTROLES.
42
TM
Basis C3
Manual del Propietario 99301003-e
ACCESORIOS
EQUIPO OPCIONAL para Basis C3
Contacte al Servicio a Clientes llamando sin costo al (800-888-3078) para ordenar los
accesorios que se indican a continuación.
TM
DESCRIPCIÓN DE ACCESORIOS
CÓDIGO
Abrazaderas para cabecera-Ind. XL
4B6117
Abrazaderas para cabecera-Matr. XL/Q
4B6118
Kit de patas / ruedas
Cojinetes de goma
Patas de 4”
(juego de 4)
(juego de 4)
4B3644
4B1034
4B1833
(juego de 4)
Ruedas bloqueables con encastre
IMAGEN
(juego de 4)
4B0107
TM
Basis C3
Manual del Propietario 99301003-e
43
AJUSTE DEL TORNILLO TENSOR
Si el extremo del pie de la base se desnivela (FIGURA 1), lleve a cabo ajustes siguiendo las
siguientes instrucciones.
PASO 1
En un lado de la base de la base afloje la contratuerca en la parte del
extremo del ajuste del tensor usando una llave de ½” (FIGURA 2). Se
atornilla hacia la derecha. Repita la operación en el otro lado de la
base de la base.
FIGURA 1
EXTREMO DEL PIE DE LA BASE
DESNIVELADO
PASO 2
En un lado de la base de la base, afloje la contratuerca del extremo
del soporte del ajuste del tensor usando una llave de ½” (FIGURA 3).
Se atornilla hacia la izquierda. Repita la operación en el otro lado de
la base de la base.
PASO 3
Después de haber aflojado ambas contratuercas, rote el cuerpo del
tensor en un lado de la base de la base (FIGURA 4). El pie de la base
de la base se elevará y nivelará. Repita la operación en el otro lado de
la base de la base hasta que se nivele completamente.
FIGURA 2
PASO 4
Después de haber hecho los ajustes, verifique la nivelación de la base
de la base usando un nivelador (FIGURA 5).
CONTRATUERCA - ENSAMBLADO
DEL EXTREMO DE LA TABLA
PASO 5
Cuando nivele, ajuste todas las contratuercas con una llave de ½”
(FIGURA 6). Sostenga el cuerpo del ajuste del tensor mientras aprieta
para asegurarse que la base permanezca nivelada. Las contratuercas
tienen que estar bien apretadas para prevenir el movimiento del tensor.
El ajuste del tensor se completó.
FIGURA 3
CONTRATUERCA - ENSAMBLADO
DEL EXTREMO DEL SOPORTE
FIGURA 5
USE UN NIVELADOR PARA
VERIFICAR LA NIVELACIÓN
ROTE EL CUERPO DEL
TENSOR HASTA QUE LA
BASE SE NIVELE
CUANDO NIVELE,
APRIETE TODAS LAS
CONTRATUERCAS
FIGURA 4
FIGURA 6
44
TM
Basis C3
Manual del Propietario 99301003-e
RESOLUCIÓN DE PROBLEMAS
En caso de que la base eléctrica no funcione, consulte los síntomas y soluciones posibles en
el cuadro a continuación:
SÍNTOMA
El control remoto se ilumina y parece estar en
funcionamiento, pero no activa la base.
SOLUCIÓN
• Verifique que el cable de alimentación esté enchufado
a un tomacorriente conectado a tierra y que funcione.
Se recomienda utilizar un dispositivo de protección
contra sobretensión eléctrica puesto a tierra. Pruebe el
tomacorriente enchufando otro aparato que funcione.
• Programe el control remoto (consulte la Guía de control
remoto, incluida con este producto para información acerca
de los procedimientos de programación).
No se activa ninguna función de la base.
• Desenchufe el cable de alimentación, espere 30 segundos
y enchufe nuevamente para reiniciar los componentes
electrónicos.
• El interruptor eléctrico puede estar activado. Verifique la caja
del interruptor eléctrico para comprobarlo.
• Dispositivo de protección contra sobretensión o tomacorriente
defectuosos. Pruebe el tomacorriente enchufando otro
aparato que funcione.
El control remoto no se ilumina.
• Reemplace las pilas del control remoto.
• El mecanismo de la base puede estar obstruido. Eleve la
base y verifique si hay una obstrucción. Elimínela.
La sección de la cabecera o de los pies se
eleva, pero no regresa a la posición horizontal
(plana).
• La sección de la cabecera puede estar muy cerca de la
pared.
• La cabecera puede estar muy cerca del borde del colchón.
Verifique que haya una distancia de 1.5” (38.1 mm) a 2”
(50.8 mm) entre el soporte de la cabecera y el colchón.
Ajuste de ser necesario.
• Verifique que se hayan extraído los soportes de la cabecera
durante la instalación. Si todavía se encuentran en la parte
inferior de la base, quítelos.
• Si la base está ubicada sobre una superficie dura, coloque
trozos de alfombra o sujetadores de goma debajo de cada
pata o rueda de la base. (Consulte la sección de accesorios
de este remoto para obtener información sobre el pedido de
sujetadores de goma.)
Ruido excesivo del motor de masaje.
• Eleve un poco la sección de la cabecera o pie de la base
(con el control remoto) para realinear los mecanismos de
elevación/descenso con la plataforma de soporte de la
base.
• Verifique que la base no esté ubicada contra una pared,
mesa de noche u otro objeto que pueda causar vibración o
ruido.
• Si la base está instalada sobre un armazón, verifique que
los motores de masaje no provoquen la vibración del
mismo (o de sus componentes).
• Verifique que los accesorios conectados a la cabecera estén
ajustados con firmeza (si se utilizan).
TM
Basis C3
Manual del Propietario 99301003-e
45
GARANTÍA LIMITADA POR 1 AÑO, 3 AÑOS Y 20 AÑOS
En esta garantía: “Base ajustable” significa la base ajustable vendida por L&P al distribuidor. La “base ajustable” no
incluye el colchón. “L&P” significa Leggett & Platt, Incorporated. “Comprador” y “Usted” ambos significan el consumidor,
quien es el comprador original de esta base ajustable fabricada por L&P. Esta garantía no es transferible. “Fecha de
inicio de la garantía” significa (i) la fecha en la que Usted compró una base ajustable L&P nueva y sin usar o (ii) la
fecha de fabricación de esta base ajustable si Usted compró una de L&P que ya haya sido usada como modelo de piso
o de exhibición. L&P le garantiza a Usted esta base ajustable conforme a los términos y condiciones y por los periodos
estipulados a continuación. Todas las reclamaciones de garantía requieren de un aviso que Usted debe hacer a L&P tal
como se indica a continuación, mismo que deberá ser recibido por L&P dentro del periodo aplicable de la garantía.
GARANTÍA COMPLETA POR 1 AÑO
Durante el primer año a partir de la Fecha de Inicio de
la Garantía, su base ajustable está garantizada contra
defectos no excluidos de la fabricación o los materiales de
L&P. Durante el primer año a partir de la Fecha de inicio
de la garantía, L&P reparará o reemplazará (sin costo para
Usted) cualquier parte defectuosa de la base ajustable.
Asimismo, L&P pagará todos los costos autorizados
de trabajo y transporte asociados con la reparación o
reemplazo de cualquier parte que esté defectuosa.
GARANTÍA LIMITADA POR EL 2º Y 3ER AÑO
Durante el segundo y tercer año a partir de la Fecha de
Inicio de la Garantía, L&P reemplazará cualquier parte
de la base ajustable que esté defectuosa y que no esté
excluida conforme a esta garantía. Usted es responsable de
pagar todos los costos de servicio y transporte relacionados
con los costos de la recepción e instalación de la parte
nueva.
GARANTÍA LIMITADA DEL 4º AÑO AL FINAL DEL AÑO 20
Comenzando en el cuarto año a partir de la Fecha de
Inicio de la Garantía y hasta el final del año 20 a partir de
la misma Fecha Inicio de la Garantía, L&P reemplazará
las partes de acero y mecánicas de la base que estén
defectuosas y que no estén excluidas conforme a esta
garantía. La presente no cubre partes electrónicas,
componentes eléctricos, motores de accionamiento o
motores de masaje. Usted es responsable de pagar todos
los costos de servicio y transporte relacionados con la
recepción e instalación de la parte nueva, al igual que una
porción del costo de la parte de acero y parte mecánica de
reemplazo, con base en el número de meses que la base
haya sido propiedad de Usted desde el cuarto aniversario
de la Fecha de Inicio de la Garantía. A partir del fin
del año 20, L&P no cubrirá ninguna parte del costo de
reemplazo. Se requiere que Usted pague 1/17 parte del
costo de reemplazo que esté vigente en ese momento para
la parte en cuestión, multiplicado por el número de años
que hayan transcurrido desde del tercer año a partir de
la Fecha de Inicio de la Garantía. Esta porción se calcula
usando la siguiente fórmula: El costo de la parte dividido
entre 17 [siendo este el número inclusivo de años entre
el año 4 y el 20], multiplicado por el número de años que
Usted ha sido propietario de la base desde el final de los
primeros 3 años.
Por ejemplo, si hace una reclamación por una parte
elegible para esta garantía en el 5º año a partir de la
Fecha de Inicio de la Garantía, Usted será responsable
de pagar: $100 correspondientes al costo de la parte en
cuestión, dividido entre 17 y luego multiplicado por 5 =
$29.41.
TÉRMINOS Y CONDICIONES ADICIONALES
Esta garantía requiere que se haga un aviso a L&P por
cualquier reclamación de reparaciones o partes de
reemplazo.
EXCLUSIONES:
Esta garantía no aplica: (a) para cualquier daño causado
por Usted; (b) si se ha realizado alguna reparación o
reemplazo de partes de la base ajustable por parte de
una persona no autorizada; (c) si la base ajustable ha
sido maltratada (ya sea durante su traslado o por otros
motivos), ha estado sujeta a abuso o mal uso físico o
eléctrico, o ha sido operada de alguna otra manera que
no corresponda con los procedimientos de operación y
mantenimiento descritos en el Manual del Propietario y
en esta garantía; (d) en casos de daños a colchones, telas,
cables, cables eléctricos o artículos suministrados por
los comerciantes (comuníquese con el comerciante para
obtener información de la garantía sobre estos artículos);
(e) si se ha realizado alguna modificación a la base
ajustable sin el consentimiento previo por escrito de L&P
o (f) por costos de llamadas a servicio innecesarias, lo
cual incluye los costos por llamadas a servicio en el sitio
que se hagan con el solo propósito de enseñarle a Usted
acerca de la base ajustable o encontrar una conexión
eléctrica adecuada.
Esta garantía quedará anulada si no se sigue la restricción
de peso recomendada (consulte la sección de información
en el Manual del Propietario) o si Usted vende, entrega o
transfiere la base a otra persona.
Cualquier reparación o reemplazo de Su base ajustable
o de sus componentes de acuerdo con los términos y
condiciones de esta garantía limitada, no extiende la
garantía aplicable a partir de la Fecha de Inicio de la
Garantía. Esta limitación de tiempo no podrá aplicarse en
algunas jurisdicciones, como en la Provincia de Québec.
La decisión de reparar o de reemplazar partes definitivas
de acuerdo con esta garantía la tomará L&P o se le pedirá
a L&P que la tome, bajo su propio criterio y su absoluta
discreción.
Continúa al dorso...
46
TM
Basis C3
Manual del Propietario 99301003-e
GARANTÍA LIMITADA POR 1 AÑO, 3 AÑOS Y 20 AÑOS
La reparación o reemplazo será el único recurso para el
Comprador. No habrá responsabilidad por parte de L&P
por cualquier daño especial, indirecto, incidental, o
consecuencial, ni por cualquier otro daño, reclamación o
pérdida que no esté cubierta en forma expresa conforme a
los términos y condiciones de esta garantía.
Esta garantía limitada no incluye el reembolso de costos o
gastos por motivos de inconveniencia, retiro, instalación,
tiempo de colocación, pérdida de uso, envío o cualquier
otro costo o gasto. L&P y sus técnicos de servicio no serán
responsables de mover muebles o cualquier otro objeto
que no esté sujeto a la base ajustable para poder llevar a
cabo el servicio en la misma.
Es absoluta responsabilidad de Usted proporcionar el
espacio adecuado y la accesibilidad conveniente para la
base ajustable. En caso de que el técnico no pueda llevar
a cabo el servicio debido a una falta de accesibilidad, la
llamada a servicio le será facturada a Usted y el servicio
deberá ser reprogramado.
L&P no hace ninguna otra garantía, ya sea expresa o
implícita, y renuncia a todas las garantías implícitas de
comerciabilidad y acondicionamiento para un propósito en
particular, mismas que quedan excluidas conforme a este
contrato.
Algunos estados de los Estados Unidos no permiten
la exclusión o limitación de daños incidentales o
consecuenciales, de modo que la limitación o exclusión
anterior podría no aplicar en el caso de Usted.
Esta garantía le confiere a Usted derechos específicos
conforme a la ley, adicionales a otros derechos que Usted
pudiera tener y que podrían variar entre una jurisdicción
y otra. Esta garantía es válida en los 50 estados de los
Estados Unidos, en el Distrito de Columbia y en Puerto
Rico, así como en las 10 provincias y los 3 territorios de
Canadá.
Para obtener servicio al cliente conforme a esta garantía
limitada, notifique a L&P por correo postal, teléfono,
correo electrónico o en línea, a las direcciones que se
muestran a continuación:
Leggett & Platt, Incorporated
PO Box 668
Lexington, North Carolina 27293
teléfono sin cargo: 1.800.888.3078
en línea: lpadjustablebases.com
correo electrónico: [email protected]
POR FAVOR, NO CONTACTE A SU DISTRIBUIDOR MINORISTA
O A CUALQUIER OTRO PERSONAL DE SERVICIO
TM
Basis C3
Manual del Propietario 99301003-e
47
[ adjustable bases ]
ASSEMBLED IN USA
NATIONWIDE CUSTOMER SERVICE
toll free: (800) 888-3078
© 2012 Leggett & Platt Adjustable Bed Group, a division of Leggett & Platt, Incorporated
lpadjustablebases.com