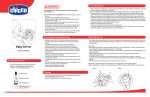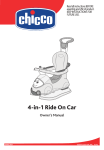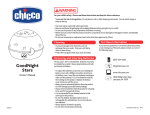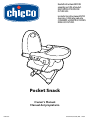
1
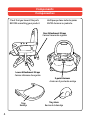
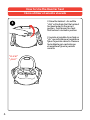
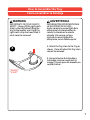
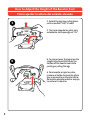
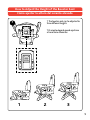
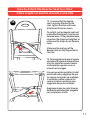
Read all instructions BEFORE
assembly and USE of product.
KEEP INSTRUCTIONS FOR
FUTURE USE.
Lea todas las instrucciones ANTES
de armar y USAR este producto.
CONSERVE LAS INSTRUCCIONES
PARA USO FUTURO.
Pocket Snack
Owner's Manual
Manual del propietario
IS0113.ES
©2014 Artsana USA, INC. 02/14
WARNING
Prevent serious injury or death from sliding out, falls, or tipping
over. Failure to follow these warnings and the instructions could
result in serious injury or death.
• Never leave your child
unattended in the booster seat.
Always keep your child in view.
• Never allow a child to push
away from table.
• Use only with children capable
of sitting upright unassisted.
• Do not use for children weighing
more than 50 lbs (23 kg).
• Always use the restraint until
child is able to get in and out of
the booster seat without help
(about 2 1⁄2 years old), the
child should be secured in the
booster seat at all times by the
restraining system. The tray is
not designed to hold the child in
the chair.
• Do NOT use this booster seat as
a standalone chair, it can only be
used when combined with a full
sized dining room table chair.
• Do NOT use on any elevated
surface other than a full sized
dining room chair.
• Never allow child to sit in
unsecured chair. Always secure
the booster seat to chair using
the attachment straps. Always
check that the attachment is
secure before each use.
2
• Never fit the booster seat to
damaged or unstable chairs,
folding chairs, pedestal chairs or
bar stools.
• Only use on chairs with a seat
larger than the booster seat.
• Always check that the surface of
the floor is even and the chair is
stable before fitting the booster
seat to a chair.
• When using the booster seat, do
not place your child near objects
that he or she can push against
to overturn the chair being used
with the booster seat.
• Do not let other children play
unattended close to the booster
seat.
• Prevent serious injury or death.
Do not use in motor vehicles.
• Do not use the booster seat if
any components are broken or
missing.
ADVERTENCIA
Evite las lesiones graves o la muerte producidas por deslizamiento,
caídas o vuelcos. El incumplimiento de estas advertencias e
instrucciones puede ocasionar lesiones graves o la muerte.
• Nunca deje al niño solo en el
asiento elevado. Observe siempre
al niño.
• Nunca permita que el niño se
empuje de la mesa.
• Use el asiento elevado solo con
niños que pueden sentarse sin
ayuda.
• No utilice para niños que pesen
más de 50 lbs (23 kg).
• Use siempre el sistema de
seguridad hasta que su hijo sea
capaz de sentarse en el asiento
elevado y salir de él sin ayuda (2
años y medio aproximadamente);
debe asegurar siempre al niño en
el asiento elevado utilizando el
sistema de seguridad. La bandeja
no está diseñada para sostener al
niño en la silla.
• NO use el asiento elevado como
una silla independiente, solo se
puede utilizar cuando se combina
con una silla del tamaño de una
mesa de comedor.
• NO use el asiento elevado en una
superficie elevada que no sea una
silla del tamaño de la mesa del
comedor.
• Nunca permita que el niño se
siente en una silla insegura.
Asegure siempre el asiento
elevado a la silla con las correas
de sujeción. Controle siempre que
la sujeción esté firme antes de
cada uso.
• Nunca coloque el asiento elevado
en sillas dañadas o inestables,
sillas plegables, sillas de pata
central ni taburetes de bar.
• Utilice solo en sillas con un
asiento más grande que el asiento
elevado.
• Controle siempre que la superficie
del suelo sea plana y que la silla
esté estable antes de colocar el
asiento elevado en la silla.
• Cuando utilice el asiento elevado,
no coloque al niño cerca de
objetos contra los que pueda
hacer presión y dar vuelta la silla
en la que se está utilizando el
asiento elevado.
• No permita que otros niños
jueguen sin supervisión cerca del
asiento elevado.
• Evite lesiones graves o fatales.
No utilice el asiento elevado en
vehículos con motor.
• No utilice este asiento si faltan
componentes o existen piezas
rotas.
3
Components
Componentes
Check that you have all the parts
BEFORE assembling your product.
Verifique que tiene todas las piezas
ANTES de armar su producto.
Rear Attachment Straps
Correas traseras de sujeción
Lower Attachment Straps
Correas inferiores de sujeción
3-point Harness
Arnés con 3 puntos de anclaje
Tray
Bandeja
4
Tray Horn
Bocina de la bandeja
How to Use the Booster Seat
Cómo utilizar el asiento elevado
1
1. Unfasten the Lower Attachment
Straps.
1. Desabroche las correas inferiores
de sujeción.
2
2. Pull out and lift up on the Tray to
remove from the booster seat.
2. Tire de la bandeja hacia afuera
y hacia arriba para retirarla del
asiento elevado.
5
How to Use the Booster Seat
Cómo utilizar el asiento elevado
3
3. Raise the backrest. An audible
"click" will indicate that the backrest
has been locked in the correct
position. Push forward to check
that backrest is locked in position.
3. Levante el respaldo. Escuchará un
“clic” que indicará que el respaldo se
fijó en la posición correcta. Presione
hacia delante para controlar que
el respaldo se fijó en la posición
correcta.
“CLICK!”
“¡CLIC!”
6
How to Assemble the Tray
Cómo ensamblar la bandeja
WARNING
IMPORTANT FOR YOUR CHILD'S
SAFETY - Always fit the rigid crotch
strap to the tray before fitting the
tray to the booster seat. Once the
rigid crotch strap has been fitted, it
must never be removed.
4
ADVERTENCIA
INFORMACIÓN IMPORTANTE PARA
LA SEGURIDAD DE SU HIJO –
Ajuste siempre la correa rígida de la
entrepierna a la charola antes de
colocar la charola en la asiento
elevado. Una vez que se haya
ajustado la correa rígida de la
entrepierna, nunca se debe quitar.
4. Attach the Tray Horn to the Tray as
shown. Once attached, the Tray Horn
cannot be removed.
4. Anexe la bocina de la bandeja a
la bandeja como se muestra en la
imagen. Una vez que esté anexada, no
se podrá retirar.
“CLICK!”
“¡CLIC!”
7
How to Adjust the Height of the Booster Seat
Cómo ajustar la altura del asiento elevado
5
5. Extend the legs buy pulling down
until an audible "click" is heard.
5. Tire hacia abajo de las patas para
extenderlas hasta que oiga un “clic”.
6
6. To raise or lower the legs press the
Height Adjustment Button on the
bottom of the booster seat while
pushing or pulling the legs.
6. Para levantar o bajar las patas,
presione el botón de ajuste de altura
que se encuentra en la parte inferior
del asiento elevado mientras empuja
las patas o tira de ellas.
8
How to Adjust the Height of the Booster Seat
Cómo ajustar la altura del asiento elevado
7. The booster seat can be adjusted to
three different heights.
7
7. El asiento elevado puede ajustarse
a tres alturas diferentes.
1
1
2
2
3
3
1
1
1
1
2
2
2
2
3
3
3
3
1
2
3
9
How to Attach the Booster Seat to a Chair
Cómo acoplar el asiento elevado a una silla
8
8. Center the booster seat on the
chair, making sure the back of the
booster seat is against the seat back.
Fasten the Rear Attachment Straps,
passing them behind the backrest of
the chair. Pull the Rear Attachment
Strap snug - Do not fully tighten.
8. Centre el asiento elevado en la silla
y asegúrese de que la parte trasera del
asiento esté contra la parte trasera de
la silla.
Ajuste las correas traseras de sujeción,
luego de pasarlas por detrás del
respaldo de la silla. Tire de la correa
trasera de sujeción para ajustarla:No
la ajuste completamente.
9
9. Then fasten the Lower Attachment
Straps, passing them underneath
the seat. Pull the Lower Attachment
Strap snug - Do not fully tighten.
9. Luego, ajuste las correas inferiores
de sujeción pasándolas por debajo
de la silla. Tire de la correa inferior de
sujeción para ajustarla: No la ajuste
completamente.
10
How to Attach the Booster Seat to a Chair
Cómo acoplar el asiento elevado a una silla
10
10. To ensure that the booster
seat is securely attached to the
chair, tighten the Rear and Lower
Attachment Straps as shown.
Once tight, pull on booster seat and
make sure attachment straps do not
become loose. If they become loose,
reposition the straps and retighten to
make sure the straps do not become
loose.
Make sure the rear Legs of the
Booster Seat are fully supported on
the chair.
10. Para asegurarse de que el asiento
elevado esté sujeto de manera firme
a la silla, ajuste las correas traseras
e inferiores de sujeción como se
muestra en la imagen.
Una vez que estén ajustadas, tire del
asiento elevado y asegúrese de que
las correas de sujeción no se aflojan.
Si se aflojan, vuelva a colocar las
correas y vuelva a ajustarlas para
asegurarse de que no se aflojen.
Asegúrese de que las patas traseras
del asiento elevado estén apoyadas
por completo en la silla.
11
How to Use the 3-point Harness
Cómo utilizar el Arnés con 3 puntos de Anclaje
11a
11a. Once the booster seat is fitted
to the chair securely, the child can be
seated and secured with the 3-point
harness. Unfasten the 3-point
harness by squeezing prongs on both
sides.
11b. The 3-point harness can be
adjusted to better fit your child.
11b
11a. Una vez que el asiento elevado
está acoplado de manera segura a la
silla, el niño se puede sentar y se lo
puede sujetar con el arnés con tres
puntos de anclaje. Desabroche el
arnés con tres puntos de anclaje
presionando las puntas a ambos
lados.
11b. El arnés con 3 puntos de anclaje
se puede ajustar para adaptarse mejor
a su niño.
12
12. Place the child in the booster seat,
securing him or her with the 3-point
harness.
12. Coloque al niño en el asiento
elevado y sujételo con el arnés con
tres puntos de anclaje.
12
How to Attach the Tray
Cómo anexar la bandeja
WARNING
Until child is able to get in and out of
the booster seat without help (about
2 1/2 years old), the child should
be secured with the restraint at all
times. The tray is not designed to
hold the child in the chair.
13
ADVERTENCIA
Hasta que su hijo sea capaz de
sentarse en el asiento elevado y salir
de él sin ayuda (2 años y medio
aproximadamente), debe sujetar
siempre al niño con el arnés de
seguridad. La bandeja no está
diseñada para sostener al niño en la
silla.
13. Fit the Tray to the booster seat,
pushing the Tray down onto the
Tray Attachment Buttons. The Tray
can be adjusted to three different
positions.
13. Coloque la bandeja en el asiento
elevado presionando la bandeja
hacia abajo en los botones de
sujeción de la bandeja. La bandeja
puede ajustarse en tres posiciones
diferentes.
13
Closing and Transporting the Booster Seat
Cierre y traslado del asiento elevado
14
14. Pull out and lift up on the Tray to
remove from the booster seat.
14. Tire de la bandeja hacia afuera y
hacia arriba para retirarla del asiento
elevado.
15
15. Unbuckle the Rear and Lower
Attachment Straps.
Fold up and store Rear Attachment
strap using the hook and loop strap.
15. Desabroche las correas traseras e
inferiores de sujeción.
Pliegue y guarde la correa posterior de
sujeción con las correas sujetadoras.
14
Closing and Transporting the Booster Seat
Cierre y traslado del asiento elevado
16
16. Press both Backrest Release
Buttons located on the arms of the
booster seat, and pull the arms
forward to fold the booster seat.
16. Presione ambos botones de
liberación del respaldo, ubicados
en los brazos del asiento elevado, y
tire de los brazos hacia delante para
plegar el asiento.
17
17. Turn the Booster Seat upside down
and place on a flat surface. Fold the
Legs by press the Height Adjustment
Button on the bottom of the Booster
Seat while pushing the Legs towards
the booster seat.
17. Dé vuelta el asiento elevado y
colóquelo sobre una superficie plana.
Pliegue las patas presionando el
botón de ajuste de altura en la parte
inferior del asiento elevado mientras
empuja las patas hacia delante para
plegar el asiento elevado.
15
Closing and Transporting the Booster Seat
Cierre y traslado del asiento elevado
18
18. Attach the Tray to the booster seat
as shown.
18. Anexe la bandeja al asiento
elevado como se muestra en la
imagen.
19
19. Buckle the Lower Attachment
Strap around the booster seat as
shown.
The booster seat can be easily
transported using the Rear
Adjustment strap or the Transport
Handle located on the rear side of the
seat.
19. Abroche la correa inferior de
sujeción alrededor de la asiento
elevado como se muestra en la
imagen.
El asiento elevado puede
transportarse fácilmente utilizando
la correa trasera de ajuste o la manija
de transporte que está ubicada en la
parte trasera del asiento.
16
Cleaning and Maintenance
Limpieza y Mantenimiento
All cleaning and maintenance operations must only be carried out by an adult.
Periodically check the booster seat for wear, damage, or missing components.
Should any parts be missing or damaged, the booster must not be used.
• Clean the plastic parts with a damp cloth only.
• Do NOT fully submerge Tray in water.
• Tray is NOT dishwasher safe.
Todas las operaciones de limpieza y mantenimiento deben ser realizadas solo por
un adulto. Revise periódicamente el asiento elevado para detectar componentes
deteriorados, dañados o faltantes. En caso de que falte alguna pieza o haya alguna
pieza dañada, el asiento elevado no debe usarse.
• Limpie las piezas de plástico con un trapo húmedo solamente.
• NO sumerja la bandeja completamente en agua.
• NO se debe lavar la bandeja en el lavaplatos.
17
For More Information
Más información
For USA customers :
If you have any questions or comments about this product, or are missing any of the
parts, please do not return this product to the store. Contact us in one of the
following ways:
Para clientes de los EE. UU.:
Si tiene preguntas o sugerencias sobre este producto, o falta alguna de las partes, no
devuelva este producto a la tienda. Comuníquese con nosotros por alguno de los
siguientes medios:
(877)-424-4226
@
[email protected]
www.chiccousa.com
1826 William Penn Way
Lancaster, PA 17601
18
www.chiccousa.com