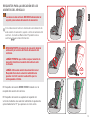
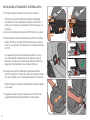
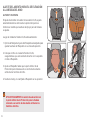
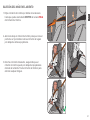
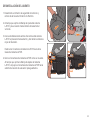
1
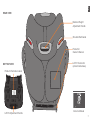
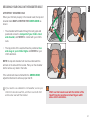
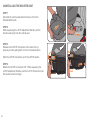
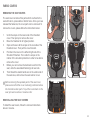
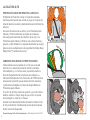
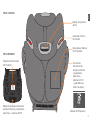
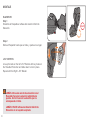
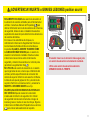
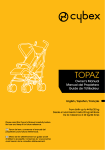
EN
ES
SOLUTION Q-FIX
Owner’s Manual
Manual del Propietario
READ this Owner’s Manual carefully before first use, and keep it for future reference.
LEA este Manual del Propietario minuciosamente antes de usarlo y guarde para su futura referencia.
DEAR PARENTS
Thank you for purchasing the CYBEX Solution Q-fix High Back Booster Seat. We are proud to bring this German engineered
seat to North America. We hope the Solution Q-fix will make your child’s travel both safer and more pleasant, as well as
making installation and use for you as simple and easy as possible.
The Solution Q-fix is the next generation of the test winning Solution Q-fix booster seat.With greatly improved protection in
side impact and forward facing crashes. The Solution Q-fix takes booster safety to a new level.
Statistics show that over 75% of car seats are installed incorrectly!
Please read and follow these instructions to install this booster seat correctly, even if the installation and use of this booster
seat might seem simple and intuitive. The safety of your child depends on it! Although many booster seats may be used
without the backrest attached, the Solution Q-fix should NEVER BE USED WITHOUT THE BACKREST ATTACHED as it
dramatically reduces the protection in a crash.
We recommend keeping your young child in a properly sized and installed car seat as long as possible before making the
switch to the Solution Q-fix High Back Booster Seat.
No car seat can guarantee protection from injury in every situation, but proper use helps reduce the risk of death or serious
injury. If you have any questions or need assistance, please contact Regal Lager, Inc. the North American distributor at
1–800–593–5522. Also, please remember to register your booster seat so we can contact you in the unlikely event of a recall.
Keep this Owner’s Manual for future reference by storing it in the pocket on the back of Solution Q-fix. We appreciate your
purchase and invite you to visit our web site www.cybex-online.com to see other great CYBEX products.
Before the first use of this booster seat, please make sure you have followed all the steps in the Safety Checklist and CYBEX
Safe Practices found on page 26.
Bengt Lager
President, Regal Lager, Inc.
Child Passenger Safety Technician
SOLUTION Q-FIX FEATURES........................................................................................................................................ 2
REGISTRATION AND RECALL INFORMATION............................................................................................................ 3
WARNINGS AND IMPORTANT SAFETY INFORMATION.............................................................................................. 4
BOOSTER SEAT OVERVIEW......................................................................................................................................... 6
CHILD SIZE: HEIGHT, WEIGHT AND AGE RANGES.................................................................................................... 8
ASSEMBLY...................................................................................................................................................................... 9
THE SEAT..................................................................................................................................................................... 9
L.S.P. BOLSTERS......................................................................................................................................................... 9
VEHICLE SEAT LOCATION REQUIREMENTS.............................................................................................................. 10
VEHICLE LATCH REQUIREMENTS............................................................................................................................... 13
INSTALLING WITH SEAT BELT ONLY........................................................................................................................... 16
ADJUSTING THE SEAT FOR YOUR CHILD.................................................................................................................. 17
HEIGHT AND WIDTH.................................................................................................................................................... 17
ADJUSTING THE RECLINING HEADREST................................................................................................................. 18
SECURING YOUR CHILD IN THE BOOSTER SEAT .................................................................................................... 19
UNINSTALLING THE BOOSTER SEAT ......................................................................................................................... 22
FABRIC COVERS............................................................................................................................................................ 23
REMOVING THE SEAT COVERS................................................................................................................................. 23
CARE AND CLEANING................................................................................................................................................... 24
SAFETY CHECKLIST...................................................................................................................................................... 26
RESOURCES................................................................................................................................................................... 27
IF YOU NEED HELP..................................................................................................................................................... 27
WARRANTY..................................................................................................................................................................... 28
EN
INDEX
SOLUTION Q-FIX FEATURES
The Solution Q-fix brings all new technologies to the High
Back Booster Seat category to greatly increase the safety
of your child in the event of a side impact collision. Reports
show that 27% of all crashes are side impact collisions1.
LINEAR SIDE-IMPACT PROTECTION™ (L.S.P.)
The L.S.P. system allows the forces from a side impact
collision to be reduced gradually to minimize injuries. A
series of reactions are triggered and the Head and Shoulder
Protectors absorb the momentum of the head and body
to maximize the protection of your child. The Head and
Shoulder Protectors are made of extra deep and thick energy
absorbing EPS foam to create a deep Safety Zone™ around
your child.
THREE POSITION, RECLINING HEADREST
We all know the head of a child falling asleep in a booster
seat tends to fall forward, and in most cases ends up outside
the Safety Zone of the head protectors. The CYBEX Three
Position Reclining Headrest eliminates this by allowing your
child’s head to recline and remain protected in the Safety
Zone of the Head Protectors. If your child slumps forward out
of position when asleep, there is an increased risk that your
child will not be well protected in the event of a collision.
Thanks to the Reclining Headrest of the Solution Q-fix, your
child will be able to lean back and sleep comfortably with the
head inside the Safety Zone.
1
2
National Highway Traffic Safety Administration, Traffic Safety Facts 2005, 2007
DE E P
Please complete the Registration Card that came with
your Child Restraint and mail it immediately or register
online.
EN
REGISTRATION AND RECALL INFORMATION
THIS RESTRAINT IS NOT CERTIFIED
FOR USE IN AIRCRAFT as shoulder
belts are not available for proper use.
Child restraints could be recalled for safety reasons. You
must register this restraint to be reached in a recall. Send
your name, address, e-mail address if available, and the
restraint’s model number and manufacturing date to:
CYBEX Registration
1100 Cobb Place Blvd NW
Kennesaw, Georgia 30144, USA
or call 1-800–593–5522
or register online at www.regallager.com
Registration information may be found on the label
below or affixed to the underside of the Booster Base.
For recall information, call the U.S.
Government’s Vehicle Safety Hotline at: 1–888–327–4236
(TTY: 1-800-424-9153), or go to www.NHTSA.gov.
CERTIFICATION
This child restraint system conforms to all applicable Federal
Motor Vehicle Safety Standards. This restraint is certified for
use in motor vehicles.
3
!
4
WARNING! DEATH OR SERIOUS INJURY CAN OCCUR
•YOUR CHILD’S SAFETY depends on you correctly installing
and using this booster seat.
•READ and FOLLOW all booster seat and vehicle
instructions carefully. Failure to follow these instructions
can result in DEATH or SERIOUS INJURY of your child in a
sharp turn, sudden stop, or crash.
•DO NOT install or use this booster seat until you have read
and understand the instructions in this manual and in your
vehicle Owner’s Manual
. If there is a conflict between the
two, the vehicle Owner’s Manual must be followed.
•DO NOT let others install or use this booster seat unless
they understand how to correctly install and use it.
•KEEP this Owner’s Manual for future reference by storing it
in the pocket on the back of the booster seat.
•USE ONLY with children who are 3 years of age or older
AND whose height is between 38—60 inches (96—152 cm)
AND who weigh between 33—110 lb (15—50 kg). Using this
booster seat with a child who does not meet ALL of these
requirements will increase the risk of death or serious injury.
•ONLY USE this booster seat with the bottom of the Head
Protection positioned at two fingers width above your child’s
shoulders.
•NEVER USE the Booster Base without the Backrest
attached.
•NEVER TAKE your child out of the booster seat to tend to
his or her needs while the vehicle is moving. Unrestrained
occupants are at a greatly increased risk of DEATH or
SERIOUS INJURY in a car crash.
•NEVER TEND to your child’s needs while driving. Driving
while distracted is the cause of many car crashes. Safely
stop your vehicle in order to tend to your child.
•The primary protection for occupants of a vehicle in a
collision is the structure of the vehicle itself; a booster
seat will not protect a child when the vehicle is seriously
impacted. correctly used, This booster seat will substantially
improve the chances for survival in most crashes.
•TOO MUCH RECLINE IN THE VEHICLE SEAT BACK can
result in improper seat belt position. An improperly positioned
seat belt increases the risk of DEATH or SERIOUS
INJURY in a crash. Follow your vehicle Owner’s Manual
instructions for proper seat back positioning.
•USE ONLY the vehicle’s three point lap and shoulder belt
system when restraining your child in this booster seat.
•NEVER USE this booster seat with a two–point only vehicle
belt, (lap belt or shoulder belt only) or with any motorized, or
door mounted vehicle belts. Your child would not be properly
restrained in the event of a crash.
•IMPROPER PLACEMENT of this booster seat in a vehicle
affects the booster seat’s performance and can result in
DEATH or SERIOUS INJURY.
•ONLY PLACE this booster seat in a vehicle seating location
allowed by the vehicle manufacturer. Refer to your vehicle
Owner’s Manual
for information about vehicle seat belt
systems, air bags, and child restraint/booster seat installation
to determine allowable seating positions.
•Based on crash statistics, the National Highway Traffic
Safety Administration (NHTSA) recommends that parents
select the REAR SEAT as the safest location for a properly
installed booster seat. Study the sections on vehicle seat
belts and vehicle seat location in these instructions to ensure
your child’s safety.
•DO NOT USE this booster seat in a seating position with an
airbag unless the vehicle manufacturer specifically allows
WARNING! DEATH OR SERIOUS INJURY CAN OCCUR
placement of a child restraint there. If an air bag inflates, it
can hit your child with such a great force that it may cause
DEATH or SERIOUS INJURY
•The Backrest of this booster seat MUST REST against the
vehicle seat back.
•Vehicle headrest MUST NOT INTERFERE with the booster
seat Backrest. See the vehicle Owner’s Manual
for
adjustment or possible removal of vehicle headrest.
•NO PART of this booster seat should hang over the front of
the vehicle seat.
•Use this booster seat FORWARD FACING ONLY.
•NEVER USE a locking clip when installing this booster seat.
•DO NOT SECURE this booster seat to the vehicle’s
lower LATCH anchors if the seat belt or seat belt buckle
is not easily accessible when the booster seat is securely
installed.
•NEVER LEAVE a vehicle seat with a folding mechanism
unlocked. In the event of a sudden stop, a loose vehicle
seat back could prevent this booster seat from protecting
your child as well as it should.
•DO NOT LEAVE loose objects (e.g. books, bags, etc.) in
a vehicle. In the event of a sudden stop, loose objects will
become projectiles, potentially causing serious injuries.
•DO NOT USE anything to raise this booster seat off the
vehicle seat.
•NEVER USE this booster seat in the home, on aircraft,
boats, low speed vehicles (LSV), all-terrain vehicles (ATV),
golf carts, or any other non-certified applications.
•NEVER ALLOW children to play with this booster seat.
•NEVER ALLOW children to play with vehicle seat belts as
EN
!
they may create an ENTANGLEMENT HAZARD for any
child that can reach the seat belt and may wrap it around
his or her neck.
•DO NOT USE this booster seat if it has been in a crash.
There may be hidden damage and it must be replaced. Your
insurance company may provide some assistance replacing
the booster seat.
•NEVER USE this booster seat if it has been damaged in
any way or has missing parts.
•NEVER USE a cut, damaged, frayed, or inoperable vehicle
seat belt.
•DO NOT ATTEMPT to make repairs to or otherwise modify
or tamper with this booster seat.
•NEVER USE this booster seat without properly installed
fabric covers.
•NEVER USE a second–hand booster seat or a booster seat
whose history you do not know.
•DO NOT USE accessories or parts with this booster seat
other than those approved by Cybex. Use of accessories or
parts from other manufacturers could alter the performance
of the booster seat.
•DISCONTINUE USING this booster seat when it is
older than seven (7) years and recycle it. The date of
manufacture can be found on a label affixed to the bottom
of the Booster Base.
•This booster seat and the vehicle seat belt can become very
hot if left in the sun and can burn your child’s skin. ALWAYS
TOUCH the surfaces of the parts before putting your child in
the booster seat.
•NEVER LEAVE children unattended in a vehicle, even for a
short period of time.
5
BOOSTER SEAT OVERVIEW
Reclining Headrest
FRONT VIEW
Head Protection
Backrest
Shoulder Protection
LSP Bolster
Armrest
Lower Belt Guide
Rigid LATCH
Booster Base
6
LATCH Guides
(tied to Booster Base for shipping)
EN
REAR VIEW
Backrest Height
Adjustment Handle
Shoulder Belt Guide
Pocket for
Owner’s Manual
BOTTOM VIEW
LATCH Connector
(stored inside base)
Product Information Label
(6
(1
Model Name: Solution Q-fix
Model Number: 12-0884814
Color: Allen Gray
CYBEX Article: 7706256101
Manufactured in: 01/2014
Do not use after: 01/2021
Distributed by Regal Lager, Inc.
1100 Cobb Place Blvd., Ste. 120
Kennesaw, GA 30144, USA.
Made in China.
51.76+103(+:
Owner’s Manual
Manual del Propietario
5($'WKLV2ZQHU¶V0DQXDOFDUHIXOO\EHIRUH¿UVWXVHDQGNHHSLWIRUIXWXUHUHIHUHQFH
/($HVWH0DQXDOGHO3URSLHWDULRPLQXFLRVDPHQWHDQWHVGHXVDUOR\JXDUGHSDUDVXIXWXUDUHIHUHQFLD
LATCH Adjustment Handle
Owner’s Manual
7
CHILD SIZE: HEIGHT, WEIGHT AND AGE RANGES
DO NOT USE THIS CHILD RESTRAINT IF YOUR
CHILD DOES NOT MEET ALL OF THESE
REQUIREMENTS:
• 3 YEARS OR OLDER
AND
• HEIGHT IS BETWEEN 38—60 INCHES (96–152 CM)
AND
• WEIGHT IS BETWEEN 33—110 LB (15—50 KG)
ONLY use this booster seat with the bottom of the
Head Protection positioned at two fingers width
above child’s shoulders.
Use this child restraint forward facing ONLY.
8
EN
ASSEMBLY
THE SEAT
Step 1
Connect the Backrest to the Booster Base.
Step 2
Fold the Backrest up until it CLICKS into place.
L.S.P. BOLSTERS
Line up the tabs on the left L.S.P. Bolster with key holes on
the Shoulder Protection and slide down to lock in place.
Repeat with the Right L.S.P. Bolster.
NEVER USE this booster seat with the Backrest
past the allowable adjustment range. An audible
CLICK will alert you when you have gone too far.
NEVER USE the Booster Base without the Backrest
attached.
9
!
WARNING! DEATH OR SERIOUS INJURY CAN OCCUR
•Only place this booster seat in a vehicle seating location
allowed by the vehicle manufacturer. Refer to your
vehicle Owner’s Manual
for information about vehicle
seat belt systems, air bags, and child restraint/booster
seat installation to determine allowable seating positions.
•Based on crash statistics, the National Highway Traffic
Safety Administration recommends that parents select
the REAR SEAT as the safest location for a properly
installed booster seat. Study the section on vehicle seat
belts in these instructions to ensure your child’s safety.
If in doubt about installing this booster seat, consult the
vehicle Owner’s Manual
.
•DO NOT USE this booster seat in a seating position with
an airbag unless the vehicle manufacturer specifically
allows placement of a child restraint there. If an air bag
inflates, it can hit your child with such a great force that it
may cause death or serious injury to your child.
•TOO MUCH RECLINE in the vehicle seat back can result
in improper seat belt position. An improperly positioned
seat belt increases the risk of DEATH or Serious injury
in a crash. Follow your vehicle Owner’s Manual
instructions for proper vehicle seat back positioning.
10
Refer to vehicle
Owner’s Manual
The REAR SEAT is the safest location for a properly
installed booster seat.
Use this booster seat FORWARD FACING ONLY.
Use this booster seat in FORWARD FACING SEATS
ONLY.
EN
VEHICLE SEAT LOCATION REQUIREMENTS
The design and operation of vehicle seat belt systems vary
from vehicle to vehicle and from seating location to seating
location in the same vehicle. Refer to your vehicle Owner’s
Manual
for proper use, placement, and adjustment of the
vehicle’s lap and shoulder belts.
This booster seat may not fit some vehicle seating positions.
Select a seat location allowed by your vehicle manufacturer
that is equipped with a THREE POINT LAP AND
SHOULDER BELT system.
Use only the vehicle’s three point lap and shoulder
belt system when restraining your child in this
booster seat.
NEVER USE the booster seat with:
• a lap belt only
• a lap belt with motorized shoulder belt
• vehicle belts that are attached to the door in any
way
• vehicle belts that move along a track automatically
to restrain the passenger when the door is closed
• inflatable seat belts
11
VEHICLE SEAT LOCATION REQUIREMENTS
The vehicle headrest MUST NOT interfere with the
booster seat head support.
If the vehicle headrest interferes with the installation of
this booster seat, adjust or remove the vehicle headrest.
Check your vehicle Owner’s Manual
for more
information.
NO PART of this booster seat should hang over the
front of vehicle seat.
NEVER ALLOW your child to use this booster seat
if the vehicle seat back is in a reclined position.
NEVER USE this booster seat with the Backrest
past the allowable adjustment range. An audible
CLICK wil alert you when you have gone too far.
The Backrest MUST REST against the vehicle seat back.
The Backrest will adjust to the vehicle seat back through an
allowable adjustment range of approximately 15° as shown
in green.
12
CLICK!
EN
VEHICLE LATCH REQUIREMENTS
Applicable only if installing booster seat using the lower
LATCH anchors:
• LATCH (Lower Anchors and Tethers for CHildren) refers
to a pair of fixed Lower Anchors and Top Tether Anchors
built into your vehicle. The Solution Q-fix High Back
Booster Seat has been designed to attach to the lower
LATCH anchors. A top tether is not required for Belt
Positioning Booster seats such as the Solution Q-fix.
• The lower LATCH anchors are located in the crease
between the vehicle seat back and seat cushion. If the
lower LATCH anchor locations are not visible, their
position will be indicated by
symbols located near the
crease between the seat back and seat cushion.
• Vehicles manufactured for the 2003 model year or newer
have at least two rear seating locations with lower LATCH
anchors. Some 2001 and 2002 model year vehicles have
lower LATCH anchors. Vehicles from model years 2000
and older DO NOT have lower LATCH anchors. Refer
to your vehicle Owner’s Manual
for lower LATCH
anchor positions in your vehicle.
13
INSTALLATION USING LATCH CONNECTORS
The Solution Q-fix is designed to be used with the vehicle’s
lower LATCH anchors, if available. This booster seat may be
used in seating positions without lower LATCH anchors, see
page 18.
DO NOT INSTALL this booster seat using LATCH if
the seat belt buckle is located in between the lower
LATCH anchors.
DO NOT INSTALL this booster seat using LATCH if
the seat belt is located between the lower LATCH
anchors.
Step 1
Select a seat location allowed by your vehicle manufacturer
equipped with a THREE POINT LAP AND SHOULDER
BELT system. Locate the lower LATCH anchors or the
symbols indicating their location.
Step 2
If the lower LATCH anchors are hidden behind the crease
between the seat back and seat cushion, install the supplied
LATCH Guides to the lower LATCH anchors for easier
installation of the booster seat.
To install, connect the two LATCH Guides to the two lower
LATCH anchors by sliding the LATCH Guides into the crease
and under the lower LATCH anchor.
14
EN
INSTALLATION USING LATCH CONNECTORS
Step 3
Place the Solution Q–fix on its side. While squeezing the
orange LATCH Adjustment Handle, located on the bottom of
the Booster Base, pull the LATCH Connectors out until they
stop.
Step 4
Rotate the LATCH Connectors 180°.
Step 5
Slide both of the LATCH Connectors into both LATCH Guides
(if being used) until you hear both of them CLICK as they lock
onto the lower LATCH anchors.
The green security bar will be visible on the red release
buttons when the LATCH Connectors are securely attached to
the lower LATCH anchors.
Step 6
While squeezing the LATCH Adjustment Handle, push the
booster until it rests against the vehicle seat back.
Release the handle and the booster seat will lock into place.
Step 7
Make sure that the booster seat is connected safely by trying
to pull it out on both sides.
15
INSTALLING WITH SEAT BELT ONLY
First, refer to pages 13—14 for Vehicle Seat Location
Requirements.
Select a seat location allowed by your vehicle manufacturer
that is equipped with a THREE POINT LAP AND
SHOULDER BELT system.
With the LATCH connectors pushed in and stored away,
simply place the booster seat on the vehicle seat, making
sure that the Backrest is in full contact with the vehicle seat
back and does not interfere with by the vehicle’s headrest.
Route the shoulder belt behind the headrest until it rests
INSIDE the RED Shoulder Belt Guide.
NEVER USE the Booster Base without the Backrest
attached.
NEVER USE a locking clip when installing this
booster seat.
The REAR SEAT is the safest location for a properly
installed booster seat.
16
EN
ADJUSTING THE SEAT FOR YOUR CHILD
HEIGHT AND WIDTH
The innovative size adjustment of the Solution Q-fix
automatically adjusts the width of the Shoulder Protection as
the height of the Headrest is adjusted.
After the Solution Q-fix is properly installed:
Step 1
Squeeze the orange Backrest Adjustment Handle and adjust
the Backrest to its highest position.
Step 2
Place your child in the booster seat making certain they are
sitting up straight with their back against the Backrest.
Step 3
Adjust the Backrest down until the bottom of the Head
Protection until it is two finger widths above your child’s
shoulders.
Step 4
Release the handle which will lock the Backrest into position.
ONLY use this booster seat with the bottom of the
Head Protection positioned at two fingers width
above child’s shoulders.
17
ADJUSTING THE SEAT FOR YOUR CHILD
ADJUSTING THE RECLINING HEADREST
Proper head position is critical for protecting your child in
side impact crashes. The Solution Q-fix has a Three Position
Reclining Headrest to help prevent your child’s head from
falling forward while asleep. By first lifting up and then
moving the headrest forward or backward, the angle of the
headrest can be adjusted in three different positions:
1. Upright
2. Semi recline
3. Full recline
After adjusting the booster seat Backrest to the correct height
for your child (see page 19), select the headrest position that
is most comfortable for your child.
For smaller children, it may be appropriate to set the
headrest for one of the two reclining positions in
anticipation of them falling asleep.
With some instruction and practice, a child can easily
learn to adjust the Reclining Headrest by him or herself.
18
EN
SECURING YOUR CHILD IN THE BOOSTER SEAT
NEVER USE WITH A LAP BELT ONLY.
NEVER ALLOW your child to place the shoulder
belt behind his or her back.
NEVER ALLOW your child to place the shoulder
belt under his or her armpit.
NEVER ALLOW the seat belt buckle to be located
within the Lower Belt Guide. Refer to the vehicle
Owner’s Manual
for possible solutions.
NEVER USE with the shoulder belt in contact with
your child’s neck.
NEVER POSITION any part of the vehicle seat belt
over the top of the armrests.
NEVER ALLOW your child to slide down in the
booster seat which could position the vehicle’s lap
belt across your child’s abdomen and cause the
shoulder belt to be in contact with your child’s neck.
19
SECURING YOUR CHILD IN THE BOOSTER SEAT
Step 1
Slip the shoulder belt between the Shoulder Protection and
the Headrest and route the belt inside the Belt Guide making
sure it rests INSIDE the RED area
Step 2
Pull the shoulder belt down across your child’s chest while
guiding the lap belt underneath both armrests.
Step 3
Buckle the seat belt, making sure the shoulder belt passes
underneath the armrest on the buckle side. Pull up on the
shoulder belt to remove any slack.
20
EN
SECURING YOUR CHILD IN THE BOOSTER SEAT
A PROPERLY SECURED CHILD
When your child sits properly in the booster seat, the lap and
shoulder belts MUST LIE WITHIN THE GREEN ZONE as
shown:
• The shoulder belt threaded through the belt guide and
positioned across the mid-point of your child’s chest
and shoulder, and NEVER in contact with your child’s
neck.
• The lap portion of the seat belt must be positioned low
and snug on your child’s thighs and NEVER on your
child’s abdomen.
BOTH the lap and shoulder belt must be underneath the
armrest on the side with the buckle. Pull up on the shoulder
belt to remove any slack in the belts.
If the vehicle belt does not fall within the GREEN ZONE,
adjust the Backrest to achieve proper belt fit.
If you need to use a blanket in cold weather, secure your
child in the booster seat first, and then cover both child
and booster seat with the blanket.
ONLY use this booster seat with the bottom of the
Head Protection positioned at two fingers width
above child’s shoulders.
21
UNINSTALLING THE BOOSTER SEAT
STEP 1
Unbuckle the vehicle seat belt and remove it from the
Shoulder Belt Guide.
STEP 2
While squeezing the LATCH Adjustment Handle, pull the
booster seat away from the vehicle seat.
STEP 3
Release both LATCH Connectors at the same time by
pressing in while pulling back on the red release buttons.
Slide the LATCH Connectors out of the LATCH Guides.
STEP 4
Rotate the LATCH Connectors 180°. While squeezing the
LATCH Adjustment Handle, push the LATCH Connectors into
the booster seat for storage.
22
EN
FABRIC COVERS
REMOVING THE SEAT COVERS
The seat cover consists of five parts which are fixed to the
seat with velcro, press studs or button holes. Once you have
released the fasteners, the cover parts can be removed. To
remove the covers, please follow the instructions below:
1.
2.
3.
4.
5.
6.
Undo the snaps on the lower side of the Headrest
cover. Then pull up to remove the cover.
Move the Headrest to its highest position.
Open and loosen all the snaps on the rear side of the
Headrest cover. Then pull the cover forward.
Pull down the cover on the left and right side of the
Shoulder Protectors. Then undo the snaps on the
interior of the shoulder protectors in order to be able to
remove the cover
Before you can remove the backrest cover from the
seat, undo the associated fastenings its rear side.
Then thread the elastic bands out on the under side of
the seat area, and remove the seat cushion cover.
Before removing the separate parts of the seat cover,
please ensure that the cover is already positioned above
the decorative silver parts. To put the covers back on the
seat, proceed as above in reverse order.
REINSTALLING THE SEAT COVERS
To install the seat covers, follow the removal instructions
above in reverse.
23
CARE AND CLEANING
Follow these instructions to care for your Solution Q–fix:
SPOT CLEANING
Spot clean the fabric seat covers as needed with a clean
cloth using mild detergent and water.
FABRIC SEAT COVERS
The Booster Base and Lower Backrest Covers may bTe
laundered according to following instructions:
Machine wash separately, cold water, gentle cycle
Do not bleach
Do not tumble dry
Do not iron
Do not dry clean
Line dry
24
EN
METAL AND PLASTIC PARTS
REPLACEMENT SEAT COVERS
In the event you need to replace your seat covers, please
contact us at 1-800-593-5522 to purchase a new fabric set.
Keep in mind that colors and styles change each year, so
your current color might not be available.
Owner’s Manual
Manual del Propietario
Wipe clean with mild detergent and cold water. Do not use
household cleaners or solvents.
OWNER’S MANUAL STORAGE
After carefully reading and following these instructions, store
the Owner’s Manual in the pocket on the back of the booster
seat as shown.
25
SAFETY CHECKLIST
Did you read and completely understand this Owner’s Manual and all labels found on this booster seat?
Is the booster seat complete, with the Backrest attached to the Booster Base?
Is today’s date before the “Do Not Use After” date on your booster seat?
Does your child weigh between 33 and 110 pounds, AND stand 38 to 60 inches tall, AND is he/she 3 years of age or older?
Is the booster seat forward–facing, in a seating position with a three-point lap and shoulder belt?
Is the Head Protection positioned at two fingers widths above your child’s shoulders?
If using the lower LATCH anchors, are both green safety bars showing on the LATCH Connectors?
Does the backrest fit flat against the vehicle seat back in an upright position?
Did you check for hot surfaces in sunny weather?
Is the Lap Belt under both arm rests?
Is the shoulder belt routed inside the RED Shoulder Belt Guide?
Does the shoulder belt lie in the GREEN ZONE across the mid-point of your child’s chest and shoulder?
Does the lap belt lie in the GREEN ZONE by being positioned low and snug on your child’s thighs?
Are the lap and shoulder belts snug, not twisted and with no slack?
If you answered YES to all of these questions, you are good to go, DRIVE SAFELY!
26
CYBEX SAFE CAR PRACTICES
Everyone rides buckled up or the vehicle does not go! Make
no exceptions for adults or children!
If someone unbuckles, the vehicle stops! Being firm and
consistent will result in fewer disciplinary problems as
children grow older. Do not leave loose objects (e.g. books,
bags, etc.) in a vehicle. In the event of a sudden stop, loose
objects will keep moving, potentially causing serious injuries.
IF YOU NEED HELP
Please contact our Customer Care Department, where
we have many Child Passenger Safety (CPS) Technicians
on staff, with any questions you may have concerning
installation, parts, maintenance, or warranty information.
When you contact us, please have the Model Number
and Manufactured on Date ready so that we may help you
efficiently. This information can be found on page 3 of this
Owner’s Manual, or on the underside of your Booster Base.
EN
RESOURCES
75% OF ALL CAR SEATS ARE INSTALLED
INCORRECTLY!
Installing your car seat correctly in your vehicle is extremely
important for your child’s safety. However, it is not always
easy to do. Make sure your car seat is installed correctly by
using one of the following resources:
www.nhtsa.gov/cps/cpsfitting/index.cfm
www.safekids.org
www.seatcheck.org
Your local fire and police departments for available CPS
Technicians
DO NOT USE this child restraint if it has been in a
crash. There may be hidden damage and it must
be replaced. Your insurance company may provide
some assistance in replacing the child restraint.
Please contact the U.S. CYBEX Distributor,
Regal Lager, Inc.:
Toll free: 1–800–593–5522
E-mail: [email protected]
Web: www.regallager.com
27
WARRANTY
LIMITED WARRANTY
CYBEX warrants to the original consumer purchaser that this product will be free from defects in material and workmanship
for two (2) years from the date of original purchase (the “Warranty Period”). During the Warranty Period, CYBEX, at its option,
may repair or replace this product if it is found by the manufacturer to be defective in material or workmanship. CYBEX
reserves the right to discontinue or change parts, fabrics, models, or products, or to substitute this product with a comparable
model or product. To make a claim under this warranty, please contact us at [email protected], call us at 1–800–593–5522,
or write to us at:Attn: CYBEX Warranty, Regal Lager, Inc., 1100 Cobb Place Blvd NW, Kennesaw, Georgia 30144 An original
receipt is required to validate your warranty and shipping charges will be the responsibility of the original consumer purchaser.
To expedite the processing of any future warranty claims and to verify the original date of purchase, please complete and mail
the pre–addressed owner registration card within thirty (30) days of purchase.
WARRANTY LIMITATIONS
This warranty does not cover the effects of normal wear and tear or damages resulting from negligence, modification,
improper installation, accidents, misuse or abuse of this product. It is expressly agreed that the obligations of CYBEX and
the original consumer purchaser’s remedies under the limited warranty contained herein are exclusive and are strictly limited
to the repair or replacement of the product. This limited warranty is conditional upon strict compliance with the provisions of
the Owner’s Manual. In no event will CYBEX or the dealer selling this product be liable to you for any damages, including
incidental or consequential damages, arising out of the use or inability to use this product.
LIMITATION OF WARRANTIES AND STATE/PROVINCIAL LAW RIGHTS:
The warranty and remedies as set forth above are exclusive and in lieu of all others, oral or written, express or implied. To the
extent permitted by applicable law, any implied warranties, including implied warranties of merchantability and fitness for a
particular purpose, are hereby disclaimed. Some states/provinces do not allow limitations as to how long an implied warranty
lasts or the exclusion or limitation of incidental or consequential damages, so the above limitations may not apply to you.
This warranty gives you specific legal rights, and you may have other rights, which vary from state/province to state/province.
Neither CYBEX nor the dealer selling this product has authorized any person to create for it any other warranty, obligation, or
liability in connection with this product.
28
EN
29
Distributed in the United States by Regal Lager, Inc.
1100 Cobb Place Blvd. NW, Suite 120 | Kennesaw, Georgia 30144 USA
TOLL FREE: 1-800-593-5522 | E-MAIL: [email protected] | WWW.REGALLAGER.COM
© 2014 CYBEX Industrial, Ltd. All rights reserved. Printed in China.
This product and its components are subject to change without notice.
Protected by Patent.
C223_US030_01A
CYBEX Industrial, Ltd.
Suite 1222, 12/F. | Leighton Centre | 77 Leighton Road | Causeway Bay | Hong Kong |
WWW.CYBEX-ONLINE.COM
ESTIMADOS PADRES DE FAMILIA:
Muchas gracias por la compra del Asiento Infantil de
Elevación con Respaldo Alto CYBEX Solution Q–fix.
Estamos orgullosos de traer a América del Norte este
asiento de diseño alemán. Esperamos que el asiento
Solution Q-fix haga más seguro y placentero el viaje en
automóvil para su hijo, además de que la instalación y
la utilización resulten para ustedes lo más sencillo y fácil
posible.
El asiento Solution Q-fix ha sido sometido a pruebas
extensivas y cumple o supera todas las normas federales
aplicables de seguridad de automotores en América del
Norte, así como las normas aplicables en Europa. En
cuatro pruebas independientes llevadas a cabo por revistas
alemanas durante el 2009 y el 2010, el Asiento Infantil
de Elevación con Respaldo Alto Solution Q-fix obtuvo el
primer lugar en cuanto a protección en impactos de frente
y laterales. En el 2010, el Instituto de Seguros sobre la
Seguridad del Tránsito en las Carreteras (IIHS, por sus
siglas en inglés) le otorgó a SolutionQ-fix un “Best Bet” por
lo bien que el asiento de elevación posiciona el cinturón de
seguridad sobre su niño.
¡Las estadísticas muestran que más del 75% de los
asientos para automóvil se instalan incorrectamente!
Favor de leer y seguir estas instrucciones para instalar
correctamente este asiento de elevación aun cuando su
instalación y uso pudieran parecer cuestiones sencillas
y lógicas. ¡La seguridad de su niño depende de ello!
Aunque muchos asientos de elevación pueden utilizarse
sin el respaldo instalado, el asiento Solution Q-fix JAMÁS
DEBERÁ UTILIZARSE SIN EL RESPALDO INSTALADO
ya que la protección en caso de choque podría reducirse
drásticamente.
Les recomendamos que mantengan a su pequeño en un
asiento de automóvil bien instalado y del tamaño correcto
durante el mayor tiempo posible antes de cambiarlo al
Asiento Infantil de Elevación con Respaldo Alto Solution
Q-fix.
Ningún asiento de auto puede garantizar una protección
contra lesiones en todas las situaciones, pero la utilización
correcta ayuda a reducir el riesgo de muerte o de lesiones
graves. Si tienen alguna duda o necesitan ayuda, favor de
comunicarse con Regal Lager, Inc., el distribuidor en los
Estados Unidos, llamando al 1-800-593-5522. Por favor
recuerden de registrar su asiento de elevación para que
podamos ponernos en contacto con ustedes en el caso poco
probable de una orden de retirar el producto.
Conserven su Manual del Propietario para cualquier
referencia futura colocándolo en la bolsa del dorso del
asiento Solution Q-fix. Les agradecemos su compra y les
invitamos a que visiten nuestro sitio en internet www.cybexonline.com para ver otros maravillosos productos de CYBEX.
Antes de utilizar por primera vez este asiento de elevación,
favor de asegurarse de haber seguido todos los pasos
señalados en la Lista de Verificación de Seguridad y las
Prácticas Seguras de CYBEX en la página 67.
Bengt Lager
Presidente, Regal Lager, Inc.
Child Passenger Safety Technician
INDEX
REGISTRO E INFORMACIÓN SOBRE RETIRO DEL PRODUCTO.............................................................................. 3
CHILD SIZE: HEIGHT, WEIGHT AND AGE RANGES.................................................................................................... 7
VISTA GENERAL DEL SOLUTION Q-FIX...................................................................................................................... 8
MONTAJE........................................................................................................................................................................ 10
EL ASIENTO.................................................................................................................................................................. 10
L.S.P. APOYOS............................................................................................................................................................. 10
REQUISITOS DEL VEHÍCULO – SISTEMA LATCH....................................................................................................... 14
INSTALACIÓN UTILIZANDO EL SISTEMA LATCH....................................................................................................... 15
INSTALACIÓN UTILIZANDO ÚNICAMENTE EL CINTURÓN DE SEGURIDAD........................................................... 17
AJUSTE DEL ASIENTO INFANTIL DE ELEVACIÓN A LA MEDIDA DEL NIÑO........................................................... 18
ALTURA Y ANCHURA................................................................................................................................................... 18
PARA AJUSTAR LA CABECERA RECLINABLE........................................................................................................... 19
SUJECIÓN DEL NIÑO EN EL ASIENTO......................................................................................................................... 20
UN NIÑO CORRECTAMENTE SUJETADO.................................................................................................................. 22
DESINSTALACIÓN DEL ASIENTO................................................................................................................................. 23
FORROS DE TELA.......................................................................................................................................................... 24
QUITAR LA FUNDA DE LA SILLA................................................................................................................................. 24
REINSTALACIÓN DEL EL FORRO............................................................................................................................... 24
CARE AND CLEANING................................................................................................................................................... 25
LISTA DE VERIFICACIÓN SOBRE SEGURIDAD.......................................................................................................... 26
SI NECESITA AYUDA...................................................................................................................................................... 27
GARANTIA....................................................................................................................................................................... 28
ES
LA SOLUTION Q-FIX....................................................................................................................................................... 2
LA SOLUTION Q-FIX
PROTECCIÓN LINEAR EN IMPACTOS LATERALES
El Sistema de Protección Linear en Impactos Laterales
permite que las fuerzas que entran en juego en choques de
impacto lateral se reduzcan gradualmente para minimizar las
lesiones.
Una serie de reacciones se activan y los Protectores para
Cabeza y Hombros absorben el ímpetu de la cabeza y
del cuerpo para maximizar la protección de su hijo. Los
Protectores para Cabeza y Hombros son extra profundos y
gruesos y están forrados con espuma absorbente de energía
para crear una verdadera zona de seguridad profunda (Deep
Safety Zone™) alrededor de su hijo.
CABECERA RECLINABLE DE TRES POSICIONES
Todos sabemos que la cabeza de un niño que se queda
dormido en un asiento de elevación tiende a inclinarse
hacia adelante y, en muchos casos, a quedar fuera de la
Zona de Seguridad de los protectores para cabeza. La
Cabecera Reclinable de Tres Posiciones de CYBEX elimina
esta posición al permitir que la cabeza del niño descanse
y permanezca protegida en la Zona de Seguridad de los
Protectores para Cabeza.
Si su niño al dormirse cambia de posición y se inclina hacia
delante, existirá un mayor riesgo de que el niño no quede
bien protegido en caso de un choque.
Gracias a la Cabecera Reclinable del asiento Solution Q-fix,
el niño podrá dormir cómodamente conservando la cabeza
dentro la Zona de Seguridad.
1
2
National Highway Traffic Safety Administration, Traffic Safety Facts 2005, 2007
DE E P
Favor de llenar la Tarjeta de Registro que viene junto con
el sistema de Sujeción Infantil y enviarla de inmediato por
correo o inscribirse en línea.
Los sistemas de sujeción infantil podrían recibir la orden de
retiro por cuestiones de seguridad. Usted debe registrar este
sistema de sujeción para poder localizarlo en caso de retiro.
Envíe su nombre, dirección, dirección de correo electrónico,
de contar con una, y el número del modelo y la fecha de
fabricación del sistema de sujeción a:
ESTE SISTEMA DE SUJECIÓN
NO ESTÁ CERTIFICADO PARA
UTILIZACIÓN EN AERONAVES. NO
HAY CINTURONES DE HOMBRO
QUE PERMITAN UNA UTILIZACIÓN
CORRECTA.
ES
REGISTRO E INFORMACIÓN SOBRE RETIRO DEL PRODUCTO
Attention: CYBEX Registration
Regal Lager, Inc.
1100 Cobb Place Blvd. NW
Kennesaw, Georgia 30144, USA
o llamar a: 1-800–593–5522
o inscribirse en línea en www.regallager.com/
Para información sobre retiro de productos, llame a la Línea
de Emergencia de Seguridad Vehicular del Gobierno de
Estados Unidos a: 1–888–327–4236 (TTY: 1-800-424-9153),
o ingrese a www.NHTSA.gov.
CERTIFICACIÓN
Este sistema de sujeción infantil cumple con todas las
normas federales aplicables de seguridad de automotores.
Este sistema de sujeción está certificado para utilización en
vehículos automotores.
Para obtener la información de registro necesaria,
consulte la página 3 de este manual o debajo de la
base del Asiento Infantil de Elevación.
3
!
¡ADVERTENCIA! MUERTE o GRAVES LESIONES podrían ocurrir
•LA SEGURIDAD DE SU HIJO depende de que usted instale
y utilice correctamente este asiento de elevación. Lea y
siga cuidadosamente todas las instrucciones del asiento
de elevación y las del vehículo. EL NO SEGUIR estas
instrucciones puede resultar en la MUERTE o en LESIONES
GRAVES del niño en caso de un viraje cerrado, un frenado
súbito o un choque.
•NO INSTALE o utilice el asiento de elevación hasta que
haya leído y comprendido las instrucciones de este manual
y del Manual del Propietario de su vehículo
. Si existe
algún conflicto entre ambos, el que habrá de respetarse es
el Manual del Propietario del vehículo
..
•NO PERMITA que otros instalen o utilicen este asiento
de elevación a menos que comprendan cómo instalarlo y
utilizarlo correctamente.
•CONSERVE este manual de instrucciones para consulta
futura en la bolsa del dorso del asiento de elevación.
•UTILÍCESE SOLAMENTE para niños que pesen entre
15—50 kg (33-110 lb) Y cuya estatura sea entre 96—152
cm (38-60 pulgadas) Y que tengan 3 años de edad o más.
El utilizar este asiento de elevación para un niño que no
cumpla con TODOS estos requisitos incrementará el riesgo
de MUERTE o LESIONES GRAVES.
•NO UTILICE el asiento de elevación cuando la parte
superior de las orejas del niño sobresalga de la orilla
superior del respaldo del asiento de elevación. LESIONES
GRAVES EN CABEZA o CUELLO pueden resultar si la
cabeza no cuenta con el apoyo correcto.
•UTILICE SOLAMÉNTE el asiento de elevación con la parte
inferior de la protección para la cabeza colocada a un ancho
de dos dedos arriba de los hombros del niño.
4
•JAMÁS UTILICE la Base del Asiento Infantil de Elevación
sin el respaldo acoplado.
•JAMÁS SAQUE al niño del asiento de elevación para
atenderlo mientras el vehículo esté en marcha. Los
ocupantes que no están sujetados representan un mayor
riesgo de MUERTE o de LESIONES GRAVES en choques
automovilísticos.
•JAMÁS ATIENDA al niño mientras maneja. El manejar
estando distraído es la causa de muchos de los choques
automovilísticos. Detenga el vehículo de manera segura
para atender al niño.
•La protección principal para los ocupantes de un vehículo en
un choque es la estructura del vehículo mismo; un asiento
de elevación no protegerá al niño si el vehículo recibe un
impacto fuerte. El asiento de elevación, siempre y cuando
se utilice correctamente, incrementará considerablemente
las oportunidades de supervivencia en la mayoría de los
choques.
•UTILICE ÚNICAMENTE el sistema de cinturones de tres
puntos de regazo y hombro del vehículo para sujetar al niño
al asiento de elevación.
•UNA RECLINACIÓN EXCESIVA EN EL RESPALDO DEL
VEHÍCULO puede ocasionar la colocación inadecuada
del cinturón de seguridad. Un cinturón de seguridad mal
colocado incrementa el riesgo de lesiones graves o muerte
en caso de choque. Siga las instrucciones del Manual del
Propietario de su vehiculo
para colocar adecuadamente
el respaldo.
•JAMÁS UTILICE el asiento de elevación en vehículos con
cinturones de dos puntos (cinturón de regazo solamente
o cinturón de hombro solamente) o con cinturones
¡ADVERTENCIA! MUERTE o GRAVES LESIONES podrían ocurrir
automáticos o que estén instalados en la puerta del
vehículo. Su hijo no estará correctamente sujetado en caso
de choque.
•LA COLOCACIÓN INCORRECTA de este asiento de
elevación en un vehículo afecta el funcionamiento del
asiento de elevación y puede resultar en la MUERTE o en
LESIONES GRAVES.
•SOLAMENTE COLOQUE este asiento de elevación en
la ubicación de asientos admisible para el fabricante del
vehículo. Consulte su Manual del Propietario de su vehículo
para obtener información acerca de los sistemas de
cinturones de seguridad, bolsas de aire e instalación de
asientos sujetadores/de elevación para determinar las
ubicaciones de asientos admisibles.
•Con base en las estadísticas de choques, la Administración
Nacional de Seguridad del Tránsito en las Carreteras de
Estados Unidos (NHTSA) recomienda que los padres
ELIJAN EL ASIENTO TRASERO COMO LA UBICACIÓN
MÁS SEGURA para un asiento de elevación correctamente
instalado. Estudie en estas instrucciones las secciones
sobre cinturones de seguridad y ubicación de asientos en el
vehículo para garantizar la seguridad del niño.
•NO UTILICE este asiento de elevación en un asiento que
tenga bolsa de aire a menos que el fabricante del vehículo
permita específicamente la colocación del sistema de
sujeción infantil en este asiento. Al inflarse, la bolsa de aire
puede golpear al niño y al sistema de sujeción infantil con
una fuerza enorme y ocasionar la MUERTE o LESIONES
GRAVES a su hijo.
•El Respaldo del asiento DEBE ESTAR nivelado con el
respaldo del asiento del vehículo.
•La cabecera del vehículo NO DEBE ESTORBAR el
Respaldo del asiento de elevación. Consulte el Manual del
Propietario del vehículo
para ajustar o posiblemente
retirar la cabecera del vehículo.
•NINGUNA PARTE del asiento de elevación debería
sobresalir por encima del frente del asiento del vehículo.
•Utilice el asiento de elevación solamente MIRANDO HACIA
EL FRENTE.
•Algunos asientos de elevación NO SE ACOMODARÁN en
ciertas posiciones de los asientos del vehículo.
•NO UTILICE un clip de sujeción al instalar este asiento de
elevación.
•JAMÁS DEJE un asiento de elevación sin sujetar en su
vehículo. Este asiento de elevación debe estar asegurado
por el cinturón de seguridad del vehículo aun cuando no
esté ocupado. En un viraje cerrado, un choque o un frenado
súbito, el asiento de elevación suelto puede desplazarse y
lesionar gravemente a los ocupantes del vehículo.
•NO SUJETE este asiento de elevación a los anclajes
inferiores del sistema LATCH si el acceso al cinturón de
seguridad o a la hebilla del cinturón es difícil una vez que el
asiento de elevación esté correctamente instalado.
•NO DEJE los asientos plegables sin trabar, en caso de que
el vehículo cuente con ellos. En caso de un frenado súbito,
un respaldo de asiento suelto podría evitar que el asiento
de elevación proteja al niño tan bien como debería.
•NO DEJE objetos sueltos (por ejemplo, libros, bolsas, etc.)
en un vehículo. En caso de un frenado súbito, los objetos
sueltos se convierten en proyectiles con el potencial de
ocasionar lesiones graves.
ES
!
5
!
¡ADVERTENCIA! MUERTE o GRAVES LESIONES podrían ocurrir
•NO UTILICE objeto alguno para elevar el asiento de
elevación por encima del asiento del vehículo.
•Este asiento de elevación NUNCA DEBE utilizarse en casa,
en aeronaves, botes, vehículos de baja velocidad (LSV, por
sus siglas en inglés), vehículos todo terreno (ATV, por sus
siglas en inglés), carritos de golf u otras aplicaciones no
certificadas.
•JAMÁS PERMITA que un niño juegue con este asiento de
elevación.
•JAMÁS PERMITA que los niños jueguen con los cinturones
de seguridad del vehículo ya que éstos podrían constituir un
RIESGO DE ESTRANGULACIÓN para cualquier niño que
alcance el cinturón de seguridad y se lo enrede alrededor
del cuello.
•NO UTILICE este asiento de elevación si ha estado
involucrado en un choque. El asiento puede tener daños
ocultos por lo que debe ser reemplazado. Su compañía
de seguros le puede prestar ayuda para reemplazar este
asiento de elevación.
•JAMÁS UTILICE este asiento si está de alguna forma
dañado o si le faltan piezas.
•JAMÁS UTILICE un cinturón de seguridad de vehículo
que haya sido cortado o esté dañado, deshilachado o
inoperable.
•NO INTENTE hacer reparaciones o de alguna otra forma
modificar o manipular indebidamente este asiento de
elevación. Para obtener instrucciones sobre el retiro
adecuado de la funda del asiento, consulte la sección
titulada “Cuidados y Limpieza”.
6
•JAMÁS UTILICE el asiento de elevación sin las fundas de
tela correctamente instaladas.
•JAMÁS UTILICE un asiento de elevación de segunda mano
o un asiento de elevación cuyos antecedentes de utilización
desconozca.
•NO UTILICE accesorios o piezas con este asiento de
elevación distintos a los autorizados por CYBEX. La
utilización de accesorios o piezas de otros fabricantes podría
modificar el funcionamiento del asiento de elevación.
•SUSPENDA LA UTILIZACIÓN de este asiento de elevación
cuando tenga más de siete (7) años de antigüedad y
recíclelo. La fecha de fabricación se encuentra en la etiqueta
pegada en la parte inferior del asiento.
•Este asiento de elevación y el cinturón de seguridad del
vehículo pueden calentarse mucho si permanecen bajo los
rayos del sol y pueden ocasionar quemaduras en la piel del
niño. SIEMPRE TOQUE las superficies de las piezas antes
de colocar al niño en el asiento de elevación.
•JAMÁS deje solos a los niños en un vehículo, aunque sea
por períodos breves de tiempo.
NO UTILICE ESTE SISTEMA DE SUJECIÓN
INFANTIL SI EL NIÑO NO CUMPLE CON TODOS
ESTOS REQUISITOS.
ES
CHILD SIZE: HEIGHT, WEIGHT AND AGE RANGES
• PESO ES ENTRE 33 A 110 LIBRAS (15–50 KG)
Y
• ESTATURA SEA ENTRE 96 Y 30 PULGADAS
(96–142 CM)
Y
• TENGAN 3 AÑOS DE EDAD O MÁS.
UTILICE SOLAMENTE el asiento de elevación con
la parte inferior de la Protección para la Cabeza
colocada a un ancho de dos dedos arriba de los
hombros del niño.
Utilice el asiento de elevación solamente MIRANDO
HACIA EL FRENTE.
7
VISTA GENERAL DEL SOLUTION Q-FIX
Cabecera Reclinable de Tres Posiciones
VISTA DELANTERA
Protección para la Cabeza
Respaldo
Protección para los Hombros
L.S.P. Apoyo
Apoyabrazos
Guías Inferiores del Cinturón
Conectores del sistema de anclajes
inferiores y sujetadores para niños –
sistema LATCH
Base del Asiento de
Elevación
8
LATCH Guides
(tied to Booster Base for shipping)
ES
VISTA TRASERA
Manija de Ajuste de
Altura
Guías del Cinturón
de Hombro
VISTA INFERIOR
Etiqueta de Información
del Producto
Bolsa para el Manual
del Propietario
Model Name: Solution Q-fix
Model Number: 12-0884814
Color: Allen Gray
CYBEX Article: 7706256101
Manufactured in: 01/2014
Do not use after: 01/2021
Distributed by Regal Lager, Inc.
1100 Cobb Place Blvd., Ste. 120
Kennesaw, GA 30144, USA.
Made in China.
(6
(1
Conectores
del sistema de
anclajes inferiores
y sujetadores
para niños –
sistema LATCH
– (guardados al
interior de base)
Manija de Ajuste del sistema de
anclajes inferiores y sujetadores
para niños – sistema LATCH
51.76+103(+:
Owner’s Manual
Manual del Propietario
5($'WKLV2ZQHU¶V0DQXDOFDUHIXOO\EHIRUH¿UVWXVHDQGNHHSLWIRUIXWXUHUHIHUHQFH
/($HVWH0DQXDOGHO3URSLHWDULRPLQXFLRVDPHQWHDQWHVGHXVDUOR\JXDUGHSDUDVXIXWXUDUHIHUHQFLD
Manual del Propietario
9
MONTAJE
EL ASIENTO
Step 1
Ensamble el Respaldo a la Base del Asiento Infantil de
Elevación.
Step 2
Doble el Respaldo hasta que se trabe y quede en su lugar.
L.S.P. APOYOS
Line up the tabs on the left L.S.P. Bolster with key holes on
the Shoulder Protection and slide down to lock in place.
Repeat with the Right L.S.P. Bolster.
JAMÁS utilice este asiento de elevación con el
Respaldo fuera de la selección admisible de
ajustes. Un CLIC sonoro le advertirá que ha
sobrepasado el límite.
JAMÁS UTILICE la Base del Asiento Infantil de
Elevación sin el respaldo acoplado.
10
CLIC!
¡ADVERTENCIA! MUERTE o GRAVES LESIONES podrían ocurrir
•SOLAMENTE COLOQUE este asiento de elevación en
la ubicación de asientos admisible para el fabricante del
vehículo. Consulte su Manual del Propietario
para
obtener información acerca de los sistemas de cinturones
de seguridad, bolsas de aire e instalación de asientos
sujetadores/de elevación para determinar las ubicaciones
de asientos admisibles.
•Con base en las estadísticas de choques, la
Administración Nacional de Seguridad del Tránsito en
las Carreteras de Estados Unidos recomienda que
los padres ELIJAN EL ASIENTO TRASERO COMO
LA UBICACIÓN MÁS SEGURA para un asiento de
elevación correctamente instalado. Estudie en estas
instrucciones las secciones sobre cinturones de
seguridad y ubicación de asientos en el vehículo para
garantizar la seguridad del niño
.
•NO UTILICE este asiento de elevación en un asiento
que tenga bolsa de aire a menos que el fabricante del
vehículo permita específicamente la colocación del
sistema de sujeción infantil en este asiento. Al inflarse,
la bolsa de aire puede golpear al niño y al sistema de
sujeción infantil con una fuerza enorme y ocasionar la
MUERTE o LESIONES GRAVES a su hijo.
•UNA RECLINACIÓN EXCESIVA EN EL RESPALDO
DEL VEHÍCULO puede ocasionar la colocación
inadecuada del cinturón de seguridad. Un cinturón
de seguridad mal colocado incrementa el riesgo de
lesiones graves o muerte en caso de choque. Siga las
instrucciones del Manual del Propietario de su vehiculo
para colocar adecuadamente el respaldo.
ES
!
Consulte el Manual
del Propietario
El asiento trasero es la ubicación más segura para
un asiento de elevación correctamente instalado.
Utilice este asiento de elevación solamente
MIRANDO HACIA EL FRENTE.
11
REQUISITOS PARA LA UBICACIÓN DE LOS
ASIENTOS DEL VEHÍCULO
El diseño y funcionamiento de los sistemas de cinturones de
seguridad varían de un vehículo a otro y de una ubicación
de los asientos a otra en un mismo vehículo. Consulte el
Manual del Propietario de su vehículo
para el uso,
colocación y ajuste adecuados de los cinturones de regazo
y de hombro del vehículo. Algunos asientos de elevación no
se podrán acomodar en ciertas posiciones de los asientos
del vehículo.
Seleccione una ubicación para el asiento aprobado por el
fabricante del vehículo y que esté equipado con CINTURONES DE SEGURIDAD DE REGAZO Y DE HOMBRO de tres
puntos.
Utilice solamente el sistema de cinturones de tres
puntos de regazo y de hombro del vehículo al
sujetar al niño a este asiento de elevación.
JAMÁS UTILICE solamente el cinturón de regazo.
JAMÁS utilice con:
un cinturón de regazo con cinturón automático de
hombro
cinturones de vehículo que estén fijados de
cualquier modo a la puerta
cinturones de vehículo que se muevan
automáticamente a lo largo de guías para sujetar al
pasajero al cerrar la puerta
12
ES
REQUISITOS PARA LA UBICACIÓN DE LOS
ASIENTOS DEL VEHÍCULO
La cabecera del vehículo NO DEBE obstaculizar al
soporte para cabeza del asiento de elevación.
Si la cabecera del vehículo obstaculiza la instalación de
este asiento de elevación, ajuste o retire la cabecera del
vehículo. Consulte el Manual del Propietario de su
vehículo
para más información.
NINGUNA PARTE del asiento de elevación debería
sobresalir por encima del frente del asiento del
vehículo.
JAMÁS PERMITA que el niño ocupe el asiento de
elevación mientras el asiento del vehículo esté
reclinado.
JAMÁS utilice este asiento de elevación con el
Respaldo fuera de la selección admisible de
ajustes. Un CLIC sonoro le advertirá que ha
sobrepasado el límite.
CLICK!
El Respaldo del asiento DEBE ESTAR nivelado con el
respaldo del asiento del vehículo.
El Respaldo del asiento se ajustará al respaldo del
vehículo mediante una selección admisible de ajustes de
aproximadamente 15° que aparece en color verde.
13
REQUISITOS DEL VEHÍCULO – SISTEMA LATCH
Aplicables únicamente si se instala el asiento de elevación
utilizando los anclajes inferiores del sistema LATCH
• El sistema LATCH (Anclajes Inferiores y Sujetadores para
Niños) consiste en un par de anclajes inferiores fijos y
anclajes sujetadores superiores integrados a su vehículo.
El Asiento Infantil de Elevación con Respaldo Alto Solution
Q-fix está diseñado para acoplarse firmemente a los
anclajes inferiores del sistema LATCH. Para asientos de
Elevación de Posicionador de Cinturón como el Solution
Q-fix, no se requiere de una correa superior de anclaje.
• Los anclajes inferiores del sistema LATCH están
localizados en el doblez entre el respaldo del asiento del
vehículo y el cojín del asiento. Si las ubicaciones de los
anclajes inferiores del sistema LATCH no están visibles, su
posición estará indicada mediante símbolos
localizados
cerca del doblez entre el respaldo del asiento y el cojín del
asiento.
• Los vehículos fabricados como modelos 2003 o más
recientes cuentan por lo menos con dos ubicaciones
de asientos traseros con anclajes inferiores del sistema
LATCH. Algunos vehículos de modelo 2001 y 2002
cuentan con anclajes inferiores del sistema LATCH. Los
vehículos de modelo 2000 o más antiguos NO TIENEN
anclajes inferiores del sistema LATCH. Consulte el Manual
del Propietario del vehículo vehicupara localizar las
posiciones de los anclajes inferiores del sistema LATCH en
su vehículo.
14
El Solution Q-fix está diseñado para utilizarse con los
anclajes inferiores LATCH del vehículo, si los mismos están
disponibles. Este asiento de elevación puede utilizarse en
posiciones sin los anclajes inferiores LATCH, ver pagina 18.
ES
INSTALACIÓN UTILIZANDO EL SISTEMA LATCH
NO INSTALE el asiento de elevación utilizando el
sistema LATCH si la hebilla del cinturón del asiento
está localizada entre los anclajes inferiores del
sistema LATCH.
NO INSTALE el asiento de elevación utilizando
el sistema LATCH si el cinturón del asiento está
localizado entre los anclajes inferiores del sistema
LATCH.
1. Primero, consulte las páginas 11—12 para ver los
Requisitos para la Ubicación de los Asientos del Vehículo.
Seleccione una ubicación para el asiento aprobado
por el fabricante del vehículo y que esté equipado con
CINTURONES DE SEGURIDAD DE REGAZO Y DE
HOMBRO de tres puntos y localice los anclajes inferiores
del sistema LATCH o los símbolos que indican su
ubicación.
2. Si los anclajes inferiores del sistema LATCH están
ocultos detrás del doblez entre el respaldo y el cojín del
asiento, instale las Guías LATCH provistas en los anclajes
inferiores del sistema LATCH para una instalación más
sencilla del asiento de elevación. Para instalar, conecte
las dos Guías LATCH a los anclajes inferiores del sistema
LATCH deslizando las Guías LATCH en el doblez y por
debajo del anclaje inferior del sistema LATCH.
15
INSTALACIÓN UTILIZANDO EL SISTEMA LATCH
3. Coloque el asiento Solution Q-fix sobre su costado.
Al tiempo que oprime la Manija de Ajuste anaranjada
del sistema LATCH localizada en la Base de Elevación,
empuje los Conectores del sistema LATCH hasta que se
detengan.
4. Gire los Conectores del sistema LATCH como se muestra.
5. Deslice ambos Conectores del sistema LATCH en ambas
Guías LATCH (si se están utilizando) hasta que escuche
el clic que se produce al trabarse en los anclajes inferiores
LATCH.
Los seguridad verdes la barra estará visible en la zona
roja sobresaldrán visiblemente de los botones rojos de
liberación cuando los Conectores del sistema LATCH se
aseguran correctamente a los anclajes inferiores.
6. Al tiempo que oprime la Manija de Ajuste del sistema
LATCH, empuje con firmeza el asiento de elevación hasta
que esté nivelado con el respaldo del asiento del vehículo.
Suelte la manija y el asiento de elevación quedará trabado
en su lugar.
7. Asegúrese que el asiento de elevación esté firmemente
acoplado tratando de desprenderlo de ambos lados.
16
1. Primero, consulte las páginas 47—50 para ver los
Requisitos para la Ubicación de los Asientos del Vehículo.
ES
INSTALACIÓN UTILIZANDO ÚNICAMENTE EL
CINTURÓN DE SEGURIDAD
2. Seleccione una ubicación para el asiento aprobado
por el fabricante del vehículo y que esté equipado con
CINTURONES DE SEGURIDAD DE REGAZO Y DE
HOMBRO de tres puntos.
3. Con los conectores del sistema LATCH hacia adentro y
guardados, simplemente coloque el asiento de elevación
sobre el asiento, asegurándose que el respaldo esté
totalmente en contacto con el respaldo del asiento del
vehículo y sin que la cabecera del vehículo lo obstaculice.
4. Dirija el cinturón de hombro por detrás de la cabecera
hasta que quede acomodado DENTRO de la Guía del
Cinturón de Hombro.
JAMÁS UTILICE la Base del Asiento Infantil de
Elevación sin el respaldo acoplado.
JAMÁS UTILICE un clip de sujeción al instalar este
asiento de elevación.
El asiento trasero es la ubicación más segura para
un asiento de elevación correctamente instalado.
17
AJUSTE DEL ASIENTO INFANTIL DE ELEVACIÓN
A LA MEDIDA DEL NIÑO
ALTURA Y ANCHURA
El ajuste de tamaño innovador de la solución Q-fix, ajusta
automáticamente la anchura de la protección para los
hombros a medida que la altura del Apoyo para la Cabeza
se ajusta.
Luego de instalar la Solution Q-fix adecuadamente:
1. Oprima la Manija de Ajuste del Respaldo anaranjada para
ajustar la altura del Respaldo en su más alta posición.
2. Coloque al niño en el asiento Solution Q–fix,
asegurándose que esté sentado derecho con la espalda
contra el Respaldo.
3. Ajuste el Respaldo hasta que la parte inferior de la
Protección para Cabeza esté un ancho de dos dedos
arriba de los hombros del niño.
4. Suelte la manija, lo cual fijará el Respaldo en su posición.
UTILICE SOLAMENTE el asiento de elevación con
la parte inferior de la Protección para la Cabeza
colocada a un ancho de dos dedos arriba de los
hombros del niño.
18
PARA AJUSTAR LA CABECERA RECLINABLE
La posición correcta de la cabeza es crítica para proteger al
niño en choques de impacto lateral. El asiento Solution Q–fix
cuenta con una Cabecera
Reclinable de Tres Posiciones para ayudar a evitar que
la cabeza del niño se incline hacia delante al quedarse
dormido. Al levantar y luego jalar la cabecera hacia delante o
hacia atrás, el ángulo de la cabecera puede ajustarse en tres
posiciones distintas:
ES
AJUSTE DEL ASIENTO INFANTIL DE ELEVACIÓN
A LA MEDIDA DEL NIÑO
1. Posición recta
2. Posición semi-reclinada
3. Posición totalmente reclinada
Luego de ajustar el Respaldo del asiento de elevación a la
altura correcta del niño (ver página 17), elija la posición de la
cabecera más cómoda para el niño.
Para niños más pequeños, podría ser adecuado ajustar
la cabecera en una de las dos posiciones reclinadas
previendo que el niño se quede dormido.
Con unas cuantas instrucciones, el niño puede
fácilmente aprender a hacer este ajuste él mismo.
19
SUJECIÓN DEL NIÑO EN EL ASIENTO
JAMÁS UTILICESE con un cinturón que sea sólo
de regazo.
JAMÁS PERMITA que su hijo coloque el cinturón
de hombro por detrás de su espalda.
JAMÁS PERMITA que su hijo coloque el cinturón
de hombro por debajo de la axila.
La hebilla del cinturón de seguridad JAMÁS DEBE
estar ubicada dentro de las Guías Inferiores del
Cinturón de seguridad. Consulte el Manual del
Propietario del vehículo
para obtener posibles
soluciones.
JAMÁS UTILICE con el cinturón de hombro en
contacto con el cuello de su hijo.
JAMÁS PERMITA que su hijo se deslice hacia abajo
en el asiento de elevación, ya que esto podría
colocar el cinturón de regazo del vehículo atraves
del abdomen de su hijo y ocasionar que el cinturón
de hombro quede en contacto con su cuello.
20
1. Dirija el cinturón de hombro por detrás de la cabecera
hasta que quede acomodado DENTRO de la Guía ROJA
del Cinturón de Hombro.
ES
SUJECIÓN DEL NIÑO EN EL ASIENTO
2. Jale hacia abajo el cinturón de hombro para que cruce el
pecho de su hijo mientras coloca el cinturón de regazo
por debajo de ambos apoyabrazos.
3. Abroche el cinturón del asiento, asegurando que el
cinturón de hombro quede por debajo del apoyabrazos
del lado de la hebilla. Tire del cinturón del hombro para
eliminar cualquier holgura.
21
SUJECIÓN DEL NIÑO EN EL ASIENTO
UN NIÑO CORRECTAMENTE SUJETADO
Si su niño está sentado correctamente en el asiento de
elevación, los cinturones de regazo y hombro DEBEN
QUEDAR UBICADOS dentro de la zona verde tal y como se
muestra:
• La correa de los hombros se pasa por la guía del
cinturón y cruzando por el punto medio del pecho y del
hombro del niño y JAMÁS sin tocar el cuello del niño.
• La sección del regazo del cinturón de seguridad DEBE
estar colocada a baja altura y ceñida a los muslos del
niño; NUNCA sobre su abdomen.
TANTO el cinturón de regazo COMO el cinturón de hombro
DEBEN ir por debajo del apoyabrazos del lado de la hebilla.
Tire del cinturón de hombro para eliminar cualquier holgura
de los cinturones.
Si el cinturón del vehículo no está dentro de la ZONA
VERDE, ajuste el Respaldo para lograr el ajuste correcto del
cinturón.
Si necesita utilizar una frazada cuando haga frío, primero
coloque al niño en el asiento de elevación y luego cubra
ambos con la frazada.
22
UTILICE SOLAMENTE el asiento de elevación con
la parte inferior de la Protección para la Cabeza
colocada a un ancho de dos dedos arriba de los
hombros del niño.
1. Desabroche el cinturón de seguridad del vehículo y
retírelo de la Guía del Cinturón de Hombro.
ES
DESINSTALACIÓN DEL ASIENTO
2. Al tiempo que oprime la Manija de Ajuste del sistema
LATCH, jale el asiento hasta retirarlo del asiento del
vehículo.
3. Libere simultáneamente ambos Conectores del sistema
LATCH al presionar hacia adentro y tirar atrás los botones
rojos de liberación.
Deslice los Conectores del sistema LATCH fuera de la
Guías del sistema LATCH.
4. Gire los Conectores del sistema LATCH como se muestra.
Al tiempo que oprime la Manija de Ajuste del sistema
LATCH, empuje los Conectores del sistema LATCH hacia
adentro del asiento de elevación para guardarlos.
23
FORROS DE TELA
QUITAR LA FUNDA DE LA SILLA
El tapizado consta de 5 partes, que se acoplan a la silla con
velcro o botones. Una vez haya desabrochado todas las
fijaciones puede quitar el tapizado.
1. Desconecte los botones de presión en la parte baja
de la vestsidura del respaldo. Ahora ya puede quitar la
funda hacia arriba.
2. Active la palanca del respaldo y llévelo a su posición
más elevada.
3. Abra y afloje todos los botones de presión en la parte
trasera del respaldo. Luego tire de la vestidura.
4. Tire de ambos lados de la vestidura del respaldo.
Luego libere los botones de presión en el interior
de ambas partes del respaldo para poder retirar
completamente la vestidura.
5. Antes de retirar la vestidura del respaldo de la silla,
desconecte los enganches de la parte trasera
6. Luego saque las bandas elásticas de la parte baja de
la silla yretire la vestidura del asiento hacia delante.
.
Antes de retirar las partes separadas de la vestidura,
asegúrese de que están por encima de los
embellecedores plateados. Para volver a colocar la
vestidura en la silla, siga los anteriores pasos en orden
contrario.
REINSTALACIÓN DEL EL FORRO
Para volver a colocar tela forro en el asiento, proceda en
orden inverso al seguido para retirarlos. Asegúrese que los
forros esté secos antes de volver a instalarlos.
24
CARE AND CLEANING
Owner’s Manual
Manual del Propietario
ES
PARA SACAR MANCHAS
Cuando sea necesario sacarle manchas a los forros de tela,
use un paño limpio con agua y detergente suave.
LAVADO DE LOS FORROS DE TELA
• Lavar a maquina por separado, agua tibia, ciclo delicado
• No usar blanqueador
• No secar a maquina
• No planchar
• No lavar en seco
• Colgar a secar
LIMPIEZA DE COMPONENTES METÁLICOS Y PLÁSTICOS
Limpie con detergente suave y agua fría. No use limpiadores
o solventes para el hogar.
REEMPLAZO DE LOS FORROS DEL ASIENTO
En caso de que necesite remplazar los forros, llámenos al
1-800-593-5522 para adquirir un nuevo juego de forros de
tela. Por favor tenga presente que por cuestiones de moda,
los colores y estilos cambian cada año, y por lo tanto, su
color actual podría no estar disponible.
CONSERVACIÓN DEL MANUAL DEL PROPIETARIO
Luego de leer y seguir estas instrucciones minuciosamente,
conserve su Manual del Propietario en la bolsa del dorso del
asiento de elevación como se muestra.
25
LISTA DE VERIFICACIÓN SOBRE SEGURIDAD
¿Leyó y comprendió íntegramente este Manual del
Propietario y todas las etiquetas localizadas en su
Asiento Infantil de Elevación?
¿Está el asiento de elevación completo con el Respaldo
instalado en la Base de Elevación?
¿La fecha que aparece en su asiento de elevación de
“No Usar Después De…”, es previa a la fecha de hoy?
¿Pesa su niño entre 15—50 kg (33—110 lb) Y tiene una
altura de entre 96—152 cm (38—60 pulgadas) Y tiene
su niño 3 años de edad o más?
¿Está el asiento de elevación mirando hacia el frente en
una posición de asientos que cuente con un cinturón de
hombro y regazo de tres puntos?
¿La parte inferior de la protección para la cabeza
colocada a un ancho de dos dedos arriba de los
hombros del niño?
¿Si utiliza los anclajes inferiores del sistema LATCH,
¿está el asiento de elevación inmovilizado en su lugar
con ambos botones de seguridad verdes visibles en los
conectores del sistema LATCH?
¿Descansa el Respaldo completamente contra el
asiento del vehículo en una posición recta?
¿Verificó si había superficies calientes en clima
soleado?
¿Está el Cinturón de Regazo debajo de ambos
apoyabrazos?
26
¿Está el cinturón de hombro dentro del cinturón rojo de
la Guía del Cinturón de Hombro?
¿Está el cinturón de hombro colocada en la ZONA
VERDE a través del punto medio del pecho y del
hombro del niño?
¿Está el cinturón de regazo dentro de la ZONA VERDE
al estar colocado a baja altura y ceñido a los muslos del
niño?
¿Están los cinturones de regazo y de hombro ceñidos,
no torcidos y sin holgura?
Si la respuesta es SÍ a todas estas preguntas,
entonces está listo para partir; ¡MANEJE CON
CUIDADO!
PRÁCTICAS SEGURAS DE CYBEX
•
¡Todos nos abrochamos o el vehículo no avanza! No
haga excepciones para los adultos o los niños.
•
¡Si alguien se desabrocha el cinturón, el vehículo se
detendrá! Ser firmes y congruentes resultará en un
número menor de problemas disciplinarios a medida
que los hijos crezcan.
•
NO DEJE objetos sueltos (por ejemplo, libros, bolsas,
etc.) en un vehículo. En caso de un frenado súbito,
los objetos sueltos seguirán desplazándose con el
potencial de ocasionar lesiones graves.
Favor de ponerse en contacto con nuestro Departamento
de Servicio al Cliente, donde nuestro personal cuenta
con muchos Especialistas en Seguridad de Pasajeros
Infantiles (CPS), con las preguntas que pudiera tener sobre
utilización, componentes, mantenimiento o información
sobre el producto. Al ponerse en contacto con nosotros,
por favor tenga a la mano el Número de Modelo de su
producto y la fecha de fabricación (fabricado el…) para que
podamos ayudarle eficientemente. Se puede encontrar esta
información en la etiqueta de la página 3 del Manual del
Propietario, o de la Base del Asiento Infantil de Elevación.
EVENTO DE REVISIÓN DE ASIENTOS DE AUTO
Para localizar la ubicación y el horario de los eventos de
revisión de asientos de auto en su zona:
• www.nhtsa.gov/cps/cpsfitting/index.cfm
• www.safekids.org
• www.seatcheck.org
• Departamentos de bomberos y policía de su localidad
con disponibilidad de Técnicos en Seguridad de
Pasajeros Infantiles
ES
SI NECESITA AYUDA
Favor comunicarse con Regal Lager:
• Gratuitamente: 1–800–593–5522
• Por correo electrónico: [email protected]
• En sitio de internet: www.regallager.com
¡EL 75% DE LOS ASIENTOS DE AUTOMÓVIL SE
INSTALAN INCORRECTAMENTE!
La instalación correcta de su asiento de automóvil en su
vehículo es extremadamente importante para la seguridad
de su hijo. Sin embargo, esto no siempre resulta sencillo.
¡Las estadísticas muestran que el 75% de asientos de
automóvil se instalan incorrectamente!
NO UTILICE este asiento de elevación si ha estado
involucrado en un choque. El asiento puede tener
daños ocultos por lo que debe ser reemplazado.
Asegúrese que SU asiento de elevación quede
correctamente instalado utilizando alguno de los siguientes
recursos:
27
GARANTIA
IMPORTANTE: Registre de inmediato su asiento Solution Q–fix para que podamos ponernos en contacto con usted en el caso poco probable
de una orden de retirar el producto por cuestiones de seguridad. Ingrese a: http://www.regallager.com o envíe por correo la tarjeta de registro
proporcionada.
GARANTÍA LIMITADA
CYBEX garantiza al comprador original que este producto estará libre de defectos en cuanto a materiales y fabricación durante dos (2) años
a partir de la fecha de la compra original (el “Período de Garantía”). Durante el Período de Garantía, CYBEX, a opción suya, puede reparar o
reemplazar este producto si el fabricante encuentra que está defectuoso en cuanto a materiales o fabricación. CYBEX se reserva el derecho de
descontinuar o cambiar piezas, telas, modelos o productos o sustituir este producto por un modelo o producto comparable. Para presentar una
reclamación bajo esta garantía, favor comunicarse con nosotros a: [email protected], llámenos al 1–800–593–5522, o escríbanos a: Attn:
CYBEX Warranty, Regal Lager, Inc.,1100 Cobb Place Blvd. NW, Kennesaw, Georgia 30144. Para hacer valer su garantía se requiere la factura
original y los costos de transporte serán responsabilidad del comprador original. Para dar curso al procesamiento de reclamaciones futuras de
garantía si las hubiera y verificar la fecha de compra original, favor de llenar y enviar por correo la tarjeta de registro del dueño con la dirección
pre-impresa dentro de los treinta (30) días posteriores a la compra.
LIMITACIONES DE LA GARANTÍA
Esta garantía no cubre los efectos del uso y desgaste normal o los daños que resulten por negligencia, modificación, instalación incorrecta,
accidentes, uso indebido o abuso de este producto. Se acuerda expresamente que las obligaciones de CYBEX y las reparaciones para el
comprador original de acuerdo con la garantía limitada aquí incluida son exclusivas y están estrictamente limitadas a la reparación o reemplazo
del producto. Esta garantía limitada está condicionada al estricto cumplimiento de las disposiciones del Manual del Propietario. En ningún caso,
CYBEX o el distribuidor que vende este producto será responsable ante usted por daño alguno, incluyendo daños incidentales o indirectos que
surjan del uso o incapacidad de uso del producto.
LIMITACIÓN DE GARANTÍAS Y DERECHOS BAJO LAS LEYES ESTATALES/PROVINCIALES:
La garantía y las reparaciones tal y como se estableció anteriormente son exclusivas y están en lugar de todas las demás, orales o escritas,
expresas o implícitas. Hasta donde la ley aplicable lo permita, por este medio se renuncia a cualquier garantía implícita, incluyendo las garantías
implícitas de comerciabilidad e idoneidad para un propósito particular. Algunos estados/provincias no autorizan limitaciones en cuanto a la
duración de una garantía implícita o la exclusión o limitación de daños incidentales o indirectos, por lo que las limitaciones anteriores pueden no
aplicarse a su caso. Esta garantía le otorga derechos legales específicos y usted puede tener otros derechos, los cuales varían de un estado/
provincia a otro estado/provincia. Ni CYBEX ni el distribuidor que vende este producto han autorizado a persona alguna a crear para ellos ninguna
otra garantía, obligación o responsabilidad en relación con este producto.
28