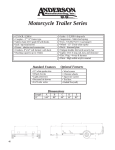
1
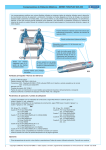
Installation Manual www.ecoological.com ©2014 Ecoological 04/2014 Thank you for choosing the GapShield™ as a valued accessory for your truck that will save you significant time and hassle from cleaning out that obnoxious debris that falls in the tailgate gap. Please follow these installation instructions so your GapShield™ will perform properly. If you have any further concerns or questions regarding your GapShield™, please review the FAQ’s, images, and installation videos at http://www.ecoological.com/gapshield-tailgate-gap-cover-specifications.html INSTALLATION TIME Approximate installation time: 10-15 minutes TOOLS REQUIRED Clean Cloth Rubbing alcohol, surface cleaner, soap/water Scissors or other cutting utensil PARTS INCLUDED (1) GapShield™ w/installed tape (1) Adhesion promoter -ATTENTIONRead and understand all instructions before installing or using this product. The GapShield™ will fit trucks with plastic liners, spray liners and no liners. However, please pay attention to specific instructions for each bed surface condition. Any modification or unintended use of this product shall immediately void all manufacturer warranties. The manufacturer disclaims all liability for injuries to persons and property resulting from modifications to, or unintended use of this product. WARNING - If using a power washer, do not spray directly on the GapShield™ as it could detach it from its location. INSTALLATION Open tailgate and clear debris from gap and bed surface. Before removing red backing from tape, put the GapShield™ in place and determine its fitting. Trim length for your specific truck, if necessary. Note: Optimal temperature for installing the GapShield™ is 20°C to 38°C and never below 15°C. Adhesion can be maximized by subjecting tape to 65°C temp with a hair dryer or heat gun, safely aimed toward adhesion area and applying pressure to taped area. Use clean cloth with a cleaner that will remove oil/grease to clean the bedside surface where tape will be applied (see Figure 1). Let dry and then apply included adhesion promoter to truck bed surface where tape will be applied and let dry. In most cases, the rearward (stiffer) flange of the GapShield™ should be flush with the rear edge of the truck bed, but never more than ¾ inch forward from the edge, as shown in Figure 2. Use rear edge of truck bed or draw a straight pencil line on the truck bed along the forward edge of the GapShield™ for reference. Peel red backing from adhesive strip progressively as you carefully position the GapShield™ into place. Continue until the tape is evenly applied to the truck bed surface (refer to Figure 3). Apply firm pressure along the taped area to assure adhesion. Important Note: For truck beds with corrugations at the rear of bed, the rearward tape on the stiffer flange should only be adhered to the high corrugation surfaces in order to keep a straight Figure 3 hinge point as shown in Figure 4. Do not attempt to conform/adhere rear taped flange down in the Forward tape pressed corrugation valley, as this will distort your GapShield™ and it will not hinge properly. The forward in to corrugation tape (flexible leading edge) should be pressed down in to the corrugation. Applying heat and pressing firmly in this area will make the material more compliant and increase adhesion strength. Rearward tape not In most cases where a drop-in liner is present, the GapShield™ should be installed with the taped pressed in to corrugation portion between the liner and the truck bed. Please visit http://www.ecoological.com/gapshieldFigure 4 tailgate-gap-cover-specifications.html for more instruction. DIRECTIONS FOR USE The GapShield™ is designed to flex when the tailgate is in the closed position (A) and to lay relatively flat and bridge the gap between the truck-bed and tailgate when the tailgate is lowered (B), keeping loose materials/debris from falling through the gap. (A) (B) (C) (D) The GapShield™ is made from a durable elastomer that will become a little stiffer during cooler weather and may take more time to lay flat when the tailgate is opened, especially when new. In these situations, you may prefer to keep the free end of the GapShield™ tucked down in to the gap when not hauling loose materials (C). In this position, the GapShield™ is out of the way of any other uses of your truck bed when the tailgate is lowered and acts as a tailgate seal when the tailgate is closed (D), inhibiting intrusion of dust and moisture in to the truck bed. Simply pull free end out of gap when ready to haul material without the mess! Manual de instalación www.ecoological.com ©2014 Ecoological 04/2014 Gracias por elegir el GapShield ™ como un valioso accesorio para tu camión que le ahorrará mucho tiempo y molestia de la limpieza de ese odioso los desechos que cae en el hueco del portón trasero. Por favor siga estas instrucciones de instalación para que su GapShield ™ se desempeñará apropiadamente. Si usted tiene más preguntas o preocupaciones con respecto a su GapShield ™, por favor, revise las preguntas frecuentes, imágenes y videos de la instalación en http://www.ecoological.com/gapshield-tailgate-gap-cover-specifications.html TIEMPO DE INSTALACIÓN Tiempo de instalación aproximado: 10-15 minutos HERRAMIENTAS NECESARIAS Paño limpio Frotando alcohol, limpiador, jabón/agua Tijeras u otro utensilio de corte PIEZAS INCLUIDAS GapShield con cinta de instalado (1) Promotor de adherencia -ATENCIÓNLea y comprenda todas las instrucciones antes de instalar o usar este producto. El GapShield caben camiones con revestimientos de plásticos, Revestimientos de aerosol y no los trazadores de líneas. Sin embargo, el accesorio puede ser más difícil si un revestimiento plástico o aerosol está instalado en el camión. Cualquier modificación o uso no intencional de este producto anulará inmediatamente todas las garantías del fabricante. El fabricante declina toda responsabilidad por lesiones a las personas y bienes causados por modificaciones o debido al uso de este producto. ADVERTENCIA - Si utiliza una lavadora, no rocíe directamente en la GapShield como podía desconectarlo de su ubicación. INSTALACIÓN Abra la compuerta y limpiar los restos de superficie gap y cama. Antes de quitar el forro de la cinta roja, colocar el GapShield ™ y determinar su guarnición. Recortar la longitud para su carro específico, si es necesario. Nota: La temperatura óptima para la instalación de la GapShield ™ es 20° C a 38° C y nunca inferior a 15° C. Adherencia puede maximizarse sometiendo cinta a 65° C la temperatura con un secador de pelo o pistola, salvo dirigido hacia la zona de adherencia de calor y presión a grabó área. Utilice el paño limpio con un limpiador que eliminará aceite/grasa para limpiar la superficie cabecera donde cinta se aplicará (ver figura 1). Dejar secar y luego aplique promotor de adherencia incluyen a la superficie de la cama de camión donde será aplicado cinta y dejar secar.Aplicar promotor de adherencia a la superficie limpiada camión donde se aplicará la cinta. En la mayoría de los casos, la brida trasera (rígida) del GapShield ™ debe quedar al ras con el borde trasero de la camioneta, pero nunca más de ¾ de pulgada hacia adelante desde el borde, como se muestra en la figura 2. Utilice el borde trasero de la camioneta o dibujar una línea recta trazada sobre la cama del camión a lo largo del borde delantero del GapShield ™ para referencia. Pele el forro rojo de la cinta adhesiva progresivamente como colocar cuidadosamente el ™ GapShield en su lugar. Continúe hasta que la cinta se aplica uniformemente a la superficie de la cama del carro (consulte la figura 3). Aplique una presión firme a lo largo de la zona con cinta para asegurar la adherencia. Nota Figure 3 importante: Para camas de camión con corrugaciones en la parte trasera de la cama, la cinta hacia atrás en la brida rígida sólo respete las superficies altas corrugación para mantener un punto de bisagra recta como Forward tape pressed in to corrugation se muestra en la figura 4. No intente cumplir/se adhieren brida posterior con cinta abajo en el valle de corrugación, como esto distorsionará su GapShield ™ y no colocará las bisagras correctamente. La cinta hacia adelante (borde flexible) debe ser presionada en a la corrugación. Aplicando calor y presionando Rearward tape not pressed in to firmemente en esta área se hacen más compatible con el material y aumentar la fuerza de adherencia corrugation En la mayoría de los casos donde está presente un trazador de líneas de sobreponer el GapShield ™ debe Figure 4 instalarse con la porción grabada entre el forro y la cama del camión. Por favor visite http://www.ecoological.com/gapshield-tailgate-gap-cover-specifications.html para más instrucciones. INSTRUCCIONES DE USO El GapShield está diseñado para doblar cuando el portón trasero está en la posición cerrada (A) y para poner relativamente plana y puente de la brecha entre la camioneta y el portón trasero cuando la puerta trasera es baja (B), manteniendo materiales/detritos caiga a través del espacio. (A) (B) (C) (D) El GapShield ™ está hecho de un elastómero durable que se convertirá en un poco más rígido durante el clima más fresco y puede tardar más tiempo a poner plana cuando se abre el portón trasero, especialmente cuando son nuevos. En estas situaciones, usted puede preferir mantener el extremo libre del GapShield ™ metidos hacia abajo a la brecha cuando no transportar materiales sueltos (C). En esta posición, el GapShield ™ está fuera del camino de cualquier otro uso de su camioneta cuando la puerta trasera es bajada y actúa como un sello de la puerta trasera cuando se cierra la puerta trasera (D), inhibición de intrusión de polvo y humedad en a la cama del camión. Simplemente sacar el extremo libre de brecha cuando esté listo para transportar material sin el lío!