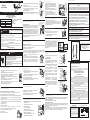
1
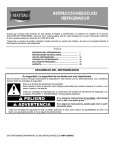
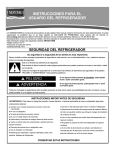
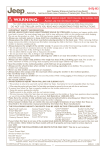
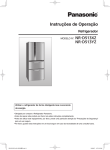
stm02171 Rev. B No. Parte: W10159908 Rev. B Se recomienda que quede un poco inclinado hacia atrás, así la puerta tenderá a cerrarse sola. 4. Deje reposar el refrigerador de 2 a 3 horas antes de conectarlo, esto permitirá que se asiente el gas y el aceite antes de iniciar el proceso de refrigeración Conecte el refrigerador Se requiere una fuente de energía eléctrica debidamente aterrizada de 110-127 V~, 60 Hz con fusibles de 15 ó 20 A Manual de Uso y Cuidado Este manual contiene información útil, léalo detenidamente. AMPARA LOS SIGUIENTES MODELOS: NWR2001Q, NWR2001G, NWR0001Q, NWR0001G, NWR20001D, NWR0001D Características Eléctricas Nominales Corriente Nominal Frecuencia Tensión Nominal 6,0 A 60 Hz 110-127 V ~ ADVERTENCIA Tornillo nivelador Bajar Figura 1. Fabricado por Industrias Acros Whirlpool S.A. de C.V. Antigua carretera a Roma km 9 Col. Milagro Apodaca N.L. México, 66600 Tel. (01-81) 83 29 21 00 Para reducir el riesgo de incendio, descarga eléctrica o heridas personales cuando use su refrigerador, siga estas precauciones básicas: Lea todas las instrucciones antes de usar su refrigerador. El dejar abandonado un refrigerador puede causar que alguien jugando pueda quedarse atrapado en él y se sofoque. Si va a cambiar su refrigerador hágalo de una forma segura para todos. Le aconsejamos que quite las puertas del refrigerador fuera de uso o que se asegure con una cuerda resistente. Nunca deje que un niño opere, juegue o se meta dentro de un refrigerador. Nunca limpie las piezas de un refrigerador con líquidos inflamables; los vapores pueden causar incendios o explosiones. PARA SU SEGURIDAD No almacene o use gasolina o gases inflamables cerca de este o cualquier electrodoméstico, los vapores pueden causar incendios o explosiones. Si el cordón tomacorriente se daña, debe ser reemplazado por nuestro departamento de servicio o por un electricista calificado para evitar algún riesgo. -GUARDE ESTAS INSTRUCCIONES- Instalar adecuadamente ! Bajar Elevar Elevar Importantes instrucciones de seguridad ! Tornillo nivelador ADVERTENCIA Peligro de Choque Eléctrico Es necesario que éste refrigerador sea puesto a tierra. NO modifique el cordón eléctrico. Si no calza en el tomacorriente, haga instalar un tomacorriente apropiado por un electricista calificado. NO use una extensión eléctrica con este refrigerador. Consulte con un electricista calificado si tiene dudas respecto a si el refrigerador está debidamente puesto a tierra. Si no se cumplen las precauciones indicadas anteriormente se puede ocasionar una lesión grave o aún la muerte. Instrucciones para la puesta a tierra Método de puesta a tierra Su refrigerador está equipado con un cordón eléctrico provisto de un enchufe de puesta a tierra de 3 terminales. Para disminuir a un mínimo la posibilidad de sufrir choque eléctrico, el cordón debe ser conectado en un tomacorriente mural del tipo con puesta a tierra para enchufes de 3 terminales, puesto a tierra de acuerdo con el Código Nacional de Electricidad y todos los códigos y reglamentos locales. Si no se dispone de un tomacorriente de este tipo, es responsabilidad y obligación del cliente hacer instalar un tomacorriente mural para enchufes de 3 terminales debidamente puesto a tierra por un electricista calificado. Enchufe de puesta a tierra de 3 terminales Cómo usar el anaquel multiposiciones 1. Retire todos los artículos del anaquel. 2. Sujete el anaquel con ambas manos por la parte inferior y jale las lengüetas hacia usted como lo indica la flecha en el anaquel, manténgalas de esta forma hasta alcanzar la altura deseada y libérelas para fijar el anaquel. Cordón eléctrico Terminal de puesta a tierra Esta pieza le permite contar con dos divisiones en el cajón legumbrero, la parte superior del mismo está diseñada especialmente para legumbres y frutas pequeñas o delicadas. Control de humedad del cajón para legumbres(Puede variar según el modelo Fig. 1 ó Fig. 2) Para la mejor conservación de sus frutas y legumbres incluimos este control que regula la entrada de aire frío al cajon para legumbres. Para el caso de la Fig. 1 Ajuste el control de temperatura Deslice el control de arriba hacia abajo. Para la Fig. 2 Su refrigerador tiene 2 controles que le permiten regular la temperatura en el compartimiento deslice el control de lado a lado. En ambos casos esto permitirá que usted controle el flujo de aire frío del refrigerador y del congelador independientes. que usted desee. Cuando se conecte por primera vez: Ponga los controles de temperatura del refrigerador y del congelador en la posición MED, que significa Frío Medio. Los controles van desde MIN o - (menos frío) hasta MAX + (más frío). Cambio de giro de las puertas (algunos Al mover el control del refrigerador a Apagado, dejan de enfriar modelos) el congelador y el refrigerador, pero no se desconecta de la electricidad. El cambio de giro de las puertas lo deberá realizar Dé tiempo al refrigerador de enfriarse completamente antes una persona calificada. de poner alimentos en él. Su enfriamiento puede tomar varias Información importante horas. Ajuste el control de temperatura para mantener la comida tan fría como desee. Las posiciones sugeridas Antes de empezar, coloque la perilla de control en anteriormente son las correctas para uso normal casero. Apagado, desenchúfelo y retire todos los alimentos de los anaqueles de las puertas. Al sacar las bisagras, mantenga cerradas las puertas hasta que pueda separarlas del gabinete. Para cambiar el foco No use el refrigerador en un cuarto donde la temperatura baje a menos de 13 °C (55 °F). Mantenga el refrigerador lejos de los efectos del clima. Conecte el refrigerador solo en un tomacorriente apropiado con el suministro eléctrico adecuado y con conexión a tierra. No ponga comida en el refrigerador antes de que se haya enfriado en la forma apropiada. Use el refrigerador solo como se especifica en este manual. Dé el mantenimiento apropiado al refrigerador. Asegúrese de que el refrigerador no sea operado por personas no capacitadas para hacerlo en la forma indicada. El refrigerador es sólo para uso doméstico. 1. Desconecte el refrigerador. 2. Desatornille la cubierta del foco. Necesita un desarmador de caja hexagonal de 6,3 mm (1/4). 3. Reemplácelo con un foco de 40 watts para electrodomésticos. 4. Coloque de nuevo la cubierta del foco. 5. Conecte el refrigerador nuevamente. NOTA: No todos los focos son adecuados, asegúrese de reemplazarlo por otro que tenga la misma forma y tamaño. Deodorizador (algunos modelos) Para sacar las puertas comience por la bisagra superior y trabaje en sentido descendente. Para volver a colocarlas, empiece por la bisagra inferior y trabaje en sentido ascendente. Alinee las puertas de forma que estén centradas con respecto a los laterales del gabinete y paralelas entre sí. Selle todos los orificios que no se vayan a utilizar con tornillos o tapones de plástico, ya que la humedad penetrará por todas las aberturas. NOTA: Una vez que haya cambiado el sentido de apertura de las puertas, vuelva a colocar las jaladeras (algunos modelos). Si las puertas no se cierran por sí solas, consulte la sección Cómo instalar el refrigerador. Cómo instalar el refrigerador Siga estos pasos antes de conectar el nuevo refrigerador: 1. Retire los aditamentos de empaque incluso los interiores y las bases de madera. 2. Coloque el refrigerador bajo las siguientes recomendaciones: Deje un espacio mínimo de 7,5 cm (3) entre la parte superior del refrigerador y los gabinetes. Deje cuando menos un espacio de 5 cm (2") entre el condensador del refrigerador en la parte posterior y la pared. Deje un espacio de 1,25 cm (1/2") a cada lado del aparato para facilitar la instalación. Si el refrigerador va a estar contra la pared lateral, deje un espacio adicional para permitir que se abra más la puerta. 3. Nivele el refrigerador Retire las bases de madera. Para subir o bajar su refrigerador siga las instrucciones de la figura 1. Para mayor precisión verifique con un nivel de carpintero colocado en la parte superior del refrigerador o verifique si al abrir y cerrarlo no se mueve, entonces estará nivelado. MUY IMPORTANTE ES RESPONSABILIDAD DEL USUARIO VERIFICAR LA SIGUIENTE INFORMACIÓN ANTES DE LLAMAR AL TÉCNICO: SI USTED SIGUIÓ CORRECTAMENTE LAS INSTRUCCIONES DEL MANUAL DE INSTALACIÓN, USO Y CUIDADOS Y TIENE PREGUNTAS SOBRE EL FUNCIONAMIENTO DEL REFRIGERADOR, ESTA GUÍA LE OFRECE SOLUCIONES A PROBLEMAS QUE PUEDE DETECTAR Y CORREGIR EN SU HOGAR. SI EL REFRIGERADOR NO FUNCIONA Conecte directa y correctamente la clavija, NO USE EXTENSIONES. Revise EL CONTACTO ELÉCTRICO, PODRÍA ESTAR DAÑADO, conecte otro aparato y pruebe si funciona. Evite poner a funcionar varios aparatos a la vez; LA INSTALACIÓN ELÉCTRICA SE SOBRECARGA. Verifique que el CONTROL DE TEMPERATURA ESTÁ EN POSICIÓN DE ENCENDIDO. Asegúrese de que NO ESTÉ JUNTO A UNA FUENTE DE CALOR como horno, estufa o luz directa del sol. LAS PUERTAS DEBEN CERRAR HERMÉTICAMENTE, revise el empaque magnético de las puertas. NIVELE EL REFRIGERADOR, retire las bases de madera y ajuste los tornillos niveladores (FIGURA 1). NO SOBRECARGUE EL REFRIGERADOR , la circulación de aire frío será deficiente. Coloque la perilla de control de TEMPERATURA EN MED (frío medio) y espere por lo menos 24 horas antes de hacer un nuevo cambio de temperatura. NOTA QUE EL REFRIGERADOR TRABAJA POR PERIODOS PROLONGADOS Verifique que el CONDENSADOR ESTÉ LIBRE DE POLVO Y PELUSA (FIGURA 1). EVITE ABRIR CONTINUAMENTE LA PUERTA o por periodos prolongados. NO INTRODUZCA ALIMENTOS CALIENTES y manténgalos tapados. SI ESCUCHA SONIDOS EXTRAÑOS Revise que NO HAYA OBJETOS SOBRE O DETRÁS DEL REFRIGERADOR. EL COMPRESOR NO TRABAJA CORRECTAMENTE, puede ser que un bajo voltaje estuviera presente. Verifique la intensidad de la luz, si es baja esto nos indica que tiene un bajo voltaje, hable a su compañía de luz para que corrijan el suministro de energía (FIGURA 1). En las posiciones indicadas este cajón alcanza temperaturas más frías, permitiéndole tener los alimentos frescos por más tiempo. Esto se logra colocando la parrilla donde se indica en la flecha (posición 1 y 5). También es posible utilizar el cajón como un legumbrero adicional, al colocarlo en la última posición. Para remover el cajón multiusos: 1. Deslice el cajón hacia afuera hasta que tope. 2. Levante el frente y deslice hacia afuera. Para colocar el cajón nuevamente deslícelo hasta el fondo Separador del cajón para legumbres (algunos modelos) Como usar el refrigerador Antes de conectar el refrigerador M NA AU Tomacorriente mural del tipo puesta a tierra para enchufes de 3 terminales. Antes de llamar al técnico Cajón multiusos (algunos modelos) Su refrigerador posee un deodorizador que absorbe los olores desagradables que circulan en el interior. El deodorizador está incorporado en el conducto de circulación de aire y no necesita ninguna operación especial. Para remover las parrillas completas de vidrio o alambre Ajuste las parrillas del refrigerador de acuerdo a la forma en que se usa el refrigerador. Para quitar las parrillas: 1. Retire todos los artículos de las parrillas. 2. Levante la parte posterior. 3. Deslice la parrilla hacia afuera. Para volver a colocar las parrillas: 1. Ponga la parte trasera de la parrilla en los rieles situados en las paredes laterales. 2.Guíe la parte delantera de la parrilla en los rieles. 3. Deslícela hacia adentro hasta que tope. FIGURA 1 Fig. 1 EMPAQUE MAGNÉTICO SI DESPUÉS DE SEGUIR LAS INSTRUCCIONES DE ESTA GUÍA, EL REFRIGERADOR NO FUNCIONA LLAME A LOS CENTROS DE SERVICIO INDICADOS 01 800 8 300 400 Fig. 2 BISAGRA SUPERIOR CONDENSADOR Tapa Tornillos Bisagra superior Suplemento BISAGRA CENTRAL Tope de la Puerta Tornillo Suplemento Separador Pasador de la Bisagra Tornillos Separador Soporte de la Bisagra BISAGRA INFERIOR Tope de la Puerta Tornillo Separador Suplemento Soporte de la Bisagra Tornillos Pasador de la Bisagra Sonidos que pueden escucharse Su nuevo refrigerador puede emitir sonidos, la mayoría de ellos son normales, pero las superficies duras como el piso, las paredes de la cocina y el refrigerador pueden hacerlos más audibles. Murmullo Suave, silbido suave Pueden ser el ventilador y el aire en movimiento. Golpecitos secos o cascabeleo El termostato emite un golpecito seco bien definido cuando el refrigerador para; igualmente cuando empieza a funcionar de nuevo. El reloj del control de descongelador también emite el mismo tipo de sonido cuando el ciclo de descongelación comienza. Sonidos de agua Después de que el refrigerador pare, se puede oir por algunos minutos un goteo en la tubería. Puede oirse también agua que corre a la bandeja recolectora de agua y un sonido peculiar como agua cayendo sobre una superficie caliente en los ciclos de descongelación. COMPRESOR TORNILLOS NIVELADORES PÓLIZA DE GARANTÍA WHIRLPOOL MÉXICO S.A. DE C.V. Antigua carretera a Roma km 9, Col. Milagro, Apodaca, N.L., Mexico, 66600, Tel. (01 81) 83-29-21-00, en los términos de esta póliza, garantiza al comprador y usuario del refrigerador identificado en la presente póliza, exclusivamente lo siguiente: AMPARA LOS SIGUIENTES MODELOS MARCA : NWR2001Q, NWR2001G, NWR0001Q, NWR0001G, NWR20001D, NWR0001D CONCEPTOS CUBIERTOS POR LA GARANTÍA: Defectos de fabricación que impidan total ó parcialmente el correcto funcionamiento del aparato que se presenten dentro de los términos de vigencia de esta garantía. En este caso, la reparación se hará sin costo alguno para el comprador o usuario. Si se requiere el reemplazo de alguno de los componenetes, piezas o del aparato, asimismo correrá por cuenta del otorgante. Igualmente los gastos de transporte dentro de la red de servicio y mano de obra derivados del cumplimiento de la garantía serán cubiertos por el otorgante. CONCEPTOS QUE INVALIDAN LA GARANTÍA: · Cuando el producto se hubiere utilizado en condiciones distintas a las normales. (El refrigerador no es para uso comercial o industrial). · Cuando el producto no hubiere sido operado de acuerdo con el instructivo de uso y manejo que lo acompaña. · Cuando el producto hubiere sido alterado o reparado por personas no autorizadas por Whirlpool Service. PROCEDIMIENTO PARA HACER EFECTIVA LA GARANTÍA: Al considerar el comprador final que ha ocurrido algún evento amparado por esta póliza, deberá ponerse en contacto con Whirlpool Service a nuestro Centro Nacional de Llamadas, desde Monterrey N.L y su área conurbada al (81) 83-29-2100 y desde el interior de la República Mexicana al 01-800-8-300-400; donde un asesor de servicio especializado lo atenderá. Nuestras instalaciones están ubicadas en Carretera Miguel Alemán Km. 16 Col. El Milagro C.P 66600. Apodaca, N.L. En donde también podrá encontrar accesorios y partes originales. Para mayor información de nuestros servicios, visite www.whirlpoolservice.com.mx." TÉRMINO: Esta garantía tiene una vigencia de 12 meses en todas sus partes a partir de que el consumidor reciba de conformidad el refrigerador. NOTA IMPORTANTE Este documento deberá ser presentado para cualquier trámite relacionado con la garantía. EL COMPRADOR DEBERÁ MANTENER ESTE DOCUMENTO EN SU PODER Y EN UN LUGAR SEGURO. El consumidor podrá solicitar que se haga efectiva la garantía que ampara esta póliza con el distribuidor donde se adquirió el producto. En caso de extravío de la póliza, el distribuidor expedirá una nueva póliza de garantía, previa presentación de la nota de compra o factura respectiva. Formato de identificación NOMBRE DEL COMPRADOR: DOMICILIO: TEL. NOMBRE DEL DISTRIBUIDOR: DOMICILIO: TEL. PRODUCTO: MODELO: NUM. DE SERIE FECHA DE ENTREGA: FIRMA DEL DISTRIBUIDOR Y SELLO (Señalar con precisión calle, número exterior o interior, colonia, ciudad, estado y C.P.) stm02171 Rev. B Part No. W10159908 Rev. B Use & Care Guide 4. Before starting the refrigeration process allow the refrigerator to rest from 2 to 3 hours in order to let the gas and oil be settled. Connecting your refrigerator A 110-127 V~ , 60 Hz AC only 15 or 20 A fused and properly grounded electrical supply is required. Levellin g screw Lower Raise Figure 1. Grounding method This guide contains useful information, read it carefully. APPLY FOR THE FOLLOWING MODELS: NWR2001Q, NWR2001G, NWR0001Q, NWR0001G, NWR20001D, NWR0001D Nominal Technical Specifications Nominal Current Frecuency Voltage 6,0 A 60 Hz 110-127V~ Manufactured by Industrias Acros Whirlpool S.A. de C.V. Antigua carretera a Roma km 9 Col. Milagro Apodaca N.L. México, 66600 Phone (01-81) 83 29 21 00 Your refrigerator has an electrical cord provided with 3 prong grounding plug. To minimize the possibility of electrical shock, the cord must be plugged into a mating 3 prong grounding type wall outlet according to national electrical code and all local codes. If plug will not fit the outlet, is your responsibility to have a proper outlet installed by a qualified electrician. To reduce the risk of fire, electrical shock, or injury when using your refrigerator, follow these basic precautions: WARNING Read all instructions before using the refrigerator. Child entrapment and suffocation are not problems of the past. Junked or abandoned refrigerators are still dangerous ... even if they will "just sit in the garage a few days". If you are getting rid of your old refrigerator, do it safely. Never allow children to operate, play with, or crawl inside the refrigerator. Never clean refrigerator parts with flammable fluids. The fumes can create a fire hazard or explosion. We suggest to remove the door or thigh it with a resistant cord. FOR YOUR SAFETY DO NOT STORE OR USE GASOLINE OR OTHER FLAMMABLE VAPORS AND LIQUIDS IN THE VICINITY OF THIS OR ANY OTHER APPLIANCE. THE FUMES CAN CREATE A FIRE HAZARD OR EXPLOSION. IF THE ELECTRICAL CORD IS DAMAGED, OUR SERVICE DEPARTMENT OR A QUALIFIED ELECTRICIAN SHOULD CHANGE IT. -SAVE THESE INSTRUCTIONS- Install in correct way ! WARNING Electrical shock hazard The refrigerator must be properly grounded. Do not modify the electrical cord Do not use an extension cord with this appliance, consult with a qualify technician any doubts about the proper grounding of this appliance. If your wall outlet is not proper one have a qualify technician install it. Not complying with the above precautions may result in high risk of injury and even death 3 prong plug cord Electrical cord Important safety instructions ! Wall outlet for 3 prong plug cord, grounded correctly. Grounding terminal How to use the refrigerator Controls Your refrigerator has two controls that let you regulate the temperature in the freezer and refrigerator compartments. When you plug in the refrigerator for the first time: Set the temperature control at MED (normal). Temperature control adjustments range from MIN (warmest) to MAX (coldest). Turning the temperature control to Apagado (Off) stops cooling in both the refrigerator and freezer compartments. But it does not disconnect the refrigerator from the power supply. Give the refrigerator time to cool down completely before adding food. This could take several hours. Adjust the temperature control to have food as cold as you like. The settings indicated above should be correct for normal, household refrigerator usage. To change the refrigerator light 1. Disconnect refrigerator from power supply. 2. Remove the light cover. (Use 1/4 hexagonal box screwdriver). 3. Replace with a 40 watts appliance bulb. 4. Replace light cover. 5. Reconnect refrigerator to power supply. NOTE: Not all appliance bulbs will fit your refrigerator. Be sure to replace a bulb with one of the same size and shape. Deodorizer (some models) Before using your refrigerator Do not use the refrigerator in an area where the room temperature will fall below 13 °C (55 °F). Keep the refrigerator out of the weather. Connect the refrigerator only to the proper kind of outlet, with the correct electrical supply and grounding. Do not load the refrigerator with food before it has time to get properly cold. Use the refrigerator only for the uses described in this manual. Properly maintain the refrigerator. Be sure the refrigerator is not used by anyone unable to operate it properly. The refrigerator is only for domestic use. Your refrigerator is provided with a deodorizer that acts as a filter, absorbing unpleasant odors that circulate inside the refrigerator. The doedorizer is built in the cold air circulation duct and it does not require any special attention. M NA AU How to install the refrigerator Before connecting the new refrigerator follow these steps: 1. Remove all packing material and the wood bases. 2. Install your refrigerator under the following conditions: Allow 7,5 cm (3 inches) between overhead cabinets and refrigerator top. Allow at least 5 cm (2 inches) between the refrigerator condenser on the back and the wall. Allow 1,25 cm (1/2") on each side of the refrigerator for ease of installation. If the hinge side of the refrigerator is to be against the wall, you might want to leave extra space so the door can be opened wider. 3. Levelling the refrigerator Levellin g screw Remove the wooden supports. To raise or lower the front of the refrigerator, turn each screw in a clockwise or counterclockwise direction (figure 1). For greater levelling accuracy you should place a spirit level Raise Lower on the upper surface of the refrigerator. It is recommended to incline lightly back the refrigerator in order to let the door close by itself. How to clean your refrigerator Before cleaning, disconnect your refrigerator to prevent electrical shock hazard. - Use a tablespoon with baking soda mixed in a liter of water to clean the interior (it absorb odors). -Clean refrigerator interior with soft cloth and a mild detergent. Never use fibers or sharp objects. - Clean the condenser coils at least every six months. Use a soft cloth or a sponge to eliminate accumulated dust. How to rearrange your glass or wire shelves Adjust the refrigerator shelves to match the way you use your refrigerator. To remove the shelves: 1. Remove items from the shelf. 2. Lift back of shelf over stop. 3. Slide shelf straight out. To replace the shelves: 1. Slide back of shelf into shelf track in wall of cabinet. 2. Guide front of shelf into shelf track. 3. Slide shelf in the rest of the way. Before calling the technician How to remove the multipurpose drawer (some models) IMPORTANT BEFORE CALLING THE TECHNICIAN IT IS VERY IMPORTANT TO VERIFY THE FOLLOWING INFORMATION: In the indicated positions, this drawer reaches temperatures up to 0 ºC; allowing you to have fresh food for a longer period of time. To get the extra cold position, introduce the shelf on positions one and five indicated by arrows on the side wall of your refrigerator. It is also possible to use it as an additional crisper when you place it in the last position. 1. Slide the drawer outwards until it stops. 2. Lift the front and slide outwards. 3. Place it again inserting the rear of the crisper in the slots and slide toward inside until it reaches de boundary. IF AFTER READING THE USE AND REFERENCE GUIDE YOU HAVE QUESTIONS, THIS GUIDE MAY OFFER YOU SOME SOLUTIONS TO PROBLEMS YOU CAN DETECT AND CORRECT YOURSELF IN YOUR HOME. IF THE REFRIGERATOR IS NOT WORKING Plug firmly into a live circuit. Do not use an extension cord. Check the power supply. It could be damaged. Connect another appliance and see if it works normally. Do not connect various appliances at the same time, the electrical installation will over load. Verify that the temperature control is in the ON position. Avoid placing the appliance close to a hot source. Close the doors completely. Check to see if the gaskets are dirty or sticky. Level the refrigerator. Remove wood supports and adjust the roller levels (FIGURE 1). Do not overload the refrigerator. The air circulation will be deficient. Set the temperature control in MED (middle position) and wait at least 24 hours before making another change of temperature. THE REFRIGERATOR SEEMS TO RUN TOO MUCH Verify if the condenser has lint or is dirty (FIGURE 1). Avoid opening the doors constantly or for long periods. Do not introduce warm food and keep them covered. IS THE REFRIGERATOR MAKING UNFAMILIAR SOUNDS Verify there is nothing on top or behind. The compressor does not work properly, check if you are using the right voltage Verify the light intensity. If it is low, consult with an qualified technician (FIGURE 1). How to use the adjustable multipositions shelf (some models) 1. Remove all the items from the shelf. 2. Hold the lower part of the shelf with both hands and pull the tabs upwards as indicated by the arrow of the shelf, hold them in this way until they reach the desired position and release the tabs in order to fix the shelf. Crisper divider (some models) This item allows to have two divisions in the crisper, the upper part is specially designed for vegetables and small or delicate fruits. MAGNETIC SEAL FIGURE 1 Humidity control of the crisper (Variation between models) For the best preservation of fruits and vegetables, we include this control that regulates the entrance of cold air into the crisper.Fig. 1 slide the control up to down. Fig. 2 slide the control side to side. Both controls permit the air control. CONDENSER Fig. 1 How to change the swinging of the doors (some models) Reversing the door swing should be performed by a qualified person. Important Information - Before you begin, turn refrigerator OFF, unplug it, and remove any food from door shelves. - When removing hinges, keep doors closed until ready to lift free from cabinet. - To remove doors, start at the top hinge and work your way down. - To replace doors, start at the bottom hinge and work your way up. - Line up doors so they are centered between the sides of the cabinet and parallel with each other. - Seal all unused openings with screws or plastic plugs. Moisture will enter any openings. NOTE: After the doors are reversed, reinstall the handles. If the doors are not shutting on their own, see the How to install the refrigerator section. IF AFTER FOLLOWING THE INSTRUCTIONS THE REFRIGERATOR STILL WITH PROBLEMS CALL AN AUTHORIZED SERVICE CENTER Fig. 2 COMPRESSOR LEVELLING ROLLERS TOP HINGE WA R R A N T Y Cover WHIRLPOOL MÉXICO S.A. DE C.V. Screws Antigua carretera a Roma km 9, Col. Milagro, Apodaca, N.L., México, 66600 Phone (01-81) 83-29-21-00, in the terms of this policy, we guarantee to the buyer and the consumer the WHIRLPOOL refrigerator identified in this following policy: Top hinge Supplement PROTECT THE FOLLOWING MODELS: NWR2001Q, NWR2001G, NWR0001Q, NWR0001G, NWR20001D, NWR0001D Boundary of the door Screw Divider Supplement Hinge Pin CENTRAL HINGE WHIRLPOOL MÉXICO S.A. DE C.V. WILL NOT PAY: Screws When the refrigerator is used in other than normal, single family household use. Divider When the refrigerator was not used according with the use and care guide attached. Hinge Support Boundary of the door Divider Screw Hinge Support Supplement Screws COVERED CONCEPTS: Manufacturing defects that prevent the partial or total product functioning according to the terms of this policy. In this case the repair will be made at no charge for the buyer or consumer , in case that parts and/or components replacement is required will at manufacturer expenses, so are the shipping and handling costs with in the service and labor guarantee network. LOWER HINGE When the refrigerator would have been repaired by any unauthorized service. PROCEDURE TO MAKE EFFECTIVE THE WARRANTY: The procedure to use the warranty if the consumer considers that one of the events cited above occurred. He or She should contact one of the authorized service centers. TERMS: This is a 12 MONTHS warranty in all refrigerator parts beginning the day the buyer or consumer receives the refrigerator to his satisfaction. Hinge Pin Identify format CONSUMER NAME: ________________________________________________________ ADDRESS:____________________________ PHONE. ________________________ IMPORTANT NOTE This document must be shown in any transaction related with this warranty DEALER NAME _________________________________________________________ ADDRESS:____________________________ PHONE. ________________________ PRODUCT: ___________________________ MODEL: _______________________ SERIAL NUMBER __________________DELIVERY DATE:_________________ THE CONSUMER CAN REQUEST THE DEALER WHERE THE PURCHASE WAS DONE THE WARRANTY COVERED BY THIS POLICY. In case of loss of policy, the dealer will issue a new one, when required with the proper bill of sale or invoice. DEALER SIGNATURE AND STAMP (Indicate precise street, col. State and zip code.) To buy accessories, call the consumer assistance center toll free: 01 800 8 300 400